Quick setup guide
Guide d’installation rapide
Warranty card
(Not available in some locations)
Carte de garantie
(Non disponible dans certains pays)
Regulatory guide
Guide réglementaire
Power cord
Cordon d’alimentation
Batteries
(Not available in some locations)
Piles
(Non disponible dans certains pays)
Remote Control
Télécommande
D-SUB cable
Câble D-SUB
RS232C(IN) adapter
Adaptateur RS232C(IN)
BN68-05861C-00
[English]
Contact the vendor where you purchased the product if any
components are missing.
The appearance of the components and items sold separately may
differ from the image shown.
[Français]
S’il manque le moindre composant, contactez le revendeur auprès
duquel vous avez acheté le produit.
L’aspect des composants et éléments vendus séparément peut
être différent de l’illustration.
[Deutsch]
Wenn Komponenten fehlen, wenden Sie sich an den Anbieter, bei
dem Sie das Gerät gekauft haben.
Das Aussehen des lieferbaren Zubehörs und der lieferbaren Teile
kann vom dargestellten Bild abweichen.
[Italiano]
Se alcuni componenti risultassero mancanti, rivolgersi al punto
vendita presso il quale è stato acquistato il prodotto.
L’aspetto dei componenti e degli accessori venduti separatamente
può variare rispetto immagine fornita.
[Español]
Póngase en contacto con el distribuidor donde adquirió el producto
si falta alguno de los componentes.
El aspecto real de los componentes y elementos que se venden por
separado puede ser diferente del de la ilustraciones.
[Svenska]
Kontrakta leverantören där du köpte produkten om några delar
saknas.
Utseendet hos de faktiska delarna kan variera från bilden som visas.
[Magyar]
Ha bármelyik alkatrész hiányzik, forduljon a forgalmazóhoz.
A tényleges alkatrészek és a külön kapható tartozékok megjelenése
különbözhet a képen láthatótól.
[Polski]
Jeżeli brakuje jakichkolwiek elementów, skontaktuj się ze sprzedawcą
produktu.
Wygląd elementów znajdujących się w opakowaniu oraz akcesoriów
sprzedawanych oddzielnie może się różnić od elementów pokazanych
na ilustracji.
[Português]
Contacte o vendedor onde adquiriu o produto caso haja componentes
em falta.
O aspecto dos componentes e dos itens vendidos em separado pode
ser diferente da imagem apresentada.
[Türkçe]
Herhangi bir parça eksikse, ürünü satın aldığınız satıcıyla temas
kurun.
Ayrı satılan parçaların ve eşyaların görünümü gösterilen
görüntüden farklı olabilir.
DM82D
Quick Setup Guide
Guide d’installation rapide
Checking the Components
Verification des composants
Control Panel
Panneau de configuration
[Español]
1
Encender el producto.
Si pulsa el botón mientras el producto está encendido, se mostrará el menú de control.
- Para salir del menú OSD, mantenga pulsada la tecla del panel durante al menos un segundo.
2
Moverse al menú superior o inferior. También puede ajustar el valor de una opción.
3
Moverse al menú izquierdo o derecho.
4
Sensor del mando a distancia
Pulse un botón del mando a distancia apuntando al sensor ubicado en la parte delantera del producto para utilizar la función
correspondiente a dicho botón.
[Svenska]
1
Slå på produkten.
Om du trycker på knappen när produkten är påslagen visas kontrollmenyn.
- Du stänger skärmmenyn genom att trycka och hålla in panelknappen under minst en sekund.
2
Gå till den övre eller lägre menyn. Du kan också ändra värdet för ett alternativ.
3
Gå till vänster eller höger meny.
4
Fjärrsensor
Tryck på en knapp på fjärrkontrollen och rikta den mot sensorn på produktens framsida när du vill utföra motsvarande funktion.
[Magyar]
1
Kapcsolja be a készüléket.
Ha megnyomja a gombot a készülék bekapcsolt állapotában, akkor megjelenik a vezérlő menü.
- A képernyő menüből való kilépéshez nyomja meg és tartsa lenyomva a panel gombot legalább egy másodpercig.
2
Lépjen a felső vagy az alsó menüre. Módosíthatja az egyes opciók értékét is.
3
Lépjen a jobb vagy a bal oldali menüre.
4
A távirányító érzékelője
Nyomjon meg egy gombot a távirányítón, miközben a készülék előlapján levő érzékelőre mutat, a megfelelő funkció elvégzéséhez.
[Polski]
1
Włączenie urządzenia.
Naciśnięcie przycisku , gdy urządzenie jest włączone spowoduje wyświetlenie menu sterowania.
- Aby wyjść z menu ekranowego, należy nacisnąć przycisk panelu i przytrzymać go przez przynajmniej jedną sekundę.
2
Wybór wyższej lub niższej opcji menu. Te przyciski umożliwiają również zmianę wartości opcji.
3
Wybór opcji menu po lewej lub prawej stronie.
4
Czujnik pilota
Aby skorzystać z wybranej funkcji, nacisnąć odpowiedni przycisk na pilocie sterowania skierowanym na czujnik umieszczony z
przodu urządzenia.
[Português]
1
Para ligar o produto.
Se premir o botão quando o produto está ligado, o menu de controlo será apresentado.
- Para sair do menu OSD, prima e mantenha premida a tecla do painel durante, pelo menos, um segundo.
2
Para deslocar para o menu superior ou inferior. Pode também ajustar o valor de uma opção.
3
Para deslocar para o menu esquerdo ou direito.
4
Sensor do telecomando
Prima um botão do telecomando apontando para o sensor localizado na parte frontal do produto para executar a função correspondente.
[Türkçe]
1
Ürünü açar.
Ürün açıkken düğmesine bastığınızda kontrol menüsü görüntülenir.
- OSD menüsünden çıkmak için panel düğmesini en az bir saniye basılı tutun.
2
Bir üst veya alt menüye gider. Bir seçeneğin değerini ayarlamak için de kullanabilirsiniz.
3
Soldaki veya sağdaki menüye gider.
4
Uzaktan kumanda sensörü
İlgili işlevi gerçekleştirmek için uzaktan kumandayı ürünün ön tarafındaki sensöre doğrultarak bir düğmeye basın.
Reverse Side
Face arrière
[English]
1
Power on the product.
If you press the button when the product is turned on, the control menu will be displayed.
- To exit the OSD menu, press and hold the panel key for at least one second.
2
Move to the upper or lower menu. You can also adjust the value of an option.
3
Move to the left or right menu.
4
Remote sensor
Press a button on the remote control pointing at the sensor on the front of the product to perform the corresponding function.
[Français]
1
Met l'appareil sous tension.
Si vous appuyez sur le bouton alors que l'appareil est allumé, le menu de commande s'afche.
- Pour quitter le menu OSD, appuyez sur le bouton du panneau et maintenez-le enfoncé pendant au moins une seconde.
2
Passez au menu supérieur ou au menu inférieur. Vous pouvez aussi ajuster la valeur d'une option.
3
Passez au menu de gauche ou au menu de droite.
4
Capteur de la télécommande
Appuyez sur un bouton de la télécommande tout en pointant cette dernière vers le capteur situé à l'avant du produit pour exécuter
la fonction correspondante.
[Deutsch]
1
Einschalten des Geräts.
Wenn Sie die Taste drücken, während das Gerät eingeschaltet ist, wird das Steuerungsmenü geöffnet.
- Drücken Sie zum Schließen des OSD-Menüs die Steuerungstaste mindestens 1 Sekunde.
2
Geht zum oberen oder unteren Menü. Sie können damit auch den Wert einer Option ändern.
3
Geht zum linken oder rechten Menü.
4
Fernbedienungssensor
Drücken Sie auf eine Taste auf der Fernbedienung, während Sie auf den Sensor an der Vorderseite des Geräts zielen, um die
entsprechende Funktion auszuführen.
[Italiano]
1
Consente di accendere il prodotto.
Se si preme il tasto mentre il prodotto è acceso, verrà visualizzato il menu di controllo.
- Per uscire dal menu OSD, tenere premuto il tasto del pannello per almeno un secondo.
2
Consente di spostarsi al menu superiore o inferiore nonché di regolare il valore di un'opzione.
3
Consente di spostarsi al menu di sinistra o destra.
4
Sensore remoto
Per eseguire una funzione, premere il pulsante corrispondente sul telecomando puntando quest'ultimo in direzione del sensore sulla
parte frontale del prodotto.
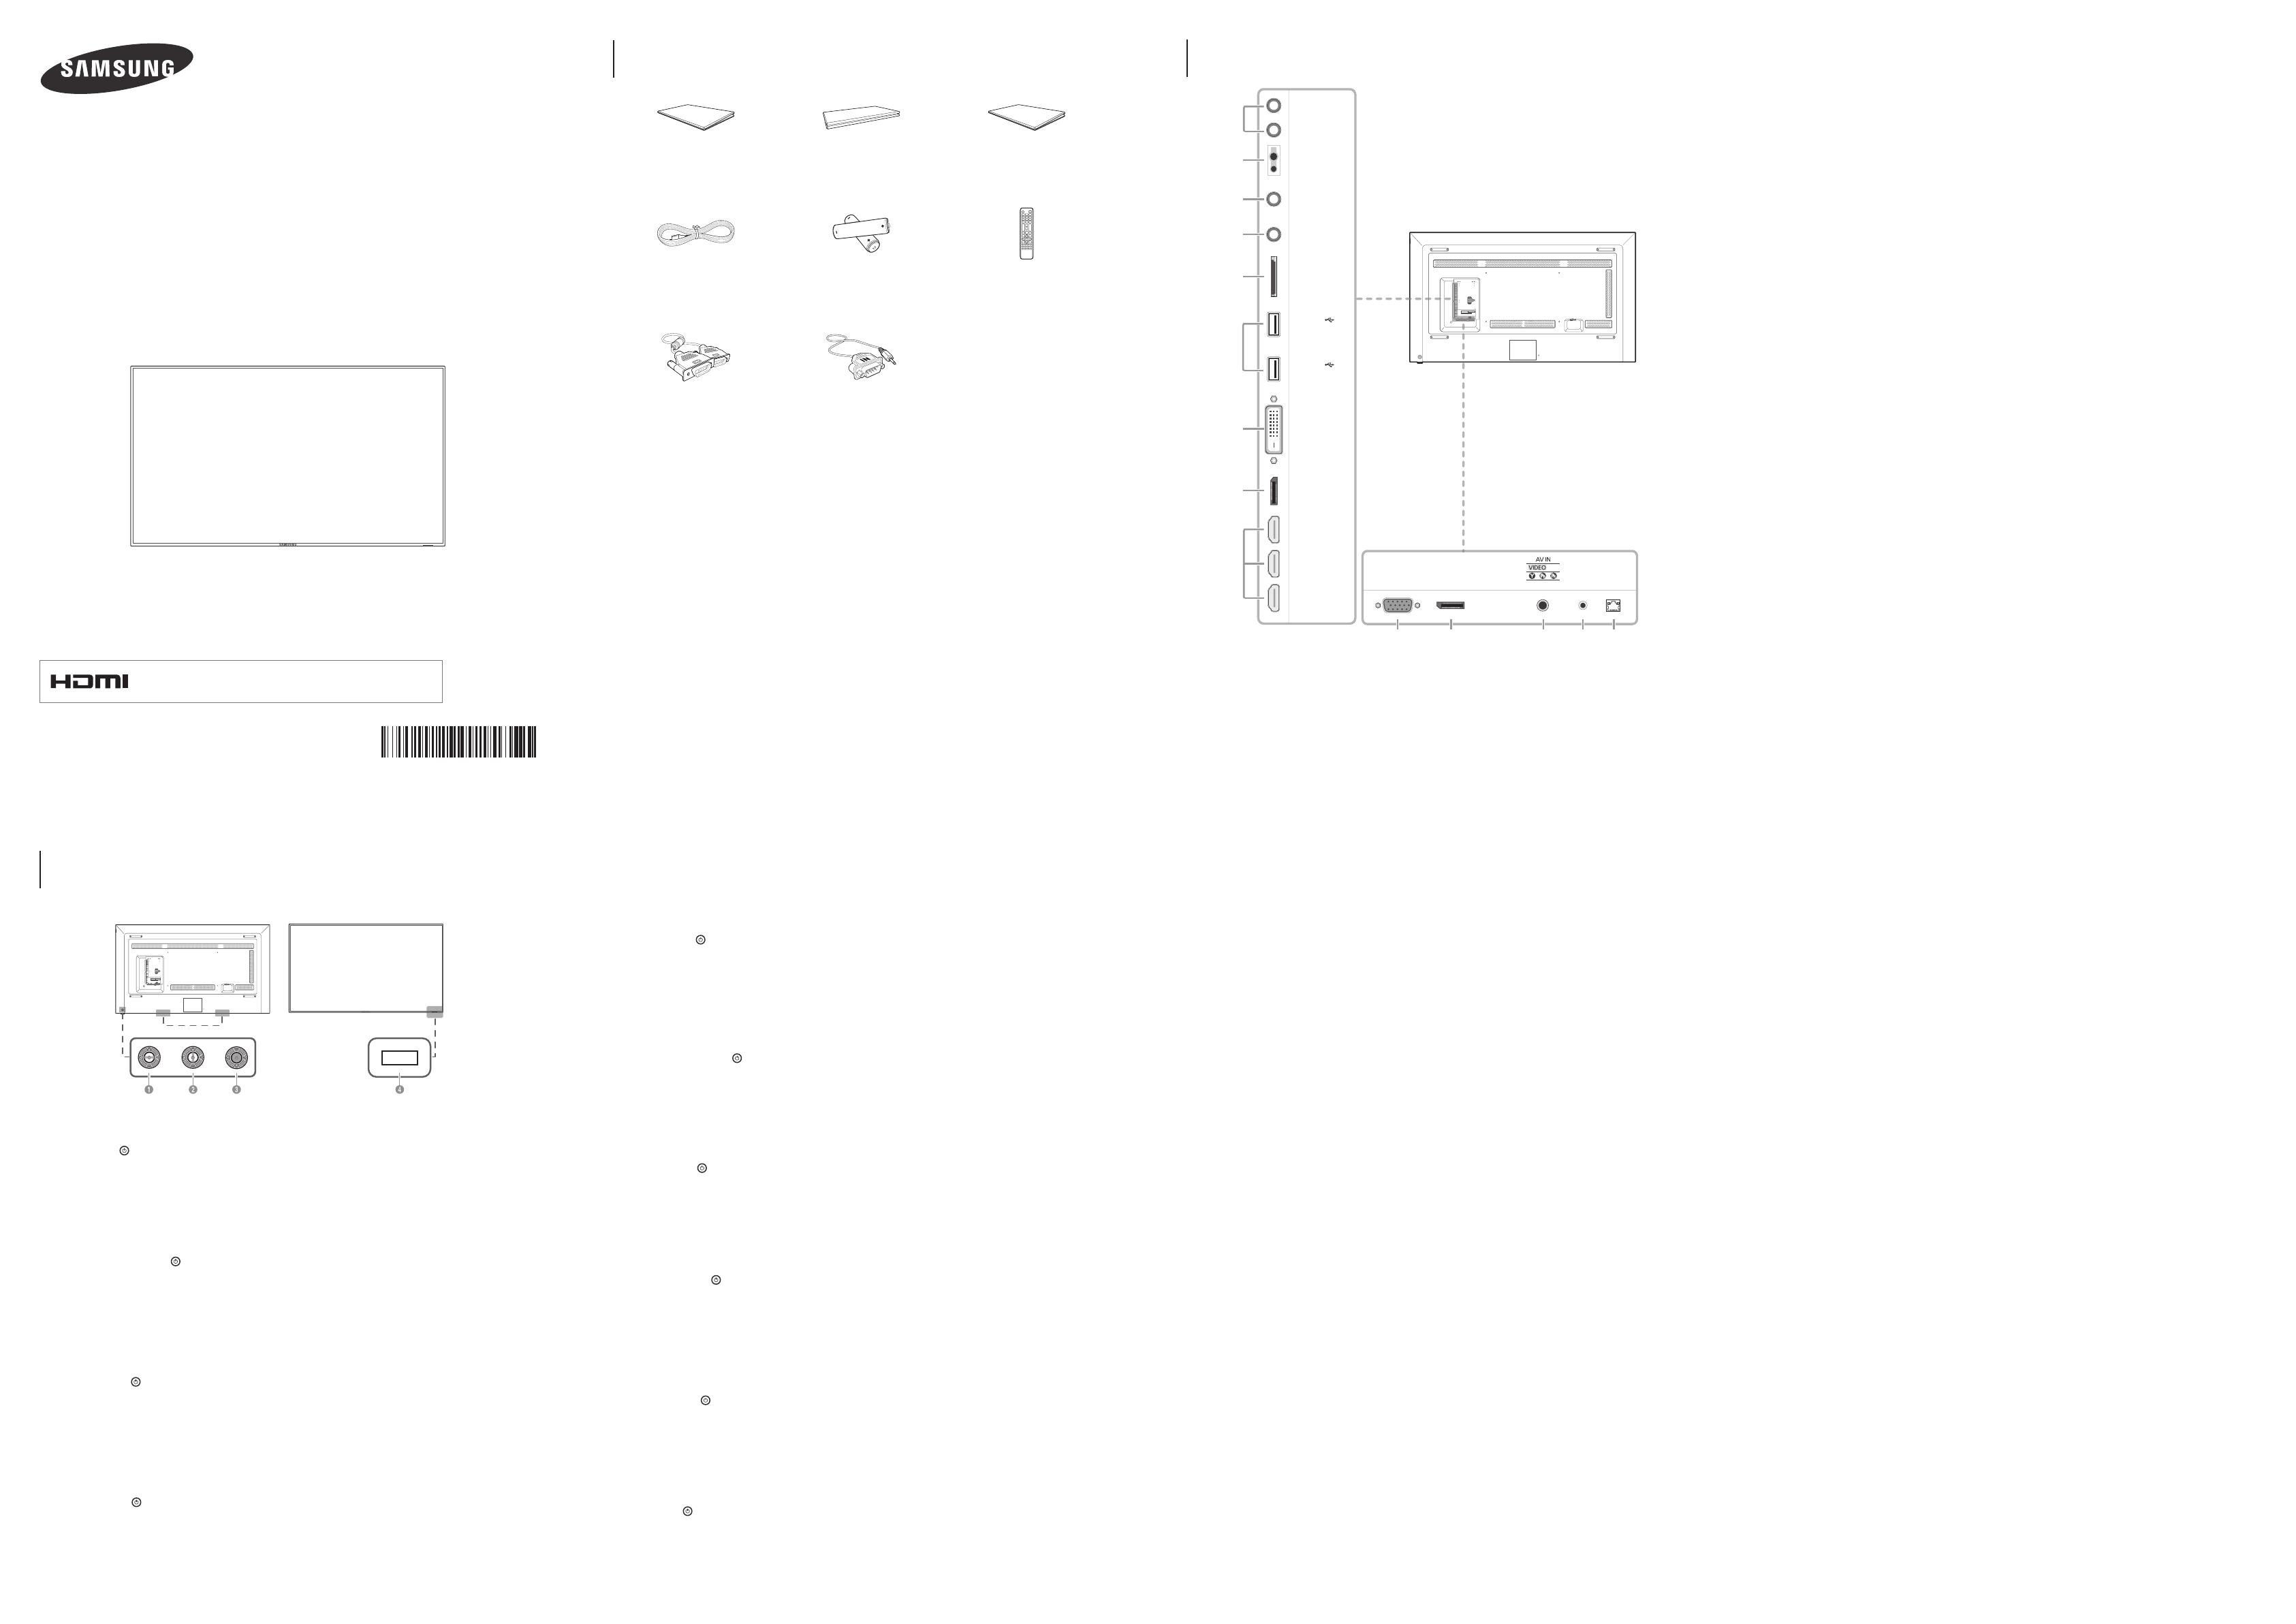
[English]
1
Connects to MDC using an RS232C adapter.
2
Supplies power to the external sensor board or receives the light sensor signal.
3
Receives sound from a PC via an audio cable.
4
Connects to the audio of a source device.
5
Connect to an SD memory card.
6
Connect to a USB memory device.
-
The USB ports on the product accept a maximum constant current of 1A. If the maximum value is exceeded, USB ports may not work.
7
DVI: Connects to a source device using a DVI cable or HDMI-DVI cable.
MAGICINFO IN: To use MagicInfo, make sure to connect the DP-DVI cable.
8
Connects to a PC using a DP cable.
9
Connects to a source device using an HDMI cable.
0
Connects to a source device using a D-SUB cable.
!
Connects to another product using a DP cable.
- To use old and new models together, rst contact the dealer the product was purchased from to check if they are compatible.
@
Connects to a source device using the AV/Component adapter.
#
Receives the remote control signal via the external sensor board and outputs the signal via LOOP OUT.
$
Connects to MDC using a LAN cable.
[Français]
1
Connexion au MDC grâce à un adaptateur RS232C.
2
Permet d'alimenter la carte de capteur externe ou de recevoir le signal de capteur lumineux.
3
Permet de recevoir le son d'un ordinateur via un câble audio.
4
Connexion au signal audio d'un périphérique source.
5
Permet de se connecter à une carte mémoire SD.
6
Permet de se connecter à un périphérique de mémoire USB.
- Les ports USB sur le produit acceptent un courant constant de 1A maximum.
Si cette valeur maximale est dépassée, il est possible que les ports USB ne fonctionnent pas.
7
DVI: Connexion à un périphérique source à l'aide d'un câble DVI ou HDMI-DVI.
MAGICINFO IN: Pour utiliser MagicInfo, veillez à brancher le câble DP-DVI.
8
Permet de se connecter à un ordinateur via un câble DP.
9
Permet le branchement à un périphérique source via un câble HDMI.
0
Permet de se connecter à un périphérique source via un câble D-SUB.
!
Permet de se connecter à un autre produit via un câble DP.
- Si vous souhaitez utiliser une combinaison de modèles anciens et récents, contactez d'abord le vendeur auquel vous avez acheté le
produit pour vérier si ces modèles sont compatibles.
@
Permet de se connecter à un périphérique source via l'adaptateur AV/composant.
#
Permet de recevoir le signal de la télécommande via la carte de capteur externe et d'émettre le signal via LOOP OUT.
$
Permet de se connecter à MDC via un câble LAN.
[Deutsch]
1
Zur Verbindung mit MDC über einen RS232C-Adapter.
2
Versorgt die externe Sensoreinheit mit Strom oder empfängt das Beleuchtungssensorsignal.
3
Nimmt Ton von einem PC über ein Audiokabel auf.
4
Anschließen an den Audioausgang eines externen Gerätes.
5
Für den Anschluss einer SD-Speicherkarte.
6
Zum Anschluss eines USB-Speichergeräts.
- Die USB-Anschlüsse am Gerät sind für einen konstanten Strom von maximal 1A ausgelegt.
Bei einer Überschreitung des Maximalwerts funktionieren die USB-Anschlüsse möglicherweise nicht.
7
DVI: Anschließen an ein externes Gerät mit Hilfe eines DVI- oder HDMI-DVI-Kabels.
MAGICINFO IN: Zur Verwendung von MagicInfo muss das DP-DVI-Kabel angeschlossen sein.
8
Zum Anschluss eines PCs über ein DP-Kabel.
9
Zum Anschluss eines Quellgeräts über ein HDMI-Kabel.
0
Zum Anschluss eines Quellgeräts über ein D-SUB-Kabel.
!
Zum Anschluss eines anderen Geräts über ein DP-Kabel.
- Für die gemeinsame Verwendung von alten und neuen Modellen kontaktieren Sie bitte zuerst den Händler, bei dem Sie die Produkte
gekauft haben, um deren Kompatibilität zu prüfen.
@
Zum Anschluss eines externen Geräts mit dem AV/Component-Adapter.
#
Empfängt das Signal der Fernbedienung über die externe Sensoreinheit und gibt das Signal über LOOP OUT aus.
$
Zum Anschluss eines PCs über ein LAN-Kabel.
[Italiano]
1
Consente il collegamento a MDC mediante un adattatore RS232C.
2
Alimenta il sensore esterno o riceve il segnale del sensore luce.
3
Riceve l’audio da un PC attraverso il cavo audio.
4
Collega alla porta audio di un dispositivo sorgente.
5
Per il collegamento a una scheda di memoria SD.
6
Consente il collegamento a un dispositivo di memoria USB.
- Le porte USB sul prodotto accettano una corrente costante massima di 1A.
Se il valore massimo viene superato, le porte USB potrebbero non funzionare.
7
DVI: Collega a un dispositivo sorgente mediante cavo DVI o HDMI-DVI.
MAGICINFO IN: Per utilizzare MagicInfo, assicurarsi di connettere il cavo DP-DVI.
8
Consente il collegamento a un PC mediante un cavo DP.
9
Consente il collegamento a un dispositivo sorgente mediante un cavo HDMI.
0
Consente il collegamento a un dispositivo sorgente mediante un cavo D-SUB.
!
Consente il collegamento a un altro prodotto mediante un cavo DP.
- Per utilizzare contemporaneamente i modelli vecchi e nuovi, contattare innanzitutto il rivenditore da cui è stato acquistato il prodotto
per vericarne la compatibilità.
@
Consente il collegamento a un dispositivo sorgente mediante un adattatore AV/componente.
#
Consente di ricevere il segnale del telecomando attraverso il sensore esterno e inviare in uscita il segnale attraverso LOOP OUT.
$
Consente il collegamento a MDC mediante un cavo LAN.
[Español]
1
Conecta a MDC mediante un adaptador RS232C.
2
Suministra alimentación a la placa de sensores externa o recibe la señal del sensor de luz.
3
Recibe el sonido de un PC a través de un cable de audio.
4
Conexión del audio de un dispositivo de origen
5
Conecta una tarjeta de memoria SD.
6
Conecta con un dispositivo de memoria USB.
- Los puertos USB del producto pueden admitir una intensidad de corriente de 1A como máximo.
Si se excede este valor máximo es posible que los puertos USB no funcionen.
7
DVI: Conecta a un dispositivo de origen mediante un cable DVI o un cable HDMI-DVI.
MAGICINFO IN: Para utilizar MagicInfo, asegúrese de conectar el cable DP-DVI.
8
Conecta con un PC mediante un cable DP.
9
Conecta con un dispositivo que actúa como fuente mediante un cable HDMI.
0
Conecta con un dispositivo que actúa como fuente mediante un cable D-SUB.
!
Conecta con otro producto mediante un cable DP.
- Si desea usar conjuntamente modelos antiguos y nuevos, póngase en contacto con el distribuidor a quien compró el producto para
comprobar si son compatibles.
@
Conecta a un dispositivo fuente mediante el adaptador de componentes/AV.
#
Recibe la señal del mando a distancia a través de la placa del sensor externa y envía la señal a través de LOOP OUT.
$
Conecta con MDC mediante un cable LAN.
[Svenska]
1
Ansluter till en MDC med en RS232C-adapter.
2
Ger ström åt den externa sensorns kretskort eller tar emot ljussensorsignalen.
3
Tar emot ljud från en dator via en ljudkabel.
4
Ansluter ljudet för källenheten.
5
Ansluter till SD-minneskort.
6
För anslutning av ett USB-minne.
- USB-portarna på produkten accepterar en högsta konstant ström på 1A.
Om maxvärdet överskrids kanske inte USB-portarna fungerar.
7
DVI: Ansluter till en källenhet med DVI-kabel eller HDMI-DVI-kabel.
MAGICINFO IN: Glöm inte att ansluta DP-DVI-kabeln när du ska använda MagicInfo.
8
För anslutning av en dator via en DP-kabel.
9
Anslut till en källenhet med en HDMI-kabel.
0
För anslutning av en källenhet via en D-SUB-kabel.
!
För anslutning till en annan produkt via en DP-kabel.
- Om du vill använda gamla och nya modeller samtidigt bör du först kontakta återförsäljaren där produkten köptes för att kontrollera
om de är kompatibla.
@
För anslutning av en källenhet via AV-/Komponentadaptern.
#
Tar emot fjärrkontrollens signaler via den externa sensorns kretskort och sänder signalen via LOOP OUT.
$
För anslutning till MDC via en LAN-kabel.
[Magyar]
1
Csatlakoztatás MDC-hez RS232C adapterrel.
2
A külső érzékelőtábla tápellátása, illetve a fényérzékelő jelének fogadása.
3
Hang fogadása PC-ről, audiokábelen keresztül.
4
Csatlakoztatás forráseszköz audiocsatlakozójához.
5
SD-memóriakártya csatlakoztatása.
6
USB-memóriaeszköz csatlakoztatása.
- A készüléken levő USB portok maximum 1A állandó áramerősséget fogadnak el.
Ha ez a maximális értéket meghaladja, akkor előfordulhat, hogy az USB portok nem működnek.
7
DVI: Csatlakoztatás forráseszközhöz DVI-kábel vagy HDMI–DVI kábellel.
MAGICINFO IN: A MagicInfo használatához csatlakoztassa a DP-DVI kábelt.
8
Csatlakoztatás számítógéphez DP-kábellel.
9
Csatlakozás jelforrás készülékhez HDMI kábellel.
0
Csatlakozás jelforrás készülékhez D-SUB kábellel.
!
Csatlakoztatás más készülékhez DP-kábellel.
- Ha régi és új modelleket szeretne együtt használni, a kompatibilitást illetően előbb lépjen kapcsolatba azzal a forgalmazóval, akinél
a terméket vásárolta.
@
Csatlakoztatás forráseszközhöz AV/Component adapterrel.
#
A távirányító jelének fogadása a külső érzékelőpanelen keresztül, és a jel LOOP OUT csatlakozón keresztül történő továbbítása.
$
Csatlakozás MDC-hez LAN kábellel.
[Polski]
1
Gniazdo dla funkcji MDC (adapter RS232C).
2
Do zasilania zewnętrznej płyty czujnika lub odbioru sygnału czujnika światła.
3
Do odbioru dźwięku z komputera przez przewód audio.
4
Do łączenia monitora z wyjściem audio urządzenia źródłowego.
5
Do podłączenia karty pamięci SD.
6
Do podłączenia urządzenia pamięci USB.
- Gniazda USB w urządzeniu mogą przesyłać prąd o stałym natężeniu wynoszącym maksymalnie 1A.
W przypadku wyższych wartości gniazdo może nie działać prawidłowo.
7
DVI: Do podłączania urządzenia źródłowego za pomocą kabla DVI lub kabla HDMI/DVI.
MAGICINFO IN: Aby móc używać funkcji MagicInfo, należy podłączyć kabel DP-DVI.
8
Do podłączenia do komputera poprzez kabel DP.
9
Podłączenie do urządzenia źródłowego za pomocą kabla HDMI.
0
Do podłączenia do urządzenia źródłowego za pomocą kabla D-SUB.
!
Do podłączenia do innego produktu za pomocą kabla DP.
- Aby używać równocześnie starych i nowych modeli, należy najpierw skontaktować się z dystrybutorem, od którego został zakupiony
produkt, aby uzyskać informację dotyczącą zgodności.
@
Do podłączenia urządzenia źródłowego za pomocą adaptera AV/złącze komponentowe.
#
Do odbioru sygnału zdalnego sterowania przez zewnętrzną płytę czujnika i wysyłania sygnału przez gniazdo LOOP OUT.
$
Do podłączenia do MDC za pomocą kabla LAN.
[Português]
1
Liga-se a um MDC utilizando um adaptador RS232C.
2
Fornece alimentação ao quadro do sensor externo ou recebe o sinal do sensor de luz.
3
Recebe o som de um PC através de um cabo de áudio.
4
Liga-se ao áudio de um dispositivo de entrada.
5
Ligue a um cartão de memória SD.
6
Ligue a um dispositivo de memória USB.
- As portas USB do produto suportam uma corrente constante máxima de 1A.
Se o valor máximo for ultrapassado, as portas USB podem não funcionar.
7
DVI: Liga-se a um dispositivo de entrada utilizando um cabo DVI ou HDMI-DVI.
MAGICINFO IN: Para usar o MagicInfo, certique-se de que liga o cabo DP-DVI.
8
Liga-se a um PC através de um cabo DP.
9
Para ligar a um dispositivo de fonte utilizando um cabo HDMI.
0
Liga-se a um dispositivo de entrada através de um cabo D-SUB.
!
Liga-se a outro produto através de um cabo DP.
- Se quiser utilizar modelos novos juntamente com modelos velhos, contacte primeiro o revendedor que lhe vendeu o produto para
vericar se estes são compatíveis.
@
Liga-se a um dispositivo de entrada através do adaptador do componente/AV.
#
Recebe o sinal do telecomando através do quadro do sensor externo e transmite o sinal através da porta LOOP OUT.
$
Liga-se ao MDC através de um cabo LAN.
[Türkçe]
1
RS232C adaptörü kullanarak bir MDC'ye bağlar
2
Harici sensör kartına güç sağlar veya ışık sensör sinyalini alır.
3
PC'den sesi bir ses kablosu ile alır.
4
Bir kaynak cihazın ses kısmına bağlanır.
5
Bir SD bellek kartına bağlayın.
6
USB bellek cihazını takın.
- Üründeki USB bağlantı noktalarının kabul ettiği maksimum sabit akım 1A değerindedir.
Maksimum değer aşılırsa USB bağlantı noktaları çalışmayabilir.
7
DVI: Bir DVI kablosu ya da HDMI-DVI kablosu kullanan bir kaynak cihaza bağlanır.
MAGICINFO IN: MagicInfo'yu kullanmak için DP-DVI kablosunu bağladığınızdan emin olun.
8
DP kablosuyla bir PC'ye bağlar.
9
HDMI kablosuyla bir kaynak aygıta bağlanır.
0
D-SUB kablosuyla bir kaynak cihaza bağlanır.
!
DP kablosuyla başka bir ürüne bağlanır.
- Eski ve yeni modelleri bir arada kullanmak için, birbirlerine uyumlu olup olmadıklarını öğrenmek için ilk önce ürünü satın aldığınız
satıcıya başvurun.
@
AV/Komponent adaptörüyle bir kaynak cihaza bağlanır.
#
Uzaktan kumanda sinyalini harici sensör kartından alır ve LOOP OUT aracılığıyla sinyal çıkışı verir.
$
LAN kablosuyla MDC'ye bağlanır.
RGB / DVI /
HDMI / AV /
COMPONENT
AUDIO IN
AUDIO
OUT
RS232C
OUT
RS232C IN
SD CARD
DVI /
MAGICINFO IN
HDMI IN 1
HDMI IN 2
HDMI IN 3
DP IN
IR /
AMBIENT
SENSOR IN
RGB IN RJ45DP OUT
COMPONENT IN
IR
OUT
USB
(5V 1A)
USB
(5V 1A)
1
2
3
4
5
6
7
8
9
0 ! #@ $
Speaker / Haut-parleur
The terms HDMI and HDMI High-Denition Multimedia Interface, and
the HDMI Logo are trademarks or registered trademarks of HDMI
Licensing LLC in the United States and other countries.
[DMD82-EU-QSG]BN68-05861C-00.indd 1 2014-11-18 2:28:16

