Fieldmann FDSM 200120-E Instrukcja obsługi
- Typ
- Instrukcja obsługi

FDSM 200120-E

2
FDSM 200120-E
English ............................................................................................................................................................................... 8–24
Čeština ........................................................................................................................................................................... 25–42
Slovenčina ................................................................................................................................................................... 43–60
Magyarul ...................................................................................................................................................................... 61–78
Polski ............................................................................................................................................................................... 79–96

3
ELECTRIC CHAIN SAW USER’S MANUAL

4
FDSM 200120-E

5
ELECTRIC CHAIN SAW USER’S MANUAL

6
FDSM 200120-E

7
ELECTRIC CHAIN SAW USER’S MANUAL

EN 8
FDSM 200120-E
Concrete Mixer
USER'S MANUAL
1. SAFETY SYMBOLS ...........................................................................................................................................................9
2. SPECIFICATIONS ...........................................................................................................................................................11
3. MACHINE DESCRIPTION ..........................................................................................................................................11
4. ILLUSTRATED GUIDE ....................................................................................................................................................12
5. CONDITIONS OF USE .................................................................................................................................................12
6. SAFETY INSTRUCTIONS ..............................................................................................................................................13
7. UNPACKING ...................................................................................................................................................................17
8. ASSEMBLY ........................................................................................................................................................................17
9. OPERATION ....................................................................................................................................................................18
10. MAINTENANCE AND STORAGE ............................................................................................................................19
11. TROUBLESHOOTING ...................................................................................................................................................21
12. SERVICE AND SPARE PARTS ...................................................................................................................................21
13. DISPOSAL ........................................................................................................................................................................22
14. GUARANTEE OF THE PRODUCT ............................................................................................................................22
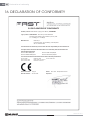
16. DECLARATION OF CONFORMITY .......................................................................................................................24
Before the fi rst operation, please read the owner’s manual carefully!
CONGRATULATIONS ON YOUR GREAT CHOICE. ON PURCHASING A QUALITY, TECHNICALLY
ADVANCED PRODUCT. A PRODUCT BY HECHT.
Due to constant development and the need to adapt to the latest requirements of both EU directives and
standards and national standards, technical and design changes can be made to the products. The photographs
and drawings in this manual are for illustrative purposes only. (Pictures of another product may be used to
explain a function.)
No claims or complaints related to this manual can be made (especially related to possible deviations from
the data stated in it) if the product meets the conditions of all certifi cations and declarations and provides the
function as stated and described in the manual and if the use of the product corresponds to intended purpose at
the time of purchase.
The purpose of this manual is primarily to acquaint the operator with the principles of handling the product, with
its assembly/installation, with safety rules during use, maintenance, storage and transport. The manual, which is
an integral part of the product, must be kept in a safe place so that the necessary information can be found in the
future. When passing the product to another person, it is necessary to pass on the manual as well.
If in doubt, contact the importer or the shop where the product was purchased.

EN
CONCRETE MIXER USER’S MANUAL
9
Safety symbols
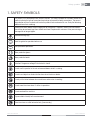
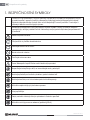
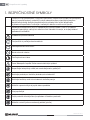
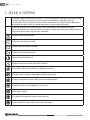
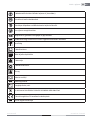
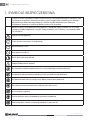
1. SAFETY SYMBOLS
The product must be operated with extreme caution. The safety symbols on the labels affi xed to the
product indicate the type of hazard and remind you of preventive safety precautions. The correct
interpretation of these symbols will make the product safer and easier to use. Study the following
table and learn their meaning.
Stickers and safety labels are an integral part of the product. Therefore, under no circumstances
should they be removed; kept them visible and clean. Replace with new ones if they are missing or
damaged or no longer legible.
General warning sign
Read the guide for operation before use.
Use eye and ear protection.
Wear protective gloves.
Wear protective boots.
Attention! Dangerous voltage! Risk of electric shock!
Do not use this product in the rain or leave outdoors while it is raining.
Do not insert objects or limbs into the drum when the drum rotates.
Do not put the limbs between drum and frame when mixer is working.
Do not move the mixer when it’s full or in operation.
Do not overload the machine.
Dispose debris friendly to the environment.
Place the mixer on a fl at horizontal only (transversaly).

EN 10
FDSM 200120-E
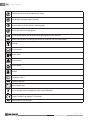
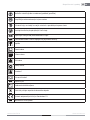
Safety symbols
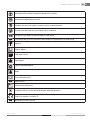
Place the mixer on a fl at horizontal only (long).
Do not start the engine cover removed.
Guard covers must be in place in working order.
Do not put limbs into moving parts.
Do not allow another person and children getting close to the machine.
Before maintenance or cleaning disconnect the machine from the mains power.
Voltage
Drum content
Motor power
Drum estuary
Drum speed
Weight
Protection class II
Ingress protection
Sound power level
Do not discard electrical appliances with household waste.
Product conforms to relevant EU standards.
Identifi cation Article Number

EN
CONCRETE MIXER USER’S MANUAL
11
Specifications
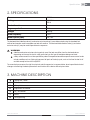
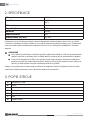
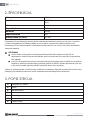
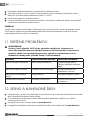
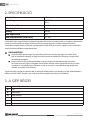
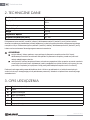
2. SPECIFICATIONS
Power 550 W
Voltage AC 230 V
50 Hz
Protection class II
Ingress protection IP44
Weight 49,5 kg
Drum capacity 120 l
Drum speed (rpm) 36 / min.
The declared total vibration value(s) and noise emission value(s) were determined using the standard test
method and may be used to compare one tool with another. The declared total vibration value(s) and noise
emission value(s) may be used to pre-determine exposure.
WARNING!
vibration and noise emissions during actual use of the tool may differ from the declared values
depending on the way the tool is used, particularly on the type of workpiece being machined.
safety measurements must be specifi ed to protect the operator based on exposure assessment under
actual conditions of use (taking into account all parts of the duty cycle, such as the time the tool is off
and idle except for the start time)002E
The manufacturer reserves the right to misprints and discrepancies in representation; also to possible technical
changes not affecting the basic parameters and function of the device without prior notice.
3. MACHINE DESCRIPTION
ATipping rod / wheel
BDrum
CMixing blade
DEngine with the transfer
EOn / off switcher
FWheel
GThe support leg

EN 12
FDSM 200120-E
Illustrated guide
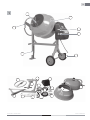
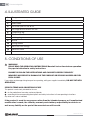
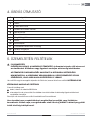
4. ILLUSTRATED GUIDE
1The gearbox
2The upper part of the drum
3Bed cradle
4The lower part of the drum
5The original instructions for use
6Supporting leg
7Flip the wheel
8Locking ring
9Wheel
10 Mixing blade
11 Box insert with fi ttings
12 Base with axle
13 Frame
5. CONDITIONS OF USE
WARNING!
PLEASE READ THE OPERATING INSTRUCTIONS! Read all instructions before operation.
Pay special attention to safety instructions.
FAILURE TO FOLLOW THE INSTRUCTIONS AND FAILURE TO RESPECT SECURITY
MEASURES MAY RESULT IN DAMAGE OF THE PRODUCT OR SERIOUS INJURIES OR EVEN
FATAL INJURY.
If you notice any damage during transport or unpacking, notify your supplier immediately. DO NOT PUT INTO
OPERATION.
SPECIFIC TERMS AND CONDITIONS OF USE
This product is exclusively intended for the use:
for the production of concrete, mortar and plaster.
according to the corresponding descriptions and safety instructions in these operating instructions.
Any other use is not as intended.
If the product is used for any purpose other than the intended purpose or if unauthorized
modifi cation is made, the statutory warranty and statutory responsibility for defects as
well as any liability on the part of the manufacturer will be void.

EN
CONCRETE MIXER USER’S MANUAL
13
Safety instructions
Do not overload! Use the product only for the powers it was designed for. The product
designed for a given purpose performs it better and safer than one that has a similar function. Therefore, always
use the correct one for a given purpose.
Please keep in mind that our products are not designed for commercial, trade or industrial use according to their
intended purpose. We accept no liability if the product is used in these or comparable conditions.
Where it is required, follow the legal guidelines and regulations to prevent possible
accidents during operation.
CAUTION!
Never use the product if it is close to people, especially children or pets.
The user is liable for all damages caused to third parties or their property.
Keep these instruction manual and use them whenever you need more information. If you don’t understand
some of these instructions, contact your dealer. If the product is lent to another person, it is necessary to lent
this instruction manual with it.
All operating personnel must be adequately trained in the use, operation and setting and especially familiar
with prohibited activities.
CAUTION!
This product is not intended for use by persons with reduced sensory or mental
capacity or lack of experience and knowledge - unless they are under the
supervision of the person responsible for their safety or if this person has instructed
how use this product. The product is not intended for use by children and persons
with reduced mobility or poor physical disposition. We strongly recommend to
pregnant women to contact her doctor before use of this product.
Respect national/local regulations regarding working time (please, contact your local authority).
6. SAFETY INSTRUCTIONS
WARNING!
Failure to follow the warnings and instructions may result in electric shock, fi re and/
or serious injury.
The use of other accessories or attachments other than those specifi ed in the
instructions for use, can cause injury.
Get to know this product. Carefully read the instruction manual. Learn how to use this product, all restrictions,
and what risks could related with its use. Learn the product quickly stop and turn off the controls.
Be careful at work, be concentrated on actual work, and use the common sense.
If the product is not in use, it should be stored in a dry and secure place out of the reach of children.
Never pull the plug from the socket by pulling on the cord. Keep the supply cord away from heat, grease and
sharp edges.

EN 14
FDSM 200120-E
Safety instructions
Always disconnect the product from the mains supply before repairing, when changing accessories, and
when the product is not used.
Make sure when plugging into a socket that the switch is in “off” position.
If the product is used outside, use only extension cord designed for outdoor use and marked as such.
Pay attention to what you are doing, be concentrated and think sensibly, do not work with the product if you
are tired, under the infl uence of alcohol, drugs or medication.
Faulty switches must be entrusted to an authorised repair service for replacement.
Do not use this product if the main switch does not allow it to switch on or off.
This product is designed in accordance with all applicable safety requirements and standards applicable to
it. All repairs should be only made by qualifi ed person and spare parts replaced by original parts, otherwise
the user may be in serious danger.
DEVICE-SPECIFIC SAFETY INSTRUCTIONS
The cement mixer can only be put into operation completely assembled, with complete protection equipment
and if the engine cabinet is completely closed
The cement mixer cannot be started and used when it is in motion
Risk of injury near the spinning drum. Do not put objects such as shovels, hoes, etc. into the rotating drum.
Never put your hands into a drum that is rotating.
The cement mixer, connecting or extension cable must not be damaged.
It is necessary to use an extension cable with splashproof sockets and to place it in such a way that the
sockets do not come into direct contact with water and that the cable cannot be mechanically damaged.
Do not leave the operable cement mixer unattended.
ELECTRICAL REQUIREMENTS
Never use at the nominal voltage other than 230V/50Hz. The circuit must be properly and accordingly
current protected.
RECOMMENDATIONS FOR PROTECTION CLASS II MACHINES
Machines must be powered via a current protector (RCD) with a maximum 30 mA tripping current.
EXTENSION LEAD
Always use a double-insulated power supply and the parameters corresponding to the machine’s power
consumption. The minimum cross section of the cable must be determined according to the current or
power data on the fork/label of the machine. It’s not only necessary to take the load into account, but also
the length of the extension lead and the type of fuse.
Position power supply cable so it does not interfere with the work and is not damaged.
Only use rubberised extension cables with suffi cient conductor cross section and fully developed.
The correct maximum load of the extension cable must always be indicated on its label.
Use only outdoor cables, preferably colour-coded, well visible. This reduces the chance of accidental
damage to the cable.
PROTECTIVE EQUIPMENT
Wear eye protection! The operation of machine can result in foreign objects being thrown into your eyes
which may result in severe eye damage. Normal glasses are not suffi cient for eye protection. For example,

EN
CONCRETE MIXER USER’S MANUAL
15
Safety instructions
corrective glasses or sunglasses do not provide adequate protection because they have not special safety
glass and aren’t enough closed from the sides.
Wear adequate noise protection equipment! The impact of noise can cause hearing damage or hearing loss.
Take frequent work breaks. Limit the amount of exposure per day.
Safety equipment such as a dust mask or hard hat used for appropriate conditions will reduce personal
injuries, especially when the machining operation creates dust or there is a risk of hitting your head on
protruding or low level obstructions.
Wear protective gloves.
PREVENTION AND FIRST AID
Note:
We recommend always having:
A suitable fi re extinguisher (snow, powder, halotron) at your disposal.
A fully equipped fi rst-aid kit, easily accessible for accompaniment and operator.
Mobile phone or other device for quickly calling emergency services.
Accompaniment familiar with the principles of fi rst aid. Accompaniment must
keep a safe distance from the workplace while always seeing you!
Always follow the principles of fi rst aid in case of any injuries.
When an electric shock is caused, it is necessary more than anywhere else to put emphasis on safety and
risk elimination for the rescuers. The affected person usually stays in contact with electrical equipment
(source of injury) because of muscle spasms caused by the electric shock. Traumatic process continues
in this case. It is therefore necessary to TURN THE POWER OFF FIRST using any possible way. Subsequently
CALL AN AMBULANCE or other professional service, and then PROVIDE FIRST AID! Ensure free airways,
check breathing, check pulse, put the affected fl at on their back, bend their head and stick out their lower jaw.
If necessary, begin with artifi cial respiration into the lungs and heart massage.
In the case of inhalation of chemicals seek medical advice immediately.
In the case of chemical burns immediately remove contaminated clothing, remain in an upright position, do
not consume any fl uids or do not induce vomiting, seek professional treatment immediately.
When you feel dizzy or nauseous and have a headache or a stomachache, see a doctor immediately. Inform
him of what chemicals you use and your operation (operating time, operating area, operating means, etc.)
Immediate care is required to avoid serious chemical injuries.
If chemicals have entered the eye or the mouth, fl ush them immediately with cool water and seek immediate
medical attention.
IN CASE OF FIRE:
If the motor starts to burn or it the smoke appears from it, turn the product off, disconnect power supply and
move away to safety.
To extinguish the fi re, use suitable fi re extinguisher (CO2, Dry Powder, halotron).
DO NOT PANIC. Panic can cause even more damage.
FIRST AID INSTRUCTIONS - LIME AND CEMENT
In case of skin contact, it is necessary fi rst to remove the dust from the garment and wash the affected area
with a lot of lukewarm water, soap or detergent and treat the affected areas with a regenerating cream.

EN 16
FDSM 200120-E
Safety instructions
When inhaling cement, the affected person must be transported to clean air. Then it is necessary to wash his
face and rinse his mouth and nose with water. In case of breathing diffi culties, medical help should be called
immediately.
In case of eye contact, it is necessary to wash the eyes with lukewarm water for at least 10 minutes and seek
immediate medical attention.
If accidentally swallowed, rinse mouth with water, let the affected person drink a glass of water and seek
medical attention. DO NOT INDUCE VOMITING!
CAUTION!
Always wear protective gloves, respiratory protection, protective working garments,
and effective eye protection when working with cement.
RESIDUAL RISKS
Even if the product is used according to instructions, it’s impossible to eliminate all the risks associated with its
operation. The following risks may occur arising from product construction:
Electrical hazard caused by touch with live electrical parts (direct contact) or with parts, which came under
voltage due to failure of the product (indirect contact).
Heat hazard resulting in burning or scalding and other injuries caused by possible contact with high
temperature objects or materials including heat sources.
Dangers caused by failing in ergonomic principles by construction of the product, for example dangers
caused by unhealthy position of body or excessive overcharge and unnature to the anatomy of the human
hand-arm, relate to construction of handle, equilibrium of the product.
Dangers caused by unexpected starting, unexpected exceeding of engine revs caused by defect / failure of
control system, relate to the defects by the handle and placing of drivers.
Dangers caused by impossibility to stop the product in best conditions, relate to solidity of the handle and
placing of engine shut down product.
Dangers caused by defect of product control system, relate to solidity of the handle, placing of drivers and
marking.
Dangers caused by shooting up of subjects or splashing of liquids.
Mechanical hazard, caused by cut and throw off.
Noise risk resulting in loss of hearing (deafness) and other physiological disorders (e.g. loss of balance, loss
of consciousness).
Vibration risk (resulting in vascular and neurological harm in the hand-arm system, for example so called
“white fi nger disease”).
WARNING!
The product produces an electromagnetic fi eld of a very weak intensity. This fi eld
may interfere with some pacemakers. To reduce the risk of serious or fatal injury,
persons with pacemakers should consult the use with their physician.

EN
CONCRETE MIXER USER’S MANUAL
17
Unpacking
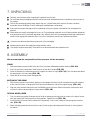
7. UNPACKING
Carefully check all parts after unpacking the product from the box.
Do not throw away packaging materials until you have not reviewed carefully if they did not remain a part of
the product.
Parts of the packaging (plastic bags, paper clips, etc.) do not leave within reach of children, could be
a possible source of danger. There is a danger of swallowing or suffocating!
If you notice transport damage or while unpacking, notify your supplier immediately. Do not operate the
product!
We recommend save the package for future use. The packaging materials must still be recycled or disposed
of in compliance with the relevant legislation. Sort different parts of the packaging according to material and
hand it to the appropriate collection sites. For further information contact your local administration.
Fasteners can become loose during transport in the packaging.
Standard accessories are subject to change without notice.
This product requires assembly. The product must be assembled correctly before use.
8. ASSEMBLY
We recommend the cooperation of two persons for the assembly.
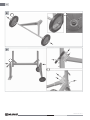
STAND
1. Slide a fl at washer on each side of the axle, then the wheel, followed by another washer (FIG. 2A).
2. Insert the pin into the axle holes. Bend the pins so they don’t fall out (FIG. 2B).
3. Place the stand on the side and secure the support as shown in Figure (FIG. 3A). Turn the stand and attach
the wheel axle in the same way (FIG. 3B).
4. Check that all nuts and screws are tightened.
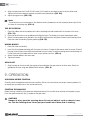
BOTTOM OF THE DRUM
1. With the other person’s assistance, gently push the bottom of the drum with the axle onto the side supports
of the stand as shown. A longer part of the axle should be on the side of the supporting leg. (FIG. 4A)
2. Align the holes on both sides and insert the M8x65 screws into them. Attach the washer, lock washer and
nut from the other side and tighten using a wrench (FIG. 4B).
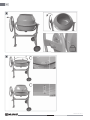
TIPPING WHEEL/LEVER
1. Push the locking ring onto the longer end of the drum axle by punching inside as shown in the fi gure. Fasten
with two screws with lock washers and fl at washers. Tighten the nuts (FIG. 5A).
2. Install the M8×25 screw into the tube on the tilting wheel / lever. Insert a washer and spring from the other
side. (FIG. 5B)
3. Attach the tipping wheel/lever to the drum axle (to the longer, protruding end of the axle, on the leg side of
the stand.)

EN 18
FDSM 200120-E
Operation
4. Align the holes and insert the M 10×65 screw. Put the washer, lock washer and nut on the other hand.
Tighten so that free movement around is possible from/toward you. (FIG. 5C)
5. Adjust spring pressure, (FIG. 5D)
Note:
The wheel/lever must move freely in the direction of from/toward you so that the wheel/lever stops fi t into
the holes in the locking ring. (FIG. 6)
TOP OF THE DRUM
1. Place the rubber seal on the bottom of the drum and align the seal threads with the threads in the drum.
(FIG. 7A)
2. Place the top of the drum on the bottom and align the holes. The arrows must point toward each other.
3. Attach the spring washers to the bolts, then install the fl at washers and place screws into all holes by hand.
Place the mixer horizontally Tighten gradually. (FIG. 7B)
MIXING BLADES
1. Place the mixer horizontally.
2. Insert the stirring blade and align with the holes in the drum. Thread the fl at washer onto the screw. Thread it
through the drum from the outside and the blade from the inside. Thread the sealing washer and locking nut.
Fix the other end of the blade with the other screw, washers and nut. (FIG. 8)
3. Attach the other blade in the same way.
4. Tighten all screws.
GEAR CASE
1. Align the cogs on the drum with the engine pinion and attach the gear case to the drum axle. Attach the
gearbox to the rack using four M8 bolts with washers. (FIG. 9)
9. OPERATION
CHECKING BEFORE STARTING
Carefully check the operation and technical condition. Do not run the machine should you have any doubts! Let
an expert give you advice you in our authorized centre.
STARTING THE MACHINE
Before starting, unfold the entire extension cable and connect it fi rst to the mixer and then to the power supply.
Press the green button with the (I) symbol on the gear case.
CAUTION!
Danger of injury near the spinning drum. Do not put objects such as shovels, hoes,
etc. into the rotating drum. Never put your hands into a drum that is rotating.

EN
CONCRETE MIXER USER’S MANUAL
19
Maintenance and storage
FILLING
Always start the cement mixer before fi lling the drum.
Always fi ll the drum only when it rotates.
Fill the drum slowly, gradually.
Do not throw the material into the mixer sharply to prevent it from sticking to the back of the drum.
Note:
Wait until the mixture is thoroughly mixed.
TIPPING THE DRUM
Do not turn off the cement mixer if it is full and empty it only when it rotates.
To tip the drum, pull the top of the wheel/lever so that the stops on it protrude from the locking wheel grooves and
allow the drum to tip into the required position. Then slide the stops back into the locking wheel grooves to lock
the drum by moving the wheel/lever in the direction from you.
TURNING THE MACHINE OFF
Turn off the cement mixer using the red button with the (0) symbol on the gear case after fi nishing mixing and
emptying the drum.
Note:
The engine is equipped with a thermal overheating protection. The thermal protection automatically restarts
once the engine has cooled down. REDUCE THE CEMENT MIXER LOAD (FILLING) in case of failure!
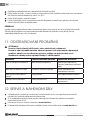
10. MAINTENANCE AND STORAGE
CAUTION!
To ensure proper functioning of the machine, it is necessary to have it checked and
adjusted by qualifi ed personnel in an authorized service centre at least once a year.
Proper maintenance is essential for safe, economic and trouble-free operation of the machine.
Failure to follow the maintenance instructions and safety precautions may cause serious injury or death. Always
follow the procedures, safety precautions, recommended maintenance and recommended checks mentioned in
this manual.
WARNING!
Prior to any work on the machine (maintenance, inspection, replacement of
accessories, servicing) or before storing it, ALWAYS SWITCH THE ENGINE OFF, wait for
all moving parts to stop and allow the machine to cool down. Prevent the engine
from being started accidentally (disconnect the power unit from the mains).
THIS WARNING IS NOT REPEATED IN ANY FOLLOWING POINTS!

EN 20
FDSM 200120-E
Maintenance and storage
Always make sure that all nuts and bolts are fi rmly tightened and make sure the machine is in good working
order.
Keep the machine in good condition, if necessary change warning and instruction labels on the machine.
Always ensure that the ventilation openings are kept clear of debris.
For safety reasons, replace worn or damaged parts. Only use original spare parts and accessories. Parts not
tested and approved by the equipment manufacturer can cause unforeseeable damage.
Repair and maintenance work other than described in this section, which are more complicated, or it needs
special tools, let it on our authorized service.
After drying the mixer lubricate moving parts of the mixer by waterproof vaseline
CLEANING
CAUTION!
Never spray the product with water or expose it to water.
Never use aggressive detergents or solvents for cleaning.
1. Carefully clean the machine after each use.
2. Do not let the handles contaminate with oil or grease. Clean the handle clean with a damp cloth washed in
soapy water. Never use aggressive detergents or solvents for cleaning. This can cause irreparable damage
to the product. The plastic parts can be eaten away by chemicals.
3. Wipe down the product with a slightly damp cloth or with brush.
4. Clean the cover of the machine, especially the ventilation holes.
Thoroughly clean the mixer at the end of each day’s operation. Keep your mixer clean. The slightest trace of
material left in the drum will harden and attract more each time you use it until the machine is useless. Dried
cement should be scraped out of the drum. Do not throw bricks into mixer drum to clean it out. Do not beat on the
drum with a shovel, a hammer or other tools to break up accumulations of dried cement mix, as damage to the
mixer may result.
The drum may be scoured for approximate 2 minutes, using 1:1 gravel and water mixture. Then discharge the
gravel/water mixture and hose down the drum assembly inside and out. The IP44D protection class construction
of the concrete mixer enables you to hose down the drum assembly safely.
WARNING!
Do not pour or spray water directly over the motor cover, especially into the
openings in it.
Wipe off any external material on the motor cover. Do not use petrol, turpentine, lacquer or paint thinner, dry
cleaning fl uids or similar products. The use of chemical products or solvents may affect the properties of the
cover which was made of high-density polyethylene PET.
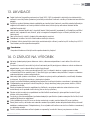
STORAGE
Store the machine out of reach of children.
Turn the motor off and disconnect the mains plug if the machine is not used.
Allow let the machine to cool down before storage.
Do not store the machine a long time in direct sunlight.
Strona się ładuje...
Strona się ładuje...
Strona się ładuje...
Strona się ładuje...
Strona się ładuje...
Strona się ładuje...
Strona się ładuje...
Strona się ładuje...
Strona się ładuje...
Strona się ładuje...
Strona się ładuje...
Strona się ładuje...
Strona się ładuje...
Strona się ładuje...
Strona się ładuje...
Strona się ładuje...
Strona się ładuje...
Strona się ładuje...
Strona się ładuje...
Strona się ładuje...
Strona się ładuje...
Strona się ładuje...
Strona się ładuje...
Strona się ładuje...
Strona się ładuje...
Strona się ładuje...
Strona się ładuje...
Strona się ładuje...
Strona się ładuje...
Strona się ładuje...
Strona się ładuje...
Strona się ładuje...
Strona się ładuje...
Strona się ładuje...
Strona się ładuje...
Strona się ładuje...
Strona się ładuje...
Strona się ładuje...
Strona się ładuje...
Strona się ładuje...
Strona się ładuje...
Strona się ładuje...
Strona się ładuje...
Strona się ładuje...
Strona się ładuje...
Strona się ładuje...
Strona się ładuje...
Strona się ładuje...
Strona się ładuje...
Strona się ładuje...
Strona się ładuje...
Strona się ładuje...
Strona się ładuje...
Strona się ładuje...
Strona się ładuje...
Strona się ładuje...
Strona się ładuje...
Strona się ładuje...
Strona się ładuje...
Strona się ładuje...
Strona się ładuje...
Strona się ładuje...
Strona się ładuje...
Strona się ładuje...
Strona się ładuje...
Strona się ładuje...
Strona się ładuje...
Strona się ładuje...
Strona się ładuje...
Strona się ładuje...
Strona się ładuje...
Strona się ładuje...
Strona się ładuje...
Strona się ładuje...
Strona się ładuje...
Strona się ładuje...
Strona się ładuje...
Strona się ładuje...
Strona się ładuje...
Strona się ładuje...
Strona się ładuje...
Strona się ładuje...
Strona się ładuje...
Strona się ładuje...
-
 1
1
-
 2
2
-
 3
3
-
 4
4
-
 5
5
-
 6
6
-
 7
7
-
 8
8
-
 9
9
-
 10
10
-
 11
11
-
 12
12
-
 13
13
-
 14
14
-
 15
15
-
 16
16
-
 17
17
-
 18
18
-
 19
19
-
 20
20
-
 21
21
-
 22
22
-
 23
23
-
 24
24
-
 25
25
-
 26
26
-
 27
27
-
 28
28
-
 29
29
-
 30
30
-
 31
31
-
 32
32
-
 33
33
-
 34
34
-
 35
35
-
 36
36
-
 37
37
-
 38
38
-
 39
39
-
 40
40
-
 41
41
-
 42
42
-
 43
43
-
 44
44
-
 45
45
-
 46
46
-
 47
47
-
 48
48
-
 49
49
-
 50
50
-
 51
51
-
 52
52
-
 53
53
-
 54
54
-
 55
55
-
 56
56
-
 57
57
-
 58
58
-
 59
59
-
 60
60
-
 61
61
-
 62
62
-
 63
63
-
 64
64
-
 65
65
-
 66
66
-
 67
67
-
 68
68
-
 69
69
-
 70
70
-
 71
71
-
 72
72
-
 73
73
-
 74
74
-
 75
75
-
 76
76
-
 77
77
-
 78
78
-
 79
79
-
 80
80
-
 81
81
-
 82
82
-
 83
83
-
 84
84
-
 85
85
-
 86
86
-
 87
87
-
 88
88
-
 89
89
-
 90
90
-
 91
91
-
 92
92
-
 93
93
-
 94
94
-
 95
95
-
 96
96
-
 97
97
-
 98
98
-
 99
99
-
 100
100
-
 101
101
-
 102
102
-
 103
103
-
 104
104


Fieldmann FDSM 200120-E Instrukcja obsługi
- Typ
- Instrukcja obsługi
w innych językach
- slovenčina: Fieldmann FDSM 200120-E Používateľská príručka
Inne dokumenty
-
Altrad MK-145/B Gravity Concrete Mixer Instrukcja obsługi
-
 Meec tools 024341 Concrete Mixer Instrukcja obsługi
-
Meec tools 024342 Instrukcja obsługi
-
 XTline XT180H Instrukcja obsługi
-
 XTline XT160H Instrukcja obsługi
-
AL-KO TOP 1402 HR Instrukcja obsługi
-
 XTline XT140H Instrukcja obsługi
-
VARI BDR-620B Lucina 65 Instrukcja obsługi


