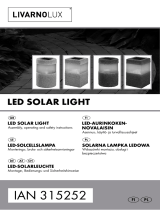
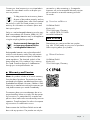
LED SOLAR LIGHT
IAN 273745
LED SOLAR LIGHT
Assembly, operating and safety instructions
LED-SOLARLEUCHTE
Montage-, Bedienungs- und Sicherheitshinweise
SOLARNA LAMPA LEDOWA
Wskazówki montażu, obsługi i bezpieczeństwa

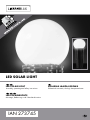
GB / IE Assembly, operating and safety instructions Page 5
PL Wskazówki montażu, obsługi i bezpieczeństwa Strona 11
DE / AT / CH Montage-, Bedienungs- und Sicherheitshinweise Seite 17
Before reading, unfold the page containing the illustrations and familiarise yourself with all functions of the
device.
Przed przeczytaniem proszę rozłożyć stronę z ilustracjami, a następnie proszę zapoznać się z wszystkimi
funkcjami urządzenia.
Klappen Sie vor dem Lesen die Seite mit den Abbildungen aus und machen Sie sich anschließend mit allen
Funktionen des Gerätes vertraut.

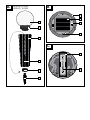
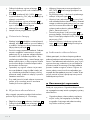
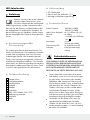
B
6
7
8
2
A
1
2
3
4
10295A / JL-T009
10295C / JL-T009
C
10
9
4
5


5 GB/IE
Introduction ................................................................................................................................... Page 6
Intended use ........................................................................................................................................ Page 6
Parts description ..................................................................................................................................Page 6
Scope of delivery ................................................................................................................................Page 6
Technical Data ....................................................................................................................................Page 6
Safety notices ..............................................................................................................................Page 6
Product-specific safety instructions .....................................................................................................Page 6
Safety instructions for rechargeable batteries ................................................................................... Page 7
Functionality .................................................................................................................................Page 7
Start-up .............................................................................................................................................Page 7
Mounting the light ............................................................................................................................... Page 7
Installing the light ................................................................................................................................Page 7
Replacing the rechargeable battery ..................................................................................................Page 8
Charging ..............................................................................................................................................Page 8
Maintenance and Cleaning ..............................................................................................Page 8
Troubleshooting ........................................................................................................................Page 8
Disposal ............................................................................................................................................Page 8
Warranty and Service .......................................................................................................... Page 9
Service address ................................................................................................................................... Page 9
Manufacturer .......................................................................................................................................Page 9

6 GB/IE
LED Solar Light
Introduction
Familiarise yourself with the device be-
fore using it for the first time. In addition,
please carefully refer to the operating
instructions and the safety advice below. Use the
product only as described and for the indicated
purpose. Keep these instructions in a safe place. If
you pass the device on to anyone else, please en-
sure that you also pass on all the documentation.
Intended use
The solar light is intended as outdoor ambient /
decorative lighting. The integrated solar cell and
the rechargeable battery allow usage independent
from the electricity grid. Any modification to the
product are considered improper use and may re-
sult in considerable hazards. The manufacturer will
not accept liability for loss or damage arising from
improper use. This device is not intended for
commercial use.
Parts description
1 Lamp shade
2 Solar cell housing
3 Light body
4 Ground stake
5 Adapter
6 Solar cell
7 ON / OFF switch
8 Retaining screw
9 Battery compartment
10 Rechargeable battery
Scope of delivery
1 LED solar light
1 Rechargeable Ni-MH battery, AA, 600 mAh,
1.2 V
1 Instructions for assembly and use
Technical Data
Item / Model no.: 10295A / JL-T009,
10295C / JL-T009
Dimensions
(without ground stake): approx. 15 x 40 cm (Ø x h)
Weight: approx. 400 g
Rechargeable battery: 1 x Ni-MH, AA, 600 mAh,
1.2 V
Illuminant: 4 x LED (not replaceable)
Rated output LED: approx. 0.025 W per LED
Protection type: IP44 (splash-proof)
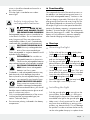
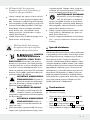
Safety notices
PLEASE READ THE INSTRUCTIONS FOR USE
PRIOR TO USE! PLEASE KEEP THE INSTRUCTIONS
IN A SAFE PLACE! IF PASSING THIS PRODUCT
ON TO A THIRD PARTY, INCLUDE ALL
DOCUMENTS!
This device may be used by children age
8 years and up, as well as by persons with re-
duced physical, sensory or mental capacities,
or lacking experience and / or knowledge, so
long as they are supervised or instructed in the
safe use of the device and understand the asso-
ciated risks. Children should not be allowed to
play with the device. Cleaning and user main-
tenance should not be performed by children
without supervision.
Do not use the product if you detect any type
of damage.
Switch the product off whilst storing in a dark
environment to prevent draining the battery.
Product-specific safety
instructions
Make sure the solar cell is free of dirt and free
of snow and ice in winter. Otherwise the
performance of the solar panel will diminish.
Cold temperatures negatively impact the bat-
tery operating time. If the solar garden light
will not be used for extended periods, e.g. in

7 GB/IE
winter, it should be cleaned and stored in a
dry, warm location.
The solar light is intended as an outdoor
accent light.
Safety instructions for
rechargeable batteries
RISK OF AC-
CIDENT AND DANGER TO LIFE
FOR INFANTS AND CHILDREN!
Rechargeable batteries are not intended to be
in the hands of children. Do not leave the bat-
teries lying around. They may otherwise be
swallowed by children or pets. If accidentally
swallowed seek immediate medical attention.
CAUTION! EXPLOSION HAZ-
ARD! Use only rechargeable bat-
teries of the recommended type.
Other rechargeable or single-use batteries could
explode during charging.
FIRE HAZARD! Do not allow re-
chargeable batteries to short-circuit.
Otherwise the rechargeable batteries
may overheat, become a fire hazard or explode.
CAUTION! EXPLOSION HAZ-
ARD! Never throw rechargeable
batteries into fire or water.
Outdated or used rechargeable batteries may
leak chemicals which damage the product.
R
emove, therefore, the rechargeable battery wh
en
the lamp is not required for any length of time.
WEAR PROTECTIVE GLOVES!
If they come into contact with skin,
leaked or damaged rechargeable
batteries could cause chemical burns; you s
hould
therefore wear suitable protective gloves at all
times if such an event occurs.
Only use rechargeable batteries of the correct
size and and the recommended type (see
section ”Technical Data”).
Ensure correct polarity, indicated in the battery
compartment.
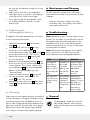
Functionality
The integrated solar cell of the article converts so-
lar radiation into electrical energy and stores it in
the Ni-MH rechargeable battery. Switches on the
light as it begins to get dark. The built-in LED is an
energy-saving illuminant with a very long life. The
light duration depends on the amount of sunlight,
the angle of light on the solar panel and the tem-
perature (the battery capacity is temperature-de-
pendent). A vertical angle of light at temperatures
above the freezing point is ideal. The rechargeable
battery will only achieve its maximum capacity
after several charging and discharging cycles.
Start-up
Mounting the light
Pull the solar cell housing 2 including lamp-
shade 1 out of the lamp body 3.
Push the ground spike 4 out of the adapter 5
and into the lamp body 3.
Push the ground spike 4 into the ground in the
desired location, then attach the lamp body 3.
Turn the solar cell housing 2 out of the lamp-
shade 1 counter-clockwise.
Set the ON / OFF switch 7 to the “ON“ posi-
tion to allow the product to switch on in the dark.
Insert the solar cell housing 2 into the lamp-
shade 1 and tighten clockwise.
Attach the lampshade 1 to the lamp body 3.
Your solar light is now ready for use.
Installing the light
Push the ground spike 4 far enough into the
ground (lawn, flower bed) so it is firmly posi-
tioned upright in the ground. Then attach the
assembled solar light to the ground spike 4.
Make sure it is firmly positioned. Do not use
any force when assembling or setting up the
product, e.g. hammer blows. This will damage
the product. In order to achieve the best result,
set the solar garden lamp up in a place where

8 GB/IE
the solar cell will get direct sunlight for as long
as possible.
Make sure the solar cell is not impacted by
other light sources, e.g. yard- or street lighting,
or the light will not switch on at twilight.
In low light the light will automatically switch
on, and automatically switch off in normal
ambient light.
Replacing the
rechargeable battery
The batteries should be replaced every 12 months
to ensure optimum performance.
Remove the lampshade 1 from the lamp
body 3.
Rotate the solar cell housing 2 counter-
clockwise out of the lampshade 1.
Switch off the light using the ON / OFF switch 7
by setting the switch to the “OFF“ position.
Remove the fixing screws 8 using a small
cross-tip screwdriver.
Replace the old rechargeable battery 10 with
a new one. Be sure to insert the batteries in the
correct direction. This is shown inside the bat-
tery compartment 9. Use only rechargeable
batteries of the recommended type (see
“Technical Data“).
Tighten the retaining screws 8 with a small
cross-tip screwdriver. Slide the ON / OFF
switch 7 to the “ON“ position.
Reattach the solar cell housing 2 to the lamp
shade 1. Then assemble the remaining parts
of the lamp.
Charging
Please note, the solar garden light must be switched
on when the battery is charging. The battery charg-
ing period using the solar cell depends on the in-
tensity of the sunlight and the angle incidence of the
light on the solar cell. Place the solar cell as perpen-
dicular as possible to the angle of light incidence.
In this way you will receive the highest light levels.
Maintenance and Cleaning
The LEDs cannot be replaced. The solar lamp is
maintenance-free, except for any necessary change
of battery.
Clean the solar lamp regularly with a dry,
non-fluffing cloth. Use a slightly moist cloth to
remove any stubborn dirt.
Troubleshooting
Note: the device contains sensitive electronic com-
ponents. For this reason it is possible that it can be
disrupted by radio transmitting equipment in the
immediate vicinity. If you notice that the device is
malfunctioning, remove any sources of interference
from the area of the device.
Note: Electrostatic discharge can cause malfunc-
tions. In the event of such malfunctions briefly
remove and reinsert the rechargeable batteries.
Fault Cause Solution
The light will
not switch on
even though
the sun shone
on the lamp all
day.
Artificial sour-
ces of light,
e.g. street
lighting, inter-
fere with the
lamp.
Place the light in
a location whe-
re it will not be
affected by
other light
sources.
The light does
not come on or
comes on only
briefly.
The recharge-
able battery
is broken or
there was not
enough day-
light.
Replace the
rechargeable
battery or mount
the lamp in a
place where it
can receive
more sunlight.
Disposal
The packaging is made of environmen-
tally friendly materials, which may be
disposed of through your local recycling
facilities.

9 GB/IE
Contact your local community or municipal admin-
istration for more details on how to dispose your
worn-out product.
To help protect the environment, please
dispose of the product properly, and not
in household waste, when it has reached
the end of its useful life. Please contact your local
authority for information on collection points and
their opening hours.
Faulty or used rechargeable batteries must be recy-
cled in accordance with Directive 2006 / 66 / EC.
Return rechargeable batteries and / or the appliance
using the recycling facilities provided.
Environmental damage due
to improper disposal of the
rechargeable batteries!
Rechargeable batteries may not be disposed of
with the usual domestic waste. They may contain
toxic heavy metals and are subject to hazardous
waste regulations. The chemical symbols of the
heavy metals are: Cd = cadmium, Hg = mercury,
Pb = lead. Therefore dispose of used batteries
through your municipal collection site.
Warranty and Service
Note: this product includes a 36 month warranty
from the date of purchase. The product has been
produced to the highest standards and thoroughly
checked before dispatch. However, if defects in man-
ufacturing or material arise during the warranty pe-
riod, please contact your retailer immediately.
The warranty does not cover damages due to im-
proper handling, failure to comply with the operat-
ing instructions, or manipulation by unauthorised
persons. Most malfunctions are caused by incorrect
operation. Therefore please first refer to the operat-
ing instructions if a malfunction occurs.
Please contact the Uni-Elektra GmbH service ad-
dress with any questions. The product can only be
returned to us after contacting us. Postage due
shipments will not be accepted. Warranty services
do not extend or restart the warranty period of
36 months.
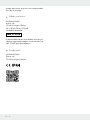
Service address
Uni-Elektra GmbH
Kirchstr. 48
72145 Hirrlingen / Germany
Tel.: +49 (0) 7478 / 91385-0
service@uni-elektra.de
IAN 273745
Please have your receipt and the item number
(e.g. IAN 12345) ready as your proof of purchase
when enquiring about your product.
Manufacturer
Uni-Elektra GmbH
Kirchstr. 48
72145 Hirrlingen / Germany

10

11 PL
Instrukcja ......................................................................................................................................Strona 12
Zastosowanie zgodne z przeznaczeniem .....................................................................................Strona 12
Opis części ....................................................................................................................................... Strona 12
Zakres dostawy ................................................................................................................................Strona 12
Dane techniczne ..............................................................................................................................Strona 12
Wskazówki bezpieczeństwa ......................................................................................Strona 12
Wskazówki dotyczące bezpieczeństwa charaktery-styczne dla produktu..................................Strona 13
Wskazówki dotyczące bezpieczeństwa użytko-wania akumulatorów ........................................Strona 13
Sposób działania ..................................................................................................................Strona 13
Uruchomienie............................................................................................................................Strona 13
Montaż lampy ..................................................................................................................................Strona 13
Ustawienie lampy.............................................................................................................................Strona 14
Wymiana akumulatora ....................................................................................................................Strona 14
Ładowanie akumulatora ..................................................................................................................Strona 14
Konserwacja i czyszczenie............................................................................................Strona 14
Usuwanie błędów ................................................................................................................ Strona 15
Utylizacja .....................................................................................................................................Strona 15
Gwarancja i serwis ..............................................................................................................Strona 15
Adres serwisu ...................................................................................................................................Strona 16
Producent ..........................................................................................................................................Strona 16

12 PL
Solarna lampa ledowa
Instrukcja
Przed pierwszym użyciem należy zapo-
znać się zurządzeniem. W tym celu
przeczytaj uważnie poniższą instrukcję
obsługi oraz wskazówki dotyczące bezpieczeństwa.
Urządzenie stosować wyłącznie zgodnie z opisem
i przeznaczeniem. Niniejszą instrukcję należy za-
chować. Przekazując produkt innej osobie, należy
załączyć do niego wszystkie dokumenty.
Zastosowanie zgodne z
przeznaczeniem
Lampa solarna służy jako oświetlenie nastrojowe
lub dekoracyjne na zewnątrz. Wbudowane ogniwo
solarne i akumulator umożliwiają pracę niezależną
od sieci elektrycznej. Wszelkie zmiany urządzenia
są niezgodne z przeznaczeniem i mogą spowodo-
wać poważne wypadki. Producent nie ponosi
odpowiedzialności za szkody powstałe wskutek
zastosowania urządzenia niezgodnie z jego prze-
znaczeniem. Urządzenie nie jest przeznaczone do
użytku komercyjnego.
Opis części
1 Klosz lampy
2 Obudowa ogniwa solarnego
3 Lampa
4 Stojak wbijany do ziemi
5 Adapter
6 Ogniwo solarne
7 Przełącznik WŁĄCZ / WYŁĄCZ (ON / OFF)
8 Śruba mocująca
9 Komora akumulatorów
10 Akumulator
Zakres dostawy
1 lampa solarna LED
1 akumulator Ni-MH, AA, 600 mAh, 1,2 V
1 instrukcja montażu i obsługi
Dane techniczne
Typ / Nr artykułu: 10295A / JL-T009,
10295C / JL-T009
Wymiary (bez stojaka): ok. 15 x 40 cm (Ø x wys.)
Ciężar: ok. 400 g
Akumulator: 1 x Ni-MH, AA, 600 mAh,
1,2 V
Źródło światła: 4 x dioda LED (niewy-
mienna)
Moc znamionowa LED: ok. 0,025 W na diodę LED
Stopień ochrony: IP44 (zabezpieczenie
przed wodą bryzgową)
Wskazówki
bezpieczeństwa
PRZED UŻYCIEM NALEŻY ZAPOZNAĆ SIĘ Z
INSTRUKCJĄ OBSŁUGI! INSTRUKCJĘ OBSŁUGI
NALEŻY ZACHOWAĆ! W PRZYPADKU PRZE-
KAZANIA PRODUKTU NALEŻY DOŁĄCZYĆ DO
NIEGO CAŁĄ JEGO DOKUMENTACJĘ!
Niniejsze urządzenie może być używane przez
dzieci od lat 8 oraz przez osoby z obniżonymi
zdolnościami fizycznymi, sensorycznymi lub
mentalnymi lub brakiem doświadczenia i / lub
wiedzy, jeśli pozostają pod nadzorem lub zo-
stały pouczone w kwestii bezpiecznego użycia
urządzenia i rozumieją wynikające z niego
zagrożenia. Dzieci nie mogą bawić się urzą-
dzeniem. Czyszczenie i konserwacja nie mogą
być przeprowadzane przez dzieci bez nadzoru.
Nie używać urządzenia w razie stwierdzenia
jakichkolwiek uszkodzeń.
Wyłączyć artykuł, jeśli jest przechowywany w
ciemnym otoczeniu, aby uniknąć rozładowania
akumulatora.

13 PL
Wskazówki dotyczące
bezpieczeństwa charaktery-
styczne dla produktu
Należy uważać, aby ogniwo solarne nie było
zabrudzone i w zimie przykryte śniegiem lub lo-
dem. Zmniejsza to wydajność ogniwa solarnego.
Niskie temperatury mają negatywny wpływ na
żywotność eksploatacyjną baterii. Jeżeli ogro-
dowa lampa solarna nie będzie potrzebna
przez dłuższy czas, na przykład w zimie,
należy ją oczyścić i przechować w suchym,
ciepłym pomieszczeniu.
Lampa solarna służy do dekoracyjnego oświe-
tlania obszaru zewnętrznego.
Wskazówki dotyczące
bezpieczeństwa użytko-
wania akumulatorów
NIEBEZPIE-
CZEŃSTWO ODNIESIENIA
OBRAŻEŃ IUTRATY ŻYCIA
PRZEZ DZIECI! Akumulatory nie powinny
dostać się w ręce dzieci. Nie należy pozosta-
wiać akumulatorów w miejscu dostępnym dla
wszystkich. Istnieje niebezpieczeństwo, że zo-
staną one połknięte przez dzieci lub zwierzęta
domowe. W przypadku połknięcia należy na-
tychmiast udać się do lekarza.
OSTROŻNIE! NIEBEZPIECZEŃ-
STWO WYBUCHU! Używać wy-
łącznie akumulatorów zalecanego
typu. Inne akumulatory / baterie mogłyby eks-
plodować podczas ładowania.
ZAGROŻENIE POŻAROWE!
Nie należy zwierać biegunów aku-
mulatorów. Może to spowodować
przegrzanie, zagrożenie pożarowe lub pęknię-
cie akumulatorów.
OSTROŻNIE! NIEBEZPIECZEŃ-
STWO WYBUCHU! Nigdy nie
należy wrzucać akumulatorów do
ognia lub wody.
Jeżeli akumulatory są przestarzałe lub zużyte,
mogą z nich wypłynąć chemiczne płyny, które
uszkodzą produkt. Dlatego należy wyjąć aku-
mulatorek, jeśli słoneczna oprawa oświetleniowa
nie jest potrzebna przez dłuższy czas.
NOSIĆ RĘKAWICE OCHRONNE!
Akumulatory, z których nastąpił wy-
ciek, lub akumulatory uszkodzone
mogą w przypadku kontaktu ze skórą spowo-
dować oparzenie substancją żrącą; dlatego w
takim przypadku należy koniecznie stosować
odpowiednie rękawice ochronne.
Należy używać wyłącznie akumulatorów wła-
ściwej wielkości i zalecanego typu (patrz roz-
dział „Dane techniczne”).
Zwrócić uwagę na prawidłowe ułożenie biegu-
nów – jest ono oznaczone w komorze na aku-
mulatory.
Sposób działania
Wbudowane do artykułu ogniwo solarne
przetwarza
w przypadku promieniowania słonecznego światło
na energię elektryczną i magazynuje ją w jednym
akumulatorze Ni-MH. Światło jest włączane o
zmierzchu. Wbudowana dioda jest bardzo trwałym
i energooszczędnym źródłem światła. Czas trwania
świecenia zależy od promieniowania słonecznego,
kąta padania światła na ogniwo słoneczne oraz
od temperatury (z powodu zależności pojemności
akumulatora od temperatury). Idealny jest prosto-
padły kąt padania światła przy temperaturach po-
wyżej temperatury zamarzania. Akumulator osiąga
swoją maksymalną pojemność dopiero po kilku
cyklach ładowania i rozładowania.
Uruchomienie
Montaż lampy
Wyjąć obudowę ogniwa solarnego 2 z klo-
szem 1 z lampy 3.
Wcisnąć stojak do wbicia w ziemię 4 z ada-
ptera 5 do wnętrza lampy 3.
Wbić stojak do wbicia w ziemię 4 w wybranym
miejscu podłoża, a następnie nałożyć lampę 3.

14 PL
Odkręcić obudowę ogniwa solarnego 2 w
kierunku odwrotnym do ruchu wskazówek ze-
gara 1.
Przesunąć przełącznik WŁ. / WYŁ. 7 na po-
zycję zaznaczoną „ON“, aby artykuł mógł się
włączyć w ciemności.
Włożyć obudowę ogniwa solarnego 2 do
klosza lampy 1 iobrócić ją wkierunku zgod-
nym zruchem wskazówek zegara.
Nałożyć klosz lampy 1 na lampę 3.
Lampa solarna jest gotowa do użycia.
Ustawienie lampy
Wetknąć stojak 4 tak daleko w ziemię (trawnik,
rabatkę), aż będzie stabilnie i prosto osadzony
w podłożu. Następnie nałożyć zmontowaną
lampę solarną na stojak 4.
Zwrócić uwagę na pewne osadzenie. Podczas
montażu względnie ustawiania nie używać
nadmiernej siły, np. poprzez wbijanie młotkiem.
Prowadzi to do uszkodzenia produktu. Aby
uzyskać optymalne efekty, ustawić lampę ogro-
dową w takim miejscu, w którym ogniwo solarne
jest możliwie długo oświetlane bezpośrednio
promieniami słonecznymi.
Sprawdzić, czy ogniwo solarne nie jest nara-
żone na działanie innego źródła światła, jak
np. oświetlenia podwórka lub lampy ulicznej,
ponieważ wtedy światło nie włączy się wraz z
nastaniem zmierzchu.
Przy małej jasności światło włącza się automa-
tycznie, przy normalnej jasności otoczenia
światło ponownie wyłącza się.
Wymiana akumulatora
Aby osiągnąć optymalną wydajność akumulator
powinien być wymieniany co 12 miesięcy.
Zdjąć klosz lampy 1 z elementu świetlnego 3.
Odkręcić obudowę ogniwa solarnego 2 w
kierunku odwrotnym do ruchu wskazówek ze-
gara 1.
Wyłączyć lampę za pomocą przełącznika
WŁ. / WYŁ. 7, przesuwając przełącznik na
pozycję „OFF“.
Za pomocą małego śrubokrętu krzyżakowego
odkręcić śruby mocujące 8.
Wymienić stary akumulator 10 na nowy. Pod-
czas wkładania akumulatorów należy zwracać
uwagę na właściwą polaryzację. Jest ono ozna-
czone w komorze akumulatorów 9. Używać
wyłącznie akumulatorów zalecanego typu
(patrz „Dane techniczne“).
Ponownie przykręcić śruby mocujące 8 za
pomocą małego śrubokrętu krzyżakowego od-
kręcić. Przesunąć przełącznik WŁ. / WYŁ. 7
na pozycję „ON“.
Ponownie połączyć obudowę ogniwa solar-
nego 2 z kloszem 1. Następnie złożyć ze
sobą inne części lampy.
Ładowanie akumulatora
Należy pamiętać, że solarna lampa ogrodowa
podczas ładowania akumulatora powinna być włą-
czona. Czas ładowania akumulatorów przy użyciu
ogniwa solarnego uzależniony jest od natężenia
promieniowania słonecznego oraz kąta padania
promieni światła na ogniwo solarne. Ogniwo sło-
neczne należy ustawić możliwie najbardziej pro-
stopadle do kąta padania promieni światła. W ten
sposób można uzyskać największą intensywność
oddziaływania promieni.
Konserwacja i czyszczenie
Diody nie są wymienne. Ogrodowa lampa solarna
nie wymaga konserwacji aż do wymaganej wymiany
akumulatorów.
Ogrodową lampę solarną należy regularnie
czyścić suchą, niestrzępiącą się szmatką. W
przypadku silniejszego zabrudzenia należy
użyć lekko zwilżonej szmatki.

15 PL
Usuwanie błędów
Wskazówka: Urządzenie zawiera wrażliwe po-
dzespoły elektroniczne. Dlatego możliwe jest jego
zakłócenie przez znajdujące się w jego bezpośred-
nim pobliżu urządzenia emitujące fale radiowe.
W przypadku stwierdzenia zakłóceń w działaniu
urządzenia należy usunąć tego rodzaju źródła
zakłóceń z jego otoczenia.
Wskazówka: Wyładowania elektrostatyczne
mogą powodować zakłócenia w działaniu urzą-
dzenia. W razie pojawienia się takich zakłóceń
należy wyjąć akumulatory i po chwili włożyć je
ponownie.
Usterka Przyczyna Rozwiązanie
Lampa nie włą-
cza się, cho-
ciaż przez cały
dzień była
oświetlona
słońcem.
Sztuczne źró-
dła światła,
np. latarnie
uliczne, za-
kłócają dzia-
łanie lampy.
Zamontować
lampę w miejscu,
w którym inne
źródła światła
nie będą mogły
zakłócać jej
działania.
Lampa nie
świeci lub świe-
ci tylko krótko.
Akumulator
jest uszkodzo-
ny lub światło
dzienne było
niewystarcza-
jące.
Wymień akumu-
lator lub zamon-
tuj lampę wmiej-
scu, wktórym
będzie ona le-
piej oświetlona
słońcem.
Utylizacja
Opakowanie wykonane jest z materia-
łów przyjaznych dla środowiska, które
można przekazać do utylizacji wlokal-
nym punkcie przetwarzania surowców
wtórnych.
Informacji na temat możliwości utylizacji wyeksplo-
atowanego produktu udziela urząd gminy lub miasta.
Z uwagi na ochronę środowiska nie
wyrzucać urządzenia po zakończeniu
eksploatacji do odpadów domowych,
lecz prawidłowo zutylizować. Informacji o punk-
tach zbiorczych i ich godzinach otwarcia udziela
odpowiedni urząd.
Uszkodzone lub zużyte akumulatory muszą być
poddane procesowi recyklingu zgodnie z dyrek-
tywą 2006 / 66 / WE. Akumulatory i / lub urządze-
nie należy pozostawić w lokalnym punkcie zbiórki.
Niewłaściwa utylizacja akumu-
latorów stwarza zagrożenie dla
środowiska naturalnego!
Nie należy wyrzucać akumulatorów razem z od-
padami domowymi. Mogą one zawierać szkodliwe
metale ciężkie i należy je traktować jak odpady
specjalne. Symbole chemiczne metali ciężkich są
następujące: Cd = kadm, Hg = rtęć, Pb = ołów.
Dlatego też zużyte baterie należy przekazywać do
komunalnych punktów gromadzenia odpadów.
Gwarancja i serwis
Wskazówka: Produkt objęty jest gwarancją
36 miesięcy od daty zakupu. Produkt został staran-
nie wyprodukowany ipoddany skrupulatnej kontroli
przed wysyłką. Mimo to jeśli w czasie trwania
gwarancji pojawiłyby się błędy produkcyjne lub
materiałowe, należy niezwłocznie skontaktować
się ze sprzedawcą.
Uszkodzeń spowodowanych niewłaściwym obcho-
dzeniem się z urządzeniem, nieprzestrzeganiem
instrukcji obsługi lub ingerencją przez nieautoryzo-
wane osoby gwarancja nie obejmuje. Większość
zakłóceń funkcjonowania wywołanych jest niewła-
ściwą obsługą. Dlatego w razie wystąpienia zakłó-
ceń funkcjonowania najpierw należy przeczytać
instrukcję obsługi.
Przed ewentualnym odesłaniem przedmiotu należy
skontaktować się z punktem serwisowym Uni-Elektra
GmbH. Dopiero po konsultacji można przyjąć
produkt. Przesyłki wysłane ze znaczkiem dopłaty
pocztowej nie zostaną przyjęte. Po wykonaniu
świadczenia gwarancyjnego gwarancja nie

16 PL
zostaje odnowiona, a jej okres nie zostaje przedłu-
żony do 36 miesięcy.
Adres serwisu
Uni-Elektra GmbH
Kirchstr. 48
72145 Hirrlingen / Niemcy
Tel.: +49 (0) 7478 / 91385-0
service@uni-elektra.de
IAN 273745
Przed skontaktowaniem się z działem serwisowym
należy przygotować paragon i numer artykułu (np.
IAN 12345) jako dowód zakupu.
Producent
Uni-Elektra GmbH
Kirchstr. 48
72145 Hirrlingen / Niemcy

17 DE/AT/CH
Einleitung ......................................................................................................................................... Seite 18
Bestimmungsgemäße Verwendung ....................................................................................................Seite 18
Teilebeschreibung ...............................................................................................................................Seite 18
Lieferumfang ........................................................................................................................................ Seite 18
Technische Daten ................................................................................................................................Seite 18
Sicherheitshinweise ................................................................................................................Seite 18
Produktspezifische Sicherheitshinweise .............................................................................................Seite 19
Sicherheitshinweise für Akkus ............................................................................................................. Seite 19
Funktionsweise ..........................................................................................................................Seite 19
Inbetriebnahme ......................................................................................................................... Seite 19
Leuchte montieren ...............................................................................................................................Seite 19
Leuchte aufstellen ................................................................................................................................Seite 20
Akku austauschen ...............................................................................................................................Seite 20
Akku aufladen .....................................................................................................................................Seite 20
Wartung und Reinigung .....................................................................................................Seite 20
Fehler beheben ..........................................................................................................................Seite 20
Entsorgung .....................................................................................................................................Seite 21
Garantie und Service ............................................................................................................Seite 21
Serviceadresse ....................................................................................................................................Seite 21
Hersteller ..............................................................................................................................................Seite 22

18 DE/AT/CH
LED-Solarleuchte
Einleitung
Machen Sie sich vor der ersten Inbetrieb-
nahme mit dem Gerät vertraut. Lesen
Sie hierzu aufmerksam die nachfolgende
Bedienungsanleitung und die Sicherheitshinweise.
Benutzen Sie das Gerät nur wie beschrieben und für
die angegebenen Einsatzbereiche. Bewahren Sie
diese Anleitung gut auf. Händigen Sie alle Unterla-
gen bei Weitergabe des Geräts an Dritte ebenfalls
mit aus.
Bestimmungsgemäße
Verwendung
Die Solarleuchte dient als Ambientelicht bzw. De-
kolicht im Außenbereich. Die eingebaute Solarzelle
und der Akku ermöglichen einen vom Stromnetz
unabhängigen Betrieb. Alle Veränderungen des
Geräts sind nicht bestimmungsgemäß und können
erhebliche Unfallgefahren bedeuten. Der Hersteller
übernimmt für aus bestimmungswidriger Verwendung
entstandene Schäden keine Haftung. Dieses Gerät
ist nicht für den gewerblichen Einsatz bestimmt.
Teilebeschreibung
1 Lampenschirm
2 Solarzellengehäuse
3 Leuchtenkörper
4 Erdspieß
5 Adapter
6 Solarzelle
7 EIN- / AUS-Schalter (ON / OFF)
8 Befestigungsschraube
9 Akkufach
10 Akku
Lieferumfang
1 LED-Solarleuchte
1 Akku Ni-MH, AA, 600 mAh, 1,2 V
1 Montage- und Bedienungsanleitung
Technische Daten
Artikel- / Typennr.: 10295A / JL-T009,
10295C / JL-T009
Maße (ohne Erdspieß): ca. 15 x 40 cm (Ø x H)
Gewicht: ca. 400 g
Akku: 1 x Ni-MH, AA, 600 mAh,
1,2 V
Leuchtmittel: 4 x LED
(nicht austauschbar)
Nennleistung LED: ca. 0,025 W pro LED
Schutzart: IP44 (spritzwasserge-
schützt)
Sicherheitshinweise
VOR GEBRAUCH BITTE DIE BEDIENUNGSAN-
LEITUNG LESEN! BEDIENUNGSANLEITUNG
SORGFÄLTIG AUFBEWAHREN! HÄNDIGEN SIE
ALLE UNTERLAGEN BEI WEITERGABE DES
PRODUKTES AN DRITTE EBENFALLS MIT AUS!
Dieses Gerät kann von Kindern ab 8 Jahren
und darüber sowie von Personen mit verringer-
ten physischen, sensorischen oder mentalen
Fähigkeiten oder Mangel an Erfahrung und
Wissen benutzt werden, wenn sie beaufsichtigt
oder bezüglich des sicheren Gebrauchs des
Gerätes unterwiesen wurden und die daraus
resultierenden Gefahren verstehen. Kinder
dürfen nicht mit dem Gerät spielen. Reinigung
und Benutzerwartung dürfen nicht von Kindern
ohne Beaufsichtigung durchgeführt werden.
Verwenden Sie den Artikel nicht, wenn Sie
irgendwelche Beschädigungen feststellen.
Schalten Sie den Artikel aus, wenn Sie ihn in
dunkler Umgebung lagern, um eine Entladung
des Akkus zu vermeiden.

19 DE/AT/CH
Produktspezifische
Sicherheitshinweise
Achten Sie darauf, dass die Solarzelle nicht
verschmutzt oder im Winter durch Schnee und
Eis bedeckt ist. Dies verringert die Leistungsfä-
higkeit der Solarzelle.
Kalte Temperaturen haben negativen Einfluss auf
die Akku-Betriebsdauer. Wenn Sie die Solar-
Gartenleuchte längere Zeit nicht benötigen, z.B.
im Winter, so sollte diese gereinigt und in einem
trockenen, warmen Raum aufbewahrt werden.
Die Solarleuchte dient zur dekorativen Beleuch-
tung im Außenbereich.
Sicherheitshinweise
für Akkus
LEBENS-
UND UNFALLGEFAHREN FÜR
KLEINKINDER UND KINDER!
Akkus gehören nicht in Kinderhände. Lassen
Sie Akkus nicht offen herumliegen. Es besteht
die Gefahr, dass diese von Kindern oder Haus-
tieren verschluckt werden. Suchen Sie im Falle
eines Verschluckens sofort einen Arzt auf.
VORSICHT! EXPLOSIONSGE-
FAHR! Verwenden Sie nur Akkus
des empfohlenen Typs. Andere Ak-
kus / Batterien könnten während des Aufladens
explodieren.
BRANDGEFAHR! Akkus dürfen
nicht kurzgeschlossen werden. Über-
hitzung, Brandgefahr oder Platzen
der Akkus können die Folge sein.
VORSICHT! EXPLOSIONSGE-
FAHR! Werfen Sie Akkus niemals
in Feuer oder Wasser.
Bei überalterten oder verbrauchten Akkus kön-
nen chemische Flüssigkeiten austreten, die das
Produkt beschädigen. Entfernen Sie deshalb den
Akku, wenn Sie die Solarleuchte für längere
Zeit nicht benötigen.
SCHUTZHANDSCHUHE
TRAGEN! Ausgelaufene oder be-
schädigte Akkus können bei
Berüh-
rung mit der Haut Verätzungen verursachen;
tragen Sie deshalb in diesem Fall unbedingt
geeignete Schutzhandschuhe.
Benutzen Sie nur Akkus der richtigen Größe
und des empfohlenen Typs (siehe Kapitel
„Technische Daten“).
Achten Sie auf die richtige Polarität, diese wird
im Akkufach angezeigt.
Funktionsweise
Die eingebaute Solarzelle des Artikels wandelt bei
Sonneneinstrahlung das Licht in elektrische Energie
um und speichert diese in einem Ni-MH-Akku. Das
Licht wird bei beginnender Dunkelheit eingeschaltet.
Die eingebaute Leuchtdiode ist ein sehr langlebiges
und energiesparendes Leuchtmittel. Die Leuchtdauer
ist von der Sonneneinstrahlung, dem Einfallwinkel des
Lichts auf die Solarzelle und der Temperatur (wegen
der Temperaturabhängigkeit der Akkukapazität) ab-
hängig. Ideal ist ein senkrechter Lichteinfallwinkel bei
Temperaturen über dem Gefrierpunkt. Der Akku er-
reicht erst nach mehreren Lade- und Entladezyklen
seine maximale Kapazität.
Inbetriebnahme
Leuchte montieren
Ziehen Sie das Solarzellengehäuse 2 mit Lam-
penschirm
1
aus dem Leuchtenkörper
3
heraus.
Drücken Sie den Erdspieß 4 aus dem Adapter
5 ins Innere des Leuchtenkörpers 3 herein.
Stecken Sie den Erdspieß 4 an der gewünschten
Stelle in den Boden und setzen Sie anschließend
den Leuchtenkörper 3 auf.
Drehen Sie das Solarzellengehäuse 2 gegen
den Uhrzeigersinn aus dem Lampenschirm 1.
Bewegen Sie den EIN / AUS-Schalter 7 in die
mit „ON“ markierte Position, damit der Artikel
sich bei Dunkelheit einschalten kann.
Setzen Sie das Solarzellengehäuse 2 in den
Lampenschirm 1 ein und drehen Sie es im
Uhrzeigersinn fest.

20 DE/AT/CH
Stecken Sie den Lampenschirm 1 auf den
Leuchtenkörper 3.
Ihre Solarleuchte ist nun einsatzbereit.
Leuchte aufstellen
Stecken Sie den Erdspieß 4 soweit in den
Boden (Rasen, Blumenbeet), dass dieser fest und
aufrecht im Boden sitzt. Setzen Sie anschließend
die montierte Solarleuchte auf den Erdspieß 4.
Achten Sie auf einen sicheren Stand. Wenden
Sie bei der Montage bzw. beim Aufstellen keine
Gewalt an, z.B. durch Hammerschläge. Dies
beschädigt das Produkt. Um ein optimales
Ergebnis zu erzielen, stellen Sie die Solar-Gar-
tenleuchte an einem Ort auf, an dem die Solar-
zelle möglichst lange direktem Sonnenlicht
ausgesetzt ist.
Stellen Sie sicher, dass die Solarzelle nicht von
einer anderen Lichtquelle, wie z.B. Hof- oder
Straßenbeleuchtung, beeinflusst wird, da sich
das Licht sonst in der Dämmerung nicht ein-
schaltet.
Bei niedriger Helligkeit schaltet sich das Licht
automatisch ein, bei normaler Umgebungshel-
ligkeit schaltet sich das Licht wieder aus.
Akku austauschen
Um eine optimale Leistung zu erzielen, sollte der
Akku alle 12 Monate ausgetauscht werden.
Nehmen Sie den Lampenschirm 1 vom
Leuchtenkörper 3 ab.
Drehen Sie das Solarzellengehäuse 2 gegen
den Uhrzeigersinn aus dem Lampenschirm 1.
Schalten Sie die Leuchte mit dem EIN- / AUS-
Schalter 7 aus, indem Sie den Schalter auf
die Position „OFF“ schieben.
Lösen Sie mittels eines kleinen Kreuzschlitzschrau-
bendrehers die Befestigungsschrauben 8.
Ersetzen Sie den alten Akku 10 durch einen
neuen. Achten Sie beim Einsetzen auf die
richtige Polarität. Diese wird im Akkufach 9
angezeigt. Verwenden Sie nur Akkus des emp-
fohlenen Typs (siehe „Technische Daten“).
Ziehen Sie die Befestigungsschrauben 8 mittels
eines kleinen Kreuzschlitzschraubendrehers
wieder an. Schieben Sie den EIN- / AUS-
Schalter 7 auf die Position „ON“.
Verbinden Sie das Solarzellengehäuse 2
wieder mit dem Lampenschirm 1. Setzen Sie
anschließend die anderen Teile der Leuchte
zusammen.
Akku aufladen
Achten Sie darauf, dass die Solar-Gartenleuchte
eingeschaltet sein muss, wenn der Akku lädt. Die
Ladedauer der Akkus bei Nutzung der Solarzelle
ist abhängig von der Lichtintensität der Sonnen-
strahlung und dem Einfallwinkel des Lichts auf die
Solarzelle. Stellen Sie die Solarzelle möglichst
senkrecht zum Lichteinfallwinkel auf. So erhalten
Sie die höchste Strahlungsintensität.
Wartung und Reinigung
Die Leuchtdioden sind nicht austauschbar. Die
Solar-Gartenleuchte ist bis auf einen erforderlichen
Akkuwechsel wartungsfrei.
Reinigen Sie die Solar-Gartenleuchte regelmäßig
mit einem trockenen, fusselfreien Tuch. Verwen-
den Sie bei stärkeren Verschmutzungen ein
leicht angefeuchtetes Tuch.
Fehler beheben
Hinweis: Das Gerät enthält empfindliche elektro-
nische Bauteile. Daher ist es möglich, dass es durch
Funkübertragungsgeräte in unmittelbarer Nähe
gestört wird. Falls Sie Störungen in der Funktion
feststellen, entfernen Sie solche Störquellen aus
der Umgebung des Gerätes.
Hinweis: Elektrostatische Entladungen können zu
Funktionsstörungen führen. Entfernen Sie bei solchen
Strona się ładuje...
Strona się ładuje...
Strona się ładuje...
Strona się ładuje...
Strona się ładuje...
-
 1
1
-
 2
2
-
 3
3
-
 4
4
-
 5
5
-
 6
6
-
 7
7
-
 8
8
-
 9
9
-
 10
10
-
 11
11
-
 12
12
-
 13
13
-
 14
14
-
 15
15
-
 16
16
-
 17
17
-
 18
18
-
 19
19
-
 20
20
-
 21
21
-
 22
22
-
 23
23
-
 24
24
-
 25
25


w innych językach
- Deutsch: LIVARNO 273745 Bedienungsanleitung
- English: LIVARNO 273745 Owner's manual
Powiązane artykuły
-
LIVARNO 383073 Instrukcja obsługi
-
-
-
-
-
-
-
-
-