
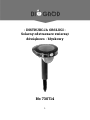
1
- INSTRUKCJA OBSŁUGI -
Solarny odstraszacz zwierząt
dźwiękowo - błyskowy
No 730714

2
JĘZYKI
Instrukcja obsługi -
Solarny
odstraszacz
zwierząt
dźwiękowo -
błyskowy
PL – 3
User manual -
Solar-powered
animal repeller
sound & flash
EN – 6
Bedienungsanleitung
Solar-tierschreck
akustisch und mit
blitz
DE – 10
Notice d'utilisation
Répulsif solaire
pour animaux son
– flash
FR - 13
Naudojimo
instrukcija -
Gyvūnų saulės
baidyklė - garsinė
blyksinti
LT - 17
Lietotāja
rokasgrāmata -
Dzīvnieku saules
atbaidītājs - skaņas –
gaismas
LV – 20
Kasutusjuhend -
Päikeseenergial
töötav loomade
peletaja - peletab
heli - ja
valguslainetega
EE - 23

3
- INSTRUKCJA OBSŁUGI -
Solarny odstraszacz zwierząt
dźwiękowo - błyskowy
Odstarszacz wyposażony został zarówno w odgłosy
dźwiękowe, jak i świetlne. Generowane odpowiednio w trybie
dzień/noc, który należy ustawić ręcznie za pomocą
przełącznika (night/day/off). W zależności który tryb ustawisz,
generowane będą albo sygnały dźwiękowe – tryb dzienny,
albo sygnały świetlne – tryb nocny.
Odgłosy generowane przez odstraszacz to: głos orła,
szczekanie psa, wystrzał z pistoletu, ustawiane są
indywidualnie za pomocą przełącznika (eagle, dogbark,
gunshot). Generator akustyczny, jak i świetlny emituje odgłosy
w momencie wykrycia ruchu. Dźwięki te słyszalne są również
dla człowieka. Dzięki zastosowaniu panelu solarnego,
urządzenie jest niezależne od innych źródeł zasilania, po
naładowaniu działa również w nocy. Posiada wyłączniki off,
dzięki któremu możemy w dowolnym czasie wyłączyć
urządzenie.
Dzięki potencjometrowi (volume) możesz płynnie regulować
głośność emitowanych dźwięków. Wszystkie przełączniki i
akumulatory znajdują się pod uchylną głowicą panelu
solarnego.
Wbudowany panel słoneczny umożliwia ciągłą pracę, bez
narażania nas na wydatki!
Sposób użycia:
Urządzenie przeznaczone jest do użytku na otwartym terenie,
z pełnym dostępem do światła słonecznego.
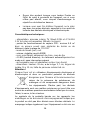
Etapy instalacji urządzenia:
1. Przed zainstalowaniem urządzenia wybierz

4
nasłonecznioną, najlepiej niezacienioną w ciągu
całego dnia strefę. W miejscu montażu nie powinna
gromadzić się woda deszczowa, ani nie powinno być
ono sztucznie nawadniane.
2. Odstraszacz emituje sygnały na odległość 5-8 m, w
promieniu o zakresie 110-120o, miejsce jego montażu
nie powinno być ograniczane przez przeszkody np.
fundament, murek, ścianę.
3. Akumulatory umieść pod głowicą panelu solarnego.
4. Połącz szpikulec urządzenia ze stopką i zamontuj na
niej podstawę głowicy.
5. Po złożeniu odstraszacza, pozostaw go przez
minimum 5 godzin w nasłonecznionym miejscu, w celu
naładowania baterii.
6. Po pełnym naładowaniu, umieść odstraszacz w
docelowym, wybranym wcześniej miejscu.
7. Przed umieszczeniem w podłożu, wykonaj otwór przy
użyciu pikownika lub innego narzędzia. W wykonanym
otworze umieść urządzenie, w taki sposób, aby
szpikulec znajdował się w środku, a stopka wystawała
ponad grunt. Pamiętaj, aby nie wbijać urządzenia
bezpośrednio w podłoże, gdyż można w ten sposób
uszkodzić szpikulec lub korpus.
8. Ziemię wokół szpikulca dobrze ubij, dzięki temu
urządzenie będzie stabilne.
9. Po zamontowaniu urządzenia w odpowiednimmiejscu,
unieś głowicę panelu solarnego i przełącznikiem
(night/day) włącz odstraszacz, ustawiając
jednocześnie głośność i odpowiedni odgłos emitowany
przez urządzenie. Wybierz odpowiednie parametry
częstotliwości i zasięgu czujnika PIR.
UWAGA: Różna intensywność dźwięków zapobiega
przyzwyczajeniu się intruzów i gwarantuje skuteczne ich
odstraszanie. W związku z tym zaleca się co 2 tygodnie
zmianę głośności.

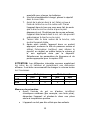
5
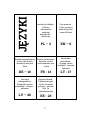
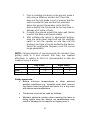
Tryb dzienny
Tryb nocny
dzień
noc
dzień
noc
LED
-
+
-
+
Dźwięk
+
+
+
-
Środki ostrożności:
Przed nastaniem mrozów lub innych ekstremalnych
warunków pogodowych (np. ulewnych deszczy),
wymontuj urządzenie i przechowuj je w suchym
pomieszczeniu o dodatniej temperaturze.
Urządzenie nie może być użytkowane przez dzieci.
Zachowaj szczególną ostrożność w trakcie koszenia
trawy lub uprawiania sportu w okolicy urządzenia,
nieuwaga może spowodować uszkodzenie
odstraszacza lub potknięcie się o niego.
Po zakończonej eksploatacji, nie wyrzucaj urządzenia
z innymi odpadami, oddaj je do punktu zbiórki
odpadów elektrycznych i elektronicznych.
Dane techniczne:
- zasilanie: panel solarny 7V 30mA 0,2W i 4*1,2V Ni-MH AA
bateria typu akumulatorowego 300mAh (w zestawie)
- zasięg działania czujnika PIR: ok. 5-8 m² w przestrzeni
otwartej bez przeszkód terenowych/budowlanych, w zakresie
110-120o
- tryb pracy: dzień /noc
- głośność: regulacja dźwięku do 90DB
- wydawane dźwięki: głos orła, szczekanie psa, wystrzał z
pistoletu
- 4 diody LED (białe światło), automatycznie załączane w
trybie nocnym, nie posiadają osobnego włącznika
- możliwość ładowania adapterem z sieci (brak w zestawie)
- wymiary: wysokość: 35 cm; ø pręta: 3,7 cm; szerokość
głowicy: 16 x 13 cm; rozmiar panelu solarnego 6x6 cm

6
Uwaga!
Każde gospodarstwo jest użytkownikiem sprzętu
elektrycznego i elektronicznego, a co za tym idzie
potencjalnym wytwórcą niebezpiecznego dla ludzi i
środowiska odpadu, z tytułu obecności w sprzęcie
niebezpiecznych substancji, mieszanin oraz części
składowych. Z drugiej strony zużyty sprzęt to cenny materiał, z
którego możemy odzyskać surowce takie jak miedź, cyna,
szkło, żelazo i inne.
Symbol przekreślonego kosza na śmieci
umieszczany na sprzęcie, opakowaniu lub
dokumentach do niego dołączonych oznacza, że
produktu nie wolno wyrzucać łącznie z innymi
odpadami. Oznakowanie oznacza jednocześnie, że sprzęt
został wprowadzony do obrotu po dniu 13 sierpnia 2005 r.
Obowiązkiem użytkownika jest przekazanie zużytego sprzętu
do wyznaczonego punktu zbiórki w celu właściwego jego
przetworzenia. Informacje o dostępnym systemie zbierania
zużytego sprzętu elektrycznego można znaleźć w punkcie
informacyjnym sklepu oraz w urzędzie miasta/gminy.
Odpowiednie postępowanie ze zużytym sprzętem zapobiega
negatywnym konsekwencjom dla środowiska naturalnego i
ludzkiego zdrowia.
- USER MANUAL -
Solar-powered animal repeller sound & flash
The repeller emits both acoustic and light signals. They are
generated accordingly in day or night mode, which needs to
be set manually using a switch (night/day/off). Depending on
the mode set, either acoustic signals – in day mode – or light
signals – in night mode – are generated.

7
The sounds generated by the repeller include: eagle
screaming, dog barking, and gunshot. They are set individually
using a switch (eagle, dogbark, gunshot). Both the sound and
light are emitted at the moment when motion is detected.
These sounds are also audible to the human ear. Thanks to
using a solar panel, this device is independent of other power
sources and works also at night after being charged during the
day. The repeller features on/off switch that allows turning the
device off at any time.
Thanks to the volume potentiometer it is possible to adjust
smoothly the loudness of the sounds emitted. All the switches
and batteries are located under the swivelling head of the
solar panel. The built-in solar panel enables continuous
operation, without exposing the owner to costs!
How to use:
The device is intended for outdoor use on open ground with
full access to sunlight.
Stages of device installation:
1. Before installing the device, pick a sunny location,
best one that remains free of shade during the
whole daytime. The installation location should not
accumulate rainwater and should not be artificially
irrigated.
2. The repeller emits signals within the distance of 5-
8 m and the radius of 110-120° and its installation
location should not feature any limiting obstacles
such as foundations or walls.
3. The batteries should be located under the solar
panel head.
4. Connected the spike of the device with its foot and
install the head base on it.
5. After installing the repeller, leave it for at least 5
hours in an insolated location to let its batteries
get charged.
6. After it is fully charged, place it in the previously
selected target location.

8
7. Prior to inserting the device in the ground, make a
hole using a dibber or another tool. Place the
device in the hole made in such a manner that the
spike is inside the hole and the foot protrudes
above the ground. Remember not to stick the
device directly into the ground as this may lead to
damage of its spike or body.
8. Compact the ground around the spike well, thanks
to which the device will remain stable.
9. After installing the device in appropriate location,
raise the solar panel head and use the night/day
switch to turn the repeller on and then set the
loudness and type of sound emitted by the device.
Select the appropriate frequency and PIR sensor
range parameters.
NOTE: Varying intensity of sound prevents the intruders from
getting used to it and ensures that they are repelled
effectively. In relation to that it is recommended to alter the
loudness every 2 weeks.
Day mode
Night mode
day
night
day
night
LED
-
+
-
+
Sound
+
+
+
-
Safety measures:
Before sub-zero temperatures or other extreme
weather conditions (e.g. torrential rains) start, remove
the device from the ground and store it in a dry room
with above-zero temperature.
The device must not be used by children.
Maintain particular caution when mowing the lawn or
doing sports near the device, as carelessness may
result in damage to the repeller or tripping over it.

9
When you no longer need the device, do not dispose
of it together with other waste but hand it over at a
waste electrical and electronic equipment collection
point.
Technical parameters:
- power supply: solar panel (7V 30mA 0,2W) and 4
rechargeable AA batteries (Ni-MH 1.2 V, 300mAh)
- PIR sensor range: ca. 5-8 m² in open space without any land
/ building obstacles, within the radius of 110-120°
- operation mode: day/night
- loudness: volume adjustment up to 90 dB
- sounds emitted: eagle screaming, dog barking, gunshot
- 4 LED lights (white), automatically activated in night mode,
do not feature a separate on/off switch
- possibility of charging with a power adapter (not included)
- dimensions: height: 35 cm; rod diameter: 3.7 cm; head width:
16 x 13 cm;
- solar panel size: 6x6 cm
Note!
Every household uses electrical and electronic equipment and,
therefore, is a potential producer of waste that is hazardous to
people and the environment due to presence of hazardous
substances, mixtures, and constituents in the equipment. On
the other hand, waste equipment constitutes valuable material
from which raw materials such as copper, tin, glass, iron, etc.
can be recovered.
The symbol of a crossed out rubbish bin placed on
equipment, packaging, or accompanying
documents means that the product must not be
disposed of together with other waste. Such a
marking means at the same time that the equipment was
placed on the market after 13th of August 2005.
The user is obligated to provide waste equipment to the
designated waste collection point for appropriate processing.
You can find information on the available system for collecting

10
waste electrical equipment at a given store’s enquiry point and
at the city hall/municipal office. Proper handling of waste
equipment prevents negative consequences for the natural
environment and human health!
- BEDIENUNGSANLEITUNG -
Solar-tierschreck akustisch und mit blitz
Der Abschrecker wurde sowohl mit akustischen, als auch
Lichtsignalen ausgestattet. Diese werden entsprechend im
Modus Tag/Nacht generiert, der manuell mithilfe eines
Umschalters (night/day/off) eingestellt wird. Je nach Modus
den Sie einstellen, werden entweder akustische (Tagmodus)
oder Lichtsignale (Nachtmodus) generiert.
Die vom Abschrecker generierten Signale sind: Adlerschrei,
Hundebellen, Pistolenschuss, die individuell mittels eines
Umschalters eingestellt werden (eagle, dogbark, gunshot).
Sowohl akustische, als auch Lichtsignale werden im
Augenblick der Erkennung einer Bewegung emittiert. Diese
Töne sind auch für den Menschen hörbar. Dank der
Verwendung eines Solarpaneels ist das Gerät von anderen
Versorgungsquellen unabhängig, nach der Aufladung wirkt es
auch in der Nacht. Der Abschrecker besitzt einen Off-Schalter,
dank dem wir ihn während einer beliebigen Zeit ausschalten
können.
Dank einem Potentiometer (volume) können Sie fließend die
Lautstärke der ausgegebenen Töne regulieren. Alle Schalter
und Akkus befinden sich unter dem kippbaren Kopf des
Solarpaneels. Das eingebaute Solarpaneel ermöglicht einen
durchgehenden Betrieb, ohne Kosten zu verursachen!
Verwendungsweise:
Das Gerät ist für die Verwendung im Freien, mit vollem
Zugang zu Sonnenlicht, bestimmt.

11
Etappen der Installation des Geräts:
1. Vor der Installation des Geräts einen am besten
den ganzen Tag über besonnten Bereich
auswählen. Am Montageort sollte sich kein
Regenwasser sammeln, er sollte auch nicht
künstlich bewässert werden.
2. Der Abschrecker sendet Signale strahlenförmig
nach allen Seiten, in einem Umkreis von 5-8 m im
Bereich von 110-120o aus, deshalb sollte sein
Montageort nicht durch Hindernisse z. B.
Fundamente, Mauern, Wände begrenzt werden.
3. Die Akkus unter dem Kopf des Solarpaneels
platzieren.
4. Den Spieß des Geräts mit dem Fuß verbinden
und auf ihm die Basis des Kopfes montieren.
5. Nach Zusammenlegen des Abschreckers ihn
mindestens 5 Stunden lang an einer besonnten
Stelle belassen, damit seine Batterien aufgeladen
werden.
6. Nach der vollen Aufladung den Abschrecker am
ausgewählten Zielort platzieren.
7. Vor der Platzierung im Boden, eine Mulde im
Boden machen. In der ausgehobenen Mulde das
Gerät so platzieren, dass sich der Spieß im Boden
befindet und der Fuß über den Boden hinausragt.
Das Gerät nicht unmittelbar in den Boden
rammen, weil sonst eine Beschädigung des
Spießes oder Gehäuses droht.
8. Den Boden um den Spieß herum gut
feststampfen, damit das Gerät stabil bleibt.
9. Entsprechende Parameter der Frequenz und
Netzabdeckung des PIR-Sensors wählen.
ACHTUNG: Die verschiedene Intensität der Geräusche
verhindert, dass die Schädlinge sich an sie gewöhnen und
schreckt sie ab. Deshalb wird empfohlen, die Lautstärke alle 2
Wochen zu ändern

12
Tagmodus
Nachtmodus
Tag
Nacht
Tag
Nacht
LED
-
+
-
+
Ton
+
+
+
-
Vorsichtsmaßnahmen:
Vor Frost oder anderen extremen
Witterungsverhältnissen (z. B. heftigen Regengüssen)
das Gerät ausmontieren und in einem trockenen
Raum mit Plustemperatur aufbewahren.
Das Gerät darf nicht von Kindern bedient werden.
Besondere Vorsicht ist beim Rasenmähen oder
Treiben von Sport in der Umgebung des Geräts
geboten, weil Unachtsamkeit zur Beschädigung oder
zum Stolpern über das Gerät führen kann.
Nach Verschleiß das Gerät nicht mit anderen Abfällen
entsorgen, sondern an einen Sammelpunkt für
elektrische und elektronische Abfälle bringen.
Technische Daten:
- Spannungsversorgung: Solarpaneel 7V 30mA 0,2W und 4*
Ni-MH1,2V AA Batterie vom Akkutyp 300mAh (im Set
enthalten)
- Wirkungsbereich des PIR-Sensors: ca. 5-8 m² Freien, ohne
bauliche Hindernisse im Bereich von 110 bis 120o.
- Betriebsmodus: Tag /Nacht
- Lautstärke: Regulierung von Ton bis 90 DB
- ausgegebene Töne: Adlerschrei, Hundebellen,
Pistolenschuss
- 4-LED-Dioden (weißes Licht), automatisch angeschlossen im
Nachtbetrieb; haben keinen gesonderten Einschalter
- Möglichkeit des Aufladens mit einem Adapter aus dem Netz
(nicht im Set enthalten)
- Abmessungen: Höhe: 35 cm; Ø des Stabs: 3,7 cm; Breite
des Kopfes: 16 x 13 cm; Abmessungen des Solarpaneels 6x6
cm.

13
Achtung! In jedem Haushalt werden elektrische und
elektronische Geräte benutzt und somit Abfülle
erzeugt, die für Mensch und Umwelt, aufgrund der
in den Geräten enthaltenen gefährlichen
Substanzen, Mischungen und Bestandteile,
gefährlich sind. Andererseits sind verbrauchte Geräte
kostbares Material, aus dem solche Rohstoffe wie Kupfer,
Zinn, Glas, Eisen und Anderes zurückgewonnen werden kann.
Das Symbol des durchgestrichenen Mülleimers auf Geräten,
Verpackungen und beigefügten Dokumenten bedeutet, dass
das Produkt nicht zusammen mit anderen Abfällen
weggeworfen werden darf. Dieses Zeichen bedeutet auch,
dass solch ein Gerät nach dem 13. August 2005 in den
Warenverkehr gebracht wurde.
Der Benutzer hat die Pflicht verbrauchte Geräte an einen
entsprechenden Sammelpunkt zu bringen, damit sie
ordnungsgemäß verwertet werden. Informationen über das
System des Sammelns von verbrauchten Elektrogeräten sind
im Info-Punkt des Geschäfts oder im Gemeindeamt zu finden.
Ein ordnungsgemäßer Umgang mit verbrauchten Geräten
verhindert negative Auswirkungen auf die Umwelt und auf die
menschliche Gesundheit!
- NOTICE D'UTILISATION -
Répulsif ultrasonique des rongeurs
Le répulsif est équipé de bruits sonores et lumineux. Générés
respectivement en mode jour/nuit, qui doit être réglé
manuellement à l'aide du commutateur (nuit/jour/arrêt). Selon
le mode que vous avez choisi, des signaux sonores - mode

14
jour ou des signaux lumineux - mode nuit seront générés.
Les sons générés par le répulsif sont : voix d'un aigle,
aboiement d'un chien, coup de feu, réglés individuellement à
l'aide du commutateur (eagle, dogbark, gunshot). Le
générateur acoustique, tout comme le générateur de lumière,
émet des bruits lorsqu'un mouvement est détecté. Ces sons
sont également audibles par les humains. Grâce au panneau
solaire, l'appareil est indépendant des autres sources
d'énergie. Après la recharge, il fonctionne également la nuit. Il
dispose d'un interrupteur qui permet d'éteindre l'appareil à tout
moment.
Grâce au potentiomètre (volume), vous pouvez régler en
continu le volume des sons émis. Tous les interrupteurs et les
batteries sont situés sous la tête inclinable du panneau
solaire.
Le panneau solaire intégré permet un fonctionnement continu
sans que nous ayons à dépenser de l'argent!
Mode d’emploi :
L'appareil est destiné à être utilisé dans une zone ouverte
avec un accès complet à la lumière du soleil.
Étapes de montage:
1. Avant d'installer l'appareil, choisissez un endroit
ensoleillé, de préférence un endroit qui n'est pas
ombragé pendant la journée. Le site d'installation
ne doit pas accumuler d'eau de pluie ni être irrigué
artificiellement.
2. Le répulsif émet des signaux à une distance de 5-
8 m, dans un rayon de 110-120o, son lieu
d'installation ne doit pas être limité par des
obstacles tels que fondation, mur, paroi.
3. Placez les batteries sous la tête du panneau
solaire.
4. Connectez la broche de l'appareil au pied et
montez la base de la tête dessus.
5. Après avoir assemblé le répulsif, laissez-le
pendant au moins 5 heures dans un endroit

15
ensoleillé pour charger les batteries.
6. Une fois complètement chargé, placez le répulsif
dans la zone cible.
7. Avant de le placer dans le sol, faites un trou à
l'aide de la broche ou d'un autre outil. Placez
l’appareil dans le trou que vous avez fait, de sorte
que la broche soit au centre et que le pied
dépasse du sol. N'oubliez pas de ne pas enfoncer
l'appareil directement dans le sol, car cela pourrait
endommager la broche ou le corps.
8. Tassez bien la terre autour de la broche, cela
rendra l'appareil stable.
9. Après avoir installé l’appareil dans un endroit
approprié, soulevez la tête du panneau solaire et
utilisez l'interrupteur (nuit/jour) pour allumer le
répulsif, en réglant en même temps le volume et
le son approprié émis par le dispositif.
Sélectionnez les paramètres de fréquence et de
portée appropriés pour le capteur PIR.
ATTENTION: Les différentes intensités sonores empêchent
les intrus de s'y habituer et garantissent une dissuasion
efficace. Il est donc recommandé de changer le volume toutes
les 2 semaines.
Mode jour
Mode de nuit
jour
nuit
jour
nuit
LED
-
+
-
+
Son
+
+
+
-
Mesures de précaution
Avant l'arrivée du gel ou d'autres conditions
climatiques extrêmes (par exemple, une forte pluie),
démontez l'appareil et stockez-le dans une pièce
sèche à température positive.
L'appareil ne doit pas être utilisé par des enfants.

16
Soyez très prudent lorsque vous tondez l'herbe ou
faites du sport à proximité de l'appareil, car si vous
n'êtes pas attentif, vous risquez d'endommager le
répulsif ou de trébucher dessus.
Lorsque vous avez fini d'utiliser l'appareil, ne le jetez
pas avec les autres déchets, apportez-le à un point de
collecte des déchets électriques et électroniques.
Caractéristiques techniques:
- alimentation: panneau solaire 7V 30mA 0,2W et 4* Ni-MH
1.2V AA piles rechargeables 300mAh (incluses)
- portée de fonctionnement du capteur PIR : environ 5-8 m²
dans un espace ouvert sans obstacles de terrain ou de
bâtiment, dans la plage de 110-120°
- mode de travail: jour / nuit
- volume: réglable jusqu'à 90DB
- sons: voix d'aigle, aboiement de chien, coup de feu
- 4 LED (lumière blanche), ils s'allument automatiquement en
mode nuit, sans interrupteur séparé
- rechargeable avec un adaptateur secteur (non fourni)
- dimensions: hauteur: 35 cm; ø de la tige: 3,7 cm, largeur de
la tête: 16 x 13 cm; taille du panneau solaire 6x6 cm
Attention !
Chaque foyer est un utilisateur d'équipements électriques et
électroniques et donc un producteur potentiel de déchets
dangereux pour l'homme et l'environnement en
raison de la présence de substances, de
mélanges et de composants dangereux dans
les équipements. D'autre part, les déchets
d'équipements sont une matière précieuse qui peut être une
source de matières premières secondaires telles que le cuivre,
l'étain, le verre, le fer et autres.
Le symbole de la poubelle barrée sur les appareils, les
emballages ou les documents d'accompagnement indique que
le produit ne doit pas être éliminé avec d'autres déchets. Le
marquage indique également que l'équipement a été mis sur

17
le marché après le 13 août 2005.
Il incombe à l'utilisateur de remettre les équipements usagés à
un point de collecte désigné pour un traitement approprié. Les
informations sur la collecte de déchets d'équipements
électriques sont disponibles au point d'information du magasin
et au bureau municipal. Une bonne gestion des déchets
d'équipements permet d'éviter les conséquences négatives
pour l'environnement et la santé humaine!
- NAUDOJIMO INSTRUKCIJA -
Ultragarsinė graužikų baidyklė
Baidyklė skleidžia ir garso, ir šviesos signalus. Signalai
atitinkamai skleidžiami dienos (nakties) režimu, kurį būtina
nustatyti jungikliu (night/day/off). Atsižvelgiant į nustatytą
režimą, skleidžiami arba garso signalai – dienos režimu, arba
šviesos signalai – nakties režimu.
Baidyklės skleidžiami garsai: erelio klyksmas, šuns lojimas,
pistoleto šūvis, nustatomi atskirai jungikliu (eagle, dogbark,
gunshot). Ir garso, ir šviesos signalai skleidžiami, kai
aptinkamas judesys. Šie garsai taip pat girdimi žmonėms. Dėl
naudojamo saulės elemento prietaisui nereikia kitų maitinimo
šaltinių – įkrauta veikia ir naktį. Baidyklėje yra jungiklis off,
kuriuo galima bet kada išjungti prietaisą.
Potenciometru (volume) galima tolygiai reguliuoti skleidžiamų
garsų garsumą. Visi jungikliai i akumuliatoriai yra po varstoma
saulės elemento galvute. Įmontuotas saulės elementas
užtikrina, kad prietaisas veikia visą laiką nesukeldamas
išlaidų!
Naudojimo būdas:
Prietaisas skirtas naudoti atvirojoje teritorijoje, kurioje visiškai
pasiekiama saulės šviesa.

18
Prietaiso įrengimo etapai:
1. Prieš įrengiant prietaisą pasirinkti saulėtą vietą,
geriausia kurios visą dieną nepasiekia šešėlis.
Įrengimo vietoje neturėtų kauptis lietaus vanduo,
taip pat vieta neturėtų būti dirbtinai drėkinama.
2. Baidyklė skleidžia signalus 5–8 m atstumu 110–
120o spinduliu, todėl baidyklės įrengimo vietos
neturėtų riboti kliūtys, pvz., pamatai, sienelės,
sienos.
3. Akumuliatorius įdėti po saulės elemento galvute.
4. Prietaiso smaigą sujungti su kojele ir privirtinti ant
jos galvutės pagrindą.
5. Surinktą baidyklė palikti bent 5 valandas saulėtoje
vietoje, kad įsikrautų elementai.
6. Visiškai įkrautą baidyklę pastatyti iš anksto
pasirinktoje naudojimo vietoje.
7. Prieš įstatant į pagrindą, padaryti angą pikavimo
arba kitu įrankiu. Į padarytą angą įstatyti prietaisą
taip, kad smaigas būtų per vidurį, o kojelė kyšotų
virš žemės. Atsiminti, kad negalima prietaiso kalti į
pagrindą, nes galima sugadinti smaigą arba
korpusą.
8. Žemę apie smaigą gerai suplūkti, kad prietaisas
stovėtų stabiliai.
9. Įrengus prietaisą norimoje vietoje, pakelti saulės
elemento galvutės skydą ir mygtuku (night/day)
įjungti baidyklę, taip pat nustatyti garsumą ir
parinkti pageidaujamą prietaiso skleidžiamą
garsą. Parinkti tinkamus PIR jutiklio dažnio ir
aprėpties parametrus.
DĖMESIO: Įvairus garsų dažnis neleidžia įsibrovėliams prie jų
priprasti ir užtikrina, kad jie veiksmingai atbaidomi. Dėl to
rekomenduojama kas 2 savaites keisti garsumą.

19
Dienos režimas
Nakties režimas
diena
naktis
diena
naktis
LED
–
+
–
+
Garsas
+
+
+
–
Atsargumo priemonės:
Prieš prasidedant šalnoms ar kitoms ekstremalioms
orų sąlygoms (pvz., smarkiam lietui), išmontuoti
prietaisą ir laikyti jį sausoje patalpoje, kur teigiama
temperatūra.
Prietaiso negali naudoti vaikai.
Būti itin atsargiems, kai pjaunama žolė ar sportuojama
šalia prietaiso – dėl neatidumo galima sugadinti
prietaisą arba užkliūti už jo.
Baigus naudoti prietaisą neišmesti jo su kitomis
atliekomis – atiduoti į elektros ir elektroninių atliekų
surinkimo vietą.
Techniniai duomenys:
- maitinimas: 7V 30mA 0,2W saulės elementas ir 4
Ni-MH 1,2 V 300 mAh akumuliatoriaus tipo AA elementai
(komplekte)
- PIR jutiklio veikimo aprėptis: apie 5–8 m² atvirojoje erdvėje,
jeigu nėra reljefo (statybinių) kliūčių, 110–120o spinduliu
- veikimo režimas: dienos / nakties
- garsumas: garso iki 90 dB reguliavimas
- skleidžiami garsai: erelio klyksmas, šuns lojimas, pistoleto
šūvis
- 4 LED diodai (baltos šviesos), automatiškai įjungiami nakties
režimu, neturi atskiro jungiklio.
- galima krauti adapteriu iš tinklo (nėra komplekte)
- matmenys: aukštis 35 cm; strypo ø 3,7 cm; galvutės plotis
16 x 13 cm; saulės elemento dydis 6 x 6 cm
Dėmesio!
Kiekvienas namų ūkis yra elektros ir elektronikos įrangos

20
naudotojai, todėl gali sukurti žmonėms ir aplinkai
pavojingų atliekų, kadangi įrangoje yra pavojingų
medžiagų, mišinių ir sudedamųjų dalių. Kita
vertus, panaudota įranga – tai vertinga medžiaga,
iš kurios galima atgauti žaliavas, pvz., varį, alavą, stiklą, geležį
ir kt.
Perbrauktos šiukšliadėžės simbolis ant įrangos, pakuotės arba
pridedamuose dokumentuose reiškia, kad gaminio negalima
mesti kartu su kitomis atliekomis. Ženklas taip pat reiškia, kad
įranga į rinką patiekta po 2005 m. rugpjūčio 13 d.
Naudotojas privalo perduoti panaudotą įrangą į nurodytą
surinkimo vietą, kad būtų tinkamai perdirbta. Informaciją apie
panaudotos elektros įrangos surinkimo sistemą galima rasti
parduotuvės informacinėje iškaboje arba savivaldybėje.
Tinkamas panaudotos įrangos tvarkymas padeda išvengti
neigiamų padarinių aplinkai ir žmonių sveikatai!
- lietotāja rokasgrāmata -
Dzīvnieku saules atbaidītājs - skaņas – gaismas
Atbaidītājs var izdot gan skaņas, gan gaismas signālus. Tie
parasti tiek ģenerēti režīmā diena/nakts, kas ir jāiestata
manuāli ar slēdža palīdzību (night/day/off). Atkarībā no tā,
kādu režīmu Jūs iestatīsiet, tiks ģenerēti vai nu skaņas signāli
— dienas režīmā, vai gaismas signāli — nakts režīmā.
Atbaidītāja ģenerētie signāli ir: ērgļa balss, suņa riešana,
šāviens no pistoles, tiek iestatīti individuāli, izmantojot slēdzi
(ērglis, suņu rejas, šāviens). Skaņas un gaismas ģenerators
ģenerē signālus, konstatējot kustību. Šīs skaņas ir
sadzirdamas arī cilvēkam. Pateicoties saules panelim, ierīce
nav atkarīga no citiem barošanas avotiem, kā arī pēc uzlādes
darbojas naktī. Tam ir slēdzis, pateicoties kuram mēs varam
Strona się ładuje...
Strona się ładuje...
Strona się ładuje...
Strona się ładuje...
Strona się ładuje...
Strona się ładuje...
Strona się ładuje...
Strona się ładuje...
Strona się ładuje...
Strona się ładuje...
-
 1
1
-
 2
2
-
 3
3
-
 4
4
-
 5
5
-
 6
6
-
 7
7
-
 8
8
-
 9
9
-
 10
10
-
 11
11
-
 12
12
-
 13
13
-
 14
14
-
 15
15
-
 16
16
-
 17
17
-
 18
18
-
 19
19
-
 20
20
-
 21
21
-
 22
22
-
 23
23
-
 24
24
-
 25
25
-
 26
26
-
 27
27
-
 28
28
-
 29
29
-
 30
30


w innych językach
- Deutsch: Bioogród 730714 Bedienungsanleitung
- eesti: Bioogród 730714 Omaniku manuaal
- français: Bioogród 730714 Le manuel du propriétaire
- English: Bioogród 730714 Owner's manual
Powiązane artykuły


Inne dokumenty
-
Jula 478-300 Instrukcja obsługi
-
Kerbl 299906 Instrukcja obsługi
-
Castorama Répulsif à ultrasons pour nuisibles d'intérieur Instrukcja obsługi
-
Parkside 327055 1904 Operation and Safety Notes
-
Perel GRR01 Instrukcja obsługi
-
Perel CSOLMF Instrukcja obsługi
-
-
STEINEL XSolar L-S Instrukcja obsługi
-
Perel CSOLCRW Instrukcja obsługi