Freggia HCI430B Instrukcja obsługi
- Kategoria
- Płyty
- Typ
- Instrukcja obsługi

INDUCTION
VITROCERAMIC HOB
ИНДУКЦИОННАЯ КЕРАМИЧЕСКАЯ
ВАРОЧНАЯ ПОВЕРХНОСТЬ
ИНДУКЦІЙНА КЕРАМІЧНА
ВАРИЛЬНА ПОВЕРХНЯ
PŁYTA INDUKCYJNA DO ZABUDOWY
User manual
Руководство пользователя
Керівництво з експлуатації
Instrukcja obsługi
HCI430

EN
Thank you for purchasing Freggia built-in hob.
Please carefully read the user manual, as it contains the instructions for the safe
installation, operation and maintenance of the built-in hob.
Save it for future use.
RU
Благодарим Вас за приобретение варочной поверхности компании Freggia. Пожа-
луйста, внимательно прочитайте данное руководство пользователя, так как в нем
содержатся инструкции по безопасной установке, эксплуатации и обслуживанию
варочной поверхности.
Сохраните его для использования в будущем.
UA
Дякуємо Вам за те, що Ви придбали варильну поверхню компанії Freggia. Будь ласка,
уважно прочитайте керівництво з експлуатації, бо в ньому містяться інструкції з без-
печної установки, експлуатації та обслуговування варильної поверхні.
Зберігайте його для подальшого використання.
PL
Dziękujemy Państwu za dokonanie zakupu płyty do zabudowy marki Freggia.
Prosimy o uważne zapoznanie się z instrukcją obsługi, gdyż zawiera ona wskazówki
dotyczące bezpiecznej instalacji, eksploatacji i obsługi płyty.
Zalecamy zachowanie jej do wykorzystania w przyszłości, jak również zapisanie nazwy
modelu i numeru seryjnego Państwa urządzenia.


GB
5
SAFETY WARNINGS
Carefully read the contents of this leaet since it
provides important instructions regarding safety
of installation, use and maintenance.
Keep the leaet for possible future consultation.
All the operations relating to installation (electrical
connections) must be carried out by specialised
personnel in accordance with current regulations.
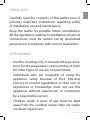
SAFETY WARNINGS
• Use the cooktop only in household-type situa-
tions for the preparation and warming of food.
All other types of use are not permitted.
• Individuals who are incapable of using the
appliance safely because of their physical,
sensory or mental capabilities or their lack of
experience or knowledge must not use this
appliance without supervision or instruction
by a responsible person.
• Children under 8 years of age must be kept
away from the cooktop unless they are under
constant supervision.
GENERAL NOTICE

6SAFETY WARNINGS
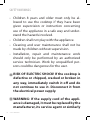
SAFETY WARNINGS
• Children 8 years and older must only be al-
lowed to use the cooktop if they have been
given supervision or instruction concerning
use of the appliance in a safe way and under-
stand the hazards involved.
• Children shall not play with the appliance.
• Cleaning and user maintenance shall not be
made by children without supervision.
• Installation, repair and maintenance work
should only be performed by an authorized
service technician. Work by unqualied per-
sons could be dangerous for the user.
RISK OF ELECTRIC SHOCK! If the cooktop is
defective or chipped, cracked or broken in
any way, immediately switch it o and do
not continue to use it. Disconnect it from
the electrical power supply.
WARNING: If the supply cord of the appli-
ance is damaged, it must be replaced by the
manufacturer, its service agent or similarly

GB
7
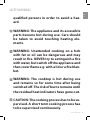
SAFETY WARNINGS
qualied persons in order to avoid a haz-
ard.
WARNING: The appliance and its accessible
parts become hot during use. Care should
be taken to avoid touching heating ele-
ments.
WARNING: Unattended cooking on a hob
with fat or oil can be dangerous and may
result in re. NEVER try to extinguish a re
with water, but switch o the appliance and
then cover ame e.g. with a lid or a re blan-
ket.
WARNING: The cooktop is hot during use
and remains so for some time after being
switched o. The risk of burns remains until
the residual heat indicators have gone out.
CAUTION: The cooking process has to be su-
pervised. A short term cooking process has
to be supervised continuously.
SAFETY WARNINGS

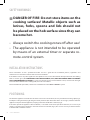
8SAFETY WARNINGS
DANGER OF FIRE: Do not store items on the
cooking surfaces! Metallic objects such as
knives, forks, spoons and lids should not
be placed on the hob surface since they can
become hot.
• Always switch the cooking zones o after use!
• The appliance is not intended to be operated
by means of an external timer or separate re-
mote-control system.
INSTALLATION INSTRUCTIONS
These instructions are for a specialized installer and are a guide for the installation process, regulations and
maintenance in accordance with the law and current standards.
If the built-in oven or any other appliances that produce heat, need to be installed directly underneath the cooking
hobs in ceramic glass, IT IS NECESSARY THAT THE APPLIANCE (oven) AND THE COOKING HOBS IN CERAMIC
GLASS ARE ADEQUATELY ISOLATED, in such a way that the heat generated from the oven, measured on the right
hand side of the bottom of the cooking hobs, does not exceed 60°C.
Failure to follow this precaution, could cause a malfunction in the TOUCH CONTROL system.
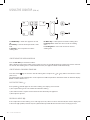
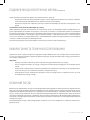
POSITIONING
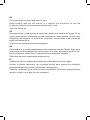
The domestic appliance was built in order to be encased on a work surface, the way it is illustrated in the graph (Fig.1).
Predispose sealing material (Fig.4) along the whole perimeter (for dimensions of the cut see Fig.1). Lock the domestic
appliance into place with 4 supporters, keeping in mind the width of the surface (Fig.2).
If the lower part of the appliance after installation, is accessible via the lower part of the furniture, it is necessary to
mount a separating panel keeping in mind the distances indicated (Fig.3). This is not necessary if underneath the
induction hob is installed an oven.
SAFETY WARNINGS

GB
9
ELECTRICAL CONNECTIONS
The distance between the cooktop and built-in kitchen’s furniture or cooking apparatuses must guarantee sucient
ventilation of the air. Not to use the cooktop if in the oven is in course the pyrolysis process.
ELECTRICAL CONNECTIONS (Fig.5)
Before making the electrical connections, check that:
• the system ratings meet the ratings indicated on the identication plate xed on the lower part of the
worktop;
• the system is tted with ecient ground wires in accordance with the laws and current standards.
Grounding is mandatory by law. If the domestic appliance is not supplied with a cable and/or suitable plug, use
material suitable for the absorption value indicated on the identication plate and the operating temperature. If
wishing to make a direct connection to the mains, an omnipolar switch must be installed with a minimum 3 mm
opening between the contacts and appropriate for the load indicated on the plate and in accordance with current
standards (the yellow/green ground conductor must not be disconnected by a switch). When the appliance has been
installed, the omnipolar switch must be easily reachable.
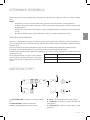
INDUCTION COOKING
The fundamental characteristic of the induction system is the direct transference of heat from the generator to the
cooking recipient.
Advantages:
• The transference of power takes place only when the recipient is placed on the cooking zone.
• The heat is generated only at the base of the recipient and transferred directly to the food to be cooked.
• Reduced heating time and low consumption of power during the beginning of cooking, allowing a global
saving of power.
• The breglass top remains cold, the heat felt on the cooking top is that reected from the base of the
recipient.
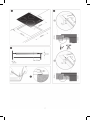
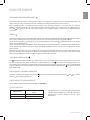
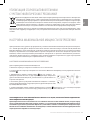
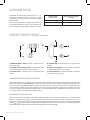
COOKING RECIPIENTS
The use of appropriate recipients is an essential factor for induction cooking. Check that your pots are suitable for the
induction system. The recipients must contain iron. You can check whether the material of the pot is magnetic with a
simple magnet (Fig.6).
We advise recipients having a at base (Fig.7A). This way you can use the power optimally.
Do not use recipients with a rough base to avoid scratching the thermal
surface of the top. A very important factor in induction cooking is the
dimension of the pot compared to the plate used (Fig.7B).
The cooking zones allow the use of recipients with bases of various
diameters. It is, however, preferable to use the appropriate cooking
zone for the dimension of the pot.
VENTILATION
COOKING ZONE
DIAMETER
MINIMUM PAN
DIAMETER
Ø 145 mm 80 mm
Ø 210 mm 130 mm

10 USING THE COOKTOP
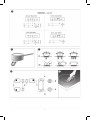
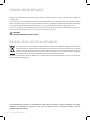
USING THE COOKTOP FIG. 8
A - ON/OFF key > switch the appliance on and
o
B- Lock key > activate control panel lock / child
lock
C- Plus key > increase power level of the
cooking zone
D- Minus key > reduce power level of the cooking zone
E- Display area > shows the values set for the cooking
zone
F- Cooking Zone > select and activate the desired
cooking zone
SWITCHING THE APPLIANCE ON
Press the On-O key to switch the hob on.
All the displays relative to the cooking zones switch on in the «0» standby position. The control unit remains active for
10 seconds. If no cooking zone is selected within this time, the appliance switches o automatically.
SWITCHING A COOKING ZONE ON
Press the relative key to select the desired cooking zone and press the or key within 10 seconds to set the
power level.
The power of the single cooking zone can be adjusted in 9 dierent positions and will be shown on luminous display
B with a number from “1 to 9”.
POT DETECTION « »
If the symbol « » should appear on one of the cooking area displays, it means that:
1) The recipient being used is not suitable for induction cooking.
2) The diameter of the recipient used is inferior to that allowed by the appliance.
3) No recipient is present.
RESIDUAL HEAT
If the temperature of the cooking area is still high (over 50°) after it has been switched o, the relative display will
indicate the « » symbol (residual heat). The symbol will only switch o when the burn risk in no longer present.

11
USING THE COOKTOP
USING THE COOKTOP
GB
QUICK HEATING/POWER BOOST
This function further reduces cooking time in a given area taking the temperature to the maximum power for a 10
minute interval. At the end of this interval, the cooking area power automatically returns to level 9.
The use of this function is recommended for heating a large quantity of liquid in a very short time (i.e. water for
cooking pasta) or other dishes. To activate this function, select the cooking area and press the key up to level 9.
Press the key again. An acoustic signal will be emitted and a symbol «P» will be visualised on the display E relative
to the area.
TIMER
This function allows you to set the time (from «01» to «99» minutes) to automatically switch o of the selected cooking
zone. Select a cooking zone by pressing one of the F keys and set the power by pressing the C or D keys.
To activate the timer press again the F key, an acustic signal will be heard and the « » symbol will appear on the display
of the selected cooking zone.
Set the time by pressing the C or D keys. If the cooking zone is in the lower part of the cooktop the time will be shown
on the display of the cooking zone in the upper part of the cooktop and vice versa. Press the key F again to conrm
your selection.
When the timer function elapses, the cooking zone will automatically switch o and an acoustic signal will be heard.
To disable the timer function, press the F key on the cooking zone previously started, bring the timer value back to
«00» by using the D key, then press the B key again to conrm your selection.
CONTROL PANEL LOCK
The key blocks the hob functioning, in order to prevent any unintentional operation (e.g. by children). In this state
no action on the keys has eect. To activate the safety function, press the key until the warning light switches on.
The cooking top can however be switched o even when the controls block is activated. In this case the controls block
remains active when the top is switched on again. To deactivate the safety function press the key until the warning
light switches o.
SWITCHING A COOKING ZONE OFF
To switch a cooking zone o, press the relative key to select it then press simultaneously the and key, or press
the key until reaching position «0».
SWITCHING THE APPLIANCE OFF
To turn o the cooking top entirely hold down the On-O key.
SAFETY SWITCH
The appliance has a safety switch that automatically
switches o the cooking zones when they have been
operating for a certain amount of time at a given
power level.
POWER LEVEL OPERATING TIME LIMIT
(hours)
1 - 8 10
9 3

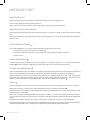
12 CLEANING AND MAINTENANCE
CLEANING AND MAINTENANCE
Remove any residues of food and drops of grease from the cooking surface by using the special scraper supplied on
request (Fig.9).
Clean the heated area as thoroughly as possible using suitable products, and a cloth/paper, then rinse with water and dry
with a clean cloth. Using the special scraper immediately remove any fragments of aluminium and plastic material that
have unintentionally melted on the heated cooking area, or residues of sugar or food with a high sugar content.
In this way, any damage to the cooktop surface can be prevented. Under no circumstances should abrasive sponges, or
corrosive chemical detergents, such as oven sprays or stain removers, be used.
WARNING:
STEAM CLEANERS MUST NOT BE USED.
DISPOSAL OF OLD ELECTRICAL APPLIANCES
The European Directive 2002/96/EC on Waste Electrical and Electronic Equipment (WEEE), requires that old
household electrical appliances must not be disposed of in the normal unsorted municipal waste stream. Old
appliances must be collected separately in order to optimise the recovery and recycling of the materials they
contain and reduce the impact on human health and the environment. The crossed-out dustbin symbol on
the product reminds you of your obligation regarding separated waste collection.
Consumers should contact their local public service or their local dealer for more information on the correct disposal of
exhausted household appliances.
THE MANUFACTURER DECLINES ALL RESPONSIBILITY FOR EVENTUAL DAMAGES CAUSED BY BREAKING THE ABOVE
WARNINGS. THE WARRANTY IS NOT VALID IN THE CASE OF DAMAGE CAUSED BY FAILURE TO COMPLY WITH THE
ABOVEMENTIONED WARNINGS.

13
POWER MANAGEMENT
POWER MANAGEMENT
The default cooktop maximum power limit is 7200W. This power limit can be reduced by the user to 2800W, 3500W or
6000W.
Each time the user tries to increase the power of a cooking zone, the total power level of the cooktop is calculated. If
this total power lever is greater than the cooktop maximum power limit, the power increase of the cooking zone is not
allowed. An error beep sounds and the cooking zone display shows an ‘r’ for 3 seconds.
SETTING COOKTOP POWER LIMIT
To set a dierent power limit:
1. Turn the cooktop o and disconnect it from the electrical mains.
2. Reconnect the cooktop to the mains. Press the key to unlock the cooktop.
3. Press at the same time the key of the cooking zones 1 and 3 (see Fig.1)
Once this is done, a beep sounds and the actual cooktop maximum power
limit will be shown in the upper cooking zone displays.
4. Select the new power limit using the and Available congurations are
2800W, 3500W, 6000W or 7200W.
5. To conrm the settings press at the same time the key of the cooking
zones 1 and 3 within 60 seconds. If this operation is not executed within this
time the settings will be cancelled.
GB

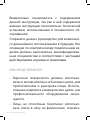
14 МЕРЫ ПРЕДОСТОРОЖНОСТИ
Внимательно ознакомьтесь с содержанием
данной инструкции, так как в ней содержатся
важные инструкции относительно безопасной
установки, использования и технического об-
служивания.
Сохраните данное руководство для возможно-
го дальнейшего использования в будущем. Все
операции по электрическому подключению из-
делия должны выполняться квалифицирован-
ным специалистам в соответствии с местными
действующими нормами и правилами.
МЕРЫ ПРЕДОСТОРОЖНОСТИ
• Варочная поверхность должна использо-
ваться исключительно в бытовых целях, для
приготовления и разогрева пищи. Исполь-
зование изделия в коммерческих целях, как
профессионального оборудования запре-
щается.
• Лица, не способные безопасно использо-
вать плиту в силу их физических, психиче-

15
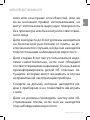
МЕРЫ ПРЕДОСТОРОЖНОСТИ
RU
МЕРЫ ПРЕДОСТОРОЖНОСТИ
ских или сенсорных способностей, или же
из-за незнания правил использования, не
могут использовать варочную поверхность
без присмотра или без контроля ответствен-
ного лица.
• Дети в возрасте до 8 лет должны находиться
на безопасном расстоянии от плиты, за ис-
ключением тех случаев, когда они находятся
под постоянным наблюдением взрослого.
• Дети старше 8 лет могут пользоваться изде-
лием самостоятельно, если они обладают
соответствующими навыками. Очень важно
проинформировать детей об опасных си-
туациях, которые могут возникать в случае
неправильной эксплуатации прибора.
• Следите за детьми, которые находятся ря-
дом с прибором, и не позволяйте им играть
с ним.
• Дети не должны проводить чистку или об-
служивание плиты, если они не находятся
под наблюдением взрослого.

-
! -
,
-
. -
.
: -
, -
,
, -
.
:
.
,
, .
: -
-
. , -
, -
МЕРЫ ПРЕДОСТОРОЖНОСТИ
16 МЕРЫ ПРЕДОСТОРОЖНОСТИ

RU
17
МЕРЫ ПРЕДОСТОРОЖНОСТИ
. , ,
-
.
: -
, -
-
.
, -
.
: -
.
.
,
,
-
. -
.
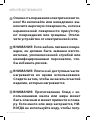
• Опасность возникновения пожара: Не дер-
жите предметы на поверхности плиты! Ме-
МЕРЫ ПРЕДОСТОРОЖНОСТИ

таллические посторонние предметы, такие
как ножи, вилки, ложки и крышки, не долж-
ны находиться на поверхности плиты, по-
скольку они могут раскалиться.
• Всегда выключайте конфорки после их ис-
пользования!
• Прибор не предназначен для использования
с помощью внешнего таймера или отдель-
ной системы дистанционного управления.
ИНСТРУКЦИЯ ПО УСТАНОВКЕ
Данные инструкции предназначены для профессионального монтажника и представляют собой руководство
для процесса установки, регулировки и технического обслуживания в соответствии с действующим законода-
тельством и стандартами. Если требуется установить встроенную духовку или другое устройство, вырабатыва-
ющее тепло, непосредственно под стеклокерамическими варочными панелями, то НЕОБХОДИМО ЧТОБЫ ЭТО
УСТРОЙСТВО (духовка) И ВАРОЧНАЯ СТЕКЛОКЕРАМИЧЕСКАЯ ПАНЕЛЬ БЫЛИ СООТВЕТСТВУЮЩИМ ОБРАЗОМ
ИЗОЛИРОВАНЫ, таким образом, чтобы тепло, генерируемое духовкой и измеренное с правой стороны нижней
части варочной поверхности, не превышало 60°С. Несоблюдение этого условия может вызвать неправильную
работу системы СЕНСОРНОГО УПРАВЛЕНИЯ.
УСТАНОВКА ИЗДЕЛИЯ
Этот бытовой прибор спроектирован для монтажа в рабочую поверхность кухни, как это показано на
рисунке 1. Предварительно уложите изоляционный материал (рисунок 4) вдоль всего периметра (размеры для
обрезки указаны на рисунке 1). Данная операция необходима для того, чтобы воспрепятствовать проникнове-
нию каких-либо жидкостей в рабочую поверхность, так как невозможно гарантировать, что поверхность, стек-
ло и их соединение будут полностью плоскими. Закрепите устройство по месту установки посредством 4 мон-
тажных скоб, учитывая при этом ширину поверхности (рисунок 2). Если нижняя часть варочной поверхности
после установки просматривается через нижний уровень кухонной столешницы, тогда необходимо установить
разделительную панель, учитывая указанные расстояния (рисунок 3).
Это не обязательно, если под нижней частью варочной панели располагается духовка.
МЕРЫ ПРЕДОСТОРОЖНОСТИ
18 МЕРЫ ПРЕДОСТОРОЖНОСТИ

RU
19
ВЕНТИЛЯЦИЯ
Расстояние между варочной панелью и кухонной мебелью или кухонными принадлежностями должно гаран-
тировать достаточную вентиляцию воздуха. Не используйте варочную панель, если духовка находится в состо-
янии процесса пиролиза.
ПОДКЛЮЧЕНИЕ К ЭЛЕКТРИЧЕСКОЙ СЕТИ (рисунок 5)
Прежде чем выполнить электрические подключения убедитесь в том, что:
• Параметры вашей электрической сети (напряжение, частота) соответствуют данным, указанным на та-
бличке с техническими данными, прикрепленной к нижней части данного изделия;
• Электрическая сеть имеет эффективную систему заземления в соответствии с действующим законода-
тельством и стандартами.
.
Если устройство бытовой техники поставляется без сетевого шнура и /или соответствующей вилки, исполь-
зуйте материал, подходящий по потребляемой мощности, указанной на табличке с паспортными данными и
подходящий по рабочим температурам. Если вы хотите осуществить прямое подключение к розетке, то следует
установить входной многополюсный выключатель, с минимальным размыканием контактов в 3мм и соответ-
ствующий нагрузке, указанной на табличке с паспортными данными, а также соответствующий действующим
стандартам (желтый/зеленый провод «земля» не должен размыкаться этим выключателем).
Поле монтажа устройства к данному выключателю должен быть обеспечен легкий доступ.
ИСПОЛЬЗОВАНИЕ И ТЕХНИЧЕСКОЕ ОБСЛУЖИВАНИЕ
Под каждой зоной нагрева расположена индукционная катушка. Включаясь, она создает переменное элек-
тро-магнитное поле, которое возбуждает индукционные токи в ферромагнитном днище кастрюли. Вследствие
этого кастрюля, расположенная в зоне нагрева, нагревается.
:
• Передача мощности имеет место только тогда, когда посуда расположена в зоне нагрева;
• Тепло генерируется только в основании посуды и передается непосредственно продуктам, которые
необходимо приготовить;
• Сокращенное время приготовления нагрева и низкий уровень потребления энергии во время начала
приготовления пищи обеспечивает значительную глобальную экономию энергии;
• Стеклокерамическая панель остается холодной, тепло, которое ощущается на варочной панели, это
тепло, отраженное от основания посуды.
ВЫБОР ТИПА ПОСУДЫ
Использование соответствующей посуды является основным фактором для индукционного приготовления
пищи. Убедитесь в том, что ваша посуда соответствует требованиям индукционной системы. Рекомендуется
ВЕНТИЛЯЦИЯ

ИСПОЛЬЗОВАНИЕ И ТЕХНИЧЕСКОЕ ОБСЛУЖИВАНИЕ
20 ИСПОЛЬЗОВАНИЕ ПРИБОРА
A. ONN/OFF (/) - включает или
выключает устройство
. () - активирует замок
панели управления/функция замок от детей.
. - увеличивает уровень мощности
зоны нагрева
D. - уменьшает уровень мощности
зоны нагрева
. - показывает значение
мощности, выбранное для данной зоны нагрева.
F. - для выбора и активации необхо-
димой зоны нагрева
использовать всю посуду с ферромагнитным слоем на днище (проверьте это с помощью небольшого магнита):
чугунную и стальную, эмалированную посуду, посуду из нержавеющей стали с ферромагнитными днищами. Вы
можете убедиться в том, что материал посуды имеет соответствующие свойства c помощью простого магнита
(рисунок 6). Мы рекомендуем использовать посуду с плоским днищем (рисунок 7). Таким образом, вы сможете
оптимально использовать энергию.
Не используйте посуду с шероховатым днищем для предотвращения нанесения царапин на керамическую по-
верхность варочной панели.
Важным фактором при приготовлении пищи на индукционных варочных панелях является размер кастрюли в
сравнении с используемой зоной нагрева (рисунок 7В). Зоны нагрева позволяют использовать посуду с разным
диаметром основания. Тем не менее, предпочтительнее использовать посуду, соответствующую размерам зон
нагрева.
Рекомендуется использовать посуду с плоским
дном, диаметром равным или немного большим,
чем площадь нагрева. (Рис.7). Не используйте ка-
стрюли с грубым, шероховатым дном, чтобы пре-
дотвратить появление царапин на стеклокерами-
ческой поверхности варочной панели.
ИСПОЛЬЗОВАНИЕ ПРИБОРА (рисунок 8)
ДИАМЕТР ЗОНЫ НАГРЕВА МИНИМАЛЬНЫЙ
ДИАМЕТР ПОСУДЫ
Ø 145 mm 80 mm
Ø 210 mm 130 mm
Strona się ładuje...
Strona się ładuje...
Strona się ładuje...
Strona się ładuje...
Strona się ładuje...
Strona się ładuje...
Strona się ładuje...
Strona się ładuje...
Strona się ładuje...
Strona się ładuje...
Strona się ładuje...
Strona się ładuje...
Strona się ładuje...
Strona się ładuje...
Strona się ładuje...
Strona się ładuje...
Strona się ładuje...
Strona się ładuje...
Strona się ładuje...
Strona się ładuje...
Strona się ładuje...
Strona się ładuje...
Strona się ładuje...
Strona się ładuje...
-
 1
1
-
 2
2
-
 3
3
-
 4
4
-
 5
5
-
 6
6
-
 7
7
-
 8
8
-
 9
9
-
 10
10
-
 11
11
-
 12
12
-
 13
13
-
 14
14
-
 15
15
-
 16
16
-
 17
17
-
 18
18
-
 19
19
-
 20
20
-
 21
21
-
 22
22
-
 23
23
-
 24
24
-
 25
25
-
 26
26
-
 27
27
-
 28
28
-
 29
29
-
 30
30
-
 31
31
-
 32
32
-
 33
33
-
 34
34
-
 35
35
-
 36
36
-
 37
37
-
 38
38
-
 39
39
-
 40
40
-
 41
41
-
 42
42
-
 43
43
-
 44
44


Freggia HCI430B Instrukcja obsługi
- Kategoria
- Płyty
- Typ
- Instrukcja obsługi
Inne dokumenty
-
HOTPOINT/ARISTON KIB 633 C E instrukcja
-
Indesit VIB 644 C E Instrukcja obsługi
-
-
Indesit VIX 633 Instrukcja obsługi
-
Hotpoint KIX 644 C E Instrukcja obsługi
-
-
Candy CDI 30/G3 Instrukcja obsługi
-
Brandt I4DE64Z2S Instrukcja obsługi