
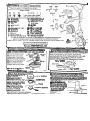
Instructions
Made
in
U.S.A.
Dear
Parents,
Ages:
2-5
Mau'mum
Weight:
60
lbs
Minimum
Height
35
'tall
Playskoal's
Wst
Bike
is
a fun, special
way
ta
Lntroduce children
to
bFkes
and help them learn
to
ride.
It lets younger
children
ride
two-wheel blkes because of
ita
smaller size, wide wheels and
unique
trw
system.
h
general, c,?ildren lean
to
pedal at
21/2
ta
3
years
of age, but each child
is
different and
may
be
ready
to
try
new
LIs
at
Mferent
ages.
With
your
encouragement,
your
chlld
can
leam
to
ride
a
bike when he or
she
is
~ady.
A
feeling
of confidence
and
security
is
important
when children
Q-y
somethFng new, so make
sue
you
child's
feet much
the
floor
wUe
sithng
on the bike.
We
have found that children
35
"or
Uer
are
a
comfoIrtaSle
heght
to
sit
a?d pedal the
Bike.
We
spe
your
cud wears soft-soled shoes
to
.
keep
traction on
tfie
pedals
when
learrung
to
pedal.
&unique
trdnning-system
b
designed
t6
help children learn
to
ride.
Em's
a
chz-?
3
help
you:
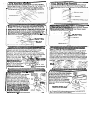
Learning
to
pedal
--
Gaining confidence
-
Riding
a
two-wheeler
-
Pushes
bike
with
feet or
Pedals
and
makes
turns
Has learned to balance
pedals. at the same time.
and
mastered second
Learning to balance.
stage.
Adults
Please
Note:
This product
should
be assembled by an adult. Periodically check all hardware to
be
sure
it
is
secure.
Please read
insfructions prior to assembly, and save this guide and all literature for future reference. Study each step carefully to
familiarize yourself
with
procedure and parts. Remove all pieces from plastic bags and discard bags
IMMEDIATELY.
For easier assembly,
trim
excess plastic from all parts before
starting.
I
Caution:
Aduh
supervision
and
instruction
is
required regarding the proper use of this toy. This ride-on toy
is
;,a
to
be used
-sar
swimming
pools,
on or
near
hills, roadways, or stairways. Shoes must be worn at all times when riding
this
toy:
,esigned
for
only
one
rider
at
a time. Do not ride after
dark
Do not
carry
anything, particularly objects that impair
vision,
while
riding
this
toy.
As
with
all rid-ns, use of
a
helmet is advisable.
1
bols
required (not included): Hammer, Phillips@ screwdriver
and
a small block of
(appmr
2.
x
2
x
314
3.

I
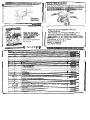
&rts
~iagrarn
Please
check
all
Pam
carefully
before
assembly.
Use
this gauge for proper
screw
length.
SCREW
GAUGE
1.
Hmdlei~s 14.
Ttaining
whed
axles
(2)
2.
Sli~nng
collar 15.
Suppon
faneners (2)
3
Snr,
fin4
16. Paln~%
(9)
4.
Fnne
17.
MnuPlwl
5.
Joumz'
bezrinc
18. Seit
md
6.
Fcrm
19.
Serf
7,
Fnzi
whea!:#he?! cnnk
20.
=&'I2
"
screhs (2)
8.
FtSil~
(2)
21.
*PIE
"
SCrewS
(2)
9
AX!E
ti35
(2)
22.
.&I
'
SCWfS
(2)
10.
Rei:vine:l 23.
.&l%"
scrtws(2)
11.
R22:
a::
24.
=I&l
"screws
(3)
12. Trci~ing
ch%!s
(2) 25. Label sheet
(not
shM)
1
7
!
is
2) 2E.
Hanp
ta~ (not shcwn)
H
you
have
any queslions, cammenls, or need additionai informalion conccming this
pmtuc:
or
ils
pans,
piense call our Playskool Cansurner Service holiine
a1
1400-PUYCKL
(14CC-752-57EIj, Mcnday lhmugh Fnday,
8:00
AM
lo
5:00
PM
Earlem Time,
8
All wrinen inquiries should be mailed to:
Playskool Cansumer Service De~aRmenl
P.O. Box 200
\
PaMucket, Rhode Island 028624200
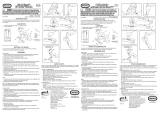
Step
3.
Fork
&
Frame
Assembly
B.
Insen
pos:
on
fwk
into journal bean'ngsnap
ring
A
Insert journal bearing
into
assembly.
Fwk
should
tall
into
coned
position
by
Mu.
hole in bonom of
~;C~I~~SCREWS
hie
caps
should face lhe rear of lhe bike. PI~c
IDI*
ffane.siigr,ing tabs on
fork
and slide
il
dorm
to
snap ring, aligning one of the
hdes
journal beaing
wil2
in
Vie
wllar with the front of the bike. Prew down On
cdh
indentations in hme. Inser; SNAP RING and fit one SIC-1'
snap ring into hoie in top of
screw into
front
hde
In
frame. Press down on snap
mllar and tighten, using
ring until it maps into
Phillips screwdriver. lnsen
journal bezmg. Fit hvo
remaining
hK)
screw
into
'6-'h'sc:ews inlo snap
holes in mllar, turning fork
rinyjournal bearing
BuRING
as
needed to wholes
aserr,bly and hghcen, using
TAB
more easily.
W
NOT
Phillips sc:ewdrwer.
OVER-TIG~N
W
NG
OVEA-TIGHTEN SCREWS.
SCREWS.
010-1
'SCREW
\
6tep
1.
Peda!
Assembly
(step
2.
Front
Wheel
&
Fork
Assembly
Siide cne peca! onio front wheel cank. Note: The recessed
end
of:he pezal sW~l2 be
facing
cut,
as
shew'..
Fit
WnuF
we:
end of cznk.
Place biock of wcd under
other erC of cmk for suppo~,
as
shm. Fit Pdnu! twl over
Palnut. Using hmrne:, h~t
Wnb? onto and of cnnk.
fiepea ste:
fw
other peda!.
W:
n
n
.re
aiq
dsa
m!
BLOCK
DIC*TJ~~~~
wmmn.
Place front wheellcrank assembly into slots in fork. Align
axle
cap screw holes with pilot holes in fork.
fit
one '8-1
'saew
into lop hole in axle
cap
md tighten, using Phillips
screwdriver. Fit one
*b5/a
'
screw into bonorn hole in
axle
cao
and tighten, using Phillips screwdriver.
DO
NOT
OVER-TIGhTEN
SCRFflS.
Repeat step lor other side.
*BJIm'SCREW
\
08-1 'SCREW

-~
-
4.
~andlebar Assembly
Slide handlebars over squZe
pcs:
on fork. Note: Handles
should face
me
reu
of the bike.
Fn
rw
*bl~h'screws into
holes at
fro*
and
back
in
handlebars and tighten, uslng
Phillips
scewcnver. DO
NOT
OVEA-TIGHTEN SCREWS.
B
Sl~de axle throuS? hole in wheel. Make sure Palnut
fits
recess in front of wneel. Slide axle throuqh front of training
whee! sucmct (see illus:rat~onl. Place back o! minino wheel
f
suppon face up.
Ta,?
whee! o/allat sueace to make sure
axle
gws
ccrrpie:e!y throush suppcn. hsition Palnut over
'
e-d of
axle.
F.I Palr,ur twl over Palnut. Using hammer, h~f
.
'
Rlnur
cn:o
enc c'ule. fiewat s:ecs for Otherhzllnin~whee!.
-
PALNUT
TOOL
PALNUT
S
S;iC'€ ale
i?~:c>~?
hie
ir,
cne re27 !ep. Poskion rear whee!
herwen rer- lefs. 2nd slide w:e ::rough hole in wheel.
Stecd uc, and h~id leojwheel assembly as shown in
i1lus:ration. F:xe
zt!e
on block of wocd. Lwk through hole
inrear
lg,
and
alifn ale wirh hsle. Push down on leghvheel
assembly to push axle through hole. Nore: This is a very
snus
%:
you
n>{
need
to use
2
lcr c: presswe.
Wit5 axle on a smzll
REAR
WHEEL
blcck o!&, pcsition
Palnut wer end of reat
axle.
Ffl
Painut :col cver
Palnut.
Us~ns hammer.
hit
Palnrn onto end of de.
BLOCK
Ibi.namda%~.msa&7h.hmamer~rrrrainnm.
%te~
8.
Attachina Trainina Wheel
\
-
supports
to
~ik;
A
For easier wembly, Mm excess
pliLStic
!ran
lhread on
post.
For
beginning riders, make sure the
mining whee!s are on the ouside of
the
suopors and facing away from
the bike. Place hole
in suppon onto
threaded
pcs:,
making sure knob on
suppan goes inro hole in body.
WHEEL
turning fasene! until rib goes past
SC.m
support fs:ener onto post.
kn&.
Make sure fasener is Securely
anached. Repeat for other support.
Ik~L,,LdOmrs9:lylpl5111~m)DicInm
mt.
ur
*:
?.--
rrvl
us.;
.
-
-
5.
Training Wheel Asembly
A.
Place
baining wheel axle (small axle) on sma;, block
of
wood,
as shwn. Position Palnut
wer
lop end of axle,
F;I
pana
tool
over
Palnut. Using hammer,
hin
Palnut onto end of
I
axle.
6\
-
Step
6.
Rear Axle
8
Rear Wheel Assembly
A'Place
rear
axle on small block of
wood,
as
shown. Position
Palnut
over
end of axle.
Fn
Palnut twl wer Palnut. Using
[amyer,
.
...
.
h~
yn;
on9ale.
p-PALNUT
TOOL
/step
7.
Seat
&
Frame Assembly
Place seat in hole in frame. Slide seat rod through hole in
side of frame, through hole in seat, and through hole on
other side of frame. Make sure seat rod snaps into
position
belore using the bike. The seat can be adjus:ed lo three
different
heighn by repeating the above steps, and placing
the
rod
lhmugh one of the lhree holes in the seat The Seat
rod should be in place wen when the seat is in the
lowest
position.
SEAT
ROD
SEAT
HOLE
H*LibkmbllO)mpiaam&mn~ra~hlmnn~
r
B
As
your child gains conridence,
rwene
the training wheel supports
M
that
the wheels
are
inside the
suppwts and facing
loward
the
bike.
To reverse supports, unscrew
support
faslenen, lum supporLs
around, and sc:ew on fanenen.
Make sure fastenen are secure
anached.
TRAINING
WHEEL
SUP

&el, Fur child is ready
1c
ride a~wheel bike.
fE!mOVe>
'
*e baining whel supporn horn ihe bike. R+amch the
suppan fasene
seer
removing lhe supports.
SUPPORT
FASTENER
J
Step
9.
Label
Application
ImpoRant: Be sure of
bbel
placement before allwdng
hbek
toset overnight. Thoroughlywipe label
ares
clean
with
dry
dolh befure applying labels.
Peel
labels from labe! sheet one
i
at a time and
apply
shown.
Forbes
results.
Se
sure all
laSelr
are
positioned on bike
exactly
as
shcwn.
6
I
'
Step
10.
Hang
Tag
\D"F"
Ee:z~~e~: When c~splaying
-9~
1
fie ,i*e please s::p ithe
,
--
-.
.
hang
is^
oc:o the
handle<as.
L-,:sgner: Please liscarcl
t:.e
k;~5
:a;.
FalnuP is a mislered tradernark of
TRW,
lnc
All
RighS ~e2rved.
O1091
Plapkobl. lnc, Pawtucke!. RI
028e2
U.S.A..
a
subsidiay of Hasbro, Inc
All
Rights Reerved.
Disvibuled inthe U.K. bv Pla~kDol (U.K.), a division
of
Hzsbro eradlev U.K.
~td..
~aiwell
way,
N-n, Gwent.
NP9OYH.
odenotes Reg.
U.S.
Fat.
8
TM
Office
Made and printed in
U.S.A.
59581
FM
42252m
1
I
5
I
sea:
I
4225003
i
I
\
\
1
Repiacemen1 Pans
Order
Form
ITEHHO.
.
(
DESCRI~IOH
PART
NO.
I
I
I
I
t
\
I
1
F.;T.~
6
I
Froc:
wheelhrheel
crank
4225MXK:
42251900
12
13
14.22,
e.
17.3
9
15
16
I;
i€
15
Z.~,i2
2:
2c
25
i
I
Err
1
42250100
7
1
Rex
wheel
wmbb
1
4aUOOO
AlfC
capr
(2)
S~eenng
wllw
Tmning
wnee
supw
3,
mnm-
w+mI
ah
0.
WnM
(41,
R~~UIIDOI.
bain~ng
Wee's
(21,
su~ofl
kslenrr
(2)
Snan
nng
Journal
bealng
HarCware
bag-Rlnvlr(9),
*B-l'h'urw(21,8B-l'~w(2).
*1&1
'-(3).
'e-'!.!l'scw(2).
a€-'h'um(2)
Rear
ule
Tmning
Wee! axles
m
iawl
shee!
!
1PSim
U?5~400
~h
N~.
¶a
42251600
4PS1m
422518~0
4psz103
m
42224='
-
 1
1
-
 2
2
-
 3
3
-
 4
4


w innych językach
Powiązane artykuły
Inne dokumenty
-
Ar?v Meld EB16-EU-RD Instrukcja obsługi
-
Simplicity 7800277 Instrukcja obsługi
-
 Little Tikes Go & Grow™ Lil' Rollin Giraffe Instrukcja obsługi
-
Suzuki GRAND VITARA - Instrukcja obsługi
-
SunriseMedical EIZ4-2 Parts Manual
-
Bosch BRC3600 Instrukcja obsługi
-
Spokey Agility Instrukcja obsługi
-
Beyblade Auto Change Balancer Instrukcja obsługi
-
Bosch TRAVEL CHARGER 0 275 007 914 Original Instructions Manual
