HP Portable Bluetooth Speaker Instrukcja instalacji
- Kategoria
- Przenośne głośniki
- Typ
- Instrukcja instalacji
Strona się ładuje...

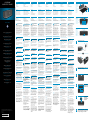
NEDERLANDS
Onderdelen
1 Luidspreker
2 Tasje
3 Netvoedingsadapter
Bovenpaneel
4 Pauzeknop
5 Knop Geluid zachter
6 Knop Geluid harder
7 Knop Bluetooth koppelen
8 Bluetooth statusindicator
Achterpaneel
9 AUX-in connector
- Aan/uit-schakelaar
q Klep batterijcompartiment
w Micro USB-poort voor 5 V
gelijkstroom in
WAARSCHUWING! Ga als volgt
te werk om het risico van een
elektrische schok en schade aan
de apparatuur te beperken:
•
Sluit het netsnoer aan op een geaard
bereiken is.
•
Onderbreek de stroomtoevoer van de
luidspreker door de stekker van het
netsnoer uit het stopcontact te trekken
(niet uit de luidspreker).
•
Als het netsnoer is voorzien van een
geaarde stekker, steekt u deze in een
geaard stopcontact. Probeer niet de
adapters of stekkerdozen zonder
aarding te gebruiken. De aarding is
1
Sluit de luidspreker aan op
een voedingsbron.
Sluit de micro USB-connector
aan op luidspreker
1
en de
voedingsadapter op een
stopcontact
2
.
OF
Plaats 4 AA-alkalinebatterijen in
het batterijvak achterop.
2
Controleer of de Bluetooth-
functie is ingeschakeld op
notebook, tabled of smartphone.
3
Zet de luidspreker aan.
4
Druk op een knop op het
bovenpaneel om de knoppen
te activeren.
5
Druk op de Bluetooth-
koppelknop om het
koppelingsproces te starten.
U hoort een geluidssignaal en
de Bluetooth-statusindicator
knippert snel. Als het systeem
met de luidspreker is gekoppeld,
knippert de Bluetooth-statusindicator
langzaam.
OPMERKING: De time-out voor koppelen
is 2,5 minuten. Als het koppelen binnen
deze periode mislukt, herhaalt u het
Bluetooth-koppelproces.
6
Controleer of uw notebook,
tabled of smartphone met
de luidspreker is gekoppeld.
Voer 0000 in als het systeem
om een code vraagt tijdens het
koppelproces.
OPMERKING: U kunt ook een optioneel
audiosnoer gebruiken om de luidspreker
aan te sluiten op uw notebook, tablet of
smartphone.
Problemen oplossen
PROBLEEM: Koppelen en verbinden
via Bluetooth is mislukt.
OPLOSSING: Onder Windows® 7
moet u het Bluetooth-apparaat met
de hand toevoegen. Klik op Start >
Apparaten en printers > Een
apparaat toevoegen. Selecteer de
HP Bluetooth Speaker in de lijst.
PROBLEEM: Geen geluid uit de
luidspreker.
OPLOSSING: controleer of het volume
is “ingeschakeld” op het systeem
en of een hoog volumeniveau
is ingesteld. Controleer onder
Windows 7 of de schakelaar voor
geluidsweergave naar Bluetooth
Hands-free Speakers verwijst: Klik
opStart>Conguratiescherm>
Hardware en geluiden > Audio-
apparaten beheren.
Mogelijk moet u ook de optie
“muziek luisteren” binnen de
Bluetooth-diensten inschakelen nadat
u het apparaat hebt gekoppeld.
Klik op Apparaten en printers >
Eigenschappen > Services.
Selecteer Muziek luisteren.
POLSKI
Elementy
1Głośnik
2 Etui
3Zasilaczprąduprzemiennego
Panel górny
4
Przycisk „Wstrzymaj”
5
Przyciskzmniejszaniagłośności
6
Przyciskzwiększaniagłośności
7
PrzyciskpowiązaniaurządzeńBluetooth
8
WskaźnikstanukomunikacjiBluetooth
Panel tylny
9Gniazdowejścioweaudio
-Włącznikzasilania
q Pokrywka komory baterii
wZłączemicroUSBdozasilania
prądemstałym5V
•
•
•
gniazdka elektrycznego. Nie wolno
1
Podłącz głośnik do zasilania.
PodłączwtykmicroUSB
dogłośnika
1
azasilaczprądu
przemiennego do gniazda
ściennego
2
.
LUB
Umieść4bateriealkaiczneAAw
komorzebateriidostępnejzpanela
tylnego.
2
Sprawdź, czy w komputerze
przenośnym, tablecie lub
telefonie inteligentnym włączona
jest komunikacja Bluetooth.
3
Włącz głośnik.
4
Naciśnij dowolny przycisk
na panelu górnym, aby
uaktywnić przyciski.
5
Naciśnij przycisk powiązania
urządzeń Bluetooth.
Wygenerowanyzostaniesygnał
dźwiękowy,wskaźnikstanu
komunikacji Bluetooth zacznie
szybkomigotać.Gdyurządzenia
zostanąpomyślniepowiązane,
wskaźnikstanukomunikacji
Bluetoothzaczniemigotaćpowoli.
UWAGA: Maksymalny czas próby
Bluetooth.
6
Sprawdź, czy komputer
przenośny, tablet lub telefon
inteligentny może komunikować
się z głośnikiem. Jeśli system
operacyjny wymaga podania hasła
w procesie powiązywania urządzeń,
wpisz 0000.
UWAGA:
PROBLEM: Niemożnapowiązać
urządzeńBluetoothinawiązać
połączenia.
W systemie
operacyjnym Windows® 7 dodaj
ręcznieurządzenieBluetooth.
WybierzStart>Urządzeniai
drukarki>Dodajurządzenie.
WybierzzlistyurządzenieHP
BluetoothSpeaker(GłośnikHP
Bluetooth).
PROBLEM:Brakdźwiękuzgłośnika.
Sprawdź,czydźwięk
nie jest wyciszony i czy ustawiony
jestodpowiednipoziomgłośności.
W systemie operacyjnym Windows
7sprawdź,czyjakourządzenie
odtwarzającedźwiękwybrano
głośnikiBluetooth:WybierzStart>
Panel sterowania >
Sprzętidźwięk>Zarządzaj
urządzeniamiaudio.
Możebyćrównieżkonieczne
włączenieopcji„słuchaniemuzyki”
wramachusługkomunikacji
Bluetoothpopowiązaniuurządzeń.
Wybierz Urządzenia i drukarki >
Właściwości > Usługi. Zaznacz pole
wyboru Słuchanie muzyki.
PORTUGUÊS
Componentes
1 Altifalante
2 Bolsa
3 Transformador
Painel superior
4 Botão de pausa
5 Botão para diminuir o volume
6 Botão para aumentar o volume
7 Botão de emparelhamento por Bluetooth
8 Indicador de estado do Bluetooth
Painel traseiro
9 Tomada AUX-in
- Interruptor de alimentação
q Porta do compartimento da bateria
w Porta micro-USB para entrada de
5V CC
AVISO: Para reduzir o risco de
equipamento:
•
Ligue o cabo de alimentação a uma
em todas as situações.
•
Desligue o fornecimento de energia
ao altifalante removendo o cabo de
removendo o cabo de alimentação do
altifalante).
•
Se o cabo de alimentação tiver uma
terra do cabo de alimentação utilizando,
por exemplo, um adaptador de dois
importante recurso de segurança.
1
Ligue o altifalante a uma fonte
de alimentação.
Ligue o conector micro-USB ao
altifalante
1
e o transformador
à tomada elétrica
2
.
OU
Insira 4 pilhas alcalina AA no
compartimentodabateriaacessível
no painel traseiro.
2
Certique-se que a função
Bluetooth está ligada no
notebook, tablet ou smartphone.
3
Ligue o altifalante.
4
Prima qualquer botão no
painel superior para ativar
os botões.
5
Para iniciar o processo de
emparelhamento por
Bluetooth, prima o botão de
emparelhamento por Bluetooth.
Ouviráumsinalsonoroeoindicador
de estado do Bluetooth vai piscar
rapidamente. Quando o sistema
caremparelhadocomsucessoao
altifalante, o indicador de estado do
Bluetooth vai piscar lentamente.
NOTA: O tempo limite para o
Se o emparelhamento não for bem
sucedido desta vez, repita o processo
de emparelhamento por Bluetooth.
6
Certique-se que o seu
notebook, tablet ou smartphone
ca emparelhado com o altifalante.
Se o sistema pedir um código de
acesso durante o processo de
emparelhamento, introduza 0000.
NOTA:
o altifalante ao seu notebook, tablet
ou smartphone.
Resolução de problemas
PROBLEMA: O emparelhamento e
ligação por Bluetooth não foram
bem sucedidos.
SOLUÇÃO: No Windows® 7,
adicione o dispositivo de Bluetooth
manualmente.CliqueemIniciar>
Dispositivos e Impressoras >
Adicionar um dispositivo. Selecione
Altifalante Bluetooth HP da lista.
PROBLEMA: Não sai som do
altifalante.
SOLUÇÃO:Veriqueseovolume
estáligadonosistemaecoloque
num volume alto. No Windows 7,
certique-sequeointerruptorde
reproduçãodeáudioestádenido
paraAltifalantePortátilBluetooth:
CliqueemIniciar>Painelde
Controlo > Hardware e Som >
Gerirdispositivosdeáudio.
Poderáterdeativaraopção
“ouvirmúsica”nosserviços
Bluetooth depois de emparelhar o
dispositivo.CliqueemDispositivos
e impressoras > Propriedades >
Serviços. Assinale Ouvir música.
PORTUGUÊS BRASIL
Componentes
1 Alto-falante
2 Maleta
3 Adaptador de AC
Painel superior
4 Botão pause (pausar)
5 Botão de diminuir volume
6 Botão de aumentar volume
7 Botão de emparelhamento Bluetooth
8 Indicador de estado Bluetooth
Painel traseiro
9 Conector AUX-in
- Interruptor de alimentação
q Tampa do compartimento das pilhas
w Porta micro USB para entrada de
5V DC
ADVERTÊNCIA: Para reduzir o risco
equipamento:
•
Conecte o cabo de alimentação
•
Desconecte a alimentação do alto-
falante retirando o cabo de alimentação
da tomada de CA (não desconectando
o cabo de alimentação do alto-falante).
•
Se o cabo de alimentação tiver um
conector de três pinos, conecte-o
a uma tomada de três pinos com
aterramento (aterrada). Não desative
o pino de aterramento do cabo de
alimentação, por exemplo, conectando
um adaptador de 2 pinos. O pino de
de segurança.
1
Conecte o alto-falante a uma
fonte de alimentação.
Ligue o conector micro USB no alto-
falante
1
e o adaptador de CA na
tomada de parede
2
.
OU
Insira 4 pilhas alcalinas AA no
compartimentodaspilhas,acessível
no painel posterior.
2
Certique-se de que o
Bluetooth está ativado no
notebook, tablet ou smart phone.
3
Ligue o alto-falante.
4
Pressione qualquer botão no
painel superior para ativar
os botões.
5
Para iniciar o emparelhamento
do Bluetooth, pressione o botão
de emparelhamento do Bluetooth.
Vocêouviráumalertasonoroeo
indicador de estado do Bluetooth
piscarárapidamente.Quando
o sistema e o alto-falantes forem
emparelhados com sucesso, o
indicador de estado do Bluetooth
piscarálentamente.
OBSERVAÇÃO: O tempo limite para o
Se o emparelhamento não ocorrer
durante esse tempo, repita o processo
de emparelhamento do Bluetooth.
6
Verique se o notebook, tablet
ou smart phone emparelha
com o alto-falante. Se o sistema
solicitar um código durante o
emparelhamento, digite 0000.
OBSERVAÇÃO:
conectar o alto-falando ao notebook,
tablet ou smart phone.
Solução de problemas
PROBLEMA: O emparelhamento
e a conexão do Bluetooth não
obtiveram sucesso.
SOLUÇÃO: No Windows® 7,
adicione o dispositivo Bluetooth
manualmente.CliqueemIniciar>
Dispositivos e Impressoras >
Adicionar um dispositivo. Selecione
Alto-Falante Bluetooth HP na lista.
PROBLEMA: O alto-falante não produz
nenhum som.
SOLUÇÃO:Veriqueseosomestá
ativado no sistema e num volume
sucientementealto.NoWindows
7,certique-sedequeocontrolede
reproduçãodeáudioestádenido
para Alto-Falantes Viva Voz
Bluetooth:CliqueemIniciar>Painel
de Controle > Hardware e Som >
Gerenciardispositivosdeáudio.
Talveztambémsejanecessário
ativaraopção“ouvirmúsica”
dentro dos serviços Bluetooth depois
deemparelharodispositivo.Clique
em Dispositivos e Impressoras >
Propriedades > Serviços. Marque
a opção Ouvir música.
1Динамик
2Мешок
3Адаптерпеременноготока.
4Кнопкапаузы
5Кнопкауменьшениягромкости
6Кнопкаувеличениягромкости
7КнопкасозданияпарыBluetooth
8ИндикаторсостоянияBluetooth
9РазъемAUX-in
-Переключательпитания
qОтсекдлябатареи
wПортmicroUSBспитанием
5Впостоянноготока
•
•
•
1
Подключите динамик
к источнику питания.
ПодключитеразъемmicroUSBк
динамику
1
,аадаптерпеременного
токакэлектрическойрозетке
2
.
Вставьте4щелочныхбатареи
типаAAвотсекбатареи,
расположенныйназаднейпанели.
2
Убедитесь, что функция
Bluetooth на ноутбуке,
планшете или смартфоне
включена.
3
Включите динамик.
4
Нажмите любую кнопку
на верхней панели, чтобы
активировать кнопки.
5
Чтобы приступить к
процессу создания пары
Bluetooth, нажмите кнопку
создания пары Bluetooth.
Прозвучитзвуковойсигнал,
ииндикаторсостоянияBluetooth
начнетбыстромигать.После
созданиясистемойпарыс
динамикоминдикаторсостояния
Bluetoothбудетмигатьмедленно.
6
Убедитесь, что ноутбук,
планшет или смартфон
создает пару с динамиком.
Если во время процесса создания
пары потребуется ввести пароль,
введите “0000”.
Неудалосьсоздать
паруBluetoothиустановить
подключение.
ВОСWindows®7
добавьтеустройствоBluetooth
вручную.ВыберитеПуск>
Устройстваипринтеры>Добавить
устройство.Выберитеизсписка
“ДинамикBluetoothHP”.
Динамикневыдает
звука.
Убедитесь,чтозвук
всистемевключениустановлен
высокийуровеньгромкости.
ВОСWindows7убедитесь,что
переключательвоспроизведения
звукаустановленвположение
“Динамики(BluetoothHands-
free)”.ВыберитеПуск>Панель
управления>Оборудование
извук>Управление
аудиоустройствами.
Кромеэтого,послесоздания
парысустройствомможет
понадобитьсяактивировать
параметр“Прослушиваниемузыки”
вслужбахBluetooth.Выберите
Устройства и принтеры > Свойства
> Службы.Выберитепараметр
Прослушивание музыки.
SLOVENSKI
Komponente
1Zvočnik
2 Torbica
3 Napajalnik
4 Gumb Zaustavi
5Gumbzazmanjšanjeglasnosti
6Gumbzapovečanjeglasnosti
7 Gumb za vzpostavljanje povezave
Bluetooth
8 Indikator stanja povezave Bluetooth
9PriključekAUX-in
- Stikalo za vklop/izklop
qVratcaležiščazabaterije
w Vrata mikro USB za enosmerno
napajanje 5 V
OPOZORILO:
udara ali poškodbe opreme
•
•
•
da na primer uporabite dvopolni
1
Priključite zvočnik na
napajanje.
PriključitepriključekmikroUSBv
zvočnik
1
innapajalnikvvtičnico
2
.
ALI
Vstavite 4 alkalne baterije AA
vležiščezabaterije,dostopno
z zadnje strani.
2
Preverite, ali je funkcija
Bluetooth na prenosniku,
tabličnem računalniku ali
pametnem telefonu vklopljena.
3
Vklopite zvočnik.
4
Pritisnite kateri koli na zgornji
plošči, da aktivirate gumbe.
5
Pritisnite gumb za vzpostavitev
povezave Bluetooth, da
zaženete postopek vzpostavljanja
povezave Bluetooth.
Zaslišalibostepiskinindikator
stanja povezave Bluetooth bo hitro
utripal. Ko sistem vzpostavi povezavo
zzvočnikom,boindikatorstanja
povezaveBluetoothpočasiutripal.
OPOMBA:
6
Preverite, ali vaš prenosnik,
tablični računalnik oziroma
pametni telefon omogoča
povezovanje z zvočnikom.
Če sistem med postopkom
vzpostavljanja povezave
zahteva geslo, vnesite 0000.
OPOMBA:
pametni telefon lahko uporabite tudi
Vzpostavitev povezave
Bluetooth ni uspela.
V sistemu Windows® 7
dodajtenapravoBluetoothročno.
Kliknite Start > Naprave in tiskalniki
> Dodajanje naprave. S seznama
izberiteZvočnikHPBluetooth.
Nizvokaizzvočnikov.
Preverite, ali je v sistemu
zvok vklopljen in nastavljen na
visoko raven glasnosti. V sistemu
Windows 7 preverite, ali je stikalo
za predvajanje zvoka nastavljeno
naprostoročnizvočnikBluetooth:
KlikniteStart>Nadzornaplošča>
Strojna oprema in zvok >
Upravljanjezvočnihnaprav.
Po vzpostavitvi povezave z napravo
bostemordamoraliomogočiti
možnost„poslušanjeglasbe”v
storitvah Bluetooth. Kliknite Naprave
in tiskalniki > Lastnosti > Storitve.
PreveritemožnostPoslušanje glasbe.
SRPSKI
Komponente
1Zvučnik
2Vreća
3 AC adapter
4 Dugme za pauziranje
5Dugmezautišavanjezvuka
6Dugmezapojačavanjezvuka
7 Dugme za uparivanje Bluethooth
uređaja
8 Indikator statusa za Bluetooth
9AUX-inutikač
-Prekidačzanapajanje
q Vratanca odeljka za bateriju
w Mikro USB port za 5V DC
UPOZORENJE:
•
lako dostupna.
•
•
1
Priključite zvučnik na izvor
napajanja.
PovežitemikroUSBkonektorsa
zvučnikom
1
iadapternaizmenične
strujesautičnicomnazidu
2
.
-ILI-
Ubacite 4 AA alkalne baterije
u odeljak za baterije kome se
pristupasazadnjeploče.
2
Proverite da li je funkcija
Bluetooth uključena na
prenosnom računaru, tablet
računaru ili pametnom telefonu.
3
Uključite zvučnik.
4
Pritisnite bilo koje dugme na
gornjoj ploči za aktiviranje
dugmadi.
5
Kako biste započeli proces
uparivanja Bluetooth uređaja,
pritisnite dugme za uparivanje
Bluetooth uređaja.
Čućetezvučnisignaliindikator
statusaBluetoothvezebrzoće
treperiti.Kadasesistemuspešno
uparisazvučnikom,indikatorstatusa
Bluetoothvezesporoćetreperiti.
NAPOMENA:
ne uspe u okviru ovog vremena, ponovite
6
Potvrdite da se vaš prenosni
računar, tablet računar ili
pametan telefon upario sa zvučnikom.
Ako sistem zatraži šifru za vreme
procesa uparivanja, unesite 0000.
NAPOMENA:
PROBLEM: Uparivanje i povezivanje
bluetoothuređajanijebilouspešno.
ZaWindows®7,ručno
dodajteBluetoothuređaj.Kliknite
na Start > Devices and Printers
(Uređajiištampači)>Adda
device(Dodajuređaj).Izaberite
HPBluetoothzvučniksaliste.
PROBLEM:Izzvučnikanedolazizvuk.
Potvrdite da je u sistemu
zvukuključenna„on”ipodešenna
nivo jakog zvuka. Za Windows 7,
uveritesedajeprekidačzaaudio
reprodukcijupodešennaBluetooth
hendsfrizvučnike:Kliknitena
Start > Control Panel (Kontrolna
tabla) > Hardware and Sound
(Hardver i zvuk) > Manage audio
devices (Upravljanje audio
uređajima).
Moždaćetakođebitipotrebnoda
omogućiteopciju„listentomusic”
(slušanjemuzike)uokviruBluetooth
usluga,nakonštosteupariliuređaj.
Kliknite na Devices and Printers
(Uređaji i štampači) > Properties
(Svojstva) > Services (Usluge).
OznačiteListen to music (Slušanje
muzike).
한국어
구성
요소
1 스피커
2 파우치
3 AC 어댑터
윗면
패널
4 일시 정지 버튼
5 볼륨 낮추기 버튼
6 볼륨 높이기 버튼
7 Bluetooth 페어링 버튼
8 Bluetooth 상태 표시기
뒷면
패널
9 AUX-in 잭
- 전원 스위치
q 배터리함 덮개
w 5V DC용 Micro USB 포트
경고:
감전
위험이나
장비
손상을
방지하려면
다음과
같이
하십시오
.
•
전원
코드를
항상
쉽게
접근할
수
있는
AC
콘센트에
꽂으십시오
.
•
AC
콘센트에서
전원
코드를
뽑아
컴퓨터로
유입되는
전원을
차단하십시오
(
스피커의
전원
코드를
뽑으면
안
됩니다
).
•
전원
코드에
3
핀
장착
플러그가
있으면
접지된
3
핀
콘센트에
코드를
꽂습니다
. 2
핀
어댑터
등을
사용하여
전원
코드
접지
핀을
고장내지
마십시오
.
접지
핀은
중요한
안전
장치입니다
.
1
스피커를 전원 장치에
연결합니다.
Micro USB 커넥터를 스피커
1
와
벽면 콘센트의 AC 어댑터
2
에
연결합니다.
또는
뒷면 패널에 있는 배터리함에 AA
알칼라인 배터리 4개를 삽입합니다.
2
노트북, 태블릿 또는
스마트폰의 Bluetooth
기능이 켜져 있는지 확인합니다.
3
스피커를 켭니다.
4
윗면 패널에 있는 버튼을 눌러
버튼을 활성화합니다.
5
Bluetooth 페어링 프로세스를
시작하려면 Bluetooth 페어링
버튼을 누릅니다.
곧 소리가 나면서 Bluetooth 상태
표시기가 빠르게 깜박거립니다.
컴퓨터가 스피커와 성공적으로
페어링되면 Bluetooth 상태
표시기가 천천히 깜박거립니다.
참고:
페어링
제한
시간은
2
분
30
초입니다
.
페어링이
시간
내에
이루어지지
않으면
Bluetooth
페어링
프로세스를
반복해야
합니다
.
6
노트북, 태블릿 또는
스마트폰이 스피커와
페어링되었는지 확인합니다.
컴퓨터가 페어링 프로세스
중 암호를 요청하면 0000을
입력합니다.
참고:
노트북
,
태블릿
또는
스마트폰에
스피커를
연결할
때
옵션
오디오
케이블을
사용할
수도
있습니다
.
문제
해결
문제:
Bluetooth 페어링 및 연결이
제대로 되지 않았습니다.
해결
방법:
Windows
®
7의 경우,
Bluetooth 장치를 수동으로
추가합니다. 시작 > 장치 및 프린터
> 장치 추가를 클릭합니다. 목록에서
HP Bluetooth 스피커를 선택합니다.
문제:
스피커에서 소리가 나지
않습니다.
해결
방법:
컴퓨터에서 볼륨이
"켜짐"으로 되어 있는지 확인하고
볼륨을 높입니다. Windows 7의
경우, 오디오 재생 스위치가
Bluetooth Hands-free Speakers
(블루투스 핸즈프리 스피커)로
설정되어 있는지 확인합니다.
시작 > 제어판 > 하드웨어 및
사운드 > 오디오 장치 관리를
클릭합니다.
장치를 페어링한 후에 Bluetooth
서비스에서 "음악 감상" 옵션을
활성화해야 할 수도 있습니다.
장치 및 프린터 > 특성 > 서비스
를 클릭합니다.음악 감상 확인란을
표시합니다.
Federal Communications Commission notice
Modications
TheFCCrequirestheusertobenotiedthatanychangesormodicationsmadetothisdevicethatarenot
expresslyapprovedbyHPmayvoidtheuser’sauthoritytooperatetheequipment.
This device complies with Part 15 of the FCC Rules. Operation is subject to the following 2 conditions:
1. This device may not cause harmful interference.
2. This device must accept any interference received, including interference that may cause undesired
operation.
Ifyouhavequestionsabouttheproductthatarenotrelatedtothisdeclaration,writeto:
Hewlett-Packard Company
P. O. Box 692000, Mail Stop 530113
Houston, TX 77269-2000
ForquestionsregardingthisFCCdeclaration,writeto:
Hewlett-Packard Company
P. O. Box 692000, Mail Stop 510101
Houston, TX 77269-2000
or call HP at 281-514-3333
To identify your product, refer to the part, series, or model number located on the product.
This device must not be co-located or operating in conjunction with any other antenna or transmitter.
WARNING! Exposure to Radio Frequency Radiation The radiated output power of this device is
below the FCC radio frequency exposure limits. Nevertheless, the device should be used in such
a manner that the potential for human contact is minimized during normal operation of tablet PCs and
notebook computers.
ToavoidthepossibilityofexceedingtheFCCradiofrequencyexposurelimits,humanproximitytothe
antennas should not be less than 20 cm (8 inches), including when the computer display is closed.
CAUTION: When using IEEE 802.11a wireless LAN, this product is restricted to indoor use, due to
its operation in the 5.15- to 5.25-GHz frequency range. The FCC requires this product to be used
indoors for the frequency range of 5.15 GHz to 5.25 GHz to reduce the potential for harmful interference
to cochannel mobile satellite systems. High-power radar is allocated as the primary user of the 5.25- to
5.35-GHz and 5.65- to 5.85- GHz bands. These radar stations can cause interference with and/or
damage to this device.
In some environments, the use of wireless devices may be restricted. Such restrictions may apply in
hospitals, near explosives, in hazardous locations, and so on. If you are uncertain of the policy that
applies to the use of this product, ask for authorization to use it before you turn it on.
RMN: MBT-2111
Brazil notice
Esteequipamentooperaemcarátersecundário,istoé,nãotemdireitoaproteçãocontrainterferência
prejudicial, mesmo de estações do mesmo tipo, e não pode causar interferência a sistemas operando em
caráterprimário.
Canada notices
ThisClassBdigitalapparatusmeetsallrequirementsoftheCanadianInterference-CausingEquipment
Regulations.Wirelessoperationissubjectto2conditions.Therstisthatthewirelessdevicemay
not cause interference. The second is that the wireless device must accept any interference, including
interference that may cause undesired operation of the device.
CAUTION: When using IEEE 802.11a wireless LAN, this product is restricted to indoor use, due
to its operation in the 5.15 to 5.25 GHz frequency range. Industry Canada requires this product
to be used indoors for the frequency range of 5.15 GHz to 5.25 GHz to reduce the potential for harmful
interference to co-channel mobile satellite systems. High-power radar is allocated as the primary user of
the 5.25 to 5.35 GHz and 5.65 to 5.85 GHz bands. These radar stations can cause interference with
and/or damage to this device.
The antennas for this device are not replaceable. Any attempt at user access will damage your computer.
ToavoidthepossibilityofexceedingtheFCC/ICradiofrequencyexposurelimits,humanproximitytothe
antennas should not be less than 20 cm (8 inches).
Industry Canada statement:
This device complies with RSS-210 of the Industry Canada Rules. Operation is subject to the following
two conditions: (1) This device may not cause harmful interference, and (2) this device must accept any
interference received, including interference that may cause undesired operation.
ATTENTION :
Lesantennesdecepériphériquenesontpasremplaçables.Toutetentatived’accèsutilisateur
endommagera votre ordinateur.
Pourévitertoutrisquededépassementdeslimitesd’expositionauxfréquencesradioédictéesparla
FCC/IC, les antennes ne doivent pas se trouver à moins de 20 cm (8 pouces).
Déclaration d’Industrie Canada :
Ce dispositif est conforme à la norme CNR-210 d’Industrie Canada applicable aux appareils radio
exempts de licence. Son fonctionnement est sujet aux deux conditions suivantes: (1) le dispositif ne doit pas
produire de brouillage préjudiciable, et (2) ce dispositif doit accepter tout brouillage reçu, y compris un
brouillagesusceptibledeprovoquerunfonctionnementindésirable.
European Union Regulatory Notice
Products bearing the CE marking comply with the following EU Directives:
• LowVoltageDirective2006/95/EC
• EMCDirective2004/108/EC
• EcodesignDirective2009/125/EC,whereapplicable
Compliance with these directives implies conformity to applicable harmonized European standards
(European Norms) that are listed in the EU Declaration of Conformity issued by HP for this product or
product family and available (in English only) either within the product documentation or at the following
website:www.hp.eu/certicates(typetheproductnumberinthesearcheld).
The compliance is indicated by one of the following conformity markings placed on the product:
For non-telecommunications products and for EU harmonized telecommunications products,
such as Bluetooth® within power class below 10mW.
ForEUnon-harmonizedtelecommunicationsproducts(Ifapplicable,a4-digitnotied
body number is inserted between CE and !).
Please refer to the regulatory label provided on the product.
The point of contact for regulatory matters is:
Hewlett-Packard GmbH, Dept./MS: HQ-TRE, Herrenberger Strasse 140,
71034 Boeblingen, GERMANY.
Laoperacióndeesteequipoestásujetaalassiguientesdoscondiciones:(1)esteequipopuedequeno
causeinterferenciay(2)esteequipodebeaceptarcualquierinterferencia,incluyendointerferenciaque
pueda ser causada por la operacion no deseada.
AC adapter notices
WARNING! To reduce the risk of electric
shock or damage to the equipment:
unplugging the AC adapter from the product).
WARNING! To reduce potential safety issues, only the AC adapter provided with the product, a
replacement AC adapter provided by HP, or an AC adapter purchased as an accessory from HP
should be used with the product.
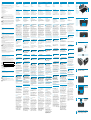
Inhoud van de
doos
zestawu
Conteúdo da
caixa
Conteúdo da
caixa
Vsebina kompleta
키트 구성물
3
1
2
Bovenpaneel
Panel górny
Painel superior
Painel superior
윗면 패널
8
4
5 6 7
Achterpaneel
Panel tylny
Painel traseiro
Painel posterior
뒷면 패널
9
q
-
w
1
Connect speaker to power source.
2
1
OR
2
Ensure that the Bluetooth function is turned on at the
notebook, tablet, or smart phone.
3
Turn on the speaker.
4
Press any button
on the top panel to
activate the buttons.
5
To start the Bluetooth
pairing process,
press the Bluetooth
pairing button.
6
Verify that your notebook, tablet, or smart phone
pairs with the speaker. If the system requests a pass
code during the pairing process, enter 0000.
-
 1
1
-
 2
2


HP Portable Bluetooth Speaker Instrukcja instalacji
- Kategoria
- Przenośne głośniki
- Typ
- Instrukcja instalacji
w innych językach
- čeština: HP Portable Bluetooth Speaker instalační příručka
- español: HP Portable Bluetooth Speaker Guía de instalación
- italiano: HP Portable Bluetooth Speaker Guida d'installazione
- Deutsch: HP Portable Bluetooth Speaker Installationsanleitung
- português: HP Portable Bluetooth Speaker Guia de instalação
- français: HP Portable Bluetooth Speaker Guide d'installation
- English: HP Portable Bluetooth Speaker Installation guide
- русский: HP Portable Bluetooth Speaker Инструкция по установке
- Nederlands: HP Portable Bluetooth Speaker Installatie gids
Powiązane artykuły
Inne dokumenty
-
Trust Jukebar Instrukcja instalacji
-
Sony SRS-BTD70 Instrukcja obsługi
-
Trust 18017 Vintori Wireless Speaker Instrukcja obsługi
-
Samsung EO-SG510 Instrukcja obsługi
-
-
ECG BTS Elysium M1 Black Instruction Manual, Safety Instructions, Technical Data
-
-
-
-