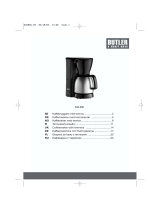
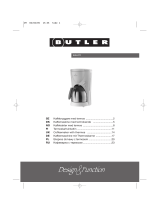
Kompernass Coffeemaker KH 1114 Instrukcja obsługi
- Kategoria
- Akcesoria do parzenia kawy
- Typ
- Instrukcja obsługi
Niniejsza instrukcja jest również odpowiednia dla

- 1 -
List of contents Page
Safety instructions 2
Technical data 3
Items supplied 3
Intended use 3
Description of parts 3
Before the First Use 3
Setting the time 3
Memory Function 3
Making coffee 4
Using the Timer 4
Cleaning and care 5
Danger of electrical shock 5
Risk of burns! 5
Removing scale 5
Rectifying malfunctions 6
Disposal 6
Warranty & Service 7
Importer 7
Read the operating instructions carefully before using the appliance for the first time and preserve this booklet
for later reference. Pass this booklet on to whoever might acquire the appliance at a later date.
IB_KH1114_UK4 10.10.2007 16:18 Uhr Seite 1

- 2 -
Coffee Maker
KH 1114
Safety instructions
Danger of electric shock!
• Connect the appliance only to correctly installed
and earthed mains sockets.
• Remove the plug from the wall socket when you
move the appliance, fill it with water, if it malfunc-
tions, before cleaning it and when it is not in use.
• NEVER submerse the appliance in liquids.
Should liquids nonetheless permeate into the
appliance housing, immediately remove the plug
from the wall socket. Arrange for it to be repai-
red by qualified specialists.
• Never take hold of the appliance, power cable
or plug with wet hands.
• To disconnect, always pull the plug itself from the
power socket, do not pull on the power cable.
• Do not fold or squeeze the power cable.
• Should the power cable or plug be damaged, to
avoid possibly life-threatening risks immediately
arrange for it to be replaced by qualified specia-
lists.
Fire hazard!
• Do not leave the appliance unattended when in
use.
• Never operate the appliance without water.
• Never place the appliance near sources of heat.
• Do not use extension cables. In the event of dan-
ger, the plug must be quickly accessible.
Risk of personal injuries
• NEVER use the thermos jug r in a microwave
oven.
• DO NOT allow children to use the appliance
without adult supervision. Explain to children the
potential dangers of the appliance.
• Lay the power cable in such a way that no one
can tread on or trip over it.
• Do not insert sharp or stiff objects into the ther-
mos jug r. Do not grab into the thermos jug r.
This may damage the appliance and lead to inju-
ries.
Risk of scalding!
• Never open the filter holder q during the bre-
wing process.
• Do not handle the hot filter bag. Remove the filter
bag first when the coffee has drained away and
it has cooled down. Use the filter insert y to re-
move the filter bag.
• Do not hold your hands in the rising steam.
• Never move/transport the appliance during the
brewing process.
• Remove the thermos jug r first when the brewing
process is complete and the filter has fully drai-
ned itself.
• Always close the filter container before switching
on, there exists a risk of scalds from steam and
hot water.
Caution: To avoid damage to the
appliance!
• Fill the water tank w of the appliance exclusively
with clean water.
• Do not expose the glass of the thermos jug r to
extreme variation in temperature. The glass can
be damaged.
• There is no liability for damages caused by brea-
kage of glass!
IB_KH1114_UK4 10.10.2007 16:18 Uhr Seite 2

- 3 -
Technical data
Mains voltage: 220 - 240 V
~
50 Hz
Power consumption: 1000 W
Coffee filter bags: Size 1x4
Items supplied
• Coffee Maker KH 1114 with Timer Function
• Thermos jug with lid
• Measuring spoon
• Operating instructions
• Warranty card
Before taking the appliance into use, check that all
items are present and free of visible damage.
Intended use
The Coffee Maker is intended exclusively for bre-
wing coffee. This Coffee Maker is intended exclusi-
vely for use in private domestic households. Do not
use it commercially. The appliance is for indoor use
only.
Description of parts
The description of parts is located at the right fold
out page.
Coffee Maker:
q Filter holder
w Water tank
e Scale
r Thermos jug
t Cable storage compartment
y Filter insert
Control panel:
u Button "min"
i Button "auto"
o Aroma knob
a Red indicator
s Green indicator
d Switch "off"
f Switch "on"
g Red indicator "calc"
h Button "prog"
j Button "h"
Before the First Use
Note:
Never fill the appliance with water beyond the
max-marking (10 cups). The appliance can
overflow.
• Before the first use, set the aroma knob o to the
setting and allow two times 8 cups of water to
flow through the appliance. Do not use coffee
powder for this.
• Clean the appliance
(see chapter "Cleaning and care").
Setting the time
• Press the buttons "h" j for hours resp. "min" u
for minutes repeatedly until the correct time is
shown in the display.
Memory Function
In the event of a power failure lasting up to about 3
minutes, the setting of time and timer is saved once
power has been restored.
IB_KH1114_UK4 10.10.2007 16:18 Uhr Seite 3

- 4 -
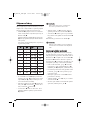
Making coffee
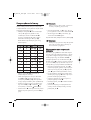
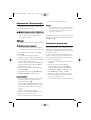
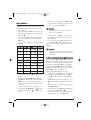
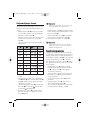
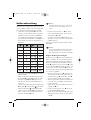
Avoid brewing less than 2 large or 3 small cups of
coffee. Otherwise, the coffee will not have the des-
ired temperature and strength.
• Turn the filter holder q to the outside and insert a fil-
ter bag (Size 1x4) with its sides folded over into the
filter insert y. Fill the bag with the required amount
of coffee powder (medium to fine ground) (Fig. ).
One small teaspoon is equivalent to about 6 g of
coffee powder.
• Turn the filter holder q back into the Coffee Ma-
ker.
• Fill the required amount of water in the water
tank w by using the scale on the outside e
(Fig. ) of the water tank. Never fill the applian-
ce with water beyond the max-marking (10 cups)
• Enter in the desired coffee strength by turning the
aroma knob o on the Panel (Fig. ).
The setting results in stronger coffee and the
setting results in mild coffee.
• Place the thermos jug r in the Coffee maker and
make sure the thermos jug r is empty before
every use.
Note:
The coffee remains warm for a longer period
if the thermos jug is rinsed out with hot water
before use.
• Start the brewing process by pressing switch
"on"f. The red indicator a turns on.
• Pour the coffee from the thermos jug after the red
indicator light a turns off.
Take note of Fig. for serving the coffee.
Note:
Let the coffee maker cool down for about 5
minutes, before you start the next brewing pro-
cess or add water.
Using the Timer
With the button „prog“ h you can programme the
Coffee Maker so that it starts the brewing process at
a predetermined time. Always first insert coffee pow-
der into the filter bag in the filter holder q and wa-
ter into the water tank w.
Place the thermos jug r in the Coffee Maker. Make
sure the thermos jug r is empty and the water tank
is not filled beyond the max-marking (10 cups)befo-
re every use.
• Press and hold down the button "prog" h.
• Enter in the desired start time with the buttons "h"
j and "min" u (see chapter "Setting the timer").
• When the desired time has been entered, release
the button "prog" h. The Timer is set.
• Enter in the desired coffee strength by turning the
aroma knob o.
• Press the button "auto" i until the green indica-
tor s lights up.
• If you wish to deactivate the automatic brewing
start, press the button "off" d.
g
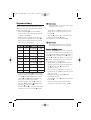
3 2 3 x 6g 18
4
1
/
2
3 4 x 6g 24
6 4 5 x 6g 30
7
1
/
2
5 6 x 6g 36
9 6 7 x 6g 42
10
1
/
2
7
7
1
/
2
x 6g
45
12 8
8
1
/
2
x 6g
51
13
1
/
2
9 9 x 6g 54
15 10 10 x 6g 60
IB_KH1114_UK4 10.10.2007 16:18 Uhr Seite 4

- 5 -
Cleaning and care
• Always remove the plug from the power socket
before cleaning the appliance.
Danger of electrical shock
Before you clean the Coffee Maker, you must
remove the power plug from the power soc-
ket.
Caution
When cleaning the Coffee Maker, under no
circumstances may you submerse it in water or
hold it under running water.
Risk of burns!
Always wait until the Coffee Maker has coo-
led down before cleaning it.
Take off the lid of the thermos jug r, when cleaning
(see Fig )
• Do not use household detergents or sharp/poin-
ted objects to remove soiling. These could dama-
ge the Coffee Maker.
• Wipe the housing of the Coffee Maker and the
thermos jug r with a soft cloth lightly moistened
with a soapy solution.
• After every brewing process remove the filter
bag from the filter insert y.
• Remove the filter and rinse the filter holder q, the
filter insert y and the thermos jug r under run-
ning water.
Cleaning of the lid
• To clean the lid of the thermos jug r first disas-
semble the lid (See Fig. ):
• Carefully pull off the silicone disc from the valve
at the underside of the lid. When doing this, hold
the valve, because it is pressed up by a spring
from the other side.
• You now can take off the valve and the spring.
• Clean all parts with a mild soapy solution and
wipe them off well.
• To assemble the lid again, proceed in reversed
order.
Note:
Do not let the thermos jug with lid lie in soapy
water and do not wash the parts in the dish-
washer, as they could become leaky!
If you do not use the Coffee Maker for an extended
period, store the power cable in the cable storage
compartment t (Fig. ).
Removing scale
Remove scale from the Coffee Maker regularly.
If your water has a high degree of hardness, the cof-
fee maker must be descaled after every 30 applica-
tions, low degrees of hardness need only be desca-
led after every 60 applications.
Use only descaling agents that are suitable for cof-
fee machines and read up the instructions.
• Insert the descaling agent into the water tank w.
• Fill it with enough water for max. 8 large cups.
• Turn the aroma knob o to "calc" to activate the
descaling function.
• Press the button "on" f. The red indicator a
turns on and the indicator “calc” g is blinking.
• Wait until the solution has completely run
through the Coffee Maker.
• When the procedure is complete, rinse the Cof-
fee Maker through with 8 large cups of clean
water twice.
• After descaling, the Coffee Maker switches itself off.
IB_KH1114_UK4 10.10.2007 16:18 Uhr Seite 5

- 6 -
Rectifying malfunctions
The Coffee Maker does not start working.
• The appliance is not turned on.
Press the switch “on” f to turn on the Coffee
Maker.
• The power plug is not plugged into the power
socket. Connect the Coffee Maker to the mains
by plugging the power plug into the power sok-
ket.
• The appliance has not been cooled down after
the last brewing process. Wait for the appliance
to cool down for about 5 minutes until you start
the next brewing process.
The brewing process does not start at the determi-
ned time (Timer Function):
• The timer is not activated. Press the button “auto”
i to activate the timer.
• The time is not set correctly. Check the present
time and set the time if necessary.
The coffee is too strong/too weak:
• There is too little/too much water in the water
tank. Fill in the correct amount of water.
• There is too much/too little coffee powder in the
filter bag. Fill in less/more coffee power.
• The coffee powder is grinded too fine/too rough.
Choose a different type of ground coffee.
The brewing process lasts very long.
The appliance switches off during brewing.
The unit gets very loud during brewing.
Immoderate steam develops during brewing.
• The brewing system is scaled. remove the scale
as described under “Removing scale”.
Disposal
Do not dispose of the appliance in your nor-
mal domestic waste.
Dispose of the appliance through an approved di-
sposal centre or at your community waste facility.
Observe the currently applicable regulations. In
case of doubt, please contact your waste disposal
centre.
Dispose of packaging materials in an envi-
ronmentally responsible manner.
IB_KH1114_UK4 10.10.2007 16:18 Uhr Seite 6

- 7 -
Warranty & Service
This appliance is guaranteed for 3 years from the
date of purchase. It has been carefully produced
and meticulously checked before delivery. Please
keep your receipt as proof of purchase. Contact
your service centre by telephone in case of ques-
tions pertaining to the warranty.
Your goods can be transmitted free of cost only in
this manner.
The warranty covers only material or manufacturing
faults, not normal wear or damage to fragile parts
such as switches or rechargeable batteries.
The appliance is intended solely for private, not
commercial, use. If this product has been subjected
to improper or inappropriate handling, abuse, or
interventions not carried out by one of our authori-
sed sales and service outlets, the warranty will be
considered void. This warranty does not affect your
statutory rights. This warranty applies only to the in-
itial purchaser and is non-transferable.
DES Ltd
Units 14-15
Bilston Industrial Estate
Oxford Street
Bilston
WV14 7EG
Tel.: 0870 787 6177
Fax: 0870 787 6168
e-mail: [email protected]
Importer
KOMPERNASS GMBH
BURGSTRASSE 21
D-44867 BOCHUM
www.kompernass.com
IB_KH1114_UK4 10.10.2007 16:18 Uhr Seite 7

- 8 -
IB_KH1114_UK4 10.10.2007 16:18 Uhr Seite 8

- 9 -
Pojemność Strona
Wskazówki bezpieczeństwa 10
Dane techniczne 11
Zakres dostawy 11
Użytkowanie zgodne z przeznaczeniem 11
Opis urządzania 11
Przed pierwszym użyciem 11
Ustawianie czasu 11
Funkcja pamięci 11
Przyrządzanie kawy 12
Wyznaczanie czasu rozpoczęcia parzenia 12
Czyszczenie i konserwacja 13
Usuwanie kamienia 13
Usuwanie usterek 14
Utylizacja 14
Gwarancja i serwis 15
Importer 15
Przed pierwszym użyciem urządzenia należy dokładnie przeczytać niniejszą instrukcję obsługi i zachować ją na
przyszłość. Przekazując urządzenie innej osobie należy jej również udostępnić niniejszą instrukcję obsługi.
IB_KH1114_PL4.qxd 10.10.2007 16:17 Uhr Seite 9

- 10 -
AAuuttoommaatt ddoo kkaawwyy
KKHH 11111144
Wskazówki
bezpieczeństwa
NNiieebbeezzppiieecczzeeńńssttwwoo ppoorraażżeenniiaa
pprrąąddeemm!!
• Urządzenie należy podłączać wyłącznie do pra-
widłowo zainstalowanego gniazdka ze stykiem
uziemiającym.
• Przed poruszaniem lub napełnianiem, w przypadku
wystąpienia zakłóceń, przed czyszczeniem lub w
przypadku zaprzestania użytkowania urzą-dzenia
należy wyciągnąć wtyczkę z gniazdka sieciowego.
• Nigdy nie zanurzać urządzenia w cieczach. Jeżeli
mimo wszystko do obudowy urządzenia dostanie
się ciecz, należy natychmiast wyciągnąć wtyczkę
urządzenia z gniazdka. Zlecić naprawę wykwalifi-
kowanemu personelowi specjalistycznemu.
• Nigdy nie chwytać ani nie dotykać urządzenia,
kabla sieciowego lub wtyczki wilgotnymi rękami.
• Wyciągając kabel sieciowy z gniazda, pociągaj
zawsze za wtyczkę, a nie za kabel.
• Nie wyginaj i nie przygniataj kabla sieciowego.
• Przed każdym użyciem sprawdź kabel sieciowy i
wtyczkę. W wypadku uszkodzenia przewodu za-
silania należy zwrócić się do producenta, autory-
zowanego serwisu lub wykwalifikowanego punk-
tu naprawczego w celu naprawienia usterki.
NNiieebbeezzppiieecczzeeńńssttwwoo ppoożżaarruu!!
• W trakcie używania nigdy nie zostawiać urzą-
dzenia bez nadzoru.
• Nigdy nie używać urządzenia bez wody.
• Nie ustawiać urządzenia w pobliżu źródeł ciepła.
• Nie stosować przedłużaczy.W razie zagrożenia
wtyczka musi znajdować się w dostępnej od-
ległości.
ZZaaggrroożżeenniiee ooddnniieessiieenniieemm
oobbrraażżeeńń!!
• Nigdy nie używać termosu r urządzenia
w kuchence mikrofalowej.
• Nie wolno dopuścić, by dzieci używały urzą-
dzenie bez nadzoru osoby dorosłej. Należy
poinformować dzieci o zagrożeniach, powodo-
wanych przez urządzenie.
• Kabel sieciowy musi być ułożony tak, aby nikt
nie mógł po nim deptać ani potknąć się o kabel.
• Nie wkładać ostrych lub twardych przedmiotów
do termosu r. Nie wkładać palców do termo-
su. Może to spowodować uszkodzenia urząd-
zenia i obrażenia.
OOssttrrzzeeżżeenniiee pprrzzeedd ppooppaarrzzeenniiaammii!!
• Podczas parzenia nigdy nie otwierać uchwytu
filtra q.
• Nie dotykać gorącego wkładu filtracyjnego. Filtr pa-
pierowy należy wyjmować dopiero wtedy, gdy
ciecz całkowicie spłynie i filtr ostygnie. Do usuwania
filtra papierowego należy używać wkładu filtra yn.
• Nie trzymać rąk nad obszarem unoszenia się
pary wodnej.
• Nigdy nie przemieszczać urządzenia podczas
parzenia.
• Termos r należy wyjmować dopiero wtedy, gdy
parzenie zostanie zakończone i filtr jest pusty.
• Przed włączeniem urządzenia zawsze zamykać
koszyczek na filtr, w przeciwnym wypadku ist-
nieje zagrożenia poparzenia z powodu ulatnia-
jącej się gorącej pary wodnej.
UUwwaaggaa::
PPoozzwwoollii ttoo uunniikknnąąćć uusszzkkooddzzeenniiaa uurrzząą--
ddzzeenniiaa!!
• Do zbiornika wody w urządzenia należy nale-
wać wyłącznie czystej wody wodociągowej.
• Szkła termosu r nie należy nigdy narażać na
duże wahania temperatury. Może to spowodo-
wać uszkodzenie szkła.
• Nie przejmuje się żadnej odpowiedzialności za
uszkodzenia, spowodowane pęknięciem szkła!
IB_KH1114_PL4.qxd 10.10.2007 16:17 Uhr Seite 10

- 11 -
Dane techniczne
Napięcie sieciowe : 220 - 240 V
~
50 Hz
Moc znamionowa: 1000 W
Filtr do kawy: Wielkość 1x4
Zakres dostawy
• Ekspres do kawy KH 1114 z funkcją zegara ste-
rującego
• Termos z pokrywką
• Miarka
• Instrukcja obsługi
Przed uruchomieniem urządzenia sprawdź, czy
w zestawie znajdują się wszystkie elementy oraz
czy nie występują żadne uszkodzenia.
Użytkowanie zgodne z
przeznaczeniem
Ekspres do kawy służy wyłącznie do przyrządzania
kawy. Ten ekspres kawowy przeznaczony jest
wyłącznie do zastosowania w gospodarstwach
domowych. Nie należy go używać do zastosowań
przemysłowych.
Opis urządzania
Ilustracja znajduje się na tylnej wkładce.
EEkksspprreess ddoo kkaawwyy::
q Uchwyt filtra
w Zbiornik wody
e Skala
r Termos
t Kieszeń na kabel
y Wkład filtra
PPaanneell sstteerroowwaanniiaa::
u Przycisk „min”
i Przycisk „auto”
o Pokrętło regulacji aromatu
a Czerwona kontrolka
s Zielona kontrolka
d Przełącznik „off”
f Przełącznik „on”
g Czerwona kontrolka „calc”
h Przycisk „prog”
j Przycisk „h”
Przed pierwszym
użyciem
UUWWAAGGAA::
Nie napełniać wody powyżej znacznika
„Max” (10 filiżanek). Urządzenie może
zostać przepełnione.
• Przed pierwszym użyciem ustawić pokrętło re-
gulatora aromatu o w pozycji i dwukrotnie
przegotować urządzenie z 8. dużymi filiżankami
wody. Nie wkładać filtra papierowego i nie
nasypywać kwy.
• Oczyścić urządzenie (patrz rozdział Czyszczenie
i konserwacja).
Ustawianie czasu
• Tyle razy naciskać przycisk „h” j (ustawianie
godzin) lub przycisk „min” u (ustawianie minut),
aż ustawiony zostanie wymagany czas.
FFuunnkkccjjaa ppaammiięęccii
W razie awarii zasilania ustawienie czasu zegaro-
wego i czasu startu pozostaje zachowane przez
około 3 minuty.
IB_KH1114_PL4.qxd 10.10.2007 16:17 Uhr Seite 11

- 12 -
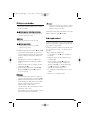
Przyrządzanie kawy
Należy unikać parzenia mniej niż 2 dużych lub
3 małych filiżanek. Inaczej kawa nie będzie miała
wymaganej temperatury i mocy.
• Odchylić uchwyt filtra q nach na zwewnątrz
i włożyć filtr papierowy (wielkość 1x4)
z załamanym szwem do wkładu filtra y.
Za pomocą miarki napełnić kawy (średnio
lub drobno zmielonej) do filtra (rys. ).
Plaska miarka odpowiada przy tym ok. 6 g
zmielonej kawy.
• Obrócić uchwyt filtra q z pworotem do
wnętrza ekspresu do kawy.
• Nalać wymaganą ilość wody do zbiornika
wody w (rys. ). Skorzystać przy tym z
zewnętrznej skali e (rys. ). Nie napełniać
wody powyżej znacznika „Max” (10 filiżanek).
• Ustawić moc kawy za pomocą pokrętła regu-
lacji aromatu o (rys. ). Ustawienie daje
mocną kawę, a ustawienie słabszą kawę.
• Wstawić termos r do ekspresu do kawy. Przed
każdym użyciem upewnić się, że termos r jest
pusty.
WWsskkaazzóówwkkaa::
Kawa pozostanie dłużej ciepła, jeżeli termos
zostanie przepłukany gorącą wodą.
• Nacisnąć przełącznik „on” f u góry, aby roz-
począć parzenie. Świeci czerwona kontrolka a.
• Można wyjąć termos r i podać kawę, gdy
czerwona kontrolka a zgaśnie.
Przy nalewaniu kawy należy kierować się ilustracją .
WWsskkaazzóówwkkaa::
Przed ponownym parzeniem kawy lub napełnia-
niem wody pozostawić ekspres do kawy na
około 5 minut do wystygnięcia.
WWyyzznnaacczzaanniiee cczzaassuu rroozzppoocczzęęcciiaa
ppaarrzzeenniiaa
Przyciskiem „prog” h można tak ustawić ekspres
do kawy, aby rozpoczął parzenie kawy o określo-
nej godzinie. Najpierw nasypać zmielonej kawy
do filtra papierowego we wkładzie filtra y, a
następnie napełnić wody do zbiornika wody w.
Wstawić termos r do ekspresu do kawy. Upewnić
się, że termos r jest pusty i zbiornik wody nie zo-
stał napełniony powyżej maksimum (10 filiżanek).
• Nacisnąć i przytrzymać przycisk „prog” h.
Ustawić wymaganą godzinę rozpoczęcia par-
zenia za pomocą przycisku „h” j i przycisku
„min” u (patrz rozdział „Ustawianie czasu”).
• Po wprowadzeniu wymaganej godziny startu
zwolnić przycisk „prog” h. Czas rozpoczęcia
parzenia został zaprogramowany.
• Ustawić wymaganą moc kawy za pomocą
pokrętła regulacji aromatu o.
• Nacisnąć przycisk „auto” i, aż zaświeci zielona
kontrolka s.
• Jeżeli automatyczny początek parzenia ma
zostać ponownie dezaktywowany, nacisnąć
przełącznik „off” d.
g
3 2 3 x 6g 18
4
1
/
2
3 4 x 6g 24
6 4 5 x 6g 30
7
1
/
2
5 6 x 6g 36
9 6 7 x 6g 42
10
1
/
2
7
7
1
/
2
x 6g
45
12 8
8
1
/
2
x 6g
51
13
1
/
2
9 9 x 6g 54
15 10 10 x 6g 60
IB_KH1114_PL4.qxd 10.10.2007 16:17 Uhr Seite 12

- 13 -
Czyszczenie i konserwacja
• Przed każdym czyszczeniem urządzenia wyjąć
wtyczkę z gniazdka sieciowego.
NNiieebbeezzppiieecczzeeńńssttwwoo ppoorraażżeenniiaa eelleekkttrryycczznneeggoo!!
Przed rozpoczęciem czyszczenia ekspresu do
kawy należy zawsze wyciągnąć wtyczkę
z gniazdka sieciowego.
UUwwaaggaa!!
Nigdy nie zanurzać ekspresu do kawy w wodzie.
NNiieebbeezzppiieecczzeeńńssttwwoo ppooppaarrzzeenniiaa!!
Przed rozpoczęciem czyszczenia odczekać
do całkowitego ostudzenia ekspresu do kawy.
Do czyszczenia zdjąć pokrywkę z termosu r
(patrz rys. ).
• Do usuwania brudu nigdy nie używać
artykułów do czyszczenia ani żadnych innych
ostrych przedmiotów. W przeciwnym wypadku
można uszkodzić ekspres do kawy.
• Obudowę ekspresu do kawy i termos f czyścić
miękką ściereczką, lekko zwilżoną delikatnym
płynem do mycia naczyń.
• Po każdym użyciu wyjmować filtr papierowy
z wkładu filtra y.
• Wyjąć filtr i wypłukać uchwyt filtra q, wkład
filtra y i termos r pod bieżącą wodą.
CCzzyysszzcczzeenniiee ppookkrryywwkkii
• W celu oczyszczenia pokrywki termosu należy
ją najpierw rozłożyć na części zgodnie z
poniższym opisem (rys. ):
• Ostrożnie zdjąć podkładkę silikonową z czopa
od dołu pokrywki. Przytrzymać przy tym czop,
gdyż od przeciwnej strony jest on dociskany
sprężyną.
• Wyjąć czop ze sprężyną z pokrywki.
• Oczyścić części w delikatnym płynie do mycia
naczyń, a potem dobrze wysuszać.
• Aby ponownie zmontować pokrywkę należy
postępować w odwrotnej kolejności.
UUwwaaggaa!!
Nie pozostawiać termosu i pokrywki w wod-
zie z płynem do mycia naczyń ani nie myć ich
w zmywarce do naczyń, gdyż inaczej części
mogą stracić szczelność.
Jeżelli ekspres do kawy nie będzie używany przez
dłuższy czas, należy schować kabel w kieszeni na
kabel t (rys. ).
Usuwanie kamienia
Przy wysokiej twardości wody odkamienianie jest
konieczne po każdych 30 przygotowaniach kawy,
natomiast przy niskiej twardości wody po każdych
60 przygotowaniach.
Stosować wyłącznie środki do odkamieniania do-
mowego użytku, przeznaczone dla ekspresów do
kawy, i przestrzegać instrukcji użycia danego środka.
Sposób usuwania kamienia:
• Dodać środek odkamieniający do zbiornika na
wodę w.
• Napełnić na maks. 8 dużych filliżanek.
• Ustawić pokrętło regulatora aromatu o na
„calc”, aby rozpopcząć funkcję odkamnieniania.
• Nacisnąć przełącznik f „on”. Świeci czerwona
kontrolka a i miga kontrolka „calc” g.
• Odczekać, aż ekspres przegotuje całą wodę.
• Po usuwaniu kamieniać przegotować w ekspresie
dwa razy po 8 filiżanek wody.
• Po odkamienieniu ekspres do kawy wyłącza się.
IB_KH1114_PL4.qxd 10.10.2007 16:17 Uhr Seite 13

- 14 -
Usuwanie usterek
EEkksspprreess ddoo kkaawwyy nniiee ddzziiaałłaa::
• Urządzenie nie jest włączone. Nacisnąć
przełącznik „on” f, aby włączyć urządzenie.
• Wtyczka nie jest podłączona do gniazdka sie-
ciowego. Połączyć urządzenie z siecią zasilają-
cą. Podłącz wtyczkę do gniazdka sieciowego.
• Ekspres do kawy nie wystygnął jeszcze wystarc-
zająco po ostatnim parzeniu. Przed ponownym
parzeniem kawy pozostawić ekspres do kawy
na około 5 minut do wystygnięcia.
PPrroocceess ppaarrzzeenniiaa nniiee rroozzppoocczzyynnaa ssiięę oo
wwyymmaaggaannyymm cczzaassiiee ((zzeeggaarr sstteerruujjąąccyy))::
• Zegar sterujący nie został aktywowany. Nacis-
nąć przycisk „auto” i, aby aktywować zegar
sterujący.
• Czas nie jest poprawnie ustawiony. Sprawdzić
czas i ustawić go w miarę potrzeby.
KKaawwaa jjeesstt zzaa mmooccnnaa aallbboo zzaa ssłłaabbaa::
• W zbiorniku wody jest za mało lub za dużo
wody. Napełnić odpowiednią ilość wody.
• Nasypano za dużo lub za mało zmielonej kawy.
Nasypać mniej lub więcej zmielonej kawy.
• Kawa jest zmielona za drobno lub za grubo.
Wybrać inny stopień zmielenia kawy.
PPrroocceess ppaarrzzeenniiaa ttrrwwaa nniieettyyppoowwoo
ddłłuuggoo..
UUrrzząąddzzeenniiee wwyyłłąącczzaa ssiięę ppooddcczzaass
ppaarrzzeenniiaa..
PPooddcczzaass ppaarrzzeenniiaa uurrz
ząąddzzeenniiee pprraaccuujjee
ggłłoośśnniieejj..
WWyyddoossttaajjee ssiięę bbaarrddzzoo dduużżoo ppaarryy..
• System parzenia urządzenia jest pokryty osadem
kamienia kotłowego. Odkamienić urządzenie zgod-
nie z opisem w rozdziale „Usuwanie kamienia”.
Utylizacja
Urządzenia nie należy wyrzucać wraz z
normalnymi odpadami domowymi.
Urządzenie należy poddać utylizacji w akredyto-
wanym zakładzie utylizacji lub komunalnym
zakładzie utylizacji odpadów.
Należy przestrzegać aktualnych przepisów. W razie
pytań należy skontaktować się z komunalnym
zakładem utylizacji odpadów.
Wszystkie materiały wchodzące w skład
opakowania należy przekazać do odpo-
wiednich punktów zbiórki odpadów.
IB_KH1114_PL4.qxd 10.10.2007 16:17 Uhr Seite 14

- 15 -
Gwarancja i serwis
Urządzenie objęte jest trzyletnią gwarancją, licząc
od daty zakupu. Urządzenie zostało starannie
wyprodukowane i poddane skrupulatnej kontroli
przed wysyłką. Paragon należy zachować jako do-
wód dokonania zakupu. W przypadku roszczeń
gwarancyjnych należy skontaktować się telefonicz-
nie z serwisem. Tylko w ten sposób można zagwar-
antować bezpłatną wysyłkę zakupionego produktu.
Gwarancja obejmuje wyłącznie wady materiałowe
i fabryczne, natomiast nie obejmuje części ulegają-
cych zużyciu ani uszkodzeń części łatwo łamli-
wych, np. wyłącznika lub akumulatorów. Urządze-
nie jest przeznaczone wyłącznie do użytkowania
w gospodarstwie domowym, a nie do celów prze-
mysłowych.
Gwarancja traci ważność w przypadku niewłaści-
wego używania urządzenia, używania niezgodne-
go z przeznaczeniem, użycia siły lub ingerencji w
urządzenie dokonywanej poza naszymi autoryzo-
wanymi punktami serwisowymi. Niniejsza gwa-
rancja nie ogranicza ustawowych praw nabywcy
urządzenia. Niniejsza gwarancja obowiązuje
wyłącznie w odniesieniu do pierwotnego nabywcy
produktu i nie podlega cesji.
KKoommppeerrnnaassss SSeerrvviiccee PPoollsskkaa
ul, Strycharska 4
26-600 Radom
Tel. 048 360 91 40
Fax.048 384 65 38
e-mail: support.pl@kompernass.com
Importer
KOMPERNASS GMBH
BURGSTRASSE 21
D-44867 BOCHUM
www.kompernass.com
IB_KH1114_PL4.qxd 10.10.2007 16:17 Uhr Seite 15

- 16 -
IB_KH1114_PL4.qxd 10.10.2007 16:17 Uhr Seite 16

- 17 -
Tartalmjegyzék Oldalszám
Biztonsági utasítások 18
Műszaki adatok 19
Tartozékok 19
Rendeltetésszerű használat 19
A készülék leírása 19
Az első használat előtt 19
Az óra beállítása 19
Memória funkció 19
Kávéfőzés 20
A főzés elindításának meghatározása 20
Tisztítás és karbantartás 21
Vízkőoldás 21
Hibaelhárítás 22
Ártalmatlanítás 22
Garancia és szerviz 23
Gyártja 23
Az első használat előtt figyelmesen olvassa el az útmutatót, és későbbi használatra tegye el.
A készülék harmadik fél részére történő továbbadásakor adja át a leírást is.
IB_KH1114_HU4.qxd 10.10.2007 16:23 Uhr Seite 17

- 18 -
KKáávvééffőőzzőő ggéépp
KKHH 11111144
Biztonsági utasítások
ÁÁrraammüüttééss vveesszzééllyyee!!
• A készüléket csak előírásszerűen beszerelt és
földelt konnektorba csatlakoztassa.
• Húzza ki a hálózati dugót a hálózati aljzatból,
ha a készüléket mozgatja, tölti, ha hiba lép fel,
a készülék tisztításának megkezdése előtt vagy
ha nincs szüksége a készülékre.
• Soha ne merítse a készüléket folyadékba. Ha
mégis folyadék kerülne a készülék burkolatába,
azonnal húzza ki a készülék csatlakozóját az
aljzatból.Képzett szakemberrel javíttassa meg.
• Ne fogja meg nedves kézzel az eszközt, a
hálózati kábelt és a hálózati dugót.
• Soha ne húzza ki a csatlakozót a kábelnél fogva,
a csatlakozóvéget fogja meg.
• Ne törje meg és ne szorítsa be a hálózati kábelt.
• Használat előtt mindig ellenőrizze a hálózati
kábelt és a csatlakozót. Ha megsérül a készülék
hálózati vezetéke, cseréltesse ki a gyártóval, annak
ügyfélszolgálatával vagy hasonló szakemberrel,
hogy ne veszélyeztesse magát.
TTűűzzvveesszzééllyy!!
• Üzemeltetés közben soha se hagyja a készüléket
felügyelet nélkül.
• Csapvíz nélkül soha ne működtesse a készüléket.
• A készüléket soha se állítsa hőforrás közelébe.
• Ne használjon hosszabbítókábelt.Veszély esetén
a csatlakozónak gyorsan elérhetőnek kell lennie.
SSéérrüüllééssvveesszzééllyy!!
• Soha ne használja a készülék hőszigetelő kan-
náját r a mikrohullámú sütőben.
• Soha ne engedje, hogy a gyermekek felnőtt
felügyelete nélkül használják a készüléket.
Magyarázza el a gyermekeknek a készülék
veszélyeit.
• Úgy helyezze el a hálózati kábelt, hogy arra
senki ne léphessen rá és senki ne botolhasson
meg benne.
• Ne dugjon a tegyen a kannába r hegyes vagy
kemény tárgyat. Ne nyúljon bele a kannába.
Ez kárt tehet a készülékben és sérülést okozhat.
FFiiggyyeellmmeezztteettééss,, lleeffoorrrráázzhhaattjjaa mmaaggáátt!!
• A főzési eljárás során soha ne nyissa ki a szűrő-
tartót q.
• Ne érjen hozzá a forró filterhez. Csak azután vegye
ki a szűrőpapírt, miután a folyadék eltávozott és
a szűrőpapír lehűlt. Használja a filterbetétet y a
papírfilter eltávolítására.
• Ne tartsa kezét a felszálló vízgőzbe.
• A főzési eljárás során soha ne mozgassa az
eszközt.
• Csak azután vegye ki a kannát r, ha a főzés
befejeződött és a szűrő kiürült.
• Bekapcsolás előtt zárja le a szűrőtartót, mivel
a felszálló gőz és a forró víz leforrázhatja.
VViiggyyáázzaatt::
ÍÍggyy kkeerrüüllhheettii eell,, hhooggyy kkáárr kkeelleettkkeezzzzeenn
aa kkéésszzüülléékkbbeenn!!
• Kizárólag tiszta csapvizet töltsön a készülék
víztartályába w.
• Ne tegye ki a termoszkannában r lévő üveget
nagy hőingadozásnak. Az üveg megsérülhet.
• Az üveg eltöréséből eredő kárért nem vállalunk
felelősséget!
IB_KH1114_HU4.qxd 10.10.2007 16:23 Uhr Seite 18

- 19 -
Műszaki adatok
Hálózati feszültség: 220 - 240 V
~
50 Hz
Névleges teljesítmény: 1000 W
Kávéfilter: 1x4-es méret
Tartozékok
• időzítő funkcióval rendelkező kávéfőző automata
KH 1114
• fedeles hőszigetelő kanna
• mérőkanál
• használati útmutató
Üzembe helyezés előtt kérjük ellenőrizze, hogy a cso-
mag hiánytalan-e és nincsen-e esetleg megsérülve.
Rendeltetésszerű
használat
A kávéfőző kizárólag csak kávé készítésre alkal-
mazható. Ez a kávéfőző rendeltetésszerűen csak
magánháztartásokban használható. Ne használja
kereskedelmi célokra.
A készülék leírása
Az ábra a hátsó kihajtható oldalon található.
KKáávvééffőőzzőő::
q filtertartó
w víztartály
e skála
r hőszigetelő kanna
t vezetéktartó
y filterbetét
KKeezzeellőőppaanneell::
u „min“ gomb
i „auto“ gomb
o forgatható aromaszabályozó
a piros kijelzőlámpa
s zöld kijelzőlámpa
d „off“ kapcsoló
f „on“ kapcsoló
g piros „calc“ kijelzőlámpa
h „prog“ gomb
j „h“ gomb
Az első használat előtt
TTuuddnniivvaallóó::
Soha ne töltsön bele több vizet, mint ahogy az
a Max jelzéssel meg van adva (10 csésze).
A készülékből kifolyhat a viz.
• Mielőtt először használná a készüléket, állítsa a
forgatható aromaszabályozót o beállításra
és eresszen át a gépen kétszer 8 nagy csésze
vizet. Ne helyezzen be papírfiltert és ne hasz-
náljon hozzá kávét.
• Tisztítsa meg a készüléket (lásd a Tisztítás és kar-
bantartás részt).
Az óra beállítása
• Nyomja meg annyiszor a „h“ gombot j az
órák, és a „min“ gombot u a percek beállításához,
amíg be nem állította a kívánt időpontot.
MMeemmóórriiaa ffuunnkkcciióó
Az óra és a kezdési idő beállítása áramkimaradás
után akár 3 percig megmarad.
IB_KH1114_HU4.qxd 10.10.2007 16:23 Uhr Seite 19

- 20 -
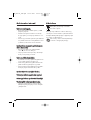
Kávéfőzés
Ha lehet, ne főzzön 2 nagy vagy 3 kis csészénél
kevesebb kávét. Különben a kávé nem lesz elég
meleg és elég erős.
• Hajtsa ki a filterszűrőt q és helyezzen be egy
behajtott oldalú papírfiltert (1x4-es méret) a fil-
terbetétbe y.
Töltsön a mérőkanállal őrölt kávét (közepesen
durvára vagy finomra őröltet) a papírfilterbe
( ábra).
Egy csapott mérőkanál kb. 6 g őrölt kávénak
felel meg.
• Hajtsa vissza a filtertartót q a kávéfőző auto-
matába.
• Töltse bele a víztartályba w a kívánt vízmennyisé-
get ( ábra). Használja hozzá a külső skálát
e (ábra). Soha ne töltsön bele több vizet,
mint ahogy az a Max jelzéssel meg van adva
(10 csésze).
• A kávé erősségét állítsa be a forgatható aro-
maszabályozóval o ( ábra). A beállítás
erős kávét eredményez, a beállítás pedig
gyengét.
• Helyezze be a hőszigetelő kannát r a kávéfő-
ző automatába. Használat előtt győződjön meg
róla, hogy a termoszkanna r üres.
TTuuddnniivvaallóó::
A kávé tovább marad meleg, ha a kannát
előtte forró vízzel kiöblíti.
• Nyomja meg az „on“ f kapcsolót a felső végén,
ha el szeretné indítani a főzést. A piros kijelző-
lámpa a világít.
• Ha a piros kijelzőlámpa a kialszik, kiveheti a
termoszkannát r és felszolgálhatja a kávét.
A kávé kitöltésére vonatkozólag vegye figyelembe
a ábrát.
TTuuddnniivvaallóó::
Hagyja kb. 5 percig hűlni a kávéfőző automatát,
mielőtt másik kávét kezdene főzni vagy vizet
töltene bele.
AA ffőőzzééss eelliinnddííttáássáánnaakk mmeegghhaattáárroozzáássaa
A"prog" gombbal húgy állíthatja be a kávéfőző
automatát, hogy az meghatározott időpontban
kezdje meg a kávéfőzést. Először mindig töltse
bele a kávét a filterbetétben y lévő papírfilterbe
és a vizet a víztartályba w. Helyezze a kannát r a
kávéfőző automatába. Győződjön meg róla, hogy
a kannát r üres és a víztartály nincs
a Max jelzés fölött megtöltve (10 csésze).
• Nyomja meg a „prog“ h gombot és tartsa lenyom-
va. Állítsa be a kívánt kezdési időt a „h“ j és
„min“ u gombokkal (lásd az „Idő beállítása“
részt).
• Ha beállította a kívánt időt, engedje el a „prog“
h gombot. Ezzel be van programozva a kezdési
idő.
• A kávé erősségét a forgatható aromaszabályo-
zóval o állíthatja be.
• Nyomja meg az „auto“ igombot, amíg világítani
nem kezd a zöld kijelzőlámpa s .
• Ha ki szeretné kapcsolni az automatikus főzésin-
dítást, nyomja meg az „off“ d kapcsolót.
g
3 2 3 x 6g 18
4
1
/
2
3 4 x 6g 24
6 4 5 x 6g 30
7
1
/
2
5 6 x 6g 36
9 6 7 x 6g 42
10
1
/
2
7
7
1
/
2
x 6g
45
12 8
8
1
/
2
x 6g
51
13
1
/
2
9 9 x 6g 54
15 10 10 x 6g 60
IB_KH1114_HU4.qxd 10.10.2007 16:23 Uhr Seite 20
Strona się ładuje...
Strona się ładuje...
Strona się ładuje...
Strona się ładuje...
Strona się ładuje...
Strona się ładuje...
Strona się ładuje...
Strona się ładuje...
Strona się ładuje...
Strona się ładuje...
Strona się ładuje...
Strona się ładuje...
Strona się ładuje...
Strona się ładuje...
Strona się ładuje...
Strona się ładuje...
Strona się ładuje...
Strona się ładuje...
Strona się ładuje...
Strona się ładuje...
Strona się ładuje...
Strona się ładuje...
Strona się ładuje...
Strona się ładuje...
Strona się ładuje...
Strona się ładuje...
Strona się ładuje...
Strona się ładuje...
Strona się ładuje...
Strona się ładuje...
Strona się ładuje...
Strona się ładuje...
Strona się ładuje...
Strona się ładuje...
Strona się ładuje...
Strona się ładuje...
Strona się ładuje...
Strona się ładuje...
Strona się ładuje...
Strona się ładuje...
Strona się ładuje...
Strona się ładuje...
Strona się ładuje...
Strona się ładuje...
-
 1
1
-
 2
2
-
 3
3
-
 4
4
-
 5
5
-
 6
6
-
 7
7
-
 8
8
-
 9
9
-
 10
10
-
 11
11
-
 12
12
-
 13
13
-
 14
14
-
 15
15
-
 16
16
-
 17
17
-
 18
18
-
 19
19
-
 20
20
-
 21
21
-
 22
22
-
 23
23
-
 24
24
-
 25
25
-
 26
26
-
 27
27
-
 28
28
-
 29
29
-
 30
30
-
 31
31
-
 32
32
-
 33
33
-
 34
34
-
 35
35
-
 36
36
-
 37
37
-
 38
38
-
 39
39
-
 40
40
-
 41
41
-
 42
42
-
 43
43
-
 44
44
-
 45
45
-
 46
46
-
 47
47
-
 48
48
-
 49
49
-
 50
50
-
 51
51
-
 52
52
-
 53
53
-
 54
54
-
 55
55
-
 56
56
-
 57
57
-
 58
58
-
 59
59
-
 60
60
-
 61
61
-
 62
62
-
 63
63
-
 64
64


Kompernass Coffeemaker KH 1114 Instrukcja obsługi
- Kategoria
- Akcesoria do parzenia kawy
- Typ
- Instrukcja obsługi
- Niniejsza instrukcja jest również odpowiednia dla
w innych językach
Inne dokumenty
-
Bifinett KH 1114 Operating Instructions Manual
-
Silvercrest KH 1115 Operating Instructions Manual
-
Silvercrest SKAK 1000 A1 Operating Instructions Manual
-
Silvercrest KH 1081 Operating Instructions Manual
-
Philips HD7450/70 Instrukcja obsługi
-
Philips HD7544/56 Instrukcja obsługi
-
Philips HD7690/30 Instrukcja obsługi
-
-
 Butler 645-056 Instrukcja obsługi
-
 Butler 645-071 Instrukcja obsługi

