
QUICK INSTALLATION GUIDE
SIMPLIFY MONITORING AND CONTROL SYSTEM
|en|da|de|fr|es|nl|no|pl|sv|
*110077*
110077
Rev.1.2 · 2023-W05-3

|en| QUICK INSTALLATION GUIDE........................................................9
|da| LYNINSTALLATIONSVEJLEDNING..................................................14
|de| KURZANLEITUNG ZUR INSTALLATION.............................................18
|fr| GUIDE D'INSTALLATION RAPIDE...................................................23
|es| GUÍA DE INSTALACIÓN RÁPIDA....................................................28
|nl| BEKNOPTE GEBRUIKERSHANDLEIDING............................................33
|no| HURTIGVEILEDNING FOR INSTALLASJON . . .. . . .. . . . . . .. . . .. . . . . . .. . . .. . . . . . .. . . ..38
|pl| SKRÓCONA INSTRUKCJA INSTALACJI..............................................42
|sv| SNABB INSTALLATIONSGUIDE .....................................................47

123
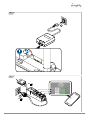
1
Simplify Relay Box
Simplify Control Unit
Simplify Sensor Box
Simplify Sensor Probe
RH/TEMP
Resistive
IAQ
s
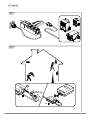
3

2
Android 5.1 IOS10 “Dantherm Simplify”
REGISTER
123
3
4

4
3x
1x
123
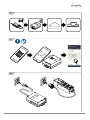
5
5

6
123
2x
3x
I.
II.
7
6

https://simplifyclimatesolutions.com
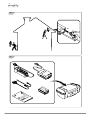
8
9
10
1
2
3
7

I.
II.
11
123
12
8

en
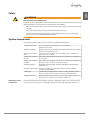
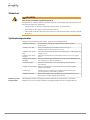
Safety
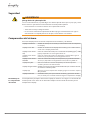
WARNING
Danger of injury and explosion!
Incorrect use can cause liquid to leak from the battery, which is harmful to the skin, eyes and
mucous membranes. An incorrectly inserted battery may explode!
• When inserting the battery, ensure that the positive and negative terminals are inserted
correctly.
• Never open the battery and never dispose of the battery in a fire.
• In case of contact with leaking liquid, rinse immediately with water. If the liquid gets
into your eyes, seek additional medical attention.
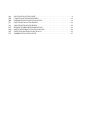
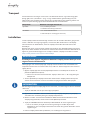
System components
The Simplify system includes several hardware and software components:
Simplify Control Unit A control unit for the control and radio connection of
Simplify components.
Simplify Sensor Box Unit for connecting aSimplify Sensor Probe and for radio connection
with theSimplify Control Unit.
Simplify Sensor Probe–
IAQ
Cable with sensor head for air quality (TVOC [µg/m3], eCO2 [ppm]).
Available in 24cm length.
Simplify Sensor Probe–
Resistive
Cable with sensor head for water content in materials[%]. Available in
24cm length.
Simplify Sensor Probe–
RH/TEMP
Cable with sensor head for temperature[°C] and relative humidity[%].
Available in 24cm, 300cm and 2000cm length.
Simplify Relay Box Relay with 3socket outlets. Available with different plug types for
184-265VAC.
Simplify Integration Box Unit for integration of a mobile Dantherm CDT MKII and MKIII
condensing dehumidifier.
Simplify App Smartphone application that is used for scanning Simplify compon-
ents and registration of the system. Supports iOS and Android.
Simplify Dashboard Online platform for presentation of data and generation of reports as
well as remote control of some Simplify components.
Unpacking system
components
The main components of the Simplify system are depicted in figure1. The contents of the
case may vary. Check the case and Simplify components for proper condition before use.
9

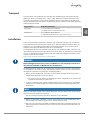
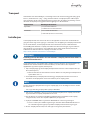
Transport
The lithium batteries contained are subject to the requirements of the dangerous goods
regulations (class9 dangerous goods, lithium content >1.0g, <5.0g). When shipping via
third parties (e.g. air transport or freight forwarding), special requirements for packaging and
marking must be observed. In this case, a dangerous goods expert must be consulted when
preparing the package for shipping.
Component Batteries contained
Control unit 1 × 3.7 V lithium-ion battery
1 × CR2032 lithium button cell battery.
Sensor box 1 × 9 V metal lithium battery.
≥ 1200mAh (for a service life of at least 5years)
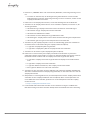
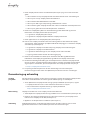
Installation
Fully charge the Simplify Control Unit for 4hours when putting it into operation for the first
time or after prolonged storage (≥ 6months). If you notice that the Simplify Control Unit has a
damaged battery, send the Simplify Control Unit to Dantherm A/S for battery replacement.
The battery provided with the Simplify Sensor Box is not rechargeable and must be replaced
once discharged. To provide for a service life of 5years, use a 9V metal lithium battery with at
least 1200mAh. For replacement of the battery in the Simplify Sensor Box, please refer to the
video under:
https://www.youtube.com/watch?v=3drKseAWyKs
NOTICE
The product warranty is voided if a battery in the Simplify Control Unit is re-
placed by anyone other than Dantherm A/S.
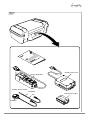
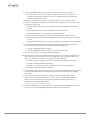
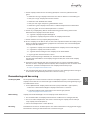
The start-up is carried out with the Simplify App „Simplify Climate Solutions“ for smartphones
and tablets. If you have not installed it yet, download it from the respective App Store and in-
stall the app (Fig.2).
1. Open the Simplify App and have the Simplify components ready to scan the affixed QR
codes (Fig.3).
ðIf the list is empty, you will be prompted to scan directly. For each additional compon-
ent, press "ADD" or "+".
2. Scan the QR code on the Simplify Control Unit and name the Simplify Control Unit so that
the results can be clearly assigned to this project later.
INFORMATION
If a previous project has not been archived in the Simplify App, the previous name is displayed
instead of "Archived".
• To store the previous project, press "ARCHIVE".
3. Open the "SENSORS" tab. Scan and name eachSimplify Relay Box, eachSimplify Sensor
Box and, if applicable, other Simplify components.
4. If you are using a Dantherm CDT MKII and MKIII condensing dehumidifier with
Simplify Integration Box, scan the corresponding QR code on the unit.
10

en
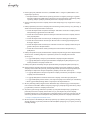
5. Press "CONTROL UNIT" and then "REGISTER" to start the registration.
ðYou have 12hours to complete the registration. After that, the GSM connection will
be disconnected. To attempt the registration once more, unplug and then plug in
the Simplify Control Unit again.
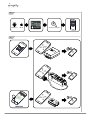
6. Position the Simplify Control Unit, e.g. using the magnets on the back.
7. Connect theSimplify Control Unit to a socket outlet (figure4 and wait until the LED
flashes green.
ðLED flashing orange: Simplify Control Unit searching for Ethernet or GSM signal
ðLED lights up orange: Simplify Control Unit connected
ðLED flashing red: Backup battery defective
ðLED lights up red: No mains voltage, backup battery active
ðLED flashing green: Simplify Control Unit is ready for connecting the components
ðLED lights up green: All scanned components are connected
8. Connect each Simplify Relay Box to a properly earthed socket outlet and monitor the
connection to theSimplify Control Unit (Fig.5).
ð1 beep: Simplify Relay Box switched on
ð3 beeps: Simplify Relay Box connected with Simplify Control Unit
9. Connect the equipment to each Simplify Relay Box (Fig.6).
10. Position each Simplify Sensor Box one after another and connect each corresponding
Simplify Sensor Probe. For this, pull back the handle part of the plug before plugging it
in. This switches the Simplify Sensor Box on. (Fig.7).
ð2 beeps: Simplify Sensor Box switched on and Simplify Sensor Probe is working
ð3 beeps: Simplify Sensor Box connected
ð1 beep: battery is working, but defective Simplify Sensor Probe
ðNo beep: Battery empty or missing
11. Connect other accessories if given (e.g. a DanthermCDT MKII and MKIII condensing
dehumidifier with Simplify Integration Box) and connect them to theSimplify Control
Unit.
12. Using the link below, check if all components are connected with the Simplify Control
Unit and are active in the Simplify Dashboard (Fig.8). If a component does not connect
after 10minutes, reposition the component or the Simplify Control Unit.
ðhttps://simplifyclimatesolutions.com
13. For further information, you can find the current version of the detailed operating in-
structions under the link or the QR code on the back of these instructions.
11

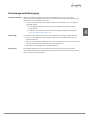
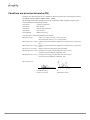
Disassembly and Disposal
Complete the
project
When a project is completed, it must be archived using the app. Otherwise, when there is no
power supply via the mains plug, the Simplify Control Unit will continue to operate with the
backup battery.
1. Scan the QR code of the Simplify Control Unit and press "ARCHIVE" in the app (Fig.9).
ðThe Simplify Control Unit is switched off by the "Cloud" after a maximum of
10minutes.
ðThe successful archiving can be checked in the Simplify Dashboard under:
https://simplifyclimatesolutions.com
Disassembly The Simplify Sensor Box switches off when the Simplify Sensor Probe is unplugged.
1. Unplug the mains plugs of the Simplify Control Unit and the Relay Boxes from the socket
outlets (Fig.10).
2. Unplug and collect all other components. Remove the Simplify Sensor Probe from each
Simplify Sensor Box (Fig.11).
3. Stow all the components in the case (Fig.12).
Disposal The product does not belong in household waste and must be disposed of separately in
accordance with the applicable statutory regulations. For more information, please refer to
the operating instructions.
12

en
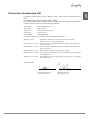
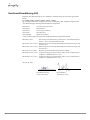
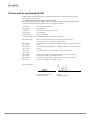
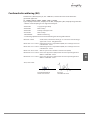
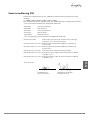
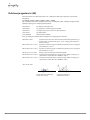
Declaration of conformity (EU)
Dantherm A/S, Marienlystvej 65, DK - 7800 Skive hereby declares that the equipment listed
below:
No.: 380000, 380010, 380003, 380005, 380011, 380006
Type Simplify Control Unit, Simplify Sensor Box, Simplify Relay Box, Simplify Integration Box
- complies with the provisions of the following guidelines:
2014/35/EU Low Voltage Directive
2014/30/EU EMC Directive
2014/53/EU Radio Equipment Directive
2011/65/EU RoHS Directive
1907/2006/EC REACH Regulation
- and is manufactured in accordance with the following standards:
EN 62368-1:2020 Audio/video, information and communication technology
equipment - Part 1: Safety requirements
EN 301 489-1 V2.1.1:2017 Electromagnetic compatibility (EMC) standard for radio equipment
and services; Part1
EN 301 489-3 V2.1.1:2019 Electromagnetic compatibility (EMC) standard for radio equipment
and services; Part3
EN 301 511 V12.5.1:2017 Global System for Mobile communications (GSM)
EN 300 220-2 V3.2.1:2018 Short Range Devices (SRD) operating in the frequency range 25 MHz
to 1 000 MHz; Part 2
EN 300 220-1 V3.1.1:2017 Short Range Devices (SRD) operating in the frequency range 25 MHz
to 1 000 MHz; Part 1
Skive, 03.01.2023
Product development
Henrik Sick Hansen
Jakob Bonde Jessen
Managing Director
13

Sikkerhed
ADVARSEL
Risiko for tilskadekomst og eksplosionsfare!
Forkert brug kan medføre, at væske strømmer ud af batteriet, der skader hud, øjne og
slimhinder. Et forkert isat batteri kan eksplodere!
• Sørg ubetinget for, at plus- og minuspolen vender rigtigt, når batteriet lægges i.
• Åbn aldrig batteriet og kast aldrig batteriet i ilden.
• Skyl straks med vand, hvis du kommer i kontakt med udløbende væske. Kommer væske i
øjnene, skal du gå til læge.
Systemkomponenter
Simplify-systemet omfatter flere hard- og softwarekomponenter.
Simplify Control Unit En styreenhed til styring og trådløs forbindelse af Simplify-
komponenter.
Simplify Sensor Box Produkt til at tilslutte en Simplify Sensor Probe og til trådløs forbindelse
med Simplify Control Unit.
Simplify Sensor Probe -
IAQ
Kabel med sensorhoved til luftkvalitet (TVOC [µg/m3], eCO2 [ppm]).
Fås i længde 24cm.
Simplify Sensor Probe -
Resistive
Kabel med sensorhoved til vandindhold i materialer [%]. Fås i længde
24cm.
Simplify Sensor Probe -
RH/TEMP
Kabel med sensorhoved til temperatur [°C] og relativ luftfugtighed [%].
Fås i længde 24cm, 300cm og 2000cm.
Simplify Relay Box Relæ med 3stikdåser. Fås med forskellige stiktyper til 184-265VAC.
Simplify Integration Box Produkt til at integrere en mobil Dantherm CDT MKII og MKIII
kondenserings-luftaffugter.
Simplify App Smartphone-app til at scanne simplify-komponenter og til at systemre-
gistrere. Understøtter iOS og Android.
Simplify Dashboard Online-platform til at vise data og udarbejde rapporter samt til at
fjernstyre forskellige Simplify-komponenter.
Systemkomponen
ter pakkes ud
Hovedkomponenterne til Simplify-systemet findes på billede 1. Indholdet i kufferten kan
afvige. Kontroller kufferten og Simplify-komponenterne for mangler, før de bruges.
14

da
Transport
De indeholdte litium-batterier skal overholde kravene i bestemmelser om farligt gods
(farligt gods, klasse 9, litiumindhold >1,0g, <5,0g). Sendes produktet af tredjemand (f.eks.
lufttransport eller spedition), skal der overholdes særlige krav, der stilles til emballage og
mærkning. Her skal en person, der er ekspert i farligt gods, kontaktes, når
forsendelsesenheden forberedes.
Komponent Indeholdte batterier
Styreenhed 1× 3,7V litium-ion-batteri
1× CR2032 litium-knapcelle-batteri.
Sensorkasse 1× 9 V metal-litium-batteri
≥1200mAh (levetid på mindst 5 år)
Installation
Lad Simplify Control Unit helt i 4 timer, før den bruges første gang eller efter længere opbe-
varing (≥6måneder) Konstateres det, at Simplify Control Unit har et beskadiget batteri, sen-
des Simplify Control Unit til Dantherm A/S til batteriudskiftning.
Det medleverede batteri til Simplify Sensor Box kan ikke genoplades og skal skiftes efter af-
ladning. Brug et 9 V metal-lithium-batteri med mindst 1200 mAh for at sikre 5 års levetid.
Batteriskift i Simplify Sensor Box vises i følgende video:
https://www.youtube.com/watch?v=3drKseAWyKs
BEMÆRK
Produktgarantien bortfalder, hvis et batteri i Simplify Control Unit erstattes af
andre end Dantherm A/S.
Ibrugtagningen gennemføres med Simplify App „Simplify Climate Solutions“ til
Smartphones og Tablets. Hvis disse ikke er installeret endnu, downloades de fra den
pågældende App-Store, hvorefter appen installeres (billede2).
1. Åbn Simplify App og hold Simplify-komponenterne klar til at scanne de påklæbede
QR-koder (billede3).
ðEr en liste tom, opfordres du direkte til at scanne. Til hver yderligere komponent
trykkes på „ADD“ eller „+“.
2. Scan QR-koden på Simplify Control Unit og navngiv Simplify Control Unit, så
resultaterne kan forbindes entydigt til dette produkt på et senere tidspunkt.
INFO
Hvis et tidligere projekt ikke er arkiveret i Simplify App, vises det tidligere navn i stedet for
„Archived“.
• Det tidligere projekt gemmes ved at trykke på „ARCHIVE“.
3. Åbn fanen „SENSORS“. Scan og betegn hver Simplify Relay Box, hver Simplify Sensor
Box og evt. yderligere Simplify-komponenter.
4. Bruges en Dantherm CDT MKII og MKIII kondenserings-luftaffugter med Simplify
Integration Box, scannes den pågældende QR-kode på produktet.
5. Tryk på „CONTROL UNIT“ og så på „REGISTER“ for at starte registreringen.
ðDu har 12 timer til at afslutte registreringen. Herefter afbrydes GSM-forbindelsen.
Registreringen forsøges igen ved at fjerne Simplify Control Unit sætte den i igen.
6. Placer Simplify Control Unit f.eks. vha. magneten på bagsiden.
15

7. Forbind Simplify Control Unit til en stikdåse (billede4) og vent, til LED-lampen blinker
grøn.
ðLED blinker orange: Simplify Control Unit søger efter Ethernet- eller GSM-signal
ðLED lyser orange: Simplify Control Unit forbundet
ðLED blinker rød: Bufferbatteri defekt
ðLED lyser rød: Ingen netspænding, bufferbatteri aktiv
ðLED blinker grøn: Simplify Control Unit er klar til at forbinde komponenterne
ðLED lyser grøn: Alle scannede komponenter er forbundet
8. Forbind hver Simplify Relay Box til en forskriftsmæssigt jordforbundet stikdåse og overvåg
forbindelsen til Simplify Control Unit (billede5).
ð1 signaltone: Simplify Relay Box tændt
ð3 signaltoner: Simplify Relay Box forbundet med Simplify Control Unit
9. Forbind produkterne til hver Simplify Relay Box (billede6).
10. Placer hver Simplify Sensor Box en ad gangen og forbind den tilhørende Simplify Sensor
Probe. Træk hertil stikkets gribedel tilbage før istikningen. Derved tændes Simplify Sensor
Box. (billede7).
ð2 signaltoner: Simplify Sensor Box tændt og Simplify Sensor Probe fungerer
ð3 signaltoner: Simplify Sensor Box forbundet
ð1 signaltone: Batteri fungerer, men Simplify Sensor Probe defekt
ðingen signaltone: Batteri tomt eller findes ikke
11. Forbind hvis til stede yderligere tilbehør (f.eks. Dantherm CDT MKII og MKIII kondense-
rings-luftaffugter med Simplify Integration Box) og forbind det med Simplify Control Unit.
12. Kontroller under følgende link, om alle komponenter er forbundet med Simplify Control
Unit og er aktive i Simplify Dashboard (billede8). Hvis en komponent ikke forbindes efter
10 minutter, positioneres komponenten eller Simplify Control Unit igen.
ðhttps://simplifyclimatesolutions.com
13. Yderligere informationer findes i den aktuelle udgave af den detaljerede driftsvejledning
under linket eller Qr-koden på bagsiden af denne vejledning.
Demontering og bortskaffelse
Projekt afsluttes Når et projekt er afsluttet, skal det gemmes vha. appen. Ellers kører Simplify Control Unit vi-
dere med bufferbatteriet, hvis netstikket er uden spænding.
1. Scan QR-koden til Simplify Control Unit og tryk i appen på „ARCHIVE“ (billede9).
ðSimplify Control Unit slukkes efter maks. 10 minutter af „Cloud“.
ðDen korrekte arkivering kan kontrolleres i Simplify Dashboard:
https://simplifyclimatesolutions.com
Afmontering Simplify Sensor Box slukker, hvis Simplify Sensor Probe afbrydes.
1. Træk netstikket til Simplify Control Unit og relæboksene ud af stikdåsen (billede10).
2. Afbryd alle yderligere komponenter og saml dem sammen. Fjern Simplify Sensor Probe på
hver Simplify Sensor Box (billede11).
3. Gem alle komponenterne i kufferten (billede12).
Bortskaffelse Produktet må ikke smides ud sammen med det almindelige affald og skal bortskaffes separat
iht. de gældende, lovmæssige bestemmelser. Yderligere informationer findes i betjeningsvej-
ledningen.
16

da
Overensstemmelseserklæring (EU)
Dantherm A/S, Marienlystvej 65, DK - 7800 Skive, erklærer hermed, at produkterne, der
nævnes nedenfor:
Nr.: 380000, 380010, 380003, 380005, 380011, 380006
type: Simplify Control Unit, Simplify Sensor Box, Simplify Relay Box, Simplify Integration Box
– overholder bestemmelserne i de efterfølgende direktiver:
2014/35/EU Lavspændings-direktiv
2014/30/EU EMC-direktiv
2014/53/EU Radioudstyr-direktiv
2011/65/EU Direktiv om begrænsning af anvendelsen af visse farlige stoffer i elektrisk
og elektronisk udstyr
1907/2006/EF REACH-forordning
– og fremstilles i overensstemmelse med følgende standarder:
EN 62368-1:2020 Audio-/video-, informations- og kommunikationsteknologiudstyr –
Del 1: Sikkerhedskrav
EN 301 489-1 V2.1.1:2017 Elektromagnetisk kompatibilitet (EMC) standard til radioudstyr og
radiotjenester; del 1
EN 301 489-3 V2.1.1:2019 Elektromagnetisk kompatibilitet (EMC) standard til radioudstyr og
radiotjenester; del 3
EN 301 511 V12.5.1:2017 Globalt System for Mobilkommunikation (GSM)
EN 300 220-2 V3.2.1:2018 Short Range Devices (SRD) operating in the frequency range 25
MHz to 1 000 MHz; Part 2:
EN 300 220-1 V3.1.1:2017 Short Range Devices (SRD) operating in the frequency range 25
MHz to 1 000 MHz; Part 1:
Skive, 03.01.2023
Produktudvikling
Henrik Sick Hansen
Direktør
Jakob Bonde Jessen
17

Sicherheit
WARNUNG
Verletzungsgefahr und Explosionsgefahr!
Bei falscher Anwendung kann Flüssigkeit aus der Batterie austreten, die schädlich für Haut,
Augen und Schleimhäute ist. Eine falsch eingesetzte Batterie kann explodieren!
• Achten Sie beim Einlegen der Batterie unbedingt darauf, dass die Plus- und Minuspole
korrekt eingelegt sind.
• Öffnen Sie die Batterie niemals und werfen Sie die Batterie niemals in ein Feuer.
• Bei Kontakt mit auslaufender Flüssigkeit sofort mit Wasser abspülen. Wenn die Flüssigkeit
in die Augen kommt, nehmen Sie zusätzlich ärztliche Hilfe in Anspruch.
Systemkomponenten
Das Simplify-System umfasst mehrere Hard- und Softwarekomponenten:
Simplify Control Unit Eine Steuereinheit zur Steuerung und zur Funkverbindung von
Simplify-Komponenten.
Simplify Sensor Box Gerät zum Anschluss einer Simplify Sensor Probe und zur
Funkverbindung mit der Simplify Control Unit.
Simplify Sensor Probe -
IAQ
Kabel mit Sensorkopf für Luftqualität (TVOC [µg/m3], eCO2 [ppm]).
Erhältlich in Länge 24cm.
Simplify Sensor Probe -
Resistive
Kabel mit Sensorkopf für Wassergehalt in Materialien [%]. Erhältlich in
Länge 24cm.
Simplify Sensor Probe -
RH/TEMP
Kabel mit Sensorkopf für Temperatur [°C] und relative Luftfeuchtigkeit
[%]. Erhältlich in Länge 24cm, 300cm und 2000cm.
Simplify Relay Box Relais mit 3 Steckdosen. Erhältlich mit verschiedenen Steckertypen für
184-265VAC.
Simplify Integration Box Gerät zur Integration eines mobilen Dantherm CDT MKII und MKIII
Kondensations-Luftentfeuchters.
Simplify App Smartphone-App zum Scannen der Simplify-Komponenten und zur Sys-
temregistrierung. Unterstützt iOS und Android.
Simplify Dashboard Online-Plattform zur Datendarstellung und Berichtserstellung sowie zur
Fernsteuerung einiger Simplify-Komponenten.
Systemkomponen
ten auspacken
Die Haupt-Komponenten des Simplify-Systems sind in Bild 1 dargestellt. Der Inhalt des Koffers
kann abweichen. Prüfen Sie Koffer und Simplify-Komponenten vor der Verwendung auf Un-
versehrtheit.
18

de
Transport
Die enthaltenen Lithium-Batterien unterliegen den Anforderungen des Gefahrgutrechts
(Gefahrgut, Klasse 9, Lithiumgehalt >1,0g, <5,0g). Beim Versand durch Dritte (z.B. Luft-
transport oder Spedition) sind besondere Anforderungen an Verpackung und Kennzeich-
nung zu beachten. Hier muss bei der Vorbereitung des Versandstückes ein Gefahrgut-Exper-
te hinzugezogen werden.
Komponente Enthaltene Batterien
Steuergerät 1× 3,7V Lithium-Ionen-Batterie
1× CR2032 Lithium- Knopfzelle-Batterie.
Sensorkasten 1× 9 V Metall-Lithium-Batterie.
≥1200mAh (für mindestens 5 Jahre Lebensdauer)
Installation
Laden Sie die Simplify Control Unit 4 Stunden lang vollständig auf, wenn Sie diese für den
ersten Gebrauch oder nach längerer Lagerung (≥6 Monate) in Betrieb nehmen. Wenn Sie
feststellen, dass die Simplify Control Unit eine beschädigte Batterie hat, schicken Sie die
Simplify Control Unit zum Batterieaustausch an Dantherm A/S.
Die mitgelieferte Batterie der Simplify Sensor Box ist nicht wiederaufladbar und muss nach
dem Entladen ausgetauscht werden. Um 5 Jahre Lebensdauer zu gewährleisten, verwenden
Sie eine 9V Metall-Lithium-Batterie mit mindestens 1200mAh. Zum Batteriewechsel in der
Simplify Sensor Box siehe Video:
https://www.youtube.com/watch?v=3drKseAWyKs
HINWEIS
Die Produktgarantie erlischt, wenn eine Batterie in der Simplify Control Unit
von jemand anderem als Dantherm A/S ersetzt wird.
Die Inbetriebnahme erfolgt mit der Simplify App „Simplify Climate Solutions“ für Smartpho-
nes und Tablets. Falls Sie diese noch nicht installiert haben, laden Sie sie vom entsprechen-
den App-Store herunter und installieren Sie die App (Bild2).
1. Öffnen Sie die Simplify App, und halten Sie die Simplify-Komponenten bereit, um die
aufgeklebten QR-Codes zu scannen (Bild3).
ðBei einer leeren Liste werden Sie direkt zum Scannen aufgefordert. Für jede weitere
Komponente drücken Sie „ADD“ oder „+“.
2. Scannen Sie den QR-Code auf der Simplify Control Unit und benennen Sie die Simplify
Control Unit so, dass die Ergebnisse diesem Projekt später eindeutig zugeordnet wer-
den können.
INFO
Wenn ein vorheriges Projekt in der Simplify App nicht archiviert wurde, wird der vorherige
Name anstelle von „Archived“ angezeigt.
• Um das vorherige Projekt zu speichern, drücken Sie auf „ARCHIVE“.
3. Öffnen Sie den Reiter „SENSORS“. Scannen und benennen Sie jede Simplify Relay Box,
jede Simplify Sensor Box und ggf. weitere Simplify-Komponenten.
4. Wenn Sie einen Dantherm CDT MKII und MKIII Kondensations-Luftentfeuchter mit Sim-
plify Integration Box verwenden, dann scannen Sie den entsprechenden QR-Code auf
dem Gerät.
19

5. Drücken Sie „CONTROL UNIT“ und anschließend „REGISTER“, um die Registrierung zu star-
ten.
ðSie haben 12 Stunden Zeit, um die Registrierung abzuschließen. Danach wird die
GSM-Verbindung getrennt. Um die Registrierung erneut zu versuchen, stecken Sie die
Simplify Control Unit aus und ein.
6. Platzieren Sie die Simplify Control Unit, z.B. mit Hilfe der Magnete auf der Rückseite.
7. Schließen Sie die Simplify Control Unit an einer Steckdose an (Bild4) und warten Sie, bis
die LED grün blinkt.
ðLED blinkt orange: Simplify Control Unit sucht nach Ethernet- oder GSM-Signal
ðLED leuchtet orange: Simplify Control Unit verbunden
ðLED blinkt rot: Pufferbatterie defekt
ðLED leuchtet rot: Keine Netzspannung, Pufferbatterie aktiv
ðLED blinkt grün: Simplify Control Unit ist bereit für die Verbindung der Komponenten
ðLED leuchtet grün: Alle gescannten Komponenten sind verbunden
8. Schließen Sie jede Simplify Relay Box an einer vorschriftsmäßig geerdeten Steckdose an
und überwachen Sie die Verbindung zur Simplify Control Unit (Bild5).
ð1 Signalton: Simplify Relay Box eingeschaltet
ð3 Signaltöne: Simplify Relay Box mit Simplify Control Unit verbunden
9. Schließen Sie die Geräte an jede Simplify Relay Box an (Bild6).
10. Platzieren Sie nacheinander jede Simplify Sensor Box und schließen Sie jeweils die
zugehörige Simplify Sensor Probe an. Ziehen Sie dafür den Griffteil des Steckers vor dem
Einstecken zurück. Dadurch wird die Simplify Sensor Box eingeschaltet. (Bild7).
ð2 Signaltöne: Simplify Sensor Box eingeschaltet und Simplify Sensor Probe funktio-
niert
ð3 Signaltöne: Simplify Sensor Box verbunden
ð1 Signalton: Batterie funktioniert, aber Simplify Sensor Probe defekt
ðkein Signalton: Batterie leer oder nicht vorhanden
11. Schließen Sie, falls vorhanden, weiteres Zubehör (z.B. Dantherm CDT MKII und MKIII Kon-
densations-Luftentfeuchter mit Simplify Integration Box) an und verbinden Sie es mit der
Simplify Control Unit.
12. Überprüfen Sie unter folgendem Link, ob alle Komponenten mit der Simplify Control Unit
verbunden und im Simplify Dashboard aktiv sind (Bild8). Wenn eine Komponente sich
nach 10Minuten nicht verbindet, positionieren Sie die Komponente oder die Simplify
Control Unit neu.
ðhttps://simplifyclimatesolutions.com
13. Für weiterführende Informationen finden Sie die aktuelle Fassung der ausführlichen
Betriebsanleitung unter dem Link oder dem QR-Code auf der Rückseite dieser Anleitung.
20
Strona się ładuje...
Strona się ładuje...
Strona się ładuje...
Strona się ładuje...
Strona się ładuje...
Strona się ładuje...
Strona się ładuje...
Strona się ładuje...
Strona się ładuje...
Strona się ładuje...
Strona się ładuje...
Strona się ładuje...
Strona się ładuje...
Strona się ładuje...
Strona się ładuje...
Strona się ładuje...
Strona się ładuje...
Strona się ładuje...
Strona się ładuje...
Strona się ładuje...
Strona się ładuje...
Strona się ładuje...
Strona się ładuje...
Strona się ładuje...
Strona się ładuje...
Strona się ładuje...
Strona się ładuje...
Strona się ładuje...
Strona się ładuje...
Strona się ładuje...
Strona się ładuje...
Strona się ładuje...
-
 1
1
-
 2
2
-
 3
3
-
 4
4
-
 5
5
-
 6
6
-
 7
7
-
 8
8
-
 9
9
-
 10
10
-
 11
11
-
 12
12
-
 13
13
-
 14
14
-
 15
15
-
 16
16
-
 17
17
-
 18
18
-
 19
19
-
 20
20
-
 21
21
-
 22
22
-
 23
23
-
 24
24
-
 25
25
-
 26
26
-
 27
27
-
 28
28
-
 29
29
-
 30
30
-
 31
31
-
 32
32
-
 33
33
-
 34
34
-
 35
35
-
 36
36
-
 37
37
-
 38
38
-
 39
39
-
 40
40
-
 41
41
-
 42
42
-
 43
43
-
 44
44
-
 45
45
-
 46
46
-
 47
47
-
 48
48
-
 49
49
-
 50
50
-
 51
51
-
 52
52


