
E
CZ
F
D
GB
I
NL
RO
H
FIN
PL
S
SK
Operating Instructions
Bedienungsanleitung
Mode d‘emploi
Instrucciones de uso
Istruzioni per l‘uso
Gebruiksaanwijzing
Instrukcja obsługi
Használati útmutató
Návod kpoužití
Návod na použitie
Manual de utilizare
Bruksanvisning
Käyttöohje
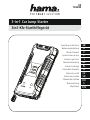
3-in-1Car Jump Starter
3in1-Kfz-Starthilfegerät
00
136692


Pic 1
Pic 2
1
2
3
4
5
6 7
8
red
black
1
3
2
4
5
red
black

2
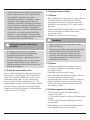
G Operating instruction
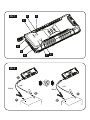
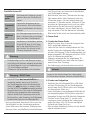
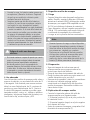
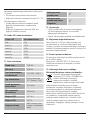
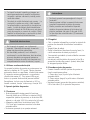
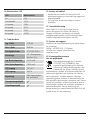
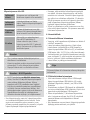
Controls and Displays (Pic 1)
1. Power button /Light on/off
2. USB input
3. Battery status LED
4. USB output
5. LED work light
6. Jump lead socket
7. Jump start status LED
8. Boost button
Thank you for choosing aHama product.
Take your time and read the following instructions
and information completely.Please keep these
instructions in asafe place for futurereference. If
you sell the device, please pass these operating
instructions on to the new owner.
1. Explanation of Warning Symbols and Notes
Warning
This symbol is used to indicate safety instructions
or to draw your attention to specific hazards
and risks.
Note
This symbol is used to indicate additional
information or important notes.
Risk of electric shock
This symbol indicates product parts energized
with adangerous voltage of sucient magnitude
to constitute arisk of electric shock.
2. Package Contents
•Vehicle jump starter
•1jump lead with fully insulated terminal clamps
•1USB vehicle charger (5 V/2A)
•1Micro-USB charging cable
•These operating instructions
3. Safety Notes
•Use the product for its intended purpose only.
•This product is intended for private, non-commer-
cial use only.
•Keep this product, as all electrical products, out of
the reach of children!
•Donot operate the product outside the power
limits given in the specications.
•When using this product, observe the applicable
local traclaws and regulations.
•Take carethat components such as airbags, safety
areas, controls, instruments, etc. and visibility are
not blocked or restricted.
•Donot drop the product and do not expose it to
any major shocks.
Warning
•Risk of injury re and damage by short circuit.
Improper handling of jumper leads may result
in severeinjuries and damage.
•Risk of explosion and re!Keep sources of
ignition (e.g. lit cigarettes) way from battery.
•Risk of chemical burns! Risk of injury to the
eye. Wear protective eyewear and do not lean
over the battery.The electrolyte inside the
drained starter battery remains liquid even at
low temperatures.
•Risk of explosion! Never use the jumper leads
in explosion-prone surroundings.
•Firehazard! The vehicle’sengine displacement
must be within the approved range of the
jumper leads.
•Batteries can generate explosive gases during
charging and release them into the environ-
ment. Make surethereisadequate ventilation
and avoid any sparking.
•Beawarethat battery acid is corrosive. In case
of contact with skin or eyes, rinse the affected
area(s) immediately with plenty of water and
consult adoctor.Ifbattery acid gets onto
fabrics, it willdissolve them within 24–48
hours if left untreated, and can also attack
parts of the body that come into contact. Rinse
the affected area(s) immediately with plenty of
water and change your clothing if necessary.

3
Risk of electric shock
•Donot attempt to service or repair the product
yourself.Leave any and all service work to
qualied experts.
•Donot open the product. Do not continue to
operate the product if it is damaged, which may
be indicated by smoke, odour or loud noises.
Immediately contact your dealer or our service
department (see item “Service and Support”).
4. Proper use
The jump starter can be used to start avehicle
with an empty 12 Vcar battery.For starting diesel
engines with amaximum capacity of 3litres, or
petrol engines with amaximum capacity of 5litres.
The integrated USB output allows charging of mobile
devices, such as atablet or smartphone. Includes a
LED work light with continuous light, stroboscope
and SOS function.
5. Jump starter
5.1 Charging
•Charge the device beforestarting it up for the rst
time. Connect the included Micro-USB cable to the
USB input (2) of the jump starter and to asuitable
USB charger (at least 5V/2A;not included in
delivery package).
•Alternatively,use the supplied 12 VUSB vehicle
charger to charge the device via the cigarette
lighter connection of your vehicle.
•Charging begins and ends automatically.
Note
•Donot leave the device unattended for a
longer time period during charging!
•Charge the jump starter fully beforeusing it for
the rst time.
•Tojump start avehicle, the jump starter must
be at least half charged (at least two of the
four battery status LEDs (2) areconstantly lit).
5.2 Preparations
•Make sureyou observe the jump starting informa-
tion in the vehicles’ operating instructions.
•Pull the parking brake on the vehicle.
•Put the gear lever into neutral position, or,in
the case of an automatic gearbox, select the P
position.
•Switch off vehicle ignitions and all consumers.
•Insert the supplied jump lead into the socket (6)
on the jump starter.Press it in rmly as far as it
will go.
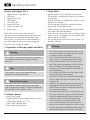
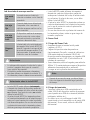
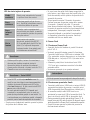
5.3 Jump starting avehicle
•Connect the pole terminals of the jump lead in the
following order:
1. Positive terminal (red) to positive pole of the
vehicle battery
2. Negative terminal (black) to negative pole of the
vehicle battery
•Beforebeginning the start-up procedure, please
check the jump start status LED (7).
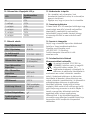
Jump start status LED
Constant
green
Youcan start the vehicle as usual
with the ignition key.
Constant
red
Incorrect connection of the con-
nection plugs. Please check the
jump lead for incorrect polarity.
Flashing
red
Overvoltage protection of the
device is activated, or the battery
level of the jump starter is too low.
No light
Car battery is completely discharged;
press the BOOSTbutton (8) for 3
seconds until the jump start status
LED (7) lights up green. Youcan now
start the vehicle as usual.

4
Warning
•The order of positive pole and negative pole
must be observed when connecting and
removing the pole terminals.
•The jump starter is only suitable for use with
12 Vcar batteries.
•Pole terminals must not touch each other.
Warning –BOOSTbutton
•The BOOSTbutton must only be used if the
status LED is not lit after connecting the jump
starter to the car battery.Inother cases, the
BOOSTbutton must not be used!
•When the Boost button is pressed, the pole
terminals areconnected directly to the built-in
battery,meaning thereisnolonger any reverse
polarity protection. In the case of short circuit
or reversed polarity of the pole terminals, there
is an acute risk of explosion or re!
•After asuccessful start attempt, please remove the
jump starter from the car battery immediately.First
release the black pole terminal from the negative
pole; then release the redpole terminal from the
positive pole. Lastly,disconnect the jump lead from
the jump starter.
•Please note that amaximum of three start
attempts may be performed. Each start attempt
may last amaximum of 5seconds. Wait at least 10
seconds between each start attempt. If after three
start attempts the vehicle engine still does not run
on its own, abandon the start attempt.
•Itisthen obvious that the vehicle has adefect that
is preventing the start attempt. Please have the
vehicle checked by aspecialist workshop.
6. Power pack
6.1 Charging the power pack
•Make surethat your mobile device supports
charging at 5V /2A.
•Charge the device beforestarting it up for the rst
time. Connect the included Micro-USB cable to the
USB input (2) of the jump starter and to asuitable
USB charger (at least 5V/2A;not included in
delivery package).
•Alternatively,use the supplied 12 VUSB vehicle
charger to charge the device via the cigarette
lighter connection of your vehicle.
•Charging begins and ends automatically.
Note
Do not leave the device unattended for alonger
time period during charging!
6.2 Charging terminal devices
•Connect the included Micro-USB cable to the USB
output (4) of the jump starter and to the Micro-
USB port of your terminal device (smartphone,
tablet, etc.)
•The included USB cable may not be suitable for
the USB port of your terminal device. In this case,
use the USB cable that was included with your
terminal device.
•Press the Power button (1) to start the charging
process. The status LEDs (3) show the remaining
capacity of the power pack when charging.
•The jump starter switches off automatically after
charging.
6.3 LED light
•Toswitch on the work light, press and hold the
Power button (1) for at least 3seconds.
•Press the Power button (1) rmly to select, in
turn, the various light modes: Continuous light -
Stroboscope -SOS light
7. Switching off the jump starter
The jump starter has an automatic switch-off
function. Once it is no longer connected to the car
battery,orthe charging of mobile devices has been
completed, it automatically switches to idle mode.

5
8. FAQs
Q: Can my vehicle be damaged if the jump starter is
connected with reversed polarity?
A: The device has overvoltage protection and
protection against incorrect polarity.Should
you connect the terminal clamps incorrectly,
the device recognises this and interrupts the
current ow (red control LED light). (When the
Boost button is pressed, the pole terminals are
connected directly to the built-in battery,meaning
thereisnolonger any reverse polarity protection.
In the case of short circuit or reversed polarity
of the pole terminals, thereisanacute risk of
explosion or re!)
Q: What should Idoifthe vehicle still does not start?
A: Please wait at least 10 seconds between each
start attempt and restrict the start attempt to
amaximum of 5seconds. If after three start
attempts the vehicle engine still does not run on
its own, abandon the start attempt.
It is obvious that the vehicle has adefect that
is preventing the start attempt. Please have the
vehicle checked by aspecialist workshop.
Q: How many start attempts can the device perform?
A: Providing the device has been correctly charged
to 100%, up to 15 start procedures arepossible.
This varies according to the operating conditions
and the size of the engine to be started.
Q: How long is the device ready for use?
A: If the device has been correctly charged to 100%,
it can be stored ready for use for up to six months
(standby time). However,itisrecommendedthat
you charge the device every three months at the
latest, to reduce self-discharge to aminimum.
The life of the integrated battery is very much
dependent on the user application.
Q: How long does it take to fully charge the battery?
A: It takes 5hours to charge the device (with an
empty battery) using a5V/2A USB charger.Use
of aweaker charger is not recommended!
Q: How long does it take to charge asmartphone on
the device?
A: It depends very much on the size of your
smartphone’sbattery –usually afullcharge is
possible within 2hours.
9. Troubleshooting
After connecting the jump lead to the car battery,the
control light on the jump starter does not light up.
•Either the vehicle battery is completely discharged
or the connection to the jump starter is
interrupted.
•Press the Boost button (8) for 3seconds until the
control light lights up green and the vehicle is
ready for astart attempt.
Charging the integrated battery takes over 10 hours.
•Anincorrect charger is being used for charging.
•Please use acharger with a5V/2Acharging
current.
The power button does not function
•The jump starter’sdeep discharge protection is
activated and the device has switched off.
•Please connect the device to aUSB charger to
deactivate the protection function.
10. Battery status LED
LED Battery status
Off 0%
1xashing 10 %
1xilluminated
25 %
2xilluminated 50 %
3xilluminated 75 %
4xilluminated 100 %

6
11. Technical Data
Typ. output 27,9 Wh
Min. output 26,6 Wh
Jump start current 12 V/ 250 –500 A
Battery type
3.7 Vlithium poly-
mer (3 installed)
Typ. battery capacity
2510 mAh
Min. battery capacity
2400 mAh
USB input 5V/1.4 A
USB output 5V/2 A
Degree of protection
IP65 (protection
against dust and
water spray)
Overvoltage protection
ü
Polarity reversal
protection
ü
12. Careand Maintenance
•Only clean this product with aslightly damp,
lint-free cloth and do not use aggressive cleaning
agents.
•Make surethat water does not get into the
product.
13. Warranty Disclaimer
Hama GmbH &CoKGassumes no liability and
provides no warranty for damage resulting from
improper installation/mounting, improper use of
the product or from failuretoobserve the operating
instructions and/or safety notes.
14. Service and Support
Please contact Hama Product Consulting if you have
any questions about this product.
Hotline: +49 9091 502-115 (German/English)
Further support information can be found here:
www.hama.com
15. Recycling Information
Note on environmental protection:
After the implementation of the European
Directive 2012/19/EU and 2006/66/EU in
the national legal system, the following
applies: Electric and electronic devices as
wellasbatteries must not be disposed of
with household waste. Consumers areobliged by law
to return electrical and electronic devices as wellas
batteries at the end of their service lives to the public
collecting points set up for this purpose or point of
sale. Details to this aredened by the national law of
the respective country.This symbol on the product,
the instruction manual or the package indicates that
aproduct is subject to these regulations. By
recycling, reusing the materials or other forms of
utilising old devices/batteries, you aremaking an
important contribution to protecting our
environment.

7
D Bedienungsanleitung
Bedienungselemente und Anzeigen (Pic 1)
1. Power-Taste/ Licht Ein/Aus
2. USB-Eingang
3. Akku-Status-LED
4. USB-Ausgang
5. LED-Arbeitsleuchte
6. Buchse Starthilfekabel
7. Starthilfe-Status-LED
8. Boost-Taste
Vielen Dank, dass Sie sich für ein Hama Produkt
entschieden haben!
Nehmen Sie sich Zeit und lesen Sie die folgenden
Anweisungen und Hinweise zunächst ganz durch.
Bewahren Sie diese Bedienungsanleitung anschlie-
ßend an einem sicheren Ort auf,umbei Bedarf
darin nachschlagen zu können. Sollten Sie das Gerät
veräußern, geben Sie diese Bedienungsanleitung an
den neuen Eigentümer weiter.
1.
Erklärung von Warnsymbolen und Hinweisen
Warnung
Wirdverwendet, um Sicherheitshinweise zu
kennzeichnen oder um Aufmerksamkeit auf
besondereGefahren und Risiken zu lenken.
Hinweis
Wirdverwendet, um zusätzlich Informationen
oder wichtige Hinweise zu kennzeichnen.
Gefahr eines elektrischen Schlages
Dieses Symbol weist auf eine Berührungsgefahr
mit nicht isolierten Teilen des Produktes hin,
die möglicherweise eine gefährliche Spannung
von solcher Höhe führen, dass die Gefahr eines
elektrischen Schlags besteht.
2. Packungsinhalt
•Kfz-Starthilfegerät
•1Starthilfekabel mit vollisolierten Polzangen
•1USB-Kfz-Ladegerät (5V/2A)
•1Micro-USB-Ladekabel
•diese Bedienungsanleitung
3. Sicherheitshinweise
•Verwenden Sie das Produkt ausschließlich für den
dazu vorgesehenen Zweck.
•Das Produkt ist für den privaten, nicht-gewerbli-
chen Gebrauch vorgesehen.
•Dieses Produkt gehört, wie alle elektrischen
Produkte, nicht in Kinderhände!
•Betreiben Sie das Produkt nicht außerhalb
seiner in den technischen Daten angegebenen
Leistungsgrenzen.
•Beim Einsatz des Produktes im Straßenverkehr
gelten die Vorschriften der StVZO.
•Beachten Sie, dass keine Komponenten, wie der
Airbag, Sicherheitsbereiche, Bedienelemente,
Instrumente, etc. oder die Sicht, verdeckt oder
einschränkt sind.
•Lassen Sie das Produkt nicht fallen und setzen Sie
es keinen heftigen Erschütterungen aus.
Warnung
•Verletzungs-, Brand- und Beschädigungsgefahr
durch Kurzschluss! Der unsachgemäße Umgang
mit dem Starthilfekabel kann zu schweren
Verletzungen und Beschädigungen führen.
•Verpuffungs- und Brandgefahr! Zündquellen (z.B.
brennende Zigarette) von der Batterie fernhalten.
•Verätzungsgefahr! Risiko von Augenverletzungen.
Schutzbrille tragen und nicht über die Batterie
beugen. Das Elektrolyt der entladenen Starterbat
-
terie ist auch bei niedrigen Temperaturen üssig.
•Explosionsgefahr! Verwenden Sie das Starthilfe-
kabel nicht in explosionsgefährdeter Umgebung.
•Brandgefahr! Der Hubraum der Fahrzeuge
muss innerhalb der zulässigen Grenzen des
Starthilfekabels liegen.

8
• Batterien können während des Ladens explosi-
ve Gase entwickeln und in die Umgebung ab-
geben. Sorgen Sie für ausreichende Belüftung
und vermeiden Sie jegliche Funkenbildung.
• Beachten Sie, dass Batteriesäureätzend ist.
Bei Kontakt mit Haut oder Augen, spülen Sie
die betroffene(n) Stelle(n) umgehend mit viel
Wasser und suchen Sie einen Arzt auf.Batte-
riesäureauf Textilien löst diese unbehandelt
innerhalb 24-48 Stunden auf und kann auch
damit in Kontakt stehende Körperstellen
angreifen. Spülen Sie die betroffene(n) Stelle(n)
umgehend mit viel Wasser und wechseln Sie
ggf.die Bekleidung.
Gefahr eines elektrischen Schlages
•Versuchen Sie nicht, das Produkt selbst zu war-
ten oder zu reparieren. Überlassen Sie jegliche
Wartungsarbeit dem zuständigen Fachpersonal.
•Öffnen Sie das Produkt nicht und betreiben Sie
es bei Beschädigungen, davon ausgehender
Rauchentwicklung, Geruchsbildung oder
lauten Geräusche nicht weiter.Wenden Sie sich
umgehend an Ihren Händler oder unsereServi
-
ceabteilung (siehe Pkt. Service und Support).
4. Bestimmungsgemäße Verwendung
Mit dem Starthilfegerät kann ein Fahrzeug mit einer
leeren 12V-Autobatterie wieder gestartet werden.
Zum Starten von Dieselmotoren bis max. 3l Hubraum
bzw.Benzinmotoren bis max. 5l Hubraum. Durch
den integrierten USB-Ausgang können auch mobile
Endgeräte wie z.B. Tablet/ Smartphone geladen
werden. Inklusive LED-Arbeitsleuchte mit Dauerlicht,
Stroboskop- und SOS-Funktion.
5. Starthilfegerät
5.1 Auadung
•Laden Sie das Gerät vor Inbetriebnahme auf.Ver-
binden Sie dazu das beiliegende Micro-USB-Kabel
mit dem USB-Eingang (2) des Starthilfegerätes und
einem geeigneten USB-Ladegerät mit mind. 5V/2A
(nicht im Lieferumfang enthalten).
•Alternativ verwenden Sie das mitgelieferte 12V
USB-KFZ-Ladegerät zum Laden über den Zigaret-
tenanschluss ihres Fahrzeugs.
•Der Ladevorgang startet und endet automatisch.
Hinweis
•Lassen Sie das Gerät während des Ladevor-
gangs nicht über einen längeren Zeitraum
unbeaufsichtigt!
•Laden Sie vor dem ersten Gebrauch das Start-
hilfegerät zunächst einmal vollständig auf.
•Für die Starthilfe eines Fahrzeuges muss das
Starthilfegerät mindestens zur Hälfte geladen
sein (mindestens 2der 4Akkustatus-LED (2)
leuchten dauerhaft).
5.2 Vorbereitungen
•Beachten Sie unbedingt die Hinweise zur Starthilfe
in den Betriebsanleitungen der Fahrzeuge.
•Feststellbremse am Fahrzeug anziehen.
•Schalthebel in Leerlaufstellung bringen, Automa-
tikgetriebe in Stellung P.
•Zündungen der Fahrzeuge und alle Verbraucher
ausschalten.
•Stecken Sie das mitgelieferte Starthilfekabel in die
Buchse (6) am Starthilfegerät. Bitte fest reindrü-
cken bis zum Anschlag.
5.3 Starthilfe geben
•Polklemmen des Starthilfekabels in folgender
Reihenfolge anklemmen:
1. Plusklemme (rot) an den Pluspol der Fahrzeug-
batterie
2. Minusklemme (schwarz) an den Minuspol der
Fahrzeugbatterie
•Bevor Sie den Startvorgang beginnen kontrollieren
Sie bitte die Starthilfe-Status-LED (7).

9
Starthilfe-Status-LED
Dauerhaft
grün
Sie können das Fahrzeug nun wie
gewohnt über den Zündschlüssel
starten.
Dauerhaft
rot
Fehlerhafte Verbindung der An-
schlussstecker.Bitte kontrollieren
Sie das Starthilfekabel auf falsche
Polarität.
Blinkend
rot
Der Überspannungsschutz des Ge-
rätes ist aktiviert oder zu niedriger
Akkustand beim Starthilfegerät.
kein Licht
Autobatterie ist tiefentladen, drücken
Sie die BOOST-Taste (8) für 3Sekun-
den bis die Starthilfe-Status-LED (7)
grün leuchtet. Nun können Sie das
Fahrzeug wie gewohnt starten.
Warnung
•Die Reihenfolge von Plus- und Minuspol ist beim
Anschließen und Entfernen unbedingt einzuhalten.
•Das Starthilfegerät ist nur zur Verwendung mit
12V Autobatterien geeignet.
•Polklemmen dürfen einander nicht berühren.
Warnung –BOOST-Taste
•Die BOOST-Taste darf ausschließlich nur
verwendet werden, wenn nach Anschluss
des Starthilfegerätes an die Autobatterie die
Status-LED nicht leuchtet. In anderen Fällen
darf die BOOST-Taste nicht verwendet werden!
•Bei gedrückter Boost-Taste sind die Polklemmen
direkt mit dem eingebauten Akku verbunden,
dadurch besteht kein Verpolungsschutz mehr.
Bei Kurzschluss oder Verpolung der Polklemmen
besteht akute Explosions und Brandgefahr!
•Nach erfolgreichem Startversuch bitte sofort das
Starthilfegerät von der Autobatterie entfernen.
Hierzu bitte zuerst die schwarze Polklemme vom
Minuspol lösen, anschließend die rote Polklemme
vom Pluspol lösen und zuletzt das Starthilfekabel
vom Starthilfegerät trennen.
•Bitte beachten, dass max. 3Startversuche durchge-
führt werden dürfen. Jeder Startversuch darf max.
5Sekunden dauern. Zwischen jedem Startversuch
mindestens 10 Sekunden warten. Sollte nach 3Start
-
versuchender Fahrzeugmotor noch nicht von selbst
laufen brechen Sie den Startversuch komplett ab.
•Esist dann naheliegend, dass ein Defekt am Fahr
-
zeug vorhanden ist der den Startversuch verhindert.
Bitte lassen Sie dies durch eine Fachwerkstatt prüfen.
6. Power-Pack
6.1 Laden des Power-Packs
•Stellen Sie sicher,dass ihr mobiles Endgerät über
5V/2A aufgeladen werden kann.
•Laden Sie das Gerät vor Inbetriebnahme auf.Ver-
binden Sie dazu das beiliegende Micro-USB-Kabel
mit dem USB-Eingang (2) des Starthilfegerätes und
einem geeigneten USB-Ladegerät mit mind. 5V/2A
(nicht im Lieferumfang enthalten).
•Alternativ verwenden Sie das mitgelieferte 12V
USB-KFZ-Ladegerät zum Laden über den Zigaret-
tenanschluss ihres Fahrzeugs.
•Der Ladevorgang startet und endet automatisch.
Hinweis
Lassen Sie das Gerät während des Ladevorgangs
nicht über einen längeren Zeitraum unbeaufsichtigt!
6.2 Laden von Endgeräten
•Verbinden Sie das beiliegende Micro-USB-Kabel
mit dem USB-Ausgang (4) des Starthilfegerätes
und mit dem Micro-USB-Anschluss Ihres Endgerä-
tes (Smartphone, Tablet, etc.)
•Unter Umständen ist das beiliegende USB-Kabel für
den endgeräteseitigen USB-Anschluss unpassend.
Verwenden Sie dann das USB-Kabel des Endgerätes.
•Drücken Sie die Power-Taste (1), um den Lade-
vorgang zu starten. Während des Ladevorgangs
zeigen die Status-LEDs (3) die noch verfügbare
Kapazität des Power-Packs an.
•Nach erfolgter Auadung schaltet sich das Starthil-
fegerät automatisch aus.

10
6.3 LED-Leuchte
•Zum Einschalten der Arbeitsleuchte, drücken und
halten Sie die Power-Taste (1) für mindestens 3
Sekunden gedrückt.
•Durch festes Drücken der Power-T aste (1) wählen
Sie fortlaufend die verschiedenen Licht-Modi:
Dauerlicht-Stroboskop- SOS- Licht aus
7. Ausschalten des Starthilfegerätes
Das Starthilfegerät hat eine automatische Ausschalt-
funktion. Sobald es nicht mehr mit der Autobatterie
verbunden ist oder der Ladevorgang von mobilen
Endgeräten abgeschlossen ist wechselt es automa-
tisch in den Ruhemodus.
8. FA
Qs
F: Kann ein polverkehrtes Anschließen des Starthilfe-
gerätes mein Fahrzeug schädigen?
A: Das Gerät verfügt über einen Überspannungs-
schutz sowie einen Schutz gegen falsche
Polarität. Sollten Sie dennoch die Anschluss-
klammern falsch verbinden erkennt dies das
Gerät und unterbricht den Stromuss (rote LED
Kontrollleuchte leuchtet auf).
(Bei gedrückter Boost-Taste sind die Polklemmen
direkt mit dem eingebauten Akku verbunden,
dadurch besteht kein Verpolungsschutz mehr.
Bei Kurzschluss oder Verpolung der Polklemmen
besteht akute Explosions und Brandgefahr!)
F:
Wastun, wenn das Fahrzeug dennoch nicht startet?
A: Bitte warten Sie zwischen jedem Startversuch
mindestens 10 Sekunden und begrenzen Sie den
Startversuch auf max. 5Sekunden. Sollte nach
3Startversuchen der Fahrzeugmotor noch nicht
von selbst laufen brechen Sie den Startversuch
komplett ab.
Es ist naheliegend, dass ein Defekt am Fahrzeug
vorhanden ist der den Startversuch verhindert. Bitte
lassen Sie dies durch eine Fachwerkstatt prüfen.
F: Wie viele Startversuche kann das Gerät tätigen?
A: Sofern das Gerät korrekt zu 100% geladen wurde
sind bis zu 15 Startvorgänge mögliche. Dies
variiert von den Einsatzbedingungen sowie der
Motorengröße die gestartet werden soll.
F: Wie lange ist das Gerät einsatzbereit?
A: Wurde das Gerät korrekt zu 100% geladen kann
es bis zu 6Monate einsatzbereit gelagert werden
(Standby-Zeit). Es wirdaber empfohlen spätestens
alle 3Monate das Gerät zu laden, um die Selbst-
entladung auf ein Minimum zu reduzieren.
Die Lebensdauer des integrierten Akkus ist stark
von der Benutzeranwendung abhängig.
F: Wie lange dauert es den Akku voll zu laden?
A: Es dauert 5Stunden, wenn das Gerät (bei leerem
Akku) über ein USB-Ladegerät, das über eine
Ausgangsleistung von 5V/2A verfügt, aufgeladen
wird. Die Benutzung eines schwächeren Ladege-
rätes wirdnicht empfohlen!
F: Wie lange dauert es ein Smartphone am Gerät
aufzuladen?
A: Dies hängt stark von der Größe des Akkus Ihres
Smartphones ab –meist ist eine volle Ladung
innerhalb 2Std. möglich.
9. Fehlerbehebung
Nach Anschluss des Starthilfekabels an der Autobatterie
leuchtet die Kontrollleuchte am Starthilfegerät nicht auf.
•Die Fahrzeugbatterie ist entweder tiefentladen oder
die Verbindung zum Starthilfegerät ist unterbrochen.
•Drücken Sie die Boost-Taste (8) für 3Sekunden
bis die Kontrollleuchte grün aueuchtet und das
Fahrzeug somit bereit für einen Startversuch ist.
Das Auaden des integrierten Akkus dauert über 10 Std.
•Eswirdein falsches Ladegerät zum Auaden
verwendet.
•Bitte verwenden Sie ein Ladegerät mit 5V/2A
Ladestrom.
Der Einschaltknopf ist ohne Funktion
•Der Tiefentlade-Schutz des Starthilfegerätes ist
aktiviert und das Gerät hat sich abgeschalten.
•Bitte verbinden Sie das Gerät mit einem USB-
Ladegerät, um die Schutzfunktion zu deaktivieren.

11
10. Akku-Status-LED
LED Akku-Status
Aus 0%
1x blinkend 10 %
1x leuchtend
25 %
2x leuchtend 50 %
3x leuchtend 75 %
4x leuchtend 100 %
11. Technische Daten
Typ. Leistung 27,9 Wh
Min. Leistung 26,6 Wh
Starthilfestrom 12 V/ 250 –500 A
Batterie-Typ
3.7 VLithium-Polymer
(3 Stk. verbaut)
Typ. Batterie-Kapazität
2510 mAh
Min. Batterie-Kapazität
2400 mAh
USB-Eingang 5V/1.4 A
USB-Ausgang 5V/2 A
Schutzart
IP65 (Staubschutz
und Schutz vor
Strahlwasser)
Überspannungsschutz
ü
Verpolungsschutz
ü
12. Wartung und Pege
•Reinigen Sie dieses Produkt nur mit einem fussel-
freien, leicht feuchten Tuch und verwenden Sie
keine aggressiven Reiniger.
•Achten Sie darauf,dass kein Wasser in das Produkt
eindringt.
13. Haftungsausschluss
Die Hama GmbH &CoKGübernimmt keinerlei
Haftung oder Gewährleistung für Schäden, die
aus unsachgemäßer Installation, Montage und
unsachgemäßem Gebrauch des Produktes oder einer
Nichtbeachtung der Bedienungsanleitung und/oder
der Sicherheitshinweise resultieren.
14. Service und Support
Bitte wenden Sie sich bei Fragen zum Produkt gerne
an die Hama-Produktberatung.
Hotline: +49 9091 502-115 (Deu/Eng)
WeitereSupportinformationen nden sie hier:
www.hama.com
15. Entsorgungshinweise
Hinweis zum Umweltschutz:
Ab dem Zeitpunkt der Umsetzung der
europäischen Richtlinien 2012/19/EU und
2006/66/EG in nationales Recht gilt
folgendes: Elektrische und elektronische
Geräte sowie Batterien dürfen nicht mit dem
Hausmüll entsorgt werden. Der Verbraucher ist
gesetzlich verpichtet, elektrische und elektronische
Geräte sowie Batterien am Ende ihrer Lebensdauer
an den dafür eingerichteten, öffentlichen
Sammelstellen oder an die Verkaufsstelle
zurückzugeben. Einzelheiten dazu regelt das
jeweilige Landesrecht. Das Symbol auf dem Produkt,
der Gebrauchsanleitung oder der Verpackung weist
auf diese Bestimmungen hin. Mit der Wiederverwer-
tung, der stoichen Verwertung oder anderen
Formen der Verwertung von Altgeräten/Batterien
leisten Sie einen wichtigen Beitrag zum Schutz
unserer Umwelt.

12
F Mode d‘emploi
Éléments de commande et d'affichage (Pic 1)
1. Touche d’alimentation (Power) /LumièreON/OFF
2. Entrée USB
3. LED d’état de la batterie
4. Sortie USB
5. Lampe de travail LED
6. Prise pour câble de démarrage
7. LED d’état du câble de démarrage
8. Touche Boost
Nous vous remercions d’avoir choisi un produit Hama.
Veuillez prendreletemps de lirel‘ensemble des
remarques et consignes suivantes. Veuillez conserver
ce mode d‘emploi àportée de main andepouvoir
le consulter en cas de besoin. Transmettez-le au
nouveau propriétaireavec l’appareil le cas échéant.
1. Explication des symboles d‘avertissement et
des remarques
Avertissement
Ce symbole est utilisé pour indiquer des consignes
de sécurité ou pour attirer votreattention sur des
dangers et risques particuliers.
Remarque
Ce symbole est utilisé pour indiquer des informations
supplémentaires ou des remarques importantes.
Risque d’électrocution
Ce symbole indique un risque de contact avec
des parties non isolées du produit susceptibles
de conduireuncourant électrique capable de
provoquer un risque d‘électrocution.
2. Contenu de l‘emballage
•Booster de batterie
•1câble de démarrage àpinces entièrement isolées
•1chargeur de véhicule USB (5 V/2A)
•1câble de charge microUSB
•Mode d‘emploi
3. Consignes de sécurité
•Utilisez le produit exclusivement conformément à
sa destination.
•Ceproduit est destiné àunusage domestique non
commercial.
•Cet appareil, comme tout appareil électrique, doit
êtregardé hors de portée des enfants !
•N‘utilisez pas le produit en dehors des limites de puis-
sance indiquées dans les caractéristiques techniques.
•Veuillez respecter les lois et réglementations
locales en vigueur relatives au code de la route lors
de l‘utilisation du produit.
•Veuillez contrôler que le produit n‘affecte le fonc-
tionnement d‘aucun élément de sécurité tel qu‘un
airbag, zone de sécurité, élément de commande,
instrument, etc. et qu‘il n‘entrave pas la visibilité.
•Protégez le produit des secousses violentes et
évitez tout choc ou toute chute.
Avertissement
•Risque de blessure, d’incendie et d’endom-
magement par court-circuit. Le maniement
non conforme de ces câbles de démarrage est
susceptible de provoquer des blessures et des
dommages graves.
•Risque de déagration et d’incendie. Éloignez
toute source d’inammation (cigarette allumée,
etc.) de la batterie.
•Risque de brûlurepar acide. Risque de lésion
oculaire. Portez des lunettes de protection et ne
vous penchez pas au-dessus de la batterie. L’élec-
trolyte d’une batterie de démarrage déchargée est
liquide, même àfaible température.
•Risque d’explosion. N’utilisez pas les câbles de
démarrage dans un environnement présentant un
risque d’explosion.
•Risque d’incendie. La cylindrée des véhicules doit
se situer dans les limites autorisées pour ces câbles
de démarrage.

13
•Les batteries sont susceptibles de développer
des gaz explosifs pendant la charge et dissiper
ces derniers dans l’environnement. Veillez à
garantir une aération susante et évitez toute
formation d’étincelles.
•Notez que l’acide contenu dans les batteries est
caustique. En cas de contact avec la peau ou
les yeux, rincez immédiatement la /les zone(s)
concernée(s) àgrande eau et consultez un
médecin. Sans traitement, l’acide des batteries
dissout les textiles sous 24-48 heures et peut
donc également agresser les parties du corps en
contact avec les zones concernées. Rincez immé
-
diatement la /les zone(s) concernée(s) àgrande
eau et, le cas échéant, changez de vêtement.
Risque d’électrocution
•Netentez pas de réparer l’appareil vous-même ni
d’effectuer des travaux d’entretien. Déléguez tous
travaux d‘entretien àdes techniciens qualiés.
•N‘ouvrez pas l‘appareil et cessez de l’utiliser en
cas de détérioration, de dégagement de fumée,
de formation d‘odeurs ou de niveau de bruit
élevé. Adressez-vous dans les plus brefs délais
àvotrerevendeur ou ànotreservice clientèle
(voir point Service et assistance).
•Nedéposez jamais le produit sur la batterie.
4. Utilisation conforme
Ce booster permet de démarrer un véhicule dont la
batterie (12 V) est vide. Produit idéal pour démarrer
un moteur diesel d’une cylindrée de 3lmaxi ou un
moteur essence d’une cylindrée de 5lmaxi. Grâce à
la sortie USB intégrée, les appareils mobiles (tablettes,
smartphones, etc.) peuvent également êtrechargés.
Une lampe de travail LED àlumièrepermanente,
fonction de stroboscope et fonction SOS est incluse.
5. Booster
5.1 Charge
•Chargez l’appareil avant de le mettreenservice :
branchez le câble microUSB fourni àl’entrée USB
(2) du booster et àunchargeur USB adapté d’au
moins 5V/2A(non fourni).
•Vous pouvez également utiliser le chargeur de
véhicule USB de 12 Vfourni pour effectuer une
recharge sur l’allume-cigaredevotrevéhicule.
•Lacharge commence et se termine
automatiquement.
Remarque
•Nelaissez pas l’appareil sans surveillance de
manièreprolongée pendant la charge.
•Chargez entièrement le booster avant la
premièreutilisation.
•Pour démarrer un véhicule, le booster doit
êtreaumoins àmoitié chargé (au moins 2
des 4LED d’état de la batterie (2) doivent être
allumées en permanence).
5.2 Préparatifs
•Respectez impérativement les indications d’aide
au démarrage mentionnées dans le mode d’emploi
du véhicule.
•Serrez le frein àmain du véhicule.
•Mettez le levier de vitesses au point mort ou sur P
pour les boîtes automatiques.
•Coupez le contact du véhicule et des
consommateurs.
•Insérez le câble d’aide au démarrage fourni dans
la prise (6) du booster.Insérez-le bien jusqu’à la
butée.
5.3 Démarrage
•Branchez les pinces du câble de démarrage dans
l’ordresuivant :
1. Pince plus (rouge) sur la borne +delabatterie
du véhicule
2. Pince moins (noire) sur le pôle -delabatterie
du véhicule
•Contrôlez la LED d’état de l’aide au démarrage (7)
avant de lancer le démarrage.

14
LED d’état du câble de démarrage
Vert
permanent
Vous pouvez démarrer votre
véhicule comme d’habitude, en
tournant la clé dans le contact.
Rouge
permanent
Branchement incorrect des
connecteurs. Vériez si les pinces
du câble de démarrage sont bien
branchées au bonnes bornes.
Rouge
clignotant
La protection contrelasurtension
de l’appareil est activée ou la
batterie du booster est trop faible.
Aucune
lumière
La batterie du véhicule est profondé-
ment déchargée :appuyez sur la tou-
che BOOST(8) pendant 3secondes
jusqu’à ce que la LED d’état d’aide
au démarrage (7) s’allume en vert.
Vous pouvez alors démarrer votre
véhicule comme d’habitude.
Avertissement
•Respectez impérativement l’ordreprescrit pour
le raccordement et le débranchement des
pinces sur les bornes +et-.
•Lebooster est uniquement adapté aux
batteries de véhicule de 12 V.
•Les pinces ne doivent pas entrer en contact.
Avertissement –Touche BOOST
•Utilisez la touche BOOST exclusivement
lorsque la LED d’état ne s’allume pas après le
branchement du booster àlabatterie du véhicule.
N’utilisez pas la touche BOOSTdans d’autres cas.
•Lorsque vous appuyez sur la touche Boost, les
pinces sont directement connectées àlabatterie
intégrée :aucune protection contreles inversions
de polarité n’est donc plus active. Risque
important d’explosion et d’incendie en cas de
court-circuit ou d’inversion des pinces.
•Après une tentative de démarrage réussie, débran-
chez immédiatement le booster de la batterie du
véhicule :débranchez premièrement la pince noire
de la borne -, puis la pince rouge de la borne +;
débranchez nalement le câble de démarrage du
booster.
•Veuillez noter qu’un maximum de 3tentatives
de démarrage peuvent êtreeffectuées. Chaque
tentative doit durer 5secondes au maximum.
Patientez au moins 10 secondes entrechaque
tentative de démarrage. Interrompez la procédure
de démarrage si le moteur du véhicule ne démarre
toujours pas au bout de 3tentatives.
•Ilest fort probable qu’une panne du véhicule
empêche le démarrage. Faites contrôler ce défaut
par un mécanicien.
6. Bloc d’alimentation
6.1 Charge du bloc d‘alimentation
•Assurez-vous que votreappareil mobile peut être
chargé à5V/2A.
•Chargez l’appareil avant de le mettreenservice :
branchez le câble microUSB fourni àl’entrée USB
(2) du booster et àunchargeur USB adapté d’au
moins 5V/2A(non fourni).
•Vous pouvez également utiliser le chargeur de
véhicule USB de 12 Vfourni pour effectuer une
recharge sur l’allume-cigaredevotrevéhicule.
•Lacharge commence et se termine automatiquement.
Remarque
Ne laissez pas l’appareil sans surveillance de
manièreprolongée pendant la charge.
6.2 Charge d‘appareils
•Branchez le câble microUSB fourni àlasortie
USB (4) du booster et au port microUSB de votre
appareil (smartphone, tablette, etc.).
•Ilest possible que le câble USB fourni ne soit pas
compatible avec le port USB de votreappareil. Uti-
lisez, dans ce cas, le câble USB de votreappareil.
•Appuyez sur la touche Power (1) andedémarrer la
charge. Les LED d’état (3) indiquent la capacité dis-
ponible du bloc d‘alimentation pendant la charge.

15
•Lebooster se met automatiquement hors tension,
une fois la charge terminée.
6.3 Lampe LED
•Maintenez la touche Power (1) enfoncée pendant au
moins 3secondes and’allumer la lampe de travail.
•Enappuyant fermement sur la touche Power (1),
vous pouvez sélectionner en continu un des dif-
férents modes d’éclairage :éclairage permanent -
stroboscope -SOS -extinction
7. Mise hors tension du booster
Le booster dispose d’une fonction de mise hors
tension automatique. il se met automatiquement en
mode veille dès qu’il n’est plus branché àlabatterie
du véhicule ou que la charge de l’appareil mobile
est terminée.
8. FAQ
•Q:Une inversion des bornes de branchement du
booster peut-elle endommager mon véhicule ?
•R:L’appareil dispose d’une protection contrela
surtension ainsi que d’une protection contre
les inversions de polarité. L’appareil reconnaît
toute inversion des pinces et interrompt le débit
de courant (le voyant de contrôle LED s’allume
en rouge). Lorsque vous appuyez sur la touche
Boost, les pinces sont directement connectées à
la batterie intégrée :aucune protection contre
les inversions de polarité n’est donc plus active.
Risque important d’explosion et d’incendie en
cas de court-circuit ou d’inversion des pinces.
•Q:
Que fairesilevéhicule ne démarretoujours pas ?
•R:Attendez au moins 10 secondes pour effectuer
une nouvelle tentative de démarrage et limitez
chaque tentative à5secondes au maximum.
Interrompez la procédurededémarrage si le
moteur du véhicule ne démarretoujours pas au
bout de 3tentatives. Il est fort probable qu’une
panne du véhicule empêche le démarrage.
Faites contrôler ce défaut par un mécanicien.
•Q:Combien de tentatives de démarrage l’appareil
peut-il réaliser ?
•R:Jusqu’à 15 processus de démarrage sont
possibles lorsque l’appareil aété correctement
chargé à100 %, en fonction des conditions
d’utilisation ou de la puissance du moteur que
vous désirez démarrer.
•Q:Combien de temps l’appareil est-il
opérationnel?
•R:Après une charge conforme à100 %, l’appareil
peut êtrestocké jusqu’à 6mois pour être
réutilisé àchaque instant (appareil en veille).
Il est toutefois recommandé de recharger
l’appareil au plus tardtous les 3mois ande
réduireaumaximum la décharge naturelle du
produit. La durée de vie de la batterie intégrée
dépend fortement de l’utilisation faite par
l’utilisateur.
•Q:Combien de temps durelarecharge complète
de la batterie ?
•R:Larechargedure5heures si vous chargez
l’appareil (avec batterie vide) via un chargeur
USB disposant d’une puissance de sortie de 5
V/2A.Iln’est pas recommandé d’utiliser un
chargeur plus faible.
•Q:Combien de temps durelarecharge d’un
smartphone sur l’appareil ?
•R:Larechargedépend fortement de la taille de
la batterie de votresmartphone –laplupart
du temps, une recharge complète est possible
dans un délai de 2heures.

16
10. LED d’état de la batterie
LED État de la batterie
Off 0%
1LED clignote 10 %
1LED s’allume
25 %
2LED s’allument 50 %
3LED s’allument 75 %
4LED s’allument 100 %
11. Caractéristiques techniques
Puissance typique 27,9 Wh
Puissance minimale 26,6 Wh
Courant d’aide au
démarrage
12 V/ 250 –500 A
Type de batterie
Lithium poly mère
3,7 V(3pièces)
Capacité typique de la
batterie
2510 mAh
Capacité minimale de
la batterie
2400 mAh
Entrée USB 5V/1.4 A
Sortie USB 5V/2 A
Indice de protection
IP65 (protection
contrelapoussièreet
les jets d’eau)
Protection contrela
surtension
ü
Protection contre
l’inversion de polarité
ü
12. Soins et entretien
•Nettoyez la balance uniquement àl’aide d’un
chiffon non breux légèrement humide ;évitez tout
détergent agressif.
•Veillez àcequ’aucun liquide ne pénètredans le
produit.
13. Exclusion de garantie
La société Hama GmbH &CoKGdécline toute
responsabilité en cas de dommages provoqués par
une installation, un montage ou une utilisation non
conformes du produit ou encoreprovoqués par un
non respect des consignes du mode d‘emploi et/ou
des consignes de sécurité.
14. Service et assistance
En cas de question concernant le produit, veuillez
vous adresser au service de conseil produits de Hama.
Ligne téléphonique directe :+49 9091 502-115
(allemand/anglais)
Vous trouverez ici de plus amples informations
concernant l‘assistance :www.hama.com
15. Consignes de recyclage
Remarques concernant la protection de
l’environnement:
Conformément àladirective européenne
2012/19/EU et 2006/66/CE, et an
d‘atteindre un certain nombred‘objectifs
en matièredeprotection de
l‘environnement, les règles suivantes
doivent êtreappliquées: Les appareils électriques et
électroniques ainsi que les batteries ne doivent pas
êtreéliminés avec les déchets ménagers. Le
pictogramme “picto” présent sur le produit, son
manuel d‘utilisation ou son emballage indique que le
produit est soumis àcette réglementation. Le
consommateur doit retourner le produit/la batterie
usager aux points de collecte prévus àcet effet. Il
peut aussi le remettreàunrevendeur.Enpermettant
ennlerecyclage des produits ainsi que les batteries,
le consommateur contribueraàlaprotection de notre
environnement. C‘est un acte écologique.

17
E Instrucciones de uso
Elementos de manejo eindicadores (Pic 1)
1. Tecla Power/Luz On/Off
2. Entrada USB
3. Led de estado de la batería
4. Salida USB
5. Lámparaled de trabajo
6. Cable de arranque auxiliar con hembrilla
7. Led de estado de arranque auxiliar
8. Tecla Boost
Le agradecemos que se haya decidido por un
producto de Hama.
Tómese tiempo yléase primerolas siguientes
instrucciones eindicaciones. Después, guarde estas
instrucciones de manejo en un lugar seguropara
poder consultarlas cuando sea necesario. Si vende el
aparato, entregue estas instrucciones de manejo al
nuevo propietario.
1. Explicación de los símbolos de aviso ydelas
indicaciones
Aviso
Se utiliza paracaracterizar las indicaciones de
seguridad oparallamar la atención sobrepeligros
yriesgos especiales.
Nota
Se utiliza paracaracterizar informaciones
adicionales oindicaciones importantes.
Peligrodesufrir una descarga
eléctrica
Este símbolo hace referencia al peligrode
contacto con partes no aisladas del producto que
pueden conducir una tensión peligrosa de una
intensidad tal que puede provocar una descarga
eléctrica.
2. Contenido del paquete
•Dispositivo auxiliar de arranque paraautomóviles
•1cable de arranque auxiliar con pinzas polares
totalmente aisladas
•1cargador USB paraautomóviles (5 V/2 A)
•1cable de carga microUSB
•Estas instrucciones de uso
3. Instrucciones de seguridad
•Emplee el producto exclusivamente paralafunción
paralaque fue diseñado.
•Elproducto está destinado al uso privado, no
comercial.
•Este aparato, como todos los aparatos eléctricos,
no debe estar en manos de los niños.
•Noopereelproducto fueradelos límites de
potencia indicados en los datos técnicos.
•Tenga en cuenta al utilizar el producto las
disposiciones yleyes locales vigentes parael
tráco rodado.
•Asegúrese de que ni la vista ni ningún
componente, como airbag, áreas de seguridad,
elementos de manejo, instrumentos, etc.,se verán
tapados olimitados.
•Nodeje caer el producto ni lo someta asacudidas
fuertes.
Aviso
•Peligrodelesiones, incendios ydaños por
cortocircuito La manipulación inadecuada
del cable de arranque auxiliar puede causar
lesiones ydaños graves.
•Peligrodeexplosión eincendio! Mantenga las
fuentes de ignición (por ejemplo, cigarrillos
encendidos) alejadas de la batería.
•Peligrodequemaduras químicas! Riesgo de lesio-
nes oculares. Use gafas protectoras ynoseincline
sobrelabatería. El electrolito que se encuentraen
el interior de la batería de arranque vacía perma-
nece líquido incluso abajas temperaturas.
•Peligr odeexplosión No use el cable de arranque
auxiliar en una atmósferapotencialmente explosiva.
•Peligrodeincendio La cilindrada del vehículo
debe estar dentrodelos límites admitidos por el
cable de arranque auxiliar.

18
•Durante la carga, las baterías pueden generar ga-
ses explosivos yliberarlos al entorno. Asegúrese
de que hay una ventilación suciente yevite
cualquier formación de chispas.
•Tenga en cuenta que el ácido de la batería es
corrosivo. En caso de que se produzca contacto
con la piel olos ojos, enjuague la(s) parte(s)
afectada(s) inmediatamente con agua abundante
yacuda aunmédico. Si el ácido de la batería en
-
traencontacto con textiles ynoserealiza sobre
losmismos el tratamiento debido, en un plazo
de 24-48 horas los habrá disuelto, pudiendo así
afectar alas partes del cuerpo que estuvieran en
contacto con los mismos. Enjuague la(s) parte(s)
afectadas inmediatamente con agua abundante
ycámbiese la ropa de ser necesario.
Peligrodesufrir una descarga
eléctrica
•Nointente mantener oreparar el aparato por cuenta
propia. Encomiende cualquier trabajo de manteni-
miento al personal especializado competente.
•Noabraelproducto ynolosiga operando de
presentar deterioros, de formación de humo, olores
oruidos altos. En tales casos, diríjase sin demoraa
su proveedor oanuestrodepartamento de servicio
(véase el punto Servicio ysoporte).
4. Uso adecuado
Con el dispositivo auxiliar de arranque podrá volver a
arrancar un vehículo con una batería de coche de 12
Vdescargada. Está diseñado paraarrancar motores
diésel con una cilindrada máx. de 3lomotores de
gasolina con una cilindrada máx. de 5l.Gracias a
la salida USB integrada, también es posible cargar
terminales móviles, como p. ej., tabletas oteléfonos
inteligentes. Incluye una lámparaled de trabajo con
función de luz ja, estroboscópica ySOS.
5. Dispositivo auxiliar de arranque
5.1 Carga
•Cargue el dispositivo antes de ponerlo en funciona-
miento. Para ello, conecte el cable microUSB sumi-
nistrado en la entrada USB (2) del dispositivo auxiliar
de arranque yuncargador USB compatible con mín.
5V/2 A(no incluido en el volumen de suministro).
•Como alternativa, utilice el cargador paravehículos
USB de 12 Vsuministrado paracargar el dispositi-
vo utilizando el encendedor de su automóvil.
•Lacarga se inicia y naliza de forma automática.
Nota
•Durante el proceso de carga, no deje el dispositivo
sin supervisión durante largos períodos de tiempo.
•Antes de utilizar el dispositivo auxiliar de carga
por primeravez, cárguelo por completo.
•Paraarrancar un automóvil de forma auxiliar,
el dispositivo auxiliar de arranque debe estar
cargado hasta la mitad como mínimo (al
menos dos de los cuatroledes de estado de la
batería (2) deben permanecer iluminados).
5.2 Preparación
•Siga estrictamente las indicaciones parael
arranque auxiliar que se proporcionan en las
instrucciones de uso del vehículo.
•Ponga el freno de estacionamiento del vehículo.
•Ponga la palanca de cambio en punto muerto oel
cambio automático en la posición P.
•Desconecte el encendido ytodos los consumidores.
•Introduzca el cable de arranque auxiliar
suministrado en la hembrilla (6) del dispositivo
auxiliar de arranque. Presione hacia dentrocon
fuerza hasta el tope.
5.3 Aplicación del arranque auxiliar
•Conecte los terminales polares del cable de
arranque auxiliar en el siguiente orden:
1. El terminal positivo (rojo) en el polo positivo de
la batería del coche.
2. El terminal negativo (negro) en el polo negativo
de la batería del coche.
•Antes de comenzar el arranque, compruebe el led
de estado de arranque auxiliar (7).
Strona jest ładowana ...
Strona jest ładowana ...
Strona jest ładowana ...
Strona jest ładowana ...
Strona jest ładowana ...
Strona jest ładowana ...
Strona jest ładowana ...
Strona jest ładowana ...
Strona jest ładowana ...
Strona jest ładowana ...
Strona jest ładowana ...
Strona jest ładowana ...
Strona jest ładowana ...
Strona jest ładowana ...
Strona jest ładowana ...
Strona jest ładowana ...
Strona jest ładowana ...
Strona jest ładowana ...
Strona jest ładowana ...
Strona jest ładowana ...
Strona jest ładowana ...
Strona jest ładowana ...
Strona jest ładowana ...
Strona jest ładowana ...
Strona jest ładowana ...
Strona jest ładowana ...
Strona jest ładowana ...
Strona jest ładowana ...
Strona jest ładowana ...
Strona jest ładowana ...
Strona jest ładowana ...
Strona jest ładowana ...
Strona jest ładowana ...
Strona jest ładowana ...
Strona jest ładowana ...
Strona jest ładowana ...
Strona jest ładowana ...
Strona jest ładowana ...
Strona jest ładowana ...
Strona jest ładowana ...
Strona jest ładowana ...
Strona jest ładowana ...
Strona jest ładowana ...
Strona jest ładowana ...
Strona jest ładowana ...
Strona jest ładowana ...
Strona jest ładowana ...
Strona jest ładowana ...
Strona jest ładowana ...
Strona jest ładowana ...
Strona jest ładowana ...
-
 1
1
-
 2
2
-
 3
3
-
 4
4
-
 5
5
-
 6
6
-
 7
7
-
 8
8
-
 9
9
-
 10
10
-
 11
11
-
 12
12
-
 13
13
-
 14
14
-
 15
15
-
 16
16
-
 17
17
-
 18
18
-
 19
19
-
 20
20
-
 21
21
-
 22
22
-
 23
23
-
 24
24
-
 25
25
-
 26
26
-
 27
27
-
 28
28
-
 29
29
-
 30
30
-
 31
31
-
 32
32
-
 33
33
-
 34
34
-
 35
35
-
 36
36
-
 37
37
-
 38
38
-
 39
39
-
 40
40
-
 41
41
-
 42
42
-
 43
43
-
 44
44
-
 45
45
-
 46
46
-
 47
47
-
 48
48
-
 49
49
-
 50
50
-
 51
51
-
 52
52
-
 53
53
-
 54
54
-
 55
55
-
 56
56
-
 57
57
-
 58
58
-
 59
59
-
 60
60
-
 61
61
-
 62
62
-
 63
63
-
 64
64
-
 65
65
-
 66
66
-
 67
67
-
 68
68
-
 69
69
-
 70
70
-
 71
71


w innych językach
- čeština: Hama 00136692 Návod k obsluze
- español: Hama 00136692 El manual del propietario
- italiano: Hama 00136692 Manuale del proprietario
- Deutsch: Hama 00136692 Bedienungsanleitung
- slovenčina: Hama 00136692 Návod na obsluhu
- svenska: Hama 00136692 Bruksanvisning
- français: Hama 00136692 Le manuel du propriétaire
- English: Hama 00136692 Owner's manual
- suomi: Hama 00136692 Omistajan opas
- Nederlands: Hama 00136692 de handleiding
- română: Hama 00136692 Manualul proprietarului
Powiązane dokumenty
-
Hama Power Delivery 27Вт (178312) Instrukcja obsługi
-
-
Hama 00178337 Instrukcja obsługi
-
-
Hama P2223771 Instrukcja obsługi
-
-
Hama 00137259 Instrukcja obsługi
-
-
-
Inne dokumenty
-
Einhell Car Expert CE-JS 8/1 Instrukcja obsługi
-
Expert E200401 Instrukcja obsługi
-
Schumacher BC12.1C FACOM Booster Instrukcja obsługi
-
ULTIMATE SPEED UPBS 12000 A1 Operation and Safety Notes
-
TRONIC KH 3108 12-VOLT POWER STATION Instrukcja obsługi
-
Stanley SXAE00125 Instrukcja obsługi
-
-
Denver Electronics JST-9200 Waterproof IP66 Jump Starter Instrukcja obsługi
-
Perel AJUS7 Instrukcja obsługi
-
GYS CHARGER STARTER NEOSTART 620 Instrukcja obsługi