Sharp YC-PC322A Instrukcja obsługi
- Kategoria
- Mikrofale
- Typ
- Instrukcja obsługi

*Product images are for illustration purpose only. Actual product may vary.
YC-PC322A
Microwave oven
User manual
EN PTDE FR NLES PL IT


EN
EN – 1
EN – 1
Attention:
Your product
is marked with
this symbol.
It means that
used electrical
and electronic
products should
not be mixed
with general
household
waste. There is a
separate collec-
tion system for
these products.
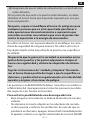
A. Information on Disposal for Users
(private households)
1. In the European Union
Attention: If you want to dispose of this equipment, please do not use the
ordinary dustbin!
Used electrical and electronic equipment must be treated separately and
in accordance with legislation that requires proper treatment, recovery and
recycling of used electrical and electronic equipment.
Following the implementation by member states, private households within
the EU states may return their used electrical and electronic equipment to
designated collection facilities free of charge*.
In some countries* your local retailer may also take back your old product
free of charge if you purchase a similar new one.
*) Please contact your local authority for further details.
If your used electrical or electronic equipment has batteries or
accumulators, please dispose of these separately beforehand according
to local requirements. By disposing of this product correctly you will help
ensure that the waste undergoes the necessary treatment, recovery and
recycling and thus prevent potential negative e ects on the environment
and human health which could otherwise arise due to inappropriate waste
handling.
2. In other Countries outside the EU
If you wish to discard this product, please contact your local authorities and
ask for the correct method of disposal.
For Switzerland: Used electrical or electronic equipment can be returned
free of charge to the dealer, even if you don't purchase a new product.
Further collection facilities are listed on the homepage of www.swico.ch or
www.sens.ch.
B. Information on Disposal for Business Users
1. In the European Union
If the product is used for business purposes and you want to discard it:
Please contact your SHARP dealer who will inform you about the take-back
of the product. You might be charged for the costs arising from take-back
and recycling. Small products (and small amounts) might be taken back by
your local collection facilities.
For Spain: Please contact the established collection system or your local
authority for take-back of your used products.
2. In other Countries outside the EU
If you wish to discard of this product, please contact your local authorities
and ask for the correct method of disposal.
For service, please refer to www.sharpconsumer.com/contact/, for your warranty rights go to
www.sharpconsumer.com/support/ or contact the retailer where you purchased your product.
Declarations of conformity are available from www.sharpconsumer.com/documents-of-conformity/
www.sharpconsumer.com/
support/
www.sharpconsumer.com/
documents-of-conformity/
www.sharpconsumer.com/
contact/

EN – 2
EN – 2
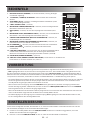
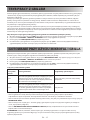
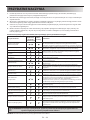
PRECAUTIONS TO AVOID POSSIBLE EXPOSURE TO MICROWAVE ENERGY
1. Do not attempt to operate this oven with the door open as this can result in harmful exposure to microwave
energy. It is important not to defeat or tamper with the safety interlocks.
2. Do not insert anything between the oven front face and the door or allow debris or cleaner residue to accumulate
on sealing surfaces.
3. Do not operate the oven if it is damaged. It is very important that the oven door closes properly and that there is
no damage to the door, hinges, latches or door seals and sealing surfaces.
4. Do not attempt to repair or adjust the oven.
CONTENTS
IMPORTANT SAFETY INSTRUCTIONS .............................................................................................................................................................. 3
INSTALLATION .......................................................................................................................................................................................................10
RADIO INTERFERENCE .......................................................................................................................................................................................11
GROUNDING (EARTHING) INSTRUCTIONS..................................................................................................................................................11
SPECIFICATIONS ................................................................................................................................................................................................... 11
OVEN AND ACCESSORIES .................................................................................................................................................................................12
CONTROL PANEL .................................................................................................................................................................................................. 13
BEFORE USING THE OVEN .................................................................................................................................................................................13
SETTING THE CLOCK ........................................................................................................................................................................................... 13
MICROWAVE COOKING ...................................................................................................................................................................................... 14
QUICK START .........................................................................................................................................................................................................14
GRILL COOKING .................................................................................................................................................................................................... 15
MICROWAVE + GRILL .......................................................................................................................................................................................... 15
CONVECTION ........................................................................................................................................................................................................16
MICROWAVE + CONVECTION .......................................................................................................................................................................... 16
AUTO MENU ..........................................................................................................................................................................................................17
AUTO DEFROST ....................................................................................................................................................................................................18
AUTO REHEAT........................................................................................................................................................................................................18
KITCHEN TIMER ..................................................................................................................................................................................................... 18
POWER SAVING FUNCTION ..............................................................................................................................................................................18
MUTE FUNCTION ................................................................................................................................................................................................. 19
SAFETY LOCK ........................................................................................................................................................................................................19
CHILD LOCK ........................................................................................................................................................................................................... 19
AUTOMATIC PROTECTION MECHANISM .....................................................................................................................................................19
CLEANING AND CARE ........................................................................................................................................................................................20
SUITABLE OVENWARE ........................................................................................................................................................................................21
MICROWAVE COOKING ADVICE......................................................................................................................................................................22
DEFROSTING ADVICE .........................................................................................................................................................................................24
REHEATING ADVICE ............................................................................................................................................................................................25
TROUBLESHOOTING ........................................................................................................................................................................................... 26
STICKING BUTTON PROTECTION ...................................................................................................................................................................27
BEFORE CALLING FOR ASSISTANCE .............................................................................................................................................................. 27

EN
EN – 2EN – 2
PRECAUTIONS TO AVOID POSSIBLE EXPOSURE TO MICROWAVE ENERGY
1. Do not attempt to operate this oven with the door open as this can result in harmful exposure to microwave
energy. It is important not to defeat or tamper with the safety interlocks.
2. Do not insert anything between the oven front face and the door or allow debris or cleaner residue to accumulate
on sealing surfaces.
3. Do not operate the oven if it is damaged. It is very important that the oven door closes properly and that there is
no damage to the door, hinges, latches or door seals and sealing surfaces.
4. Do not attempt to repair or adjust the oven.
CONTENTS
IMPORTANT SAFETY INSTRUCTIONS .............................................................................................................................................................. 3
INSTALLATION .......................................................................................................................................................................................................10
RADIO INTERFERENCE .......................................................................................................................................................................................11
GROUNDING (EARTHING) INSTRUCTIONS..................................................................................................................................................11
SPECIFICATIONS ................................................................................................................................................................................................... 11
OVEN AND ACCESSORIES .................................................................................................................................................................................12
CONTROL PANEL .................................................................................................................................................................................................. 13
BEFORE USING THE OVEN .................................................................................................................................................................................13
SETTING THE CLOCK ........................................................................................................................................................................................... 13
MICROWAVE COOKING ...................................................................................................................................................................................... 14
QUICK START .........................................................................................................................................................................................................14
GRILL COOKING .................................................................................................................................................................................................... 15
MICROWAVE + GRILL .......................................................................................................................................................................................... 15
CONVECTION ........................................................................................................................................................................................................16
MICROWAVE + CONVECTION .......................................................................................................................................................................... 16
AUTO MENU ..........................................................................................................................................................................................................17
AUTO DEFROST ....................................................................................................................................................................................................18
AUTO REHEAT........................................................................................................................................................................................................18
KITCHEN TIMER ..................................................................................................................................................................................................... 18
POWER SAVING FUNCTION ..............................................................................................................................................................................18
MUTE FUNCTION ................................................................................................................................................................................................. 19
SAFETY LOCK ........................................................................................................................................................................................................19
CHILD LOCK ........................................................................................................................................................................................................... 19
AUTOMATIC PROTECTION MECHANISM .....................................................................................................................................................19
CLEANING AND CARE ........................................................................................................................................................................................20
SUITABLE OVENWARE ........................................................................................................................................................................................21
MICROWAVE COOKING ADVICE......................................................................................................................................................................22
DEFROSTING ADVICE .........................................................................................................................................................................................24
REHEATING ADVICE ............................................................................................................................................................................................25
TROUBLESHOOTING ........................................................................................................................................................................................... 26
STICKING BUTTON PROTECTION ...................................................................................................................................................................27
BEFORE CALLING FOR ASSISTANCE .............................................................................................................................................................. 27
EN – 3
EN – 3
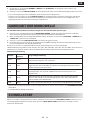
IMPORTANT SAFETY INSTRUCTIONS
READ CAREFULLY AND KEEP FOR FUTURE REFERENCE
To avoid the danger of re. The microwave oven should
not be left unattended during operation. Power levels
that are too high, or cooking times that are too long, may
overheat foods resulting in a re.
This oven is designed to be used on a countertop only. It is not
designed to be built into a kitchen unit. Do not place the oven
in a cabinet. The electrical outlet must be readily accessible so
that the unit can be unplugged easily in an emergency.
The AC power supply must be 230-240 V, 50 Hz, with a
minimum 10 A distribution line fuse, or a minimum 10A
distribution circuit breaker. A separate circuit serving only this
appliance should be provided.
Do not place the oven in areas where heat is generated. For
example, close to a conventional oven. Do not install the oven
in an area of high humidity or where moisture may collect. Do
not store or use the oven outdoors.
If smoke is observed, switch off or unplug the oven and
keep the door closed in order to sti e any ames.
Use only microwave-safe containers and utensils. Utensils
should be checked to ensure that they are suitable for use
in microwave ovens.
When heating food in plastic or paper containers, keep an
eye on the oven due to the possibility of ignition.
Clean the waveguide cover and the oven cavity. These
must be dry and free from grease. Built up grease may
overheat and begin to smoke or catch re.
Do not place ammable materials near the oven or ventilation
openings. Do not block the ventilation openings.

EN – 4
EN – 4
Remove all metallic seals, wire twists, etc., from food and food
packages. Arcing on metallic surfaces may cause a re.
Do not use the microwave oven to heat oil for deep frying. The
temperature cannot be controlled and the oil may catch re.
To make popcorn, use only special microwave popcorn makers.
Do not store food or any other items inside the oven.
Check the settings after you start the oven to ensure the oven
is operating as desired.
Do not leave the oven unattended while it is operating.
To avoid overheating and re, special care must be taken when
cooking or reheating foods with a high sugar or fat content,
for example, Sausage rolls, Pies or Christmas pudding. See the
corresponding hints in the user manual.
To avoid the possibility of injury. WARNING:
Do not operate the oven if it is damaged or malfunctioning.
Check the following before use:
a) Make sure the door closes properly and ensure it is not
misaligned or warped.
b) Check to make sure the hinges and safety door latches are
not broken or loose.
c) Ensure that the door seals and sealing surfaces have not
been damaged.
d) Make sure inside the oven cavity or on the door are no
dents.
e) Ensure that the power supply cord and plug are not
damaged.
If the door or door seals are damaged, the oven must not be
operated until it has been repaired by a competent person.
Never adjust, repair or modify the oven yourself. It is
hazardous for anyone other than a competent person to
carry out any service or repair operation which involves

EN
EN – 4EN – 4
Remove all metallic seals, wire twists, etc., from food and food
packages. Arcing on metallic surfaces may cause a re.
Do not use the microwave oven to heat oil for deep frying. The
temperature cannot be controlled and the oil may catch re.
To make popcorn, use only special microwave popcorn makers.
Do not store food or any other items inside the oven.
Check the settings after you start the oven to ensure the oven
is operating as desired.
Do not leave the oven unattended while it is operating.
To avoid overheating and re, special care must be taken when
cooking or reheating foods with a high sugar or fat content,
for example, Sausage rolls, Pies or Christmas pudding. See the
corresponding hints in the user manual.
To avoid the possibility of injury. WARNING:
Do not operate the oven if it is damaged or malfunctioning.
Check the following before use:
a) Make sure the door closes properly and ensure it is not
misaligned or warped.
b) Check to make sure the hinges and safety door latches are
not broken or loose.
c) Ensure that the door seals and sealing surfaces have not
been damaged.
d) Make sure inside the oven cavity or on the door are no
dents.
e) Ensure that the power supply cord and plug are not
damaged.
If the door or door seals are damaged, the oven must not be
operated until it has been repaired by a competent person.
Never adjust, repair or modify the oven yourself. It is
hazardous for anyone other than a competent person to
carry out any service or repair operation which involves
EN – 5
EN – 5
the removal of a cover which gives protection against
exposure to microwave energy.
Do not operate the oven with the door open or alter the door
safety latches in any way. Do not operate the oven if there is an
object between the door seals and sealing surfaces.
Do not allow grease or dirt to build up on the door seals
and adjacent parts. Clean the oven at regular intervals and
remove any food deposits.
Follow the instructions for “Care and Cleaning”. Failure
to maintain the oven in a clean condition could lead to a
deterioration of the surface that could adversely aff ect
the life of the appliance and possibly result in a hazardous
situation.
Individuals with PACEMAKERS should check with their doctor or
the manufacturer of the pacemaker for precautions regarding
microwave ovens.
To avoid the possibility of electric shock.
• Under no circumstances should you remove the outer
cabinet.
• Never spill or insert any objects into the door lock openings
or ventilation openings. In the event of a spill, turn o and
unplug the oven immediately, and call an authorised SHARP
service agent.
• Do not immerse the power supply cord or plug in water or
any other liquid.
• Do not let the power supply cord hang over the edge of a
table or work surface.
• Keep the power supply cord away from heated surfaces,
including the rear of the oven.
• Keep the appliance and its cord out of reach of children less
than 8 years.
• Do not attempt to replace the oven lamp yourself or allow

EN – 6
EN – 6
anyone who is not an electrician authorised by SHARP to do
so. If the oven lamp fails, please consult your dealer or an
authorised SHARP service agent.
• If the power supply cord is damaged, it must be replaced by
an authorised SHARP service agent.
WARNING: Liquids and other foods must not be heated
in sealed containers since they are liable to explode.
Microwave heating of beverages can result in delayed
eruptive boiling; therefore, care must be taken when
handling the container. To avoid the possibility of
explosion and sudden boiling:
Never use sealed containers. Remove seals and lids before use.
Sealed containers can explode due to a build-up of pressure
even after the oven has been turned o . Take care when
microwaving liquids. Use a wide mouthed container to allow
bubbles to escape.
Never heat liquids in narrow necked containers such as
baby bottles, as this may result in the contents erupting
from the container when heated and cause burns.
To prevent sudden eruption of boiling liquid and possible
scalding:
1. Do not use excessive amount of time.
2. Stir liquid prior to heating/reheating.
3. It is advisable to insert a glass rod or similar (not metal) into
the liquid whilst reheating.
4. Let liquid stand for at least 20 seconds in the oven at the
end of cooking time to prevent delayed eruptive boiling.
Do not cook eggs in their shells, and whole hard-boiled
eggs should not be heated in microwave ovens since they
may explode even after microwave cooking has ended.
To cook or reheat eggs which have not been scrambled or

EN
EN – 6EN – 6
anyone who is not an electrician authorised by SHARP to do
so. If the oven lamp fails, please consult your dealer or an
authorised SHARP service agent.
• If the power supply cord is damaged, it must be replaced by
an authorised SHARP service agent.
WARNING: Liquids and other foods must not be heated
in sealed containers since they are liable to explode.
Microwave heating of beverages can result in delayed
eruptive boiling; therefore, care must be taken when
handling the container. To avoid the possibility of
explosion and sudden boiling:
Never use sealed containers. Remove seals and lids before use.
Sealed containers can explode due to a build-up of pressure
even after the oven has been turned o . Take care when
microwaving liquids. Use a wide mouthed container to allow
bubbles to escape.
Never heat liquids in narrow necked containers such as
baby bottles, as this may result in the contents erupting
from the container when heated and cause burns.
To prevent sudden eruption of boiling liquid and possible
scalding:
1. Do not use excessive amount of time.
2. Stir liquid prior to heating/reheating.
3. It is advisable to insert a glass rod or similar (not metal) into
the liquid whilst reheating.
4. Let liquid stand for at least 20 seconds in the oven at the
end of cooking time to prevent delayed eruptive boiling.
Do not cook eggs in their shells, and whole hard-boiled
eggs should not be heated in microwave ovens since they
may explode even after microwave cooking has ended.
To cook or reheat eggs which have not been scrambled or
EN – 7
EN – 7
mixed, pierce the yolks and the whites. Shell and slice hard
boiled eggs before reheating them in the microwave oven.
Pierce the skin of such foods as potatoes, sausages and fruit
before cooking, or they may explode.
WARNING: The contents of feeding bottles and baby
food jars must be stirred or shaken and the temperature
checked before consumption, in order to avoid burns. Use
pot holders or oven gloves when removing food from the
oven to prevent burns. To avoid the possibility of burns:
• Always open containers, popcorn makers, oven cooking
bags, etc., away from the face and hands to avoid steam
burns and eruption of boiling. To avoid burns, always test
food temperature and stir before serving and pay special
attention to the temperature of food and drink given to
babies, children or the elderly. Accessible parts may become
hot during use. Young children should be kept away.
• Temperature of the container is not a true indication of the
temperature of the food or drink; always check the food
temperature.
• Always stand back from the oven door when opening it to
avoid burns from escaping steam and heat.
• Slice stu ed baked foods after heating to release steam and
avoid burns.
• Keep children away from the door to prevent them burning
themselves.
WARNING: Only allow children aged from 8 years and
above to use the oven without supervision when adequate
instructions have been given so that the child is able to
use the oven in a safe way and understands the hazards of
improper use.
When the appliance is operated in the GRILL, MIX GRILL,
CONVECTION, MIX CONVECTION and AUTO MENU mode

EN – 8
EN – 8
(mode applicable to model), children should only use the
oven under adult supervision due to the temperature
generated.
This appliance is not intended for use by persons
(including children) with reduced physical, sensory or
mental capabilities, or lack of experience and knowledge,
unless they have been given supervision or instruction
concerning use of the appliance by a person responsible
for their safety.
Children should be supervised to ensure that they do not
play with the appliance. Cleaning by children should be
monitored.
Models with Electronic touch panel are enabled with a
child lock mode.
Do not lean or swing on the oven door. Do not play with the
oven or use it as a toy.
Children should be taught all important safety instructions:
use of pot holders, careful removal of food coverings - paying
special attention to packaging (e.g., self-heating materials)
designed to make food crisp, as they may be extra hot.
Other warnings
Never modify the oven in any way.
Do not move the oven while it is in operation.
This appliance is intended to be used in household. This oven
is for home food preparation and may only be used for cooking
food and beverages. Drying of food or clothing and heating
of warming pads, slippers, sponges, damp cloth and similar
may lead to risk of injury, ignition or re. It is not suitable for
commercial or laboratory use.

EN
EN – 8EN – 8
(mode applicable to model), children should only use the
oven under adult supervision due to the temperature
generated.
This appliance is not intended for use by persons
(including children) with reduced physical, sensory or
mental capabilities, or lack of experience and knowledge,
unless they have been given supervision or instruction
concerning use of the appliance by a person responsible
for their safety.
Children should be supervised to ensure that they do not
play with the appliance. Cleaning by children should be
monitored.
Models with Electronic touch panel are enabled with a
child lock mode.
Do not lean or swing on the oven door. Do not play with the
oven or use it as a toy.
Children should be taught all important safety instructions:
use of pot holders, careful removal of food coverings - paying
special attention to packaging (e.g., self-heating materials)
designed to make food crisp, as they may be extra hot.
Other warnings
Never modify the oven in any way.
Do not move the oven while it is in operation.
This appliance is intended to be used in household. This oven
is for home food preparation and may only be used for cooking
food and beverages. Drying of food or clothing and heating
of warming pads, slippers, sponges, damp cloth and similar
may lead to risk of injury, ignition or re. It is not suitable for
commercial or laboratory use.
EN – 9
EN – 9
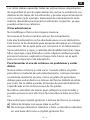
To promote trouble-free use of your oven and avoid
damage.
Never operate the oven when it is empty. When using a
browning dish or self-heating material, always place a heat-
resistant insulator such as a porcelain plate under it to prevent
damage to the oven base due to heat stress. The preheating
time speci ed in the dish’s instructions must not be exceeded.
Do not use metal utensils, which re ect microwaves and may
cause electrical arcing. Do not put cans in the oven.
To prevent the turntable or base of the oven breaking:
a) Before cleaning with water, leave to cool.
b) Do not put hot or cold foods or hot utensils on a cold
turntable/oven base.
c) Do not place anything on the outer cabinet during
operation.
NOTE:
Do not use plastic containers for microwaving if the oven is still
hot from using a combination mode (oven model dependant)
because they may melt.
Plastic containers must not be used during above modes unless
the container manufacturer says they are suitable.
If you are unsure how to connect your oven, please consult an
authorised, quali ed electrician.
Neither the manufacturer nor the dealer can accept any liability
for damage to the oven or personal injury resulting from failure
to observe the correct electrical connection procedure.
Water vapour or drops may occasionally form on the oven walls
or around the door seals and sealing surfaces. This is a normal
occurrence and is not an indication of microwave leakage or a
malfunction.
This appliance is intended for use in household and similar

EN – 10
EN – 10
applications such as; Kitchen areas reserved for sta in
stores, o ces and other professional environments / Farms
/ Use by clients of hotels, motels and other residential type
environments / Bed and breakfast type environments.
This symbol means that the surfaces are liable to get
hot during use.
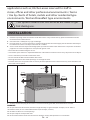
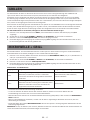
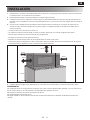
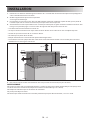
INSTALLATION
1. Remove all packing materials from the inside of the oven cavity and remove any protective lm found on the
microwave oven cabinet surface.
2. Check the oven carefully for any signs of damage.
3. Place the oven on a secure, level surface, strong enough to take the oven weight, plus the heaviest item likely to
be cooked in the oven. Do not place the oven in a cabinet.
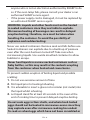
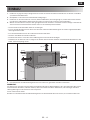
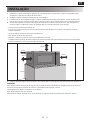
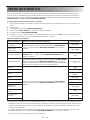
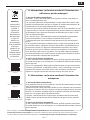
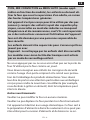
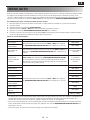
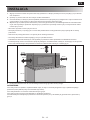
4. Select a level surface that provide enough open space for the intake and/or outlet vents. See picture on the rst
page. The rear surface of appliance can be placed against a wall.
• The minimum installation height is 85 cm.
• A minimum space of 20 cm is required between the sides of the microwave oven and any adjacent walls or objects.
• Leave a minimum space of 30 cm above the oven.
• Do not remove the feet from the bottom of the oven.
• Blocking the intake and/or outlet openings can damage the oven.
• Place the oven as far away from radios and TV as possible. Operation of microwave oven may cause interference to
your radio or TV reception.
20 cm
30 cm
85 cm
10 cm
20 cm
5. Securely connect the plug of the oven to a standard earthed (grounded) household electrical outlet.
WARNING:
Do not place the oven where heat, moisture or high humidity are generated, (for example, near or above a
conventional oven) or near combustible materials (for example, curtains).
Do not block or obstruct air vent openings.
Do not place objects on top of the oven.
Do not touch the exterior of the microwave oven during or shortly after operation as it will be hot.

EN
EN – 10EN – 10
applications such as; Kitchen areas reserved for sta in
stores, o ces and other professional environments / Farms
/ Use by clients of hotels, motels and other residential type
environments / Bed and breakfast type environments.
This symbol means that the surfaces are liable to get
hot during use.
INSTALLATION
1. Remove all packing materials from the inside of the oven cavity and remove any protective lm found on the
microwave oven cabinet surface.
2. Check the oven carefully for any signs of damage.
3. Place the oven on a secure, level surface, strong enough to take the oven weight, plus the heaviest item likely to
be cooked in the oven. Do not place the oven in a cabinet.
4. Select a level surface that provide enough open space for the intake and/or outlet vents. See picture on the rst
page. The rear surface of appliance can be placed against a wall.
• The minimum installation height is 85 cm.
• A minimum space of 20 cm is required between the sides of the microwave oven and any adjacent walls or objects.
• Leave a minimum space of 30 cm above the oven.
• Do not remove the feet from the bottom of the oven.
• Blocking the intake and/or outlet openings can damage the oven.
• Place the oven as far away from radios and TV as possible. Operation of microwave oven may cause interference to
your radio or TV reception.
20 cm
30 cm
85 cm
10 cm
20 cm
5. Securely connect the plug of the oven to a standard earthed (grounded) household electrical outlet.
WARNING:
Do not place the oven where heat, moisture or high humidity are generated, (for example, near or above a
conventional oven) or near combustible materials (for example, curtains).
Do not block or obstruct air vent openings.
Do not place objects on top of the oven.
Do not touch the exterior of the microwave oven during or shortly after operation as it will be hot.
EN – 11
EN – 11
RADIO INTERFERENCE
Operation of the microwave oven may cause interference to your radio, TV, or similar equipment. If there is
interference, it may be reduced or eliminated by taking the following measures:
1. Clean the door and cavity where they meet.
2. Change the direction of the receiving antenna of the radio or television.
3. Relocate the microwave oven with respect to the receiver.
4. Plug the microwave oven into a di erent outlet so that microwave oven and receiver are not on the same mains
feed.
GROUNDING (EARTHING) INSTRUCTIONS
This appliance must be grounded. This oven is equipped with a cord having a grounding wire with a grounding plug.
It must be plugged into a wall socket that has been properly installed and grounded. In the event of an electrical short
circuit, grounding reduces risk of electric shock by providing an escape wire for the electric current. It is recommended
that a separate circuit serving only the oven be provided.
WARNING: Improper use of the grounding plug can result in a risk of electric shock.
NOTE:
1. If you have any questions about the grounding or electrical instructions, consult a quali ed electrician or service
person.
2. Neither the manufacturer nor the dealer can accept any liability for damage to the oven or personal injury
resulting from failure to observe the electrical connection procedures.
The mains lead used in your microwave oven uses the following colour coded wires:
Green and Yellow = EARTH | Blue = NEUTRAL | Brown = LIVE
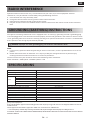
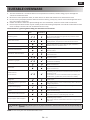
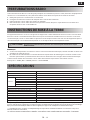
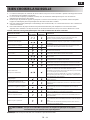
SPECIFICATIONS
Model name: YC-PC322A
AC Line Voltage 230~240 V, 50 Hz single phase
Distribution line fuse/circuit breaker 10 A
Power
Power Consumption 2300 W
Microwave Output Power 1000 W
Grill Output Power 1250 W
Convection Power 2300 W
O Mode Power <0.5 W
Microwave Frequency 2450 MHz*
Outside Dimensions (W) x (H) x (D) mm 539 x 280 x 415
Cavity Dimensions (W) x (H) x (D)** mm 362 x 223 x 378
Glass Turntable Size (ø mm) 315
Oven Capacity 32 litres**
Baking Tray Size (Diameter x H in mm) 317 x 48
Grill Rack Size (Diameter x Height in mm) 255 x 80
Weight 21 kg
Oven Lamp (LED type) 1,5 W
* - This Product ful ls the requirement of the European standard EN55011. In conformity with this standard, this product is classi ed as
group 2 class B equipment.
Group 2 means that the equipment intentionally generates radio-frequency energy in the form of electromagnetic radiation for the heat
treatment of food.
Class B equipment means that the equipment is suitable to be used in domestic establishments.
** - Internal capacity is calculated by measuring maximum width, depth and height. Actual capacity for holding food is less.
AS PART OF A POLICY OF CONTINUOUS IMPROVEMENT, WE RESERVE THE RIGHT TO ALTER DESIGN AND SPECIFICATIONS
WITHOUT NOTICE.

EN – 12
EN – 12
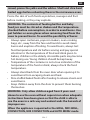
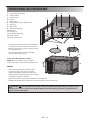
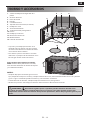
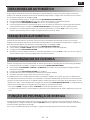
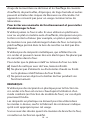
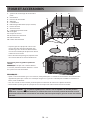
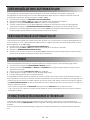
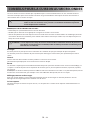
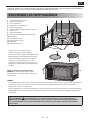
OVEN AND ACCESSORIES
1. Door safety lock system
2. Oven window
3. Control Panel
4. Display
5. Oven cavity
6. Waveguide Cover (Do Not remove)
7. Glass Tray
8. Roller Ring
9. Turntable Coupling
10. Grill Rack
11. Baking Tray
12. Ventilation openings
13. Outer cabinet
14. Power supply cord
• The Grill Rack and Baking Tray are designed for
use with grill and convection ovens only. DO
NOT use any metal accessories when using the
microwave function.
• For use of the Grill Rack refer to the GRILL
sections of this User Manual.
Never touch the grill when it is hot.
NOTE: When you order accessories, please
mention two items: part name and model name.
NOTES:
• After cooking fatty foods without a cover,
always clean the cavity and any cooking
utensils thoroughly, these must be dry and
free from grease. Built-up grease may overheat
and begin to smoke or catch re.
• When microwaving, always place cookware on the turntable.
• DO NOT use the Grill Rack or Baking Tray while using the microwave function.
WARNING: This symbol means that the surfaces are liable to get hot during use. The door, outer
cabinet, oven cavity, accessories and dishes will become very hot during operation. To prevent burns,
always use thick oven gloves.
2
7
5
9
6
8
1
3
4
14
12
13
1110

EN
EN – 12EN – 12
OVEN AND ACCESSORIES
1. Door safety lock system
2. Oven window
3. Control Panel
4. Display
5. Oven cavity
6. Waveguide Cover (Do Not remove)
7. Glass Tray
8. Roller Ring
9. Turntable Coupling
10. Grill Rack
11. Baking Tray
12. Ventilation openings
13. Outer cabinet
14. Power supply cord
• The Grill Rack and Baking Tray are designed for
use with grill and convection ovens only. DO
NOT use any metal accessories when using the
microwave function.
• For use of the Grill Rack refer to the GRILL
sections of this User Manual.
Never touch the grill when it is hot.
NOTE: When you order accessories, please
mention two items: part name and model name.
NOTES:
• After cooking fatty foods without a cover,
always clean the cavity and any cooking
utensils thoroughly, these must be dry and
free from grease. Built-up grease may overheat
and begin to smoke or catch re.
• When microwaving, always place cookware on the turntable.
• DO NOT use the Grill Rack or Baking Tray while using the microwave function.
WARNING: This symbol means that the surfaces are liable to get hot during use. The door, outer
cabinet, oven cavity, accessories and dishes will become very hot during operation. To prevent burns,
always use thick oven gloves.
2
75
9
6
8
1
3
4
14
12
13
1110
EN – 13
EN – 13
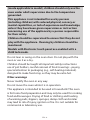
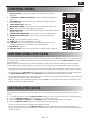
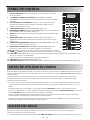
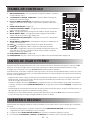
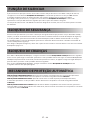
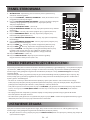
CONTROL PANEL
1. DIGITAL DISPLAY – Cooking time, power, indicators and clock time are
displayed.
2. 10 SECONDS, 1 MINUTE, 10 MINUTES – Use to set time of cooking or the
clock.
3. AUTO MENU keys – Press to select auto cooking menu. (Refer to page 17
for advice on use).
4. START/QUICK START – (Page 14).
5. MICROWAVE POWER – Press to select microwave power level. (Page 14).
6. GRILL – Press to set grill cooking program. (Page 15).
7. MICROWAVE+GRILL – Press to set microwave and grill combination cooking
program. (Page 15).
8. CONVECTION TEMPERATURE – Press to select convection temperature.
9. MICROWAVE+CONVECTION – Press to select convection ombination
cooking.
10. UP – Press to set food weight or servings.
11. DOWN – Press to set food weight or servings.
12. STOP/ECO – Press once to temporarily stop cooking, or twice to cancel
cooking altogether. Use to set power saving mode. (Page 18).
13. CHILD LOCK – (Page 19).
14. TIME/SET CLOCK –
Use to set clock time. Use to set timer function. (Page 13).
BEFORE USING THE OVEN
When the oven rst plugged in, beep will sound and the display will show "1:00". Note that the clock does not have to
be set for the oven to operate correctly. To set the clock, follow the instructions in the “Setting the Clock” section of
this User Manual.
When new, the very rst time the grill and/or convection is used, smoke and odors will be given o . To avoid this
happening when food is being cooked, use the grill and convection function without food for approx. 20 minutes.
• After opening and closing the door, the oven will enter the standby mode. If no buttons are press within 1 minute,
the display will remain on and the buttons will not operate. To enter standby mode again, open and close the door.
• During cooking, if the STOP/ECO button is pressed once, the cooking cycle will be paused. To restart cooking press
the START/QUICK START button. If the STOP/ECO button is pressed twice, cooking will be canceled.
• When programming the oven for a particular function and there is a pause between button presses of more than 30
seconds the oven will return to the standby mode.
• When a cooking cycle is completed, the display will show “End” and a tone will be heard every two minutes until a
button is pressed or the door is opened.
SETTING THE CLOCK
This oven has a clock which can be used in either 12- or 24-hour mode. To set the clock, follow the instructions as
below:
1. In standby mode, press and hold TIME/SET CLOCK button for at least 3 seconds to enter the clock setting mode.
2. Press the TIME/SET CLOCK button to select the 12- or 24-hour clock mode.
3. Use the 10 SECONDS, 1 MINUTE and 10 MINUTES buttons to set the desired hours and minutes.
4. Press the TIME/SET CLOCK button to store and exit the clock setting mode.
• It is not necessary to set the clock for the oven to work normally.
• While in the cook mode, press the TIME/SET CLOCK button to see the time of day (if set). The time of day will
change back to the cooking count down after 5 seconds. Note that the time of day can not be viewed if the kitchen
timer has been set.
10 SECONDS 1 MINUTE 10 MINUTES
YC-PC322A
1000W
STOP/ECO TIME/
SET CLOCK
CHILD
LOCK
AUTO PROGRAMS
REHEAT
BEVERAGES JACKE T
POTATO PIZZA POPCORN
FROZEN
MEAL FRESH
VEGETABLES PORRID GE AUTO
DEFROST
GRILLED
STEAK GRILLED
CHICKEN AUTO
REHEAT
ROAST
BEEF
ROAST
CHICKEN
OVEN
CHIPS
MICROWAVE
POWER
MICROWAVE
+ CONVECTION
CONVECTION
TEMPERATURE
GRILL
START/
QUICK START
MICROWAVE
+ GRILL
13
5
3
2
14
11
6
8
9
7
10
12
4
1

EN – 14
EN – 14
MICROWAVE COOKING
To use the microwave function, follow the insturcitons given below:
1. In standby mode, press the MICROWAVE POWER button to select power level. Each time this button is pressed,
the display will show the microwave power level.
2. Once the desired microwave power level has been selected, use the 10 SECONDS, 1 MINUTE and 10 MINUTES
buttons to select the time to cook.
3. Press the START/QUICK START button to start cooking.
4. When the cooking cycle is completed, the display will show “End” and a tone will be heard every two minutes until
a button is pressed or the door is opened.
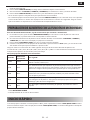
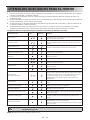
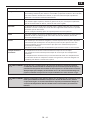
Note that the table below is for guidance. Your oven has 10 microwave power levels. These are 10%, 20%, 30%, 40%,
50%, 60%, 70%, 80%, 90% and 100%. The actual wattage output can be calculated by multiplying the microwave
power by the percentage.
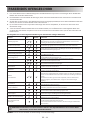
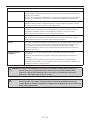
Microwave Cooking Guide:
Display Microwave
Power Suggested Use
P100 100% Use this setting for fast cooking or reheating e.g., for casseroles, hot beverages,
vegetables etc.
P-80 80%
For dense foods which require a long cooking time when cooked conventionally,
e.g., beef dishes. It is advisable to use this power setting to ensure the meat will be
tender.
P-60 60% Used for longer cooking of dense foods such as roast joints, meat loaf and plated
meals, also for sensitive dishes such as cheese sauce and sponge cakes.
P-40 40%
Defrost setting; select this power setting, to ensure that the dish defrosts evenly.
This setting is also ideal for simmering rice, pasta, dumplings and cooking egg
custard.
P-20 20% For gentle defrosting, e.g., cream gateaux or pastry.
• During cooking you can check the cooking power level by pressing and holing the MICROWAVE POWER button.
• The longest cooking time is 95 minutes.
QUICK START
If you need to cook at 100% power level, just press the START/QUICK START button while in the standby mode. Each
time the START/QUICK START button is pressed, it will add 30 seconds to the cooking time.

EN
EN – 14EN – 14
MICROWAVE COOKING
To use the microwave function, follow the insturcitons given below:
1. In standby mode, press the MICROWAVE POWER button to select power level. Each time this button is pressed,
the display will show the microwave power level.
2. Once the desired microwave power level has been selected, use the 10 SECONDS, 1 MINUTE and 10 MINUTES
buttons to select the time to cook.
3. Press the START/QUICK START button to start cooking.
4. When the cooking cycle is completed, the display will show “End” and a tone will be heard every two minutes until
a button is pressed or the door is opened.
Note that the table below is for guidance. Your oven has 10 microwave power levels. These are 10%, 20%, 30%, 40%,
50%, 60%, 70%, 80%, 90% and 100%. The actual wattage output can be calculated by multiplying the microwave
power by the percentage.
Microwave Cooking Guide:
Display Microwave
Power Suggested Use
P100 100% Use this setting for fast cooking or reheating e.g., for casseroles, hot beverages,
vegetables etc.
P-80 80%
For dense foods which require a long cooking time when cooked conventionally,
e.g., beef dishes. It is advisable to use this power setting to ensure the meat will be
tender.
P-60 60% Used for longer cooking of dense foods such as roast joints, meat loaf and plated
meals, also for sensitive dishes such as cheese sauce and sponge cakes.
P-40 40%
Defrost setting; select this power setting, to ensure that the dish defrosts evenly.
This setting is also ideal for simmering rice, pasta, dumplings and cooking egg
custard.
P-20 20% For gentle defrosting, e.g., cream gateaux or pastry.
• During cooking you can check the cooking power level by pressing and holing the MICROWAVE POWER button.
• The longest cooking time is 95 minutes.
QUICK START
If you need to cook at 100% power level, just press the START/QUICK START button while in the standby mode. Each
time the START/QUICK START button is pressed, it will add 30 seconds to the cooking time.
EN – 15
EN – 15
GRILL COOKING
The Grill heating element at the top of the oven cavity has one power setting only, it is e cient and economical. The
grill is ideal for cooking bacon, gammon steak, sh ngers and tea cakes.
Use the Gill Rack for grilling small items of food such as bacon and sausages, turn over halfway through grilling. Food
can be placed directly on the rack or placed in a an dish or on a heat-resistant plate. To make sure that any fat or oil
which can drip from the food being cooked, ensure that a suitable tray is placed below the Grill Rack.
When browning and crisping the surface of foods in a casserole dish, the Grill Rack can be used if the container is
shallow enough. However, it is advisable to place such containers directly on the turntable allow a little extra time to
brown and crisp as desired. It is not possible to use the Grill Rack for grilling.
To use the grill function, follow the instructions below:
1. In standby mode, press the GRILL button to select the grill function. The display will show ”Grl”
2. use the 10 SECONDS, 1 MINUTE and 10 MINUTES buttons to select the time to cook.
3. Press the START/QUICK START button to start cooking.
4. When the cooking cycle is completed, the display will show “End” and a tone will be heard every 2 minutes until a
button is pressed or the door is opened.
MICROWAVE + GRILL
Using both the microwave and grill function it is possible to brown and cook the food quickly. To use the microwave
and grill function, follow the instruction as below:
1. In standby mode, press MICROWAVE + GRILL pad once or twice to select "Co-1" or "Co-2".
2. Use the 10 SECONDS, 1 MINUTE and 10 MINUTES buttons to set cooking time.
3. Press START/QUICK START button to start.
4. When the cooking cycle is completed, the display will show “End” and a tone will be heard every two minutes until
a button is pressed or the door is opened.
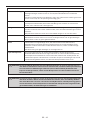
Microwave + Grill Function
Display Cooking Process Suggested Use
Co-1
The oven will cook in the following cycle:
Microwave 22 seconds, grill 11 seconds. this will
repeat until the end of the total time set.
Chicken Pieces, Chicken Breast, Pork
Chops
Co-2
The oven will cook in the following cycle:
Microwave on full power for 18 seconds then grill for
15 seconds. this will repeat until the end of the total
time set.
Whole Chicken
• Maximum cooking time with the grill is 95 minutes.
• During grilling allow smoke or smells to disperse by opening a window or switching on kitchen ventilation. This is
normal and not a fault with the oven.
• During cooking you can check the current combination cooking power by touching MICROWAVE + GRILL button.
• When using the grill function, the grill will turn on and o at regular intervals to prevent overheating.
• When using the MICROWAVE+GRILL function, food can be placed in a suitable container directly on the turntable.
WARNING: The door, outer cabinet, oven cavity, accessories and dishes will become very hot during operation. To
prevent burns, always use thick oven gloves.

EN – 16
EN – 16
CONVECTION
During convection cooking, hot air is circulated throughout the oven cavity to brown and make crisp foods quickly
and evenly. This oven can be programmed for thirteen di erent cooking temperatures (200°C, 190°C, 180°C, 170°C,
160°C, 150°C, 140°C, 130°C, 120°C, 110°C).
It is recommended to preheat the oven before cooking in the convection mode. To preheat and cook using the
convection function, follow the instructions given below:
Your oven can be programmed to combine preheating and convection cooking operations.
1. In standby mode, press CONVECTION button repeatedly to select convection temperature.
2. Press START/QUICK START button to start the preheat function.
3. When the designated temperature is reached, the oven will bleep.
Once the oven has preheated and the bleep sounds:
1. Open the door and place container of food at the center of the atbed.
2. Use the 10 SECONDS, 1 MINUTE and 10 MINUTES buttons to set cooking time. The longest time is 95 minutes.
3. Press START/QUICK START button to start.
NOTE: When the convection preheat temperature is reached, the oven will bleep every two seconds. The preheat
temperature will be maintained for 30 minutes after which the oven will turn o ."
MICROWAVE + CONVECTION
The Microwave+Convection mode makes cooking easier and faster as it uses fast microwave cooking and convection
to crisp the food.
It is possible to cook at 4 di erent convection temperatures. To start the dual cook mode, follow the instrucitons as
below:
1. In standby mode, press MICROWAVE+CONVECTION repeatedly to select temperature (200°C, 170°C, 140°C,
110°C).
2. Press the 10 SECONDS, 1 MINUTE and 10 MINUTES buttons to set cooking time. The time ranges from 10
seconds to 95 minutes.
3. Press START/QUICK START button to start.
When using the Microwave + Convection function the timing of the microwave and convection cooking is as shown
below. Choose the most suitable option for cooking your food and making it crispy.
Display Cooking Process
200 °C 10 second of microwave power, then 23 seconds of convection cooking. Cycle will repeat until
end of set cooking time.
170 °C 15 second of microwave power, then 18 seconds of convection cooking. Cycle will repeat until
end of set cooking time.
140 °C 19 second of microwave power, then 14 seconds of convection cooking. Cycle will repeat until
end of set cooking time.
110 °C 24 second of microwave power, then 9 seconds of convection cooking. Cycle will repeat until
end of set cooking time.

EN
EN – 16EN – 16
CONVECTION
During convection cooking, hot air is circulated throughout the oven cavity to brown and make crisp foods quickly
and evenly. This oven can be programmed for thirteen di erent cooking temperatures (200°C, 190°C, 180°C, 170°C,
160°C, 150°C, 140°C, 130°C, 120°C, 110°C).
It is recommended to preheat the oven before cooking in the convection mode. To preheat and cook using the
convection function, follow the instructions given below:
Your oven can be programmed to combine preheating and convection cooking operations.
1. In standby mode, press CONVECTION button repeatedly to select convection temperature.
2. Press START/QUICK START button to start the preheat function.
3. When the designated temperature is reached, the oven will bleep.
Once the oven has preheated and the bleep sounds:
1. Open the door and place container of food at the center of the atbed.
2. Use the 10 SECONDS, 1 MINUTE and 10 MINUTES buttons to set cooking time. The longest time is 95 minutes.
3. Press START/QUICK START button to start.
NOTE: When the convection preheat temperature is reached, the oven will bleep every two seconds. The preheat
temperature will be maintained for 30 minutes after which the oven will turn o ."
MICROWAVE + CONVECTION
The Microwave+Convection mode makes cooking easier and faster as it uses fast microwave cooking and convection
to crisp the food.
It is possible to cook at 4 di erent convection temperatures. To start the dual cook mode, follow the instrucitons as
below:
1. In standby mode, press MICROWAVE+CONVECTION repeatedly to select temperature (200°C, 170°C, 140°C,
110°C).
2. Press the 10 SECONDS, 1 MINUTE and 10 MINUTES buttons to set cooking time. The time ranges from 10
seconds to 95 minutes.
3. Press START/QUICK START button to start.
When using the Microwave + Convection function the timing of the microwave and convection cooking is as shown
below. Choose the most suitable option for cooking your food and making it crispy.
Display Cooking Process
200 °C 10 second of microwave power, then 23 seconds of convection cooking. Cycle will repeat until
end of set cooking time.
170 °C 15 second of microwave power, then 18 seconds of convection cooking. Cycle will repeat until
end of set cooking time.
140 °C 19 second of microwave power, then 14 seconds of convection cooking. Cycle will repeat until
end of set cooking time.
110 °C 24 second of microwave power, then 9 seconds of convection cooking. Cycle will repeat until
end of set cooking time.
EN – 17
EN – 17
AUTO MENU
For convience the Auto Programs allow food to be cooked quickly and e ecenlty with only a few button presses. It is
not necessary to program the duration and the cooking power, all that is required is to press the required auto cook
button, enter the weight/pieces by using the UP and DOWN buttons and then press START/QUICK START button.
For example, to cook two jacket potatoes.
1. Open the door and place the food inside the oven using suitable ovenware for the cook cycle being used.
2. Close the door.
3. Press the JACKET POTATO button once.
4. Use the UP and DOWN buttons to enter numbers of potatoes.
5. Press START/QUICK START button.
6. When the cooking cycle is completed, the display will show “End” and a tone will be heard every two minutes until
a button is pressed or the door is opened.
Auto cook menus:
Auto Menu Method to Select Weight or Pieces Size/Weight
Frozen Meal Select the weight by using the UP and DOWN buttons control, then
press the START/QUICK START button to begin cooking.
200 to 800g
Auto Defrost 100 to 1800g
Reheat Beverages Select the number of cups by using the UP and DOWN buttons, then
press the START/QUICK START button to begin cooking.
1 to 3 cups (200ml
each)
Jacket Potato
Select the number of potatoes by using the UP and DOWN buttons,
then press the START/QUICK START button to begin cooking.
Depending on the number of potatoes selected you may be asked to
rearrange the potatoes part way through the cooking cycle.
1 to 3 potatoes
(230g each)
Popcorn
Select the weight by using the UP and DOWN buttons, then press the
START/QUICK START button to begin cooking.
100g
Fresh Vegetables 200 to 600g
Pizza 150g / 300g / 450g
Porridge 50 to 150g
Grilled Steak* 200 to 600g
Grilled Chicken* 200 to 600g
Auto Reheat* 200 to 800g
Oven Chips 200g
Roast Beef / Lamb 200 to 600g
Roast Chicken 800g to 1400g
• The result of auto cook depends on factors such as the shape and size of food, your personal preference as to the
doneness of certain foods and how the food is placed in the oven. If the resold of the cooking is not satifactory,
please adjust the cooking time to suit.
• For some of the auto cook programs, you may be requested to turn the food over. Open the door, turn the food,
close the door and then press the START/QUICK START button to resume cooking.
• Wear oven gloves (or similar) when turning food over.

EN – 18
EN – 18
AUTO DEFROST
Auto Defrost allows you to defrost food by weight. The defrosting time and power level are automatically set once the
food category and the weight are programmed. The frozen food weight ranges from 200 to 1800g.
1. In the standby mode, press the AUTO DEFROST button.
2. Use the UP and DOWN buttons to select weight of food to be defrosted.
3. Press the START/QUICK START button to start the defrost cycle.
4. If oven stops during the defrosting cycle, turn the food over to ensure uniform defrosting and then press START/
QUICK START to defrost for the remaining time.
5. When a defrost cycle is completed, the display will show “End” and a tone will be heard every two minutes until a
button is pressed or the door is opened.
AUTO REHEAT
The oven allows you to reheat food based on the weight entered by user. The defrosting time and power level are
automatically set once the food category and the weight are programmed. The reheat weight ranges from 200 to
800g.
1. In standby mode, press the AUTO REHEAT button.
2. Using the UP and DOWN buttons to select weight of food to be reheated
3. Press START/QUICK START.
4. When the cooking cycle is completed, the display will show “End” and a tone will be heard every two minutes until
a button is pressed or the door is opened.
KITCHEN TIMER
The oven is equipped with a kitchen timer which will count down from the time set.
1. While in the standby mode, press TIME/SET CLOCK button once.
2. Using the 10 SECONDS, 1 MINUTE and 10 MINUTES to set desired time. The longest time is 95 minutes.
3. Press START/QUICK START button to con rm.
4. Display will count down from the set time.
5. When the display reaches zero, a tone will sound.
It is also possible to use the kitchen timer while in the cook mode. To do this follow the steps as outline above while
your food is cooking. Once the kitchen timer is activated, it will appear on the display for ve seconds, then the display
will revert to to the countdown timer for the cooking cycle. To view the timer again press the TIME/SET CLOCK button
once and the kitchen timer will appear for ve seconds, then revert to the cooking countdown.
• To cancel the TIMER program press STOP/ECO button and the display shows the time.
• If a cooking cycle has been started, it is possible to start the kitchen timer by following the steps as above.
POWER SAVING FUNCTION
This feature allows power to be saved while the oven is not being used. To activate this feature while in the standby
mode, press and hold STOP/ECO button for 3 seconds, the display will turn o ; the oven will enter power saving
mode.
To cancel the power saving mode, press any button or open and close the oven door.
Strona się ładuje...
Strona się ładuje...
Strona się ładuje...
Strona się ładuje...
Strona się ładuje...
Strona się ładuje...
Strona się ładuje...
Strona się ładuje...
Strona się ładuje...
Strona się ładuje...
Strona się ładuje...
Strona się ładuje...
Strona się ładuje...
Strona się ładuje...
Strona się ładuje...
Strona się ładuje...
Strona się ładuje...
Strona się ładuje...
Strona się ładuje...
Strona się ładuje...
Strona się ładuje...
Strona się ładuje...
Strona się ładuje...
Strona się ładuje...
Strona się ładuje...
Strona się ładuje...
Strona się ładuje...
Strona się ładuje...
Strona się ładuje...
Strona się ładuje...
Strona się ładuje...
Strona się ładuje...
Strona się ładuje...
Strona się ładuje...
Strona się ładuje...
Strona się ładuje...
Strona się ładuje...
Strona się ładuje...
Strona się ładuje...
Strona się ładuje...
Strona się ładuje...
Strona się ładuje...
Strona się ładuje...
Strona się ładuje...
Strona się ładuje...
Strona się ładuje...
Strona się ładuje...
Strona się ładuje...
Strona się ładuje...
Strona się ładuje...
Strona się ładuje...
Strona się ładuje...
Strona się ładuje...
Strona się ładuje...
Strona się ładuje...
Strona się ładuje...
Strona się ładuje...
Strona się ładuje...
Strona się ładuje...
Strona się ładuje...
Strona się ładuje...
Strona się ładuje...
Strona się ładuje...
Strona się ładuje...
Strona się ładuje...
Strona się ładuje...
Strona się ładuje...
Strona się ładuje...
Strona się ładuje...
Strona się ładuje...
Strona się ładuje...
Strona się ładuje...
Strona się ładuje...
Strona się ładuje...
Strona się ładuje...
Strona się ładuje...
Strona się ładuje...
Strona się ładuje...
Strona się ładuje...
Strona się ładuje...
Strona się ładuje...
Strona się ładuje...
Strona się ładuje...
Strona się ładuje...
Strona się ładuje...
Strona się ładuje...
Strona się ładuje...
Strona się ładuje...
Strona się ładuje...
Strona się ładuje...
Strona się ładuje...
Strona się ładuje...
Strona się ładuje...
Strona się ładuje...
Strona się ładuje...
Strona się ładuje...
Strona się ładuje...
Strona się ładuje...
Strona się ładuje...
Strona się ładuje...
Strona się ładuje...
Strona się ładuje...
Strona się ładuje...
Strona się ładuje...
Strona się ładuje...
Strona się ładuje...
Strona się ładuje...
Strona się ładuje...
Strona się ładuje...
Strona się ładuje...
Strona się ładuje...
Strona się ładuje...
Strona się ładuje...
Strona się ładuje...
Strona się ładuje...
Strona się ładuje...
Strona się ładuje...
Strona się ładuje...
Strona się ładuje...
Strona się ładuje...
Strona się ładuje...
Strona się ładuje...
Strona się ładuje...
Strona się ładuje...
Strona się ładuje...
Strona się ładuje...
Strona się ładuje...
Strona się ładuje...
Strona się ładuje...
Strona się ładuje...
Strona się ładuje...
Strona się ładuje...
Strona się ładuje...
Strona się ładuje...
Strona się ładuje...
Strona się ładuje...
Strona się ładuje...
Strona się ładuje...
Strona się ładuje...
Strona się ładuje...
Strona się ładuje...
Strona się ładuje...
Strona się ładuje...
Strona się ładuje...
Strona się ładuje...
Strona się ładuje...
Strona się ładuje...
Strona się ładuje...
Strona się ładuje...
Strona się ładuje...
Strona się ładuje...
Strona się ładuje...
Strona się ładuje...
Strona się ładuje...
Strona się ładuje...
Strona się ładuje...
Strona się ładuje...
Strona się ładuje...
Strona się ładuje...
Strona się ładuje...
Strona się ładuje...
Strona się ładuje...
Strona się ładuje...
Strona się ładuje...
Strona się ładuje...
Strona się ładuje...
Strona się ładuje...
Strona się ładuje...
Strona się ładuje...
Strona się ładuje...
Strona się ładuje...
Strona się ładuje...
Strona się ładuje...
Strona się ładuje...
Strona się ładuje...
Strona się ładuje...
Strona się ładuje...
Strona się ładuje...
Strona się ładuje...
Strona się ładuje...
Strona się ładuje...
Strona się ładuje...
Strona się ładuje...
Strona się ładuje...
Strona się ładuje...
Strona się ładuje...
Strona się ładuje...
Strona się ładuje...
Strona się ładuje...
Strona się ładuje...
Strona się ładuje...
Strona się ładuje...
Strona się ładuje...
Strona się ładuje...
Strona się ładuje...
Strona się ładuje...
Strona się ładuje...
Strona się ładuje...
Strona się ładuje...
Strona się ładuje...
Strona się ładuje...
Strona się ładuje...
Strona się ładuje...
Strona się ładuje...
Strona się ładuje...
Strona się ładuje...
Strona się ładuje...
Strona się ładuje...
Strona się ładuje...
Strona się ładuje...
Strona się ładuje...
Strona się ładuje...
-
 1
1
-
 2
2
-
 3
3
-
 4
4
-
 5
5
-
 6
6
-
 7
7
-
 8
8
-
 9
9
-
 10
10
-
 11
11
-
 12
12
-
 13
13
-
 14
14
-
 15
15
-
 16
16
-
 17
17
-
 18
18
-
 19
19
-
 20
20
-
 21
21
-
 22
22
-
 23
23
-
 24
24
-
 25
25
-
 26
26
-
 27
27
-
 28
28
-
 29
29
-
 30
30
-
 31
31
-
 32
32
-
 33
33
-
 34
34
-
 35
35
-
 36
36
-
 37
37
-
 38
38
-
 39
39
-
 40
40
-
 41
41
-
 42
42
-
 43
43
-
 44
44
-
 45
45
-
 46
46
-
 47
47
-
 48
48
-
 49
49
-
 50
50
-
 51
51
-
 52
52
-
 53
53
-
 54
54
-
 55
55
-
 56
56
-
 57
57
-
 58
58
-
 59
59
-
 60
60
-
 61
61
-
 62
62
-
 63
63
-
 64
64
-
 65
65
-
 66
66
-
 67
67
-
 68
68
-
 69
69
-
 70
70
-
 71
71
-
 72
72
-
 73
73
-
 74
74
-
 75
75
-
 76
76
-
 77
77
-
 78
78
-
 79
79
-
 80
80
-
 81
81
-
 82
82
-
 83
83
-
 84
84
-
 85
85
-
 86
86
-
 87
87
-
 88
88
-
 89
89
-
 90
90
-
 91
91
-
 92
92
-
 93
93
-
 94
94
-
 95
95
-
 96
96
-
 97
97
-
 98
98
-
 99
99
-
 100
100
-
 101
101
-
 102
102
-
 103
103
-
 104
104
-
 105
105
-
 106
106
-
 107
107
-
 108
108
-
 109
109
-
 110
110
-
 111
111
-
 112
112
-
 113
113
-
 114
114
-
 115
115
-
 116
116
-
 117
117
-
 118
118
-
 119
119
-
 120
120
-
 121
121
-
 122
122
-
 123
123
-
 124
124
-
 125
125
-
 126
126
-
 127
127
-
 128
128
-
 129
129
-
 130
130
-
 131
131
-
 132
132
-
 133
133
-
 134
134
-
 135
135
-
 136
136
-
 137
137
-
 138
138
-
 139
139
-
 140
140
-
 141
141
-
 142
142
-
 143
143
-
 144
144
-
 145
145
-
 146
146
-
 147
147
-
 148
148
-
 149
149
-
 150
150
-
 151
151
-
 152
152
-
 153
153
-
 154
154
-
 155
155
-
 156
156
-
 157
157
-
 158
158
-
 159
159
-
 160
160
-
 161
161
-
 162
162
-
 163
163
-
 164
164
-
 165
165
-
 166
166
-
 167
167
-
 168
168
-
 169
169
-
 170
170
-
 171
171
-
 172
172
-
 173
173
-
 174
174
-
 175
175
-
 176
176
-
 177
177
-
 178
178
-
 179
179
-
 180
180
-
 181
181
-
 182
182
-
 183
183
-
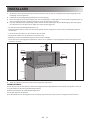 184
184
-
 185
185
-
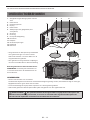 186
186
-
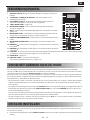 187
187
-
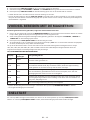 188
188
-
 189
189
-
 190
190
-
 191
191
-
 192
192
-
 193
193
-
 194
194
-
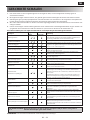 195
195
-
 196
196
-
 197
197
-
 198
198
-
 199
199
-
 200
200
-
 201
201
-
 202
202
-
 203
203
-
 204
204
-
 205
205
-
 206
206
-
 207
207
-
 208
208
-
 209
209
-
 210
210
-
 211
211
-
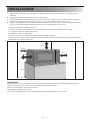 212
212
-
 213
213
-
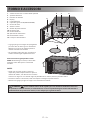 214
214
-
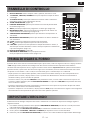 215
215
-
 216
216
-
 217
217
-
 218
218
-
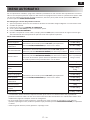 219
219
-
 220
220
-
 221
221
-
 222
222
-
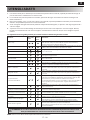 223
223
-
 224
224
-
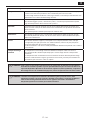 225
225
-
 226
226
-
 227
227
-
 228
228
-
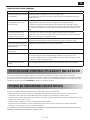 229
229
-
 230
230
-
 231
231
-
 232
232


Sharp YC-PC322A Instrukcja obsługi
- Kategoria
- Mikrofale
- Typ
- Instrukcja obsługi
w innych językach
- español: Sharp YC-PC322A Manual de usuario
- italiano: Sharp YC-PC322A Manuale utente
- Deutsch: Sharp YC-PC322A Benutzerhandbuch
- português: Sharp YC-PC322A Manual do usuário
- français: Sharp YC-PC322A Manuel utilisateur
- Nederlands: Sharp YC-PC322A Handleiding
Powiązane artykuły
Inne dokumenty
-
 De Dietrich DMG2508B-01 Instrukcja obsługi
-
LG MC7849HS Instrukcja obsługi
-
Samsung NQ50J5530BS/EO Instrukcja obsługi
-
-
-
-
Samsung MC32F606TCT Instrukcja obsługi
-
Samsung MC285TATCSQ Instrukcja obsługi
-
Inalto 20L Microwave Skrócona instrukcja obsługi
