
M2 trainer user guide Customer Service
800.783.7257
saris.com
29263B_Saris M2 Trainer Manual_indesign file-PLK.indd 129263B_Saris M2 Trainer Manual_indesign file-PLK.indd 1 2/1/2021 2:29:38 PM2/1/2021 2:29:38 PM

2
TELL US WHAT YOU THINK
SARIS.COM/FEEDBACK
REGISTER YOUR PRODUCT FOR UPDATES
SARIS.COM/REGISTRATION
29263B_Saris M2 Trainer Manual_indesign file-PLK.indd 229263B_Saris M2 Trainer Manual_indesign file-PLK.indd 2 2/1/2021 2:29:40 PM2/1/2021 2:29:40 PM

3
Virtual Training makes it easy to
bring the outside in, whether you’re
on a tablet, desktop or phone.
VirtualTraining.Saris.com
29263B_Saris M2 Trainer Manual_indesign file-PLK.indd 329263B_Saris M2 Trainer Manual_indesign file-PLK.indd 3 2/1/2021 2:29:41 PM2/1/2021 2:29:41 PM

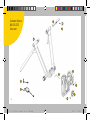
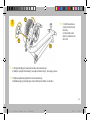
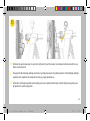
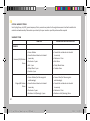
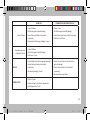
4
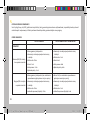
a
b
c
d
e
f
g
h
i
j
Customer Service
800.783.7257
Saris.com
29263B_Saris M2 Trainer Manual_indesign file-PLK.indd 429263B_Saris M2 Trainer Manual_indesign file-PLK.indd 4 2/1/2021 2:29:41 PM2/1/2021 2:29:41 PM

5
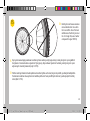
1Fully extend trainer legs and set
trainer on at surface. The foot
pads on the legs of the trainer can
be rotated to make your trainer
stand level on uneven surfaces.
Całkowicie wysunąć nóżki trenażera i ustawić urządzenie na płaskiej powierzchni. Ruchome elementy stopek
umieszczonych na nóżkach trenażera można obracać, by ustawić urządzenie w poziomie nawet na nierównym podłożu.
Úplne roztiahnite podpery trenažéra a položte ho na rovný povrch. Otáčaním nožičiek na podperách trenažéra možno
upraviť ich výšku a nastaviť vodorovnú polohu trenažéra aj na nerovných povrchoch.
EN
PL
SK
29263B_Saris M2 Trainer Manual_indesign file-PLK.indd 529263B_Saris M2 Trainer Manual_indesign file-PLK.indd 5 2/1/2021 2:29:41 PM2/1/2021 2:29:41 PM

6
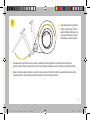
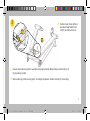
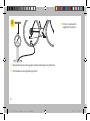
2EN Insert the bolt action tube (j) into
the trainer (a). Insert the quick
release lever (i) into the trainer slit
and through the center hole of the
bolt action tube( j). Tighten the
lever (i) into the threads of the bolt
action tube (j).
Wsunąć tuleję zamka (j) do trenażera (a). Wsunąć dźwignię szybkiego zwalniania (i) do otworu trenażera i przełożyć ją przez
otwór znajdujący się pośrodku tulei zamka (j). Dokręcić dźwignię (i) w tulei zamka (j).
Do trenažéra (a) nasuňte upínaciu rúrku (j). Do štrbiny trenažéra cez stredový otvor upínacej rúrky (j) zasuňte rýchloupínaciu
páčku (i). Páčku (i) zatiahnite do závitov na upínacej rúrke (j).
i
j
interior
bevel
a
PL
SK
29263B_Saris M2 Trainer Manual_indesign file-PLK.indd 629263B_Saris M2 Trainer Manual_indesign file-PLK.indd 6 2/1/2021 2:29:42 PM2/1/2021 2:29:42 PM

7
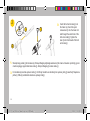
f
a
3Postition trainer frame (a) at on
ground with legs folded. Insert
L-bolt (f) as shown with arrow.
Ustawić ramę trenażera (a) płasko na podłożu ze złożonymi nóżkami. Włożyć śrubę w kształcie litery L (f),
tak jak pokazuje strzałka.
Rám trenažéra (a) položte na rovný povrch so zloženými podperami. Zasuňte L-skrutku (f) v smere šípky.
EN
PL
SK
29263B_Saris M2 Trainer Manual_indesign file-PLK.indd 729263B_Saris M2 Trainer Manual_indesign file-PLK.indd 7 2/1/2021 2:29:42 PM2/1/2021 2:29:42 PM

8
b
f
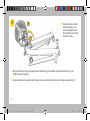
4Place the resistance unit (b)
between brackets on the
frame and guide the L-bolt
(f) through the center of the
resistance unit (b).
Włożyć jednostkę oporową (b) pomiędzy ramiona widelca ramy i przeprowadzić śrubę w kształcie litery L (f) przez
środek jednostki oporowej (b).
Odporovú jednotku (b) umiestnite medzi konzoly na ráme a L-skrutku (f) prevlečte cez stred odporovej jednotky (b).
EN
PL
SK
29263B_Saris M2 Trainer Manual_indesign file-PLK.indd 829263B_Saris M2 Trainer Manual_indesign file-PLK.indd 8 2/1/2021 2:29:42 PM2/1/2021 2:29:42 PM

9
e
b
5While holding the resistance unit
(b) in an upright position, insert
the nut (e).
EN
PL
SK
Przytrzymując jednostkę oporową (b) w pozycji pionowej, włożyć nakrętkę (e).
Odporovú jednotku (b) držte vo vzpriamenej polohe a nasuňte maticu (e).
29263B_Saris M2 Trainer Manual_indesign file-PLK.indd 929263B_Saris M2 Trainer Manual_indesign file-PLK.indd 9 2/1/2021 2:29:42 PM2/1/2021 2:29:42 PM

10
6
d
a
bGuide the bolt (d) into the
round hole of the trainer
frame (a) as indicated by
the arrow. Pass through the
resistance unit (b) and secure
into the resistance unit nut
(e) using a 1/2” wrench.
Włożyć śrubę (d) w okrągły otwór w ramie trenażera (a), zgodnie ze wskazaniem strzałki. Przełożyć przez jednostkę
oporową (b) i zamocować w nakrętce jednostki oporowej (e) przy użyciu klucza 1/2”.
Skrutku (d) zasuňte do okrúhleho otvoru rámu trenažéra (a) v smere šípky. Prevlečte ju cez odporovú jednotku (b)
a zaskrutkujte do matice odporovej jednotky (e) pomocou 1/2” kľúča.
EN
PL
SK
29263B_Saris M2 Trainer Manual_indesign file-PLK.indd 1029263B_Saris M2 Trainer Manual_indesign file-PLK.indd 10 2/1/2021 2:29:42 PM2/1/2021 2:29:42 PM

11
c
a
b
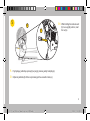
71.) Fold the resistance
unit (b) into the trainer
frame (a).
2.) Thread the clutch
knob (c) clockwise onto
the L-bolt.
1.) Złożyć jednostkę oporową (b) w kierunku ramy trenażera (a).
2.) Nakręcić pokrętło dociskowe (c) na śrubę w kształcie litery L, obracając w prawo.
1) Odporovú jednotku (b) pritlačte k rámu trenažéra (a).
2) Ovládač spojky (c) naskrutkujte v smere hodinových ručičiek na L-skrutku.
EN
PL
SK
29263B_Saris M2 Trainer Manual_indesign file-PLK.indd 1129263B_Saris M2 Trainer Manual_indesign file-PLK.indd 11 2/1/2021 2:29:42 PM2/1/2021 2:29:42 PM

12
8Fill tire to manufacturer’s
suggested tire pressure.
Napompować oponę aż do osiągnięcia ciśnienia zalecanego przez producenta.
Plášť nafúknite na tlak odporúčaný výrobcom.
PSI
EN
PL
SK
29263B_Saris M2 Trainer Manual_indesign file-PLK.indd 1229263B_Saris M2 Trainer Manual_indesign file-PLK.indd 12 2/1/2021 2:29:42 PM2/1/2021 2:29:42 PM

13
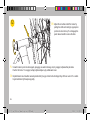
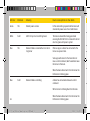
9The trainer is designed to be only used with the provided skewer. Failure
to use included skewer may result in damage or injury. Replace the
skewer on the rear wheel of your bike with the one provided. Make sure
the quick release handle is on the left (non-drive) side of the bicycle and
faces upward or backwards.
Trenażer jest przeznaczony do użytku wyłącznie z dołączonym do zestawu szybkozamykaczem. Użycie innego szybkozamy-
kacza niż dołączony do zestawu grozi uszkodzeniem urządzenia lub urazem. Należy zamienić szybkozamykacz z tylnego koła
roweru na ten dołączony do zestawu. Upewnić się, że uchwyt szybkozamykacza znajduje się po lewej stronie roweru (strona bez
napędu) i jest skierowany do góry i do tyłu.
Trenažér je určený na použitie výhradne s priloženým rýchloupinákom. Ak nepoužijete priložený rýchloupinák, hrozí riziko
poškodenia alebo zranenia. Rýchloupinák kolesa vášho bicykla nahraďte priloženým rýchloupinákom. Zabezpečte, aby
páčka rýchloupináka bola na ľavej strane bicykla (nepoháňaná strana) a smerovala hore alebo dozadu.
EN
PL
SK
29263B_Saris M2 Trainer Manual_indesign file-PLK.indd 1329263B_Saris M2 Trainer Manual_indesign file-PLK.indd 13 2/1/2021 2:29:42 PM2/1/2021 2:29:42 PM

14
10 Lift up bike by the seat post
and position the left side of
your bike skewer into the left
side of the trainer.
Unieść rower, trzymając za sztycę, i umieścić lewą stronę szybkozamykacza w lewej części trenażera.
Zdvihnite bicykel za sedlovku a ľavú stranu rýchloupináka na bicykli umiestnite na ľavú stranu trenažéra.
EN
PL
SK
29263B_Saris M2 Trainer Manual_indesign file-PLK.indd 1429263B_Saris M2 Trainer Manual_indesign file-PLK.indd 14 2/1/2021 2:29:42 PM2/1/2021 2:29:42 PM

15
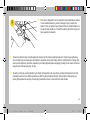
11
Pull down the quick release lever to capture the right side of your bike skewer. Quick release handle must be all the way
down in locked position.
Pociągnąć do dołu dźwignię szybkiego zwalniania, by uchwycić prawą stronę szybkozamykacza. Uchwyt dźwigni szybkiego
zwalniania musi znajdować się maksymalnie u dołu, w pozycji zablokowanej.
Potiahnutím rýchloupínacej páčky nadol uchyťte pravú stranu rýchloupináka bicykla. Rukoväť rýchloupínacej páčky musí
byť úplne dolu v uzamknutej polohe.
EN
PL
SK
29263B_Saris M2 Trainer Manual_indesign file-PLK.indd 1529263B_Saris M2 Trainer Manual_indesign file-PLK.indd 15 2/1/2021 2:29:43 PM2/1/2021 2:29:43 PM

16
12 Adjust the non-drive side of the trainer by
pulling the shaft and rotating to appropriate
position. Go back to step 11 and engage the
quick release handle to secure the bike.
EN
PL
SK
Ustawić trenażer po stronie bez napędu, pociągając za wałek i obracając tak, by osiągnąć odpowiednie położenie.
Powrócić do kroku 11 i zaciągnąć uchwyt szybkozamykacza, by zablokować rower.
Nepoháňanú stranu trenažéra nastavte potiahnutím tyče a jej otočením do vhodnej polohy. Vráťte sa na krok 11 a zaistite
bicykel zatlačením rýchloupínacej páčky.
29263B_Saris M2 Trainer Manual_indesign file-PLK.indd 1629263B_Saris M2 Trainer Manual_indesign file-PLK.indd 16 2/1/2021 2:29:43 PM2/1/2021 2:29:43 PM

17
b
h
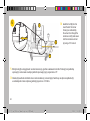
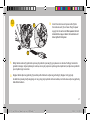
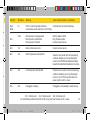
13 Insert the resistance unit power cable (h) into
the resistance unit (b) as shown. Plug the power
supply into the wall outlet.When powered, but not
connected to an app or device, the resistance unit
status light will blink green.
Włożyć kabel zasilania (h) jednostki oporowej do jednostki oporowej (b), jak pokazano na obrazku. Podłączyć zasilacz do
gniazda ściennego. Gdy urządzenie jest zasilane, ale nie jest połączone z aplikacją lub urządzeniem, lampka stanu jednostki
oporu będzie migać na zielono.
Napájací kábel odporovej jednotky (h) zasuňte podľa obrázka do odporovej jednotky (b). Napájací zdroj pripojte
do elektrickej zásuvky. Keď je napájaný, ale nie je pripojený k aplikácii alebo zariadeniu, kontrolka stavu odporovej jednotky
bude blikať nazeleno.
EN
PL
SK
29263B_Saris M2 Trainer Manual_indesign file-PLK.indd 1729263B_Saris M2 Trainer Manual_indesign file-PLK.indd 17 2/1/2021 2:29:43 PM2/1/2021 2:29:43 PM

18
c
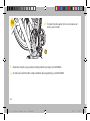
14 To tighten the roller against the tire, turn resistance unit
knob (c) until it CLICKS.
Aby docisnąć rolkę do opony, przekręcić pokrętło jednostki oporowej (c) aż do KLIKNIĘCIA.
Ak chcete valec pritlačiť k plášťu, otáčajte ovládačom odporovej jednotky (c), pokiaľ NECVAKNE.
EN
PL
SK
29263B_Saris M2 Trainer Manual_indesign file-PLK.indd 1829263B_Saris M2 Trainer Manual_indesign file-PLK.indd 18 2/1/2021 2:29:43 PM2/1/2021 2:29:43 PM

19
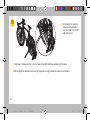
15
Aby docisnąć rolkę do opony, przekręcić pokrętło jednostki oporowej (c) aż do KLIKNIĘCIA.
Ak chcete valec pritlačiť k plášťu, otáčajte ovládačom odporovej jednotky (c), pokiaľ NECVAKNE.
Knobby tires will cause excessive
noise and vibration. Use a slick
tire to avoid this. Use of trainers
will decrease the life of your rear
tire. For longer life, use a harder
compound tire (part #9710).
EN
PL
SK
Opony kolcowane będą powodować nadmierny hałas i wibracje. Aby tego uniknąć, należy korzystać z opon gładkich.
Korzystanie z trenażerów skraca żywotność tylnej opony. Aby zachować żywotność na dłużej, należy korzystać z opon
wykonanych z twardej mieszanki (część nr 9710).
Plášte s terénnym dezénom budú spôsobovať nadmerný hluk a vibrácie. Aby ste im predišli, používajte hladké plášte.
Používanie trenažérov skracuje životnosť zadného plášťa. Ak chcete predĺžiť jeho životnosť, používajte plášť z tvrdšej
zmesi (diel č. 9710).
29263B_Saris M2 Trainer Manual_indesign file-PLK.indd 1929263B_Saris M2 Trainer Manual_indesign file-PLK.indd 19 2/1/2021 2:29:43 PM2/1/2021 2:29:43 PM

20
EN
PL
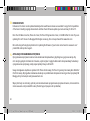
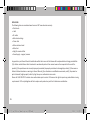
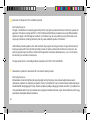
FIRMWARE UPDATES
Firmware on the trainer can be updated wirelessly when new rmware releases are available. To enjoy the full capabilities
of the trainer including ongoing enhancements and Over-the-Air rmware updates you must use Rouvy for iOS or PC.
Note: Your iOS device must be, iPhone 4s or later, iPod Touch 5th generation or later, or iPad Mini/iPad 3 or later. If you are
updating from a PC the use of a Bluegiga USB dongle is necessary, this can be purchased from www.Saris.com
More info along with step by step directions for updating the rmware of your trainer can be found at www.saris.com/
product/M2 under product support.
AKTUALIZACJE OPROGRAMOWANIA SPRZĘTOWEGO
Oprogramowanie sprzętowe trenażera można aktualizować bezprzewodowo, gdy dostępne są jego nowe wersje. Aby
móc cieszyć się pełnymi możliwościami trenażera, w tym korzystać z ciągłych udoskonaleń i bezprzewodowych aktualizacji
oprogramowania sprzętowego, należy używać aplikacji Rouvy na iOS lub PC.
Uwaga: obsługiwane urządzenia z systemem iOS: iPhone 4s lub nowszy, iPod Touch 5. generacji lub nowszy albo iPad Mini/
iPad 3 lub nowszy. W przypadku instalowania aktualizacji za pośrednictwem komputera konieczny jest klucz sprzętowy USB
Bluegiga, który można kupić w witrynie www.Saris.com.
Więcej informacji oraz instrukcje, jak krok po kroku zaktualizować oprogramowanie sprzętowe trenażera, można znaleźć na
stronie www.saris.com/product/M2 w sekcji Product Support (wsparcie dot. produktów).
29263B_Saris M2 Trainer Manual_indesign file-PLK.indd 2029263B_Saris M2 Trainer Manual_indesign file-PLK.indd 20 2/1/2021 2:29:43 PM2/1/2021 2:29:43 PM
Strona się ładuje...
Strona się ładuje...
Strona się ładuje...
Strona się ładuje...
Strona się ładuje...
Strona się ładuje...
Strona się ładuje...
Strona się ładuje...
Strona się ładuje...
Strona się ładuje...
Strona się ładuje...
Strona się ładuje...
Strona się ładuje...
Strona się ładuje...
Strona się ładuje...
Strona się ładuje...
Strona się ładuje...
Strona się ładuje...
Strona się ładuje...
Strona się ładuje...
-
 1
1
-
 2
2
-
 3
3
-
 4
4
-
 5
5
-
 6
6
-
 7
7
-
 8
8
-
 9
9
-
 10
10
-
 11
11
-
 12
12
-
 13
13
-
 14
14
-
 15
15
-
 16
16
-
 17
17
-
 18
18
-
 19
19
-
 20
20
-
 21
21
-
 22
22
-
 23
23
-
 24
24
-
 25
25
-
 26
26
-
 27
27
-
 28
28
-
 29
29
-
 30
30
-
 31
31
-
 32
32
-
 33
33
-
 34
34
-
 35
35
-
 36
36
-
 37
37
-
 38
38
-
 39
39
-
 40
40


w innych językach
- slovenčina: Saris M2 International Používateľská príručka
- English: Saris M2 International User manual
Powiązane artykuły
Inne dokumenty
-
Garmin Tacx Boost Bundle Instrukcja obsługi
-
-
-
Garmin Tacx NEO2T Smart-Trainer Instrukcja obsługi
-
-
-
Beurer 8sense PC 100 Instrukcja obsługi