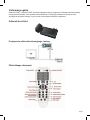
Emtec S885 Instrukcja obsługi
- Kategoria
- Telefony
- Typ
- Instrukcja obsługi
Niniejsza instrukcja jest również odpowiednia dla

1/UK
DVB-T Scart receiver
Decodeur TNT / DVB-T scart empfanger
Decodeur
scart empfanger
>S885
User’s Manual

2/UK
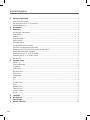
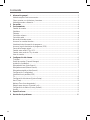
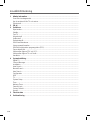
Table of content
1 General information ................................................................................................................... 3
Scart DVB-T Receiver Unit ...........................................................................................................
3
How to Connect with your TV and Antenna ..................................................................................
3
Remote Controller Unit .................................................................................................................
3
2 Switching on ..............................................................................................................................
4
3 Operation .....................................................................................................................................
4
Changing Channels .....................................................................................................................
4
Subtitle .........................................................................................................................................
4
Teletext ........................................................................................................................................
4
Volume Control ............................................................................................................................
4
Audio Control ...............................................................................................................................
4
Soundtrack Language
.................................................................................................................. 5
Accessing the favorite channels ..................................................................................................
5
Displaying program information ...................................................................................................
5
Accessing the Electronic Program Guide (EPG) .........................................................................
5
Pausing the current picture ..........................................................................................................
5
Switching between DTV AND VCR mode
.................................................................................... 5
Switching between TV and Radio mode ......................................................................................
5
Channel List .................................................................................................................................
5
4 System Setup ..............................................................................................................................
6
Digital TV ......................................................................................................................................
6
Channel Manager ........................................................................................................................
7
Installation
.................................................................................................................................... 7
Area Search .................................................................................................................................
7
Manual Search
............................................................................................................................. 7
Auto Search ..................................................................................................................................
7
Configuration ...............................................................................................................................
7
OSD .............................................................................................................................................
7
TV ................................................................................................................................................
8
System Setup ...............................................................................................................................
8
Time .............................................................................................................................................
8
Wakeup Time ...............................................................................................................................
8
Parental Lock ...............................................................................................................................
9
Factory Default ............................................................................................................................
9
Version .........................................................................................................................................
9
5 Specifications ............................................................................................................................
9
6 Trouble Shooting .....................................................................................................................
10

3/UK
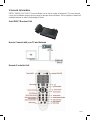
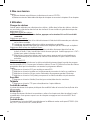
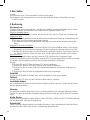
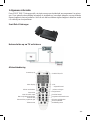
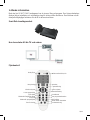
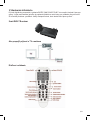
1 General information
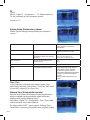
EMTEC S885 SCART DVB-T Receiver allows you to view a variety of programs. This user manual
covers the installation and necessary steps to operate various features. It also explains in details all
available features to take full advantage of them.
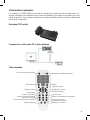
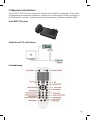
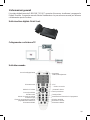
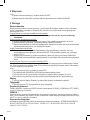
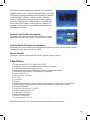
Scart DVB-T Receiver Unit
How to Connect with your TV and Antenna
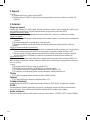
Remote Controller Unit

4/UK
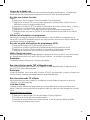
2 Switching on
Steps:
a) Turn on your TV set and select the SCART input.
b) Turn on the main power supply to the receiver and connect IR receiver to SCART receiver.
3 Operation
Changing Channels
There are four ways of channel selection - stepping through the channel list, selection by num-
ber, from the on-screen channel list, and using the electronic program guide (EPG)
Stepping through the channel list:
To move through the channel list, press the CH+ or CH- key on the remote
controller.
Selection by number:
Enter the channel list number directly by remote controller to select desired
channel.
Auto scan will clean the channels that stored first.
Manual scan don’t clean the channels, but it will not add the repeated channels
that have stored.
Selection by on-screen channels list:
You can also select the required channel directly from on-screen channel list. This
is displayed using the SCART receiver ‘s main menu. Please press “EXIT” to go out of
channel list.
Select Channel menu to go submenu, press UP/DOWN cursor button preview chan-
nels and press OK button to switch to the desired channel.
Selection by EPG:
You can also select the required channel directly from electronic program guide (EPG). Like
the channel list, the EPG screen displays a list of the stored channels along with information on
what programmes are being broadcast. Steps:
Press the EPG button to enter the EPG menu.
Press the UP/DOWN cursor button to highlight channel.
Press OK cursor button to check program information within 30 minutes.
Press Exit button to switch to the desired channel and preview channel.
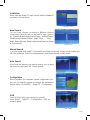
Subtitle
Press Subtitle button to switch subtitle On/Off.
Teletext
Press TTX button to Open/Close teletext
Volume Control
The volume level of the SCART receiver can be altered with the LEFT/ RIGHT cursor button to
remote controller.
NOTE :
The volume level selected will remain set, even when the receiver is turned off and on again,
until it’s altered. You can silence the sound from the receiver by pressing MUTE button on the
remote controller.
Audio Control
You can press the LANG button to select different audio modes among STEREO, LEFT, and
RIGHT MONO
•
•
•
•
•
•
•
•
•
•
•
•

5/UK
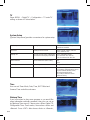
Soundtrack Language
Some programs are broadcast in two or more language simultaneously. The soundtrack lan-
guage can be selected or by pressing the LANG button on the remote controller.
Accessing the favorite channels
Steps:
Press “Menu-Digital TV-Channel Manager-Channel Organizer”
Press INFO button to get functions (Favorite/Skip/Lock/Del)
according to different color (Red/Yellow/Blue/Green)
Press EXIT button to exit from color information before “Favorite” channel
Select the favorite channel, press Red key
Press “OK-EXIT” and back to TV Program playing interface
Press FAVORITE button on RC to get favorite channel list
Displaying program information
You can read the current program information by pressing “INFO” button on the remote control-
ler. Press the button again to hide the program information table
Accessing the Electronic Program Guide (EPG)
Press the EPG button to enter EPG menu.
Press UP/DOWN cursor button to preview channel
Press OK cursor button to check program information.
Press OK button to switch to view guide.
Pausing the current picture
You can pause the current picture by pressing PAUSE button on the remote controller, press the
key again to keep switching the program.
NOTE:
The broadcast between two pauses will be skipped
Switching between DTV AND VCR mode
You can switch between Digital TV mode and VCR mode by pressing DTV/VCR button on the
remote controller.
NOTE:
When SCART receiver is in standby mode (turned off), DTV/VCR button will not activate. When
the power is off, it will automatically change to VCR.
Switching between TV and Radio mode
You can switch between Digital TV mode and Radio mode by pressing “TV/RADIO button on the
remote controller.
Channel List
Some channels broadcast material which you do not want younger members of the family to
watch. Any channel can be locked so that it cannot be selected for viewing without entering PIN
code.
Locking/Unlocking a channel:
Steps:
Press “Menu-Digital TV-Channel Manager-Channel Organizer ’’
Choose one channel you want to lock
Press the blue button on RC, enter default password 8888
The channel is locked successfully
•
•
•
•
•
•
•
•
•
•
•
•
•
•

6/UK
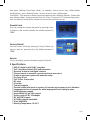
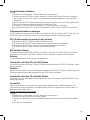
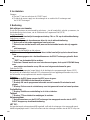
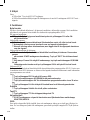
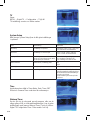
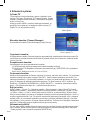
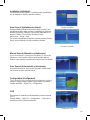
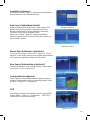
4 System Setup
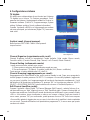
Digital TV
There are some functions provided to users
in the Digital TV system, Search TV, Program
manager, System setting, Software update and Search
software information etc. Press <MENU> button on the
remote controller to enter into the main menu, then select
[Digital TV], as shown in below:
Main Menu
Channel Manager
There is five functions under Channel Manager:
Channel Manager menu
Channel Organizer:
Channel Organizer includes Favorite Channel, Skip Channel, Lock Channel, Delete Channel
settings.
Channel Sorting:
There are three options to sort the channel as below:
(1) First Option: select the channel sorting by area
(2) Second Option: FTA (free). Scramble (encrypt).
ALL (free and encrypt);
Third Option: alphabetically from A-Z or Z-A;
Channel Grouping:
Group the channel as movie, sports, music, children or art. After assign group icon to channel,
press «OK-EXIT». If it shows «Successfully updated», means channel grouping is acted right.
After back to TV Program playing interface, press «OK» on RC to get «QUICK SELECT», you
will see «Movies/News/Sports.etc» on screen then.
Edit Channel:
Press «Menu-Digital TV-Channel Manager-Edit Channel», you will see Edit Channel List with
red «Add» and yellow «Edit». Press yellow key on RC to edit. Choose the channel you want
to edit a new name, press the key of «VOL+» on RC, there is a list with Number and Letter.
After enter the new name please press «OK» to confirm it, then press «OK» again till you
see «Sucessfully updated» which means the channel edit is successfully done. Back to TV
Program playing interface, the new name for this channel can be seen.
Delete All:
You can delete some program that you don’t like from [Channel Organizer] menu, but if you do
not like all TV or Radio program, you have to delete all from [DELETE ALL] menu.

7/UK
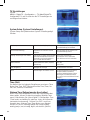
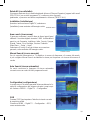
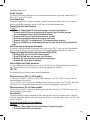
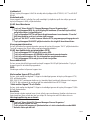
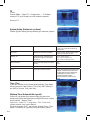
Installation
When enter into Digital TV menu, please select [Installation]
as shown in Picture below:
Installation menu
Area Search:
You can scan channels according to different countries
(areas) used. Now the unit can be used in such countries
as Germany/England/Italy/France/Spain/ Holland/Taiwan/
China/Norway/Sweden/Finland. (Main Menu → Setup →
Are�a). Select [Country Scan] to start overall scan, as shown
in Picture below:
Channel Scan
Manual Search
If you are familiar with digital TV information and know the channel frequency and number, you
can choose Manual Search including frequency search and channel number search.
Auto Search
If you know the frequency you want to search, you can input
the frequency and search the channel speedy.
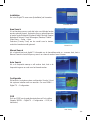
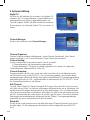
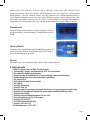
Configuration
Here it provides the customize system configuration func-
tion, you can setup the system according to the requirement
for your desire. Go to MENU → Digital TV → Configuration.
OSD
Press [OSD] to Setup user interface by yourself.
Steps: MENU → Digital TV → Configuration → OSD, as
shown in below:
OSD Setting

8/UK
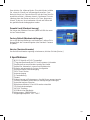
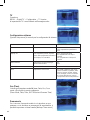
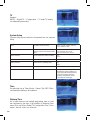
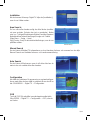
TV
Steps: MENU → Digital TV → Configuration → TV enter TV
setting, as shown in Picture below:
TV setting
System Setup
[System Setup menu] provides convenience for system setup.
EQ Setup setting EQ Standard. Classic, Rock, Jazz. POP,
default as Standard
Surround Setting sound surround OFF. Concert. Church. Passive.
Live, default as OFF
Display Off In order to save power, setting auto
shut down LCD Display under MP3
OFF: completely shutoff
5s: shut down LCD after 5s
15s: shut down LCD after 15s
Active Antenna Active Antenna On/OFF setting On
OFF
LCD Brightness LCD Brightness Support from 10% to 100%
Area Search area setting Now it can support the service areas
of Germany/ England/ Italy/ France/
Spain/ Holland/ Taiwan/ China/
Norway/Sweden/Finland.
According to different version
different setting
Time
User can set Timer Mode, Date, Time, GMT Offset and
Summer Time under this sub-menu.
Wakeup Time
If you know when to play some program or you would like
some information reminder sometime, then you can set up
by [Wakeup Timer menu]. Please press «Menu-Digital TV-
Configuration-Time -Timer mode», choose from «Auto» and
«Manual». Press «EXIT» after choose «Auto» or «Manual»,

9/UK
then press «Wakeup Timer-Timer Mode», for example, choose «once» from «off/once/daily/
weekly/yearly», press «Wakeup Mode», choose «channel» from «off/message/
channel/on». Then press the channel you want to wake up from «Wakeup channel». Set the date
from «Wakeup date», set the exact time from «On Time». Then back to TV Program playing inter-
face, the wakeup channel will be showen once arrive the exact time you set.
Parental Lock
User can change the system password by pressing nume-
ric button on the remote controller, the default password is
“8888”.
Factory Default
User can restore all factory setting by Factory Default, you
have to input the password first, the default password is
“8888”
Version
User’s can display system information by press [Version]
5 Specifications
MPEG-2 digital & fully DVB-T compliant
Full 7 days User-Friendly EPG and information
Receives all free to view digital channels
Channel search in automatic, manual search and area search
Simple to use menu system with automatic setup
One loop RF out
Full 20 Pins Scart socket
RF input
IR socket
Tele-text supports
Parental control with block on system, all channels and programs by lock limitation
Language selection of program for audio language with user setting in menu
Multi-languages support
Aspect Ratio 4:3 and 16:9 support
Power supply AC/DC 12V adaptor
RF VHF/UHF support
6/7/8 MHz channel bandwidth
Size: 148X60X26
Working Temperature: -20~65°C
•
•
•
•
•
•
•
•
•
•
•
•
•
•
•
•
•
•
•

10/UK
Note:
Specifications are subjected to change without prior notice.
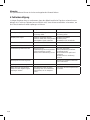
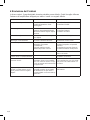
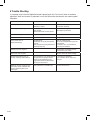
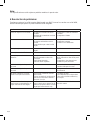
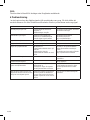
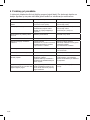
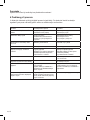
6 Trouble Shooting
In some region, the digital terrestrial signal may be weak. So you’d better use the antenna in
which the booster was built, for watching the weak signal channels.
Problem Possible cause What to do
Standby light not lit Mains lead unplugged
Mains fuse blown
Check mains lead
Check fuse
No signal found Aerial is disconnected
Aerial is damaged /misaligned
Out of digital signal area
Check aerial lead
Check aerial
Check with dealer
No picture or sound Tuned to digital teletext channel Reduce to another channel
Scrambled channel message Channel is scrambled Select alternative channel
No response to remote controller Receiver off
Handset not aimed correctly
Front panel obstructed
Hand set batteries exhausted
Plug in and turn on plug
Aim handset at front panel
Check for obstructions
Replace handset batteries
Forgotten channel lock code Re-install channels to cancel
channel lock
Forgotten menu lock code Contact help line
The remote controller will not ope-
rate your SCART receiver.
(1)The batteries in your remote
controller need replacing
(2)There is an obstruction blocking
the signal path between the remote
controller and the box.
(1)Replace the batteries.
(2) Check that there is nothing in the
way of the path between the remote
controller and the receiver.
After moving the SCART receiver
to another room you find you are
no longer able to receive digital
reception.
The aerial feed former new point
may come through a distribution
system which may reduce the digital
signal now received by the box.
Try a direct feed from the antenna.
Note:
Specifications are subjected to change without prior notice.
6 Trouble Shooting
In some region, the digital terrestrial signal may be weak. So you’d better use the antenna in
which the booster was built, for watching the weak signal channels.
Problem Possible cause What to do
Standby light not lit Mains lead unplugged
Mains fuse blown
Check mains lead
Check fuse
No signal found Aerial is disconnected
Aerial is damaged /misaligned
Out of digital signal area
Check aerial lead
Check aerial
Check with dealer
No picture or sound Tuned to digital teletext channel Reduce to another channel
Scrambled channel message Channel is scrambled Select alternative channel
No response to remote controller Receiver off
Handset not aimed correctly
Front panel obstructed
Hand set batteries exhausted
Plug in and turn on plug
Aim handset at front panel
Check for obstructions
Replace handset batteries
Forgotten channel lock code Re-install channels to cancel
channel lock
Forgotten menu lock code Contact help line
The remote controller will not ope-
rate your SCART receiver.
(1)The batteries in your remote
controller need replacing
(2)There is an obstruction blocking
the signal path between the remote
controller and the box.
(1)Replace the batteries.
(2) Check that there is nothing in the
way of the path between the remote
controller and the receiver.
After moving the SCART receiver
to another room you find you are
no longer able to receive digital
reception.
The aerial feed former new point
may come through a distribution
system which may reduce the digital
signal now received by the box.
Try a direct feed from the antenna.

RÉCEPTEUR TNT PÉRITEL
Manuel d’utilisation

2/F
Table des Matières
1 Informations générales ............................................................................................................. 3
Récepteur TNT péritel ..................................................................................................................
3
Comment raccorder votre TV et votre antenne ............................................................................
3
Télécommande .............................................................................................................................
3
2 Mise sous tension
....................................................................................................................... 4
3 Utilisation ...................................................................................................................................
4
Changer les chaînes ....................................................................................................................
4
Sous-titre ......................................................................................................................................
4
Télétexte ......................................................................................................................................
4
Contrôle du volume
...................................................................................................................... 4
Contrôle Audio .............................................................................................................................
4
Langue de la bande son ..............................................................................................................
5
Accéder aux chaînes favorites
..................................................................................................... 5
Afficher les informations du programme ......................................................................................
5
Accéder au guide électronique des programmes (EPG) .............................................................
5
Mettre l’image sur pause .............................................................................................................
5
Basculer entre les modes TNT et Magnétoscope ........................................................................
5
Basculer entre mode TV et Radio ................................................................................................
5
Liste des chaînes .........................................................................................................................
5
4 Configuration du système .........................................................................................................
6
TV numérique ...............................................................................................................................
6
Gestion des chaînes ....................................................................................................................
6
Installation
.................................................................................................................................... 7
Recherche de zone
.......................................................................................................................7
Recherche manuelle ....................................................................................................................
7
Recherche automatique
................................................................................................................ 7
Configuration ...............................................................................................................................
7
OSD .............................................................................................................................................
7
TV ................................................................................................................................................
8
Configuration du système .............................................................................................................
8
Heure ...........................................................................................................................................
8
Wakeup Time ...............................................................................................................................
8
Contrôle parental [Parental Lock] ................................................................................................
9
Paramètres par défaut .................................................................................................................
9
Version .........................................................................................................................................
9
5 Caractéristiques
......................................................................................................................... 9
6 Résolution des problèmes ......................................................................................................
10

3/F
1 Informations générales
Le récepteur TNT péritel S885 vous permet de visualiser une grande variété de programmes. Ce
manuel d’utilisation vous détaille les procédures d’installation et les étapes nécessaires pour l’utili-
sation du produit. Il vous explique également de manière détaillée, toutes les fonctions disponibles
afin de mieux en profiter..
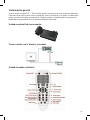
Récepteur TNT péritel
Comment raccorder votre TV et votre antenne
Télécommande
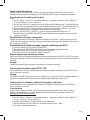
Mise sous tension/hors tension
Affichage menu
Réduction volume
Pause lecture
Couper son (sourdine)
Retour à la chaîne précédente
Sélectionner la langue
Guide électronique des programmes
Affichage télétexte
Commutateur TNT/Magnétoscope
Quitter
Ajout de chaîne
Augmenter le volume
Chaîne précédente
Chaîne favorite
Afficher les informations du programme
Sélecter le mode son
Commutateur TV/RADIO
Affichage de sous-titres

4/F
2 Mise sous tension
Étapes :
a) Allumez d’abord votre téléviseur et sélectionnez la source PÉRITEL.
b) Mettez sous tension l’alimentation électrique du récepteur et connectez le récepteur IR au récepteur.
3 Utilisation
Changer les chaînes
Il existe quatre méthodes pour sélectionner les chaînes – défiler dans la liste des chaînes, sélection-
ner par numéro, sélectionner dans la liste des chaînes à l’écran et utiliser le guide électronique des
programmes (EPG).
Défiler dans la liste des chaînes :
Pour défiler dans la liste des chaînes, appuyez sur les touches CH+ ou CH- sur la télé
-
commande.
Sélectionner par numéro :
Entrez le numéro de liste de la chaîne directement à l’aide de la télécommande pour sélection
-
ner la chaîne souhaitée.
Le balayage automatique effacera les chaînes enregistrées au préalable.
Le balayage manuel n’efface pas les chaînes mais n’ajoutent pas les chaînes qui se répètent.
Sélectionner dans la liste des chaînes à l’écran:
Vous pouvez également sélectionner la chaîne souhaitée directement depuis la liste des
chaînes à l’écran. Celle-ci est affichée à l’aide du menu principal. Veuillez appuyer sur « EXIT »
(Quitter) pour quitter la liste des chaînes.
Sélectionnez le menu des chaînes, puis le sous-menu, appuyez sur la touche haut/bas sur
la télécommande pour pré-visualiser les chaînes et sur la touche OK pour choisir la chaîne
souhaitée.
Sélectionner par EPG:
Vous pouvez également sélectionner la chaîne souhaitée directement depuis le guide des program-
mes électronique (EPG). Comme pour la liste des chaînes, l’Ècran EPG affiche une liste des chaînes
enregistrées ainsi que les informations concernants les programmes diffusés.
Étapes :
Appuyez sur la touche EPG pour accéder au menu EPG.
Appuyez sur la touche haut/bas sur la télécommande pour mettre la chaîne en surbrillance.
Appuyez sur la touche OK pour cocher l’information du programme pendant 30 minutes.
Appuyez sur la touche Exit (Quitter) pour passer à la chaîne souhaitée et la pré-visualiser
Sous-titre
Appuyez sur la touche Subtitle (Sous-titre) pour activer/désactiver les sous-titres.
Télétexte
Appuyez sur la touche TTX pour activer/désactiver l’option télétexte
Contrôle du volume
Le niveau du volume du récepteur péritel peut être modifié à l’aide de la touche Gauche/Droite de la
télécommande.
REMARQUE :
Le niveau du volume sélectionné sera maintenu, même si le récepteur est éteint et rallumé, jusqu’à
sa modification. Vous pouvez couper le son du récepteur en appuyant sur la touche MUTE de la
télécommande.
Contrôle Audio
En appuyant sur la touche LANG vous sélectionnez les différents modes audio parmi STEREO (Sté-
reo), LEFT (Gauche) et RIGHT (Droite) MONO
•
•
•
•
•
•
•
•
•
•
•
•

5/F
Langue de la bande son
Certains programmes sont diffusés en deux ou plusieurs langues simultanément. La langue de la
bande son peut être sélectionnée en appuyant sur la touche LANG de la télécommande.
Accéder aux chaînes favorites
Étapes :
Appuyez sur “Menu-Digital TV-Channel Manager-Channel Organizer”
Appuyez sur la touche INFO pour accÈder aux fonctions (Favorite/Skip/Lock/Del) selon les
diffÈrentes couleurs (Rouge/Jaune/Bleu/Vert)
Appuyez sur la touche EXIT pour quitter les informations de couleur avant la chaîne « Favorite »
Sélectionnez la chaîne favorite, appuyez sur la touche Rouge
Appuyez sur « OK-EXIT» et revenez à l’interface de fonctionnement du programme TV
Appuyez ensuite sur la touche FAVORITE sur la télécommande pour accéder à vos chaînes
favorites.
Afficher les informations du programme
Vous pouvez consulter les informations du programme en cours de diffusion en appuyant sur la
touche INFO sur la tÈlÈcommande. Appuyez sur cette touche de nouveau pour cacher le tableau des
informations relatives au programme.
Accéder au guide électronique des programmes (EPG)
Appuyez sur la touche EPG pour accéder au menu EPG
Appuyez sur la touche Haut/Bas de la télécommande pour pré-visualiser la chaîne
Appuyez sur la touche OK pour visualiser les informations relatives au programme.
Appuyez de nouveau sur la touche OK pour revenir à l’étape précédente.
Mettre l’image sur pause
Vous pouvez mettre sur pause l’image diffusée en appuyant sur la touche PAUSE sur la télécomman-
de ; appuyez de nouveau sur la touche PAUSE pour continuer de visualiser le programme.
Remarque :
La diffusion entre les deux pauses n’est pas sauvegardée.
Basculer entre les modes TNT et Magnétoscope
Vous pouvez basculer entre le mode TV numérique et le mode Magnétoscope en appuyant sur la
touche DTV/VCR de la télécommande.
Remarque :
Lorsque le récepteur est en mode veille, la touche DTV/VCR est désactivée. Lorsque le récepteur est
mis hors tension, il passera automatiquement au mode Magnétoscope.
Basculer entre mode TV et Radio
Vous pouvez basculer entre le mode TV numérique et le mode Radio en appuyant sur la touche
TV/RADIO sur la télécommande.
Liste des chaînes
Certaines chaînes diffusent des programmes non-recommandés pour les jeunes membres de la
famille. Toutes les chaînes peuvent être bloquées à l’aide d’un code secret afin d’empêcher la visuali-
sation.
Bloquer/débloquer une chaîne:
Étapes :
Appuyez sur «Menu-Digital TV-Channel Manager-Channel Organizer»
Choisissez la chaîne que vous souhaitez bloquer
Appuyez sur la touche bleue sur la télécommande, le mot de passe par défaut est 8888
La chaîne a été bloquée avec succès
•
•
•
•
•
•
•
•
•
•
•
•
•
•

6/F
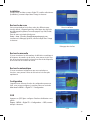
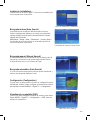
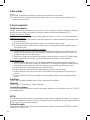
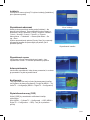
4 Configuration du système
TV numérique
Il existe des fonctions proposées aux utilisateurs dans le menu
telles que la recherche TV, la gestion des programmes, la confi-
guration, etc.
Appuyez sur la touche <MENU> sur la télécommande pour ac-
céder au menu principal, puis sélectionnez [Digital TV], comme
indiqué ci-dessous:
Gestion des chaînes
Il existe cinq fonctions du Gestionnaire des chaînes:
Organiseur des chaînes:
L’Organiseur des chaînes inclut les réglages des chaînes favorites, le blocage ou la suppression de
chaînes...
Tri des chaînes:
Il existe trois options vous permettant de trier les chaînes:
(1) Première option: sélectionnez le tri des chaînes par zone
(2) Deuxième option: FTA (libre). Scramble (crypté). ALL (libre et crypté);
Troisième option : Alphabétique de A à Z ou de Z à A;
Groupage des chaînes:
Groupez les chaînes par catégorie, telles que films, sport, musique, enfants ou art. Après avoir attri-
bué un icône de groupe pour chaque catégorie, appuyez sur OK-EXIT. Si le message « Successfully
updated » (Mise à jour réussie) apparaît cela signifie que le groupage a été correctement effectué.
Après le retour à l’interface du programme TV, appuyez sur OK sur la télécommande pour accéder au
« QUICK SELECT » (Sélection rapide), qui permet d’afficher à l’écran les catégories « Movie/News/
Sports.etc » (Films/Infos/Sports etc)
Édition des chaînes:
Appuyez sur « Menu-Digital TV-Channel Manager-Edit Channel ». Appuyez sur la touche jaune de la
télécommande pour l’édition. Choisissez la chaîne que vous souhaitez renommer, appuyez sur la tou-
che « VOL+ » sur la télécommande, vous trouverez une liste des numéros et des lettres. Après avoir
saisi le nouveau nom, veuillez appuyer sur OK de nouveau, jusqu’à ce que le message « Successfully
updated » (Mise à jour réussie) apparaisse cela signifie que l’édition a été correctement effectuée. De
retour sur l’interface des programmes TV, vous pouvez voir le nouveau nom pour cette chaîne.
Effacer tout:
Vous pouvez effacer certaines chaînes que vous n’appréciez pas, dans le menu[Channel Organi-
zer], mais si vous souhaitez effacer tous les programmes radio ou TV, vous devez utiliser le menu
[DELETE ALL].
Menu principal
Menu TV numérique

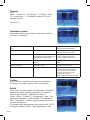
7/F
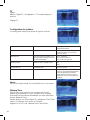
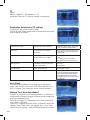
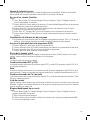
Installation
Lorsque vous accéder au menu Digital TV, veuillez sélectionner
[Installation], comme indiqué dans l’image ci-dessous:
Recherche de zone
Vous pouvez balayer les chaînes selon les différents pays
(zones) utilisés. L’appareil peut être utilisé dans des pays tels
que Allemagne/Angleterre/France/Espagne/Pays Bas/Suède/
Finlande...
Dans le menu principal sélectionnez:
Setup→ Area→[Country Scan](Balayage de pays) pour
commencer le balayage général, comme indiqué dans l’image
ci-dessous:
Recherche manuelle
Si vous connaissez les informations de télévision numérique et
la fréquence de numéro et de chaîne, vous pouvez choisir l’op-
tion de recherche manuelle, incluant la recherche de fréquence
et la recherche de numéro de chaîne.
Recherche automatique
Si vous connaissez la fréquence que vous souhaitez re-
chercher, vous pouvez l’entrer et rechercher la chaîne plus
rapidement.
Configuration
L’appareil vous offre une fonction de configuration personna-
lisée, vous pouvez configurer le système selon vos souhaits.
Allez dans le MENU→ Digital TV→ Configuration.
OSD
Appuyez sur [OSD]pour configurer l’interface d’utilisateur vous-
même.
Étapes : MENU→ Digital TV→ Configuration → OSD, comme
indiqué ci-dessous:
Menu Installation
Balayage des chaînes
OSD

8/F
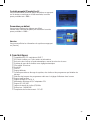
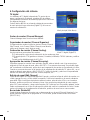
TV
Étapes :
MENU→ Digital TV→ Configuration → TV, comme indiqué ci-
dessous:
Réglage TV
Configuration du système
Le menu[System Setup] vous permet de régler le système.
Réglage EQ Configuration EQ Standard. Classic, Rock, Jazz. POP,
Standard par défaut
Surround Réglage du son surround OFF. Concert. Church (Église).
Passive (Passif). Live (en direct),
OFF par défaut
Affichage Off Afin d’économiser l’énergie, vous
pouvez régler l’affichage LCD pour
un arrêt automatique
OFF : Arrêt total
5s: Arrêt LCD après 5s
15s: Arrêt LCD après 15s
Antenne active Antenne active, réglage On/Off On
OFF
Luminosité LCD Luminosité LCD De 10% à 100%
Zone Réglage de la zone de recherche L’appareil peut être utilisé dans des
pays tels que Allemagne/Angleterre/
France/Espagne/Pays Bas/Nor-
vège/ Suède/ Finlande. Selon les
différentes versions et les différents
réglages.
Heure
Vous pouvez régler la date, l’heure hiver/été avec ce sous-menu.
Wakeup Time
Cette fonction vous permet si vous connaissez l’heure de
diffusion du programme ou si vous souhaitez avoir un rappel
d’information le basculement automatique sur cette chaîne dans
le menu [Wakeup Timer]
Veuillez appuyer sur «Menu-Digital TV-Configuration-Time -Timer
mode», et choissisez entre «Auto» et «Manual».
Appuyez sur «EXIT» puis «Wakeup Timer-Timer Mode».

9/F
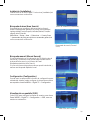
Contrôle parental [Parental Lock]
Vous pouvez modifier le mot de passe du système en appuyant
sur les boutons numérique sur la télécommande, le mot de
passe par défaut est « 8888 ».
Paramètres par défaut
Vous pouvez réintégrer les réglages par défaut.
Veuillez entrer votre mot de passe puis ressaissez le mot de
passe par défaut « 8888 »
Version
Vous pouvez afficher les informations du système en appuyant
sur [Version]
5 Caractéristiques
Compatible MPEG-2 numérique et DVB-T
EPG facile à utiliser, sur 7 jours entiers et informations
Recherche des chaînes en mode automatique, manuel et recherche de zone
Système de menu facile à utiliser avec réglage automatique
Prise péritel 20 broches
Entrée RF
Prise IR
Support télétexte
Contrôle parental avec blocage de système, des chaînes et des programmes par limitation de
blocage
Sélection des langues des programmes audio avec le réglage d’utilisateur dans le menu
Support multi-langues
Support d’image 4 :3 et 16 :9
Alimentation électrique AC/DC adaptateur 12V
Support RF VHF/UHF
Largeur de bande de chaîne 6/7/8 MHz
Dimensions : 148X60X26
Température de fonctionnement : -20˜~65°
•
•
•
•
•
•
•
•
•
•
•
•
•
•
•
•
•

10/F
Remarque :
Les caractéristiques sont soumises aux modifications sans notification préalable.
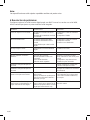
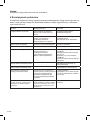
6 Résolution de problèmes
Problème Cause possible Solution
La lumière de veille ne s’allume pas Alimentation principale débranchée Vérifiez l’alimentation principale
Aucun signal trouvé Antenne déconnectée
L’antenne est endommagée/mal
alignée
Zone hors du signal numérique
Vérifiez la prise aérienne
Vérifiez l’antenne
Consultez le distributeur
Pas d’image ou de son Réglé pour le canal numérique de
télétexte
Réduire à un autre canal
Message de chaîne codé La chaîne est cryptée Choisissez une chaîne alternative
Aucune réaction de la télécom-
mande
Récepteur éteint
Capteur mal orienté
Panneau avant obstrué
Piles épuisées
Branchez et tournez la prise
Orientez le capteur vers le panneau
avant
Vérifiez les obstructions
Remplacez les piles
Code de blocage de chaîne oublié Réinstallez les chaînes pour annuler
le blocage
La télécommande ne fonctionne pas
avec votre récepteur péritel
(1) Les piles de votre télécommande
doivent être remplacées
(2)Une obstruction empêche la voie
du signal entre la télécommande et
le boîtier
(1) Remplacez les piles
(2) Vérifiez s’il n’y a pas d’obstruc
-
tion entre la télécommande et le
récepteur
Après avoir déplacé le récepteur
péritel dans une autre pièce vous
découvrez qu’il n’y a plus de récep-
tion numérique
L’ancien port de transmission du si-
gnal est probablement obstrué et le
signal numérique arrive difficilement
au boîtier
Essayez un contact direct avec
l’antenne
Strona się ładuje...
Strona się ładuje...
Strona się ładuje...
Strona się ładuje...
Strona się ładuje...
Strona się ładuje...
Strona się ładuje...
Strona się ładuje...
Strona się ładuje...
Strona się ładuje...
Strona się ładuje...
Strona się ładuje...
Strona się ładuje...
Strona się ładuje...
Strona się ładuje...
Strona się ładuje...
Strona się ładuje...
Strona się ładuje...
Strona się ładuje...
Strona się ładuje...
Strona się ładuje...
Strona się ładuje...
Strona się ładuje...
Strona się ładuje...
Strona się ładuje...
Strona się ładuje...
Strona się ładuje...
Strona się ładuje...
Strona się ładuje...
Strona się ładuje...
Strona się ładuje...
Strona się ładuje...
Strona się ładuje...
Strona się ładuje...
Strona się ładuje...
Strona się ładuje...
Strona się ładuje...
Strona się ładuje...
Strona się ładuje...
Strona się ładuje...
Strona się ładuje...
Strona się ładuje...
Strona się ładuje...
Strona się ładuje...
Strona się ładuje...
Strona się ładuje...
Strona się ładuje...
Strona się ładuje...
Strona się ładuje...
Strona się ładuje...
Strona się ładuje...
Strona się ładuje...
Strona się ładuje...
Strona się ładuje...
Strona się ładuje...
Strona się ładuje...
Strona się ładuje...
Strona się ładuje...
Strona się ładuje...
Strona się ładuje...
Strona się ładuje...
Strona się ładuje...
Strona się ładuje...
Strona się ładuje...
Strona się ładuje...
Strona się ładuje...
Strona się ładuje...
Strona się ładuje...
Strona się ładuje...
Strona się ładuje...
Strona się ładuje...
Strona się ładuje...
Strona się ładuje...
Strona się ładuje...
Strona się ładuje...
Strona się ładuje...
Strona się ładuje...
Strona się ładuje...
Strona się ładuje...
Strona się ładuje...
Strona się ładuje...
Strona się ładuje...
Strona się ładuje...
Strona się ładuje...
Strona się ładuje...
Strona się ładuje...
Strona się ładuje...
Strona się ładuje...
Strona się ładuje...
Strona się ładuje...
Strona się ładuje...
Strona się ładuje...
-
 1
1
-
 2
2
-
 3
3
-
 4
4
-
 5
5
-
 6
6
-
 7
7
-
 8
8
-
 9
9
-
 10
10
-
 11
11
-
 12
12
-
 13
13
-
 14
14
-
 15
15
-
 16
16
-
 17
17
-
 18
18
-
 19
19
-
 20
20
-
 21
21
-
 22
22
-
 23
23
-
 24
24
-
 25
25
-
 26
26
-
 27
27
-
 28
28
-
 29
29
-
 30
30
-
 31
31
-
 32
32
-
 33
33
-
 34
34
-
 35
35
-
 36
36
-
 37
37
-
 38
38
-
 39
39
-
 40
40
-
 41
41
-
 42
42
-
 43
43
-
 44
44
-
 45
45
-
 46
46
-
 47
47
-
 48
48
-
 49
49
-
 50
50
-
 51
51
-
 52
52
-
 53
53
-
 54
54
-
 55
55
-
 56
56
-
 57
57
-
 58
58
-
 59
59
-
 60
60
-
 61
61
-
 62
62
-
 63
63
-
 64
64
-
 65
65
-
 66
66
-
 67
67
-
 68
68
-
 69
69
-
 70
70
-
 71
71
-
 72
72
-
 73
73
-
 74
74
-
 75
75
-
 76
76
-
 77
77
-
 78
78
-
 79
79
-
 80
80
-
 81
81
-
 82
82
-
 83
83
-
 84
84
-
 85
85
-
 86
86
-
 87
87
-
 88
88
-
 89
89
-
 90
90
-
 91
91
-
 92
92
-
 93
93
-
 94
94
-
 95
95
-
 96
96
-
 97
97
-
 98
98
-
 99
99
-
 100
100
-
 101
101
-
 102
102
-
 103
103
-
 104
104
-
 105
105
-
 106
106
-
 107
107
-
 108
108
-
 109
109
-
 110
110
-
 111
111
-
 112
112


Emtec S885 Instrukcja obsługi
- Kategoria
- Telefony
- Typ
- Instrukcja obsługi
- Niniejsza instrukcja jest również odpowiednia dla
w innych językach
- čeština: Emtec S885 Uživatelský manuál
- español: Emtec S885 Manual de usuario
- italiano: Emtec S885 Manuale utente
- Deutsch: Emtec S885 Benutzerhandbuch
- slovenčina: Emtec S885 Používateľská príručka
- svenska: Emtec S885 Användarmanual
- français: Emtec S885 Manuel utilisateur
- English: Emtec S885 User manual
- Nederlands: Emtec S885 Handleiding
Inne dokumenty
-
Philips 300 Series Instrukcja obsługi
-
Philips 300 Series Instrukcja obsługi
-
Philips 300 Series Instrukcja obsługi
-
 Qviart UNIC Instrukcja obsługi
-
Haier LEF65V200S Operating Instructions Manual
-
TechniSat DVB-S Instrukcja obsługi
-
-
-
OK B-D4 Instrukcja obsługi
-
AIPTEK Picasso Instrukcja obsługi
