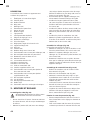
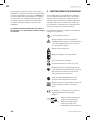
Vonroc TS501AC Instrukcja obsługi
- Kategoria
- Elektronarzędzia
- Typ
- Instrukcja obsługi

TABLE SAW
TS501AC
EN Original Instructions 07
DE Übersetzung Der Originalbetriebsanleitung 16
NL Vertaling van de oorspronkelijke gebruiksaanwijzing 27
FR Traduction de la notice originale 37
ES Traducción del manual original 48
IT Traduzione delle istruzioni originali 59
PL
Tłumaczenie instrukcji oryginalnej 69
TR
Orijinal talimatların çevirisi 80

WWW.VONROC.COM
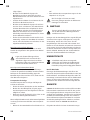
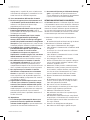
2
22A
22B
2A
2B
2C
3
7
3
4
5
61
10
8
11
9
14
16
11 10 12
17 13
9
15
A-1
A-2
31

WWW.VONROC.COM
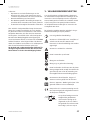
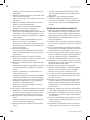
3
22B 22A
26
15
24 23
25
22B
22A
21
5
18
19
20
21
~460mm
22A
~440mm
22B
A-3
A-4

WWW.VONROC.COM
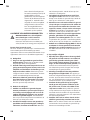
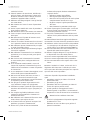
4
3-5mm
110mm
28
B-1
C-1 C-4
C-2
C-3

WWW.VONROC.COM
5
G-1
G-3
D E
27
G-2
G-4

WWW.VONROC.COM
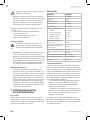
6
H-1
H-2
I-1 J-1
J-2I-2
30
30
2A
2A
2B
2B
29
29

EN
7
WWW.VONROC.COM
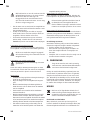
1. SAFETY INSTRUCTIONS
Read the enclosed safety warnings, the additional
safety warnings and the instructions. Failure to follow
the safety warnings and the instructions may result in
electric shock, fi re and/or serious injury. Save the safe-
ty warnings and the instructions for future reference.
The following symbols are used in the user
manual or on the product:
Read the user manual.
Denotes risk of personal injury, loss of life
or damage to the tool in case of non-obser-
vance of the instructions in this manual.
Risk of electric shock.
Keep bystanders away.
Wear a dust protection.
Wear ear and eye protection.
Keep hands away from the cutting area
while the power tool is running. Contact
with the saw blade can lead to injuries.
Danger area! Keep hands, fi ngers or arms
away from this area.
Class II machine - Double insulation - You
don’t need any earthed plug.
The product is in accordance with the
applicable safety standards in the European
directives.
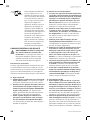
Ø30mm
Ømax.
210mm
Take note of the dimensions of
the saw blade. The hole
diameter must fi t the tool
spindle without play. If it is
necessary to use reducers,
ensure that the dimensions of
the reducer are suitable for the
base blade thickness and the
saw blade hole diameter, as well
as the tool spindle diameter.
Wherever possible, use the
reducers provided with the saw
blade. The saw blade diameter
must match the information
specifi ed on the symbol.
GENERAL POWER TOOL SAFETY WARNINGS
WARNING! Read all safety warnings and all
instructions. Failure to follow the warnings
and instructions may result in electric
shock, fi re and/or serious injury.
Save all warnings and instructions for future
reference.
The term “power tool” in the warnings refers to
your mains-operated (corded) power tool or batte-
ry-operated (cordless) power tool.
1) Work area safety
a) Keep work area clean and well lit. Cluttered or
dark areas invite accidents.
b) Do not operate power tools in explosive at-
mospheres, such as in the presence of fl amma-
ble liquids, gases or dust. Power tools create
sparks which may ignite the dust or fumes.
c) Keep children and bystanders away while ope-
rating a power tool. Distractions can cause you
to lose control.
2) Electrical safety
a) Power tool plugs must match the outlet. Never
modify the plug in any way. Do not use any
adapter plugs with earthed (grounded) power
tools. Unmodifi ed plugs and matching outlets
will reduce risk of electric shock.
b) Avoid body contact with earthed or grounded
surfaces, such as pipes, radiators, ranges and
refrigerators. There is an increased risk of elec-
tric shock if your body is earthed or grounded.
c) Do not expose power tools to rain or wet condi-
tions. Water entering a power tool will increase
the risk of electric shock.
d) Do not abuse the cord. Never use the cord for
carrying, pulling or unplugging the power tool.
Keep cord away from heat, oil, sharp edges
or moving parts. Damaged or entangled cords
increase the risk of electric shock.
e) When operating a power tool outdoors, use an
extension cord suitable for outdoor use. Use of
a cord suitable for outdoor use reduces the risk
of electric shock.

8
EN
WWW.VONROC.COM
f) If operating a power tool in a damp location
is unavoidable, use a residual current device
(RCD) protected supply. Use of an RCD reduces
the risk of electric shock.
3) Personal safety
a)
Stay alert, watch what you are doing and use
common sense when operating a power tool. Do
not use a power tool while you are tired or under
the influence of drugs, alcohol or medication.
A moment of inattention while operating power
tools may result in serious personal injury.
b) Use personal protective equipment. Always
wear eye protection. Protective equipment
such as dust mask, non-skid safety shoes, hard
hat, or hearing protection used for appropriate
conditions will reduce personal injuries.
c) Prevent unintentional starting.
Ensure the
switch is in the off-position before connecting
to power source and/or battery pack, picking up
or carrying the tool.
Carrying power tools with
your finger on the switch or energising power
tools that have the switch on invites accidents.
d) Remove any adjusting key or wrench before
turning the power tool on. A wrench or a key
left attached to a rotating part of the power tool
may result in personal injury.
e) Do not overreach. Keep proper footing and
balance at all times. This enables better control
of the power tool in unexpected situations.
f) Dress properly. Do not wear loose clothing or
jewellery. Keep your hair, clothing and gloves
away from moving parts. Loose clothes, jewel-
lery or long hair can be caught in moving parts.
g) If devices are provided for the connection of
dust extraction and collection facilities, ensure
these are connected and properly used. Use of
dust collection can reduce dust related hazards.
h)
Do not let familiarity gained from frequent use
of tools allow you to become complacent and ig-
nore tool safety principles. A careless action can
cause severe injury within a fraction of a second.
4) Power tool use and care
a) Do not force the power tool. Use the correct
power tool for your application. The correct
power tool will do the job better and safer at the
rate for which it was designed.
b) Do not use the power tool if the switch does not
turn it on and off. Any power tool that cannot
be controlled with the switch is dangerous and
must be repaired.
c) Disconnect the plug from the power source
and/or the battery pack from the power tool be-
fore making any adjustments, changing acces-
sories, or storing power tools. Such preventive
safety measures reduce the risk of starting the
power tool accidentally.
d) Store idle power tools out of the reach of child-
ren and do not allow persons unfamiliar with
the power tool or these instructions to operate
the power tool. Power tools are dangerous in
the hands of untrained users.
e) Maintain power tools. Check for misalignment
or binding of moving parts, breakage of parts
and any other condition that may affect the
power tool’s operation. If damaged, have the
power tool repaired before use. Many accidents
are caused by poorly maintained power tools.
f) Keep cutting tools sharp and clean. Properly main-
tained cutting tools with sharp cutting edges are
less likely to bind and are easier to control.
g) Use the power tool, accessories and tool bits etc.
in accordance with these instructions, taking into
account the working conditions and the work to
be performed. Use of the power tool for operations
different from those intended could result in a
hazardous situation.
h) Keep handles and grasping surfaces dry, clean
and free from oil and grease. Slippery handles and
grasping surfaces do not allow for safe handling
and control of the tool in unexpected situations.
5) Battery tool use and care
a)
Recharge only with the charger specified by the
manufacturer. A charger that is suitable for one
type of battery pack may create a risk of fire when
used with another battery pack.
b) Use power tools only with specifically desig-
nated battery packs. Use of any other battery
packs may create a risk of injury and fire.
c) When battery pack is not in use, keep it away
from other metal objects, like paper clips,
coins, keys, nails, screws or other small metal
objects that can make a connection from one
terminal to another. Shorting the battery termi-
nals together may cause burns or a fire.
d)
Under abusive conditions, liquid may be ejected
from the battery; avoid contact. If contact acci-
dentally occurs, flush with water. If liquid contacts
eyes, additionally seek medical help. Liquid ejec-
ted from the battery may cause irritation or burns.
e) Do not use a battery pack or tool that is dama-

EN
9
WWW.VONROC.COM
ged or modified. Damaged or modified batteries
may exhibit unpredictable behaviour resulting
in fire, explosion or risk of injury.
f) Do not expose a battery pack or tool to fire
or excessive temperature. Exposure to fire or
temperature above 130 °C may cause explo-
sion. NOTE The temperature „130 °C“ can be
replaced by the temperature „265 °F“.
g) Follow all charging instructions and do not
charge the battery pack or tool outside the
temperature range specified in the instructi-
ons. Charging improperly or at temperatures
outside the specified range may damage the
battery and increase the risk of fire.
6) Service
a) Have your power tool serviced by a qualified
repair person using only identical replacement
parts. This will ensure that the safety of the
power tool is maintained.
b)
Never service damaged battery packs. Service
of battery packs should only be performed by the
manufacturer or authorized service providers.
SPECIFIC SAFETY INSTRUCTIONS
ATTENTION! When using electric tools to protect
against electric shock, injury and fire the following
basic safety measures must be observed. Make
sure to read all of these instructions before you
use this power tool, keep the safety booklet and
preserve it well for later reference.
1. Always keep your workplace clean and tidy.
• An untidy workplace can lead to unwanted
accidents.
2. Consider environmental influences.
• Do not expose the power tool to rain.
• Do not use the power tool in a damp or wet
environment.
• Make sure that your working space has suffi-
cient lighting.
• Do not use the power tool in areas where there
is a fire or explosive hazard.
3. To protect yourself from an electric shock.
• Avoid body contact with grounded parts (e.g.
pipes, radiators, electric stoves, refrigerators
etc.).
4. Keep other people away
• Keep other people away especially children, do
not let them touch your power tool or cable and
keep the children away from your working area.
5. Store the unused power tools safely.
• Unused power tools should be locked up or
stored in a place that is dry and out of reach of
children.
6. Do not overload your power tool.
• You work better and safer in the specified po-
wer range.
7. Use the correct power tool.
• Do not use low-power machines for heavy work
• Do not use the power tool for purposes that
they are not intended for. For example you can-
not cut tree limbs or a log of wood using a hand
saw.
8. Wear suitable clothing.
• Do not wear loose clothing or jewelry; they can
be caught in the moving parts.
• When working outdoors non-skid footwear is
recommended.
• For long hair, wear a hairnet.
9. Use protective equipment.
• Wear protective goggles
• When doing work that generates dust, use a
breathing mask.
10. Connect the vacuum device
• If connection to the vacuum and catcher are
available then you know that these are connec-
ted and properly used.
11. Do not use the cable for purposes that it is not
intended for.
• Do not use the cable to the connector to pull it
out of the socket. Protect the cable from heat,
oil and sharp edges.
12. Secure the power tool.
• Use clamps or a vice to hold the power tool. It is
safer than holding it with your hand.
13. Avoid an abnormal posture.
• It ensures stability and keeps you balanced at
all times.
14. Keep and maintain tools with care.
• Keep the cutting tools sharp and clean, this
ensures that you work better and that it is as
safe as possible.
• Follow the lubricating and tool changing in-
structions.
• Check the connection cable of the power tool
regularly and let a qualified expert repair any
damages.
• Check the extension cables regularly and re-
place them if they are damaged.
• Keep the handles clean, dry and free of grease
and oil.

10
EN
WWW.VONROC.COM
15. Unplug the power tool from the power outlet.
• When you are not using the power tool, when
you conduct maintenance and when you chan-
ge your tools such as blades, drills and cutters.
16. Do not leave the key inside the tool.
• Before switching it on, make sure that keys and
setup tools have been cleared
17
. Avoid unintentionally switching the power tool on.
• Verify that while connecting the plug into the
socket that the power is off.
18. Use the extension cables while outdoors.
• When using the power tool outdoors make sure
to use the appropriate and approved labeled
extension cable.
ADDITIONAL SAFETY INSTRUCTIONS
1. When using the saw blades with hard metal
teeth (Carbon tipped) it is advisable to use bla-
des with a negative or slightly positive cutting
angle. Do not use any saw blades with deeply
cut teeth. They can grip the protective cap.
2. Attention: First carefully assemble all the parts
before starting work. Follow the procedure as
indicated.
3. If you are not familiar with using such a machi-
ne, you would be better to be informed first by a
professional, an instructor or by a technician.
4. Always clamp or press the workpiece firmly
against the saw guide, before you carry out the
process. The use of all possible clamping set-
ups is preferable to using your hands.
5.
Important: If you are holding the workpiece by
hand for the process to be carried out, keep a mi-
nimum distance of 100 mm from the saw blade.
6. Always press the workpiece against the bench.
7. Keep the saw blade sharp and check regular-
ly whether it rotates freely without abnormal
vibrations. Replace the saw blade if necessary.
8. Allow the machine to rotate freely until it
reaches the maximum number of revolutions,
before you start the process.
9. Maintain the air inlets at the back and the
bottom of the bench saw machine and electric
motor for a longer machine life. Dust piles must
be removed.
10. Always lock the different degree set-ups before
you start processing.
11.
Only buy suitable saw blades with a number of re-
volutions of at least 6000 revolutions per minute.
12. Only use the correct saw blade. Too small or too
big saw blades are extremely dangerous.
13. Regularly inspect the saw blade for any faults.
Replace the saw blade if necessary.
14. Grease the new saw blade and clean the flan-
ges before you assemble the new blade. Then
assemble the blade in the correct direction and
pull the flanges firmly using the central bolt.
15. Only use original flanges. All other types are not
suitable.
16. Never work without the protective cap of the
saw blade.
17. The moving part of the protective cap must also
remain assembled.
18. Never grease the saw blade while it is rotating.
19. Always keep your hands removed from the track
of the saw blades.
20. Never pick up the workpiece by grasping with
your hands along or behind the saw blade.
21. Ensure that the workpiece never touches the saw
blade before the machine has been switched on.
22. Never process metal or stone sorts with this
machine.
23. Use support aids in order to support long work-
pieces.
24. Never use the machine in a dangerous environ-
ment, where inflammable gases or fluids are
present.
25. Never leave the machine unattended without
first disconnecting it from the mains voltage.
26. If you hear abnormal noises, try to trace them
or take the machine to a recognized fitter, or
repair company.
27. If a part is broken or damaged, replace it or
repair it immediately.
28. Never stand in the track of the saw blade but
stand to the left or the right of the saw bench.
29. Your hands must likewise be placed next to the
track of the saw blade.
30. Always use the push stick instead of your hands
to push the wood through the saw.
31. Always place the wood at the front of the saw
bench and then push it further back.
32. For mitring only the adjustable guide must be
used and the fence must be removed.
33. Never use the fence as a linear measure for
cutting off beams.
34. If the saw blade is locked: first switch off the
machine before you attend to the fault.
35. Avoid workpieces hitting back in your direction
by taking the following measures:
• Always use sharp saw blades.
• Do not saw too small workpieces.

EN
11
WWW.VONROC.COM
• Never release the workpiece before it has
been completely pushed through the saw.
• Always adjust the guide parallel to the saw
blade.
• Never remove the saw protection.
36. Before you continue sawing, ensure that you
are standing firmly and that your hands are in
the required position.
37. Never use thinners to clean the machine. Only
use a damp cloth for cleaning.
38. Do not use saw blades which are damaged or
deformed.
39. Replace table insert when worn.
40. Only use saw blades specified by the manufac-
turer that are intended for working with wood or
similar materials according to EN847-1.
41. Take care that the selection of the saw blade
depends on the material to be cut.
42. Connect tabelsaws to a dust-collecting device
when sawing.
43. Use and correct adjustment of the riving knife
44. Use and correct adjustment of the upper saw
blade quard.
45. Take care when slotting.
Make sure, when changing the saw blade, the
blade width is not smaller and the main blade
thickness of the saw blade is not greater than the
thickness of the riving knife.
Wear personal protective equipment, these could
include:
• Hearing protection to reduce the risk of hearing
loss
• Eye protection
• Inhale respiratory protection to reduce the risk
of harmful dust
• Gloves when handling the blades and rough
materials (recommendation, saw blades, are
whenever practicable, carried in a container)
Warning! Do not use HSS blades.
•
Insert the push stick in its holder when not in use.
• Use a push stick or a push block to guide the
workpiece.
Warning! Do not use the saw for rebating or
grooving.
• Only use saw blades, whose maximum speed is
at least the speed indicated on the saw and is
suitable for the material to be cut.
• During the transport, the upper part of the saw
blade has to be covered, by the guard.
Switch off the machine immediately when you
discover:
• A defective mains plug or mains lead.
• A defective switch.
• Overheating of the machine.
• Smoke or odeur caused by scorched insulation.
Electrical safety
Always check that the voltage of the power
supply corresponds to the voltage on the
rating plate.
• Do not use the machine if the mains cable or
the mains plug is damaged.
•
Only use extension cables that are suitable for
the power rating of the machine with a minimum
thickness of 1.5 mm
2
. If you use an extension
cable reel, always fully unroll the cable.
Power supply
• The motor is fitted with an overload switch. If
the table saw overloads, the overload switch
switches the equipment off automatically to
protect the table saw from overheating. If the
overload switch triggers, switch off the table
saw using the ON/OFF switch (8) and wait until
the table saw cools down. Then press the ON/
OFF switch (8) and restart the table saw.
2. MACHINE INFORMATION
Intended use
This power tool is intended as a stationary
machine for making straight lengthways and
crossways cuts in hard and soft wood free from
foreign bodies such as nails, screws and mortar.
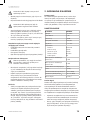
TECHNICAL SPECIFICATIONS
Model No. TS501AC
Voltage 220-240V~
Frequency 50 Hz
Power input 1500W
No load speed 5000/min
Bevel angles 0° <> +45°

12
EN
WWW.VONROC.COM
Sawblade specifications:
Diameter
Base blade thickness
Width of cut
Bore diameter
Number of teeth
Ø 210 mm
1.8 mm
2.8 mm
Ø 30 mm
40T
Max. workpiece height 90º
70 mm
Max. workpiece height 45º
50 mm
Thickness of the riving knife 2.0 mm
Weight 14.5 kg
Lpa (sound pressure level) 99.6 +3 dB(A)
Lwa (sound power level) 112.6 +3 dB(A)
Vibration value <2.5 m/s
2
Vibration level
The vibration emission level stated in this instruc-
tion manual has been measured in accordance
with a standardised test given in EN 60745; it may
be used to compare one tool with another and as
a preliminary assessment of exposure to vibration
when using the tool for the applications mentioned
- using the tool for different applications, or with
different or poorly maintained accessories, may
significantly increase the exposure level.
- the times when the tool is switched off or when
it is running but not actually doing the job, may
significantly reduce the exposure level.
Protect yourself against the effects of vibration by
maintaining the tool and its accessories, keeping
your hands warm, and organizing your work patterns
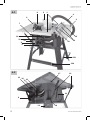
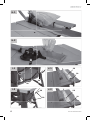
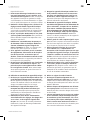
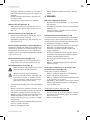
DESCRIPTION
The numbers in the text refer to the diagrams on
page 2-6.
1. Saw table with two rulers
2A. Parallel guide
2B. Guide extension
2C. Wing nuts
3. Extensions (2 pcs)
4. Dust extraction
5. Guard
6. Mitre guide
7. Push stick
8. On/off switch
9. 2 in 1 adjustment handle
10. Locking knob
11. Electric plug
12. Ruler sawblade angle
13. Extension support (4 pcs)
14. Wrenches (2 pcs)
15. Legs (4 pcs)
16. Long bolts with nuts (8 pcs)
17. Small bolts with nuts for extensions (8 pcs)
18. Dust extraction connection
19. Sawblade guard knob
20. Riving knife
21. Saw table inlay
22A. Cross strut long (2 pcs)
22B. Cross strut short (2 pcs)
23. Rubber feet (4 pcs)
24. Additional legs (2 pcs)
25. Small bolts with nuts for cross strut (16 pcs)
26.
Small bolts with nuts for additional legs (4 pcs)
27. Connection vacuum cleaner
28. Fixing screw
29. Carriage-type bolts with nuts
30. Holder clips
31. Overload protection
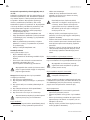
3. ASSEMBLY
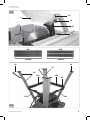
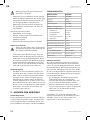
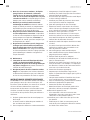
Assembly of the undercarriage (Fig A4)
First assemble all parts before firmly
tightening all bolts.
• Put the machine upside down. Put a piece of
cardboard underneath, so you don’t damage
the subsurface.
• Mount the legs (15) (4 pcs) with one extension
support (13) (4 pcs) per leg on the four corners
of the body, use longer bolts (16) with nuts (2
pcs per leg) (Fig.B1)
• Make sure the extension supports (13) are
mounted in the same way as shown in Fig.B1
• Mount Cross strut long (22A) (2 pcs) between
the legs on the front and back side of the ma-
chine. Use small bolts (25) with nuts (8 pcs).
• Mount Cross strut short (22B) (2 pcs) between
the legs on both sides of the machine. Use
small bolts (25) with nuts (8 pcs).
• Place the rubber feet (23) (4 pcs)
• Mount the additional legs (24) (2 pcs) on the
backside of the machine, use small bolts (26)
with nuts (4 pcs)
Assembly of the extensions (Fig B1)
Machine is still upside down
• Mount the extensions (3) (2 pcs) to the table,

EN
13
WWW.VONROC.COM
use small bolts (17) with nuts (4 pcs).
• Mount the extensions support (13) to the ex
ten-
sions (3), use small bolts (17) with nuts (4 pcs)
• Turn the machine back on its feet. Make sure
the extensions are levelled with the table, by
using the slots in the extensions supports.
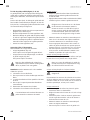
Assembly of the riving knife (Fig A4, C)
• Remove the inlay (21) from the table, by using a
screwdriver (Fig.G1).
• Loosen the fixing screw (28)(Fig.C1)
• Raise the riving knife until the depth between
the saw table and the upper edge of the riving
knife equals approx. 110mm (Fig.C2)
• The distance between the riving knife and the
toothed rim of the saw blade must be between
3 and 5 mm (Fig.C3).
• The tip of the riving knife shall not be lower than
5 mm from the tooth peak, as shown in Fig.C3.
Attachment of the guard (Fig C4)
• Turn sawblade completely upwards
(instructi-
ons for height adjustment see chapter 4).
• Pull the knob (19) of the guard (5) and place it
over the riving knife (20) while pulling the knob.
• Release the knob and make sure the pin slides
in the hole.
• Secure the guard by tightening the knob.
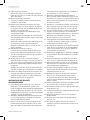
Assembly of the dust extraction (Fig. D)
• Assemble dust extraction like shown on Fig.D
• Attach the vacuum cleaner to the vacuum clea-
ner connection (27)(Fig.D)
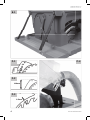
Attachment of the parallel guide (Fig E)
• Attach the parallel guide (2A) on the right side
off the saw blade on the table.
• Lock the guide down by pushing down the
handle (Fig.E)
Attachment of the parralel guide holder (Fig. I)
The parallel guide can be stored using the holder
clips (30). Mount the holder clips (30) using carri-
age-type bolts with nuts (29). The holders can be
mounted as shown in Fig I1 or as shown in Fig I2.
Attachment of the mitre guide (Fig A1)
• Slide the guide in the slot of the table at the left
side of the sawblade Fig.A1
Assemble or change the saw blade (Fig G)
First remove the plug from the mains before
the saw blade is assembled or replaced.
The arrow marked on the saw blade, which
indicates the direction of rotation, must point
in the same direction as the arrow marked on
the machine, the saw blade teeth must point
downwards on the front of the saw.
• Remove the inlay (21) from the table, by using a
screwdriver. Fig.G1
• Turn the saw blade completely upwards. (In-
structions for height adjustment see chapter 4)
• Loosen the nut with the wrenches (14) (Fig.G2)
• Remove the nut and the outside flange from the
sawblade axle. (Fig.G3)
• Slide the old saw blade over the saw blade axle
and put on a new saw blade.
• Put the outside flange back on add the nut.
• Tighten the nut by using the wrenches.
• Put the inlay back in the table and tighten the
screw.
4. OPERATION
Switching on/off (Fig A1)
• Press the switch into position ‘1’ to put your
machine into operation.
• To switch off the machine the same switch
needs to be pressed to position ‘0’
• Always keep the mains cable away from moving
parts.
Overload protection (Fig. A1)
This electrical power tool is provided with an
overload protection (31). In case that the overload
protection was initiated, proceed as follows:
• Disconnect the power tool from the power supply.
• Allow the power tool to cool down.
• Check the power tool carefully for possible
damages.
• Have damages repaired before re-starting the
power tool.
• Connect the power tool to the power supply.
• Push the overload switch (31)(Fig.A-1).
• Turn on the power tool as described and put it
into operation.

14
EN
WWW.VONROC.COM
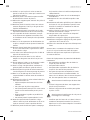
Using the 2 in 1 handle, Adjust the angle and
height of the saw blade (Fig A2)
Using the height adjustment
• Turn the handle (9) clockwise to raise the saw-
blade.
• Turn the handle counter clockwise to lower the
sawblade.
• Make sure the saw blade is always approxima-
tely 2 mm higher than the total thickness of the
material to be sawn.
Using the angle adjustment (Fig G4)
• Slightly loosen the knob(10)
• Press the handle(9) towards the machine and
turn counter clockwise to adjust the sawblade
in its angle.
• Fasten the knob(10)
Using the parallel guide (Fig A1, E, J1, J2)
The parallel guide (2A) is equipped with a guide
extension (2B). The guide extension can be used in
two different ways, depending on the thickness of
the wood.
For thicker wood, the guide extension (2B) should
be mounted as shown in figure J1.
For thinner wood, the guide extension (2B) should
be mounted as shown in figure J2.
• Unlock the guide down by pushing the handle
upwards (Fig.E)
• Slightly loosen the wing nuts (2C)
• Remove the guide extension (2B) from the
parallel guide (2A) by sliding it away from the
parallel guide
• Turn the guide extension to the desired
position
and slide it back onto the parallel guide
• Tighten the wing nuts (2C)
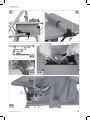
Working instructions
There are two types of sawing methods:
• Lengthwise sawing (Fig.H1)
Sawing the workpiece in the length of the wood
grain
• Cross-cutting or cutting off, use the mitre guide
(Fig.H2)
Sawing off the workpiece crosswise
For both sawing methods one of the fences
must be used. Therefor never saw without a
fence!
Attention! Before you start sawing, first check the
following:
1. Is the saw blade secured?
2. Are all the locking handles secured?
3. Is the fence parallel to the saw blade?
4. Is the protective cap working properly?
5. Are you wearing safety goggles?
6. Is the saw blade not rubbing against anything?
It is absolutely necessary to take these points
into consideration before you start work!
Lengthwise sawing
• Secure the fence to the correct measuring
position and remove the cut-off guide from the
bench carriage.
• Press the wood lightly towards the bench and
let it glide against the cut-off fence.
Remain at least 3 cm. from the front of the
saw blade before you switch on the motor.
The side of the wood which is against the
fence must be completely straight. Keep
your hands at least 10 cm away from the
saw track to be followed.
• Switch on the motor and wait until the saw
blade has reached the maximum number of
revolutions before you start sawing.
• While you press the wood against the bench
and the fence, you can carefully push the wood
through the saw blade without forcing it.
• Never pull the workpiece backwards. If neces-
sary, switch off the motor first without altering
the position of the workpiece.
Lengthwise sawing with a (vertical) mitre
This method is practically the same, except that the
saw blade is placed at the angle required.
With this type of method the fence may only
be along the righthand side of the
sawblade.
Lengthwise sawing of narrow workpieces
Assume that this process is extremely
dangerous.
Take all the necessary safety measures and conti-
nually push the workpiece through (until behind the
saw blade) using a push stick instead of by hand.

EN
15
WWW.VONROC.COM
Crosswise sawing
• Remove the fence and apply the cross-cut
fence in the righthand carriage.
• Adjust the height of the saw blade (see length-
wise sawing).
• Press the workpiece against the cross-cut fen-
ce and keep at least 2,5 cm distance from the
front of the saw blade.
• Switch on the motor and wait until the maxi-
mum number of revolutions has been reached.
• Press the workpiece against the fence and the
bench. Carefully push the wood through the
saw blade. Continue until behind the saw blade.
Then switch off the motor and keep this positi-
on until the saw blade has stopped completely
before you remove the wood.
• Never pull the wood back. If necessary, switch
the motor off and keep the position until the
saw blade has stopped completely.
Crosswise sawing with a vertical mitre
This method is practically the same, except that the
saw blade is placed in the angle required.
Only place the cross-cut fence on the
righthand side of the saw blade. Never saw
too small pieces of wood. Never use your
hands to carry out difficult operations.
Crosswise sawing with a horizontal mitre
With this method the cross-cut fence must be
secured at the angle required. Keep the workpiece
pressed firmly against the cross-cut fence and the
bench before you start cutting off.
Transporting the table saw
Before transporting the bench saw, the following
steps must be carried out:
• Pull the mains plug
•
Turn the hand-wheel (9) (Fig. A2) in anticlockwise
direction, lower the blade as much as possible
• Remove all accessories that cannot be mounted
firmly to the power tool
If possible, place unused saw blades in an enclo-
sed container for transport
• Wind the mains cable and bind it
• For lifting or transport, carry the main table (1)
(Fig.A1)
The bench saw should always be carried by
two persons in order to avoid back injuries.
5. MAINTENANCE
Before cleaning and maintenance, always
switch off the machine and remove the
mains plug from the mains.
Clean the machine casings regularly with a soft
cloth, preferably after each use. Make sure that the
ventilation openings are free of dust and dirt. Re-
move very persistent dirt using a soft cloth moiste-
ned with soapsuds. Do not use any solvents such
as gasoline, alcohol, ammonia, etc. Chemicals such
as these will damage the synthetic components.
ENVIRONMENT
Faulty and/or discarded electrical or
electronic apparatus have to be collected at
the appropriate recycling locations.
Only for EC countries
Do not dispose of power tools into domestic waste.
According to the European Guideline 2012/19/EU
for Waste Electrical and Electronic Equipment and its
implementation into national right, power tools that
are no longer usable must be collected separately
and disposed of in an environmentally friendly way.
WARRANTY
VONROC products are developed to the highest qua-
lity standards and are guaranteed free of defects
in both materials and workmanship for the period
lawfully stipulated starting from the date of original
purchase. Should the product develop any failure
during this period due to defective material and/or
workmanship then contact your VONROC directly.
The following circumstances are excluded from this
guarantee:
• Repairs and or alterations have been made
or attempted to the machine by unauthorized
service centers;
• Normal wear and tear;
• The tool has been abused, misused or im-
properly maintained;
• Non-original spare parts have been used.
This constitutes the sole warranty made by compa-
ny either expressed or implied. There are no other
warranties expressed or implied which extend

16
DE
WWW.VONROC.COM
beyond the face hereof, herein, including the im-
plied warranties of merchantability and fitness for
a particular purpose. In no event shall VONROC be
liable for any incidental or consequential damages.
The dealers remedies shall be limited to repair or
replacement of nonconforming units or parts.
The product and the user manual are subject to
change. Specifications can be changed without
further notice.
1. SICHERHEITSANWEISUNGEN
Lesen Sie die beiliegenden Sicherheitsanweis-
ungen, die zusätzlichen Sicherheitsanweisungen
sowie diese Bedienungsanleitung sorgfältig durch.
Bei Nichtbeachten der Sicherheitsanweisungen
und der Bedienungsanleitung kann es zu einem
Stromschlag, einem Brand und/oder schweren
Verletzungen kommen. Bewahren Sie die Sicher-
heitsanweisungen und die Bedienungsanleitung
zur künftigen Bezugnahme sicher auf.
Folgende Symbole werden im Benutzerhandbuch
oder auf dem Produkt verwendet:
Benutzerhandbuch/Bedienungsanleitung
lesen.
Lebens- und Verletzungsgefahr und Gefahr
von Beschädigungen am Werkzeug/Gerät
bei Nichteinhaltung der Anweisungen in
dieser Bedienungsanleitung.
Gefahr eines Stromschlags.
Umstehende fernhalten.
Tragen Sie eine Staubschutzmaske.
Schutzbrille und Gehörschutz tragen.
Kommen Sie mit Ihren Händen nicht in den
Sägebereich, während das Elektrowerkzeug
läuft. Beim Kontakt mit dem Sägeblatt
besteht Verletzungsgefahr.
Gefahrenbereich! Halten Sie möglichst
Hände, Finger oder Arme von diesem
Bereich fern.
Gerät der Schutzklasse II – schutzisoliert
– kein Schutzkontakt erforderlich.
Das Produkt entspricht den geltenden
Sicherheitsnormen der europäischen
Richtlinien.

DE
17
WWW.VONROC.COM
Ø30mm
Ømax.
210mm
Beachten Sie die Abmessungen
des Sägeblatts. Der Lochdurch-
messer muss ohne Spiel zur
Werkzeugspindel passen. Falls
eine Verwendung von
Reduzierstücken notwendig ist,
achten Sie darauf, dass die
Abmessungen des Redu-
zierstücks zur Stammblattdicke
und zum Lochdurchmesser des
Sägeblatts sowie zum
Durchmesser der Werkzeugs-
pindel passen. Verwenden Sie
möglichst die mit dem
Sägeblatt mitgelieferten
Reduzierstücke. Der Sägeblatt-
durchmesser muss der Angabe
auf dem Symbol entsprechen.
ALLGEMEINE SICHERHEITSHINWEISE
A
CHTUNG! Lesen Sie alle Sicherheitshinweise
und Anweisungen. Fehler bei der Einhaltung
der nachstehend aufgeführten Anweisungen
können elektrischen Schlag, Brand und/oder
schwere Verletzungen verursachen.
Bewahren Sie diese Anweisungen gut auf.
Der nachfolgend verwendete Begriff ,,Elektrowerk-
zeug” bezieht sich auf netzbetriebene Elektrowerk-
zeuge (mit Netzkabel) und auf akkubetriebene
Elektrowerkzeuge (ohne Netzkabel).
1) Arbeitsplatz
a) Halten Sie Ihren Arbeitsbereich sauber und
aufgeräumt. Unordnung und unbeleuchtete
Arbeitsbereiche können zu Unfällen führen.
b) Arbeiten Sie mit dem Gerät nicht in explosions-
gefährdeter Umgebung, in der sich brennbare
Flüssigkeiten, Gase oder Staub befinden. Elek-
trowerkzeuge erzeugen Funken, die den Staub
oder die Dämpfe entzünden können.
c) Halten Sie Kinder und andere Personen
während der Benutzung des Elektro werkzeugs
fern. Bei Ablenkung können Sie die Kontrolle
über das Gerät verlieren.
2) Elektrische Sicherheit
a) Der Anschlussstecker des Gerätes muss in
die Steckdose passen. Der Netzstecker darf in
keener Weise verändert werden. Verwenden Sie
keine Adapterstecker gemeinsam mit schutz-
geerdeten Geräten. Unveränderte Netzstecker
und passende Steckdosen verringern das Risiko
eines elektrischen Schlages.
b) Vermeiden Sie Körperkontakt mit geerdeten
Oberflächen, wie von Rohren, Heizungen,
Herden und Kühlschränken. Es besteht ein er-
höhtes Risiko durch elektrischen Schlag, wenn
Ihr Körper geerdet ist.
c)
Halten Sie das Gerät von Regen oder Nässe fern.
Das Eindringen von Wasser in ein Elektrogerät
erhöht das Risiko eines elektrischen Schlages.
d) Zweckentfremden Sie das Netzkabel nicht,
um das Gerät zu tragen, aufzuhängen oder um
den Netzstecker aus der Steckdose zu ziehen.
Halten Sie das Netzkabel fern von Hitze, Öl,
scharfen Kanten oder sich bewegenden Geräte-
teilen. Beschädigte oder verwickelte Netzkabel
erhöhen das Risiko eines elektrischen Schlages.
e) Wenn Sie mit einem Elektrowerkzeug im Freien
arbeiten, verwenden Sie nur Verlängerungska-
bel, die auch für den Außenbereich zugelassen
sind. Die Anwendung eines für den Außenbe-
reich geeigneten Verlängerungskabels verrin-
gert das Risiko eines elektrischen Schlages
f) Wenn sich Arbeiten mit einem Elektrowerkzeug
in feuchten Umgebungen nicht vermeiden
lassen, verwenden Sie eine Stromversorgung
mit einer Fehlerstrom-Schutzeinrichtung (RCD).
Durch die Verwendung einer RCD wird die Ge-
fahr eines elektrischen Schlags verringert.
3) Sicherheit von Personen
a) Seien Sie aufmerksam. Achten Sie darauf, was
Sie tun, und gehen Sie mit Vernunft an die Ar-
beit mit einem Elektrowerkzeug. Benutzen Sie
des Gerät nicht, wenn Sie müde sind oder unter
dem Einfluss von Drogen, Alkohol oder Medika-
menten stehen. Ein Moment der Unachtsamkeit
beim Gebrauch des Gerätes kann zu ernsthaften
Verletzungen führen.
b)
Tragen Sie persönliche Schutzausrüstung und
immer eine Schutzbrille. Das Tragen persönIicher
Schutzausrüstung, wie Staubmaske, rutschfeste
Sicherheitsschuhe, Schutzhelm oder Gehör-
schutz, je nach Art und Einsatz des Elektrowerk-
zeuges, verringert das Risiko von Verletzungen.
c) Vermeiden Sie eine unbeabsichtigte lnbetrieb-
nahme. Vergewissern Sie sich, dass der Schalter
in der Position ,,AUS(0)” ist, bevor Sie den Netzs-
tecker in die Steckdose stecken. Wenn Sie beim

18
DE
WWW.VONROC.COM
Tragen des Geräts den Finger am Schalter haben
oder das Gerät eingeschaltet an die Stromversor-
gung anschließen, kann dies zu Unfällen führen,
d)
Entfernen Sie Einstellwerkzeuge oder Schrau-
benschlüssel, bevor Sie das Gerät einschalten.
Ein Werkzeug oder Schlüssel, der sich in einem
drehenden Geräteteil befindet, kann zu Verlet-
zungen führen.
e)
Überschätzen Sie sich nicht. Sorgen Sie für ei-
nen sicheren Stand und halten Sie jederzeit das
Gleichgewicht. Dadurch können Sie das Gerät in
unerwarteten Situationen besser kontrollieren.
f)
Tragen Sie geeignete Kleidung. Tragen Sie
keine weite Kleidung oder Schmuck. Halten
Sie Haare, Kleidung und Handschuhe fern von
sich bewegenden Teilen. Lockere Kleidung,
Schmuck oder lange Haare können von sich
bewegenden Teilen erfasst werden.
g)
Wenn Staubabsaug- und -auffangeinrichtungen
montiert werden können, vergewissern Sie sich,
dass diese angeschlossen sind und richtig ver-
wendet werden. Das Verwenden dieser Einricht-
ungen verringert Gefährdungen durch Staub.
h) Achten Sie darauf, nicht durch häufigen Ge-
brauch von Werkzeugen nachlässig zu werden
und die Prinzipien zum sicheren Umgang mit
den Werkzeugen zu ignorieren. Eine unachtsa-
me Handlung kann innerhalb von Sekunden-
bruchteilen schwere Verletzungen verursachen.
4) Sorgfältiger Umgang und Gebrauch von Elektro-
werkzeugen
a) Überlasten Sie das Gerät nicht. Verwenden Sie
für lhre Arbeit das dafür bestimmte Elektro-
werkzeug. Mit dem passenden Elektrowerkzeug
arbeiten Sie besser und sicherer im angegebe-
nen Leistungsbereich.
b) Benutzen Sie kein Elektrowerkzeug, dessen
Schalter defekt ist. Ein Elektrowerkzeug, das
sich nicht mehr ein- oder ausschalten lässt, ist
gefährlich und muss repariert werden.
c) Ziehen Sie den Netzstecker aus der Steckdose,
bevor Sie Geräteeinstellungen vornehmen,
Zubehörteile wechseln oder das Gerät wegle-
gen. Diese Vorsichtsmaßnahme verhindert den
unbeabsichtigten Start des Geräts.
d) Bewahren Sie unbenutzte Elektrowerkzeuge
außerhalb der Reichweite von Kindern auf.
Lassen Sie Personen das Gerät nicht benutzen,
die mit diesem nicht vertraut sind oder diese
Anweisungen nicht gelesen haben. Elektro-
werkzeuge sind gefährlich, wenn Sie von uner-
fahrenen Personen benutzt werden.
e) Pflegen Sie das Gerät mit Sorgfalt. Kontrollie-
ren Sie, ob bewegliche Geräteteile einwandfrei
funktionieren und nicht klemmen, ob Teile
gebrochen oder so beschädigt sind, dass die
Funktion des Gerätes beeinträchtigt ist. Lassen
Sie beschädigte Teile vor dem Einsatz des Gerä-
tes reparieren. Viele Unfälle haben ihre Ursache
in schlecht gewarteten Elektrowerkzeugen.
f) Halten Sie Schneidwerkzeuge scharf und
sauber. Sorgfältig gepflegte Schneidwerkzeuge
mit scharfen Schneidkanten verklemmen sich
weniger und sind leichter zu führen.
g)
Verwenden Sie Elektrowerkzeug, Zubehör, Einsat-
zwerkzeuge usw. entsprechend diesen Anweisun-
gen und so, wie es für diesen speziellen Gerätetyp
vorgeschrieben ist. Berücksichtigen Sie dabei die
Arbeitsbedingungen und die auszuführende Tä-
tigkeit. Der Gebrauch von Elektrowerkzeugen für
andere als die vorgesehenen Anwendungen kann
zu gefährlichen Situationen führen.
h) Halten Sie Griffe und Greifflächen immer troc-
ken, sauber und frei von Öl und Fett. Rutschige
Griffe und Greifflächen verhindern in unerwarte-
ten Situationen den sicheren Umgang mit dem
Werkzeug und die richtige Kontrolle darüber.
5) Umgang mit Akkuwerkzeugen
a) Zum Laden ist ausschließlich das vom Herstel-
ler angegebene Ladegerät zu verwenden. Ein
Ladegerät, das für eine Art von Akkus geeignet
ist, kann bei Verwendung mit einer anderen Art
von Akku Brandgefahr verursachen.
b) Elektrowerkzeuge dürfen nur mit speziell dazu
bestimmten Akkus verwendet werden, da bei
der Verwendung anderer Akkus Verletzungsund
Brandgefahr entstehen kann.
c)
Wenn der Akku nicht in Gebrauch ist, ist er
von Büroklammern, Münzen, Schlüssel, Nägel,
Schrauben und anderen kleinen Metallobjekten
fernzuhalten, die eine Verbindung zwischen den
Polen bilden können. Kurzschließen der Pole
kann Brand oder Verbrennungen verursachen.
d) Bei falschem Umgang mit dem Akku kann
Flüssigkeit aus dem Akku austreten. Die
Berührung dieser Flüssigkeit ist zu vermeiden.
Bei Berührung den betroffenen Körperteil mit
Wasser abspülen. Bei Berührung der Flüssig-
keit mit den Augen muss zusätzlich ärztliche
Hilfe gerufen werden. Die Akkuflüssigkeit kann

DE
19
WWW.VONROC.COM
Reizungen oder Verbrennungen verursachen.
e)
Verwenden Sie keinesfalls Akkus und Werk-
zeuge, die beschädigt oder verändert wurden.
Beschädigte oder veränderte Akkus können ein
unvorhersehbares Verhalten zeigen, das zu Feu-
er, Explosionen oder Verletzungsgefahren führt.
f) Setzen Sie Akkus oder Werkzeuge keinem
Feuer oder übermäßigen Temperaturen aus.
Feuer oder Temperaturen über 130 °C können
zu Explosionen führen. HINWEIS: Die Tempera-
turangabe „130 °C“ kann durch die Temperatu-
rangabe „265 °F“ ersetzt werden.
g) Beachten Sie alle Hinweise zum Aufladen und
laden Sie Akkus oder Werkzeuge nicht außer-
halb der in der Anleitung angegebenen Tempe-
raturbereiche auf. Unsachgemäßes Aufladen
oder Aufladen bei Temperaturen außerhalb des
angegebenen Bereichs kann den Akku schädi-
gen und die Brandgefahr erhöhen.
6) Service
a) Lassen Sie Ihre Werkzeuge durch einen qualifi-
zierten Reparaturtechniker ausschließlich mit
identischen Ersatzteilen warten. So lässt sich
eine gleich bleibende Sicherheit des Elektro-
werkzeugs gewährleisten.
b) Beschädigte Akkus dürfen keinesfalls gewartet
werden. Die Wartung von Akkus darf nur vom
Hersteller oder von Vertragswerkstätten durch-
geführt werden
SPEZIFISCHE SICHERHEITSHINWEISE
ACHTUNG! Beim Gebrauch von Elektrowerkzeugen
sind zum Schutz gegen elektrischen Schlag, Verlet-
zungs- und Brandgefahr folgende grundsätzliche
Sicherheitsmaßnahmen zu beachten. Lesen Sie
alle diese Hinweise, bevor Sie dieses Elektrowerk-
zeug benutzen, und bewahren Sie die Sicher-
heitshinweise gut auf.
1 Halten Sie Ihren Arbeitsbereich in Ordnung.
• Unordnung im Arbeitsbereich kann Unfälle zur
Folge haben.
2 Berücksichtigen Sie Umgebungseinflüsse
• Setzen Sie Elektrowerkzeuge nicht dem Regen
aus.
• Benützen Sie Elektrowerkzeuge nicht in feuchter
oder nasser Umgebung.
• Sorgen Sie für gute Beleuchtung des Arbeitsbe-
reichs.
• Benutzen Sie Elektrowerkzeuge nicht, wo Brand-
oder Explosionsgefahr besteht.
3 Schützen Sie sich vor elektrischem Schlag
• Vermeiden Sie Körperberührung mit geerdeten
Teilen (z. B. Rohren, Radiatoren, Elektroherden,
Kühlgeräten).
4 Halten Sie andere Personen fern
• Lassen Sie andere Personen, insbesondere Kin-
der, nicht das Elektrowerkzeug oder das Kabel
berühren. Halten Sie sie von Ihrem Arbeitsbe-
reich fern.
5 Bewahren Sie unbenutzte Elektrowerkzeuge
sicher auf
• Unbenutzte Elektrowerkzeuge sollten an einem
trockenen, hochgelegenen oder abgeschlosse-
nen Ort, außerhalb der Reichweite von Kindern,
abgelegt werden.
6 Überlasten Sie Ihr Elektrowerkzeug nicht
• Sie arbeiten besser und sicherer im angegebe-
nen Leistungsbereich.
7 Benutzen Sie das richtige Elektrowerkzeug
• Verwenden Sie keine leistungsschwachen
Maschinen für schwere Arbeiten.
• Benutzen Sie das Elektrowerkzeug nicht für
solche Zwecke, für die es nicht vorgesehen ist.
Benutzen Sie zum Beispiel keine Handkreissäge
zum Schneiden von Baumästen oder Holz-schei-
ten.
8 Tragen Sie geeignete Kleidung
• Tragen Sie keine weite Kleidung oder Schmuck,
sie könnten von beweglichen Teilen erfasst
werden.
• Bei Arbeiten im Freien ist rutschfestes Schuh-
werk empfehlenswert.
• Tragen Sie bei langen Haaren ein Haarnetz.
9 Benutzen Sie Schutzausrüstung
• Tragen Sie eine Schutzbrille.
• Verwenden Sie bei stauberzeugenden Arbeiten
eine Atemmaske.
10 Schließen Sie die Staubabsaug-Einrichtung an
• Falls Anschlüsse zur Staubabsaugung und
Auffangeinrichtung vorhanden sind, überzeugen
Sie sich, dass diese angeschlossen und richtig
benutzt werden.
11 Verwenden Sie das Kabel nicht für Zwecke, für
die es nicht bestimmt ist
• Benützen Sie das Kabel nicht, um den Stecker
aus der Steckdose zu ziehen. Schützen Sie das
Kabel vor Hitze, Öl und scharfen Kanten.
12 Sichern Sie das Werkstück
• Benützen Sie Spannvorrichtungen oder einen
Schraubstock, um das Werkstück festzuhalten.

20
DE
WWW.VONROC.COM
Es ist damit sicherer gehalten als mit Ihrer Hand.
13 Vermeiden Sie abnormale Körperhaltung
• Sorgen Sie für sicheren Stand und halten Sie
jederzeit das Gleichgewicht.
14 Pflegen Sie Ihre Werkzeuge mit Sorgfalt
• Halten Sie die Schneidwerkzeuge scharf und
sauber, um besser und sicherer arbeiten zu
können.
• Befolgen Sie die Hinweise zur Schmierung und
zum Werkzeugwechsel.
• Kontrollieren Sie regelmäßig die Anschlus-
sleitung des Elektrowerkzeugs und lassen Sie
diese bei Beschädigung von einem anerkannten
Fachmann erneuern.
• Kontrollieren Sie Verlängerungsleitungen
regelmäßig und ersetzen Sie diese, wenn sie
beschädigt sind.
• Halten Sie Handgriffe trocken, sauber und frei
von Öl und Fett.
15 Ziehen Sie den Stecker aus der Steckdose
• Bei Nichtgebrauch des Elektrowerkzeugs, vor
der Wartung und beim Wechsel von Werkzeugen
wie z. B. Sägeblatt, Bohrer, Fräser.
16 Lassen Sie keine Werkzeugschlüssel stecken
• Überprüfen Sie vor dem Einschalten, dass
Schlüssel und Einstellwerkzeuge entfernt sind.
17 Vermeiden Sie unbeabsichtigten Anlauf
• Vergewissern Sie sich, dass der Schalter beim
Einstecken des Steckers in die Steckdose aus-
geschaltet ist.
18 Benutzen Sie Verlängerungskabel für den
Außenbereich
• Verwenden Sie im Freien nur dafür zugelassene
und entsprechend gekennzeichnete Verlänge-
rungskabel.
ZUSÄTZLICHE SICHERHEITSHINWEISE
1.
Bei Sägeblättern mit Zähnen aus Hartmetall
empfehlt sich die Anwendung von Blättern mit
einem negativen oder geringfügig positiven Sch-
nittwinkel zu verwenden. Verwenden Sie keine
Sägeblätter mit tief ausgeschnittenen Zähnen.
Diese können die Schutzhaube erfassen.
2. Achtung: Montieren Sie zuerst sorgfältig alle
Teile, bevor Sie mit der Arbeit beginnen. Befol-
gen Sie die angegebenen Arbeitsschritte.
3. Sollten Ihnen der Umgang mit einer derartigen
Maschine nicht vertraut sein, ist anzuraten, daß
Sie sich vorher von einen Fachmann, Lehrunter-
weiser oder Techniker beraten lassen.
4. Klemmen oder drücken Sie das Werkstück im-
mer kräftig gegen die Sägeschiene, bevor Sie es
bearbeiten. Es ist immer besser, irgendwelche
Klemmvorrichtungen als die bloßen Hände zu
verwenden.
5. Wichtig: Bei Arbeiten mit der bloßen Hand ist
immer ein Mindestabstand von 100 mm zum
Sägeblatt einzuhalten.
6. Drücken Sie das Werkstück immer gegen den
Tisch.
7. Sorgen Sie dafür, daß das Sägeblatt scharf ist
und kontrollieren Sie regelmäßig, ob es sich frei
und ohne zu vibrieren dreht. Wechseln Sie das
Sägeblatt gegebenenfalls aus.
8. Lassen Sie die Maschine unbelastet laufen, bis
sie die höchste Drehzahl erreicht hat, bevor Sie
mit der Bearbeitung beginnen.
9. Halten Sie die Lüftungsschlitze an der Rücksei-
te und der Unterseite der Tischsäge und des
Elektromotors sauber.
Dadurch gewährleisten Sie eine längere Leben-
sdauer der Maschine Staub-ansammlungen
müssen vermieden werden.
10. Arretieren Sie das Sägeblatt immer in dem je-
weiligen Winkel, bevor Sie mit der Bearbeitung
beginnen.
11. Kaufen Sie nur geeignete Sägeblätter, die für
eine Drehzahl von mindestens 6000 Umdrehun-
gen pro Minute ausgelegt sind.
12. Verwenden Sie nur geeignete Sägeblätter. Die
Verwendung von zu kleinen oder zu großen
Sägeblätter ist äußerst gefährlich.
13. Kontrollieren das Sägeblatt regelmäßig auf
eventuelle Fehler. Wechseln Sie das Sägeblatt
gegebenenfalls aus.
14.
Entfetten Sie ein neues Sägeblatt und reinigen
Sie die Flansche, bevor Sie das neue Sägeblatt
montieren. Montieren Sie das Blatt anschließend
in der richtigen Position und ziehen Sie die Flan-
sche mit der zentralen Schraube fest an.
15. Verwenden Sie nur originale Flansche. Alle
anderen sind nicht geeignet.
16. Arbeiten Sie niemals ohne die Schutzhaube des
Sägeblatts.
17. Der bewegliche Teil der Schutzhaube muß
ebenfalls immer montiert sein.
18. Schmieren Sie das Sägeblatt niemals während
der Arbeit.
19. Halten Sie Ihre Hände beim Zuführen des
Werkstücks immer vom Sägeblatt fern.
20. Greifen Sie niemals nach dem Werkstück, in-
dem Sie mit den Händen neben oder hinter das
Strona się ładuje...
Strona się ładuje...
Strona się ładuje...
Strona się ładuje...
Strona się ładuje...
Strona się ładuje...
Strona się ładuje...
Strona się ładuje...
Strona się ładuje...
Strona się ładuje...
Strona się ładuje...
Strona się ładuje...
Strona się ładuje...
Strona się ładuje...
Strona się ładuje...
Strona się ładuje...
Strona się ładuje...
Strona się ładuje...
Strona się ładuje...
Strona się ładuje...
Strona się ładuje...
Strona się ładuje...
Strona się ładuje...
Strona się ładuje...
Strona się ładuje...
Strona się ładuje...
Strona się ładuje...
Strona się ładuje...
Strona się ładuje...
Strona się ładuje...
Strona się ładuje...
Strona się ładuje...
Strona się ładuje...
Strona się ładuje...
Strona się ładuje...
Strona się ładuje...
Strona się ładuje...
Strona się ładuje...
Strona się ładuje...
Strona się ładuje...
Strona się ładuje...
Strona się ładuje...
Strona się ładuje...
Strona się ładuje...
Strona się ładuje...
Strona się ładuje...
Strona się ładuje...
Strona się ładuje...
Strona się ładuje...
Strona się ładuje...
Strona się ładuje...
Strona się ładuje...
Strona się ładuje...
Strona się ładuje...
Strona się ładuje...
Strona się ładuje...
Strona się ładuje...
Strona się ładuje...
Strona się ładuje...
Strona się ładuje...
Strona się ładuje...
Strona się ładuje...
Strona się ładuje...
Strona się ładuje...
Strona się ładuje...
Strona się ładuje...
Strona się ładuje...
Strona się ładuje...
Strona się ładuje...
Strona się ładuje...
Strona się ładuje...
Strona się ładuje...
-
 1
1
-
 2
2
-
 3
3
-
 4
4
-
 5
5
-
 6
6
-
 7
7
-
 8
8
-
 9
9
-
 10
10
-
 11
11
-
 12
12
-
 13
13
-
 14
14
-
 15
15
-
 16
16
-
 17
17
-
 18
18
-
 19
19
-
 20
20
-
 21
21
-
 22
22
-
 23
23
-
 24
24
-
 25
25
-
 26
26
-
 27
27
-
 28
28
-
 29
29
-
 30
30
-
 31
31
-
 32
32
-
 33
33
-
 34
34
-
 35
35
-
 36
36
-
 37
37
-
 38
38
-
 39
39
-
 40
40
-
 41
41
-
 42
42
-
 43
43
-
 44
44
-
 45
45
-
 46
46
-
 47
47
-
 48
48
-
 49
49
-
 50
50
-
 51
51
-
 52
52
-
 53
53
-
 54
54
-
 55
55
-
 56
56
-
 57
57
-
 58
58
-
 59
59
-
 60
60
-
 61
61
-
 62
62
-
 63
63
-
 64
64
-
 65
65
-
 66
66
-
 67
67
-
 68
68
-
 69
69
-
 70
70
-
 71
71
-
 72
72
-
 73
73
-
 74
74
-
 75
75
-
 76
76
-
 77
77
-
 78
78
-
 79
79
-
 80
80
-
 81
81
-
 82
82
-
 83
83
-
 84
84
-
 85
85
-
 86
86
-
 87
87
-
 88
88
-
 89
89
-
 90
90
-
 91
91
-
 92
92


Vonroc TS501AC Instrukcja obsługi
- Kategoria
- Elektronarzędzia
- Typ
- Instrukcja obsługi
w innych językach
- español: Vonroc TS501AC Instrucciones de operación
- italiano: Vonroc TS501AC Istruzioni per l'uso
- Deutsch: Vonroc TS501AC Bedienungsanleitung
- français: Vonroc TS501AC Mode d'emploi
- Türkçe: Vonroc TS501AC Kullanma talimatları
- Nederlands: Vonroc TS501AC Handleiding