
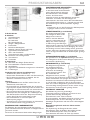
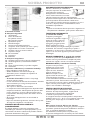
A. Bedienblende
B. Kühlfach
1. Innenbeleuchtung
2. Filter im Lüfter
2a. Lüftertaste
2b. Lüfterabdeckung
3. Ablagen / Ablagenbereich
4. Flaschenfach
5. Multi-flow-Kaltluftsystem
6. Kältefach (ideal für Fleisch und Fisch)
7. Typenschild mit Handelsnamen
8. Obst- und Gemüsefach
9. Trennelement für Obst- und Gemüsefach
10. Bausatz für Türanschlagwechsel
11. Trennelement
12. Türeinsätze
C. Gefrierfach
13. Oberkorb oder Klappe (Einfrierbereich)
14. Eiswürfelbehälter und/oder Kälteakku
15. Abstellflächen
16.
Lagerzonen zum Aufbewahren tiefgefrorener Lebensmittel
17. Türdichtungen
Antibakterieller Schutz (modellabhängig):
- Antibakterieller Filter im Gebläse (2)
-
Keimtötenden Zusatzstoffen im Obst- und Gemüsefach (8)
- Die Türdichtungen bestehen aus Material, das das
Wachstum von Bakterien hemmt (17).
Hinweise:
- Je nach Modell können die Zahl und die Form der
Zubehörteile verschieden sein.
-
Bei Stromausfall sorgt der Kälteakku dafür, dass die optimale
Lagertemperatur im Gefrierraum länger aufrecht erhalten wird.
- Alle Ablagen und Türeinsätze lassen sich herausnehmen.
- Die Innentemperaturen des Gerätes hängen von der
Raumtemperatur, der Häufigkeit der Türöffnungen und
dem Gerätestandort ab. Bei der Temperatureinstellung
müssen diese Faktoren berücksichtigt werden.
- Das Gerätezubehör ist nicht zum Spülen im
Geschirrspüler geeignet.
-
Vergewissern Sie sich nach dem Einlagern der Lebensmittel,
dass die Gefrierraumtür richtig geschlossen ist.
ERHÖHUNG DER LAGERKAPAZITÄT
Zur Erhöhung der Lagerkapazität und für die Lagerung
großer Lebensmittel können die Körbe und Klappen heraus
genommen werden.
Sie können Sie Lebensmittel direkt auf die Ablagen legen.
INBETRIEBNAHME DES GERÄTES
Die Distanzstücke (falls mitgeliefert)
an der Hinterwand des Kondensators
auf der Geräterückseite anbringen.
Den Netzstecker in die Steckdose
stecken; das Gerät startet
automatisch. Nach der Inbetriebnahme des Gerätes
mindestens 4-6 Stunden mit dem Einlegen von
Lebensmitteln in das Gerät warten. Die Kontrollleuchten
auf dem Bedienfeld leuchten ca. 1 Sekunde lang auf. Nach
der Initialisierung wird der Einstellmodus angezeigt.
Hinweis:
- Lebensmittel, die vor dem Erreichen der Kühltemperatur
eingelagert werden, können verderben.
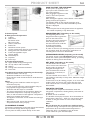
STRUKTURMATTE (je nach Modell)
Die Strukturmatte dient dazu,
den verfügbaren Platz auf der
Ablage besser nutzen zu
können, und beim Absetzen
schwerer Lebensmittel auf der
Ablage eine weiche Unterlage
zu haben. Einige der Öffnungen
können auch zur Lagerung von Flaschen genutzt werden (in
waagerechter Position). Soll sie zur Reinigung oder für die
Verwendung auf einer anderen Ablage heraus genommen
werden, sollte zuerst die Ablage herausgenommen werden,
auf der sie liegt. Die Matte kann im Geschirrspüler gereinigt
werden.
HYDROSENSE-ABLAGEN (je nach Modell)
Die spezielle Form der HydroSense Ablagen verhindert,
dass Flüssigkeiten auf die unteren Ablagen tropfen können
und erleichtert die Reinigung.
ABLAGENNETZ (je nach Modell)
Das Ablagennetz trägt dazu bei,
den verfügbaren Raum zur
Lagerung kleinerer Produkte
direkt unter der Glasablage
optimal nutzen zu können. Zum
Be- und Entladen des
Ablagennetzes dieses (mit Hilfe
der Lasche an der Vorderseite) herunter ziehen. Das Netz ist
flexibel: beim Beladen mit sperrigen oder schweren
Produkten nicht überdehnen. Maximal zulässiges Gewicht: 2
kg. Soll das Netz zur Reinigung oder für die Verwendung
unter einer anderen Ablage heraus genommen werden, sollte
zuerst die Ablage herausgenommen werden, auf der es liegt.
Das Netz kann im Geschirrspüler gereinigt werden.
LÜFTER MIT SCHALTER
Das Gebläse sorgt für eine gleichmäßige
Temperaturverteilung im Kühlraum und somit für eine
optimale Konservierung des Kühlgutes.
Normalerweise ist der Lüfter in Betrieb.
Es wird empfohlen, das Gebläse in Betrieb zu lassen, wenn
die Raumtemperatur 27-28 °C übersteigt, sich auf den
Glasablagen Tropfen bilden oder bei hoher Luftfeuchtigkeit.
Hinweis
Den Luftansaugbereich nicht mit Lebensmitteln
verdecken.
Zur Optimierung des Energieverbrauchs und der
Geräteleistung sollte das Gebläse abgeschaltet werden,
wenn die Raumtemperatur unter 18 °C absinkt.
Zum Abschalten des Lüfters die Taste (2a) drücken.
PLIFGBD
PRODUKTANGABEN
D

Wenn das Gerät mit einem Gebläse ausgestattet ist, kann
es mit ausgerüstet werden mit einem antibakteriellen
Filter. Diesen aus der Schachtel (im Gemüsefach, Teil 8)
entnehmen und in das Lüftungsgitter des Lüfters (Element
2b) einsetzen. Die Einbauanleitungen liegen dem Filter bei.
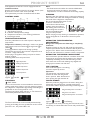
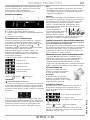
BEDIENFELD
1. Funktion Schnellkühlen
2. Anzeige der Temperatureinstellungen
3. Temperaturwahl-/Schnellkühl-Taste
4. Schalter Innenbeleuchtung
TEMPERATURAUSWAHL
Zur Temperatureinstellung die Taste des Bedienfelds
drücken.
Temperaturauswahl Sie dient zur Einstellung der
gewünschten Temperaturstufe von der höchsten über die
mittlere bis zur tiefsten Temperatur .
Durch wiederholtes Drücken der Taste werden
nacheinander alle Einstellungen angezeigt. Die
Temperatureinstellung gilt für beide Teile – Kühlraum und
Gefrierraum. Beim ersten Anschluss des Gerätes wird
automatisch eine werkseitig eingestellte mittlere Einstellung
gewählt.
Die folgende Abbildung zeigt die Temperaturstufen:
Hohe Temperatur
Mittlere/Hohe Temperatur
Mittlere Temperatur
Mittlere/tiefe Temperatur
Tiefe Temperatur
Legende LED EIN LED AUS
FUNKTIONEN
SCHNELLKÜHLEN
Diese Funktion sollte beim Einlagern einer größeren
Lebensmittelmenge in den Kühlraum gewählt werden, um
den Kühlvorgang zu beschleunigen; dazu die Taste auf dem
Bedienfeld 3 Sekunden lang niederdrücken.
Die Schnellkühl - Anzeigeleuchte (gelbe LED) leuchtet auf.
Die Funktion wird automatisch nach 28 Stunden
abgeschaltet.
Die Schnellkühlfunktion kann manuell abgebrochen
werden, indem dieselbe Taste des Bedienfelds erneut 3
Sekunden lang gedrückt wird. Die gelbe LED erlischt.
Hinweis:
- Die Schnellkühlfunktion sollte auch zur Erhöhung der
Gefrierleistung eingeschaltet werden, bevor frische
Lebensmittel im Gefrierteil eingelagert werden.
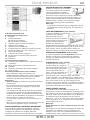
REINIGUNG
Reinigen Sie das Gerät regelmäßig mit einem Tuch und
lauwarmer Lauge mit neutralem Spezialreiniger für die
Innenreinigung des Kühlraums. Verwenden Sie weder
Scheuermittel noch harte Gegenstände für die Reinigung.
Für einen kontinuierlichen und korrekten Tauwasserablauf
die Abflussöffnung an der Kühlraumrückwand in der Nähe
des Obst- und Gemüsefachs mit dem mitgelieferten
Werkzeug regelmäßig reinigen.
Vor Reinigungs- und
Wartungsarbeiten den
Netzstecker des Geräts
ziehen oder die
Stromversorgung
unterbrechen.
KÜHLRAUM ABTAUEN
Das Abtauen des Kühlraums erfolgt vollautomatisch.
Die von Zeit zu Zeit an der Innenrückwand des Kühlraums
auftretenden Wassertropfen zeigen die automatische
Abtauphase an. Das Tauwasser wird automatisch in eine
Abflussöffnung geleitet und anschließend in einem Behälter
gesammelt, in dem es verdunstet.
GEFRIERRAUM ABTAUEN
Der Gefrierraum No Frost gewährleistet ein inneres
Umluftsystem das Eisbildungen vermeidet. Demzufolge
muss der Gefrierraum nicht abgetaut werden. Die
Tiefkühlware bleibt nicht an den Wänden haften, die
Etiketten sind immer leserlich und der Lagerungsraum
bleibt sauber und übersichtlich.
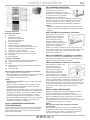
LED-Innenbeleuchtung
Wenn die LED-Innenbeleuchtung
nicht funktioniert, muss sie vom
Kundendienst ausgetauscht werden:
Wichtig:
Beim Öffnen der Tür schaltet sich die
Innenbeleuchtung ein. Bleibt die Tür
länger als 10 Minuten offen, schaltet sich die Beleuchtung ab.
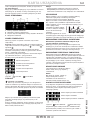
FEHLERALARME
Nach dem Anschließen des Geräts an das Stromnetz wird
u. U. während der ersten 10 Minuten des Betriebs eine
Störung des Temperatursensors gemäß folgender Tabelle
angezeigt:
Kühlraum-Verdampfersensor defekt
Kühlraumsensor defekt
Kühlraum & Verdampfersensor defekt
Legende Led AUS Led blinkt
Das Gerät kühlt zwar weiterhin, aber Sie sollten den
Kundendienst anrufen und ihm den Alarmcode mitteilen.
5019 637 01113 Printed in Poland 11/11
PLIFGBD
PRODUKTANGABEN
D

A. Control panel
B. Refrigerator Compartment
1. Lighting
2. Filter in fan
2a. button of fan
2b. cover of fan
3. Shelves / Shelf area
4. Bottle rack
5. Multi-flow cold air system
6. Cooler compartment (best for meat and fish)
7. Rating plate with commercial name
8. Fruits and vegetables crisper
9. Crisper divider
10. Reversibility kit
11. Separator
12. Door trays
C. Freezer Compartment
13. Upper basket or flap (freezing zone)
14. Ice tray and/or cold accumulator
15. Shelves
16. Storage zones for frozen food items
17. Door seals
Anti-bacterial protection (depending on the model):
- Antibacterial filter in the fan (2)
- Antibacterial additives in the Crisper (8)
- Door seals are made of material able to inhibit bacterial
growth (17).
Notes:
- Depending on the model the number and type of
accessories may vary.
- In case of power failure the cold accumulator helps to
keep optimal storage temperature longer.
- All shelves and door trays are removable.
- The internal temperatures of the appliance depend on
the ambient temperature, frequency of opening the
doors, as well as location of the appliance. Temperature
setting must consider these factors.
- The appliance accessories are not suitable for washing in
dishwasher.
- After inserting food, ensure that the freezer
compartment door closes properly.
TO INCREASE STORAGE
The freezer compartment can be used without the baskets/
flap to increase storage and for large products.
You can place the food products directly on the racks.
HOW TO START THE APPLIANCE
Fit the spacers (if supplied) on the
upper part of the condenser at the
rear of the appliance.
After plugging the appliance to the
mains, it starts the operation
automatically.
After starting the appliance, wait at least 4-6 hours before
placing food into the appliance.
The indicator LEDs on the control panel light up for
approximately 1 second, and after initialization process,
setpoint is displayed.
Note:
- If food is placed in the refrigarator before the appliance
has cooled completely, it may deteriorate.
ORGANIZING MAT (depending on the model)
The Organizing Mat is a mat
designed to better organize the
space on the shelf, and to
provide a soft-touch experience
when loading heavy items on
the shelf. Some slots could also
be used to host bottles
(horizontally positioned).
In order to remove it (for cleaning purpose, or to use it on
top of another shelf), first remove the shelf where it is
currently placed. The mat is dishwashable.
HYDROSENSE SHELVES (depending on the model)
The special contour of the HydroSense shelves creates a
barrier that contain spills and simplifies cleanup, preventing
liquids from leaking onto shelves below.
NET SHELF (depending on the model)
The Net Shelf is the net which
can be used to store little items
directly under the glass shelf,
taking full advantage of this
space. Pull down the net shelf
(using the lip on the front) to
load/unload it.
The net is flexible: do not stress
it by loading it with bulky or heavy items. Maximum weight
allowed: 2 kg.
To remove the net (for cleaning purpose, or to use it under
another shelf), you have to first remove the glass shelf
under which the net is currently placed. The net shelf is
dishwashable.
FAN WITH A BUTTON
The fan improves temperature distribution inside the
refrigerator compartment, allowing better preservation of
stored food.
By default, the fan is ACTIVE.
It is advisable to keep the fan active, when the ambient air
temperature is above 27 ÷ 28°C or if you perceive drops
of water on the glass shelves or in the severe humidity
conditions.
Note
Do not obstruct the air intake area with food items.
To optimize energy consumption and to guarantee the right
performance when the environmental temperature is
colder than 18°C, it is advisable to turn off the fan.
To turn off the fan press the button (2a).
PLIFGBD
PRODUCT SHEET
GB

PLIFGBD
If the appliance has the fan it can be equipped with the
antibacterial filter.
Remove it from the box (found in the crisper drawer (item
8) and insert into the cover of fan (item 2b).
The replacement procedure is attached with the filter.
CONTROL PANEL
1. "Fast Cooling" function
2. Indication of temperature settings
3. Temperature selection / "Fast Cooling" pushbutton
4. Internal light switch
TEMPERATURE SELECTION
Press the pushbutton on the control panel to adjust the
temperature.
Temperature selection pushbutton is used to set desired
temperature level, from warmest through lower to
coldest .
Pressing pushbutton setpoint will change cyclically.
Temperature set-point is done for both compartments at
one time – fridge and freezer.
At first plug-in of appliance factory set-point is chosen –
medium position.
Following table shows set-points level:
High temperature
Mid-high temperature
Middle temperature
Mid-low temperature
Low temperature
Legend Led ON Led OFF
FUNCTIONS
FAST COOL
The use of this function is recommended to increase the
cooling speed when placing a very high quantity of food in
the refrigerator compartment by pressing and holding the
pushbutton on the control panel for 3 sec.
The Fast Cool (yellow LED) will turn on. The function is
automatically deactivated after 6 hours.
The Fast Cool function can be manually deactivated by
pressing and holding the same pushbutton on the control
panel for 3 sec., the yellow LED is off.
Note:
- Fast Cool function should be also switched ON before
placing fresh food to be frozen in the freezer
compartment, in order to maximize the freezing capacity.
CLEANING
Regularly clean the appliance using a cloth and a solution of
warm water, with some soft detergent suitable for cleaning
the inside of the refrigerator compartment.
Do not use abrasive detergents or tools.
To ensure continuous and
correct flow of defrost water,
regularly clean the inside of
the draining hole on the back
of the refrigerator near the
fruit and vegetable drawer,
using the tool provided.
Before carrying out any cleaning or maintenance operation,
unplug the appliance or disconnect it from the power
supply.
DEFROSTING THE REFRIGERATOR
COMPARTMENT
Refrigerator compartment defrosting is completely
automatic.
Droplets of water on the rear wall inside the refrigerator
compartment indicate that the automatic defrost phase is in
progress. The defrost water is automatically run into a
drain hole and collected in a container, where it evaporates.
DEFROSTING THE FREEZER COMPARTMENT
No Frost freezers provide chilled air circulation around the
storage areas and prevent the formation of ice, thereby
completely eliminating the need for defrosting. Frozen
items don't stick to the walls, labeling stays legible and
storage space remains neat and clear.
LED's LIGHTING
If the inside LED light is not working,
it must be replace by service.
Important:
The refrigerator compartment light
switches on when the refrigerator
door is opened. After 10 minutes of
door opening the light switches off.
FAILURE ALARMS
When the product is plugged in to the mains, during first
10 minutes of its performance, possible temperature
sensor failure will be displayed according to following table:
Refrigerator Evaporator sensor failure
Refrigerator sensor failure
Refrigerator & Evaporator sensor failure
Legend Led OFF Led Flashing
The appliance will work preserving the food stored, but it
is necessary to contact after-sales service and provide alarm
code.
PRODUCT SHEET
GB
5019 637 01113 Printed in Poland 11/11

A. Bandeau de commande
B. Compartiment réfrigérateur
1. Éclairage
2. Filtre de ventilateur
2a. Touche du ventilateur
2b. Couvercle du ventilateur
3. Clayettes / Zone réservée aux clayettes
4. Galerie porte-bouteilles
5. Système d'air froid Multi-flow
6. Compartiment Frais (idéal pour viande et poisson)
7. Plaque signalétique avec nom commercial
8. Bac à fruits et légumes
9. Séparateur bac à fruits et légumes
10. Kit d'inversion de sens d'ouverture de porte
11. Séparateur
12. Balconnets
C. Compartiment congélateur
13. Compartiment à abattant ou bac supérieur (zone de
congélation)
14. Bac à glaçons et/ou accumulateur de froid
15. Clayettes
16. Zones de conservation des aliments congelés
17. Joints de porte
Protection antibactérienne (selon modèle) :
- Filtre antibactérien intégré au ventilateur (2)
- Additifs antibactériens dans le bac à fruits et légumes (8)
- Les joints de porte sont fabriqués dans un matériau
prévenant la prolifération des bactéries (17).
Remarques :
- Selon le modèle Le nombre et l'aspect des accessoires
peuvent varier.
- En cas de panne de courant, l'accumulateur de froid
permet de maintenir plus longtemps la température
idéale de conservation.
- Les clayettes et les balconnets de porte sont amovibles.
- La température à l'intérieur de l'appareil dépend de la
température ambiante, de la fréquence d'ouverture des
portes et du lieu d'installation de l'appareil. Le thermostat
doit être réglé en fonction de ces facteurs.
- Les accessoires ne peuvent en aucun cas être lavés en
machine.
- Après avoir introduit les aliments, vérifiez que la porte du
compartiment congélateur ferme correctement.
POUR AUGMENTER L'ESPACE DE RANGEMENT
Il est possible de retirer les bacs/abattants présents à
l'intérieur du congélateur afin d'augmenter l'espace de
stockage et de permettre le stockage d'aliments
volumineux. Placez les aliments directement sur les grilles.
MISE EN MARCHE DE L'APPAREIL
Installez les entretoises (le cas échéant)
sur la partie supérieure du condenseur,
à l'arrière de l'appareil. L'appareil se
met automatiquement en marche une
fois branché. Une fois l'appareil en marche, attendez au
moins 4 à 6 heures avant d'y introduire des aliments. Les
voyants lumineux du bandeau de commande s'allument
pendant environ 1 seconde, puis la valeur de consigne
s'affiche dès la fin du processus d'initialisation.
Remarque :
- Si des aliments sont placés dans le réfrigérateur avant le
refroidissement complet de l'appareil, ils risquent de se
détériorer.
TAPIS DE RANGEMENT (selon modèle)
Le tapis de rangement est destiné
à permettre une utilisation
optimale de l'espace sur la
clayette, et à amortir les produits
lourds lorsqu'ils sont placés sur la
clayette. Certains logements
peuvent être utilisés pour le
positionnement de bouteilles (à l'horizontale). Pour retirer
le tapis (en vue de son nettoyage ou pour le placer sur une
autre clayette), retirez en premier lieu la clayette sur
laquelle il se trouve. Le tapis peut être lavé au lave-vaisselle.
CLAYETTES HYDROSENSE (selon modèle)
Le contour spécial des clayettes HydroSense crée une
barrière qui retient les renversements et simplifie le
nettoyage en évitant l'écoulement des liquides sur les
clayettes inférieures.
CLAYETTE FILET (selon modèle)
La clayette filet est un filet qui
peut être utilisé pour ranger de
petits articles directement sous le
verre de la clayette, permettant
ainsi une optimisation de cet
espace. Tirez la clayette filet vers
le bas (via la lèvre située sur sa
partie frontale) pour y ranger/en retirer des aliments.
Le filet est flexible : ne le surchargez pas en y rangeant des
articles volumineux ou lourds. Poids maximum autorisé : 2 kg.
Pour retirer le filet (en vue de son nettoyage ou pour
l'installer sous une autre clayette), il est d'abord nécessaire
de retirer la clayette en verre sous laquelle il est installé. La
clayette filet est lavable au lave-vaisselle.
VENTILATEUR À TOUCHE
Le ventilateur assure une diffusion homogène de la
température à l'intérieur du réfrigérateur, garantissant ainsi
une meilleure conservation des aliments. Le ventilateur est
activé par défaut. Il est recommandé de ne pas désactiver
le ventilateur lorsque la température de l'air ambiant
dépasse 27 ÷ 28 °C ou si des gouttes d'eau sont présentes
sur les clayettes en verre, ou encore si le taux d'humidité
est particulièrement élevé.
Remarque
Évitez d'obstruer les zones d'admission d'air avec des
aliments.
Afin d'optimiser la consommation énergétique et garantir les
performances de l'appareil, lorsque la température est
inférieure à 18°C, nous vous conseillons de désactiver le
ventilateur. Pour ce faire, appuyez sur la touche (2a). Si votre
PLIFGBD
FICHE PRODUIT
F

appareil est équipé d'un ventilateur, celui-ci peut intégrer un
filtre antibactérien. Sortez le filtre de la boîte située dans le
bac à fruits et légumes (élément 8) et introduisez-le dans le
couvercle du ventilateur (élément 2b). La procédure de
remplacement du filtre est fournie avec le filtre.
BANDEAU DE COMMANDE
1. Fonction Refroidissement rapide
2. Indication des réglages de température
3. Bouton-poussoir de sélection de température /
Refroidissement rapide
4. Commutateur d'éclairage intérieur
SÉLECTION DE LA TEMPÉRATURE
Pour régler la température, appuyez sur le bouton-poussoir
au niveau du bandeau de commande.
Le bouton-poussoir de réglage de la température sert à
régler le niveau de température souhaité, de la moins
froide à la température intermédiaire et à la
température la plus froide . Chaque activation du
bouton-poussoir provoque la modification cyclique de la
valeur de consigne. La valeur de consigne de température
est réglée simultanément pour les deux compartiments
(réfrigérateur et congélateur). Au premier branchement de
l'appareil, la valeur de consigne définie en usine est
sélectionnée, à savoir le réglage intermédiaire.
Le tableau ci-après illustre les niveaux de consigne :
Température fraîche
Température moyennement fraîche
Température intermédiaire
Température moyennement plus froide
Température froide
Légende Voyant Marche Voyant
Arrêt
FONCTIONS
FAST COOL (Refroidissement rapide)
Activez cette fonction pour accélérer le refroidissement
lorsque vous rangez une très grande quantité d'aliments
dans le compartiment réfrigérateur ; pour ce faire,
maintenez la touche du bandeau de commande enfoncée
pendant 3 secondes.
Le voyant jaune de la fonction Fast Cool s'allume. La
fonction se désactive automatiquement au bout de 6
heures. Il vous est possible de désactiver la fonction Fast
Cool manuellement en maintenant la même touche du
bandeau de commande enfoncée pendant 3 secondes ; le
voyant jaune s'éteint.
Remarque :
- La fonction Fast Cool doit également être activée lorsque
vous congelez des aliments frais, afin d'optimiser la
capacité de congélation.
NETTOYAGE
Nettoyez régulièrement l'intérieur du compartiment
réfrigérateur à l'aide d'un chiffon imbibé d'une solution
d'eau tiède et de détergent neutre. N'utilisez ni produits
abrasifs ni outils. Pour assurer une évacuation constante et
correcte de l'eau de dégivrage, nettoyez régulièrement
l'intérieur de l'orifice d'évacuation situé sur la paroi arrière
du compartiment réfrigérateur, à proximité du bac à fruits
et légumes, à l'aide de l'outil fourni avec l'appareil.
Avant d'effectuer les
opérations d'entretien ou de
nettoyage, débranchez la fiche
d'alimentation électrique de la
prise de courant ou coupez
l'alimentation électrique.
DÉGIVRAGE DU COMPARTIMENT RÉFRIGÉRATEUR
Le dégivrage du compartiment réfrigérateur est
entièrement automatique.
Des gouttelettes d'eau sur la paroi arrière à l'intérieur du
compartiment réfrigérateur indiquant que la phase de
dégivrage automatique est en cours. L'eau de dégivrage est
automatiquement conduite dans un trou de vidange et
récoltée par un récipient dans lequel elle s'évapore.
DÉGIVRAGE DU COMPARTIMENT CONGÉLATEUR
Les congélateurs No Frost fournissent la circulation de l'air
froid autour des zones de stockage pour éviter la formation
de givre afin d'éliminer totalement la nécessité de dégivrer
l'appareil. Les aliments gelés ne collent pas aux parois, les
étiquettes restent lisibles et l'espace de stockage reste
ordonné et clair.
ÉCLAIRAGE à LED
Si l'éclairage LED intérieur ne
fonctionne pas, faites-le réparer par
le Service Après-vente.
Remarque importante :
L'éclairage intérieur du compartiment
réfrigérateur s'allume à l'ouverture de
la porte. Après 10 minutes d'ouverture de la porte,
l'éclairage s'éteint.
ALARMES DE PANNE
Lorsque l'appareil est branché sur une prise secteur, une
éventuelle défaillance des sondes de température est
affichée pendant les 10 premières minutes de
fonctionnement, conformément au tableau ci-après :
Sonde de l'évaporateur du réfrigérateur défectueuse
Sonde du réfrigérateur défectueuse
Sondes du réfrigérateur et de l'évaporateur
défectueuses
Légende Voyant éteint Voyant clignotant
L'appareil fonctionne et assure la conservation des aliments
qui y sont stockés, mais il est nécessaire de contacter le
Service après-vente et de communiquer le code d'alarme.
5019 637 01113 Printed in Poland 11/11
PLIFGBD
FICHE PRODUIT
F

A. Pannello comandi
B. Comparto frigorifero
1. Illuminazione
2. Filtro del ventilatore
2a. pulsante ventola
2b. coperchio ventola
3. Ripiani/Zona ripiani
4. Mensola bottiglie
5. Sistema ad aria fredda multi-flow
6. Comparto cooler (indicato per carne e pesce)
7. Targhetta dati con il nome commerciale
8. Cassetto crisper per frutta e verdura
9. Separatore crisper
10. Kit reversibilità
11. Separatore
12. Balconcini
C. Comparto congelatore
13. Cassetto superiore o flap (zona di congelamento)
14. Vaschetta ghiaccio e/o accumulatore freddo
15. Ripiani
16. Zone di conservazione per prodotti congelati
17. Guarnizioni
Protezione antibatterica (a seconda del modello):
- Filtro antibatterico nella ventola (2)
- Additivi antibatterici nel cassetto crisper (8)
- Guarnizioni porte in materiale che impedisce la
proliferazione batterica (17).
Note:
- A seconda del modello il numero e il tipo degli
accessori possono variare.
- In caso di mancanza di elettricità l'accumulatore di freddo
aiuta a mantenere più a lungo la temperatura di
conservazione ottimale.
- Tutti i ripiani e i balconcini sono estraibili.
- Le temperature interne dell'apparecchio dipendono dalla
temperatura ambiente, dalla frequenza di apertura delle
porte e dal punto in cui viene collocato l'apparecchio.
L'impostazione della temperatura deve tenere conto di
questi fattori.
- Gli accessori dell'apparecchio non sono lavabili in
lavastoviglie.
- Dopo aver introdotto gli alimenti, assicurarsi che la porta
del comparto congelatore si chiuda bene.
AUMENTO DELLO DELLO SPAZIO DI
CONSERVAZIONE
È possibile utilizzare il comparto congelatore senza
cassetti/flap per aumentare lo spazio disponibile e per la
conservazione di alimenti voluminosi.È possibile collocare
gli alimenti direttamente sulle griglie.
AVVIAMENTO DELL'APPARECCHIO
Montare i distanziali (se in dotazione)
sulla parte superiore del condensatore
posto sulla parte posteriore
dell'apparecchio. Il funzionamento si
avvia in modo automatico, una volta
collegato l'apparecchio alla rete di alimentazione.
Dopo aver avviato l'apparecchio, attendere almeno 4-6 ore
prima di introdurre alimenti all'interno dello stesso.
Le spie LED sul pannello comandi si accendono per circa 1
secondo e, dopo il processo di inizializzazione, viene
visualizzata l'impostazione.
Nota:
- Qualora si introducano alimenti prima che il frigorifero sia
completamente raffreddato, questi possono deteriorarsi.
TAPPETINO PORTAOGGETTI
(a seconda del modello)
Il tappetino portaoggetti
consente di organizzare meglio lo
spazio sul ripiano e offre una
superficie più morbida su cui
appoggiare gli oggetti pesanti.
Alcune scanalature possono
essere utilizzate per accogliere bottiglie in posizione
orizzontale. Per rimuovere il tappetino per pulirlo o
utilizzarlo su un altro ripiano è necessario estrarre prima il
ripiano su cui si trova. Il tappetino può essere lavato in
lavastoviglie.
RIPIANI HYDROSENSE (a seconda del modello)
Il contorno speciale dei ripiani HydroSense crea una
barriera contro il gocciolamento e semplifica la pulizia,
evitando che i liquidi si riversino sui ripiani sottostanti.
RIPIANO A RETE (a seconda del modello)
Il ripiano a rete può essere
utilizzato per riporre piccoli
oggetti direttamente sotto il
ripiano di vetro, sfruttando
appieno questo spazio.
Abbassare il ripiano a rete
agendo sul bordo anteriore per
riporre/prelevare gli oggetti.
La rete è flessibile: non forzarla caricando oggetti
voluminosi o pesanti. Peso massimo consentito: 2 kg.
Per rimuovere la rete per pulirla o utilizzarla sotto un altro
ripiano, estrarre prima il ripiano sotto cui è applicata. Il
ripiano a rete è lavabile in lavastoviglie.
VENTOLA DOTATA DI PULSANTE
La ventola migliora la distribuzione della temperatura
all'interno del comparto frigorifero, migliorando di
conseguenza la conservazione degli alimenti.
La ventola è preimpostata come ATTIVA.
Si consiglia di azionare la ventola quando la temperatura
ambiente supera i 27 ÷ 28 °C o se sui ripiani di vetro sono
presenti gocce d'acqua oppure in condizioni di forte
umidità.
Nota
Non ostruire l'ingresso dell'aria con alimenti.
Per ottimizzare il consumo di energia e garantire la migliore
prestazione quando la temperatura ambientale è inferiore a
18°C, si consiglia di disattivare la ventola.
Per disattivare la ventola premere il pulsante (2a).
Se presente nell'apparecchio, la ventola può essere dotata
PLIFGBD
SCHEDA PRODOTTO
I

di filtro antibatterico. Rimuoverlo dalla scatola (che si
trova nel cassetto crisper - elemento 8) e inserirlo nel
coperchio della ventola (elemento 2b).
La procedura di sostituzione è allegata al filtro.
PANNELLO COMANDI
1. Funzione Raffreddamento rapido
2. Indicazione dei settaggi della temperatura
3. Selezione della temperatura / Pulsante Raffreddamento
rapido
4. Interruttore luce interna
SELEZIONE DELLA TEMPERATURA
Premere il pulsante sul pannello comandi per regolare la
temperatura. Il pulsante di selezione della temperatura
imposta la temperatura desiderata, dalla più calda, a un
livello intermedio , fino alla più fredda .
Premendo il pulsante, l'impostazione cambia ciclicamente.
L'impostazione della temperatura avviene
contemporaneamente per entrambi i comparti, sia
frigorifero che congelatore. Al primo collegamento
dell'apparecchio all'alimentazione, viene selezionata
l'impostazione di fabbrica.
La tabella a seguire illustra i livelli di impostazione
Temperatura alta
Temperatura media alta
Temperatura media
Temperatura medio-bassa
Temperatura bassa
Legenda LED ON LED spento
FUNZIONI
RAFFREDDAMENTO RAPIDO
L'uso di questa funzione è raccomandata per aumentare
la velocità di raffreddamento quando si pone una quantità
molto elevata di alimenti nel comparto frigorifero; attivare
la funzione premendo per 3 secondi il pulsante nel pannello
di controllo.
Si accende la spia di Raffreddamento Rapido (LED giallo).
Questa funzione si disattiva automaticamente dopo 28 ore.
La funzione Raffreddamento Rapido può essere disattivata
manualmente tenendo premuto lo stesso pulsante del
pannello comandi per 3 secondi: il LED giallo si spegne.
Nota:
- La funzione Raffreddamento rapido deve essere inoltre
ATTIVATA prima di inserire alimenti freschi da congelare
nel comparto congelatore, per sfruttare al massimo la
capacità di congelamento.
PULIZIA
Pulire regolarmente l'apparecchio utilizzando un panno ed
una soluzione di acqua calda e detergente neutro specifico
per la pulizia interna del comparto frigorifero. Non usare
detergenti abrasivi o utensili. Per garantire il deflusso
costante e corretto dell'acqua di sbrinamento, pulire
regolarmente l'interno del foro di scarico situato sulla
parete posteriore del
comparto frigorifero in
prossimità del cassetto frutta e
verdura, usando l'utensile in
dotazione. Prima di qualsiasi
operazione di manutenzione o pulizia, disinserire la spina
dalla presa di corrente o scollegare l'alimentazione.
SCONGELAMENTO DEL COMPARTO FRIGORIFERO
Lo scongelamento del comparto frigorifero avviene in
maniera completamente automatica.
Eventuali goccioline di acqua sulla parete posteriore all'interno
del comparto frigorifero indicano che la fase di scongelamento
automatico è stata avviata. L'acqua di scongelamento viene
direttamente condotta in un foro di scarico e raccolta in un
apposito contenitore, da dove evapora.
SBRINAMENTO DEL COMPARTO CONGELATORE
I congelatori No Frost assicurano la circolazione di aria
molto fredda attorno alle aree di conservazione alimentare,
evitando così la formazione di ghiaccio ed eliminando
completamente la necessità di sbrinamento. I prodotti
congelati non si incollano alle pareti, le etichette risultano ben
leggibili, lo spazio di conservazione rimane ordinato e pulito.
ILLUMINAZIONE LED
Qualora la luce LED interna non
funzioni è necessaria la sostituzione
da parte del servizio assistenza.
Attenzione:
La luce all'interno del comparto
frigorifero si accende quando si apre
la porta del frigorifero. La luce si spegne dopo che la porta
rimane aperta per 10 minuti.
ALLARMI DI GUASTO
Una volta inserita la spina, durante i primi 10 minuti di
funzionamento dell'apparecchio l'eventuale guasto al
sensore della temperatura sarà visualizzato secondo la
tabella seguente:
Sensore evaporatore frigorifero guasto
Sensore frigorifero guasto
Sensore frigorifero ed evaporatore guasto
Legenda Led OFF Led lampeggiante
L'apparecchio continuerà a funzionare, conservando gli
alimenti, ma è necessario contattare il servizio assistenza
fornendo il codice di errore.
5019 637 01113 Printed in Poland 11/11
PLIFGBD
SCHEDA PRODOTTO
I

A. Panel sterowania
B. Komora chłodziarki
1. Oświetlenie
2. Wentylator z filtrem
2a. przycisk wentylatora
2b. pokrywa wentylatora
3. Półki /Obszar półek
4. Półka na butelki
5. System zimnego powietrza Multi-flow
6. Komora chłodziarki (najlepsza na mięso i ryby)
7. Tabliczka znamionowa z nazwą handlową
8. Pojemnik na owoce i warzywa
9. Przegroda pojemnika na owoce i warzywa
10. Zestaw do zmiany kierunku otwierania drzwi
11. Przegroda
12. Półki drzwiowe
C. Komora zamrażarki
13. Górna szuflada lub klapka (strefa zamrażania)
14. Pojemnik na lód i/lub akumulator zimna
15. Półki
16. Obszary do przechowywania mrożonych produktów
spożywczych
17. Uszczelki drzwi
Ochrona przed bakteriami (w zależności od modelu):
- Filtr antybakteryjny w wentylatorze (2)
-
Dodatki antybakteryjne w pojemniku na owoce i warzywa (8)
- Uszczelki drzwiowe są wykonane z materiałów
ograniczających rozwój bakterii (17).
Uwagi:
- W zależności od modelu liczba oraz rodzaj akcesoriów
mogą się różnić.
- W razie przerwy w dostawie prądu akumulator zimna
będzie pomagać w dłuższym utrzymaniu optymalnej
temperatury przechowywania.
- Wszystkie półki, w tym półki drzwiowe, można wyjmować.
- Temperatura wewnątrz urządzenia zależy od temperatury
otaczającego powietrza, częstotliwości otwierania drzwi
oraz od miejsca, w którym stoi urządzenie. Podczas
ustawiania temperatury należy uwzględnić te czynniki.
-
Akcesoria urządzenia nie nadają się do mycia w zmywarce.
- Po włożeniu produktów sprawdzić, czy drzwi komory
zamrażarki zamykają się prawidłowo.
W CELU ZWIĘKSZENIA POWIERZCHNI
PRZECHOWYWANIA
Z komory zamrażarki można korzystać bez koszy i klapek,
dzięki czemu powiększa się miejsce na przechowywanie
dużych artykułów. Produkty spożywcze można umieścić
bezpośrednio na półkach.
URUCHOMIENIE URZĄDZENIA
Zamontować rozpórki (jeśli dostarczono
w komplecie) na gónej części
skraplacza znajdującego się z tyłu
urządzenia. Po podłączeniu urządzenia
do zasilania zaczyna ono działać
automatycznie. Po uruchomieniu
urządzenia należy odczekać co najmniej 4-6 godzin przed
włożeniem żywności do środka. Kontrolki LED na panelu
sterowania zapalą się na ok. 1 sekundę, a po procesie
inicjalizacji zostaną wyświetlone ustawienia urządzenia.
Uwaga:
- Włożenie do chłodziarki produktów spożywczych zanim
osiągnie ona wymaganą temperaturę grozi zepsuciem się
żywności.
MATA USTAWCZA (w zależności od modelu)
Mata ustawcza to mata, która
pozwala lepiej zorganizować
miejsce na półce i zapewnia
odpowiednią amortyzację
podczas układania ciężkich
artykułów spożywczych. Niektóre
szczeliny maty można również
wykorzystać do układania
butelek (w położeniu poziomym). W celu wyjęcia maty (np.
do czyszczenia lub w celu umieszczenia maty na innej półce)
należy najpierw wyjąć półkę, na której leży mata. Matę
można myć w zmywarce.
PÓŁKI HYDROSENSE (w zależności od modelu)
Specjalne profilowanie półek HydroSense stwarza barierę,
która ogranicza rozlewanie się cieczy, a zapobiegając ich
kapaniu na inne półki, ułatwia czyszczenie.
PÓŁKA SIATKOWA (w zależności od modelu)
Półka siatkowa to siatka, którą
można wykorzystać do
przechowywania małych
artykułów bezpośrednio pod
półką szklaną, co pozwala
maksymalnie wykorzystać
dostępną pojemność. Pociągnąć
półkę siatkową, aby ją załadować/wyładować (używając do
tego celu uchwytu z przodu). Siatka jest elastyczna: nie
należy jej przeładowywać, wkładając do niej duże lub ciężkie
rzeczy. Maksymalna dopuszczalna waga produktów: 2 kg.
W celu wyjęcia siatki (np. do czyszczenia lub aby użyć ją na
innej półce), należy najpierw wyjąć półkę szklaną, pod którą
zamocowano siatkę. Półkę siatkową można myć w
zmywarce.
WENTYLATOR Z PRZYCISKIEM
Wentylator zapewnia korzystniejszy rozkład temperatur w
komorze chłodziarki, a w konsekwencji lepsze
przechowywanie artykułów spożywczych. Wentylator jest
domyślnie WŁĄCZONY. Zaleca się włączenie wentylatora,
gdy temperatura otoczenia przekroczy 27 ÷ 28°C, w
przypadku zauważenia kropel wody na szklanych półkach lub
w przypadku dużej wilgotności powietrza.
Uwaga
Nie zasłaniać strefy wlotu powietrza produktami
spożywczymi.
Aby zoptymalizować zużycie energii oraz zagwarantować
prawidłowe parametry pracy, kiedy temperatura otoczenia
spadnie poniżej 18°C, zaleca się wyłączenie wentylatora.
Aby włączyć wentylator, nacisnąć przycisk (2a).
PLIFGBD
KARTA URZĄDZENIA
PL

Jeśli w urządzeniu jest wentylator, można go wyposażyć w
filtr antybakteryjny.
Wyjąć go z pudełka znajdującego się w szufladzie na owoce i
warzywa (poz. 8) i włożyć w osłonę wentylatora (poz. 2b).
Sposób wymiany opisano w instrukcji dołączonej do filtra.
PANEL STEROWANIA
1. Funkcja „Szybkie chłodzenie”
2. Wskaźnik ustawienia temperatury
3.
Przycisk wyboru temperatury / funkcji „Szybkie chłodzenie”
4. Wyłącznik oświetlenia
WYBÓR TEMPERATURY
Nacisnąć przycisk na panelu sterowania, aby ustawić
temperaturę.
Przycisk wyboru temperatury służy do ustawienia żądanej
temperatury w zakresie od najwyższej, przez średnią do
najniższej .
Naciskanie przycisku powoduje automatyczną zmianę
nastawień. Temperaturę ustawia się jednocześnie dla obu
komór - chłodziarki i zamrażarki.
Po pierwszym podłączeniu urządzenia do zasilania włącza
się ustawienie fabryczne - pozycja średnia.
W tabeli poniżej przedstawiono poziomy ustawień
Wysoka temperatura
Średnio-wysoka temperatura
Średnia temperatura
Średnio-niska temperatura
Niska temperatura
Legenda Dioda WŁ. Dioda WYŁ.
FUNKCJE
SZYBKIE CHŁODZENIE
Zaleca się stosowanie tej funkcji w celu zwiększenia
szybkości chłodzenia po włożeniu dużej ilości żywności do
komory chłodziarki. Aby włączyć tę funkcję należy nacisnąć i
przytrzymać przez 3 sekundy przycisk na panelu sterowania.
Włączy się kontrolka funkcji szybkiego chłodzenia (żółta
kontrolka). Funkcja wyłączy się samoczynnie po 28
godzinach.
Funkcję „Szybkie chłodzenie" można wyłączyć ręcznie przez
wciśnięcie i przytrzymanie tego samego przycisku przez 3 s.
Gaśnie wtedy żółta kontrolka.
Uwaga:
- Funkcja Szybkie chłodzenie powinna być również
WŁĄCZONA przed włożeniem świeżej żywności do
zamrożenia w zamrażarce, aby zwiększyć moc zamrażania.
CZYSZCZENIE
Należy regularnie czyścić urządzenie szmatką zwilżoną
roztworem ciepłej wody i neutralnego detergentu
przeznaczonego do mycia wnętrza chłodziarki.
Nigdy nie stosować ściernych detergentów ani narzędzi.
Aby zapewnić stałe i prawidłowe odprowadzanie skroplin,
należy regularnie czyścić otwór odpływowy znajdujący się na
ściance tylnej komory
chłodziarki, w pobliżu szuflady
na owoce i warzywa, używając
w tym celu dostarczonego
narzędzia.
Przed przystąpieniem do czyszczenia lub dowolnych czynności
konserwacyjnych należy wyjąć wtyczkę przewodu zasilającego
urządzenia z gniazdka sieciowego lub odłączyć je od zasilania.
ROZMRAŻANIE PRZEDZIAŁU CHŁODZIARKI
Rozmrażanie przedziału chłodziarki odbywa się w
sposób całkowicie automatyczny.
Widniejące na tylnej ściance urządzenia kropelki wody
wskazują, że jest w toku automatyczne rozmrażanie. Woda
topnienia automatycznie kieruje się do otworów spustu i jest
gromadzona w zbiorniku, z którego sama wyparowuje.
ROZMRAŻANIE PRZEDZIAŁU ZAMRAŻARKI
Zamrażarki bezszronowe No Frost zapewniają krążenie
chłodzonego powietrza wokół stref przechowywania żywności
zapobiegając powstawaniu lodu, i tym samym eliminują
całkowicie konieczność rozmrażania. Zamrożone produkty
nie przylepiają się do ścianek, etykietki pozostają nadal
czytelne i cała przestrzeń przeznaczona na przechowywanie
jest zawsze porządna i czysta.
OŚWIETLENIE DIODOWE
Jeżeli wewnętrzne oświetlenie LED nie
działa, należy zlecić jego wymianę
serwisantowi.
Ważne:
Gdy drzwi są otwarte, zapala się
lampka wewnętrzna komory
chłodziarki. Po 10 minutach od
otworzenia drzwi światło wyłączy się.
ALARMY W PRZYPADKU AWARII
Po podłączeniu urządzenia do zasilania, przez pierwsze 10
minut jego pracy, na wyświetlaczu pojawi się informacja o
ewentualnej awarii czujnika temperatury zgodnie z
następującą tabelą:
Awaria czujnika parownika chłodziarki
Awaria czujnika chłodziarki
Awaria czujnika parownika i chłodziarki
Legenda Dioda LED WYŁ. Dioda LED miga
Urządzenie będzie nadal pracowało i chłodziło/mroziło
przechowywane produkty, lecz konieczny jest kontakt z
serwisem i podanie kodu alarmu.
5019 637 01113 Printed in Poland 11/11
PLIFGBD
KARTA URZĄDZENIA
PL


5019 637 01113 Printed in Poland 11/11
PLIFGBD
-
 1
1
-
 2
2
-
 3
3
-
 4
4
-
 5
5
-
 6
6
-
 7
7
-
 8
8
-
 9
9
-
 10
10
-
 11
11
-
 12
12


Bauknecht WBV3327 NF W Program Chart
- Typ
- Program Chart
- Niniejsza instrukcja jest również odpowiednia dla
w innych językach
- italiano: Bauknecht WBV3327 NF W
- Deutsch: Bauknecht WBV3327 NF W
- français: Bauknecht WBV3327 NF W
- English: Bauknecht WBV3327 NF W