Yamaha SPX1000 Instrukcja obsługi
- Kategoria
- Procesory
- Typ
- Instrukcja obsługi

AUTHORIZED
PRODUCT MANUAL
YAMAHA
Professional Multi-effect Processor

YAMAHA
Professional Multi-effect Processor
Operation Manual

INTRODUCTION
Congratulations on your acquisition of a Yamaha SPX1000 Professional Multi-effect
Processor. The SPX1000 is a highly sophisticated digital reverberation and effects system
which offers 40 preset effect programs including accurate simulations of natural
reverberation and early-reflections, delay and echo effects, gated effects, modulation
effects, a versatile compressor, a low-level expander, a harmonic exciter, multiple effects
which function as several SPX000 units in one, independent 2-channel effects, freeze
(sampling) programs and others. With a sampling frequency of 44. 1 kHz, it delivers full,
flat frequency response from 20 Hz to 20 kHz for exceptionally clean, “transparent” effect
sound, and direct digital interfacing capability makes it compatible with the most up-to-
date sound systems. The preset effect programs can be edited, re-titled, and stored in any
of 59 RAM user memory locations. Individual two-band parametric EQ and dynamic filter
parameters are provided for each effect program for precise tonal tailoring. In addition to
the basic effect and EQ parameters, the SPX1000 offers a list of “internal parameters”
which provide exacting control over the effect sound. The SPX1000 is also MIDI
compatible, with a MIDI IN terminal that allows MIDI selection of effect programs, and
a switchable MIDI THRU/OUT terminal. When switched to OUT, edited programs stored
in internal RAM can be dumped to a MIDI data recorder or other data storage device.
Programs thus stored can be reloaded when necessary via the MIDI IN terminal. As an
extra touch of convenience the SPX1000’s analog input and output terminals can be
switched to match -20 dBm or +4 dBm line levels + providing compatibility with a broader
range of sound equipment.
In order to fully take advantage of all the capability offered by the SPX1000 Professional
Multi-effect Processor, we urge you to read this operation manual thoroughly— and keep
it in a safe place for later reference.
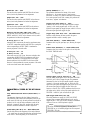
FCC INFORMATION
While the following statements are provided to comply
with FCC Regulations in the United States, the cor-
rective measures listed below are applicable world-
wide.
This series of Yamaha professional music equipment
uses frequencies that appear in the radio frequency
range and if installed in the immediate proximity of
some types of audio or video devices (within three
meters), interference may occur. This series of Yamaha
combo equipment have been type tested and found
to comply with the specifications set for a class B
computing device in accordance with those specifi-
cations listed in subpart J of part 15 of the FCC rules.
These rules are designed to provide a reasonable
measure of protection against such interference.
However, this does not guarantee that interference
will not occur. If your professional music equipment
should be suspected of causing interference with other
electronic devices, verification can be made by turning
your combo equipment off and on. If the interference
continues when your equipment is off, the equipment
is not the source of interference. If your equipment
does appear to be the source of the interference, you
should try to correct the situation by using one or
more of the following measures:
Relocate either the equipment or the electronic device
that is being affected by the interference. Utilize power
outlets for the professional music equipment and the
device being affected that are on different branch
(circuit breaker or fuse) circuits, or install AC line
filters.
In the case of radio or TV interference, relocate the
antenna or, if the antenna lead-in is 300 ohm ribbon
lead, change the lead-in to co-axial type cable.
If these corrective measures do not produce satisfac-
tory results, please contact your authorized Yamaha
professional products dealer for suggestions and/or
corrective measures.
If you cannot locate a franchised Yamaha professional
products dealer in your general area contact the pro-
fessional products Service Department, Yamaha Music
Corporation, 6600 Orangethorpe Ave., Buena Park,
CA 90620, U.S.A.
If for any reason. you should need additional infor-
mation relating to radio or TV interference, you may
find a booklet prepared by the Federal Communi-
cations Commission helpful:
“How to identify and Resolve Radio-TV Interference
Problems”. This booklet is available from the U.S.
Government Printing Office, Washington D.C. 20402
- Stock No. 004-000-00345-4.

TABLE OF CONTENTS
PRECAUTIONS
1: CONTROLS AND CONNECTIONS
3
THE
FRONTPANEL
3
THE
CONNECTOR
PANEL
5
2: THESPX1000
SYSTEM
6
MEMORY CONFIGURATION
6
INPUT MODE AND DIGITAL I/O
CONFIGURATIONS
6
INPUT
MODES
6
DIGITAL l/O MODES
7
3:
GENERALOPERATION
9
SELECTING AN EFFECT/MEMORY LOCATION 9
BYPASSING
THE
EFFECT
9
ACCESSING & EDITING THE PROGRAM
PARAMETERS
9
STORINGEFFECTS
10
EXTERNALCONTROL
ASSIGNMENT
10
4:
THE
PROGRAMS
&
PARAMETERS
12
PARAMETERS PROVIDED FOR ALL PROGRAMS
12
LEVEL PARAMETERS (Accessed via
LEVEL key)
12
EQ PARAMETERS
(Accessed via EQ key)
12
REVERB
PROGRAMS
13
1.
REV 1 HALL
13
2. REV 2 ROOM
13
3.
REV3
VOCAL
13
4. REV 4 PLATE
14
5.
REV5ECHO
ROOM
15
EARLY REFLECTION PROGRAMS
15
6. EARLY REF. 1
15
7.EARLY
REF.
2
15
8.
EARLY
REF.
3 15
9. GATE REVERB
15
10.
REVERSE
GATE..
15
DELAY PROGRAM
17
11. DELAY L,C,R
17
ECHOPROGRAM 17
12. STEREO ECHO
17
MODULATIONPROGRAMS
18
13. STEREO
FLANGE A
18
14.STEREO
FLANGEB
18
15.
CHORUS
18
16. STEREO PHASING
18
17. TREMOLO
18
18.SYMPHONIC
18
NOISE
GATE
19
19. ADR-NOISE
GATE
19
PITCH CHANGE PROGRAMS
19
20.
PITCH
CHANGE 1
20
21. PITCH CHANGE 2
20
22. PITCH CHANGE 3
20
39. STEREO PITCH
21
FREEZE PROGRAMS
21
23. FREEZE 1
21
24. FREEZE 2 23
40. STEREO FREEZE
23
PAN PROGRAMS 23
25. PAN
24
26.
TRIGGERED
PAN
24
DISTORTION PROGRAM
24
27. DISTORTION
24
MULTI-EFFECT PROGRAMS
25
28.
MULTI
(CHO&REV)
25
29.
MULTI
(SYM+REV)
26
30. MULTI (EXC&REV)
26
2-CHANNEL
PROGRAMS
26
31.
PLATE+
HALL
26
32. ER + REV
27
33.
ECHO+REV
27
34.
CHORUS
+REV
28
35. PAN + PAN
28
COMPRESSOR
&
EXPANDER
PROGRAMS
29
36. COMPRESSOR
29
37.
LO
LVLEXPANDER
30
EXCITER PROGRAM
30
38. EXCITER
30
5: UTILITY FUNCTIONS
31
TITLE EDIT
31
INPUT MODE
31
A/D l/O MODE
31
DIGITAL IN ATT
31
USER ER EDIT
31
MEMORY PROTECT
32
MIDICONTROL & MIDI
PGM
CHANGE
32
MIDI CTRL ASSIGN
33
BULK OUT 1 & BULK OUT 2
33
F.SW MEMORY RCL
34
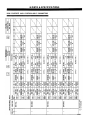
6: DATA & SPECIFICATIONS
Add-1
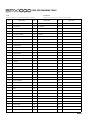
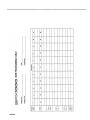
ROM CONTENTS AND CONTROLLABLE
PARAMETERS
Add-1
MIDI DATA FORMAT
Add-15
MIDI IMPLEMENTATION CHART
Add-28
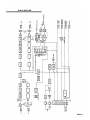
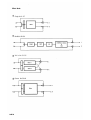
BLOCK
DIAGRAM
Add-29
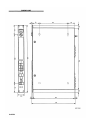
DIMENSIONS
Add-30
SPECIFICATIONS
Add-31
1

PRECAUTIONS
1. AVOID EXCESSIVE HEAT, HUMIDITY, DUST AND
VIBRATION
Keep the unit away from locations where it is likely to
be exposed to high temperatures or humidity – such
as near radiators, stoves, etc. Also avoid locations
which are subject to excessive dust accumulation or
vibration which could cause mechanical damage.
2. AVOID PHYSICAL SHOCKS
Strong physical shocks to the unit can cause damage.
Handle it with care.
3. DO NOT OPEN THE CASE OR ATTEMPT REPAIRS OR
MODIFICATIONS YOURSELF
This product contains no user-serviceable parts. Refer
all maintenance to qualified Yamaha service
personnel. Opening the case and/or tampering with the
internal circuitry will void the warranty.
4. MAKE SURE POWER IS OFF BEFORE MAKING OR
REMOVING CONNECTIONS
Always turn the power OFF prior to connecting or
disconnecting cables. This is important to prevent
damage to the unit itself as well as other connected
equipment.
6. CLEAN WITH A SOFT DRY CLOTH
Never use solvents such as benzine or thinner to clean
the unit. Wipe clean with a soft, dry cloth.
7. ALWAYS USE THE CORRECT POWER SUPPLY
Make sure that the power supply voltage specified on
the rear panel matches your local AC mains supply.
8. ELECTRICAL INTERFERENCE
Since the SPX000 contains digital circuitry, it may
cause interference and noise if placed too close to TV
sets, radios or similar equipment. If such a problem
does occur, move the SPX1000 further away from the
affected equipment.
9. BACKUP BATTERY
The SPX1000 contains a long-life lithium battery which
maintains the contents of the buffer and user memory
locations even when the unit is turned OFF. With
normal use the battery should last for approximately 5
years. If the battery voltage falls below the safe level,
however, the "*** WARNING *** LOW BATTERY”
display will appear on the LCD when the power is first
turned ON. If this occurs, have the battery replaced by
a qualified Yamaha service center. Do not attempt to
5. HANDLE CABLES CAREFULLY
Always plug and unplug cables – including the AC
cord
– by gripping the connector, not the cord.
replace the battery yourself!
IMPORTANT NOTICE FOR THE UNITED KINGDOM
Connecting the Plug and Cord
WARNING : THIS APPARATUS MUST BE EARTHED
IMPORTANT. The wires in this mains lead are coloured in accordance with the following code:
GREEN-AND-YELLOW :
EARTH
BLUE
:
NEUTRAL
BROWN
: LlVE
As the colours of the wires in the mains lead of this apparatus may not correspond with the coloured
markings identifying the terminals in your plug proceed as follows:
The wire which is coloured GREEN-AND-YELLOW must be connected to the terminal in the plug
which is marked by the letter E or by the safety earth symbol
or coloured GREEN or GREEN-
AND-YELLOW.
The wire which is coloured BLUE must be connected to the terminal which is marked with the letter
N or coloured BLACK.
The wire which is coloured BROWN must be connected to the terminal which is marked with the
letter L or coloured RED.
CANADA
THIS APPARATUS COMPLIES WITH THE "CLASS B” LIMITS FOR RADIO NOISE EMIS-
SIONS SET OUT IN RADIO INTERFERENCE REGULATIONS.
CET APPAREIL EST CONFORME AUX NORMES “CLASSE B”. POUR BRUITS RADIO-
ELECTRIQUES. TEL QUE SPECIFIER DANS LE REGLEMENT SUR LE BROUILLAGE
RADIOELECTRIQUE.
2

1: CONTROLS AND CONNECTIONS
THE FRONT PANEL
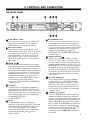
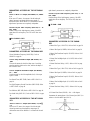
Power ON/OFF Switch
Press to turn power ON, press again to turn power OFF.
When the power is turned ON, the last program and
parameter selected will be automatically recalled.
Input Level Controls
These concentric controls vary the input level of the
analog inputs from approximately -90 dB to +l0 dB when
the rear-panel input level switch is set to +4 dB, and
between approximately -110 dB and -14 dB when the
input level switch is set to -20 dB. The inner control
adjusts the left channel and the outer control adjusts the
right channel.
PARAM Key
Accesses the main effect parameters for each program.
Each time the PARAM key is pressed the next parameter
in the selected program’s “parameter set” is called. It is
also possible to scroll backward through the parameter set
by using the SCROLL BACK key (7). Once the desired
parameter has been selected its value or setting can be
changed using the parameter
and
keys (9). The
PARAM key is also used for cursor control (forward
cursor movement) in some utility functions.
• Details under “THE PROGRAMS & PARAMETERS”
starting on page 12
LEVEL Key
Accesses the output level and balance parameters for
each program. Once the LEVEL key has been pressed,
both the LEVEL key and SCROLL BACK (7) key can be
used to select parameters. Once the desired parameter has
been selected its value or setting can be changed using
the parameter and
keys (9).
• Details on page 12
EQ Key
Accesses the digital equalizer or dynamic filter
parameters for each program. Once the EQ key has been
pressed, both the EQ key and SCROLL BACK (7) key
can be used to select parameters. Once the desired
parameter has been selected its value or setting can be
changed using the parameter and keys (9).
• Details on page 12
INT PARAMETER Key
Accesses a special set of internal parameters for each
effect program. Once the INT PARAM key has been
pressed, both the INT PARAM key and SCROLL BACK
(7) key can be used to select parameters. Once the desired
parameter has been selected its value or setting can be
changed using the parameter
and
keys (9).
• Details under “THE PROGRAMS & PARAMETERS”
starting on page 12
SCROLL BACK Key
When any set of parameters is selected – PARAM,
LEVEL, EQ, or INT PARAM – the SCROLL BACK
key can be used to scroll backward through the available
parameters while the PARAM (3), LEVEL (4), EQ (5) or
INT PARAMETER (6) key scrolls forward, according to
the parameter set selected. The preceding parameter in
the current set is selected each time the SCROLL BACK
key is pressed. The SCROLL BACK key is also used for
cursor control (backward cursor movement) in some
utility functions.
EXT CTRL ASSIGN Key
This key makes it possible to assign any parameters
(PARAM, LEVEL, EQ or INT PARAM) to external
controllers connected to the front-panel EXT CTRL/
FOOT VOL 1 and 2 jacks (21). These controllers can
then be used to control the assigned parameter in real
time. Yamaha FC7 Foot Controllers are recommended.
• Details on page 10
Parameter
and
Keys
These keys are used to change parameter values when
parameters are selected for editing (after the PARAM,
LEVEL, EQ or INT PARAM key has been pressed). The
parameter
and
keys are also used to program several
UTILITY functions. The
and
keys can be pressed
briefly to change values in single steps, or held down for
rapid continuous incrementing or decrementing of the
selected value. While holding down either the
or
key, pressing the other key or
causes the
incrementing or decrementing process to be carried out
more rapidly.
3

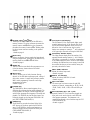
Program Select and Keys
These keys are used to select any of the SPX1000’s
memory locations. The key increments (increases) the
memory location number while the key decrements
(decreases) the memory location number. Holding either
key down causes continuous scrolling in the specified
direction.
• Details on page 9
4
RECALL Key
When a new memory location number has been selected
using the program select
and
keys, the RECALL key
must be pressed to activate the selected effect.
• Details on page 9
STORE Key
This key is used to store edited effect programs into one
of the user memory locations between 41 and 99.
• Details on page 10
UTILITY Key
This key accesses a set of utility functions allowing
selection of the SPX1000's input/output mode, editing of
effect titles, creation of original early-reflection patterns,
MIDI control programming, footswitch recall range
programming and others.
• Details on page 31
TRIGGER Key
The TRIGGER key allows manual triggering of any
SPX1000 effect program that has trigger parameters. The
reverb programs, for example, include a triggerable gate,
and the freeze programs allow triggering of recording and
playback. The TRIGGER key has the same function as a
footswitch plugged into the rear-panel TRIGGER 1 SW
jack (THE CONNECTOR PANEL, 6).
BYPASS Key
The BYPASS key switches the selected effect ON or
OFF. leaving only the direct signal when BYPASS is
active. The BYPASS key has the same function as a
footswitch plugged into the rear-panel BYPASS jack
(THE CONNECTOR PANEL, 4).
• Details on page 9
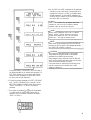
LCD (Liquid Crystal Display)
This 16-character x 2-line liquid crystal display panel
normally displays the title of the selected effect on the
top line and a selected parameter and its value on the
bottom line. One or both lines may also be used to
display error messages or warnings. “
M
” will be displayed
in the upper right corner after receiving the MIDI data.
LED Memory Number Display
This 2-digit numeric display shows the number of the
currently selected memory location (1 – 99). When the
LED display is continuously lit the effect corresponding
to the number displayed is active. When the LED display
is flashing, this indicates that a new memory location has
been selected but has not yet been recalled, leaving the
previously selected effect active.
INPUT MODE Indicators
Indicate the selected input mode.
• Details on page 6
DIGITAL I/O Indicators
Indicate the selected DIGITAL I/O mode.
• Details on page 7
Input Level Meter
The stereo input level meter consists of eight LED
segments per channel, corresponding to -42 dB, -36 dB,
-30 dB, -24 dB, -18 dB, -12 dB, -6 dB and CLIP input
level.
EXT CTRL/FOOT VOL 1 and 2 Jacks
Optional Yamaha FC7 Foot Controllers plugged into
these jacks can be used to directly control SPX1000
effect program parameters. The parameters to be
controlled are assigned to the controllers using the EXT
CTRL ASSIGN key (8).
• Details on page 10

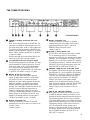
THE CONNECTOR PANEL
L(MONO) & R INPUT Connectors and Level
Switch
These are the analog stereo inputs to the SPX1000. The
input jacks are standard 1/4” monaural phono types. The
level switch selects either -20 dB or +4 dB nominal input
level. Please note that the operation of the INPUT
jacks
depends on the selected INPUT and DIGITAL I/O modes.
Refer to “INPUT MODES” and DIGITAL I/O MODES”
on page 6 for details.
When an input mode has not been selected and only one
input is being used, input is through L(MONO).
L & R OUTPUT Connectors and Level Switch
The stereo analog outputs from the SPX1000. The output
jacks are standard l/4” monaural phono types. The level
switch selects either -20 dB or +4 dB nominal output
level. Please note that the operation of the OUTPUT
jacks depends on the selected DIGITAL I/O mode. Refer
to “DIGITAL I/O MODES” on page 7 for details.
DIGITAL IN and OUT Connectors
These are the SPX1000’s stereo digital inputs and
outputs. All digital data is handled in Yamaha format.
The DIGITAL IN and OUT connectors are directly
compatible with other Yamaha equipment that provides
digital I/O capability –
the DMP7D Digital Mixing
Processor and DEQ7 Digital Equalizer are excellent
examples. The Yamaha FMC1 Format Converter can also
be used to convert the SPX1000’s digital output to
virtually all popular digital formats, allowing direct
connection to standard digital recorders, etc. Please note
that the operation of the DIGITAL IN and OUT jacks
depends on the selected DIGITAL I/O mode. Refer to
“DIGITAL I/O MODES” on page 7 for details.
BYPASS Footswitch Jack
An optional Yamaha FC5 footswitch or equivalent
connected to this jack can be used for foot control of the
BYPASS function.
• Details on page 9
INC/DEC Footswitch Jack
An optional Yamaha FC5 footswitch or equivalent
connected to this jack can be used to recall a range of
programs specified by the UTILITY mode F.SW
MEMORY RECALL RANGE function.
• Details on page 34
TRIGGER 1 SW Footswitch Jack
The TRIGGER 1 SW footswitch jack accepts a Yamaha
FC5 or equivalent footswitch for foot-controlled
triggering of any SPX1000 effect program that has trigger
parameters. The reverb programs, for example, include a
triggerable gate, and the freeze programs allow triggering
of recording and playback. A footswitch connected to the
TRIGGER 1 SW jack has the same function as the front-
panel TRIGGER key (THE FRONT PANEL, 14).
TRIGGER 2 ANALOG Jack & MIC/LINE Switch
The triggerable SPX1000 effect programs (gate programs,
freeze programs, etc.) can be triggered by the front-panel
TRIGGER key, a footswitch connected to the TRIGGER
1 SW jack, or an input signal appearing at the INPUT L
and R or DIGITAL IN connectors. The TRIGGER 2
ANALOG jack offers a fourth triggering method:
triggering can be accomplished by applying an analog
signal of sufficient amplitude to this jack. The MIC/LINE
switch changes the sensitivity of the TRIGGER 2
ANALOG input to accept microphone or line-level
signals.
MIDI IN and THRU/OUT Terminals
MIDI signals from external MIDI devices can be fed to
the MIDI IN terminal to remotely select effects, set the
pitch shift of the pitch change effects and set the pitch of
freeze-program playback. When the switch controlling
the remaining MIDI terminal is set to THRU, the terminal
simply re-transmits data received at the MIDI IN terminal
allowing daisy-chaining of MIDI devices. When set to
OUT, the internal RAM memory contents may be
dumped to a MIDI data recorder for large-volume, long-
term storage. Program data thus stored can be reloaded
later via the MIDI IN terminal (see BULK OUT 1 &
BULK OUT 2 on page 33).
5

2: THE SPX1000 SYSTEM
MEMORY CONFIGURATION
The SPX1000 has a total of 99 internal memory locations.
Locations 1 through 40 are READ-ONLY MEMORY
containing 40 preset effect programs. These locations cannot
be written to or changed in any way. The preset effect
programs contained in memory locations 1 through 40 are:
1.
REV 1 HALL
2.
REV 2 ROOM
3.
REV 3 VOCAL
4.
REV 4 PLATE
5. REVS ECHO ROOM
6.
EARLY REF. 1
7.
EARLY REF. 2
8.
EARLY REF. 3
9.
GATE REVERB
10.
REVERSE GATE
11.
DELAY L,C,R
12.
STEREO ECHO
13. STEREO FLANGE A
14. STEREO FLANGE B
15.
CHORUS
16.
STEREO PHASING
17.
TREMOLO
18.
SYMPHONIC
19.
ADR-NOISE GATE
20.PITCH CHANGE 1
21.
PITCH CHANGE 2
22.
PITCH CHANGE 3
23.FREEZE 1
24.
FREEZE 2
25.
PAN
26.
TRIGGERED PAN
27.
DISTORTION
28.
MULTI (CHO&REV)
29.
MULTI (SYM+REV)
30.
MULTI (EXC&REV)
3 1.
PLATE + HALL
32. ER + REV
33. ECHO + REV
34. CHORUS + REV
35. PAN + PAN
36.
COMPRESSOR
37. LO LVL EXPANDER
38.
EXCITER
39.
STEREO PITCH
40.
STEREO FREEZE
Locations 41 through 99 are READ/WRITE MEMORY which
can be used to store your own edited versions of the preset
programs.
INPUT MODE AND DIGITAL I/O
CONFIGURATIONS
The SPX1000 offers a choice of input modes as well as analog
and digital input/output configurations, providing
extraordinary flexibility in “adapting” to various systems and
requirements.
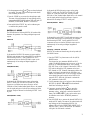
INPUT MODES
The SPX1000 offers the following input modes, regardless of
the selected DIGITAL I/O mode:
STEREO NORMAL
6
This is the normal mode of operation in which left- and right-
channel signals received at the left- and right-channel inputs
are passed on to the SPX1000 processing circuitry on the
same channels as which they were received.
STEREO REVERSE
In this input mode the received left- and right-channel signals
are switched to the opposite channels. The left-channel input
is fed to the right-channel processing circuitry and the right-
channel input signal is fed to the left-channel processing
circuitry.
MONO LEFT
This and the MONO R mode described below are ideal for use
with monaural input signals. In the MONO L mode a
monaural signal received at the INPUT L jack is fed to both
the left- and right-channel processing circuitry.
MONO RIGHT
A monaural signal received at the INPUT R jack is fed to both
the left- and right-channel processing circuitry.
Selecting an Input Mode
Input modes are selected using the utility-mode INPUT
MODE function.
1. Press the UTILITY key twice to call the INPUT MODE
function.

2. Use the parameter select
and
keys to select the desired
input mode. The name of the selected input mode should
now be flashing on the LCD.
3. Press the STORE key to activate the selected input mode.
The name of the selected mode will stop flashing and the
corresponding INPUT MODE indicator LED will light (ST
NORMAL, ST REVERSE, MONO L or MONO R).
4. Press and hold the UTILITY key until its indicator goes
out and the utility mode is exited.
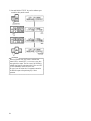
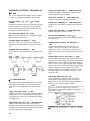
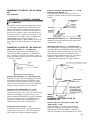
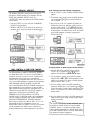
DIGITAL I/O MODES
The SPX1000 has the following DIGITAL I/O modes which
determine the operation of its analog and digital inputs and
outputs.
ANALOG
In this mode the DIGITAL IN connector is inactive and the
SPX1000 receives input via the analog INPUT L and R jacks.
Both the analog OUTPUT L and R and DIGITAL OUT
connectors are active so that the SPX1000’s output can be
simultaneously fed to analog and digital equipment if
required.
PRE(lNSERT PRE)
In this mode the SPX1000 receives input via the analog
INPUT L and R jacks. The DIGITAL IN and OUT jacks
function as a pre-effect insert point, allowing a second
SPX1000 or other Yamaha-format digital device to be inserted
into the signal path prior to both the input selector and effect
processor. Output is delivered via the analog OUTPUT L and
R jacks.
POST(INSERT POST)
In this mode the SPX1000 receives input via the analog
INPUT L and R jacks. The DIGITAL IN and OUT jacks
function as a post-effect insert point, allowing a second
SPX1000 or other Yamaha-format digital device to be inserted
into the signal path after the effect processor. Output is
delivered via the analog OUTPUT L and R jacks.
DIGITAL(DIGlTAL ONLY)
In this mode the analog INPUT L and R jacks are inactive and
the SPX1000 receives input via the DIGITAL IN connector.
Both the analog OUTPUT L and R and DIGITAL OUT
connectors are active so that the SPX1000’s output can be
simultaneously fed to analog and digital equipment if
required.
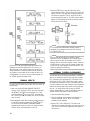
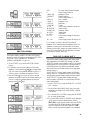
Selecting a DIGITAL l/O Mode
DIGITAL I/O modes are selected using the utility-mode A/D
I/O MODE function.
1. Press the UTILITY key three times to call the A/D I/O
MODE function.
This function has two parameters: MODE and CLK
(clock). The MODE parameter can be set to any of the four
DIGITAL I/O modes described above: ANA (Analog),
PRE, PST (Post), or DIG (Digital). When the DIG, PRE or
PST mode is selected, the CLK parameter can be set to
INT (Internal) or EXT (External), determining whether the
digital clock signal is derived from the SPX1000’s own
internal clock generator (INT) or the clock signal included
in the digital input signal received via the DIGITAL IN
connector (EXT). When the ANA mode is selected the
CLK parameter is fixed at INT.
2. Use the parameter select
and
keys to select the desired
DIGITAL I/O MODE. The name of the selected mode
should now be flashing on the LCD.
3. If necessary, press the PARAM key to move the
underline cursor to the CLK parameter and use the
parameter select
and
keys to select the desired CLK
setting. The SCROLL BACK key can be used to move
the underline cursor back to the MODE parameter if
necessary.
4. Press the STORE key to activate the selected DIGITAL I/O
mode and CLK setting. The name of the selected mode will
stop flashing and the corresponding DIGITAL I/O
indicator LED will light (INSERT PRE, INSERT POST or
DIGITAL ONLY). None of the DIGITAL I/O indicators
will light if the ANA mode is selected.
7

5. Press and hold the UTILITY key until its indicator goes
out and the utility mode is exited.
CAUTION!
When the SPX1000 clock (CLK) mode is switched from
internal (INT) to external (EXT), or vice-versa, a noise pulse
may appear at the outputs. This also occurs if the SPX1000 is
switched from digital to analog input while CLK is set to EXT
(CLK is automatically reset to INT in this case).
Be sure to lower the volume level of equipment connected to
the SPX1000 outputs when performing any of above
operations.
8

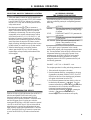
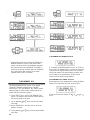
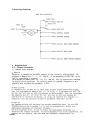
3: GENERAL OPERATION
SELECTING AN EFFECT/MEMORY LOCATION
ACCESSING & EDITING
THE PROGRAM PARAMETERS
1. Effects and memory locations can only be selected when
the utility mode is not active (the UTILITY KEY indicator
is not lit). If the UTILITY key indicator is lit, press and
hold the UTILITY key until its indicator goes out and the
utility mode is exited.
2. Press the program select
or
key to increment or
decrement the memory location number shown on the LED
display. Hold either of these keys down for continuous
incrementing or decrementing. The name of the program
corresponding to the currently selected memory location
will be shown on the LCD, or "*** NO DATA ***" will
be displayed if a memory location between 41 and 99 is
selected into which an edited effect program has not been
stored. Note that at this stage the LED memory number
display is flashing, indicating that although a new location
has been selected, its contents have not yet been recalled.
3. When the desired memory location/effect has been
selected, press the RECALL key. The LED memory
number display will stop flashing and the selected effect
will be engaged.
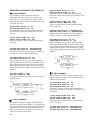
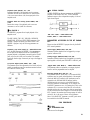
- blink -
BYPASSING THE EFFECT
There are two ways to switch the selected effect in and out: 1)
with the control panel BYPASS switch and 2) with a
footswitch connected to the connector-panel BYPASS
footswitch jack. An optional Yamaha FC5 Footswitch can be
used for foot-bypass control. In either case + when the
control-panel BYPASS key or BYPASS footswitch is pressed
+ the LED in the BYPASS key will light to indicate that the
selected program is currently being bypassed and the input
signal is directly routed to the output terminals (i.e. the effect
is OFF). Press the BYPASS key or footswitch a second time
to turn off the BYPASS Key LED and turn the effect back
ON.
Each SPX1000 program has 4 different groups of parameters
which are accessed by pressing the corresponding parameter
select keys:
KEY ACCESSES
PARAM The main effect parameters for each program.
These parameters will vary according the type
of program.
LEVEL The BALANCE and OUT LVL parameters for
each program.
The equalization or dynamic filter parameters
for each program.
EQ
INT. PARAM. Special "fine control" parameters for each
program. These parameters will vary
according to the type of program.
To call a specific group of parameters for the currently
selected effect program, press the appropriate parameter select
key. The next parameter within the group is called each time
the parameter select key for that group is pressed. In any
parameter group, the SCROLL BACK key can be used to
scroll backwards through the parameters. For example,
subsequent presses on the LEVEL parameter select key call
the following parameters:
BALANCE -> OUT LVL -> BALANCE -> etc.
The complete procedure for calling and editing parameters is:
1. Select and recall the program to be edited.
2. Press the parameter select key corresponding to the group
of parameters to be edited (PARAM, LEVEL, EQ or INT
PARAM) and the first of the selected group's parameters
will appear on the bottom line of the LCD.
3. Once the desired parameter has been called, its value can
be edited using the parameter
increases (increments) the value while the
(decrements) the value. Either key can be held down for
continuous incrementing or decrementing.
While holding down either the
other key (
decrementing process to be carried out more rapidly.
and
keys. The
key
or
key, pressing the
or
) causes the incrementing or
9
key decreases

3. Press the STORE key to store the edited effect in the
In this way you can go through and edit any number of the
parameters to create the required effect. If, however, you
select and recall a new program without first storing your
edited parameters in a memory location between 41 and 99,
any changes you have made will be lost and will have to be
re-programmed. If you want to keep an edited program, use
the STORE operation described below.
STORING EFFECTS
In order to store an edited effect for later recall you need to do
the following:
1. Make sure that the SPX1000 MEMORY PROTECT
function is OFF. Press the UTILITY key a few times until
the MEMORY PROTECT function appears. If it is ON,
press the parameter key to turn it OFF. Press and hold
the UTILITY key until its indicator goes out and the utility
mode is exited.
2. After editing the effect. select a memory location between
41 and 99 by using the program select
and
keys. Do
not recall the selected memory location. If an edited
program has previously be stored in the selected memory
location. its title will be displayed on the LCD.
10
selected memory location. The title of the effect stored will
appear on the LCD (this may later be edited to create your
own effect title using the UTILITY mode TITLE EDIT
function described on page 31). The LED memory number
display will stop flashing and the stored memory location
will become the active effect.
NOTE:
You CANNOT store edited data to memory locations 1
through 40. If you attempt to do this the LCD will show
“*** READ ONLY ***”.
NOTE:
Once an effect has been stored in a memory location
between 41 and 99, its parameters can be further edited in
the new memory location. Such changes will be lost if a
different effect is selected and recalled, however, unless the
STORE function is used to store the changes. Changes may
be stored to the current memory location number (41 – 99)
simply by pressing the STORE key.
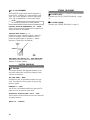
EXTERNAL CONTROL ASSIGNMENT
The SPX1000 allows two different parameters of a selected
effect to be controlled by optional foot controllers (Yamaha
FC7) connected to the front-panel EXT CTRL/FOOT VOL1
and 2 jacks. The EXT CTRL ASSIGN key is used to assign
the desired effect parameters to the foot controllers used, and
to set the required control range. External control assignments
made for an effect program can be stored in the user memory
area (41– 99) along with the effect (using the STORE
function described above), so that the assignments made are
recalled whenever that memory location is selected.
1. Select the desired effect program.
2. Select the parameter to be assigned to an external foot
controller (PARAM, LEVEL, EQ or INT PARAM
parameters can be assigned).
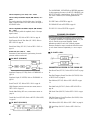
3. Press the EXT CTRL ASSIGN key. The name of the
selected effect program will remain on the upper line of the
LCD, and one of the following parameters will appear on
the lower line:

NOTE:
External control assignments will be lost if a different
memory location is selected without first storing the
assigned effect program into one of the user memory
locations (41 — 99) using the STORE function..
In the actual display, “XXXXXXXX” will be the name of
the default parameter for the selected effect program. The
EXT CTRL ASSIGN key can be used to scroll forward
through the above parameters, and the SCROLL BACK
key can be used to scroll backwards.
4. To assign the selected parameter to the EXT CTRL/FOOT
VOL 1 or EXT CTRL/FOOT VOL 2 controller, use the
EXT CTRL ASSIGN or SCROLL BACK key to call the
“FVOL1 XXXXXXXX” or “FVOL2 XXXXXXXX”
parameter.
5.
Press either the parameter
or
key and the parameter
you called within the selected effect program will be
assigned to the foot controller indicated on the display
(FVOL 1 or FVOL 2).
6. Use the “MIN” and “MAX” parameters for the appropriate
controller to set the control range. If the parameter to be
controlled has a range of 0 to 100%, for example, setting
the MIN parameter to 20 and the MAX parameter to 80
will allow the foot controller to vary the selected parameter
from 20% to 80% of its total range.
NOTE:
Either or both controllers may be assigned. When both
controllers are used, each can be assigned a different
parameter within the selected effect program.
NOTE:
MIDI control change messages received via the MIDI IN
connector can also be used to control assigned parameters.
See “MIDI CTRL ASSIGN” on page 63.
CAUTION!
When setting the range and storing it in the program,
always make sure the preset values for the assigned
parameters are included within the set range.
When setting the range, confirm the values for MIN and
MAX with the controller, and always make sure the preset
values are inside the externally set values.
If the preset values are outside the specified range, there
may be no response to the controller when a recall
operation is carried out.
11

4: THE PROGRAMS & PARAMETERS
PARAMETERS PROVIDED
FOR ALL PROGRAMS
LEVEL PARAMETERS (Accessed via LEVEL key)
Effect/Direct Signal Balance (BALANCE): 0 – 100%
This parameter adjusts the balance between the direct sound
and effect signals. At 100% only the effect sound is delivered
from the SPX1000 outputs, while at 0% only the direct sound
is output. At a setting of 50%, the direct and effect sounds are
output in approximately equal proportions.
Effect Output Level (OUT LVL): 0 – 200%
This parameter sets the overall output level of the effect
program. This is particularly handy for matching levels
between different effects.
2-CHANNEL PROGRAM (PROGRAMS 31 – 35) LEVEL
PARAMETERS
The level parameters available for the 2-channel programs
(programs 3 1
– 35) are the same as those for the other
programs, except that separate parameters are provided for the
left and right channels.
BALANCE 1 = 1 (Left)-channel Balance
BALANCE 2 = 2 (Right)-channel Balance
OUT LVL 1 = 1 (Left)-channel Output Level
OUT LVL 2
= 2 (Right)-channel Output Level
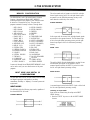
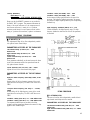
EQ PARAMETERS (Accessed via EQ key)
When the EQ key is pressed, you are presented with three
choices: “OFF” (the default setting), “EQ” (2-band parametric
equalizer mode), or “D.FLT” (Dynamic Filter mode). Use the
parameter
and keys to select the desired mode of
operation. The EQ mode provides 2-band parametric
equalization, while the Dynamic Filter mode provides a filter
which can be automatically swept across a specified frequency
range by the SPX1000’s internal low frequency oscillator or
the level of the input signal.
PARAMETERS AVAILABLE IN THE “EQ"
MODE
Low EQ Peaking or Shelving Response (LOW EQ.):
PEAK, SHLV
High EQ Peaking or Shelving Response (HIGH EQ):
PEAK, SHLV
These parameters determine whether the corresponding band
has a peaking or shelving filter response.
Low EQ Frequency (LOW FRQ): 32 Hz – 2.2 kHz
High EQ Frequency (HIGH FRQ): 500 Hz – 16 kHz
These parameters determine the center frequency for
equalization in the corresponding band. In the shelving mode,
these parameters represent the turn over frequency rather than
the center frequencies.
Low EQ Gain (LOW GAIN): -15 – + 15 dB
High EQ Gain (HIGH GAIN): -15 – + 15 dB
These parameters determine the amount of boost or cut
applied to the corresponding EQ band.
Low EQ Bandwidth (LOW Q): 0.1 – 5.0 (PEAK mode
only)
High EQ Bandwidth (HI Q): 0.1 – 5.0 (PEAK mode
only)
These parameters determine the bandwidth of the
corresponding EQ band. A setting of 5.0 produces the
narrowest bandwidth (sharpest response), and the minimum
setting of 0.1 produces the widest bandwidth (broadest
response). Note that the “Q” parameters for the low and high
bands only function when the corresponding band is set to the
PEAK mode.
PARAMETERS AVAILABLE IN THE “D.FLT”
MODE
Control Type (CTL TYPE): LFO, LEVEL
Determines whether the sweep of the dynamic filter is
controlled by the SPX1000’s LFO (Low Frequency Oscillator)
or the level of the input signal to analog trigger.
12

Filter Type (FLT TYPE): LPF, HPF, BPF, PEQ
Determines the response of the dynamic filter:
LPF = Low Pass Filter
HPF = High Pass Filter
BPF = Band Pass Filter
PEQ = Parametric EQ
Center Frequency (F CENTER): 32 Hz – 16 kHz
Sets the starting center frequency of the dynamic filter.
Frequency Depth (F DEPTH): 0 – 8 octaves
Determines the maximum sweep range of the dynamic filter.
Filter Gain (GAIN): -18, -12, -6, 6, 12, 18 dB (when
FLT TYPE = PEQ only)
Determines the gain of the dynamic filter when the PEQ filter
type is selected. Minus values create a notch response while
positive values create a peaking response.
Bandwidth (Q): LOW, HIGH
Sets the bandwidth of the dynamic filter.
Filter Shift Direction (SHIFT): UP, DOWN
Determines which direction the dynamic filter will sweep in
from the starting point.
Filter Sensitivity (SENSITIVITY): 1 – 10
Adjusts the sensitivity of the dynamic filter. Higher settings
create a greater degree of sweep for the same change in input
level (LEVEL control type).
Filter Decay (DECAY): 1 – 10
Determines the speed at which the dynamic filter will return
to the starting frequency after activation.
Low Frequency Oscillator Frequency (LFO FRQ): 0.1
– 10.0 Hz
Sets the LFO frequency and thus the speed of dynamic filter
sweep when the LFO control type is selected.
2-CHANNEL PROGRAM (PROGRAMS 31 – 35) EQ
PARAMETERS
The EQ parameters for the 2-channel programs (programs 31
– 35) are the same as for the other programs, except that
separate EQ parameters are provided for the left and right
channels when the “EQ” mode is selected.
L LOW EQ = Left-channel Low EQ
L LOW F = Left-channel Low Frequency
L LOW G = Left-channel Low Gain
L LOW Q = Left-channel Low Bandwidth
L HI EQ = Left-channel High EQ
L HI F = Left-channel High Frequency
L HI G - Left-channel High Gain
L HI Q = Left-channel High Bandwidth
R LOW EQ = Right-channel Low EQ
R LOW F = Right-channel Low Frequency
R LOW G = Right-channel Low Gain
R LOW Q = Right-channel Low Bandwidth
R HI EQ = Right-channel High EQ
R HI F = Right-channel High Frequency
R HI G - Right-channel High Gain
R HI Q = Right-channel High Bandwidth
REVERB PROGRAMS
1. REV1 HALL
2. REV2 ROOM
3. REV3 VOCAL
4. REV4 PLATE
5. REV5 ECHO ROOM
Reverberation is the warm musical “ambience” you
experience when listening to music in a hall or other properly-
designed acoustic environment. The SPX1000 offers several
different reverb effects, simulating types of reverberation you
would experience in a hall (REV 1 HALL), in a smaller room
(REV 2 ROOM), a reverb effect ideally suited to vocals (REV
3 VOCAL), the type of reverberation produced artificially by
13

a plate reverberator (REV 4 PLATE), and a special echo room
(REV 5 ECHO ROOM) in which you have extensive control
over the room’s dimensions and other parameters.
PARAMETERS ACCESSED BY THE PARAM KEY
(Except 5. REV5 ECHO ROOM)
Reverb Time (REV TIME):
0.3 – 480 seconds (1 REV1 HALL, 3 REV3 VOCAL)
0.1 –480 seconds (2 REV2 ROOM, 4 REV4 PLATE)
The length of time it takes for the level of reverberation at 1
kHz to decrease by 60 dB + virtually to silence. In a live
setting, this depends on several factors: room size, room
shape, type of reflective surfaces, and others.
High Frequency Reverb Time Ratio (HIGH): 0.1 – 1.0
Natural reverberation varies according to the frequency of the
sound. The higher the frequency, the more sound tends to be
absorbed by walls, furnishings and even air. These two
parameters allow alteration of the high-frequency and low-
frequency reverb times in relation to the overall reverb time.
Diffusion (DIFFUSION): 0 – 10
The complexity of the many reflections that make up
reverberation varies according to the shape of the room and its
contents. In the SPX1000 the term “diffusion” refers to the
complexity of these reflections. If the DIFFUSION parameter
is set to “0,” minimum complexity and therefore a clearer,
more straightforward reverb effect is produced. As the
DIFFUSION value is increased, the complexity of the
reflections increases producing a thicker, richer sound.
Initial Delay (INI DLY): 0.1 – 1000 milliseconds
This represents the time delay between the direct sound of an
instrument in a concert hall and the first of the many
reflections that make up reverberation.
High-pass Filter Frequency (HPF FRQ): THRU, 32 Hz
– 1 kHz
Permits rolling off the low-frequency content of the reverb
signal above the set frequency. The HPF is OFF when set to
THRU.
Low-pass Filter Frequency (LPF FRQ): 1 – 16 kHz,
THRU
Permits rolling off the high-frequency content of the reverb
signal above the set frequency. The LPF is OFF when set to
THRU.
5. REV5 ECHO ROOM
Reverb Time (REV TIME): 0.3 – 480 seconds
The length of time it takes for the level of reverberation at 1
kHz to decrease by 60 dB + virtually to silence. In a live
setting, this depends on several factors: room size, room
shape, type of reflective surfaces, and others.
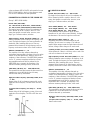
Room Width (WIDTH): 0.5 – 100.0 meters
Room Height (HEIGHT): 0.5 – 100.0 meters
Room Depth (DEPTH): 0.5 – 100.0 meters
These parameters make it possible to specify the main
dimensions of the echo room in meters. Basically, the larger
the dimensions of the room the longer the reverb sound.
Wall Variance (WALL VARY): 0 – 30
Irregularity factor refers to the relationship of the wall
surfaces in the echo room. At a setting of 1 all walls are
parallel. Higher settings increase the angles between the wall
surfaces, causing a distinct change in the reverb sound.
Listening Position (LIS. POSI.): FRONT, CENT., REAR
Allows position the “listener” to the front, center or rear of the
echo room in relation to the source sound.
High Frequency Reverb Time Ratio (HIGH): 0.1 – 1.0
Natural reverberation varies according to the frequency of the
sound. The higher the frequency, the more sound tends to be
absorbed by walls, furnishings and even air. These two
parameters allow alteration of the high-frequency and low-
frequency reverb times in relation to the overall reverb time.
Diffusion (DIFFUSION): 0 – 10
The complexity of the many reflections that make up
reverberation varies according to the shape of the room and its
contents. In the SPX1000 the term “diffusion” refers to the
complexity of these reflections. If the DIFFUSION parameter
is set to “0,” minimum complexity and therefore a clearer,
more straightforward reverb effect is produced. As the
DIFFUSION value is increased, the complexity of the
reflections increases producing a thicker, richer sound.
Initial Delay (INI DLY): 0.1 – 1000 milliseconds
This represents the time delay between the direct sound of an
instrument in a concert hall and the first of the many
reflections that make up reverberation.
High-pass Filter Frequency (HPF FRQ): THRU, 32 Hz
– 1 kHz
Low-pass Filter Frequency (LPF): 1 – 16 kHz, THRU
Same as other reverbs.
14

Width fine: -100 – +100
This sets the value specified with WIDTH as the reference
value (0) and is the parameter for fine adjustment.
Height Fine: -100 – +100
This sets the value specified with HEIGHT as the reference
value (0) and is the parameter for further fine adjustment.
Depth Fine: -100 – +100
This sets the value specified with DEPTH as the reference
value (0) and is the parameter for further fine adjustment.
Wall Vary Fine (W. VARY FINE): -100 – +100
This sets each of the value specified with WIDTH, HEIGHT,
DEPTH, and WALL VARY as the reference value (0) and is
the parameter for further fine adjustment.
W. Decay: RT x 0.1 – 1.0
Among the REV components, this sets the reverberation time
of the REV components specified with WIDTH to a multiplier
value corresponding to the REV TIME. It simulates the
acoustic properties of the side walls.
H. Decay: RT x 0.1 – 1.0
D. Decay: RT x 0.1 – 1.0
In the same way as for W. Decay, this sets a multiplier value
corresponding to REV TIME for reverberation time felt in
relation to the HEIGHT (vertical direction) in the height
direction and that felt for the DEPTH in the front-to-back
direction. It also simulates the acoustic properties of the walls
in the vertical and front-to-back disrections.
PARAMETERS ACCESSED BY THE INT PARAM
KEY
Early Reflection/Reverb Balance (ER/REV BAL.): 0 –
100%
This parameter determines the level balance between the
early-reflection portion and final reverberation portion of the
reverb sound. At 100% only the early-reflection sound will be
produced. At 0% only the final reverberation sound will be
produced. A setting of about 50% produces both the early-
reflection and final reverberation sounds at equal level.
Reverb Delay (REV DLY): 0.1 – 300.0 milliseconds
Sets the delay between the beginning of the early reflections
–
the initial group of sparse reflections that precede the dense
reverb sound
– and the beginning of the reverb sound.
Density (DENSITY): 0 – 4
This parameter determines the density of the reverb
reflections (i.e. the average amount of time between
reflections). A setting of 1 produces minimum reverb density
for a more spacious sound, while a setting of 4 produces the
most dense, “tightest” reverberation.
Trigger Level (TRG. LEVEL): 0 – 100%
Determines the level of the input signal required to trigger
“opening” of the reverb program gate. At 100% only very
high-level input signals will trigger the gate, while at 1% even
the tiniest input signal will trigger the gate.
Trigger Delay (TRG. DLY): -100 – +100 milliseconds
Produces a delay between the time at which the gate is
triggered and that at which it actually opens.
Hold Time (HOLD): 1 – 24,000 milliseconds
Determines how long the gate stays open, allowing the signal
to pass.
Release Time (RELEASE): 3 – 24,000 milliseconds
Determines how long it takes for the gate to close fully after
the HOLD TIME has ended.
Analog Trigger Level (A. TRG LVL): 0 – 100
When an analog signal applied to the rear-panel TRIGGER 2
ANALOG jack is used to trigger the gate, this parameter
determines the level of the input signal required to trigger
“opening” of the reverb program gate. At 100% only very
high-level input signals will trigger the gate, while at 1% even
the tiniest input signal will trigger the gate. When this
function is used the TRG. LEVEL parameter should be set to
the highest value (100%) so that only signals applied to the
TRIGGER 2 ANALOG jack will activate the gate.
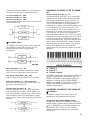
MIDI Trigger (MIDI TRG.): OFF, ON
When this parameter is turned ON, a KEY ON EVENT
message from an external MIDI keyboard can be used to
trigger the gate. A KEY ON EVENT message is transmitted
whenever a note on a MIDI keyboard is played.
NOTE:
This effect can also be triggered by the front-panel
TRIGGER key or a footswitch plugged into the rear-panel
TRIGGER 1 SW jack.
15

EARLY REFLECTION PROGRAMS
6. EARLY REF. 1
7. EARLY REF. 2
8. EARLY REF. 3
9. GATE REVERB
10. REVERSE GATE
These effects are created using different groupings of “early
reflections” –
the first cluster of reflections that occurs after
the direct sound but before the dense reflections that are
known as reverberation begin.
PARAMETERS ACCESSED BY THE PARAM KEY
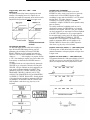
Early Reflection Pattern Type (TYPE):
EARLY REF. 1 & 2: S-HALL, L-HALL, RANDOM,
REVERSE, PLATE, SPRING
EARLY REF. 3: USER-A, USER-B, USER-C,
USER-D
GATE REVERB & REVERSE GATE: TYPE A,
TYPE B
In the EARLY REF. 1 and EARLY REF. 2 programs the
TYPE parameter selects one of six different patterns of early
reflections. S-HALL produces a typical grouping of early
reflections that would occur in a performing environment such
as a small hall. L-HALL simulates the early reflection pattern
of a larger hall. RANDOM produces an irregular series of
reflections that could not occur naturally. REVERSE
generates a series of reflections that increase in level – like
the effect produced by playing a recorded reverberation sound
backwards. PLATE produces a typical grouping of reflections
that would occur in a plate reverb unit, and SPRING produces
the same for spring type reverb unit.
In the EARLY REF. 3 program the TYPE parameter selects
one of the four user-programmed early reflection patterns:
USER-A, USER-B, USER-C or USER-D. The USER early
reflection patterns are programmed using the utility-mode
“USER ER EDIT” function (see “USER ER EDIT” on page
31 for details).
In the GATE REVERB and REVERSE GATE programs the
TYPE parameter selects either TYPE-A or TYPE-B.
Room Size (ROOM SIZE): 0.1 – 25
This parameter sets the time intervals between the early
reflections + a feature of natural early reflections which is
directly proportional to the size of the room.
Liveness (LIVENESS): 0 – 10
“Liveness” refers to the rate at which the reflected sounds
fade. An acoustically “dead” room is simulated by setting this
parameter to zero. Increasing the value of this parameter
creates an increasingly “live” sound, simulating an increasing
area of reflective surfaces in the room.
16
Diffusion (DIFFUSION): 0 – 10
The complexity of the many reflections that make up
reverberation varies according to the shape of the room and its
contents. In the SPX1000 the term “diffusion” refers to the
complexity of these reflections. If the DIFFUSION parameter
is set to “0,” minimum complexity and therefore a clearer,
more straightforward early reflection effect is produced. As
the DIFFUSION value is increased, the complexity of the
reflections increases producing a thicker, richer sound.
Initial Delay (INI DLY): 0.1 – 1000 milliseconds
Initial delay is the time between the beginning of the direct
sound and the beginning of the early reflections.
High-pass Filter Frequency (HPF FRQ): THRU, 32 Hz
– 1 kHz
Permits rolling off the low-frequency content of the reverb
signal above the set frequency. The HPF is OFF when set to
THRU.
Low-pass Filter Frequency (LPF FRQ): 1 – 16 kHz,
THRU
Permits rolling off the high-frequency content of the reverb
signal above the set frequency. The LPF is OFF when set to
THRU.
PARAMETERS ACCESSED BY THE INT PARAM
KEY
Number of Early Reflections (ER NUMBER): 1 – 19
This parameter directly sets the number of early reflections
produced from 1 to 19.
Feedback Delay (FB DELAY): 0.1 – 26000
milliseconds
Feedback Gain (FB GAIN): -99 – +99%
Feedback High-frequency Ratio (FB HIGH): 0.1 – 1.0
The feedback parameters permit thickening and/or extending
the early reflection sound. Feedback causes the early
reflections to generate more early reflections of themselves,
thus the FB GAIN parameter determines how many times (for
how long) the early reflections are repeated. The FB DELAY
parameter sets a delay time between the beginning of the
original early-reflections and the first of the repeats caused by
feedback. Shorter FB DELAY times simply thicken the early-
reflection sound, while longer FB DELAY times can create
extended or repeated early reflection effects. FB HIGH
determines how much of the high-frequency content of the
original early reflections is fed back. The lower the setting,
the less of the original high frequencies are fed back. This
causes a gradual decrease in high frequency content at each
repeat.

Density (DENSITY):
EARLYREF.2: 1 – 3
EARLY REF. 3, GATE REVERB, REVERSE GATE
:
Please note that the DENSITY parameter is not provided in
the EARLY REF. 1 program. This parameter determines the
density of the reverb reflections (i.e. the average amount of
time between reflections). A setting of 0 or 1 produces
minimum reverb density for a more spacious sound, while a
setting of 3 produces the most dense, “tightest” reverberation.
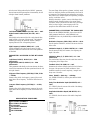
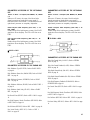
DELAY PROGRAM
11. DELAY L,C,R
This sophisticated delay effect offers independently variable
left, right and center channel delays.
PARAMETERS ACCESSED BY THE PARAM KEY
Left Channel Delay (Lch DLY): 0.1 – 5200
milliseconds
Right Channel Delay (Rch DLY): 0.1 – 5200
milliseconds
Center Channel Delay (Cch DLY): 0.1 – 5200
milliseconds
These parameters individually set the time between the direct
sound of the instrument and the first repeat heard from the
left, right and center channels.
Center Channel Level (Cch LVL): -200 – +200%
Adjusts the level of the center-channel delay signal.
PARAMETERS ACCESSED BY THE INT PARAM
KEY
High-pass Filter Frequency (HPF FRQ): THRU, 32 Hz
–1kHz
Permits rolling off the low-frequency content of the reverb
signal above the set frequency. The HPF is OFF when set to
THRU.
Low-pass Filter Frequency (LPF FRQ):
1 – 16 kHz,
THRU
Permits rolling off the high-frequency content of the reverb
signal above the set frequency. The LPF is OFF when set to
THRU.
Feedback 1 Delay (FB1 DLY): 0.1 – 5200 milliseconds
Feedback 2 Delay (FB2 DLY): 0.1 – 5200 milliseconds
Two separate feedback loops are provided in the delay
program, and these parameters determine the amount of delay
applied to each feedback signal.
Feedback 1 Gain (FB1 GAIN): -99% – +99%
Feedback 2 Gain (FB2 GAIN): -99% – +99%
Set the amount of delay signal fed back to the input of the
processor. The higher the feedback gain setting, the greater
the number of delayed repeats produced by the corresponding
feedback loop.
High Frequency Feedback (HIGH): x0.1 – x1.0
Controls feedback in the high-frequency range. The high-
frequency feedback is reduced as the value of this parameter
is decreased.
ECHO PROGRAM
12. STEREO ECHO
The stereo echo effect offers independently variable left and
right channel initial delays and echo intervals.
PARAMETERS ACCESSED BY THE PARAM KEY
Left Channel Feedback Delay (LFB DLY): 0.1 – 2600
milliseconds
Right Channel Feedback Delay (RFB DLY): 0.1 – 26000
milliseconds
17
0—3
Strona się ładuje...
Strona się ładuje...
Strona się ładuje...
Strona się ładuje...
Strona się ładuje...
Strona się ładuje...
Strona się ładuje...
Strona się ładuje...
Strona się ładuje...
Strona się ładuje...
Strona się ładuje...
Strona się ładuje...
Strona się ładuje...
Strona się ładuje...
Strona się ładuje...
Strona się ładuje...
Strona się ładuje...
Strona się ładuje...
Strona się ładuje...
Strona się ładuje...
Strona się ładuje...
Strona się ładuje...
Strona się ładuje...
Strona się ładuje...
Strona się ładuje...
Strona się ładuje...
Strona się ładuje...
Strona się ładuje...
Strona się ładuje...
Strona się ładuje...
Strona się ładuje...
Strona się ładuje...
Strona się ładuje...
Strona się ładuje...
Strona się ładuje...
Strona się ładuje...
Strona się ładuje...
Strona się ładuje...
Strona się ładuje...
Strona się ładuje...
Strona się ładuje...
Strona się ładuje...
Strona się ładuje...
Strona się ładuje...
Strona się ładuje...
Strona się ładuje...
Strona się ładuje...
Strona się ładuje...
Strona się ładuje...
Strona się ładuje...
Strona się ładuje...
Strona się ładuje...
Strona się ładuje...
Strona się ładuje...
Strona się ładuje...
Strona się ładuje...
Strona się ładuje...
Strona się ładuje...
Strona się ładuje...
-
 1
1
-
 2
2
-
 3
3
-
 4
4
-
 5
5
-
 6
6
-
 7
7
-
 8
8
-
 9
9
-
 10
10
-
 11
11
-
 12
12
-
 13
13
-
 14
14
-
 15
15
-
 16
16
-
 17
17
-
 18
18
-
 19
19
-
 20
20
-
 21
21
-
 22
22
-
 23
23
-
 24
24
-
 25
25
-
 26
26
-
 27
27
-
 28
28
-
 29
29
-
 30
30
-
 31
31
-
 32
32
-
 33
33
-
 34
34
-
 35
35
-
 36
36
-
 37
37
-
 38
38
-
 39
39
-
 40
40
-
 41
41
-
 42
42
-
 43
43
-
 44
44
-
 45
45
-
 46
46
-
 47
47
-
 48
48
-
 49
49
-
 50
50
-
 51
51
-
 52
52
-
 53
53
-
 54
54
-
 55
55
-
 56
56
-
 57
57
-
 58
58
-
 59
59
-
 60
60
-
 61
61
-
 62
62
-
 63
63
-
 64
64
-
 65
65
-
 66
66
-
 67
67
-
 68
68
-
 69
69
-
 70
70
-
 71
71
-
 72
72
-
 73
73
-
 74
74
-
 75
75
-
 76
76
-
 77
77
-
 78
78
-
 79
79


Yamaha SPX1000 Instrukcja obsługi
- Kategoria
- Procesory
- Typ
- Instrukcja obsługi
w innych językach
- čeština: Yamaha SPX1000 Návod k obsluze
- español: Yamaha SPX1000 El manual del propietario
- italiano: Yamaha SPX1000 Manuale del proprietario
- Deutsch: Yamaha SPX1000 Bedienungsanleitung
- svenska: Yamaha SPX1000 Bruksanvisning
- português: Yamaha SPX1000 Manual do proprietário
- français: Yamaha SPX1000 Le manuel du propriétaire
- 日本語: Yamaha SPX1000 取扱説明書
- Türkçe: Yamaha SPX1000 El kitabı
- English: Yamaha SPX1000 Owner's manual
- dansk: Yamaha SPX1000 Brugervejledning
- русский: Yamaha SPX1000 Инструкция по применению
- Nederlands: Yamaha SPX1000 de handleiding
- română: Yamaha SPX1000 Manualul proprietarului
Powiązane artykuły
-
Yamaha FX500B Instrukcja obsługi
-
-
-
-
-
-
-
-
-
