
E-LINGE
OTICE
LISATION
OPERA
INSTRUCTIONS
LAVADORA
MANUAL
DE INSTRUCCIONES
MÁQUINA
DE LAVAR ROUPA
MANUAL
DE INSTRUÇÕES
VATRICE
TRUZIONI
ER L'USO
ΥΝΤΗΡΙΟΠΛΥΝΤΗΡΙΟ
ΟΥΧΩΝΡΟΥΧΩΝ
Ο∆ΗΓΙΕΣ
ΧΡΗΣΕΩΣ
PRALKA
INSTREUKCJA
OBSLUGI
AUTOMATICKÁ
PRACKA
NÁVOD
K OBSLUZE
AUTOMATICKÁ
PRÁCKA
NÁVOD
NA OBSLUHU
LAVE-LINGE
NOTICE
D'UTILISATION
WASHING MACHINE
OPERATING
INSTRUCTIONS
WÄSCHMASCHINE
GEBRAUCHSANWEISUNG
WASMAC
GEBRUIKSAA
LAVADORA
MANUAL
DE INSTRUCCIONES
MÁQU
DE LAVAR
MAN
DE INST
LAVATRICE
ISTRUZIONI
ER L'USO
ΠΛΥΝΤΗΡΙΟ
ΡΟΥΧΩΝ
Ο∆ΗΓΙΕΣ
ΧΡΗΣΕΩΣ
PRALKA
INSTREUKCJA
OBSLUGI
AUTOM
PR
OMATICKÁ
LAVE-LINGE
NOTICE
D'UTILISATION
WASHING MACHINE
OPERATING
INSTRUCTIONS
WÄSCHMASCHINE
GEBRAUCHSANWEISUNG
WASMACHIN
GEBRUIKSAANWIJ
LAVADORA
MANUAL
DE INSTRUCCIONES
MÁQUINA
DE LAVAR RO
MANUAL
DE INSTRUÇ
LAVATRICE
ISTRUZIONI
PER L'USO
ΠΛΥΝΤΗΡΙΟ
ΡΟΥΧΩΝ
Ο∆ΗΓΙΕΣ
ΧΡΗΣΕΩΣ
PRALKA
INSTREUKCJA
OBSLUGI
AUTOMATI
PRACK
NÁVOD
K OBSLU
AUTOMATICKÁ
PRÁCKA
NÁVOD
NA OBSLUHU

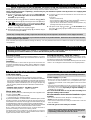
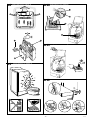
- B -
D1
explications en page 3
D2
explications en page 3
D3
explications en page 3
D4
explications en page 3
D5
explications en page 3
D6
explications en page 3
D7
explications en page 3
13
1
1
2
2
a
b
a
b
➀
➁
➀
➁
➃
➂
R°C05B

- C -
V°C04C
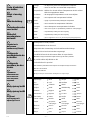
Code d’entretien
des textiles
Fabric cleaning
code
Waschanleitung
Onderhoudscodes
voor textiel
Simboli di
manutenzione
dei tessili
Objaśnienia
dotyczace
konserwacji tkanin
Codigos de
mantenimiento de
los textiles
Códigos de
manutenção dos
têxteis
Ycoe
ooae
a eax
ecx
e
Kódy úpravy textílií
Kódy úpravy textílií
Κωδικοί
καθαρισµού
υφασµάτων
GR
CZ
SK
RUS
P
E
PL
I
NL
D
GB
F
cl
95
Lavage : ne dépassez jamais les températures indiquées
Wash : never exceed the recommended temperatures
Hauptwäsche : Wählen Sie niemals höhere Temperaturen als die auf der
Wäsche angegebenen Werte
Hoofdwas : de aangegeven temperaturen nooit overschrijden
Lavaggio : non superare mai le temperature indicate
Pranie : nigdy nie przekraczać podanych temperatur
Lavado : nunca exceda las temperaturas indicadas
Lavagem : nunca ultrapassar as temperaturas indicadas
Cpa : oe cyae e pea yaae eepayp
Pranie : neprekračujte nikdy uvedené teploty
Praní : nepřekračujte nikdy uvedené teploty
Πλύση : µην υπερβαίνετε ποτέ τις συνιστώµενες θερµοκρασίες
Chlorage dilué à froid possible
Cold diluted bleach can be used
Möglichkeit der Verwendung von kalt verdünnter Bleichlauge
Verdund chloor kan koud worden toegevoegd
Possibilità di inserire lo sbiancante diluito in acqua fredda
Możliwość użycia chlorku rozpuszczonego w zimnej wodzie
Es posible utilizar lejía diluida en frío
Lixívia diluída a frio possível
Oeae paaeo xopo xooo oe ooo
Bielenie za studena
Bělení za studena
Χρησιµοποιήστε λευκαντικό διαλυµένο σε κρύο νερό
Repassage : doux moyen fort
Iron : cold medium hot
Bügeln : schwach mittel stark
Strijken : zacht middelmatig sterk
Stiratura : leggera media forte
Prasowanie : łagodne średnie gorące
Planchado : suave medio fuerte
Passar a ferro : brando médi forte
a : yepea cpe coa
eepaypa eepaypa eepaypa
Žehlenie : mierne stredné silné
Žehlení : mírné střední silné
Σίδερο : κρύο µέτριο δυνατό

- D -
F
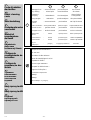
Nettoyage à sec : essence minérale perchloréthylène tous solvants
Dry-cleaning : mineral spirit hexachlorethane all solvents
Chemische
: Mineralbenzin Perchlorethyleen
allgem. übliche
Reinigung Lösungsmittel
Droog reinigen : wasbenzine perchloorethyleen alle oplosmiddelen
Lavaggio
: essenza minerale percloretilene tutti i tipi di solventi
a secco
Pranie chemiczne : benzyna mineralna perchloroetylen rozpuszczalniki różne
Lavado en seco : gasolina mineral percloretileno todos los solventes
Lavagem a seco : essência mineral percloretileno todos os solventes
Xeca
: e epxope e pacope
ca
Suché čistenie : benzin perchloretylén ostatné rozpúšťadlá
Suché čistění : benzín perchloretylen ostatní rozpouštědla
Στεγνό
: βενζίνη τετραχλωροαιθυλένιο διαλυτικό
καθάρισµα
Respectez les interdictions !
Do not use !
Beachten Sie die Verbote !
Neem de aanwijzingen in acht !
Rispettare i divieti !
Przestrzegać zakazów !
Respete las indicaciones !
Seguir as indicações !
Coae apee!
Zákazy !
Zákazy !
Ακολουθήστε τις οδηγίες
A
P
F
V°C04D
Code d’entretien
des textiles
Fabric cleaning
code
Waschanleitung
Onderhoudscodes
voor textiel
Simboli di
manutenzione
dei tessili
Objaśnienia
dotyczace
konserwacji tkanin
Codigos de
mantenimiento de
los textiles
Códigos de
manutenção dos
têxteis
Ycoe
ooae
a eax
ecx
e
Kódy úpravy textílií
Kódy úpravy textílií
Κωδικοί
καθαρισµού
υφασµάτων
GR
CZ
SK
RUS
P
E
PL
I
NL
D
GB
F

- 1 -
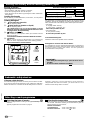
Machine location
If you locate your machine next to another appliance or an item
of furniture, you should leave space between them to allow air
to circulate.
Levelling :
Use a spirit level to check that the ground is horizontal: the
maximum allowable slope is 2° which gives a difference in height
of about 1 cm across the width of the machine and 1.5 cm from
front to rear.
Moving the machine - using the castors :
If your machine is fitted with folding castors, it is easy to move.
To extend the castors, move the lever at the bottom of the
machine from right to left (Diagram D4).
The machine should not be used while standing on its two "front"
castors : do not forget to return the lever to its original position.
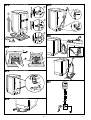
BEFORE ATTEMPTING TO USE THE MACHINE, YOU MUST FOLLOW THE PROCEDURE DESCRIBED BELOW
These operations involve removing the metal transit bracket and the blocks which immobilise the tank of your machine during the
transportation, as well as the supports which hold up the hoses and the electric cable.
These operations, known as "unpacking", are necessary for your machine to operate correctly and also for complying with
current safety standards.
Please keep carefully all the packing components because they must be replaced if the machine is to be shipped elsewhere
All these parts and the components of your machine are made of recyclable materials. Please bear this in mind when the time
comes to dispose of your machine
1 - Remove the washing machine from its base (check that the
block
훽
that retains the motor is not stuck under the
machine) (Diagram D1.
➀)
2 - Remove the four screws
훾
with a screwdriver (Diagram D1.➁)
3 - Remove the bracket
훿
by removing the two bolts
with a
or spanner (depending on the model) (Diagram D1.
➂)
(Make sure that the two plastic spacers attached to the
bar are removed at the same time).
Replace screws
훾
in their original position.
4 - Blank off the two holes using the plugs
provided (in bag of
accessories) (Diagram D1.
➃)
5 - Remove the block that immobilises the drum and tub
(Diagram D2).
To do this :
- raise the machine lid;
- if your machine comes with a packing wedge
, remove it;
- remove the block
by rotating it through 90°;
- open the doors of the drum, locked in the low position, by
pushing both flaps at the same time.
6 - Lift up the hoses support clamps
➀
and do not fall to block
the holes using plugs
➁
(provided in the accessories bag)
(Diagram D3).
1310
We advise against installing your machine on a carpeted floor. If this is unavoidable, take all precautions to avoid
preventing air circulation at the base, to ensure that the internal parts are well ventilated.
Cold water supply
Connect up the hose (Diagram D5) :
- connect one end to the union at the back of the machine;
- connect the other end to a tap fitted with a threaded end diameter
20 x 27 mm (3/4 BSP), not forgetting to insert the seal supplied in
the bag of accessories (Important: with some models, this hose
already has a rubber seal fitted). If you are using a self-piercing
tap, the opening made should have a diameter of at least 6 mm.
Water inlet :
- Minimum water pressure : 0.07 MPa or 0.7 bars
- Maximum water pressure : 1 MPa or 10 bars
Waste water drain
Connect up the drain hose, after fitting the hook supplied in the
machine (Diagram D6) :
• either temporarily into a sink or bath
• or permanently to a ventilated siphon.
If your drain installation is not fitted with a ventilated siphon, ensure
that the connection is not airtight. In order to avoid any build-up of
waste water in the machine, we strongly recommend that an air gap
be left between the drain hose of the machine and the drainpipe.
In these circumstances, the hooked end of the drain hose should
be between 90 and 65 cm above the bottom of the machine.
Note : make sure that the drain hose is securely attached to
prevent it releasing in service and causing a flood.
The waste water can be drained on to the ground, so long as
the drain hose passes through a point between 90 and 65 cm
higher than the bottom of the machine.
Power supply (Diagram D7)
• Before you connect the appliance, it is essential to check that
its electrical characteristics are compatible with your
installation (see details on the rating plate on the back of the
appliance).
• The electrical installation must be compliant with current
standards and the requirements of the Electrical Authorities in
the country concerned, especially as regards earthing and
installation in a bathroom.
We cannot be held liable for any incident resulting from
improper earthing of the machine.
Recommendations for the electrical installation of your
machine.
• Do not use extension leads, adaptors or multiple plugs ;
• Never remove the earth connection ;
• The socket outlet must be readily accessible but out of the
reach of children.
If in doubt, get in touch with your installer
For your own safety, please follow the following instructions
Your machine complies with European directives EEC/73/23
(electrical safety) and EEC/89/336 (electromagnetic
compatibility), amended by directive EEC/93/68.
Unpacking your machine
see diagrams page B D1-D2-D3
Your machine was inspected before leaving the factory. You may therefore find traces of water in the tank or in the detergent
compartment
Installing the machine see diagram page B D4
Connecting up your machine see diagrams page B D5-D6-D7
GB12-1
GB
55955-01 0501

55955-01 0501
- 2 -
Selecting a wash programme
Selecting the type of laundry
__________
Select a programme according to the type of laundry to be
washed.
Typical programmes are shown on page 3.
Selecting the temperature
______________
Select the most appropriate temperature for the clothes to
be washed. Follow the washing recommendations given on
labels attached to most articles.
WHITES-COLOUREDS
and SYNTHETICS : from "cold" to 60°C
DELICATE and WOOL : from "cold" to 30°C
21
Automatic safety devices
Lid open safety devices :
Once the washing cycle starts, the lid of your machine is locked.
If you want to open the lid during the cycle, release the "ON-OFF"
button and wait 2 or 3 minutes for the lid safety device to unlock.
Lid open safety devices :
Similarly, when the cycle has finished or if the machine is
stopped with the tank full of water, you must wait for 2 or 3
minutes for the safety device to unlock.
GB2041-2
GB
Amount of detergent to be used
140 ml
180 ml
pre-wash
main wash
Normal washing powders
Liquid detergents
300 ml
Proceed as follows :
Opening the machine
• Ensure that the "ON-OFF" button is released ;
• Raise the opening handle. The lid will open.
• Open the doors of the drum by pushing the button situated on
the front flap.
Loading the laundry
Put the laundry, sorted beforehand, in the drum ; do not push it
down, and distribute it evenly.
Loading detergent
➀
- Pre-wash tray (powder)
See the adjoining table
➁
- Main wash tray (powder or liquid)
See the adjoining table.
The ”
MAIN WASH” tray can receive powder or liquid
detergent ; however, liquid detergent should not be used
for programmes
WITH prewashing.
➂
- Fabric conditioner
The conditioner is designed to make your clothes soft and
pleasant smelling.
Concentrated conditioner should be diluted in hot water.
➃
- Bleach
Bleach can be used as a disinfectant or as a bleaching
agent. Its action supplements that of the washing powder.
Concentrated bleach must be diluted.
cl
We recommend that you use the graduated beaker provided with most
washing products for measuring out your detergent.
Loading the laundry and the washing powder/liquid
Concentrated detergents
Follow the instructions printed on the container.
The quantities recommended above refer to normal washing
conditions and may be modified according to the hardness of the
water, the dirt level of the laundry and if certain options are fitted :
• Soft water
or "slightly soiled" laundry
or "quick wash", "half load", etc.:
reduce the quantities by 10%
• Very hard water
or "very soiled" laundry :
increase the quantities by 10%.
IMPORTANT :
- when filling the detergent trays, open the lid as far as
possible ;
- do not exceed the maximum level (MAX
).
Detergents for woollens and delicate fabrics
It is advisable to use the appropriate detergent for washing of
those textiles (do not let it come into direct contact with the drum
as some products attack the metal). Use the quantities
recommended on the package.
WASHING
POWDER
WASHING
LIQUID
➀➁ ➃➂

55955-01 0501
- 3 -
12
11
1
2
3
4
5
6
7
8
9
10
P
5
30
4
40
6
1
50
1
60
2
60
50
3
12
11
10
30
8
7
1/2
9
500 r.p.m.
WASHER
50˚
60˚
40˚
30˚
1 2
43 5
Half-load
______________________________
Mainly used for reduced loads of washing, from 1 to 3 kg.
Considerable savings in water are therefore made.
Full drum stop
__________________________
This function is intended for articles you don't want to spin-
dry or if you expect to be absent when the programme
comes to an end.
When this button is selected, the cycle is interrupted before
final spinning, allowing your washing to float in water to
avoid creasing. Then :
- if you want draining with spinning : release this button. the
programme terminates automatically.
- if you simply want to drain your washing : turn knob to
position "9" and release the button.
On / Off
________________________________
Check that the power cable is plugged in and the water inlet
tap open.
Programme your machine and then press in the "ON-OFF"
button.
The washing cycle begins.
Do not start the machine unless the drum loading doors and
the machine lid are properly closed.
On completion of the cycle, switch off the machine by
releasing the "ON-OFF" button.
You can then open the lid and remove your laundry.
You should also release any other buttons you have selected.
As a safety measure, you should unplug the power cable and
close the water inlet valve.
5
1
4
3
02 : 1541
60
60
50
50
40
30
30
02 : 0042
02 : 1541
01 : 553
01 : 454
4
4
4
4
01 : 30
1
3
1
5
01 : 056
00 : 207
00 : 158
00 : 4510
00 : 1011
00 : 059
00 : 0512
or
ARRÊT
MARCHE
KEY
DEPRESSED
KEY
RELEASED
OFF
ON
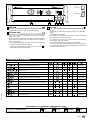
Programme examples
”Delicate and wool” cycle : maximum load 1 kg
Heavily soiled whites with pre-wash
Soiled whites
Heavily soiled coloureds and synthetics
with pre-wash
Soiled coloureds and synthetics
Soiled coloureds and synthetics
Slightly soiled coloureds and synthetics
Delicate coloureds and synthetics
Rinsing spinning whites, coloureds and synthetics
Spinning whites, coloureds and synthetics
Delicate and wool
Rinsing spinning delicate
Spinning delicate
Draining
Programme 2 : Soiled whites 60° 5 kg 02 : 00 1.40 kWh 74 l
WATERPOWERDURATIONLOAD
PROGRAMME FOR STANDARDISED COMPARATIVE TESTING
For the message on the energy label, the tests are carried out in accordance with European Directive 92/75/CEE, at nominal capacity, ensuring total use of CEI detergent from the start of the
washing phase.
GB3041-1
GB

- 4 -
55955-01 0501
Routine maintenance
See diagrams page E D8-D9-D11
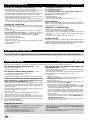
Cleaning the detergent compartment (Diagram D8)
Clean the detergent compartment regularly. To do this :
- Press simultaneously on the bosses at either side of the
compartment, causing it to spring out of its housing.
- Remove the siphon tubes
behind the detergent compartment
and separate the compartment
from the front cover
- Rinse all parts under the tap (take care to remove any excess
water remaining inside the compartment).
- Replace all parts of the detergent compartment making sure
that the actual compartment part is correctly clipped into the
cover part, then put back the assembly under the machine lid.
Cleaning the “debris trap”
This clever system traps any small debris you might have
overlooked in the clothes and prevents it from damaging the
pump.
To clean the trap :
- remove part
(see procedure in the chapter on "Incidents ...:
the machine does not empty ..."). Then rotate the drum
slightly with the flaps open, towards the front of the machine.
You then have access to the "debris trap" (Diagram D11)
- remove it from its housing ;
- remove any items from the inside ;
- rinse it under the tap ;
- replace it, pushing it firmly into its housing after first checking
that the housing is clean ;
- refit part
.
Cleaning the machine (Diagram D9).
For cleaning the surfaces:
use only soap and water.
For cleaning all plastics parts (control panels, plinth, etc.) :
use only a cloth moistened with water.
Do not use any of the following :
• abrasive powders
• metal or plastic scrubbers
• alcohol-based substances (alcohol, thinners, etc.)
Risk of freezing
If there is a risk of freezing, disconnect the water inlet hose and
empty out any water remaining in the drain hose by placing this
as low as possible in a sink.
Maintenance of internal parts
In the interests of hygiene (e.g. to prevent mould):
• leaving the lid open for a time after washing ;
• every month or so, clean the plastic and rubber parts around
the tub access using a slightly chlorinated product. Rinse
thoroughly ;
• do a wash cycle at 90° at least once a month.
Periodic checks
You should check the condition of the water inlet and drain
hoses. If you find any splits in the hoses, however minor, do not
hesitate to replace them by identical hoses that can be obtained
from the manufacturer or the after-sales service.
Replacing the power lead
Possible incidents See diagrams page E D10-D12
Incidents may occasionally occur when you are using your washing machine : if so, check the following points.
The washing machine does not work - check :
• water and power supplies ;
• that the lid is closed.
The machine vibrates when spinning - check :
• the machine has been properly unpacked ;
• that the ground is horizontal ;
• that the washing machine is not standing on its two "front" castors.
There is water on the floor near the washing machine
(VERY IMPORTANT: unplug the machine from the power
socket or remove the individual fuse) - check :
• that the drain hose hook fitting is properly positioned in the drain
• the seal on the water inlet hose or tap (check that the seals are
present and that the hose connectors on the machine and on
the tap are tight).
There may also be water on the ground near the machine if your
machine is producing too much suds.
In this case check :
- that you have in fact used a MACHINE washing product ;
- that you have not used too much detergent.
In these two cases, after mopping up the water, plug in the power
lead again, programme an emptying operation if your machine
can do this (if not, proceed as indicated at the foot of the page),
then carry out several rinses.
Finally, restart your programme.
The machine does not empty or the clothes are
not properly spun -
check :
• that you have not programmed a function that prevents spinning
(for example, full drum stop) ;
• that the bottom of the tank is not blocked by some small item of
laundry (for example, a handkerchief, sock, etc.).
In this case :
- unplug the machine ;
- remove as much water as possible using the drain spout (see
"Emptying the machine" at the foot of the page)
- remove the washing ;
- rotate the drum so that the closed flaps are at the bottom : you
will see a plastic part
(Diagram D10)
• if it is fitted on your machine, remove screw
;
• on some types of machine, part
is provided with a clip
.
If this is the case, unlock part
by applying pressure to the
clip while gently slinding it to the right ;
• then, in all instances : turn the drum again, open the doors
and remove part
by sliding it in the direction of the arrow ;
• remove whatever is in the bottom of the tub through the holes
now accessible.
Take the opportunity to clean the "debris trap" at the bottom
of the tub (see procedure in the chapter "Maintenance ...:
cleaning the debris trap").
• refit the plastic part and bolt
by following the above
procedure in the reverse order.
Emptying the machine
If, after an incident, you have to empty the machine, proceed as
follows (Diagram D12) :
- open the door
➀
at the front of the machine. To do this :
• insert a screwdriver as indicated on the diagram
• detach the door by pressing to the left
- pull on yellow plug
➁
to release the drain spout.
- separate the plug from the spout
➂
and allow the water to flow
into a container placed for the purpose (be careful of the
water temperature).
When emptying is complete, refit the spout by following the
above procedure in the reverse order.
If you ever need to change the lead, call in a qualified tradesman approved for your make of machine.
GB42-1
GB

- E -
D8
explications en page 3
+
S
A
V
O
N
E
A
U
D9
explications en page 3
D12
explications en page 3
D11
explications en page 3
➀
➁
➂
V°C04E
D10
explications en page 3
H
K
K
L
M

Service après vente :
Les éventuelles interventions sur votre appareil doivent être effectuées :
- soit par votre revendeur,
- soit par un autre professionnel qualifié dépositaire de la marque.
Lors de votre appel, mentionnez la référence complète de votre appareil (modèle, type et numéro de série). Ces renseignements figurent sur la plaque
signalétique fixée au dos de l’appareil.
After Sales Service :
Possible maintenance on your washing machine should be undertaken by :
- either your dealer,
- or another qualified mechanic who is an authorized agent for the brand appliances.
When making an appointment, state the complete reference of your equipment (model, type and serial number). This information appears on the
manufacturer's nameplate attached to the rear of the equipment.
Kundendienst:
Eingriffe an Ihrem Gerät dürfen nur :
- von Ihrem Händler oder,
- von einem sonstigen Fachmann und Vertragshändler der Marke durchgeführt werden.
Geben Sie bei der Meldung einer Störung die vollständige Typenbezeichnung Ihres Gerätes an (Modell, typ, Seriennummer). Diese Angaben sind auf
einem Schild auf der Hinterseite des Gerätes markiert.
Afdeling service :
De eventuele interventies in de machine moeten worden uitgevoerd :
- of door uw vakhandelaar,
- of door een andere professioneel van dit merk.
Tijdens het telefoneren, dient u de complete referentie op te geven van uw machine (model, type, serienummer). Deze informatie staat op het
typeplaatje aan de achterkant van de machine.
F
Servizio Assistenza :
Gli interventi eventuali sul vostro apparecchio devono essere effettuati :
- sia dal rivenditore,
- sia da persone qualificate concessionarie della marca.
Quando si chiama il Servizio Assistenza, bisogna dare tutte le referenze dell’apparecchio (modello, tipo, numero di serie). Queste informazioni sono
fornite sulla targhetta matricola aplicata sulla parte posteriore dell’apparecchio.
I
Usługi konserwacyjno-naprawcze:
Wszelkie czynności konserwacyjno-naprawcze mają być wykonywane wyłącznie przez:
- waszego sprzedawcę,
- wyspecjalizowany zakład naprawczy posiadający atest producenta
Aby przyspieszyć i ułatwić obsługę prosimy o podanie dokładnych danych dotyczących sprzętu (model, typ, numer serii). Wszystkie te dane
znajdują się na płytce informacyjnej z tyłu sprzętu.
PL
Servicio postventa :
Las intervenciones que requiera la lavadora deberán ser efectuadas :
- por el revendedor,
- o por cualquier profesional cualificado deposiario de la marca.
Al llamar, indique la referencia completa de la máquina (modelo, tipo, número de serie). Estos datos figuran en la placa de identificación situada en la
parte trasera de la máquina.
E
Serviços autorizados :
Qualquer intervenção na sua máquina de lavar deve ser realizada :
- quer pelo seu revendedor,
- quer por um outro profissional qualificado autorizado pela marca.
Ao chamá-los, indique a referência completa de sua máquina (o modelo, o tipo, o número da série). Estas informações figuram na placa de
identificação fixada atrás da máquina .
P
Tεχνική υποστήριξη:
Οι ενδεχόµενες επεµβάσεις στο πλυντήριό σας θα πρέπει να διενεργηθούν µόνο από το κατά τόπους εξουσιοδοτηµένο σέρβις.
Σε περίπτωση που τηλεφωνήσετε, θα πρέπει να αναφέρετε όλα τα στοιχεία του πλυντηρίου σας (µοντέλο, τύπο και αριθµό σειράς).
Τα στοιχεία αυτά αναγράφονται στην πινακίδα µητρώου που βρίσκεται στην πλάτη του πλυντηρίου σας.
GR
Cepcoe ocyae:
Heoxo peo Bae a oe pooc:
- o e, o poa ee Ba
- o apoa ceaco o ao ape e.
p oe peoo cy eoxoo yaa o oep Bae a (oe, cep oep). cee pee a oepo
e ca a.
RUS
Záručny servis
Prípadné opravy na prístroji môže vykonávať iba :
- váš predajca
- alebo záručna opravovňa, ktorá má zmluvu s výrobcom
Pri telefonickom styku uvádzajte kompletné označenie vášho prístroja (model, typ a výrobné číslo). Tieto údaje sú uvedené na výrobnom štítku na
zadnej strane prístroja.
SK
Záruční servis
Případné opravy na přístroji může provádět pouze :
- váš prodejce
- nebo záruční opravna, která má smlouvu s výrobcem
Při telefonickém styku uvádějte úplné označení vašeho přístroje (model, typ a výrobní číslo). Tyto údaje jsou uvedeny na výrobním štítku na zadní
straně přístroje.
CZ
GB
D
NL
R°C03F
-
 1
1
-
 2
2
-
 3
3
-
 4
4
-
 5
5
-
 6
6
-
 7
7
-
 8
8
-
 9
9
-
 10
10


