Whirlpool AQSL 09 U (EU) instrukcja
- Kategoria
- Pralki
- Typ
- instrukcja

EN
1
English,1
Contents
Installation, 2-3
Unpacking and levelling
Connecting the electricity and water supplies
Technical data
Description of the machine, 4-5
Control panel
Running a wash cycle, 6
Wash cycles and options, 7
Table of wash cycles
Wash options
Detergents and laundry, 8
Detergent
Preparing the laundry
Washing recommendations
Load balancing system
Precautions and advice, 9
General safety
Disposal
Opening the porthole door manually
Care and maintenance, 10
Cutting off the water and electricity supplies
Cleaning the machine
Cleaning the detergent dispenser drawer
Caring for your appliance drum
Cleaning the pump
Checking the water inlet hose
Trouble shooting, 11
Assistance, 12
EN
WASHING MACHINE
AQUALTIS
AQSL 09 U
Instructions for
installation and use
PL
Polski,25
Èeský,13
CZ
Slovensky,37
SK

EN
2
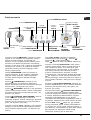
Installation
This instruction manual should be kept in a safe place
for future reference. If the washing machine is sold,
given away or moved, please ensure the manual is kept
with the machine, so that the new owner may benefit
from the advice contained within it.
Read these instructions carefully: they contain vital
information relating to the safe installation and operation
of the appliance.
Inside the pack containing this manual, you will also
find the guarantee and all the details necessary for
installation.
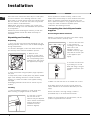
Unpacking and levelling
Unpacking
1. Once you have removed all the packaging from the
washing machine, make sure it has not been damaged
during transportation.
If it has been damaged, contact the retailer and do not
proceed any further with the installation process.
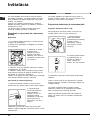
2. Remove the 4
protective screws (used
during transportation) and
the corresponding spacer,
located on the rear part of
the appliance (see figure).
3. Close off the holes using the plastic plugs supplied in
the pack.
4. Keep all the parts in a safe place; they will be needed
again if the washing machine is moved to another
location, to prevent the inside of the appliance being
damaged.
Packaging materials should not be used as toys for
children.
Levelling
1. Place the washing machine on a flat sturdy floor,
without resting it up against walls or cabinets.
2. If the floor is uneven,
the front feet of the
machine may be adjusted
until it reaches a horizontal
position (the angle of
inclination must not
exceed 2 degrees).
If the appliance is levelled correctly, it will be more
stable and much less likely to cause vibrations and noise
while it is operating, particularly during the spin cycle.
If it is placed on carpet or a rug, adjust the feet in such
a way as to allow a sufficient ventilation space
underneath the washing machine.
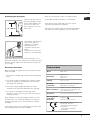
Connecting the electricity and water
supplies
Connecting the water inlet hose
Before connecting the inlet hose to the water supply,
run the water until it is perfectly clear.
1. Connect the inlet hose
to the machine by
screwing it onto the cold
water inlet of the
appliance, which is
situated on the top right-
hand side of the rear part
of the appliance (see
figure).
2. Connect the inlet hose
by screwing it to a cold
water tab using a 3/4 gas
threaded connection (see
figure).
3. Make sure that the hose is not folded over or bent.
The water pressure at the tap must fall within the
values indicated in the Technical data table (see next
page).
If the inlet hose is not long enough, contact a
specialised shop or an authorised technician.
Never use second-hand or old inlet hoses; use the
products supplied with the machine.

EN
3
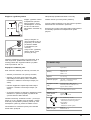
65 - 100 cm
Connecting the drain hose
Connect the drain hose to
drain duct piping or a wall
drain located between 65
and 100 cm above the
floor, making sure it is not
bent at all.
Alternatively, rest the drain
hose on the side of a
washbasin or bathtub,
fastening the duct
supplied to the tap (see
figure).
The free end of the hose
should not be underwater.
We advise against the use of hose extensions; if it is
absolutely necessary, the extension must have the same
diameter as the original hose and must not exceed 150
cm in length.
Electrical connections
Before plugging the appliance into the electricity socket,
make sure that:
the socket is earthed and complies with all applicable
laws;
the socket is able to withstand the maximum power
load of the appliance as indicated in the Technical
data table (see opposite);
the power supply voltage falls within the values
indicated in the Technical data table (see opposite);
the socket is compatible with the plug of the
appliance. If this is not the case, have the socket or
the plug replaced.
The machine must not be installed outdoors, even in
covered areas. It is extremely dangerous to leave the
appliance exposed to rain, storms and other weather
conditions.
The mains socket must remain within easy reach after
the washing machine has been installed.
Do not use extension cords or multiple sockets.
The cable should not be bent or compressed.
The power supply cable and plug must only be
replaced by authorised technicians.
Warning! The company shall not be held responsible in
the event that these regulations are not respected.
Technical data
Model
AQSL 09 U
Dimensions
width 59.5 cm
height 85 cm
depth 47 cm
Capacity
from 1 to 6 kg
Electrical
connections
please refer to the technical data
plate fixed to the machine
Water connections
maximum pressure 1 MPa (10 bar)
minimum pressure 0.05 MPa (0.5 bar)
drum capacity 40 litres
Spin speed
up to 1000 rotations per minute
Test Programmes
according to
2010/1061
programme ;
temperature 60°C and 40°C.
This appliance conforms to the
following EC Directives:
- 2004/108/EC (Electromagnetic
Compatibility)
- 2006/95/EC (Low Voltage)
- 2002/96/EC

EN
4
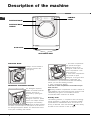
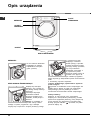
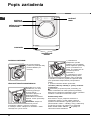
CONTROL
PANEL
PORTHOLE DOOR
PORTHOLE DOOR
HANDLE
KICK STRIP
ADJUSTABLE FEET
3
1
2
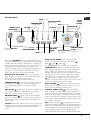
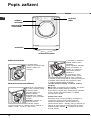
Description of the machine
PORTHOLE DOOR
Always use the handle to
open the porthole door
(see figure).
DETERGENT DISPENSER DRAWER
The detergent dispenser
drawer is located inside the
machine and can be
accessed by opening the
door.
For more information on
detergent measures, please
refer to the chapter entitled
Detergents and laundry.
Note: stick the label showing
the wash cycle descriptions and options on the front of
the detergent dispenser drawer. You will find the sticker
in the pack containing this manual.
1. pre-wash compartment:
use powder detergent.
Before pouring in the
detergent, make sure that
extra compartment 3 has
been removed.
2. main wash compartment:
use powder or liquid
detergent. If using the latter
type of detergent, we
recommend it is poured into the drawer immediately
before you start the washing machine.
3. extra compartment: Bleach
The use of extra compartment 3 excludes the pre-
wash function.
washing additives compartment: for fabric softener or
liquid additives. We recommend that the maximum level
indicated by the grille is not exceeded, and that
concentrated fabric softeners are diluted.
Standby mode
This washing machine, in compliance with new energy
saving regulations, is fitted with an automatic standby
system which is enabled after about 30 minutes if no
activity is detected. Press the ON-OFF
button briefly
and wait for the machine to start up again.

EN
5
TEMPERATURE button
WASH CYCLE
SELECTOR knob
OPTION buttons with
indicator lights
DOOR LOCKED
indicator light
START/PAUSE
button with indicator
light
WASH
CYCLE
PHASE
icons
SPIN button
DELAYED
START
button
CONTROL PANEL
LOCK button with
indicator light
Button withON/OFF
indicator light
ECO indicator light
OPTION buttons with
indicator lights
TEMPERATURE
indicator lights
SPIN indicator
lights
DELAYED START
indicator lights
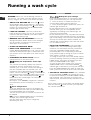
Control panel
Button with ON/OFF indicator light: press this briefly
to switch the machine on or off. The green indicator light
indicates that the machine is switched on. To switch off
the washing machine during the wash cycle, press and
hold the button for approximately 3 seconds; if the
button is pressed briefly or accidentally the machine will
not switch off. If the machine is switched off during a
wash cycle, this wash cycle will be cancelled.
WASH CYCLE SELECTOR knob: may be turned in
either direction. To select the most suitable wash cycle,
please refer to the Table of wash cycles.
The knob will not move during the wash cycle.
TEMPERATURE
button: press to modify or exclude
the temperature setting; the value will be identified by
the indicator lights above it (see Running a wash
cycle).
SPIN CYCLE
button: press to modify or exclude the
spin cycle; the value will be identified by the indicator
lights above it (see Running a wash cycle).
DELAYED START
button: press to set a delayed
start for the selected wash cycle; the delay time will be
identified by the indicator lights above (see Running a
wash cycle).
OPTION buttons with indicator lights: press to select the
available options. The indicator light corresponding to the
selected option will remain lit (see Running a wash
cycle).
WASH CYCLE PHASE icons: these illuminate to
indicate the progress of the wash cycle (Wash
Rinse
Spin Drain ).
The text
lights up when the cycle is complete.
START/PAUSE button with indicator light: when the
green indicator light flashes slowly, press the button to
start a wash cycle. Once the cycle has begun the
indicator light will remain lit in a fixed manner. To pause
the wash cycle, press the button again; the indicator
light will flash in an orange colour. If the Door locked
indicator light is switched off, the door may be
opened. To start the wash cycle from the point at which
it was interrupted, press the button again.
DOOR LOCKED
indicator light: indicates that the
porthole door is locked. To open the door, pause the
wash cycle (see Running a wash cycle).
CONTROL PANEL LOCK
button with indicator
light: to activate or deactivate the control panel lock,
press and hold the button for approximately 2 seconds.
when the indicator light is illuminated, the control panel is
locked. This means it is possible to prevent wash cycles
from being modified accidentally, especially where there
are children in the home.
ECO indicator light: the
icon lights up when, after
altering the washing parameters, an energy saving of at
least 10% is made. Furthermore, before the machine
enters Standby mode, the icon will light up for a few
seconds; when the machine is switched off the
estimated energy saving will be around the 80% mark.

EN
6
WARNING: before you use the washing machine for
the first time, run a wash cycle with detergent and no
laundry, using the 90° cottons cycle without pre-wash.
1. SWITCH THE MACHINE ON. Press the
button.
All the indicator lights will illuminate for 1 second; the
indicator light corresponding to the
button will then
remain lit in a fixed manner and the START/PAUSE
indicator light will flash slowly.
2. LOAD THE LAUNDRY. Open the porthole door.
Load the laundry, making sure you do not exceed the
maximum load value indicated in the table of wash
cycles on the following page.
3. MEASURE OUT THE DETERGENT. Pull out the
detergent dispenser drawer and pour the detergent
into the relevant compartments as described in
Description of the machine.
4. CLOSE THE PORTHOLE DOOR.
5. SELECT THE PROGRAMME. Turn the WASH
CYCLE SELECTOR KNOB right or left, until you have
selected the desired wash cycle. A temperature and
spin speed is set for each wash cycle; these may be
adjusted.
6. CUSTOMISE THE WASH CYCLE. Use the
relevant buttons on the control panel:
Modify the temperature and/or spin
speed.
The machine automatically displays the maximum
temperature and spin speed values set for the
selected cycle, or the most recently-used settings if
they are compatible with the selected cycle. The
temperature can be decreased by pressing the
button, until the cold wash ( ) setting is reached. The
spin speed may be progressively reduced by pressing
the
button, until it is completely excluded ( ). If
these buttons are pressed again, the maximum
values are restored.
Exception: if the Cottons programme is selected,
the temperature can be increased up to a value of
90°C.
Set a delayed start.
To set the "delayed start" option for the program you
have selected, press the button until the indicator light
for the desired delay time is illuminated.
The sixth time the button is pressed, the function will
be disabled.
N.B.: once the START/PAUSE button is pressed the
"delayed start" indicator light will flash
(the time delay value may only be changed by
decreasing the time).
Modify the cycle settings.
Press the OPTION buttons to customise the wash
cycle in accordance with your own requirements.
Press the button to activate the option; the
corresponding indicator light will switch on.
Press the button again to disable the option; the
indicator light will switch off.
If the selected option is not compatible with the
selected wash cycle, this incompatibility will be
signalled by the flashing of the indicator light; the
option will not be activated.
If the selected option is not compatible with another
option that has been selected previously, the indicator
light corresponding to the first option selected will flash
and only the second option will be activated; the
indicator light corresponding to the button will remain
lit in a constant manner.
7. START THE PROGRAMME. Press the START/
PAUSE button. The corresponding indicator light
remains lit in a fixed manner and the porthole door
locks (the
DOOR LOCKED indicator light
illuminates). The icons corresponding to the wash
cycle phases will light up during the cycle to indicate
which phase is currently in progress.
To change a wash cycle once it has already started,
pause the washing machine by pressing the START/
PAUSE button; then select the desired cycle and
press the START/PAUSE button again.
To open the door during a wash cycle, press the
START/PAUSE button; if the DOOR LOCKED
indicator light is switched off you may open the door.
Press the START/PAUSE button again to restart the
wash cycle from the point at which it was interrupted.
8. THE END OF THE WASH CYCLE. This is indicated
by the illuminated text END. The porthole door may
be opened immediately. If the START/PAUSE indicator
light is flashing, press the button to end the cycle.
Open the door, unload the laundry and switch off the
machine.
If you wish to cancel a cycle which has already begun,
press and hold the
button until the cycle stops and
the machine switches off.
Running a wash cycle

EN
7
Wash options
Super Wash
This option offers a high-performance wash due to the
greater quantity of water used in the initial phase of the
cycle, and due to the increased wash cycle duration, is
particularly useful for the
removal of stubborn stains.
It can be used with or
without bleach. If you desire
bleaching, insert the extra
tray compartment (3) into
compartment 1. When
pouring in the bleach, be
careful not to exceed the
max level marked on the
central pivot (see figure).
To bleach laundry without
carrying out a full wash cycle, pour the bleach into the
extra compartment 3, select the "Rinse" cycle
and
activate the "Super Wash" option
.
It cannot be used in conjunction with
, , , , ,
, , .
Easy Iron
By selecting this option, the wash and spin cycles will be
modified in order to reduce the formation of creases.
At the end of the cycle the washing machine
drum will rotate slowly; the Easy Iron and START/
PAUSE indicator lights will flash. To end the cycle press
the START/PAUSE button or the Easy Iron button.
For the Silk
wash cycle, the machine will end the
cycle while the laundry is soaking and the Easy
Iron indicator light will flash. To drain the water so that
the laundry may be removed, press the START/PAUSE
button or the Easy Iron button.
It cannot be used in conjunction with
, , , , .
Time Saver
If you select this option, the wash cycle duration will be
reduced by 30%-50%, depending on the selected cycle,
thereby guaranteeing simultaneous water and energy
saving. Use this cycle for lightly soiled garments.
It cannot be used in conjunction with
, , , ,
, , , , .
Extra rinse
By selecting this option, the efficiency of the rinse is
increased and optimal residual detergent removal is
guaranteed. It is particularly useful for skin which is
sensitive to detergents. We recommend this option is
used with a full load of washing, or when a large amount
of detergent is required.
It cannot be used in conjunction with
, , .
3
1
2
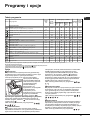
Wash cycles and options
Table of wash cycles
Icon Description of the wash cycle
Max.
temp.
(°C)
Max.
speed
(rpm)
Detergent and additives
Max.
load
(kg)
Cycle
duration
Prewash Wash
Fabric
softener
Bleach
Cottons wash cycles
Cottons
with pre-wash
(Add detergent to the relevant compartment).
90° 1000
ll l
- 6170
Cottons (1):
heavily soiled whites and resistant colours.
60°
(Max. 90°)
1000 -
ll l
6195
Cottons (1-2):
heavily soiled whites and delicate colours.
40° 1000 -
ll l
6160
Coloured
Cottons (3)
40° 1000 -
ll l
690
Shirts
40° 600 -
ll l
275
Jeans
40° 800 -
ll
- 2,5 70
Special programmes
Baby:
heavily soiled delicate colours
40° 800 -
ll l
2120
Durable
Synthetics
60° 800 -
ll l
2,5 70
Delicate
Synthetics
40° 800 -
ll l
2,5 60
"Bed & Bath"
for bedlinen and towels.
60° 1000 -
ll l
695
Quilted Jacket:
for down-stuffed garments.
30° 1000 -
ll
- 195
Silk:
for garments in silk and viscose, lingerie.
30° 0 -
ll
- 155
Wool:
for wool, cashmere, etc.
40° 600 -
ll
- 155
Mix 30':
to refresh lightly soiled garments quickly (not suitable
for wool, silk and clothes which require washing by hand)
30° 800 -
ll
- 330
Partials wash cycles
Rinse - 1000 - -
ll
635
Spin - 1000 - - - - 615
Drain - 0 - - - - 62
The length of cycle shown on the display or in this booklet is an estimation only and is calculated assuming standard working conditions. The actual duration can
vary according to factors such as water temperature and pressure, the amount of detergent used, the amount and type of load inserted, load balancing and any
wash options selected.
For all Test Institutes:
1) Test wash cycle in compliance with regulation 2010/1061: set wash cycle
with a temperature of 60°C and 40°C.
2) Long wash cycle for cottons: set wash cycle
with a temperature of 40°C.
3) Short wash cycle for cottons: set wash cycle
with a temperature of 40°C.

EN
8
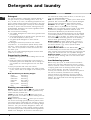
Detergents and laundry
Detergent
The type and quantity of detergent required depend on
the type of fabric you are washing (cotton, wool, silk,
etc.), as well as its colour, the washing temperature, the
level of soiling and the hardness of the water in the area.
Measuring out the detergent carefully will avoid wastage
and help to protect the environment: although they are
biodegradable, detergents still contain ingredients which
alter the balance of nature.
We recommend the following:
use powder detergents for white cotton garments and
pre-washing.
use liquid detergents for delicate cotton garments and
for all low-temperature wash cycles.
use gentle liquid detergents for wool and silk
garments.
The detergent should be poured into the relevant
compartment - or the dispenser placed directly inside
the drum - before the wash cycle begins. In the latter
case, it will not be possible to select the Cottons with
pre-wash cycle.
Do not use hand washing detergents because these
create too much foam.
Preparing the laundry
Shake out the garments before loading them into the
machine.
Divide the laundry according fabric type (symbol on
the washing instruction label) and colour, making sure
you separate the coloured garments from the white
ones;
Empty all pockets and check the buttons;
Do not exceed the values listed in the Table of wash
cycles, which refer to the weight of the laundry when
dry.
How much does your laundry weigh?
1 sheet 400-500 g
1 pillowcase 150-200 g
1 tablecloth 400-500 g
1 bathrobe 900-1200 g
1 towel 150-250 g
1 pair of jeans 400-500 g
1 shirt 150-200 g
Washing recommendations
Shirts: use the special Shirts wash cycle to wash
shirts in different fabrics and colours to guarantee they
receive the best possible care.
Jeans: use the special Jeans
wash cycle for all
denim garments; turn inside out before washing and use
a liquid detergent.
Baby: use the special Baby
wash cycle to remove
the remove the soiling typically caused by babies, while
removing all traces of detergent from nappies in order to
prevent the delicate skin of babies from suffering allergic
reactions. The cycle has been designed to reduce the
amount of bacteria by using a greater quantity of water
and optimising the effect of special disinfecting additives
added to the detergent. At the end of the wash cycle,
the machine will slowly rotate the drum; to end the cycle
press the START/PAUSE button.
Silk: use the special Silk
wash cycle to wash all silk
garments. We recommend the use of special detergent
which has been designed to wash delicate clothes.
Curtains: use the Silk
wash cycle. Fold curtains
and place them in a pillow case or mesh bag.
Wool: is the only washing machine brand to have been
awarded the prestigious Woolmark Platinum Care
endorsement (M.0508) by the Woolmark Company,
which means that all woollen garments may be washed
in the washing machine, even those which state hand
wash only
on the label. The Wool wash cycle can
be used to wash all woollen garments in the washing
machine while guaranteeing optimum performance.
Quilted Jacket: to wash quilted jacket, cushions or
clothes padded with goose down (the weight of which
should not exceed 1 kg), use the special Quilted
Jacket
wash cycle.
Bedlinen and towels: use the Bed & Bath
cycle
to wash laundry from all over the house; this optimises
fabric softener performance and helps you save time and
energy. We recommend the use of powder detergent.
Stubborn stains: it is wise to treat stubborn stains with
solid soap before washing, and to use the Cottons with
pre-wash cycle.
Load balancing system
Before every spin cycle, to avoid excessive vibrations
before every spin and to distribute the load in a uniform
manner, the drum rotates continuously at a speed which
is slightly greater than the washing rotation speed. If,
after several attempts, the load is not balanced
correctly, the machine spins at a reduced spin speed. If
the load is excessively unbalanced, the washing
machine performs the distribution process instead of
spinning. To encourage improved load distribution and
balance, we recommend small and large garments are
mixed in the load.

EN
9
Precautions and tips
The machine was designed and constructed in
accordance with international safety regulations. The
following information is provided for safety reasons and
must therefore be read carefully.
General safety
This appliance was designed for domestic use only.
This appliance is not intended for use by persons
(including children) with reduced physical, sensory or
mental capabilities, or lack of experience and
knowledge, unless they have been given supervision
or instruction concerning use of the appliance by a
person responsible for their safety. Children should be
supervised to ensure that they do not play with the
appliance.
The machine must only be used by adults, in
accordance with the instructions given in this manual.
Do not touch the machine when barefoot or with wet
or damp hands or feet.
Do not pull on the power supply cable when
unplugging the appliance from the electricity socket.
Hold the plug and pull.
Do not touch the drained water as it may reach
extremely high temperatures.
Never force the porthole door. This could damage the
safety lock mechanism designed to prevent
accidental opening.
If the appliance breaks down, do not under any
circumstances access the internal mechanisms in an
attempt to repair it yourself.
Always keep children well away from the appliance
while it is operating.
If it must be moved, proceed with the help of two or
three people and handle it with the utmost care.
Never try to do this alone, because the appliance is
very heavy.
Before loading laundry into the washing machine,
make sure the drum is empty.
Disposal
Disposing of the packaging materials: observe local
regulations so that the packaging may be re-used.
The European Directive 2002/96/EC relating to Waste
Electrical and Electronic Equipment (WEEE) states
that household appliances should not be disposed of
using the normal solid urban waste cycle. Exhausted
appliances should be collected separately in order to
optimise the cost of re-using and recycling the
materials inside the machine, while preventing
potential damage to the atmosphere and to public
health. The crossed-out dustbin is marked on all
products to remind the owner of their obligations
regarding separated waste collection.
For more information relating to the correct disposal of
household appliances, owners should contact their
local authorities or appliance dealer.
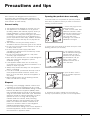
Opening the porthole door manually
In the event that it is not possible to open the porthole
door due to a powercut, and if you wish to remove the
laundry, proceed as follows:
1. remove the plug from the
electrical socket.
2. make sure the water level
inside the machine is lower
than the door opening; if it is
not, remove excess water
using the drain hose,
collecting it in a bucket as
indicated in the figure.
3. remove the cover panel on the lower front part of the
washing machine (see overleaf).
4. pull outwards using the
tab as indicated in the figure,
until the plastic tie-rod is
freed from its stop position;
pull downwards until you
hear a click, which
indicates that the door is
now unlocked.
5. open the door; if this is
still not possible repeat the
procedure.
6. reposition the panel, making sure the hooks are
securely in place before you push it onto the appliance.

EN
10
1
2
Cutting off the water and electricity
supplies
Turn off the water tap after every wash cycle. This will
limit wear on the hydraulic system in the machine and
help to prevent leaks.
Unplug the appliance when cleaning it and during all
maintenance work.
Cleaning the machine
The outer parts and rubber components of the appliance
can be cleaned using a soft cloth soaked in lukewarm
soapy water. Do not use solvents or abrasives.
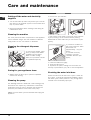
Cleaning the detergent dispenser
drawer
To remove the drawer, press
lever (1) and pull the drawer
outwards (2) (see figure).
Wash it under running
water; this procedure should
be repeated frequently.
Caring for your appliance drum
Always leave the door ajar to prevent unpleasant
odours from forming.
Cleaning the pump
The washing machine is fitted with a self-cleaning pump
which does not require any maintenance. Sometimes,
small items (such as coins or buttons) may fall into the
protective pre-chamber at the base of the pump.
Make sure the wash cycle has finished and unplug the
appliance.
To access the pre-chamber:
1. take off the cover panel on the front of the machine
by first pressing it in the centre and then pushing
downwards on both sides until you can remove it (see
figures);
2. position a container so
that it will collect the water
which flows out
(approximately 1.5 l) (see
figure);
3. unscrew the lid by
rotating it in an anti-
clockwise direction (see
figure);
4. clean the inside thoroughly;
5. screw the lid back on;
6. reposition the panel, making sure the hooks are
securely in place before you push it onto the appliance.
Checking the water inlet hose
Check the inlet hose at least once a year. If there are
any cracks, it should be replaced immediately: during
the wash cycles, water pressure is very strong and a
cracked hose could easily split open.
1
2
Care and maintenance

EN
11
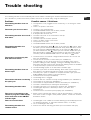
Trouble shooting
Your washing machine could occasionally fail to work. Before contacting the Technical Assistance Centre
(see Assistance), make sure that the problem cannot be not solved easily using the following list.
Problem:
The washing machine does not
switch on.
The wash cycle does not start.
The washing machine does not fill
with water.
The washing machine door
remains locked.
The machine continuously fills
with water and drains.
The washing machine does not
drain or spin.
The machine vibrates a lot during
the spin cycle.
The washing machine leaks.
The icons corresponding to the
Phase in progress flash rapidly
at the same time as the ON/OFF
indicator light.
There is too much foam.
The washing machine door
remains locked.
Possible causes / Solutions:
The appliance is not plugged into the socket fully, or not enough to make
contact.
There is no power in the house.
The door is not closed properly.
The START/PAUSE button has not been pressed.
The water tap has not been opened.
A delayed start has been set.
The water inlet hose is not connected to the tap.
The hose is bent.
The water tap has not been opened.
There is no water supply in the house.
The pressure is too low.
The START/PAUSE button has not been pressed.
If you have selected the Baby
cycle or the Easy iron option, when
the wash cycle has finished the machine will slowly rotate the drum; to end
the cycle press the START/PAUSE button or the Easy iron
button. If
you have selected the Silk
wash cycle, the machine will end the cycle
while the laundry is soaking; to drain the water so that the laundry may be
removed, press the START/PAUSE button or the Easy iron
button.
The drain hose is not fitted at a height between 65 and 100 cm from the
floor (see Installation).
The free end of the hose is under water (see Installation).
If the dwelling is on one of the upper floors of a building, there may be
problems relating to water drainage, causing the washing machine to fill
with water and drain continuously. Special anti-draining valves are available
in shops and help to prevent this inconvenience.
The wall drainage system is not fitted with a breather pipe.
The wash cycle does not include draining: Some wash cycles require the
drain phase to be started manually (see Wash cycles and options).
The Easy iron option is enabled: to complete the wash cycle, press the
START/PAUSE button (Wash cycles and options).
The drain hose is bent (see Installation).
The drainage duct is clogged.
The drum was not unlocked correctly during installation (see Installation).
The machine is not level (see Installation ).
The machine is trapped between cabinets and walls (see Installation).
The load is unbalanced (see Detergents and laundry).
The water inlet hose is not screwed on properly (see Installation).
The detergent dispenser is blocked (to clean it, see Care and
maintenance).
The drain hose is not fixed in place properly (see Installation).
Switch off the machine and unplug it, wait for approximately 1 minute and
then switch it back on again. If the problem persists, contact the Technical
Assistance Service.
The detergent is not suitable for machine washing (it should display the text
for washing machines or hand and machine wash, or the like).
Too much detergent was used.
Perform the manual unlocking procedure (see Precautions and tips).

EN
12
Before calling for Assistance:
Check whether you can solve the problem by yourself (see Trouble shooting);
Restart the wash cycle to check whether the problem has been solved;
If it has not, contact the Authorised Technical Assistance Service.
If the washing machine has been installed or used incorrectly, you will have to pay for the call-out service.
Always request the assistance of authorised technicians.
Please have the following information to hand:
the type of problem;
the appliance model (Mod.);
the serial number (S/N).
The above information can be found on the data plate located on the appliance itself.
Assistance

13
CZ
Èesky
Obsah
Instalace, 14-15
Rozbalení a vyrovnání do vodorovné polohy
Pøipojení kelektrické a kvodovodní síti
Technické údaje
Popis zaøízení, 16-17
Ovládací panel
Sputení pracího cyklu, 18
Programy a volitelné funkce, 19
Tabulka programù
Monosti
Prací prostøedky a prádlo, 20
Prací prostøedek
Pøíprava prádla
Rady pro praní
Systém automatického vyváení náplnì
Opatøení a rady, 21
Základní bezpeènostní pokyny
Likvidace
Manuální otevøení dvíøek s prùzorem
Údrba a péèe, 22
Uzavøení pøívodu vody a vypnutí elektrického napájení
Èitìní zaøízení
Èitìní dávkovaèe pracích prostøedkù
Péèe o buben
Èitìní èerpadla
Kontrola pøítokové hadice na vodu
Poruchy a zpùsob jejich odstranìní, 23
Servisní sluba, 24
CZ
PRAÈKA
AQUALTIS
AQSL 09 U
Návod kinstalaci a
pouití

CZ
14
Instalace
Je velmi dùleité uschovat tento návod za úèelem
jeho dalí konzultace. Vpøípadì prodeje, darování nebo
pøestìhování praèky se ujistìte, e zùstane uloen
vjejí blízkosti.
Pozornì si pøeètìte uvedené pokyny: Obsahují
dùleité informace týkající se instalace, pouití a
bezpeènosti pøi práci.
Vobálce stímto návodem muete najít kromì záruky
také souèástky potøebné k instalaci.
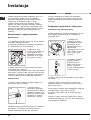
Rozbalení a vyrovnání do vodorovné polohy
Rozbalení
1. Po rozbalení praèky zkontrolujte, zda bìhem
pøepravy nedolo kjejímu pokození.
Vpøípadì, e je pokozena, ji nezapojujte a obrate se
na prodejce.
2. Odstraòte 4 rouby
chránící pøed pokozením
bìhem pøepravy a
pøíslunou rozpìrku; tyto
komponenty se nacházejí
vzadní èásti (viz
obrázek).
3. Uzavøete otvory po roubech plastovými krytkami,
které se nacházejí v obálce.
4. Uschovejte vechny díly; vprípadì pøepravy praèky
bude tøeba provést jejich opìtovnou montá, aby se
zamezilo vnitøním pokozením.
Obaly nejsou hraèky pro dìti!
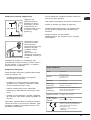
Vyrovnání do vodorovné polohy
1. Praèku je tøeba umístit na rovnou a pevnou podlahu,
ani by byla opøena o stìnu nebo nábytek.
2. Vykompenzujte
nerovnosti odroubováním
nebo zaroubováním
noek, dokud se zaøízení
nebude nacházet ve
vodorovné poloze (nesmí
být naklonìno o více ne
2 stupnì).
Dùsledné vyrovnání do vodorovné polohy zajistí
stabilitu a zabrání vibracím a hluènosti, a to zejména ve
fázi odstøedování.
Vpøípadì instalace na podlahovou krytinu nebo na
koberec nastavte noky tak, aby pod praèkou zùstal
dostateèný volný prostor pro ventilaci.
Pøipojení kelektrické a kvodovodní síti
Pøipojení pøítokové hadice vody
Pøed pøipojením pøítokové hadice krozvodu vody
nechte odtékat vodu, dokud nebude prùzraèná.
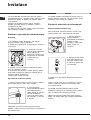
1. Pøipojte pøítokovou
hadici kzaøízení
prostøednictvím pøísluné
pøípojky na vodu,
umístìné vzadní èásti
vpravo nahoøe (viz
obrázek).
2. Pøipojte pøívodní hadici
jejím zaroubováním ke
kohoutku studené vody
shrdlem se závitem 3/4
(viz obrázek).
3. Dbejte na to, aby hadice nebyla pøíli ohnutá ani
stlaèená.
Tlak vrozvodu vody se musí pohybovat vrozmezí
hodnot uvedených vtabulce s technickými údaji
(viz vedlejí strana).
Vpøípadì, e délka pøítokové hadice nebude
dostateèná, obrate se na specializovanou prodejnu
nebo na autorizovaný technický personál.
Nikdy nepouívejte pouité nebo staré pøítokové
hadice, ale hadice, které jsou souèástí pøísluenství
zaøízení.

15
CZ
65 - 100 cm
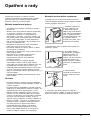
Pøipojení vypoutìcí hadice
Pøipojte vypoutìcí hadici
kodpadovému potrubí
nebo kodpadu ve stìnì,
který se nachází od 65 do
100 cm nad zemí;
jednoznaènì zamezte
jejímu ohybu.
Nebo ji zachyte na okraj
umyvadla èi vany a
pøipevnìte ji ke kohoutku
pøivázáním dráku
zpøísluenství (viz
obrázek).
Volný konec vypoutìcí
hadice nesmí zùstat
ponoøený ve vodì.
Pouití prodluovacích hadic se nedoporuèuje; je-li to
vak nezbytné, prodluovací hadice musí mít stejný
prùmìr jako originální hadice a její délka nesmí
pøesáhnout 150 cm.
Pøipojení kelektrické síti
Pøed zasunutím zástrèky do zásuvky se ujistìte, e:
Je zásuvka uzemnìna a e vyhovuje normám;
Je zásuvka schopna snést maximální zátì
odpovídající jmenovitému pøíkonu zaøízení,
uvedenému vtabulce s technickými údaji (viz vedle);
Hodnota napájecího napìtí odpovídá údajùm
uvedených vtabulce stechnickými údaji (viz vedle);
Se zásuvka shoduje se zástrèkou napájecího kabelu
zaøízení. Vopaèném pøípadì je tøeba dát vymìnit
zásuvku nebo zástrèku.
Zaøízení nesmí být umístìno venku pod irým
nebem, a to ani vpøípadì, e by se jednalo o místo
chránìné pøed nepøízní poèasí, protoe je velmi
nebezpeèné vystavit jej pùsobení detì a bouøí.
Po definitivním umístìní zaøízení musí zásuvka zùstat
snadno pøístupná.
Nepouívejte prodluovací kabely a rozvodky.
Kabel nesmí být ohnutý ani stlaèený.
Výmìna kabelu a zástrèky musí být svìøena
výhradnì autorizovanému technickému personálu.
Upozornìní! Výrobce neponese ádnou odpovìdnost
za následky nerespektování uvedených pøedpisù.
Technické údaje
Model
AQSL 09 U
Rozmìry
íøka 59,5 cm
výka 85 cm
hloubka 47 cm
Kapacita
od 1 do 6 kg
Napájení
viz títek s technickými údaji,
aplikovaný na zaøízení
Pøipojení k
rozvodu vody
maximální tlak 1 MPa (10 bar)
minimální tlak 0.05 MPa (0.5 bar)
kapacita bubnu 40 litrù
Rychlost
odstøeïování
a
¡
z do 1000 otáèek za minutu
Zkuební program
podle smìrnice
2010/1061
program ;
teplota 60
°
C a 40
°
C.
Toto zaøízení odpovídá následujícím
normám Evropské unie:
- 2004/108/CE (Elektromagnetická
kompatibilita)
- 2006/95/CE (Nízké napìtí)
- 2002/96/CE
Hluènost
(dB(A) re 1 pW)
Praní: 51
Odstøeïování: 71

CZ
16
OVLÁDACÍ
PANEL
DVÍØKA S
PRÙZOREM
MADLO DVÍØEK
S PRÙZOREM
PODSTAVEC
NASTAVITELNÉ NOKY
3
1
2
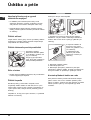
Popis zaøízení
DVÍØKA S PRÙZOREM
Kotevøení dvíøek
sprùzorem pouívejte vdy
pøísluné madlo (viz
obrázek).
DÁVKOVAÈ PRACÍCH PROSTØEDKÙ
Nachází se uvnitø zaøízení a
je knìmu umonìn pøístup
po otevøení dvíøek.
Informace týkající se
dávkování pracích
prostøedkù jsou uvedeny
vkapitole Prací prostøedky
a prádlo.
Poznámka: Pøilepte na
dávkovaè pracích
prostøedkù nálepku
spopisem programu a volitelných funkcí. Nálepka se
nachází vsáèku, vnìm je i tento návod.
1. pøihrádka pro pøedpírku:
pouijte prákový prací
prostøedek.
Pøed naplnìním pøihrádky
pracím prostøedkem se
ujistìte, e vdávkovaèi
není vloena pøídavná
pøihrádka 3.
2. pøihrádka pro praní:
pouijte prákový nebo
tekutý prací prostøedek.
Vposlednì uvedeném pøípadì se doporuèuje nalít prací
prostøedek bezprostøednì pøed sputìním praèky.
3. pøídavná nádobka: Bìlicí prostøedek
Pouití pøídavné nádobky 3 vyluèuje monost
pøedpírky.
pøihrádka pro pøídavné prací prostøedky: pro tekutou
avivá nebo jiné tekuté pøídavné prostøedky.
Doporuèujeme, abyste nikdy nepøekraèovali maximální
úroveò, která je vyznaèena møíkou, a rozøedili
koncentrovanou avivá.
Pohotovostní reim
Za úèelem shody snovými pøedpisy souvisejícími s
energetickou úsporou je tato praèka vybavena
systémem automatického vypnutí (pøechodu do
pohotovostního reimu standby), který je aktivován po
uplynutí 30 minut, kdy se praèka nepouívá. Krátce
stisknìte tlaèítko ON/OFF
avyèkejte na obnovení
èinnosti zaøízení.

17
CZ
Tlaèítko TEPLOTA
Otoèný ovladaè
PROGRAMÙ
Tlaèítka
s kontrolkami
VOLITELNÉ FUNKCE
Kontrolka
ZABLOKOVÁNÍ
DVÍØEK
Tlaèítko skontrolkou
START/PAUSE
Ikony FÁZE PRANÍ
Tlaèítko ODSTØEÏOVÁNÍ
Tlaèítko
ODLOENÝ
START
Tlaèítko skontrolkou
ZABLOKOVÁNÍ
TLAÈÍTEK
Tlaèítko skontrolkou
ON/OFF
Kontrolka EKO
Tlaèítka
s kontrolkami
VOLITELNÉ
FUNKCE
Kontrolkami
TEPLOTA
Kontrolkami
ODSTØEÏOVÁNÍ
Kontrolkami
ODLOENÝ START
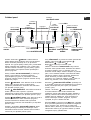
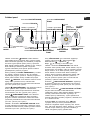
Ovládací panel
Tlaèítko skontrolkou ON/OFF: Krátké stisknutí
tohoto tlaèítka slouí kzapnutí nebo vypnutí zaøízení.
Zelená kontrolka poukazuje na to, e je zaøízení
zapnuté. Pro vypnutí praèky bìhem praní je tøeba dret
tlaèítko stisknuté déle, pøiblinì 3 sek.; krátké nebo
náhodné stisknutí neumoní vypnutí praèky. Vypnutí
zaøízení bìhem praní zpùsobí zruení probíhajícího
pracího programu.
Otoèný ovladaè VOLBY PROGRAMÙ: je moné jím
otáèet vobou smìrech. Za úèelem nastavení
nejvhodnìjího programu si prohlédnìte Tabulka
programù. Bìhem pracího programu zùstane otoèný
knoflík bez pohybu.
Tlaèítko
TEPLOTA: Jeho stisknutí slouí ke zmìnì
teploty nebo vylouèení ohøevu; hodnota bude
vyznacena prostøednictvím kontrolek nad hodnotami
(viz Sputìní pracího cyklu).
Tlaèítko
ODSTØEÏOVÁNÍ: Jeho stisknutí slouí ke
zmìnì rychlosti nebo kúplnému vylouèení
odstøeïování; hodnota bude vyznacena prostøednictvím
kontrolek nad hodnotami (viz Sputìní pracího cyklu).
Tlaèítko
ODLOENÝ START: Jeho stisknutí slouí k
nastavení odloeného startu zvoleného programu;
hodnota nastaveného odloení bude vyznaèena
prostøednictvím kontrolek nad hodnotami (viz Sputìní
pracího cyklu).
Tlaèítka s kontrolkami VOLITELNÉ FUNKCE: Slouí
kvolbì jednotlivých nabízených volitelných funkcí.
Pøísluná kontrolka zvolené volitelné funkce zùstane
rozsvícena (viz Sputìní pracího cyklu).
Ikony FÁZE PRANÍ: se rozsvítí za úèelem zobrazování
prùbìhu cyklu (Praní
- Extra Máchání -
Odstøeïování
- Vypoutìní ).
Nápis
se rozsvítí po ukonèení cyklu.
Tlaèítko skontrolkou START/PAUSE: kdy zelená
kontrolka zaène pomalu blikat, stisknìte toto tlaèítko
za úèelem zahájení praní. Po zahájení cyklu se
kontrolka rozsvítí stálým svìtlem. Pøejete-li si pøeruit
praní, znovu stisknìte tlaèítko; kontrolka bude blikat
oranovým svìtlem. Kdy je kontrolka Zablokovaní
dvíøek zhasnutá, je moné otevøít dvíøka
sprùzorem. Pro opìtovné zahájení cyklu zmísta, ve
kterém byl pøeruen, znovu stisknìte tlaèítko.
Kontrolka
ZABLOKOVÁNÍ DVÍØEK: poukazuje na
to, e dvíøka sprùzorem jsou zablokována. Pro otevøení
dvíøek je tøeba pøeruit prací cyklus (viz Sputìní
pracího cyklu).
Tlaèítko skontrolkou
ZABLOKOVÁNÍ TLAÈÍTEK:
za úcelem aktivace nebo zruení zablokování
ovládacího panelu drte stisknuté tlaèítko pøiblinì 2
sekundy. Rozsvícená kontrolka poukazuje na to, e
ovládací panel je zablokován. Tímto zpùsobem se
zamezí náhodným zmìnám programu, zejména
vpøípadì, e jsou vdomácnosti dìti.
Kontrolka EKO: Krozsvícení ikony
dojde vpøípadì,
e se pøi zmìnì parametru praní dosáhne energetické
úspory nejméne 10%. Kromì toho se jetì pøed
aktivací reimu Stand by na zaøízení ikona rozsvítí na
nìkolik málo sekund; pøi vypnutém zaøízení je odhad
energetické úspory pøiblinì 80%.

CZ
18
POZNÁMKA: pøi prvním pouití praèky spuste prací
cyklus bez prádla, spracím prákem a nastaveným
pracím programem pro vlnu 90 °C, bez pøedpírky.
1. ZAPNUTÍ ZAØÍZENÍ. Stisknìte tlaèítko
. Vechny
kontrolky se rozsvítí na 1 sekundu a poté zùstane
rozsvícená kontrolka tlaèítka
a kontrolka START/
PAUSE bude pomalu blikat.
2. NAPLÒTE PRAÈKU PRÁDLEM. Otevøete dvíøka s
prùzorem. Naplòte praèku prádlem a dbejte pøitom,
aby nedolo kpøekroèení mnoství náplnì,
uvedeného vtabulce programù na následující stranì.
3. NADÁVKUJTE PRACÍ PROSTØEDEK. Vytáhnìte
dávkovaè pracích prostøedkù a naplòte prací
prostøedek do pøísluných pøihrádek zpùsobem
vysvìtleným vèásti Popis zaøízení.
4. ZAVØETE DVÍØKA SPRÙZOREM.
5. ZVOLTE PRACÍ PROGRAM. Otáèejte OTOÈNÝ
OVLADAÈ VOLBY PROGRAMU smìrem doprava
nebo doleva, dokud nezvolíte poadovaný program;
budou pøiøazeny teploty, rychlost odstøeïování a
intenzita praní, které se mohou mìnit.
6. NASTAVTE PRACÍ PROGRAM DLE VAICH
POTØEB. Pouijte ktomu pøísluná tlaèítka
ovládacího panelu:
Zmìòte teplotu a/nebo odstøeïování.
Zaøízení automaticky zobrazuje maximální teplotu a
rychlost odstøeïování pro nastavený program nebo
poslední zvolené hodnoty, jsou-li kompatibilní se
zvoleným programem. Stisknutím tlaèítka
je
moné postupnì sníit teplotu a po praní ve
studené vodì (
). Stisknutím tlaèítka je moné
postupnì sníit rychlost odstøeïování a po jeho
úplné vylouèení (
). Dalí stisknutí tlaèítek obnoví
nastavení maximálních pøednastavených hodnot.
Výjimka: pøi volbì programu BAVLNA bude moné
zvýit teplotu a na 90°C.
Nastavte odloený start.
Pro nastavení odloeného startu zvoleného programu
stisknìte víckrát tlaèítko a do rozsvícení kontrolky
odpovídající zvolené dobì odloení startu.
Pøi estém stisknutí tlaèítka dojde kezruení funkce
Po stisknutí tlaèítka START/PAUSEbude moné
zmìnit hodnotu odloení startu pouze jejím sníením.
Zmìòte vlastnosti cyklu.
Stisknutím tlaèítek VOLITELNÝCH FUNKCÍ mùete
nastavit prací program dle vaich potøeb.
Stisknìte tlaèítko za úèelem aktivace volitelné
funkce; rozsvítí se pøísluná kontrolka.
Opìtovným stisknutím mùete zvolenou volitelnou
funkci zruit; pøísluná kontrolka zhasne.
Kdy zvolená volitelná funkce není kompatibilní
snastaveným programem, tato nekompatibilita bude
signalizována blikáním kontrolky avolitelná funkce
nebude aktivována.
Vpøípadì, e zvolená volitelná funkce není
kompatibilní sjinou pøedem zvolenou funkcí,
kontrolka první volitelné funkce bude blikat a bude
aktivována pouze druhá, pøièem kontrolka zvolené
funkce se rozsvítí stálým svìtlem.
7. SPUSTE PROGRAM. Stisknìte tlaèítko START/
PAUSE. Pøísluná kontrolka se rozsvítí stálým
svìtlem a dvíøka se zablokují (kontrolka
ZABLOKOVANÍ DVÍØEK
se rozsvítí). Bìhem
pracího cyklu se postupnì rozsvítí pøísluné ikony,
odpovídající jednotlivým fázím praní, informující o
jeho prùbìhu.
Za úèelem zmìny programu bìhem pracího cyklu
pøerute èinnost praèky stisknutím tlaèítka START/
PAUSE; poté zvolte poadovaný cyklus a opìtovnì
stisknìte tlaèítko START/PAUSE.
Aby bylo moné otevrít dvírka behem pracího cyklu,
je treba stisknout tlacítko START/PAUSE; kdy je
kontrolka ZABLOKOVANÍ DVÍØEK
zhasnutá, je
moné otevøít dvíøka. Opìtovným stisknutím tlaèítka
START/PAUSE opìtovnì uveïte do èinnosti prací
program zbodu, ve kterém byl pøeruen.
8. UKONÈENÍ PROGRAMU. Je oznámeno rozsvícením
nápisu END. Dvíøka sprùzorem bude moné
okamitì otevøít. Kdy kontrolka START/PAUSE
bliká, ukonèete cyklus stisknutím tlaèítka. Otevøete
dvíøka, vylote prádlo a vypnìte zaøízení.
Pøejete-li si zruit ji zahájený cyklus, znovu dlouze
stisknìte tlaèítko
. Cyklus bude pøeruen a dojde k
automatickému vypnutí zaøízení.
Sputìní pracího cyklu

19
CZ
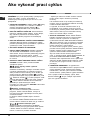
Monosti
Super Praní
Díky pouití vìtího mnoství vody v poèáteèní fázi
cyklu a díky pouití delí doby tato volitelná funkce
zaruèuje praní vysoké kvality.
Mùe se pouívat sbìlicím
prostøedkem nebo bez nìj.
Kdy si pøejete provést
také bìlení, vlote
pøídavnou nádobku 3
zpøísluenství do nádobky
1. Pøi dávkování bìlícího
prostøedku nepøekraèujte
úroveò max vyznaèenou
na støedové pøihrádce (viz
obrázek). Pokud si
pøejete provést
samostatné bìlení, nalijte bìlicí prostøedek do
pøídavné nádobky 3, nastavte program Extra Máchání
a aktivujte volitelnou funkci Super Praní .
Tuto volitelnou funkci není moné aktivovat u programu
, , , , , , , .
Snadné ehlení
Volbou této volitelné funkce se praní a odstøeïování
náleitì zmìní za úèelem sníení tvorby záhybù. Po
ukonèení cyklu praèka provede pomalé otáèení bubnu,
provázené blikáním kontrolek Snadné ehlení a
START/PAUSE. Ukonèení cyklu se provádí stisknutím
tlaèítka START/PAUSE nebo tlaèítka Snadné ehlení.
U programu Hedvábí
zaøízení ukonèí cyklus
sprádlem namoèeným ve vodì a s blikající kontrolkou
Snadné ehlení. Za úèelem odèerpání vody a vyloení
prádla zpraèky je tøeba stisknout tlaèítko START/
PAUSE nebo tlaèítko Snadné ehlení.
Tuto volitelnou funkci není moné aktivovat u
programu
, , , , .
Úspora Èasu
Pøi volbì této volitelné funkce dojde kezkrácení doby
trvání programu o30-50% podle zvoleného cyklu, kdy
bude souèasnì zaruèena úspora vody aenergie. Tento
cyklus pouijte na nepøíli zneèitìné kusy prádla.
Tuto volitelnou funkci není moné aktivovat u programu
, , , , , , , , .
Extra Máchání
Volbou této volitelné funkce se zvýí úèinnost máchání
a zajistí se maximální stupeò odstranìní pracího
prostøedku. Je uiteèná zejména pro pokoky se
zvýenou citlivostí na prací prostøedky. Tuto volitelnou
funkci doporuèujeme pouívat na zcela naplnìnou
praèku nebo pøi pouití vysokých dávek pracího
prostøedku.
Tuto volitelnou funkci není moné aktivovat u programu
, , .
3
1
2
Programy a volitelné
funkce
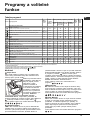
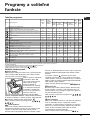
Tabulka programù
Doba trvání cyklu uvedená na displeji nebo v návodu predstavuje odhad vypocítaný na základe standardních podmínek. Skutecná doba se mue menit v závislosti na cetných faktorech, jako je napr. teplota
a tlak vody na vstupu, teplota prostredí, mnoství pracího prostredku, mnoství a druh náplne, vyváení náplne a zvolené volitelné funkce.
Pro vechny Kontrolní ústavy:
1) Kontrolní program podle normy 2010/1061: nastavte program steplotou 60°C a 40°C.
2) Dlouhý program na praní bavlny: nastavte program steplotou 40°C.
3) Krátký program na praní bavlny: nastavte program steplotou 40°C.
Ikona Popis programu
Max.
teplota
(°C)
Max.
rychlost
(otáèky za
minutu)
Prací prostøedky a pøídavné prostøedky
Max.
náplò
(kg)
Doba
trvání
cyklu
Pøedpí-
rkou
Prací
prostøedek
pro praní
Aviváz
Bìlicí
prostøedek
Programy pro praní bavlny
Bavlna
s pøedpírkou
(P
ø
idejte prací prost
ø
edek do p
ø
ísluné p
ø
ihrádky).
90° 1000
lll
- 6170
Bavlna (1)
: silnì zneèitìné bílé a barevné prádlo zodolných tkanin.
60°
(Max. 90°)
1000 -
lll
6195
Bavlna (1-2)
: silnì zneèitìné bílé a barevné choulostivé prádlo.
40° 1000 -
lll
6160
Barevná bavlna (3)
40° 1000 -
lll
690
Koile
40° 600 -
lll
275
Dzíny
40° 800 -
ll
- 2,5 70
Speciální programy
Dìtské Prádlo:
velmi zneèitìné barevné prádlo zchoulostivých tkanin.
40° 800 -
lll
2120
Syntetika
odolné tkaniny
60° 800 -
lll
2,5 70
Syntetika
choulostivé tkaniny
40° 800 -
lll
2,5 60
Povleèení a Ruèníky
prádlo: pro povleèení a koupelnové prádlo.
60° 1000 -
lll
695
Povleèení:
pro prádlo plnìné husím peøím.
30° 1000 -
ll
- 195
Hedvábí:
pro prádlo zhedvábí, viskózy, spodní prádlo.
30° 0 -
ll
- 155
Vlna:
pro vlnu, kamír apod.
40° 600 -
ll
- 155
Mix 30':
krychlému ozivení mírnì zneèitìného prádla
(nedoporuèuje se pro vlnu, hedvábí a prádlo urèené pro praní v ruce).
30° 800 -
ll
- 330
Dílèí programy
Extra Máchání
- 1000 - -
ll
635
Odstøeïování
- 1000 - - - - 615
Vypoutìní
- 0 - - - - 62

CZ
20
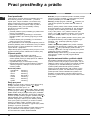
Prací prostøedky a prádlo
Prací prostøedek
Volba druhu a mnoství pracího prostøedku závisí na
druhu tkaniny (bavlna, vlna, hedvábí), na barvì,
teplotì praní, stupni zneèitìní a na tvrdosti vody.
Správné dávkování pracího prostøedku zabraòuje
plýtvání a etøí ivotní prostøedí: i kdy se jedná o
biodegradabilní látky, prací prostøedky naruují
pøirozenou rovnováhu vpøírodì.
Doporuèuje se:
pouívat prákové prací prostøedky pro prádlo zbílé
bavlny a pro pøedpírku.
pouívat tekuté prací prostøedky pro choulostivé
bavlnìné prádlo a pro vechny programy pøi nízké
teplotì.
Pouívat tekuté prací prostøedky pro choulostivé
tkaniny pro praní vlny a hedvábí.
Prací prostøedek se musí nalít pøed zahájením praní do
pøísluné pøihrádky nebo do dávkovaèe, který se vkládá
pøímo do bubnu. Vtomto pøípadì není moné zvolit
cyklus Bavlna s pøedpírkou.
Nepouívejte prací prostøedky urèené pro praní vruce,
protoe zpùsobují tvorbu nadmìrného mnoství pìny.
Pøíprava prádla
Pøed vloením prádlo øádnì rozprostøete.
Rozdìlte prádlo podle druhu tkaniny (symbol na
visaèce prádla) a barvy a dbejte pøitom na oddìlení
barevného prádla od bílého;
Vyprázdnìte kapsy a zkontrolujte knoflíky;
Nepøekraèujte hodnoty povolené náplnì, uvedené v
Tabulka programù, vztahující se na hmotnost
suchého prádla.
Kolik váí prádlo?
1 prostìradlo 400-500 g
1 povlak 150-200 g
1 ubrus 400-500 g
1 upan 900-1200 g
1 ruèník 150-250 g
1 díny 400-500 g
1 koile 150-200 g
Rady pro praní
Koile: Pro praní koil zruzných druhu látek abarvy
pouijte pøísluný program Koile
, abyste
zabezpeèili maximální péèi o nì.
Díny: Pro vechny kusy prádla zlátky Denim pouijte
pøísluný program Díny
; pøed praním jednotlivé kusy
prádla obrate naruby a pouijte tekutý prací prostøedek.
Dìtské Prádlo: Na odstranìní typické píny dìtského
obleèení pouijte pøísluný program Dìtské prádlo
a
øádnì odstraòte prací prostøedek zprádla, abyste
pøedeli alergickým reakcím jemné dìtské pokoky.
Tento prací cyklus byl navren pro sníení mnoství
bakterií spouitím vyího mnoství vody a pro
optimalizaci úèunku specifických hygienických pøísad,
pøidaných kpracímu prostøedku.
Na konci praní provede zaøízení pomalé otáèení bubnu,
aby se zabránilo tvorbì záhybù; cyklus je moné
ukonèit stisknutím tlaèítka START/PAUSE.
Hedvábí: pro praní vekerého prádla z hedvábí pouijte
pøísluný program Hedvábí
. Doporuèujeme pouití
pracího prostøedku pro choulostivé prádlo.
Záclony: pouijte program Hedvábí
. Pøehnout je a
uloit dovnitø povlaku na poltáø anebo do sáèku ze
síoviny.
Vlna: je jediná praèka, která získala prestiní uznání
Woolmark Platinum Care (M.0508) od The Woolmark
Company, která certifikuje praní vech druhù prádla
zvlny vtéto praèce, a to i prádla svisackou prát
pouze v ruce
. Spouitím programu Vlna se tedy
mùe prát vekeré prádlo zvlny se zárukou vysoké
kvality.
Povleèení: pøi praní prádla plnìného husím peøím, jako
jsou napøíklad vìtrovky nebo poltáøe (nepøesahující
hmotnost 1 kg), pouívejte pøísluný program
Povleèení
.
Loní a koupelnové prádlo: tato praèka umoòuje
prát prádlo celé domácnosti vjediném cyklu Povleèení
a Ruèníky
, který optimalizuje pouití aviváe a
umoòuje uspoøit èas a energii. Doporuèuje se pouití
prákového pracího prostøedku.
Odolné skvrny: odolné skvrny je vhodné pøed praním
potøít pevným mýdlem a pouít program Bavlna
spøedpírkou.
Systém automatického vyváení náplnì
Pøed kadým odstøeïováním buben provede otáèení
rychlostí, která mírnì pøevyuje rychlost praní, aby se
odstranily vibrace a aby se náplò rovnomìrnì rozloila.
Vpøípadì, e po nìkolikanásobných pokusech o
vyváení prádlo jetì nebude správnì vyváeno,
zaøízení provede odstøeïování nií rychlostí, ne je
pøednastavená rychlost. Pøi nadmìrném nevyváení
praèka provede namísto odstøeïování vyváení. Pro
dosaení rovnomìrnìjího rozloení náplnì a jejího
správného vyváení se doporuèuje míchat velké a malé
kusy prádla.
Strona się ładuje...
Strona się ładuje...
Strona się ładuje...
Strona się ładuje...
Strona się ładuje...
Strona się ładuje...
Strona się ładuje...
Strona się ładuje...
Strona się ładuje...
Strona się ładuje...
Strona się ładuje...
Strona się ładuje...
Strona się ładuje...
Strona się ładuje...
Strona się ładuje...
Strona się ładuje...
Strona się ładuje...
Strona się ładuje...
Strona się ładuje...
Strona się ładuje...
Strona się ładuje...
Strona się ładuje...
Strona się ładuje...
Strona się ładuje...
Strona się ładuje...
Strona się ładuje...
Strona się ładuje...
Strona się ładuje...
-
 1
1
-
 2
2
-
 3
3
-
 4
4
-
 5
5
-
 6
6
-
 7
7
-
 8
8
-
 9
9
-
 10
10
-
 11
11
-
 12
12
-
 13
13
-
 14
14
-
 15
15
-
 16
16
-
 17
17
-
 18
18
-
 19
19
-
 20
20
-
 21
21
-
 22
22
-
 23
23
-
 24
24
-
 25
25
-
 26
26
-
 27
27
-
 28
28
-
 29
29
-
 30
30
-
 31
31
-
 32
32
-
 33
33
-
 34
34
-
 35
35
-
 36
36
-
 37
37
-
 38
38
-
 39
39
-
 40
40
-
 41
41
-
 42
42
-
 43
43
-
 44
44
-
 45
45
-
 46
46
-
 47
47
-
 48
48


Whirlpool AQSL 09 U (EU) instrukcja
- Kategoria
- Pralki
- Typ
- instrukcja
w innych językach
- slovenčina: Whirlpool AQSL 09 U (EU) Užívateľská príručka
- English: Whirlpool AQSL 09 U (EU) User guide