Beko BMOB20231BG Instrukcja obsługi
- Kategoria
- Mikrofale
- Typ
- Instrukcja obsługi

BMOB20231BG
EN - DE - FR - IT - NL - PL - CZ - HR - SK - SQ - SL- SR - MK
01M-8897363200-1121-01
User Manual
Microwave Oven

Mcrowave Oven / User Manual
2 / EN
CONTENTS
ENGLISH 03-19
DEUTSCH 20-38
FRANÇAIS 39-55
ITALIANO 56-74
NEDERLANDS 75-91
POLSKI 92-110
ČESKY 111-128
HRVATSKI 129-144
SLOVENSKÝ 145-162
SHQIPTARE 163-179
SLOVENŠČINA 180-195
СРПСКИ 196-212
МАКЕДОНСКИ 213-234

Please read this manual first!
Dear Customer,
Thank you for purchasng a Beko product. We hope that you get the best results from
your product whch has been manufactured wth hgh qualty and state-of-the-art
technology. Therefore, please read ths entre user manual and all other accompanyng
documents carefully before usng the product and keep t as a reference for future
use. If you handover the product to someone else, gve the user manual as well. Follow
all warnngs and nformaton n the user manual.
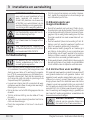
Meanings of the symbols
Followng symbols are used n the varous secton of ths user manual:
C
Important nformaton and useful
hnts about usage.
A
Warnngs for dangerous stuatons
concernng the safety of lfe and pro-
perty.
Warnng for hot surfaces.
B
Warnng for electrc shock.
Ths product has been manufactured n envronmental frendly modern plants wthout gvng any
harm to the nature.

Mcrowave Oven / User Manual
4 / EN
1 Important safety and envronmental
nstructons
Important Safety
Instructons Read Ca-
refully And Keep For
Future Reference
1.1 Safety warnngs
Ths secton contans safety ns-
tructons that wll help protect from
rsk of fre, electrc shock, exposure
to leak mcrowave energy, personal
njury or property damage. Falure
to follow these nstructons shall
vod any warranty.
•Beko Microwave Ovens comply
with the applicable safety stan-
dards; therefore, in case of any
damage on the appliance or power
cable, it should be repaired or re-
placed by the dealer, service cen-
ter or a specialist and authorized
service alike to avoid any danger.
Faulty or unqualified repair work
may be dangerous and cause risk
to the user.
•This appliance is intended to be
used in household and similar ap-
plications such as:
–Staff kitchen areas in shops,
offices and other working en-
vironments;
–Farm houses
–By clients in hotels, and other
residential type environments;
–Bed and Breakfast type envi-
ronments.
•It is not intended for industrial or
laboratory use.
•Do not attempt to start the oven
when its door is open; otherwise
you may be exposed to harmful
microwave energy. Safety locks
should not be disabled or tampered
with.
•The microwave oven is intended
for heating food and beverages.
Drying of food or clothing and
heating of warming pads, slippers,
sponges, damp cloth and similar
may lead to risk of injury, ignition
or fire.
•Do not place any object between
the front side and the door of the
oven. Do not allow dirt or cleaning
agent remnants to build up on the
closure surfaces.
•Any service works involving re-
moval of the cover that provides
protection against exposure to
microwave energy must be per-
formed by authorized persons/
service. Any other approach is dan-
gerous.

Mcrowave Oven / User Manual 5 / EN
1 Important safety and envronmental
nstructons
•Your product is intended for cook-
ing, heating and defrost food at
home. It must not be used for com-
mercial purposes.
•Your oven is not designed to dry
any living being.
•Do not use your appliance to dry
clothes or kitchen towels.
•Do not use this appliance outdoors,
bathrooms, humid environments or
in places where the it can get wet.
•No responsibility or warranty claim
shall be assumed for damages aris-
ing from misuse or improper han-
dling of the appliance.
•Never attempt to dismantle the
appliance. No warranty claims are
accepted for damage caused by
improper handling.
•Only use the original parts or parts
recommended by the manufac-
turer.
•Do not leave this appliance unat-
tended while it is in use.
•Always use the appliance on a
stable, flat, clean dry, and non-slip
surface.
•The appliance should not be oper-
ated with an external clock timer or
separate remote control system.
•Before using the appliance for the
first time, clean all parts. Please
see the details given in the “Clean-
ing and Maintenance” section.
•Operate the appliance for its in-
tended purpose only as described
in this manual.
•Appliance becomes very hot while
it is in use. Pay attention not to
touch the hot parts inside the oven.
•Do not operate the oven empty.
•Cooking utensil may get hot due
to the heat transferred from the
heated food to the utensil. You
may need oven gloves to hold the
utensil.
•Utensils shall be checked to ensure
that they are suitable for use in mi-
crowave ovens.
•Do not place the oven on stoves or
other heat generating appliances.
Otherwise, it may be damaged and
the warranty becomes void.
•Steam may come out while open-
ing the covers or the foil after
cooking the food.
•The appliance and its accessible
surfaces may be very hot when the
appliance is in use.
•Door and outer glass may be very
hot when the appliance is in use.

Mcrowave Oven / User Manual
6 / EN
•Make sure that your mains power
supply complies with the informa-
tion supplied on the rating plate of
the appliance.
•The only way to disconnect the ap-
pliance from the power supply is to
remove the power plug from the
power outlet.
•Use the appliance with a grounded
outlet only.
•Never use the appliance if the
power cable or the appliance itself
is damaged.
•Do not use this appliance with an
extension cord.
•Never touch the appliance or its
plug with damp or wet hands.
•Place the appliance in a way so that
the plug is always accessible.
•Prevent damage to the power
cable by not squeezing, bending,
or rubbing it on sharp edges. Keep
the power cable away from hot
surfaces and naked flame.
•Make sure that there is no danger
that the power cable could be ac-
cidentally pulled or that someone
could trip over it when the appli-
ance is in use.
•Unplug the appliance before each
cleaning and when the appliance is
not in use.
•Do not pull the power cable of the
appliance to disconnect it from its
power supply and never wrap its
power cable around the appliance.
•Do not immerse the appliance,
power cable, or power plug in
water or any other liquids. Do not
hold it under running water.
•When heating food in plastic or
paper containers, keep an eye on
the oven due to the possibility of
ignition.
•Remove the wire strings and/or
metal handles of paper or plastic
bags before placing bags to the
oven.
•If smoke is observed, switch off
or unplug the appliance if safe to
do so and keep the door closed in
order to stifle any flames.
•Do not use microwave oven for
storage. Do not leave paper items,
cooking material or food inside the
oven when it is not being used.
•The contents of feeding bottles
and baby food jars should be
stirred or shaken and the tempera-
ture checked before consumption,
in order to avoid burns.
1 Important safety and envronmental
nstructons

Mcrowave Oven / User Manual 7 / EN
•This appliance is a Group 2 Class B
ISM equipment. Group 2 contains
all ISM (Industrial, Scientific and
Medical) equipment in which ra-
dio-frequency energy is intention-
ally generated and/or used in the
form of electromagnetic radiation
for the treatment of material, and
spark erosion equipment.
•Class B equipment is suitable for
use in domestic establishments
and establishments directly con-
nected to a low voltage power sup-
ply network.
•Do not use cooking oil in the oven.
Hot oil may damage the compo-
nents and materials of the oven,
and it may even cause skin burns.
•Pierce food with thick crust such as
potatoes, courgettes, apples and
chestnuts.
•Appliance must be placed so that
the rear side is facing the wall.
•Before moving the appliance,
please secure the turntable to pre-
vent damage.
•Eggs in their shell and whole hard-
boiled eggs must not be heated in
microwave ovens since they may
explode, even after microwave
heating has ended.
WARNING:
If the door or door seals
are damaged, the oven must not be
operated untl t has been repared
by a competent person.
WARNING:
It s hazardous for an-
yone other than a competent per-
son to carry out any servce or re-
par operaton whch nvolves the
removal of a cover whch gves pro-
tecton aganst exposure to mcro-
wave energy.
WARNING:
Lquds and other foods
must not be heated n sealed con-
taners snce they are lable to exp-
lode.
•The oven should be cleaned regu-
larly and any food deposits re-
moved.
•There should be min 20 cm free
space above the top surface of the
oven.
•Do not over-cook foods; otherwise,
you may cause a fire.
•Do not use chemicals and steam
assisted cleaners to clean the ap-
pliance.
•Extreme caution is advised when
being used near children and per-
sons who are restricted in their
physical, sensory or mental abili-
ties.
1 Important safety and envronmental
nstructons

Mcrowave Oven / User Manual
8 / EN
•This appliance can be used by the
children who are at the age of 8 or
over and by the people who have
limited physical, sensory or men-
tal capacity or who do not have
knowledge and experience, as
long as they are supervised with
regard to safe use of the product
or they are instructed accordingly
or understand the risks of using
the product. Children should not
play with the appliance. Cleaning
and user maintenance procedures
should not be performed by chil-
dren unless they are controlled by
their elders.
•
Danger of choking!
Keep all the
packaging materials away from
children.
•Due to excessive heat that arises in
grill and combination modes, chil-
dren should only be allowed to use
these modes under supervision of
an adult.
•Keep the product and its power
cable so that they are inaccessible
by children under 8 years old.
•Do not cook food directly on the
glass tray. Put the food in / on ap-
propriate kitchen utensils before
placing them in the oven.
•Metallic containers for food and
beverages are not allowed during
microwave cooking. Otherwise,
sparking may occur.
•This product is not designed to be
built-in. Do not place the product in
a cabinet or box while it is in use.
1.2 Complance wth the WEEE
Drectve and Dsposng of the
Waste Product:
Ths product comples wth EU WEEE Drectve
(2012/19/EU). Ths product bears a classfcaton
symbol for waste electrcal and electronc equp-
ment (WEEE).
Ths symbol ndcates that ths pro-
duct shall not be dsposed wth other
household wastes at the end of ts
servce lfe. Used devce must be re-
turned to offcal collecton pont for
recyclng of electrcal and electronc devces. To
fnd these collecton systems please contact to
your local authortes or retaler where the pro-
duct was puchased. Each household performs m-
portant role n recoverng and recyclng of old app-
lance. Approprate dsposal of used applance
helps prevent potental negatve consequences
for the envronment and human health.
1.3 Complance wth RoHS
Drectve
The product you have purchased comples wth
EU RoHS Drectve (2011/65/EU). It does not con-
tan harmful and prohbted materals specfed n
the Drectve.
1 Important safety and envronmental
nstructons

Mcrowave Oven / User Manual 9 / EN
1.4 Package nformaton
Packagng materals of the product are
manufactured from recyclable mater-
als n accordance wth our Natonal
Envronment Regulatons. Do not ds-
pose of the packagng materals together wth the
domestc or other wastes. Take them to the pac-
kagng materal collecton ponts desgnated by
the local authortes.
1 Important safety and envronmental
nstructons

Mcrowave Oven / User Manual
10 / EN
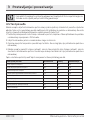
Markngs on the product or the values stated n other documents suppled wth the product are values obtaned under laboratory
condtons as per relevant standards. These values may vary accordng to the usage of the applance and ambent condtons.
Power values are tested at 230V.
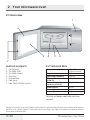
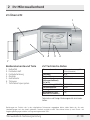
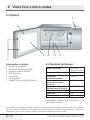
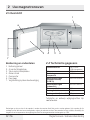
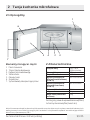
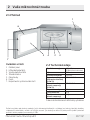
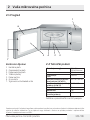
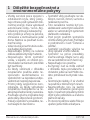
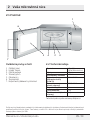
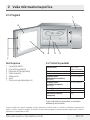
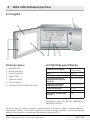
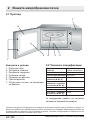
2 Your mcrowave oven
2.1 Overvew
Controls and parts
1. Control panel
2. Turntable shaft
3. Turntable support
4. Glass tray
5. Oven wndow
6. Door group
7. Door safety nterlock system
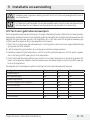
2.2 Techncal data
Power consumption
230 V~50 Hz
1250 W (Microwave)
Output
800 W
Operating frequency
2450 MHz
External dimensions
(H*W*D)
289.1*461*340 mm
External dimensions-kit
contents (H*W*D)
382*594*340 mm
Oven capacity
20 litres
Net weight
12 kg
Net weight (kit contents)
13 kg
Technical and design modification rights are
reserved.
6
7
1
235 4

Mcrowave Oven / User Manual 11 / EN
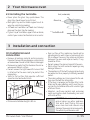
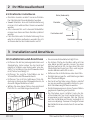
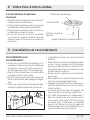
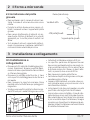
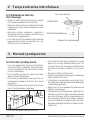
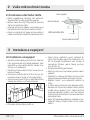
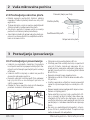
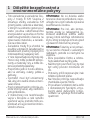
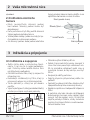
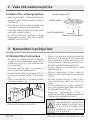
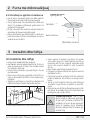
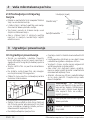
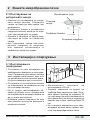
2.3 Installng the turntable
• Never place the glass tray upsde down. The
glass tray should never be restrcted.
• Both glass tray and turntable support must al-
ways be used durng cookng.
•All food and contaners of food must always
place on the glass tray for cookng.
•If glass tray or turntable support crack or break,
contact your nearest authorzed servce center.
2 Your mcrowave oven
Cam tabla
Döner tabla mili
Hub (underside)
Glass tray
Turntable shaft
Turntable support
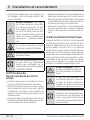
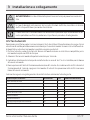
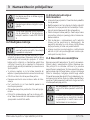
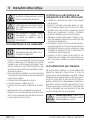
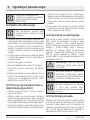
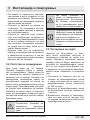
3 Installaton and connecton
3.1 Installaton and
connecton
•Remove all packng materal and accessores.
Examne the oven for any damage such as dents
or broken door. Do not nstall f oven s damaged.
•Remove any protectve flm found on the mcro-
wave oven cabnet surface.
•Do not remove the lght brown Mca cover that
s attached to the oven cavty to protect the
magnetron.
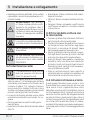
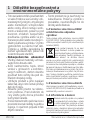
•Select a flat surface that provdes suffcent
space for nlet and outlet ducts.
20cm
30cm
20cm
min85cm
20cm
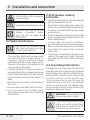
•Mnmum nstallaton heght s 85 cm.
•Rear surface of the applance should not be
placed aganst a wall. Leave a clearance of mn.
30 cm above the oven; the mnmum dstance
between the oven and adjacent walls, f any,
should be 20 cm.
•Do not remove the spacers beneath the oven.
•Obstructng the nlet and outlet openngs may
damage the oven.
•The applance s ftted wth a plug and must only
be connected to a properly nstalled grounded
socket.
•The mans voltage must correspond to the vol-
tage specfed on the ratng plate.
•If the plug s no longer accessble after nstal-
laton, an all-pole solatng swtch must be pre-
sent on the nstallaton sde wth a contact gap
of at least 3 mm.
•Adapters, mult-way sockets and extenson
cords must not be used. Overloadng can result
wth a rsk of fre.
A
WARNING: Do not place the oven
onto a hob or any other applance
that emts heat. Placng the oven
on or close to a heat resource may
damage the oven and consequently,
the warranty wll become vod.

Mcrowave Oven / User Manual
12 / EN
The accessble surface may be hot
durng operaton.
B
Do not trap or bend the power cable.
C
For bult-n use, refer to the ns-
tallaton nformaton conta-
ned n kt wth the model code
MOK 20232 X.
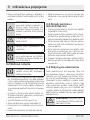
3.2 Rado nterference
C
Operaton of the mcrowave oven
may cause nterference on rados,
TVs and smlar applances.
•Place the oven as far away from rados and
TVs as possble. Operaton of mcrowave oven
may cause nterference to your rado or TV
recepton. 2. Plug your oven nto a standard
household outlet. Be sure the voltage and the
frequency s the same as the voltage and the
frequency on the ratng plate.
•In case of nterference, t may be reduced or el-
mnated by takng the precautons gven below:
•Clean the door and sealng surface of the oven.
•Set the antenna drecton of the rado or TV
agan.
•Reposton the oven based on the locaton of
the recever.
•Place mcrowave oven away from the recever.
•Plug the mcrowave oven to another outlet,
thus mcrowave oven and recever shall be on
dfferent lnes.
3 Installaton and connecton
3.3 Mcrowave cookng
prncples
•Prepare the food carefully. Place the remanng
parts to the outsde of the dsh.
•Pay attenton to the cookng tme. Cook n the
shortest tme specfed and add some more tme
f requred. Overcooked food may cause smoke
or may be burnt.
•Cover the food whle cookng. Coverng the food
prevents any splashng and helps to ensure that
food s cooked evenly.
•Turn over food such as poultry and hambur-
gers whle cookng them n a mcrowave oven n
order to accelerate cookng of ths knd of food.
Larger food such as roast must be turned over
at least once.
•Turn food such as meatballs upsde down n the
mddle of the cookng and replace them wth
each other from the center of the dsh to the
outsde.
3.4 Groundng nstructons
Ths applance must be grounded. Ths oven has a
groundng cable wth a grounded plug. Applance
must be plugged to a wall outlet nstalled and gro-
unded correctly. Groundng system allows a leak
wre for the electrcal current n case of a short
crcut and reduces the rsk of electrc shock. We
recommend usng an electrcal crcut dedcated
to the oven. Operatng wth hgh voltage s dan-
gerous and may cause fre or other accdents that
would cause damage to the oven.
AWARNING:
Msuse of groundng
plug may cause electrc shock.
B
If you have any questons on gro-
undng and electrcal nstructons,
please consult a qualfed electrc
techncan or servce personnel.

Mcrowave Oven / User Manual 13 / EN
3 Installaton and connecton
C
Manufacturer and/or dealer would not accept any responsblty for njures or damages
on the oven that may occur when electrcal connecton procedures are not followed.
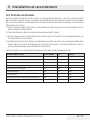
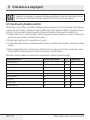
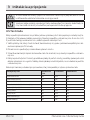
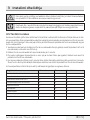
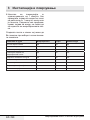
3.5 Utensl test
Never operate the mcrowave oven empty. The only excepton s the utensl test descrbed n the fol-
lowng secton. Some certan non-metal utensls may not be sutable for usng n mcrowave. If you are
not sure whether your utensl s sutable for mcrowave, you can perform the followng test.
1. Place the empty utensl to be tested nto the mcrowave oven together wth a mcrowave-compatble
glass flled wth 250 ml water.
2. Operate the mcrowave oven at max power for 1 mnute.
3. Check carefully the temperature of the utensl beng tested. If t s warmed up, t s not sutable for
use n mcrowave.
4. Never exceed the operatng tme lmt of 1 mnute. If you notce arcng durng 1 mnute of operaton,
stop the mcrowave. Utensls causng arcng are not sutable for use n mcrowave.
Followng lst s a general gude that would help you n selectng the rght utensl.
Cooking utensil Microwave Grill Combination
Heat-resistant glass Yes Yes Yes
Non-heat-resistant glass No No No
Heat-resistant ceramics Yes Yes Yes
Plastic dish suitable for microwave oven Yes No No
Paper kitchenware Yes No No
Metal tray No Yes No
Metal rack No Yes No
Aluminum foil and foil covers No Yes No
Foam materials No No No

Mcrowave Oven / User Manual
14 / EN
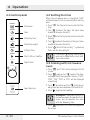
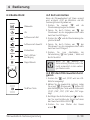
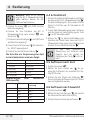
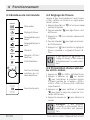
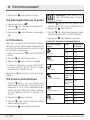
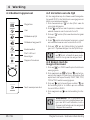
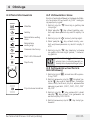
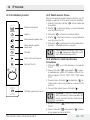
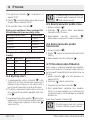
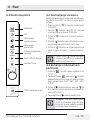
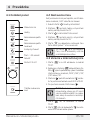
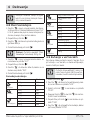
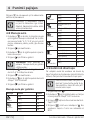
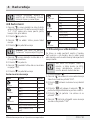
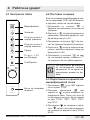
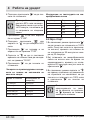
4.2 Settng the tme
When the mcrowave oven s energzed, "0:00”
wll be dsplayed n LED screen and buzzer wll rng
once.
1. Press “ ” the fgures for hours wll start flas-
hng.
2. Turn “ ” to adjust the hour; the nput value
should be between 0 and 23.
3. Press “ ” and the fgures for mnutes wll start
flashng.
4. Turn “ ” to adjust the mnutes; the nput value
should be between 0 and 59.
5. Press “ ” to fnsh tme settng. ":" symbol wll
flash, and the tme wll lght.
C
If you press “ ” durng tme settng,
oven wll automatcally return back
to prevous mode.
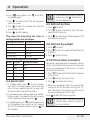
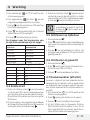
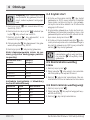
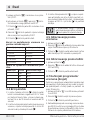
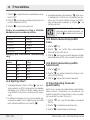
4.3 Cookng wth mcrowave
oven
1. Press “ ” and “P100” wll be dsplayed n LED
screen.
2. Press “ ” agan or turn “ ” to select the des-
red power. Each tme you press the key, “P100”,
“P80”, ”P50”, “P30” or “P10” wll be dsplayed
respectvely.
3. Press “ ” to confrm and turn “ ” to set the co-
okng tme to a value between 0:05 and 95:00.
4. Press “ ” agan to start cookng.
CExample:
If you want to use 80%
mcrowave power to cook for 20 m-
nutes, you can operate the oven
wth the followng steps.
5. Press “ ” once and “P100” wll be dsplayed n
the screen.
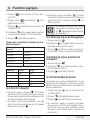
4 Operaton
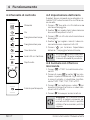
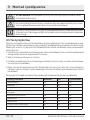
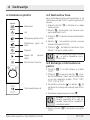
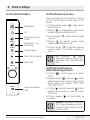
4.1 Control panel
Mcrowave
Clock
Defrost by tme
Defrost by weght
Ktchen Tmer
Start/+30 sec./Confrm
Stop/Cancel
Door Open Key

Mcrowave Oven / User Manual 15 / EN
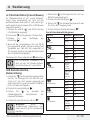
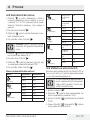
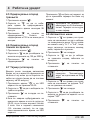
6. Press “ ” once agan or turn “ ” to set 80%
mcrowave power.
7. Press “ ” to confrm and "P 80” wll be dspla-
yed n the screen.
8. Turn “ ” to adjust the cookng tme untl the
oven dsplays "20:00".
9. Press “ ” to start cookng.
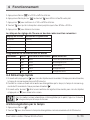
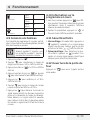
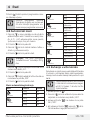
The steps for adjusting the time in
coding button are as below:
Setting the duration Increment amount
0-1 minute 5 seconds
1-5 minutes 10 seconds
5-10 minutes 30 seconds
10-30 minutes 1 minute
30-95 minutes 5 minutes
Microwave keypad instructions
Order Screen Microwave Power
1 P100 100%
2 P80 80%
3 P50 50%
4 P30 30%
5 P10 10%
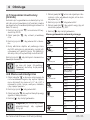
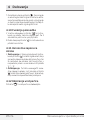
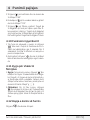
4.4 Quck start
1. In standby mode, press “ ” to start cookng
wth 100% mcrowave power. Each tme you
press the key, cookng tme wll ncrease untl
95 mnutes wth steps of 30 seconds.
2. In mcrowave oven cookng cookng or defrost
by tme modes, the cookng tme wll ncrease
by 30 seconds each tme you press “ ”.
3. In standby mode, turn “ ” counterclockwse to
set the cookng tme n order to start cookng
wth 100% mcrowave power and press “ ” to
start cookng.
C
In auto menu and defrost by weght
modes, pressng “ ” wll not ncre-
ase the cookng tme.
4.5 Defrost by tme
1. Press “ ” for once.
2. Turn “ ” to select the defrost tme. The max-
mum tme s 95 mnutes.
3. Press “ ” to start defrost. Defrost power s P30
and cannot be changed.
4.6 Defrost by weght
1. Press “ ” for once.
2. Turn “ ” to select the weght of food from 100
to 2000 g.
3. Press “ ” to start defrost.
4.7 Ktchen tmer (counter)
Your oven s equpped wth an automatc counter
whch s not lnked wth the oven functons and
can be used separately at the ktchen ( t can be
set to max. 95 mnutes.)
1. Press “ ” for once and 00:00 wll be dsplayed
n LED screen.
2. Turn “ ” to enter the correct tme.
3. Press “ ” to confrm the settng.
4. When the countdown from the entered tme
reaches to 00:00, the buzzer wll rng for 5 t-
mes. If the tme s set (24-hour system), current
tme wll be dsplayed n LED screen.
Press “ ” to abort the tmer at anytme.
C
Ktchen tmer functons dfferent
than 24-hours system. Ktchen t-
mer s just a tmer.
4 Operaton

Mcrowave Oven / User Manual
16 / EN
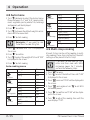
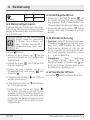
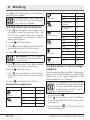
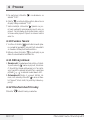
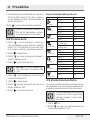
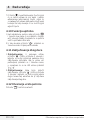
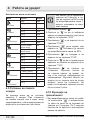
4.8 Auto menu
1. Turn “ ” clockwse to select the desred menu.
Menus between “A-1” and “A-8”, namely pzza,
meat, vegetable, pasta, potato, fsh, beverage
and popcorn, wll be dsplayed.
2. Press “ ” to confrm.
3. Turn “ ” to choose the default weght n accor-
dance wth the menu chart.
4. Press “ ” to start cookng.
CExample:
If you want to use
“Auto Menu" to cook 350 g fsh:
1. Turn “ ” clockwse untl "A-6" s dsplayed n
the screen.
2. Press “ ” to confrm.
3. Turn “ ” to select the weght of fsh untl "350"
s dsplayed n the screen.
4. Press “ ” to start cookng.
Auto cooking menu
Menu Weight Screen
A-1 Pizza
200 g 200
400 g 400
A-2 Meat
250 g 250
350 g 350
450 g 450
A-3 Vegetable
200 g 200
300 g 300
400 g 400
A-4 Pasta
50 g (with 450 ml cold
water) 50
100 g (with 800 ml cold
water) 100
A-5 Potato
200 g 200
400 g 400
600 g 600
A-6 Fish
250 g 250
350 g 350
450 g 450
A-7 Beverage
1 glass (120 ml) 1
2 glasses (240 ml) 2
3 glasses (360 ml) 3
A-8 Popcorn
50 g 50
100 g 100
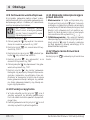
4.9 Mult-step cookng
At most 2 steps can be set for cookng. In mult-
step cookng, f one step s defrostng, then def-
rostng must be placed n the frst step.
C
If you want to thaw food for 5 m-
nutes and then cook wth 80%
mcrowave power for 7 mnutes,
perform the followng steps:
1. Press “ ” for once.
2. Turn “ ” to select the defrost tme untl "5:00"
s dsplayed n the screen.
3. Press “ ” once and “P100” wll be dsplayed n
the screen.
4. Press “ ” once agan or turn “ ” to set 80%
mcrowave power.
5. Press “ ” to confrm and "P 80” wll be dspla-
yed n the screen.
6. Turn “ ” to adjust the cookng tme untl the
oven dsplays "7:00".
4 Operaton

Mcrowave Oven / User Manual 17 / EN
7. Press “ ” to start cookng. Buzzer wll sound
once for the frst step and defrost tme count-
down wll start. Buzzer wll sound once agan
when enterng the second cookng step. Buzzer
wll sound for 5 tmes at the end of cookng.
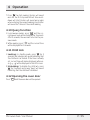
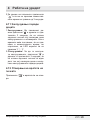
4.10 Query functon
1. In mcrowave modes, press “ ” and the cur-
rent power level wll be dsplayed for 3 seconds.
After 3 seconds, the oven wll return to the pre-
vous mode.
2. Whle cookng, press “ ” and the current tme
wll be dsplayed for 3 seconds.
4.11 Chld lock
1.
Locking:
In standby mode, press “ ” for 3
seconds and a buzzer wll sound ndcatng that
the chld lock s actvated. If the tme s already
set, current tme wll also be dsplayed; otherw-
se “ ” wll be dsplayed n the LED screen.
2.
Unlocking:
To dsable the chld lock, press
“” for 3 seconds and a long ”beep” wll sound
ndcatng that the chld lock s dsabled.
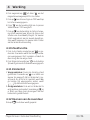
4.12 Openng the oven door
Press “ ” and the oven door wll be opened.
4 Operaton

Mcrowave Oven / User Manual
18 / EN
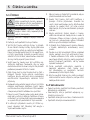
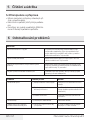
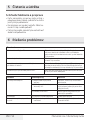
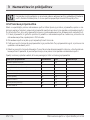
5.1 Cleanng
AWARNING:
Never use gaso-
lne, solvent, abrasve cleanng
agents, metal objects or hard
brushes to clean the applance.
BWARNING:
Never mmerse
the applance or ts power cable
n water or n any other lqud.
1. Turn the applance off and dsconnect t from
wall socket.
2. Wat for the applance to completely cool down.
3. Keep the nsde of the oven clean. Wpe wth a
damp cloth when splashed food or splled lqu-
ds stck on the walls of the oven. A mld deter-
gent may be used f the oven gets very drty.
Avod usng sprays and other harsh cleanng
agents as they may cause stans, marks, and
opaqueness on the door surface.
4. Outer surfaces of the oven must be cleaned
wth a damp cloth. Do not allow water ngress
from ventlaton openngs to prevent damage
to the operatng parts n the oven.
5. Wpe both sdes of the door and the glass, door
gaskets and parts near the gaskets frequently
wth a damp cloth n order to remove the overf-
lowng and splashng stans. Do not use abras-
ve cleanng agents.
6. Do not allow control panel to get wet. Clean
wth a soft damp cloth. Leave the door of the
oven open to prevent nadvertent operaton
whle cleanng the control panel.
7. If steam accumulates nsde or around the oven
door, wpe wth a soft cloth. Ths may occur
when the mcrowave oven s operated under
hgh humdty condtons. It s normal.
8. In some cases, you may need to remove the
glass tray for cleanng. Wash the tray n warm
soapy water or n a dshwasher.
5 Cleanng and mantenance
9. The roller ring and oven floor should be
cleaned regularly to avoid excessive noise.
10. It would be sufficient to wipe the lower surface
of the oven with a mild detergent. Roller ring
may be washed in warm soapy water or in a
dishwasher. When you remove the roller ring
from oven internal floor for cleaning, ensure
that you install it in the correct position while
replacing it.
11. In order to remove bad odors in your oven, put
a glass of water and juice and peel of a lemon
to a deep bowl suitable for use in microwave
and operate the oven for 5 minutes in
microwave mode. Wipe thoroughly and dry
with a soft cloth.
12. Please contact the authorized service when
the oven lamp needs to be replaced.
13. The oven should be cleaned regularly and
any food deposits should be removed. If the
oven is not kept clean, this may cause surface
defects that would affect the lifecycle of the
appliance negatively and that would possibly
cause risks.
14. Please do not dispose this appliance with
household waste; old ovens shall be disposed
to special waste centers provided by the
municipalities.
15. When the microwave oven is used in grill
function, a small amount of smoke and odor
may occur which will disappear after a certain
time of usage.
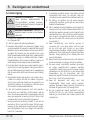
5.2 Storage
•If you do not ntend to use the applance for a
long tme, please store t carefully.
•Please make sure that the applance s unplug-
ged, cooled down and totally dry.
•Store the applance n a cool and dry place.
•Keep the applance out of the reach of chldren

Mcrowave Oven / User Manual 19 / EN
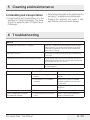
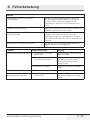
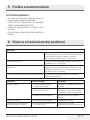
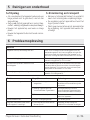
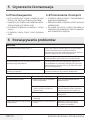
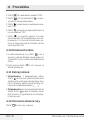
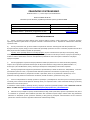
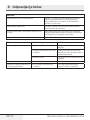
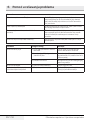
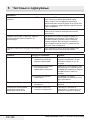
Normal
Microwave oven interferes with TV reception Radio and TV reception may be interfered when microwave
oven is operating. It is similar to the interference caused by
small electrical appliances, like mixer, vacuum cleaner, and
electric fan. It is normal.
Oven light is dimmed In low power microwave cooking, oven light may be dimmed.
It is normal.
Steam accumulating on door, hot air coming out of vents During cooking, steam may arise from the food. Most of this
steam will get out from vents. But some may accumulate on a
cool place like oven door. It is normal.
Oven started accidentally with no food in it. It is not allowed to run the appliance without any food inside.
It is very dangerous.
Problem Possible Reason Solution
Oven cannot be started. 1) Power cable is not plugged in
properly. Unplug. Then plug again after 10
seconds.
2) Fuse is blown or circuit breaker is
activated. Replace fuse or reset circuit breaker
(repaired by professional personnel of
our company).
3) Trouble with outlet. Test the outlet with other electrical
appliances.
Oven does not heat. 4) Door is not closed properly. Close the door properly.
Glass turntable makes noise when
microwave oven operates 5) Turntable and bottom of the oven
is dirty. Refer to “Cleaning and Maintenance"
section to clean dirty parts.
5 Cleanng and mantenance
5.3 Handlng and transportaton
•Durng handlng and transportaton, carry the
applance n ts orgnal packagng. The packa-
gng of the applance protects t aganst phys-
cal damages.
•Do not place heavy loads on the applance or the
packagng. The applance may be damaged.
•Droppng the applance wll render t non-
operatonal or cause permanent damage..
6 Troubleshootng

Bitte zunächst diese Anleitung lesen!
Werter Kunde,
Danke, dass Se sch für en Produkt der Marke Beko entscheden haben. Wr hoffen,
dass Se mt desem Produkt, das mt den höchsten Qualtätsanforderungen und der
modernsten Technologe hergestellt wurde, beste Ergebnsse erzelen. Btte lesen Se
de gesamte Bedenungsanletung und alle anderen Begletdokumente aufmerksam,
bevor Se das Produkt verwenden; bewahren Se se zum künftgen Nachschlagen
scher auf. Wenn Se das Produkt an enen Drtten wetergeben, händgen Se btte
auch dese Anletung aus. Befolgen Se alle Warnhnwese und Informatonen n deser
Anletung.
Bedeutung der Symbole
Folgende Symbole werden n den verschedenen Abschntten deser
Bedenungsanletung verwendet:
C
Wichtige Informationen und nützliche
Tipps in Bezug auf die Verwendung.
A
Warnhinweise zu gefährlichen
Situationen im Hinblick auf die
Sicherheit von Leib, Leben und
Eigentum.
Warnung vor heißen Flächen.
B
Warnung vor Stromschlag.
Deses Produkt wurde n umweltfreundlchen, modernen Enrchtungen ohne schädlche
Auswrkungen auf de Natur hergestellt.
Strona się ładuje...
Strona się ładuje...
Strona się ładuje...
Strona się ładuje...
Strona się ładuje...
Strona się ładuje...
Strona się ładuje...
Strona się ładuje...
Strona się ładuje...
Strona się ładuje...
Strona się ładuje...
Strona się ładuje...
Strona się ładuje...
Strona się ładuje...
Strona się ładuje...
Strona się ładuje...
Strona się ładuje...
Strona się ładuje...
Strona się ładuje...
Strona się ładuje...
Strona się ładuje...
Strona się ładuje...
Strona się ładuje...
Strona się ładuje...
Strona się ładuje...
Strona się ładuje...
Strona się ładuje...
Strona się ładuje...
Strona się ładuje...
Strona się ładuje...
Strona się ładuje...
Strona się ładuje...
Strona się ładuje...
Strona się ładuje...
Strona się ładuje...
Strona się ładuje...
Strona się ładuje...
Strona się ładuje...
Strona się ładuje...
Strona się ładuje...
Strona się ładuje...
Strona się ładuje...
Strona się ładuje...
Strona się ładuje...
Strona się ładuje...
Strona się ładuje...
Strona się ładuje...
Strona się ładuje...
Strona się ładuje...
Strona się ładuje...
Strona się ładuje...
Strona się ładuje...
Strona się ładuje...
Strona się ładuje...
Strona się ładuje...
Strona się ładuje...
Strona się ładuje...
Strona się ładuje...
Strona się ładuje...
Strona się ładuje...
Strona się ładuje...
Strona się ładuje...
Strona się ładuje...
Strona się ładuje...
Strona się ładuje...
Strona się ładuje...
Strona się ładuje...
Strona się ładuje...
Strona się ładuje...
Strona się ładuje...
Strona się ładuje...
Strona się ładuje...
Strona się ładuje...
Strona się ładuje...
Strona się ładuje...
Strona się ładuje...
Strona się ładuje...
Strona się ładuje...
Strona się ładuje...
Strona się ładuje...
Strona się ładuje...
Strona się ładuje...
Strona się ładuje...
Strona się ładuje...
Strona się ładuje...
Strona się ładuje...
Strona się ładuje...
Strona się ładuje...
Strona się ładuje...
Strona się ładuje...
Strona się ładuje...
Strona się ładuje...
Strona się ładuje...
Strona się ładuje...
Strona się ładuje...
Strona się ładuje...
Strona się ładuje...
Strona się ładuje...
Strona się ładuje...
Strona się ładuje...
Strona się ładuje...
Strona się ładuje...
Strona się ładuje...
Strona się ładuje...
Strona się ładuje...
Strona się ładuje...
Strona się ładuje...
Strona się ładuje...
Strona się ładuje...
Strona się ładuje...
Strona się ładuje...
Strona się ładuje...
Strona się ładuje...
Strona się ładuje...
Strona się ładuje...
Strona się ładuje...
Strona się ładuje...
Strona się ładuje...
Strona się ładuje...
Strona się ładuje...
Strona się ładuje...
Strona się ładuje...
Strona się ładuje...
Strona się ładuje...
Strona się ładuje...
Strona się ładuje...
Strona się ładuje...
Strona się ładuje...
Strona się ładuje...
Strona się ładuje...
Strona się ładuje...
Strona się ładuje...
Strona się ładuje...
Strona się ładuje...
Strona się ładuje...
Strona się ładuje...
Strona się ładuje...
Strona się ładuje...
Strona się ładuje...
Strona się ładuje...
Strona się ładuje...
Strona się ładuje...
Strona się ładuje...
Strona się ładuje...
Strona się ładuje...
Strona się ładuje...
Strona się ładuje...
Strona się ładuje...
Strona się ładuje...
Strona się ładuje...
Strona się ładuje...
Strona się ładuje...
Strona się ładuje...
Strona się ładuje...
Strona się ładuje...
Strona się ładuje...
Strona się ładuje...
Strona się ładuje...
Strona się ładuje...
Strona się ładuje...
Strona się ładuje...
Strona się ładuje...
Strona się ładuje...
Strona się ładuje...
Strona się ładuje...
Strona się ładuje...
Strona się ładuje...
Strona się ładuje...
Strona się ładuje...
Strona się ładuje...
Strona się ładuje...
Strona się ładuje...
Strona się ładuje...
Strona się ładuje...
Strona się ładuje...
Strona się ładuje...
Strona się ładuje...
Strona się ładuje...
Strona się ładuje...
Strona się ładuje...
Strona się ładuje...
Strona się ładuje...
Strona się ładuje...
Strona się ładuje...
Strona się ładuje...
Strona się ładuje...
Strona się ładuje...
Strona się ładuje...
Strona się ładuje...
Strona się ładuje...
Strona się ładuje...
Strona się ładuje...
Strona się ładuje...
Strona się ładuje...
Strona się ładuje...
Strona się ładuje...
Strona się ładuje...
Strona się ładuje...
Strona się ładuje...
Strona się ładuje...
Strona się ładuje...
Strona się ładuje...
Strona się ładuje...
Strona się ładuje...
Strona się ładuje...
Strona się ładuje...
Strona się ładuje...
Strona się ładuje...
Strona się ładuje...
Strona się ładuje...
Strona się ładuje...
Strona się ładuje...
Strona się ładuje...
Strona się ładuje...
Strona się ładuje...
-
 1
1
-
 2
2
-
 3
3
-
 4
4
-
 5
5
-
 6
6
-
 7
7
-
 8
8
-
 9
9
-
 10
10
-
 11
11
-
 12
12
-
 13
13
-
 14
14
-
 15
15
-
 16
16
-
 17
17
-
 18
18
-
 19
19
-
 20
20
-
 21
21
-
 22
22
-
 23
23
-
 24
24
-
 25
25
-
 26
26
-
 27
27
-
 28
28
-
 29
29
-
 30
30
-
 31
31
-
 32
32
-
 33
33
-
 34
34
-
 35
35
-
 36
36
-
 37
37
-
 38
38
-
 39
39
-
 40
40
-
 41
41
-
 42
42
-
 43
43
-
 44
44
-
 45
45
-
 46
46
-
 47
47
-
 48
48
-
 49
49
-
 50
50
-
 51
51
-
 52
52
-
 53
53
-
 54
54
-
 55
55
-
 56
56
-
 57
57
-
 58
58
-
 59
59
-
 60
60
-
 61
61
-
 62
62
-
 63
63
-
 64
64
-
 65
65
-
 66
66
-
 67
67
-
 68
68
-
 69
69
-
 70
70
-
 71
71
-
 72
72
-
 73
73
-
 74
74
-
 75
75
-
 76
76
-
 77
77
-
 78
78
-
 79
79
-
 80
80
-
 81
81
-
 82
82
-
 83
83
-
 84
84
-
 85
85
-
 86
86
-
 87
87
-
 88
88
-
 89
89
-
 90
90
-
 91
91
-
 92
92
-
 93
93
-
 94
94
-
 95
95
-
 96
96
-
 97
97
-
 98
98
-
 99
99
-
 100
100
-
 101
101
-
 102
102
-
 103
103
-
 104
104
-
 105
105
-
 106
106
-
 107
107
-
 108
108
-
 109
109
-
 110
110
-
 111
111
-
 112
112
-
 113
113
-
 114
114
-
 115
115
-
 116
116
-
 117
117
-
 118
118
-
 119
119
-
 120
120
-
 121
121
-
 122
122
-
 123
123
-
 124
124
-
 125
125
-
 126
126
-
 127
127
-
 128
128
-
 129
129
-
 130
130
-
 131
131
-
 132
132
-
 133
133
-
 134
134
-
 135
135
-
 136
136
-
 137
137
-
 138
138
-
 139
139
-
 140
140
-
 141
141
-
 142
142
-
 143
143
-
 144
144
-
 145
145
-
 146
146
-
 147
147
-
 148
148
-
 149
149
-
 150
150
-
 151
151
-
 152
152
-
 153
153
-
 154
154
-
 155
155
-
 156
156
-
 157
157
-
 158
158
-
 159
159
-
 160
160
-
 161
161
-
 162
162
-
 163
163
-
 164
164
-
 165
165
-
 166
166
-
 167
167
-
 168
168
-
 169
169
-
 170
170
-
 171
171
-
 172
172
-
 173
173
-
 174
174
-
 175
175
-
 176
176
-
 177
177
-
 178
178
-
 179
179
-
 180
180
-
 181
181
-
 182
182
-
 183
183
-
 184
184
-
 185
185
-
 186
186
-
 187
187
-
 188
188
-
 189
189
-
 190
190
-
 191
191
-
 192
192
-
 193
193
-
 194
194
-
 195
195
-
 196
196
-
 197
197
-
 198
198
-
 199
199
-
 200
200
-
 201
201
-
 202
202
-
 203
203
-
 204
204
-
 205
205
-
 206
206
-
 207
207
-
 208
208
-
 209
209
-
 210
210
-
 211
211
-
 212
212
-
 213
213
-
 214
214
-
 215
215
-
 216
216
-
 217
217
-
 218
218
-
 219
219
-
 220
220
-
 221
221
-
 222
222
-
 223
223
-
 224
224
-
 225
225
-
 226
226
-
 227
227
-
 228
228
-
 229
229
-
 230
230
-
 231
231
-
 232
232
-
 233
233
-
 234
234
-
 235
235


Beko BMOB20231BG Instrukcja obsługi
- Kategoria
- Mikrofale
- Typ
- Instrukcja obsługi
w innych językach
- italiano: Beko BMOB20231BG Manuale utente
- slovenčina: Beko BMOB20231BG Používateľská príručka
- français: Beko BMOB20231BG Manuel utilisateur