
410
Crimp Sleeve
Wire Connector
Warranty limited solely to repair or replacement;
no warranty of merchantability, fitness for a
particular purpose or consequential damages.
Pat. No. 2,810,897
IDEAL INDUSTRIES, INC.
Sycamore, IL 60178, U.S.A.
800-435-0705 Customer Assistance
www.idealindustries.com
I 9639-2 Made in U.S.A.

To be sold only with installation instructions.
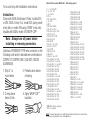
Instructions
Crimp with IDEAL Electrician’s Pliers, models 430
or 420; IDEAL Crimp Tool, model 425 (using small
crimp die) or model 429 using “BARE” crimp die).
Insulate with IDEAL model 415 WRAP-CAP
®
.
Note: Always turn off power before
installing or removing connectors.
Listed as a PRESSURE-TYPE wire connector on the
following solid and/or stranded wire combinations:
COPPER TO COPPER ONLY (DO NOT USE ON
ALUMINUM).
1. Strip 2” & 2. Pretwist wires before
insert wires. crimping.
3. Crimp sleeve 4. Apply WRAP-CAP
®
twice & trim. insulator.
Model 410 Sleeve with WRAP-CAP
®
- 600V listing applies*
5, 6, 7, 8, 9 or 10 #18
3, 4, 5, 6 or 7 #16
3, 4, 5 or 6 #14
2 #14 Str
1 #14 Sol w/1 #14 Str
2, 3 or 4 #12
2 #10 Str
1 #10 Sol w/1 #10 Str
1 #14 w/1, 2 or 3 #12
1 #14 w/1 or 2 #12 & 1 #10
2 #14 w/1 or 2 #12
2 #14 w/1 #12 & 1 #10
3 #14 w/1 or 2 #12
3 #14 w/1 #10
1 #12 w/1, 2, 3 or 4 #14
2 #12 w/1, 2 or 3 #14
2 #12 w/1 #10
2 #10 w/1 or 2 #14
2 #10 w/1 #12
1 #10 w/1, 2, 3 or 4 #14
1 #12 w/6 #16 & 1 or 2 #18
1 #12 w/5 #16 & 1, 2 or 3 #18
1 #12 w/4 #16 & 1, 2, 3 or 4 #18
1 #12 w/3 #16 & 1 to 5 #18
1 #12 w/2 #16 & 1 to 6 #18
1 #12 w/1 #16 & 1 to 8 #18
2 #12 w/4 #16 & 1 #18
2 #12 w/3 #16 & 1, 2 or 3 #18
2 #12 w/2 #16 & 1 to 4 #18
2 #12 w/1 #16 & 1 to 5 #18
3 #12 w/1 #16 & 1 or 2 #18
1 #14 w/6 #16 & 1 #18
1 #14 w/5 #16 & 1 or 2 #18
1 #14 w/4 #16 & 1, 2, 3 or 4 #18
1 #14 w/3 #16 & 1 to 5 #18
1 #14 w/2 #16 & 1 to 7 #18
1 #14 w/1 #16 & 1 to 8 #18
2 #14 w/4 #16 & 1 #18
2 #14 w/3 #16 & 3 #18
2 #14 w/2 #16 & 5 #18
2 #14 w/1 #16 & 7 #18
3 #14 w/3 #16 & 1 or 2 #18
3 #14 w/2 #16 & 1 to 4 #18
3 #14 w/1 #16 & 1 to 5 #18
4 #14 w/1 #16 & 1 or 2 #18
1 #10 w/1 or 2 #12
1 #10 w/1 to 6 #16 Str
1 #10 Str w/1 to 6 #16
1 #10 w/1 to 2 #18
1 #10 w/4 to 7 #18
1 #12 w/1 to 9 #18 or 1 to 7 #16
2 #12 w/1 to 6 #18 or 1 to 4 #16
3 #12 w/1 to 3 #18 or 1 or 2 #16
1 #14 w/1 to 9 #18 or 1 to 7 #16
2 #14 w/1 to 8 #18 or 1 to 5 #16
3 #14 w/1 to 5 #18 or 1 to 4 #16
4 #14 w/1 to 3 #18 or 1 or 2 #16
1 #16 w/3 to 7 #18
2 #16 w/2 to 8 #18
3 #16 w/1 to 7 #18
4 #16 w/1 to 5 #18
5 #16 w/1 to 4 #18
6 #16 w/1 or 2 #18
7 #16 w/1 #18
1 #10 w/5 #16 & 1 #18
1 #10 w/4 #16 & 1, 2 or 3 #18
1 #10 w/3 #16 & 1 to 4 #18
1 #10 w/2 #16 & 1 to 6 #18
1 #10 w/1 #16 & 1 to 8 #18
2 #10 w/1 or 2 #16
2 #10 w/1 #16 & 1 or 2 #18
2 #10 w/1, 2, 3 or 4 #18
*1000V Max. in fixtures and signs.
**Not C.S.A. certified.
OEM: A connector designated as an OEM (Original Equipment Manufacturer) connector does
not require pre-twisting when used in OEM applications.
-
 1
1
-
 2
2


