Bissell Pet Hair Eraser 33N7-N Instrukcja obsługi
- Kategoria
- Odkurzacze
- Typ
- Instrukcja obsługi

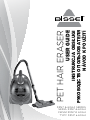
PET HAIR ERASER
USER GUIDE
33N7 & 60A4 SERIES
SERIA 33N7 & 60A4
33N7 60A4
TYPY 33N7 a 60A4

Thanks for buying a BISSELL vacuum
We’re glad you purchased a BISSELL
vacuum. Everything we know about floor
care went into the design and construc-
tion of this complete, high-tech home
cleaning system.
Your BISSELL vacuum is well made,
and we back it with a limited two-year
warranty. We also stand behind it with
a knowledgeable, dedicated Consumer
Care department, so, should you ever
have a problem, you’ll receive fast, con-
siderate assistance.
My great-grandfather invented the floor
sweeper in 1876. Today, BISSELL is a
global leader in the design, manufacture,
and service of high quality homecare
products like your BISSELL vacuum.
Thanks again, from all of us at BISSELL.
Mark J. Bissell
Chairman & CEO
Dziękujemy za zakup odkurzacza rmy BISSELL
Благодарим Вас за покупку пылесоса
BISSELL
Děkujeme Vám, že jste si vybrali vysavač
značky BISSELL
2
www.BISSELL.com

RU
......4
..............8
..........................9
..................10-15
...........16-20
...21
.................25
........................26
.......28
..............28
CS
................7
..................8
..........................9
......................10-15
......................16-20
.................24
.....................25
..........................27
.................28
................28
EN
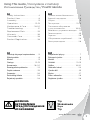
Safety Instructions..............4
Product View...................8
Assembly ......................9
Operations ..................10-15
Maintenance & Care ........16-20
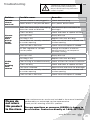
Troubleshooting ................21
Replacement Parts ............25
Warranty ......................26
Consumer Care................28
Product Registration...........28
PL
....5
..................8
....................... 9
...................10-15
................16-20
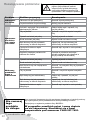
........ 22
............... 25
.................... 26
............. 28
............. 28
www.BISSELL.com
3
Using This Guide / Korzystanie z instrukcji
Использование Руководства / Použití návodu
WARNING
ПРЕДУПРЕЖДЕНИЕ
Tip
Wskazówka
Верх
Tip

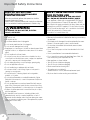
Important Safety Instructions
www.BISSELL.com
4
» Use indoors only
» For dry pick up only.
» Do not leave machine when it is plugged in
» Do not service machine when it is plugged in
» Do not use with damaged cord or plug
» If appliance is not working as it should, has been dropped, dam-
aged, left outdoors, or dropped into water, return it to a service
agent.
» Do not handle unit with wet hands.
» Do not pull or carry by cord, use cord as a handle, close door
on cord, pull cord around sharp corners or edges, run appliance
over cord, or expose cord to heated surfaces.
» Do not unplug by pulling on cord. Unplug by grasping plug.
» Do not run appliance over cord.
» Do not handle plug or appliance with wet hands.
» Do not expose hair, loose clothing, fingers or body parts to
openings or moving parts.
» Do not pick up hot or burning objects such as cigarettes,
matches, or hot ashes.
» Do not pick up flammable or combustible materials (lighter
fluid, petrol, kerosene, etc.) or use in the presence of explosive
liquids or vapours
» Do not use appliance in an enclosed space filled with vapours
given off by oil base paint, paint thinner, some moth proofing
substances, flammable dust, or other explosive or toxic vapours
» Children should be supervised to ensure that they do not play
with the appliance.
» Not intended for use by persons (including children) with
reduced physical, sensory or mental capabilities, or lack of
experience and knowledge, unless they have been given super-
vision or instruction concerning use of the appliance by a person
responsible for their safety
» Remove plug from electrical outlet before cleaning or maintaining
the appliance.
» If the supply cord is damaged, it must be replaced by the manu-
facturer or its service agent in order to avoid a hazard.)
» Do not pick up toxic material (chlorine bleach, ammonia, drain
cleaner, petrol, etc.).
» Do not use for any purpose other than described in this User’s
Guide
» Use only manufacturer’s recommended attachments
» Do not use with any opening blocked; keep free of dust, lint,
hair, and anything that may reduce air flow.
» Keep appliance on a level surface
» Turn off all controls before unplugging
» Turn off all controls before unplugging
» Be extra careful when cleaning stairs
» This appliance is provided with
double insulation. Use only identical replacement parts.
» Pay close attention when working around children
SAVE THESE INSTRUCTIONS
FOR FUTURE USE
FOR OPERATION ON A 220-240 VOLT
A.C. 50/60 HZ POWER SUPPLY ONLY.
If your appliance is fitted with a nonrewireable BS 1363 plug it
must not be used unless a 13 amp (ASTA approved to BS 1362)
fuse is fitted in the carrier contained in the plug. (Spares may be
obtained from your BISSELL supplier). If for any reason the plug
is cut off, it must be disposed of, as it is an electric shock hazard
should it be inserted into a 13 amp socket.
This model is for household use only.
READ ALL INSTRUCTIONS
BEFORE USING YOUR BAGLESS
CANISTER VACUUM.
When using an electrical appliance, basic precautions should be
observed, including the following:
Always connect to a properly Earthed outlet. Unplug from outlet when
not in use and before conducting maintenance or troubleshooting.
WARNING
To REdUCE ThE RiSk of fiRE, ELECTRiC
ShoCk, oR iNjURy:
EN

Ważne informacje dotyczące bezpieczeństwa
www.BISSELL.com
5
»
»
»
»
»
»
»
»
»
»
»
»
»
»
»
»
»
»
»
»
»
»
»
»
»
»
»
»
»
»
PL

www.BISSELL.com
6
RU
Важная информация по технике безопасности
СОХРАНИТЕ ЭТУ ИНСТРУКЦИЮ ДЛЯ
ДАЛЬНЕЙШЕГО ИСПОЛЬЗОВАНИЯ
ТОЛЬКО ДЛЯ РАБОТЫ ПРИ ЭЛЕКТРОПИТАНИИ
220-240 В ПЕРЕМЕННОГО ТОКА С ЧАСТОТОЙ
50/60 ГЦ.
»
»
»
»
»
»
»
»
»
»
»
»
»
»
»
»
»
»
»
»
»
»
»
»
»
»
ПЕРЕД ИСПОЛЬЗОВАНИЕМ
ПЫЛЕСОСА BISSELL ВНИМАТЕЛЬНО
ПРОЧТИТЕ ИНСТРУКЦИЮ ПО
ЭКСПЛУАТАЦИИ.
ПРЕДУПРЕЖДЕНИЕ
Во избежание РиСКа ВозгоРания,
ПоРажения ЭЛеКТРоТоКоМ иЛи
дРугой ТРаВМЫ:

Důležité bezpečnostní pokyny
www.BISSELL.com
7
CS
»
»
»
»
»
»
»
»
»
»
»
»
»
»
»
»
»
»
»
»
»
»
»
»
»
»
»
»
»
»

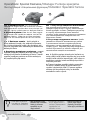
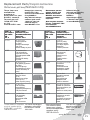
Product View/Widok produktu
Внешний вид изделия/Obrázek výrobku
16
17
18
www.BISSELL.com
8
Do not plug in your vacuum
until you are familiar with all
instructions and operating
procedures.
EN
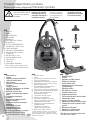
1 Flex Hose
2 Handle
3 Air Flow Regulator
4 Carry Handle
5 Swivel Hose
6 Easy Empty Dust Container
7 Power Button
8 Post-Motor HEPA Media Filter*
9 Variable Suction Power Control
10 Clean Filter Indicator
11 Automatic Cord Rewind Button
12 Telescoping Extension Wand
13 Storage Clip
14 Pet Hair Lifter Floor Tool
15 Hard Surface Brush Switch
16 Upholstery Tool
17 Crevice Tool
18 Dusting Brush Attachment
*
The filter media, not the vacuum as a whole,
complies with IEST-RP-CC001.5 HEPA standard.
PL
1
2
3
4
5
6
7
8
9
10
11
12
13
14
15
16
17
18
*
RU
1
2
3
4
5
6
7
8
9
10
11
12
13
14
15
16
17
18
*
CS
1
2
3
4
5
6
7
8
9
10
11
12
13
14
15
16
17
18
*
1
2
3
12
13
4
15
14
11
9
8
10
6
5
7

www.BISSELL.com
9
EN
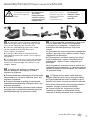
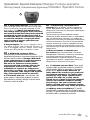
1. Connect swivel hose by squeezing
both locking buttons and inserting it into
the suction opening on the canister.
2. Connect telescoping extension wand
to the handle end of the flex hose.
Twist slightly to tighten.
3. Connect floor tool to the end of the
telescoping extension wand. Twist slightly
to tighten.
4. To store your vacuum, insert the storage
clip (located on the telescoping extension
wand) into the storage slot shown in the
images above.
PL
1.
2.
3.
4.
RU
1.
Присоедините вращающийся фиксатор
шланга, нажав обе кнопки с блокировкой,
и вставив его в отверстие в корпусе для
всасывания. Вставив фиксатор, отпустите
кнопки.
2.
Присоедините телескопическую раздвижную
трубку к другому концу гибкого шланга. Слегка
поверните для фиксации.
3.
Присоедините половую насадку для сбора
шерсти животных к концу телескопической
раздвижной трубки. Слегка поверните для
фиксации.
4.
Для хранения пылесоса вставьте зажим для
хранения (расположенный на телескопической
трубке) в отверстие для хранения, как показано
на рисунках выше.
CS
1.
2.
3.
4.
Assembly/Montaż/
Сборка пылесоса
/Montáž
Plastic film can be dangerous.
To avoid danger of suocation,
keep away from babies and
children.
1 2 3 4

www.BISSELL.com
10
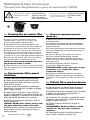
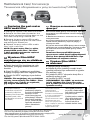
EN
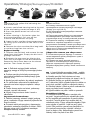
1. Gently pull out the power cord,
watching for the yellow line indicating the
end of the cord.
2. Attach specialized cleaning tool to the end
of the telescoping wand (see page 9, #3).
3. Press the power button to turn on the
machine.
4. When cleaning is finished or when the
dust container/bag is full, turn off the
machine and disconnect the plug.
5. Open the dirt cup/dust bag compartment
by lifting up on the latch on the front of the
vacuum.
6. Remove the dust container/dust bag hold-
er and dust bag from the vacuum.
Bagless Cleaning
7. Unfasten the red latch and remove the top
cover from the hinges. Empty the dirt into a
garbage container.
8. Reattach the top cover by aligning the
slots with the hinges on the dust container.
Rotate the front cover down to the closed
position. Then fasten the latch.
PL
1.
2.
3.
4.
5.
6.
Czyszczenie bezworkowe
7.
8.
RU
1. Аккуратно выньте шнур питания до
желтой полоски.
2. К концу телескопической трубы
присоедините соответствующую чистящую
насадку (см. стр.9, № 3).
3. Для включения электроприбора нажмите
кнопку включения
4. После окончания уборки или наполнения
контейнера/мешка для сбора пыли выньте
штепсельную вилку из электрической розетки.
5. Поднимите защелку на передней части
пылесоса и откройте отделение, в котором
расположены контейнер / мешок для сбора пыли.
6. Снимите держатель контейнера/мешка для
сбора пыли и выньте контейнер/мешок для
сбора пыли из пылесоса
Уборка без мешка для сбора пыли
7. Отстегните красную защелку и снимите с
петель верхнюю крышку. Выбросите грязь в
мусорный контейнер.
8. Совместите щели верхней крышки с
петлями на контейнере для сбора пыли и
обратно подсоединить верхнюю крышку.
Закройте переднюю крышку. Затем застегните
защелку.
CS
1.
2.
3.
4.
5.
6.
7.
8.
Operations/Obsługa/
Эксплуатация
/Ovládání
1
5 6 7
8

www.BISSELL.com
11
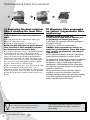
EN
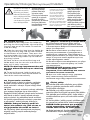
Bagged Cleaning
9. Release the dust bag from the holder by
pressing the dust bag holder clip and pulling
the dust bag out of the holder. Discard the
used dust bag.
10. Slide the new dust bag into the holder by
inserting the dust bag into the tabs located
at the bottom of the holder. Then press the
dust bag holder clip, insert the dust bag and
release the dust bag holder clip to hold the
dust bag in place.
11. Place the dust container/dust bag and
holder back into the vacuum and close the
door until it locks into place.
NOTE: The dust bag compartment door will
not close without the dirt cup or a dust bag
in place.
12. To rewind the cord, hold the plug and
press the automatic cord rewind button to
rewind the cord automatically.
PL
Czyszczenie z workiem
9.
10.
11.
12.
RU
Уборка с мешком для сбора пыли
9.
Отсоедините мешок для сбора пыли от
держателя, нажав на зажим держателя мешка
и вытащив мешок. Выбросьте использованный
мешок для сбора пыли.
10.
Вставьте новый мешок для сбора пыли в
выступы, расположенные на дне держателя и
задвиньте его в держатель. Затем нажмите на
зажим держателя мешка для сбора пыли, вставьте
мешок и отпустите зажим держателя для того,
чтобы зафиксировать мешок.
11.
Вставьте обратно контейнер/мешок для сбора
пыли в пылесос и опустите крышку так, чтобы
она защелкнулась.
ПРИМЕЧАНИЕ: крышка отделения
для мешка для сбора пыли не
закроется, если контейнер или мешок
для пыли не стоят на месте.
12.
Для того чтобы свернуть шнур, удерживая
вилку, нажмите кнопку автоматического
сматывания шнура. Шнур свернется автоматически.
CS
9.
10.
11.
12.
Operations/Obsługa/
Эксплуатация
/Ovládání
Be careful to avoid injury as
cord retracts very quickly.
Before using your vacuum,
make sure that either the dirt
cup or a dust bag and all filters
are in place. Do not operate
your vacuum without the dirt
cup or dust bag and filters.
9 11

www.BISSELL.com
12
EN
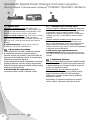
1. Floor Tool
Vacuum Carpeted Areas Set the multi
surface brush switch to the carpet position
(brushes should retract) and flip down the
Pet Hair Lifter until it clicks into place.
Vacuum Hard Surfaces Set the multi surface
brush switch to the hard floor position
(brushes should become visible) and flip up
the Pet Hair Lifter by pushing the release
button.
2. Upholstery tool Use to clean curtains,
draperies, cushions and fabrics:
PL
1.
2.
RU
1. Насадка для чистки пола
Уборка ковров и ковровых покрытий. Опустите
приспособление для сбора шерсти до фиксации
в передней части половой насадки. Затем
переключите режим поверхности в положение
«ковер» для того, чтобы убрать щетки внутрь
насадки.
Уборка твердых поверхностей Переключите
режим поверхности в положение «пол» для
того, чтобы выдвинуть щетки из насадки. Затем
уберите приспособление для сбора шерсти,
нажав желтую кнопку спуска. Этим Вы поднимете
и уберете приспособление.
2. Насадка для драпированных
поверхностей
Используйте данную насадку
для чистки штор, портьер, подушек и различных
тканей.
CS
1. Podlahový nástavec
2.
Operations: Special Tools/ Obsługa: Końcówki specjalne
Эксплуатация: специальные насадки
/
Ovládání: Speciální nástavce
21

www.BISSELL.com
13
EN
3. Dusting brush attachment Attach the
dusting brush attachment to the upholstery
tool to dust furniture, blinds, books, lamps,
shelves and baseboards.
4. Crevice tool Use in tight, narrow spaces.
5. Wide TurboBrush Use rotating brush
action for small, flat areas such as cushions
and beds.
6. Pet Contour Tool Use to reach into cor-
ners and along edges on stairs, as well as
armrests and other curved surfaces.
PL
3.
4.
5.
6.
RU
3.
Приспособление для сбора пыли:
Присоедините его к насадке для драпированных
поверхностей для чистки мебели, штор, книг,
ламп, полок и плинтусов от пыли.
4.
Насадка для чистки труднодоступных мест:
Используйте насадку для очистки любых
труднодоступных мест.
5.
Турбо-щетка Wide Pet TurboBrush:
Используйте данную вращающуюся насадку для
небольших плоских поверхностей, таких как
подушки, мягкая мебель и кровати.
6.
Насадка Pet contour Tool: Используйте
насадку для уборки в углах и зазорах лестниц, а
также других труднодоступных местах. Насадку
можно переворачивать и использовать в любом
направлении.
CS
3.
4.
5.
6.
Operations: Special Tools/ Obsługa: Końcówki specjalne
Эксплуатация: специальные насадки
/
Ovládání: Speciální nástavce
3 54 6

www.BISSELL.com
14
1
EN
1. Variable Suction Turn the control
toward the larger dots for maximum suction
and toward the smaller dots to minimize suc-
tion for lightly soiled areas or delicate fabrics.
2. Air flow regulator Slide the air flow regula-
tor towards the handle to reduce suction for
delicate fabrics. Slide the air flow regulator
down to the closed position for full suction.
PL
1.
2.
RU
1.
Регулятор мощности всасывания
Для максимальной мощности всасывания
поверните регулятор в сторону, обозначенную
более крупными точками. Поверните регулятор
в сторону, обозначенную более мелкими
точками, чтобы уменьшить мощность всасывания
для слабозагрязненных поверхностей или
деликатных тканей.
2.
Регулятор воздушного потока. Чтобы
уменьшить мощность всасывания при работе
с деликатными тканями откройте регулятор
воздушного потока, передвинув регулятор в
сторону ручки. Закройте регулятор воздушного
потока, опустив его до полного закрытия для
максимальной мощности всасывания.
CS
1.
2.
Operations: Special Features/Obsługa: Funkcje specjalne
Эксплуатация: специальные функции
/Ovládání: Speciální funkce
2
» Small objects can block the
hose and tools. Check them
occasionally for obstructions.
»
»
»

www.BISSELL.com
15
EN
3. Clean Filter Indicator If the indicator
turns orange while you are vacuuming, your
filters need to be cleaned/replaced or the
dust bag is full. NOTE: The indicator may
turn orange when using the tools. This may
not mean that the filters need to be cleaned
or replaced, or that the dust bag is full. If
the indicator does not turn off once the tool
is removed, check for a clog in the hose/
tools or clean or replace your filters (or
replace the dust bag).
4. Bag or Bagless To use as a bagless vacu-
um, place the dirt cup inside the vacuum. To
use as a bagged vacuum, attach a dust bag
to the dust bag holder and place inside.
PL
3.
4.
RU
3.
Индикатор загрязненности
фильтра Если во время уборки индикатор
станет оранжевым это значит, что мешок для
сбора пыли наполнен или фильтры необходимо
почистить/заменить.
Примечание: при использовании насадок
индикатор может изменить цвет на оранжевый.
Это не обязательно означает, что мешок для
сбора пыли наполнен или фильтры необходимо
почистить/заменить. Если после отсоединения
насадки индикатор не погас, проверьте шланг/
насадки на наличие закупорки и/или почистите
или замените фильтры (или замените мешок для
сбора пыли).
4.
Использование с мешком или
без мешка Для использования в качестве
безмешкового пылесоса, поместите контейнер
для сбора грязи внутрь пылесоса. Для
использования в качестве пылесоса с мешком
присоедините мешок к держателю мешка для
сбора пыли и поместить его внутрь.
CS
3. Ukazatel zanesení filtru.
4.
Operations: Special Features/Obsługa: Funkcje specjalne
Эксплуатация: специальные функции
/Ovládání: Speciální funkce
4

www.BISSELL.com
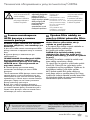
EN
Cleaning the pre-motor filter
1. Unplug the vacuum from electrical outlet.
2. Open the dust container/dust bag
compartment and lift out the dirt cup
or dust bag holder and dust bag.
3. Remove the filter frame (located on the
inside of the vacuum) from the filter holder by
grasping the lip of the frame and pulling up.
4. Remove the filter (A) from the filter frame
and clean by hand washing in warm water. A
mild detergent can be used if desired. Allow
the filter to air dry thoroughly before replacing.
5. Place the filter back into the filter frame
and replace back inside the machine.
NOTE: The filter frame should be placed so
the protective frame is visible.
6. Place the dust container or dust bag holder
and dust bag back into the compartment and
close the lid.
PL
1.
2.
3.
4.
5.
6.
RU
Очистка предмоторного
фильтра
1.
Выключите пылесос и отключите его от сети
электропитания.
2.
Откройте отделение для контейнера/мешка
для сбора пыли, подняв задвижку на передней
панели пылесоса..
3.
Удалите рамку фильтра из держателя фильтра.
Для этого возьмитесь за специальный выступ и
потяните вверх.
4.
Удалите фильтр (А) из рамки и очистите
вручную, промыв теплой водой. Можно
воспользоваться мягким моющим средством.
Перед тем, как снова установить фильтр, дайте
ему просохнуть.
5.
Поместите фильтр обратно в рамку и
установите в держатель рамки.
ПРИМЕЧАНИЕ: рамку фильтра следует
размещать так, чтобы был виден
защитный корпус.
6.
Поместите контейнер обратно в пылесос.
7.
Закройте крышку отделения для контейнера
для пыли и слегка нажмите, чтобы она встала на
место.
CS
1.
2.
3.
4.
5.
6.
16
Do not operate cleaner with
damp or wet filters or without
vacuum bags and all filters
in place.
3
A
A
Maintenance & Care/ Konserwacja
Техническое обслуживание и уход за пылесосом
/ Údržba

www.BISSELL.com
17
Maintenance & Care/ Konserwacja
Техническое обслуживание и уход за пылесосом
/ Údržba
EN
Replacing the post-motor
HEPA media filter*
1. Unplug the vacuum from electrical outlet.
2. Remove the filter door (located on the
back of the vacuum) by pulling down on the
filter door and pulling it toward you.
3. Remove the post-motor HEPA media
filter* by grasping the lip of the filter frame
and pulling out toward you.
4. Replace the post-motor HEPA media
filter* with a new filter.
NOTE: The post-motor filter is a white,
pleated HEPA media filter*. This filter
is NOT washable and must be replaced
when it becomes dirty.
PL
HEPA*
1.
2.
3.
4.
RU
Очистка выхлопного HEPA
фильтра*
Выхлопной HEPA фильтр способствует процессу
фильтрации для обеспечения чистоты воздуха в
помещении.
1.
Выключите пылесос и отключите его от сети
электропитания.
2.
Удалите дверцу фильтра (расположена на
задней панели пылесоса), опустив дверцу и
потянув на себя.
3.
Удалите выхлопной HEPA фильтр, взяв за специа-
льные выступы на рамке фильтра и потянув на себя.
4.
Замените выхлопной HEPA фильтр новым
фильтром.
Внимание: Выхлопной HEPA фильтр
представляет собой белый гофрированный
фильтр. Этот фильтр НЕЛЬЗЯ мыть. При
загрязнении он подлежит замене.
CS
HEPA
*
1.
2.
3.
4.
* The filter media, not the vacuum as a whole, complies with IEST-RP-CC001.5 HEPA standard.
*
*
This product is intended for
household use only and not for
commercial or industrial use.
Vacuuming of dust from products
like plaster, concrete or ashes
will damage the motor and void
the warranty.
32

Maintenance & Care/ Konserwacja
www.BISSELL.com
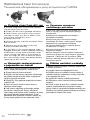
EN
Replacing the dust container
filter & cleaning the foam filter
IMPORTANT: Make sure the Dust Container
is empty before you replace or clean these
filters.
1. To remove the dust container filter, pull
down on the front snap.
2. Remove and replace as necessary.
NOTE: The dirt cup filter is a white, pleated
filter. This filter is NOT washable and must
be replaced when it becomes dirty.
3. The dirt cup foam filter is located between
the bottom of the dirt cup and the filter.
Once the filter has been removed, the foam
filter can then be removed and cleaned or
replaced as needed. To clean the foam filter,
wash with warm water and a mild detergent.
Be sure to air dry completely before replac-
ing this filter back in the dirt cup.
4. To re-install the filters, turn dirt cup upside
down and replace the foam filter. Then
replace the filter by inserting the tabs on the
back of the filter into the slots on the bottom
of the dirt cup and snap the filter back into
place.
PL
1.
2.
3.
4.
18
1 3 4
» For maximum cleaning performance, check the
filters often and clean or replace if necessary.
»

Техническое обслуживание и уход за пылесосом
/ Údržba
www.BISSELL.com
RU
Замена контейнерного
HEPA фильтра и очистка
пенного фильтра
ВАЖНО: Перед заменой или чисткой
фильтров убедитесь, что контейнер для
пыли пуст.
1.
Для того чтобы извлечь контейнерный HEPA
фильтр, нажмите на передний запор и потяните
вниз.
2.
Удалите фильтр и замените его при
необходимости.
ПРИМЕЧАНИЕ: Контейнерный HEPA
фильтр представляет собой белый
гофрированный фильтр. Этот фильтр
НЕЛЬЗЯ мыть. При загрязнении он
подлежит замене.
3.
Пенный фильтр расположен между
основанием контейнера для пыли и HEPA
фильтром.
После извлечения HEPA фильтра, можно извлечь
пенный фильтр и очистить/заменить его при
необходимости. Для очистки пенного фильтра
промойте его в теплой воде с мягким моющим
раствором. Перед тем, как снова установить
фильтр, дайте ему просохнуть.
4.
Для того чтобы установить фильтры в
контейнер для пыли, переверните контейнер и
установите пенный фильтр, вставив выступы в
задней части фильтра в пазы на нижней части
контейнера для пыли и защелкните.
CS
1.
2.
3.
4.
19
To reduce the risk of electric
shock, turn power switch OFF
and disconnectplug
from electrical outlet before
performing maintenance or
troubleshooting checks.
To reduce the risk of electric
shock, turn power switch OFF
and disconnectplug
from electrical outlet before
performing maintenance or
troubleshooting checks.
»
»

EN
Clearing clogs from dirt cup
1. To clear clogs from the dirt cup, remove
the top cover and set aside.
2. Empty the dirt into a garbage container.
3. Reach down into the dirt cup cyclone
chamber to clear any dirt or debris from
the cyclone and empty into a
garbage container.
4. Remove the dirt cup filter and foam filters
and set aside.
5. Remove any dirt or debris from the
cyclone chamber opening.
6. If the holes in the cyclone appear to be
clogged, place the cyclone chamber opening
underneath running water and allow water
to run through the holes in the cyclone to
clear any clogs. Be sure to allow the entire
dirt cup assembly to dry completely before
replacing the dirt cup filter.
PL
1.
2.
3.
4.
5.
6.
RU
Удаление мусора из
контейнера для пыли
1.
Для того, чтобы очистить контейнер для
пыли от мусора, удалите верхнюю крышку и
отложите ее.
2.
Выбросьте содержимое контейнера в
мусорный контейнер.
3.
Опустите руку в циклонную камеру
контейнера для пыли, чтобы удалить засоры.
Выбросьте их в мусорный контейнер.
4.
Удалите HEPA фильтр и пенный фильтр;
отложите их в сторону.
5.
Удалить все засоры через отверстия
циклонной камеры.
6.
Если отверстия циклона забиты, поместите
циклонную камеру под струю воды м промойте
отверстия. Перед тем, как установить HEPA
фильтр и пенный фильтр убедитесь, что корпус
полностью просох.
CS
1.
2.
3.
4.
5.
6.
www.BISSELL.com
20
3 5
Maintenance & Care/ Konserwacja
Техническое обслуживание и уход за пылесосом
/ Údržba
Strona się ładuje...
Strona się ładuje...
Strona się ładuje...
Strona się ładuje...
Strona się ładuje...
Strona się ładuje...
Strona się ładuje...
Strona się ładuje...
-
 1
1
-
 2
2
-
 3
3
-
 4
4
-
 5
5
-
 6
6
-
 7
7
-
 8
8
-
 9
9
-
 10
10
-
 11
11
-
 12
12
-
 13
13
-
 14
14
-
 15
15
-
 16
16
-
 17
17
-
 18
18
-
 19
19
-
 20
20
-
 21
21
-
 22
22
-
 23
23
-
 24
24
-
 25
25
-
 26
26
-
 27
27
-
 28
28


Bissell Pet Hair Eraser 33N7-N Instrukcja obsługi
- Kategoria
- Odkurzacze
- Typ
- Instrukcja obsługi
Powiązane artykuły
-
Bissell 42Q8 Series OPTIclean Instrukcja obsługi
-
Bissell CleanView Helix 21K3 Series Instrukcja obsługi
-
-
-
-
-
-
-
Bissell Lift-Off 30K7 SERIES Instrukcja obsługi