Rega Planar 6 Instrukcja obsługi
- Kategoria
- Dodatkowy sprzęt muzyczny
- Typ
- Instrukcja obsługi

World class hi-fi made in England.

English: For user instructions in your language, please visit www.rega.co.uk and go to
the download section of your chosen product page.
Français: Pour obtenir les instructions aux utilisateurs dans votre langue, veuillez visiter
www.rega.co.uk et vous rendre dans la section téléchargement de la page de votre
produit choisi.
Deutsch: Eine Gebrauchsanleitung in Ihrer Sprache nden Sie auf www.rega.co.uk im
Download-Bereich der Seite zu dem von Ihnen gewählten Produkt.
Italiano: Puoi trovare le istruzioni d’uso su www.rega.co.uk cliccando sulla sezione
Download della pagina del prodotto scelto.
Español: Para instrucciones del usuario en su idioma, por favor visite www.rega.co.uk y
vaya a la sección de descargas de la página del producto que ha elegido.
Português: Para instruções do utilizador no seu idioma, visite www.rega.co.uk e entre na
secção de transferências da página do produto escolhido.
Nederlands: Ga voor verdere instructies in uw taal naar www.rega.co.uk en vervolgens
naar de downloadsectie van de productpagina van uw keuze.
Dansk: Find brugsvejledningen på dit sprog ved at gå til www.rega.co.uk og fortsætte til
downloadafsnittet på siden for det produkt, du har valgt.
Svenska: För bruksanvisning på ditt språk, besök www.rega.co.uk och gå till
nedladdningssektionen på din valda produktsida.
Polski: Instrukcje użytkowania w danym języku są dostępne na stronie www.rega.co.uk,
gdzie można ściągnąć część strony, której dotyczy wybrany produkt.

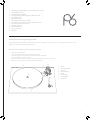
1. Platter
2. Drive Belt & Pulley
3. Tonearm
4. Balance Weight
5. Plinth
6. Power Input
7. Phono Output
8. Finger Lift
8
3
4
6
1
2
5
7
Unpacking and Setting Up the Planar 6 and Neo Power Supply
Setup and Connections
Connection to the Amplier
Cartridge Mounting and Setting Up the RB330 Tonearm
Speed Adjustment
Adjusting the Speed
Returning the Neo to Factory Settings
Use of Mobile Phone Apps to Check and Adjust the Speed
Rega Strobe and Stroboscopic Disc
Using the Strobe Kit
Safety and Warranty
Neo Specications
Warnings
1
2
2
2
2
3
3
3
3
3
4
4
4
Thank you for purchasing this Rega product.
Please follow this quick set up guide to ensure optimum performance and perfect operation. Failure to do so may invalidate your warranty. For more
information on this product, please visit www.rega.co.uk.
Unpacking and Setting Up the Planar 6 and Neo Power Supply
• Always keep the turntable at.
• Follow the unpacking guide printed inside the front of the box.
• Save the packaging in case you need to transport your turntable in the future.
• Place the turntable on a rigid level surface.
• Ensure the drive belt is in place and remove the transport hub card from beneath the sub platter.
• Carefully place the glass platter on the hub and t the turntable mat.
1

Speed Adjustment (factory set - only adjust if necessary)
The speed control functions are sited on the back panel of the Neo.
Speed programme switch – This enables the set speed mode.
Programme mode LED – This indicates the two modes of operation: Factory
default mode and speed adjustment mode.
Speed adjustment – This encoder is used to adjust the speed. The step size
of the speed control is 0.01 RPM.
A
C
B
Setup and Connections
1. Only use the Rega supplied PS1 AC adaptor.
2. Connect the power DIN lead (supplied) between the rear of the Planar 6 and the 24 V AC input socket on the rear panel of the Neo.
3. Plug in the Rega PS1 and switch the mains power on.
4. To turn the Neo on, push the button marked ‘power’ located on the front panel and the turntable platter will rotate at the selected speed.
5. When the power supply is switched on, if the Rega logo illuminates red, 33⁄RPM is selected.
6. If the Rega logo is illuminated green, 45 RPM is selected.
7. To change between speeds, press the button marked ‘33/45’ on the front panel as required.
Note: To minimise the risk of hum picked up by the cartridge, the Neo should be situated as far from the turntable as the interconnect cable will allow.
Connecting to the Amplier
The tonearm external phono leads must be connected to a suitable phono stage. Connect as follows: Red = right chanel, Black = left channel.
Depending on the type of cartridge you have chosen, you will require the appropriate moving magnet (MM) or moving coil (MC) stage. If your amplier does
not have an integrated phono stage, you will require an external stage (sold separately).
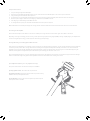
Cartridge Mounting and Setting Up the RB330 Tonearm
Firstly, ensure the cartridge xings are orientated correctly according to the cartridge makers specication. Use the cartridge alignment protractor (supplied)
to accurately set the position of the cartridge. Ensure that the tracking force dial (A) and bias adjustment slider (B) are both set to zero. Place the balance
weight (C) on to the balance weight shaft. With the stylus guard removed, position the cartridge above the lead-in groove of an LP. Whilst supporting the
headshell, carefully push the weight further up the shaft until the stylus is oating just 1mm clear of the record.
The recommended tracking force can now be applied using the tracking force dial. Always use a force which corresponds to the upper limit of the cartridge
makers recommended range. Finally, push the bias adjustment slider to the same number as the tracking force control.
2

Adjusting the Speed
Note: We recommend the Rega strobe kit to accurately measure the speed during adjustment (sold separately).
Note: The speed is adjusted whilst running at 33⁄RPM and any adjustments made at 33⁄RPM will be automatically be applied to 45 RPM.
1. Select 33⁄RPM.
2. Press the ‘speed programme’ switch on the rear panel once to put the unit into setup mode - The ‘programme mode’ LED will now be permanently
illuminated red.
3. Adjust the speed via the ‘speed adjustment’ control using the supplied 1.7 mm allen key. Turning clockwise will increase the speed and turning counter
clockwise will decrease the speed. The step size is 0.01 RPM. Only make small adjustments of up to ve ‘steps’ at a time to ensure accurate adjustment.
Check the speed after each adjustment to achieve the best accuracy.
4. When the speed has been correctly set, press the ‘speed programme switch’ once to put the unit back into ‘run mode’. The ‘programme mode’ LED will
now go out and ash approximately every ten seconds indicating the speed has been changed from the factory setting. Your turntable is now set and
ready to use.
Returning the Neo to Factory Settings
This process is recommended when tting a new drive belt to your turntable or after a service to help optimise the range of adjustment available to you.
1. Select 33⁄RPM.
2. Press and hold down the ‘speed programme’ switch until the ‘programme mode’ LED ashes every few seconds. Keep the button pressed until a solid
LED is illuminated.
3. Whilst illuminated, press the ‘speed programme’ switch button once again to fully factory reset and return to ‘run mode’.
Note: We recommend changing Rega drive belts every ve years to guarantee optimum performance. Using the Neo with old worn belts may result in lower
performance and variation in speed stability.
Use of Mobile Phone Apps to Check and Adjust the Speed
Rega, along with a London mastering studio, have used the iPhone ‘RPM’ app (available on the App Store) developed by Philip Broder to check and adjust
the speed of a turntable using the Neo, with positive results. We have veried the basic accuracy of the ‘RPM’ app using Rega’s in-house speed measuring
equipment, but as this is a third-party app we cannot guarantee the readings because of uncertainties, which could be caused by the age, condition, and
operating system of the phone the app is installed on. If you are in any doubt, you should check the calibration of the ‘RPM’ app using a suitable reference.
Rega Strobe and Stroboscopic Disc (sold separately)
The best way to adjust the speed of your Planar 6 is to use the Rega Stobe kit. A stroboscopic disc is an optical instrument used to measure the speed of the
turntable by freezing the bars on the disc. The bars are illuminated by an accurate quartz locked LED pulsing at 100 Hz.
Using the Strobe Kit
Simply place the strobe disc on the turntable platter. Switch on the 100 Hz LED and hold it approximately 2 cm above the rotating strobe. If the bars do not
appear to move and are stationary, the speed is 33⁄ RPM. If they move clockwise, the turntable is running fast, and conversely, if they move anti-clockwise,
the turntable is running slow.
If over one minute the bars appear to move by one bar to the left or one bar to the right, the speed is 0.016% fast or slow respectively. Using the speed control
on the Neo, it is possible to achieve +/- 0.05% or +/- 1.3 RPM.
Note: If over one minute the bars appear to move by two bars to the left or by two bars to the right, the speed is 0.01 RPM fast or slow respectively. Using the
speed control on the Neo, it is possible to achieve +/- 0.01 RPM, which is one step of the speed adjustment.
Warning: Because of the nature of the stroboscopic eect of the disc and the LED light, we strongly recommend anyone with photo-induced epilepsy not to
use this device. Although this condition is very rare, we must make the user aware of this condition. Ask your dealer for assistance if required.
3

Safety and Warranty
• Do not use this unit near liquids or expose to moisture.
• Do not use near sources of heat such as radiators, vents, stoves, or candles.
• Ensure adequate ventilation around the product, at least 10 cm in all directions, and avoid placing the unit on soft surfaces such as long carpet and
fabric.
• Do not open the product enclosure or force objects into openings in the unit.
• Place the unit on a xed level surface where it will not fall or tip.
• The unit should only be used in moderate climates between 5 C (41 F) and 35 C (95 F).
• Keep packaging material and small pieces out of reach of children.
• Unplug the power supply if the unit is unused for extended periods of time.
With the unit disconnected from the mains, only clean with a microbre cloth (lightly damp if necessary). If the unit performs erratically or emits smoke or
odour, disconnect from the power supply and take it to a qualied service technician.
• All Rega products are covered by a lifetime warranty against manufacture defects.
• This warranty does not cover wear and tear.
• Any unauthorised modications or failure to follow the Rega recommended guidelines may invalidate the warranty.
• If returning goods for inspection to your retailer, the original packaging must be used to preserve warranty.
• Replacement packaging is available from any Rega retailer.
• Your statutory rights are not aected.
Neo Specications
Output to motor bi-phase = 24 V AC protected by resettable fuse.
Power consumption = 7.2 W
Voltage = 24 V AC. Rega PSU1 only.
Speed control step size = 0.01 RPM
Stroboscopic disc = 100 Hz, 180 marks 33⁄ RPM
The basic one bar per minute drift resolution = 0.016%
PS1 (UK)
Input 230 V ~ 50 Hz 0.07 A
Output 24 V ~ 350 mA AC
PS1 (EU - Euro 2 pin)
Input 230 V ~ 50 Hz 0.07 A
Output 24 V ~ 350 mA AC
PS1 (UL - American)
Input 115-120 V ~ 60 Hz
Output 24 V ~ 350 mA AC
Warnings
• Do not unplug the power supply from the turntable whilst the unit is on - turn o the power supply before unplugging.
• Do not operate the power supply without the turntable connected.
• A 24 V AC plus a 20 V DC signal present on the pins of the plug - if these are shorted it will cause damage to the power unit.
• Use only with the Rega PS1 power supply or Neo.
• Never expose the unit to rain or moisture.
• Do not open the case covers. There are no user serviceable parts inside.
The Neo incorporates resettable fuses in the driver amplier to protect it from overcurrent faults, which will cause the turntable to run erratically or not at all.
If in the rare circumstance these are activated, they are reset by turning o the Neo via the front panel for approximately 10 seconds. If the fault should persist,
consult your dealer.
PS1 (Australian)
Input 230 V ~ 50 Hz 0.07 A
Output 24 V ~ 350 mA AC
PS1 (Japan)
Input 100 V ~ 50/60 Hz
Output 24 V ~ 350 mA AC
PS1 (Korea)
Input 220 V ~ 60 Hz 0.07 A
Output 24 V ~ 350 mA AC
4

- Ne débranchez pas l’appareil s’il est allumé - mettez l’appareil hors tension avant de le débrancher.
- Ne faites pas fonctionner le bloc d’alimentation s’il n’est pas connecté au tourne-disque.
- Un signal 24 V AC plus un signal 20 V CD sur les broches de la che - s’ils sont court-circuités, le bloc d’alimentation risque d’être endommagé.
- Utilisez uniquement l’adaptateur PS1 Rega.
- L’appareil ne doit pas rester sous la pluie ou être exposé à de l’humidité.
- N’ouvrez pas les couvercles du boîtier. Aucune pièce à l’intérieur de l’appareil ne peut être entretenue par l’utilisateur.
Le Neo contient des fusibles réarmables dans l’amplicateur d’attaque an de le protéger en cas de surintensité, qui pourrait endommager le tourne-disque. Si ceux-ci sont activés (ce qui arrive rarement), ils sont
remis à zéro en désactivant le Neo via le panneau avant pendant environ 10 secondes. Si le problème persiste, veuillez consulter votre revendeur.
- Schalten Sie das Netzteil aus, bevor es vom Netz getrennt wird.
- Benutzen Sie es nicht ohne angeschlossenen Plattenspieler.
- Die Kontakte des Netzteils dürfen nicht kurzgeschlossen werden, um einen Schaden zu vermeiden.
- Benutzung nur zusammen mit einem Rega PS1 Netzgerät.
- Die Geräte niemals der Feuchtigkeit oder Nässe aussetzen und die Geräte nicht önen.
Im Ausgang des Neo sind rückstellbare Sicherungen eingebaut, die den Treiber vor Überlastung schützen. In den seltenen Fällen wo diese ansprechen läuft der Motor nicht mehr richtig. Sie können
zurückgesetzt werden, indem das Neo an der Frontseite für etwa zehn Sekunden ausgeschaltet wird. Wird die richtige Funktion so nicht wiederhergestellt, soll eine Fachwerkstatt zu Rate gezogen werden.
- Non scollegare l’alimentazione dal giradischi mentre l’unità è accesa. Spegnere l’alimentazione prima di staccare la spina.
- Non accendere l’alimentatore se il giradischi non è collegato.
- Sui poli della spina sono presenti un segnale 24 V CA più un segnale 20 V CC. Se vengono messi in corto circuito si danneggia l’alimentazione dell’unità.
- Usare solo con l’alimentatore Rega PS1.
- Non esporre mai l’unità alla pioggia o all’umidità.
- Non aprire l’involucro. All’interno non sono presenti parti manutenzionabili dall’utente.
Il Neo ha incorporati fusibili resettabili nell’amplicatore dell’unità per proteggerla dalla sovracorrente, che può guastare il giradischi o farlo funzionare in modo irregolare. Se si dovessero attivare (in rare
circostanze), si possono resettare spegnendo il Neo attraverso il pannello anteriore per circa 10 secondi. Se il guasto dovesse persistere, rivolgersi al proprio rivenditore.
- No desenchufe la fuente de alimentación del giradiscos mientras la unidad esté en marcha. Apague la fuente de alimentación antes de desenchufarla.
- No haga funcionar la fuente de alimentación sin el giradiscos conectado.
- En las clavijas del enchufe existe una señal de 24 V CA y una de 20 V CC; si se cortocircuitan, la fuente de alimentación puede resultar dañada.
- Utilizar únicamente con la fuente de alimentación PS1 de Rega.
- No exponga nunca la unidad a la lluvia o la humedad.
- No abra las cubiertas de la funda. No hay piezas que requieran mantenimiento por parte del usuario en el interior.
La Neo incluye fusibles reactivables en el amplicador de transmisión para protegerlo ante fallos de corriente que harían que el giradiscos funcionase con errores o dejase de funcionar. En el raro caso de que
estos saltasen, se reactivan apagando la Neo desde el panel frontal durante aproximadamente 10 segundos. Si el fallo continúa, consulte con su proveedor.
- Não ligar ou desligar o cabo de alimentação do gira-discos com o NEO ligado - desligar a alimentação do NEO antes de qualquer ligação.
- Não operar a fonte de alimentação NEO sem o gira-discos estar ligado.
- Tensão de 24 V AC e 20 V DC estão presentes nos pinos da cha - se estes entrarem em curto-circuito, a unidade cará danicada.
- Usar apenas a fonte de alimentação PS1 da Rega.
- Nunca expor a unidade à chuva ou à humidade.
- Não abrir a caixa do NEO. Nenhum dos elementos internos pode ser reparado pelo utilizador.
O Neo tem fusíveis reajustáveis incorporados no circuito “driver” para o proteger contra falhas de corrente, o que a acontecer fará com que o gira-discos rode de forma errada, ou não funcione de todo. Se, numa
circunstância rara, estes fusíveis reajustáveis forem ativados, eles são recongurados desligando o Neo através do painel frontal durante aproximadamente 10 segundos. Se a falha persistir, consultar o seu
revendedor.
- Verwijder de voeding niet van de draaitafel wanneer de voeding is ingeschakeld - schakel de voeding uit, alvorens de stekker uit het stopcontact te halen.
- Gebruik de voeding niet wanneer de draaitafel niet is aangesloten.
- Een 24 V AC plus 20 V DC-signaal aanwezig op de pinnen van de stekker - als deze kortsluiten, beschadigt de voedingseenheid.
- Alleen gebruiken in combinatie met de PS1-voeding van Rega.
- Stel het apparaat nooit bloot aan regen of vocht.
- Houd de behuizing te allen tijde gesloten. Er bevinden zich aan de binnenzijde geen onderdelen waar door de gebruiker onderhoud aan kan worden gepleegd.
De stuurversterker van de Neo is voorzien van automatische zekeringen teneinde deze te beschermen tegen pieken die ervoor kunnen zorgen dat de draaitafel onregelmatig of helemaal niet functioneert. In
het zeldzame geval dat deze zekeringen worden geactiveerd, worden ze automatisch hersteld wanneer u de Neo ongeveer 10 seconden uitschakelt middels het paneel aan de voorzijde. Blijft het probleem zich
voordoen, neem dan contact op met uw dealer.
- Frakobl ikke strømforsyningen fra pladespilleren, mens den er tændt – sluk for strømmen, inden du frakobler.
- Betjen ikke strømforsyningen, uden at pladespilleren er tændt.
- Stikbenene indeholder et 24 V vekselstrøms- plus et 20 V jævnstrømssignal – hvis disse kortsluttes, vil det beskadige enheden.
- Må kun anvendes sammen med PS1-strømforsyning fra Rega.
- Enheden må aldrig udsættes for regn eller fugt.
- Enhedens dæksler må ikke åbnes. Der er ingen indvendige dele, der kan repareres af brugeren.
Neo omfatter sikringer, der kan nulstilles, i driverforstærkeren, som beskytter mod fejlstrøm, der vil medføre, at pladespilleren spiller ujævnt eller slet ikke. Hvis disse i sjældne omstændigheder aktiveres, kan de
nulstilles ved at slukke Neo på forsiden i ca. 10 sekunder. Hvis fejlen fortsætter, skal du kontakte din forhandler.
- Dra inte ur strömkabeln till skivspelarsladden medan enheten är på. Stäng av skivspelaren innan du drar ur strömkabeln.
- Använd inte nätaggregatet utan att kontakten till skivspelaren sitter i.
- Kontaktstiften får en 24 V AC- plus en 20 V DC-signal. Om dessa kortsluts skadas strömenheten.
- Använd endast med Rega PS1-nätadapter.
- Utsätt aldrig enheten för regn eller fukt.
- Öppna inte höljets skydd. Det nns inga delar som kan servas av användaren.
Neos drivrutinförstärkare innehåller återställningsbara säkringar som skydd mot strömfel, vilket kan leda till att skivspelaren fungerar oregelbundet eller inte alls. I den ovanliga händelse av att säkringarna
aktiveras går det att återställa dem genom att stänga av Neo via frontpanelen i ungefär 10 sekunder. Kontakta din återförsäljare om felet kvarstår.
- Zasilacza nie wolno odłączać od gramofonu, gdy jest on włączony. Przed odłączeniem należy wyłączyć zasilacz.
- Nie wolno używać zasilacza bez podłączonego gramofonu.
- Na wtykach wtyczki występuje sygnał 24 V AC i 20 V DC. Zwarcie spowoduje uszkodzenie zasilacza.
- Używać wyłącznie z zasilaczem Rega PS1.
- Nie wystawiać urządzenia na działanie deszczu ani wilgoci.
- Nie otwierać obudowy tego urządzenia. Urządzenie nie zawiera żadnych części, które mogą być naprawiane przez użytkownika.
Zasilacz Neo jest wyposażony w resetowane bezpieczniki, znajdujące się we wzmacniaczu sterownika, zabezpieczające przez usterkami wynikającymi z przetężenia, powodującymi nieprawidłową pracę lub
brak działania gramofonu. W rzadkich wypadkach, w których zostają one uaktywnione, należy je zresetować przez wyłączenie zasilacza Neo z poziomu panelu przedniego na około 10 sekund. Jeśli usterka nie
ustępuje, należy skonsultować się z dystrybutorem.

Rega Research Ltd., 6 Coopers Way, Temple Farm Industrial Estate,
Southend-on-Sea, Essex, SS2 5TE
-
 1
1
-
 2
2
-
 3
3
-
 4
4
-
 5
5
-
 6
6
-
 7
7
-
 8
8


Rega Planar 6 Instrukcja obsługi
- Kategoria
- Dodatkowy sprzęt muzyczny
- Typ
- Instrukcja obsługi
w innych językach
- italiano: Rega Planar 6 Manuale utente
- français: Rega Planar 6 Manuel utilisateur
- English: Rega Planar 6 User manual
Powiązane dokumenty
-
Rega Planar 8 Instrukcja obsługi
-
Rega io Integrated Amplifier Instrukcja obsługi
-
Rega Planar 1 Plus Instrukcja obsługi
-
-
-
NEO Neo Instrukcja obsługi
-
Rega Planar Instrukcja obsługi
-
-
-