
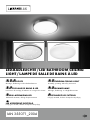
LED-BADLEUCHTE / LED BATHROOM CEILING
LIGHT / LAMPE DE SALLE DE BAINS À LED
LED-BADLEUCHTE
Montage-, Bedienungs- und Sicherheitshinweise
LED BATHROOM CEILING LIGHT
Assembly, operating and safety instructions
LAMPE DE SALLE DE BAINS À LED
Instructions de montage, d‘utilisation et consignes de sécurité
LED-BADKAMERLAMP
Montage-, bedienings- en veiligheidsinstructies
LED KÚPEĽŇOVÉ SVIETIDLO
Pokyny pre montáž, obsluhu a bezpečnostné pokyny
KOUPELNOVÉ LED SVÍTIDLO
Pokyny k montáži, obsluze a bezpečnostní pokyny
LAMPA ŁAZIENKOWA LED
Wskazówki montażu, obsługi i bezpieczeństwa
IAN 355071_2004

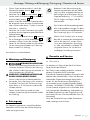
Klappen Sie vor dem Lesen die beiden Seiten mit den Abbildungen aus und machen Sie sich anschließend
mit allen Funktionen des Gerätes vertraut.
Before reading, unfold both pages containing illustrations and familiarise yourself with all functions of the
device.
Avant de lire le mode d‘emploi, ouvrez les deux pages contenant les illustrations et familiarisez-vous ensuite
avec toutes les fonctions de l‘appareil.
Vouw vóór het lezen de beide pagina‘s met de afbeeldingen open en maak u vertrouwd met alle functies
van het apparaat.
Przed przeczytaniem proszę rozłożyć obie strony z ilustracjami, a następnie proszę zapoznać się z
wszystkimi funkcjami urządzenia.
Před čtením si odklopte obě dvě strany s obrázky a potom se seznamte se všemi funkcemi přístroje.
Pred čítaním si odklopte obidve strany s obrázkami a potom sa oboznámte so všetkými funkciami prístroja.
DE / AT / CH Montage-, Bedienungs- und Sicherheitshinweise Seite 5
GB / IE Assembly, operating and safety instructions Page 11
FR / BE Instructions de montage, d‘utilisation et consignes de sécurité Page 17
NL / BE Montage-, bedienings- en veiligheidsinstructies Pagina 25
PL Wskazówki montażu, obsługi i bezpieczeństwa Strona 31
CZ Pokyny k montáži, obsluze a bezpečnostní pokyny Strana 37
SK Pokyny pre montáž, obsluhu a bezpečnostné pokyny Strana 43

14150306L
14
23
5
9 8
610
7
14150208L
14
23
5
9 8
610
7

14150409L
14
23
5
9 8
610
7

5 DE/AT/CH
Inhaltsverzeichnis
Legende der verwendeten Piktogramme ........................................................... Seite 6
Einleitung ......................................................................................................................................... Seite 6
Bestimmungsgemäße Verwendung ....................................................................................................Seite 6
Teilebeschreibung ...............................................................................................................................Seite 6
Lieferumfang ........................................................................................................................................ Seite 7
Technische Daten ................................................................................................................................Seite 7
Sicherheit ......................................................................................................................................... Seite 7
Sicherheitshinweise .............................................................................................................................Seite 7
Vorbereitung ................................................................................................................................Seite 8
Benötigtes Werkzeug und Material ...................................................................................................Seite 8
Vor der Installation .............................................................................................................................. Seite 8
Montage ...........................................................................................................................................Seite 8
Wartung und Reinigung .....................................................................................................Seite 9
Entsorgung .....................................................................................................................................Seite 9
Garantie und Service ............................................................................................................Seite 9
Garantie ..............................................................................................................................................Seite 9
Serviceadresse ....................................................................................................................................Seite 10
Konformitätserklärung .........................................................................................................................Seite 10
Hersteller ..............................................................................................................................................Seite 10

6 DE/AT/CH
Einleitung / SicherheitEinleitung
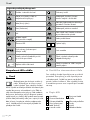
Legende der verwendeten Piktogramme
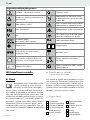
Bedienungsanleitung lesen! Schutzleiter
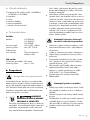
Warn- und Sicherheitshinweise
beachten! Lebens- und Unfallgefahr für
Kleinkinder und Kinder
Watt (Wirkleistung) Warnung vor elektrischem Schlag!
Lebensgefahr!
Hertz (Frequenz) Brand- und Verletzungsgefahr!
Volt Die Leuchte ist nicht geeignet für
externe Dimmer und elektronische
Schalter.
Wechselspannung
(Strom- und Spannungsart) Ra
Farbwiedergabeindex
LED-Lebensdauer ON OFF Schaltzyklen
Schutzart (spritzwassergeschützt) Montagerichtung
Diese Leuchte ist ausschließlich für den
Betrieb im Innenbereich geeignet. 20
PAP
Entsorgen Sie Verpackung
und Gerät umweltgerecht!
Lichttemperatur in Kelvin Die Verpackung besteht aus
100 % recyceltem Papier.
LED-Badleuchte
Einleitung
Wir beglückwünschen Sie zum Kauf Ihres
neuen Produkts. Sie haben sich damit für
ein hochwertiges Produkt entschieden.
Diese Anleitung gehört zu diesem Produ
kt und enthält
wichtige Hinweise zur Inbetriebnahme und Hand-
habung. Beachten Sie immer alle Sicherheitshinweise.
Prüfen Sie vor der Inbetriebnahme, ob die korrekte
Spannung vorhanden ist und ob alle Teile richtig
montiert sind. Sollten Sie Fragen haben oder unsicher
in Bezug auf die Handhabung des Gerätes sein,
setzen Sie sich bitte mit Ihrem Händler oder der
Servicestelle in Verbindung. Bewahren Sie diese
Anleitung bitte sorgfältig auf und geben Sie sie ggf.
an Dritte weiter.
Bestimmungsgemäße
Verwendung
Diese Leuchte ist nur für den Betrieb im Innenbereich
geeignet. Dieses Gerät ist für den Einsatz in priva
ten
Haushalten vorgesehen. Die Leuchte kann auf allen
normal entflammbaren Oberflächen befestigt wer
den.
Dieses Produkt ist vorgesehen für den normalen Be-
trieb und darf ausschließlich für die Deckenmontage
eingesetzt werden.
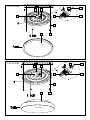
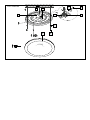
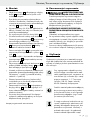
Teilebeschreibung
1 Dübel
2 Gummimembran
3 Schutzschlauch
4 Netzanschlusskabel
(extern)
5 Lüsterklemme
6 Anschlusskabel
der Leuchte
7 Unterlegscheibe
aus Silikon

7 DE/AT/CH
Einleitung / SicherheitEinleitung
8 Schrauben
9 Lampenschirm
10 Bodenplatte
Lieferumfang
1 LED-Badleuchte, Modell 14150208L /
14150306L / 14150409L
3 Dübel
3 Schrauben
2 Schutzschläuche
3 Unterlegscheiben aus Silikon
1 Montage- und Bedienungsanleitung
Technische Daten
Leuchte:
Modellnr.: 14150208L / 14150306L /
14150409L
Betriebsspannung: 230–240 V∼, 50 Hz
Nennleistung: max. LED 12,5 W
Schutzklasse: I
Schutzart: IP44 (spritzwassergeschützt)
LED-Modul:
Leuchtmittel: LED-Modul
Nennleistung: max. 11,5 W
Sicherheit
Sicherheitshinweise
Bei Schäden, die durch Nichtbeachtung dieser
Bedienungsanleitung verursacht werden, erlischt der
Garantieanspruch! Für Folgeschäden wird keine
Haftung übernommen! Bei Sach- oder Personen-
schäden, die durch unsachgemäße Handhabung
oder Nichtbeachtung der Sicherheitshinweise verur-
sacht werden, wird keine Haftung übernommen!
LEBENS-
UND UNFALLGEFAHR FÜR
KLEINKINDER UND KINDER!
Lassen Sie Kinder niemals unbeaufsichtigt mit
dem Verpackungsmaterial. Es besteht Erstic
kungs
-
gefahr durch Verpackungsmaterial. Lassen Sie
die Leuchte oder Verpackungsmaterial nicht acht-
los liegen. Plastikfolien / -tüten, Kunststoffteile,
etc. könnten für Kinder zu einem gefährlichen
Spielzeug werden. Kinder unterschätzen häufig
die Gefahren.
Halten Sie Kinder stets vom Produkt fern. Dieses
Produkt kann von Kindern ab 8 Jahren und darü
b
er
sowie von Personen mit verringerten physischen,
sensorischen oder mentalen Fähigkeiten oder
Mangel an Erfahrung und Wissen benutzt wer-
den, wenn sie beaufsichtigt oder bezüglich des
sicheren Gebrauchs des Produkts unterwiesen
wurden und die daraus resultierenden Gefahren
verstehen. Kinder dürfen nicht mit dem Produkt
spielen. Reinigung und Benutzerwartung dürfen
nicht von Kindern ohne Beaufsichtigung durch-
geführt werden.
Lebensgefahr durch
elektrischen Schlag!
Lassen Sie die Elektroinstallation durch einen
ausgebildeten Elektriker oder eine für Elektroin-
stallationen eingewiesene Person durchführen.
Die Leuchte ist ausschließlich für die Nutzung
in privaten Haushalten vorgesehen.
Benutzen Sie Ihre Leuchte niemals, wenn Sie
irgendwelche Beschädigungen feststellen.
Entfernen Sie vor der Montage die Sicherung
oder schalten Sie den Leitungsschutzschalter im
Sicherungskasten aus (0-Stellung). Stellen Sie
den Lichtschalter auf Position „Aus“.
Vergewissern Sie sich vor der Montage, dass
die vorhandene Netz spannung mit der benötig-
ten Betriebsspannung der Leuchte übereinstimmt
(230–240 V∼) (siehe „Technische Daten“).
Stellen Sie sicher, dass bei der Montage keine
Leitungen beschädigt werden.
Brand- und Verletzungsgefahr!
Montieren Sie die Leuchte nicht mit defektem
Lampenglas. Setzen Sie sich in diesem Fall für
Ersatz mit der Servicestelle in Verbindung.
Die Leuchte kann auf normal entflammbaren
Oberflächen installiert werden.

8 DE/AT/CH
Montage / Wartung und Reinigung / Entsorgung / Garantie und ServiceSicherheit / Vorbereitung / Montage
Stellen Sie sicher, dass die Leuchte ausgeschal-
tet und abgekühlt ist, bevor Sie diese berühren,
um Verbrennungen zu vermeiden. Leuchtmittel
entwickeln eine starke Hitze.
Befestigen Sie die Leuchte nicht auf feuchtem
oder leitendem Untergrund.
Die Lichtquelle dieser Leuchte ist nicht ersetzbar;
wenn die Lichtquelle ihr Lebensdauerende er-
reicht hat, ist die gesamte Leuchte zu ersetzten.
Die Leuchte ist nicht geeignet für
externe Dimmer und elektronische
Schalter.
Verwenden Sie ausschließlich die mitgelieferten
Einzelteile, ansonsten erlöschen alle Gewähr-
leistungsansprüche.
Die Leuchte nicht mit defektem Lampenglas
betreiben.
So verhalten Sie sich richtig
Seien Sie stets aufmerksam! Achten Sie immer
darauf was Sie tun und gehen Sie stets mit Ver-
nunft vor. Montieren Sie die Leuchte in keinem
Fall, wenn Sie unkonzentriert sind oder sich un-
wohl fühlen.
Nicht direkt in die Lichtquelle (Leuchtmittel, LED
etc.) hineinschauen.
Die Lichtquelle (Leuchtmittel, LED etc.) nicht mit
einem optischen Instrument (z. B. Lupe) betrach
ten.
Vorbereitung
Benötigtes Werkzeug
und Material
Die genannten Werkzeuge und Materialien sind nicht
im Lieferumfang enthalten. Es handelt sich hierbei um
unverbindliche Angaben und Werte zur Orientie
rung.
Die Beschaffenheit des Materials richtet sich nach
den individuellen Gegebenheiten vor Ort.
– Bleistift / Markierwerkzeug
– 2-poliger Spannungsprüfer
– Schraubendreher
– Bohrmaschine
– Seitenschneider
– Hammer
– Leiter
– Bohrer (ca. Ø 6 mm)
Vor der Installation
Wichtig: Lassen Sie die Elektroinstallation durch
einen ausgebildeten Elektriker oder eine für Elektro-
installationen eingewiesene Person durchführen.
Machen Sie sich vor der Installation mit allen
Anweisungen und Abbildungen in dieser
Anleitung sowie mit der Leuchte selbst vertraut.
Stellen Sie vor der Installation sicher, dass an
der Leitung, an der die Leuchte angeschlossen
werden soll, keine Spannung vorliegt. Entfernen
Sie hierfür die Sicherung oder schalten Sie den
Leitungsschutzschalter im Sicherungskasten aus
(0-Stellung).
Überprüfen Sie die Spannungsfreiheit mittels
2-poligem Spannungsprüfer.
Montage
Lösen Sie den Lampenschirm 9, indem Sie ihn
gegen den Uhrzeigersinn von der Bodenplatte
10 abdrehen.
Halten Sie die Bodenplatte gegen die Montage-
fläche und markieren Sie die Bohrlöcher mit Hilfe
der in der Bodenplatte
10
für die Schrauben
8
vorgesehenen Löcher.
Bohren Sie die Löcher (ca. Ø 6 mm, ca. 40 mm
tief). Stellen Sie sicher, dass Sie die Zuleitung
nicht beschädigen.
Stecken Sie die Dübel 1 in die Bohrlöcher.
Nehmen Sie, falls notwendig, einen Hammer
zur Hilfe.
Öffnen Sie die Gummimembran 2 mit einem
spitzen Gegenstand (z. B. Schraubendreher).
Führen Sie das Netzanschlusskabel (extern)
4
durch die Gummimembran 2. Achten Sie auf
den richtigen Sitz.
Befestigen Sie die Bodenplatte 10 mittels der
Unterlegscheiben aus Silikon 7 und der Schrau-
ben 8 an der Montagefläche.

9 DE/AT/CH
Montage / Wartung und Reinigung / Entsorgung / Garantie und ServiceSicherheit / Vorbereitung / Montage
Führen Sie die einzelnen Adern L und N des
Netzanschlusskabels (extern) 4 durch die
Schutzschläuche 5.
Verbinden Sie nun das Anschlusskabel 6 der
Leuchte mittels Lüsterklemme 5 mit dem Netz-
anschlusskabel (extern) 4.
Achten Sie auf den farblichen Zusammenschluss
der angeschlossenen Leitungen (stromführender
Leiter, schwarz oder braun = Symbol L, Neutral-
leiter, blau = Symbol N).
Verbinden Sie nun den Schutzleiter (grün-gelb)
mit der am Anschlussgehäuse gekennzeichneten
Erdungsklemme .
Befestigen Sie den Lampenschirm 9, indem Sie
ihn im Uhrzeigersinn auf die Bodenplatte 10
schrauben. Achten Sie auf den richtigen Sitz.
Setzen Sie die Sicherung wieder ein oder schalte
n
Sie den Leitungsschutzschalter am Sicherungs-
kasten wieder ein (I-Stellung).
Ihre Leuchte ist nun betriebsbereit.
Wartung und Reinigung
STROMSCHLAGGEFAHR!
Trennen Sie zur Reinigung die Leuchte zuerst vom
Stromnetz. Entfernen Sie hierfür die Sicherung
oder schalten Sie den Leitungsschutzschalter im
Sicherungskasten aus (0-Stellung).
VORSICHT! VERBRENNUNGSGEFAHR
DURCH HEISSE OBERFLÄCHEN!
Lassen Sie die Leuchte vollständig abkühlen.
Verwenden Sie zur Reinigung nur ein trockenes,
fusselfreies Tuch. Benutzen Sie keine Lösungs-
mittel, Benzin o. Ä. Die Leuchte würde hierbei
Schaden nehmen.
Setzen Sie die Sicherung wieder ein oder
schalten Sie den Leitungsschutzschalter wieder
an (I-Stellung).
Entsorgung
Die Verpackung besteht aus umweltfreundlichen
Materialien, die Sie über die örtlichen Recycling-
stellen entsorgen können.
b
a
Beachten Sie die Kennzeichnung der
Verpackungsmaterialien bei der Abfall-
trennung, diese sind gekennzeichnet mit
Abkürzungen (a) und Nummern (b) mit
folgender Bedeutung: 1–7: Kunststoffe /
20–22: Papier und Pappe / 80–98:
Verbundstoffe.
Das Produkt und die Verpackungsmateri-
alien sind recycelbar, entsorgen Sie diese
getrennt für eine bessere Abfallbehandlung.
Das Triman-Logo gilt nur für Frankreich.
Werfen Sie Ihr Produkt, wenn es ausge-
dient hat, im Interesse des Umweltschutzes
nicht in den Hausmüll, sondern führen
Sie es einer fachgerechten Entsorgung
zu. Über Sammelstellen und deren Öff-
nungszeiten können Sie sich bei Ihrer
zuständigen Verwaltung informieren.
Garantie und Service
Garantie
Sie erhalten zum Zeitpunkt des Kaufs auf dieses
Gerät 36 Monate Garantie.
Das Gerät wurde sorgfältig produziert und einer
genauen Qualitätskontrolle unterzogen.
Innerhalb der Garantiezeit beheben wir kostenlos alle
Material- oder Herstellerfehler. Sollten sich dennoch
während der Garantiezeit Mängel herausstellen,
senden Sie das Gerät bitte an die aufgeführte
Service-Adresse unter Angabe folgender Modell-
Nummern: 14150208L / 14150306L / 14150409L.
Von der Garantie ausgeschlossen sind Schäden d
urch
nicht sachgemäße Handhabung, Nichtbeachtung
der Bedienungsanleitung oder Eingriff durch nicht
autorisierte Personen sowie Verschleißteile (wie z. B.
Leuchtmittel).
Durch die Garantieleistung wird die Garantiezeit
weder verlängert noch erneuert.

10 DE/AT/CH
Garantie und Service
Serviceadresse
Briloner Leuchten GmbH & Co. KG
Im Kissen 2
59929 Brilon
DEUTSCHLAND
Tel.: +49 29 61 / 97 12‒800
Fax: +49 29 61 / 97 12‒199
E-Mail: kundenservice@briloner.com
www.briloner.com
Kostenlose Servicenummer:
Tel.: 00800 / 27456637
IAN 355071_2004
Bitte halten Sie für alle Anfragen den Kassenbon
und die Artikelnummer (z. B. IAN 123456_7890)
als Nachweis für den Kauf bereit.
Konformitätserklärung
Dieses Produkt erfüllt die Anforderungen der gel-
tenden europäischen und nationalen Richtlinien.
Die Konformität wurde nachgewiesen. Entsprechende
Erklärungen und Unterlagen sind beim Hersteller
hinterlegt.
Hersteller
Briloner Leuchten GmbH & Co. KG
Im Kissen 2
59929 Brilon
DEUTSCHLAND
Table of contents

11 GB/IE
Garantie und Service
List of pictograms used ........................................................................................................ Page 12
Introduction ................................................................................................................................... Page 12
Intended use ........................................................................................................................................ Page 12
Parts description ..................................................................................................................................Page 12
Scope of delivery ................................................................................................................................Page 13
Technical data ..................................................................................................................................... Page 13
Safety .................................................................................................................................................Page 13
Safety notes ......................................................................................................................................... Page 13
Preparation ...................................................................................................................................Page 14
Required tools and material ...............................................................................................................Page 14
Prior to installation ...............................................................................................................................Page 14
Assembly .........................................................................................................................................Page 14
Maintenance and cleaning ............................................................................................... Page 15
Disposal ............................................................................................................................................Page 15
Warranty and service ...........................................................................................................Page 15
Warranty .............................................................................................................................................Page 15
Service address ................................................................................................................................... Page 15
Declaration of conformity ...................................................................................................................Page 16
Manufacturer .......................................................................................................................................Page 16
Table of contents

12 GB/IE
Introduction / SafetyIntroduction
List of pictograms used
Please read the instructions for use! Protective conductor
Observe the warnings and safety
instructions! Danger to life and risk of accidents
for infants and children
Watt (effective power) Electric shock warning!
Danger to life!
Hertz (frequency) Risk of burns and injury!
Volt This light is not suitable for external
dimmer and electronic switches.
Alternating voltage
(current and voltage type) Ra Colour rendering index
LED operating life ON OFF Switching cycles
Protection type (splash-proof) Mounting direction
This light is suitable for indoor use only. 20
PAP
Dispose of the packaging and de-
vice in an environmentally friendly
manner!
Light temperature in Kelvin The packaging is made from
100 % recycled paper.
LED bathroom ceiling light
Introduction
Congratulations on the purchase of your
new product. You have selected a high
quality product. These instructions are part
of the product and contain important information on
setup and handling. Always follow all safety instruc-
tions. Before using this product for the first time, verify
that the voltage is correct and that all parts are prop-
erly installed. Should you have any questions or you
are unsure about operating the product, please con-
tact the dealer or service centre. Please keep these
instructions in a safe place and pass them on to third
parties as applicable.
Intended use
This light is only suitable for indoor use. This device
is intended for private household use. The light can
be mounted to any surface of normal flammability.
This product is intended for normal operation and
may only be used for ceiling installation.
Parts description
1 Wall plug
2 Rubber membrane
3 Protective tube
4 Mains connection
cable (external)
5 Lustre terminal
6 Connection
cable (light)
7 Silicone washer
8 Screws
9 Lampshade
10 Base plate

13 GB/IE
Introduction / SafetyIntroduction
Scope of delivery
1 LED bathroom ceiling light, model 14150208L /
14150306L / 14150409L
3 Wall plugs
3 Screws
2 Protective tubes
3 Silicone washer
1 Set of installation instructions and instructions for use
Technical data
Light:
Model no.: 14150208L / 14150306L /
14150409L
Operating voltage: 230–240 V∼, 50 Hz
Rated power: max. LED 12.5 W
Protection class: I
Protection type: IP44 (splash-proof)
LED module:
Illuminant: LED module
Rated power: max. 11.5 W
Safety
Safety notes
Damage due to failure to comply with these opera-
ting instructions will void the warranty! We assume
no liability for consequential damages! We assume
no liability for property damage or personal injury
caused by improper handling or failure to observe
the safety notes!
DANGER TO
LIFE AND RISK OF ACCIDENT
F
OR INFANTS AND CHILDR
EN!
Never leave children unsupervised with the
packaging material. The packaging material
poses a suffocation hazard. Do not leave the
light or packaging material lying unattended.
Plastic film or bags, plastic parts, etc. can be
come
dangerous toys for children. Children frequently
underestimate the dangers.
Always keep children away from the product. This
product may be used by children aged 8 years
and up, as well as by persons with reduced
physical, sensory or mental capacities or lack-
ing experience and knowledge, so long as they
are supervised or instructed in the safe use of
the product and understand the associated risks.
Do not allow children to play with the product.
Cleaning and user maintenance must not be
performed by children without supervision.
Danger to life from
electric shock!
Ensure that a qualified electrician, or a person
trained to carry out electrical installations, per-
forms the electrical installation.
The light is exclusively intended for use in
private households.
Never use the light if any defects have been
identified.
Prior to installation, remove the fuse or switch
off the circuit breaker (0 setting) in the fuse box.
Set the light switch to the “Off“ position.
Prior to installation, verify that the mains voltage
on site corresponds with the operating voltage
required for the light (230–240 V∼) (see
“Technical data“).
Ensure that no cables are damaged when
installing.
Risk of burns and injury!
Do not install the light, if it has a defective lamp
glass. In this case contact the service centre for
a replacement.
The light may be installed on all normal inflam-
mable surfaces.
To prevent burns, ensure that the light is switched
o
ff and has cooled down before touching it. Lig
ht
bulbs develop a great deal of heat.
Do not attach the light to a damp or conductive
substrate.
The illuminant in this light is not replaceable;
when the illuminant reaches the end of its life,
replace the entire light.

14 GB/IE
Maintenance and cleaning / Disposal / Warranty and serviceSafety / Preparation / Assembly
This light is not suitable for external
dimmer and electronic switches.
Only use the individual parts supplied, other-
wise all warranty claims will become invalid.
Do not operate the lights with defective lamp
glass. Replace defective lamp glass.
For your safety
Always be attentive when working! Always pay
attention to what you are doing and act with
common sense. Never install the light if you are
h
aving difficulty concentrating or do not feel well
.
Do not look directly into the light source (light
bulb, LED etc.).
Do not look at the light source (light bulb, LED
etc.) with an optical instrument (e.g. magnifier).
Preparation
Required tools and material
The tools and materials specified are not included.
This information and these values are non-binding
and they are only for guidance. The nature of the ma-
terial is determined by the individual local conditions.
– Pencil / marking tool
– 2-pole circuit tester
– Screwdriver
– Power drill
– Side cutter
– Hammer
– Ladder
– Drill bit (approx. Ø 6 mm)
Prior to installation
Important: Have a trained electrician or someone
who has been instructed on how to install electrical
products install the electrical product.
Familiarise yourself with all instructions and fig-
ures in these instructions as well as with the light
before installation.
Before installation, ensure that the cable that the
lights are to be connected to is not live. For this,
remove the fuse or switch off the circuit breaker
in the fuse box (0 position).
Check that the power is off using a 2-pole
circuit tester.
Assembly
Remove the lampshade 9 by twisting it counter-
clockwise off the base plate 10 .
Hold the base plate against the installation sur-
face and mark the drill holes using the holes in
the base plate 10 intended for the screws 8.
Drill the holes (approx. Ø 6 mm, approx. 40 mm
deep). Be sure not to damage the power cable.
Insert the wall plugs 1 into the drilled holes.
If necessary, tap in with a hammer.
Open the rubber membrane 2 using a sharp
object (e.g. screwdriver).
Feed the mains connection cable (external) 4
through the rubber membrane 2. Make sure
it is correctly positioned.
Attach the base plate 10 to the installation
surface using the silicone washers 7 and the
screws 8.
Pass the individual strands L and N of the mains
connection cable (external) 4 through the
protective tubes 5.
Now use the lustre terminal 5 to connect the
light‘s connection cable 6 to the mains connec-
tion cable (external) 4.
Make sure that the colours of the connected w
ires
match (black or brown live wire = L symbol,
blue
neutral wire = N symbol).
Now connect the protective conductor (green-
yellow) to the earth terminal marked on the
connection housing.
Attach the lampshade 9 by screwing it clock-
wise onto the base plate 10 . Make sure it is
correctly positioned.
Replace the fuse or switch on the circuit breaker
in the fuse box (I setting).
Your light is now ready to use.

15 GB/IE
Maintenance and cleaning / Disposal / Warranty and serviceSafety / Preparation / Assembly
Maintenance and cleaning
RISK OF ELECTRIC SHOCK!
Disconnect the light from the mains circuit before
cleaning. To do this, remove the fuse or switch
off the circuit breaker in the fuse box (0 setting).
CAUTION! RISK OF BURNS DUE TO
HOT SURFACES!
Allow the light to cool completely.
Only use a dry, lint-free cloth for cleaning. Do
not use solvents, spirit or similar substances. They
could damage the light.
Reinsert the fuse or switch the circuit breaker
back on (I setting).
Disposal
The packaging is made entirely of recyclable mate-
rials, which you may dispose of at local recycling
facilities.
b
a
Observe the marking of the packaging
materials for waste separation, which
are marked with abbreviations (a) and
numbers (b) with following meaning:
1–7: plastics / 20–22: paper and fibre-
board / 80–98: composite materials.
The product and packaging materials are
recyclable, dispose of it separately for
better waste treatment. The Triman logo
is valid in France only.
To help protect the environment, please
dispose of the product properly when it
has reached the end of its useful life and
not in the household waste. Information on
collection points and their opening hours
can be obtained from your local authority.
Warranty and service
Warranty
You receive a 36 month warranty on this product,
valid from the date of purchase.
The appliance has been carefully produced under
strict quality control.
During the warranty period we will remedy any de-
fects in material or manufacture free of charge. In the
event that a defect arises during the warranty period,
please send the device to the listed service centre
address, quoting the following model numbers:
14150208L / 14150306L / 14150409L.
Wearing parts (such as light bulbs) and damage
caused by improper handling, non-observance of the
operating instructions or unauthorised interference
with the appliance are excluded from the warranty.
The performance of services under the warranty does
not extend or renew the warranty period.
Service address
Briloner Leuchten GmbH & Co. KG
Im Kissen 2
59929 Brilon
GERMANY
Tel.: +49 29 61 / 97 12‒800
Fax: +49 29 61 / 97 12‒199
E-Mail: kundenservice@briloner.com
www.briloner.com
Free service number:
Tel.: 00800 / 27456637
IAN 355071_2004
For all inquiries about your product, please have
your receipt and the article number (e.g. IAN
123456_7890) ready as your proof of purchase.

16 GB/IE
Declaration of conformity
This product fulfils the requirements of the applicable
European and national directives. Conformity has
been demonstrated. The relevant declarations and
documents are held by the manufacturer.
Manufacturer
Briloner Leuchten GmbH & Co. KG
Im Kissen 2
59929 Brilon
GERMANY
Warranty and service Table des matières

17 FR/BE
Warranty and service
Légende des pictogrammes utilisés .......................................................................... Page 18
Introduction ................................................................................................................................... Page 18
Utilisation conforme ............................................................................................................................Page 18
Descriptif des pièces ...........................................................................................................................Page 18
Contenu de la livraison .......................................................................................................................Page 19
Caractéristiques techniques ................................................................................................................Page 19
Sécurité .............................................................................................................................................Page 19
Consignes de sécurité ......................................................................................................................... Page 19
Préparation ...................................................................................................................................Page 20
Outils et matériel nécessaires ............................................................................................................. Page 20
Avant l‘installation ...............................................................................................................................Page 20
Montage ...........................................................................................................................................Page 20
Entretien et nettoyage..........................................................................................................Page 21
Mise au rebut ............................................................................................................................... Page 21
Garantie et service .................................................................................................................. Page 21
Garantie ..............................................................................................................................................Page 21
Adresse du SAV ..................................................................................................................................Page 22
Déclaration de conformité .................................................................................................................. Page 23
Fabricant ..............................................................................................................................................Page 23
Table des matières

18 FR/BE
Introduction / SécuritéIntroduction
Légende des pictogrammes utilisés
Lire le mode d'emploi! Conducteur de protection
Respectez les avertissements et les
consignes de sécurité ! Danger de mort et risque d'accident
pour les bébés et les enfants
Watt (puissance active) Attention au risque d'électrocution !
Danger de mort !
Hertz (fréquence) Danger d'incendie et de blessures !
Volt Cette lampe n'est pas adaptée aux
variateurs externes et aux interrup-
teurs électroniques.
Tension alternative
(type de courant et de tension) Ra Indice de restitution des couleurs
Durée de vie des LED ON OFF Cycles de commutation
Indice de protection (protection contre
les projections d'eau) Direction de montage
Cette lampe est exclusivement conçue
pour un usage en intérieur. 20
PAP
Mettez l'emballage et l'appareil
au rebut dans le respect de l'environ-
nement !
Température de lumière en Kelvin L'emballage est exclusivement
composé de papier recyclé.
Lampe de salle de bains à LED
Introduction
Nous vous félicitons de l‘achat de votre
nouveau produit. Vous avez opté pour
un produit de grande qualité. Ce mode
d‘emploi est rattaché au produit et contient des ins-
tructions essentielles pour sa mise en service et sa
manipulation. Respectez toujours l‘ensemble des
consignes de sécurité. Avant la mise en service, vé-
rifiez si la tension est correcte et si toutes les pièces
sont correctement montées. Si vous avez des ques-
tions ou des doutes concernant la manipulation de
l‘appareil, veuillez contacter votre revendeur ou le
service après-vente. Veuillez conserver soigneuse-
ment ce mode d‘emploi et remettez-le aux autres
utilisateurs.
Utilisation conforme
Cette lampe est uniquement conçue pour un usage
en intérieur. Cet appareil est uniquement destiné à
un usage domestique et privé. Cette lampe peut être
fi
xée sur toutes les surfaces normalement inflammab
les.
Ce produit est prévu pour un fonctionnement normal
et doit être utilisé uniquement pour un montage au
plafond.
Descriptif des pièces
1 Cheville
2 Membrane en
caoutchouc
3 Gaine de protection
4 Câble d‘alimentation
électrique (externe)
5 Domino
6 Câble de branche-
ment de la lampe
7 Rondelle en silicone
8 Vis
9 Abat-jour
10 Plaque de fond

19 FR/BE
Introduction / SécuritéIntroduction
Contenu de la livraison
1 lampe de salle de bains à LED, modèle
14150208L / 14150306L / 14150409L
3 chevilles
3 vis
2 gaines de protection
3 rondelles en silicone
1 notice de montage et d‘utilisation
Caractéristiques techniques
Lampe:
Nº de modèle: 14150208L /
14150306L /
14150409L
Tension de service: 230–240 V∼, 50 Hz
Puissance nominale: max. LED 12,5 W
Classe de protection: I
Indice de protection: IP44 (protégé contre les
projections d‘eau)
Module LED:
Ampoule: module LED
Puissance nominale: max. 11,5 W
Sécurité
Consignes de sécurité
Les réclamations de garantie sont annulées en cas
de dommages résultant du non-respect du présent
mode d‘emploi! Le fabricant décline toute responsa-
bilité pour les dommages consécutifs! Toute respon-
sabilité est déclinée pour les dommages matériels ou
corporels causés par une manipulation incorrecte
du produit ou par le non-respect des consignes de
sécurité!
DANGER DE MORT ET RISQUE
D‘ACCIDENT POUR LES NOUR-
RISSONS ET LES ENFANTS!
Ne laissez jamais les enfants manipuler sans
surveillance le matériel d‘emballage. Ils risquent
de s‘étouffer avec les matériaux d‘emballage.
Ne laissez pas la lampe ou le matériel d‘embal-
lage traîner sans surveillance. Les films et les
sachets en plastique, les éléments en plastique,
etc. peuvent constituer des jouets dangereux
pour les enfants. Les enfants sous-estiment sou-
vent les dangers.
Tenez toujours les enfants à l‘écart du produit.
Ce produit peut être utilisé par des enfants âgés
de 8 ans et plus ainsi que par des personnes
ayant des capacités physiques, sensorielles ou
mentales réduites ou manquant d‘expérience
ou de connaissances, à condition qu‘ils soient
surveillés ou qu‘ils aient été informés de l‘utili-
sation sûre du produit et qu‘ils en comprennent
les risques liés à son utilisation. Les enfants ne
doivent pas jouer avec le produit. Le nettoyage
et l‘entretien ne doivent pas être effectués par
des enfants laissés sans surveillance.
Danger de mort
par électrocution !
L‘installation électrique doit être effectuée par
un électricien ou par une personne dûment
formée à cet effet.
La lampe est prévue pour une utilisation privée
uniquement.
N’utilisez jamais votre lampe si vous constatez
le moindre endommagement.
Avant le montage, retirez le fusible ou coupez
le disjoncteur de la boîte à fusibles (position 0).
Mettez l‘interrupteur sur la position «OFF».
Assurez-vous avant le montage que la tension
du secteur existante correspond à la tension
de fonctionnement de la lampe (230–240 V~)
(voir «Caractéristiques techniques»).
Assurez-vous lors du montage qu‘aucun fil n‘est
endommagé.
Risque d‘incendie
et de blessures !
N‘assemblez pas la lampe si la lampe à gaz
est défectueuse. Dans ce cas, veuillez contacter
le service après-vente pour faire remplacer une
pièce défectueuse.

20 FR/BE
Montage / Entretien et nettoyage / Mise au rebut / Garantie et serviceSécurité / Préparation / Montage
La lampe peut être installée sur toutes les
surfaces normalement inflammables.
Afin d‘éviter toute brûlure, assurez-vous que la
lampe est éteinte et refroidie avant de la prendre
en main. L‘ampoule dégage une forte chaleur.
Ne fixez pas la lampe sur un support humide
et conducteur.
La source lumineuse de cette lampe n‘est pas
remplaçable ; lorsque la source de lumière ar-
rive en fin de vie, l‘ensemble de la lampe doit
être remplacé.
Cette lampe n‘est pas adaptée aux
variateurs externes et aux interrup-
teurs électriques.
Utilisez exclusivement les éléments fournis, sans
quoi toute réclamation de garantie sera nulle et
non advenue.
Ne pas utiliser la lampe avec un verre de
lampe défectueux. Remplacer le verre de
lampe défectueux.
Veuillez vous conformer
aux points suivants
Soyez toujours vigilant ! Faites toujours attention
à ce que vous faites et agissez raisonnablement.
N‘effectuez jamais le montage de la lampe si
vous n‘êtes pas concentré ou si vous vous sen-
tez mal.
Ne jamais regarder directement dans la source
lumineuse (ampoule, LED, etc.).
Ne pas observer la source lumineuse (ampoule,
LED etc.) à l‘aide d‘un instrument d‘optique
(loupe p. ex.).
Préparation
Outils et matériel nécessaires
Les outils et matériels indiqués ne sont pas inclus dans
le contenu de la livraison. Il s‘agit là de données et
de valeurs indicatives vous permettant de vous orien-
ter. Les caractéristiques du matériel dépendent des
conditions spécifiques dont vous disposez sur place.
– Crayon à papier / outil de marquage
– Détecteur de tension à 2 pôles
– Tournevis
– Perceuse
– Pince coupante
– Marteau
– Escabeau
– Foret (env. Ø6 mm)
Avant l‘installation
Important : Faites effectuer l’installation électrique
par un électricien qualifié ou toute autre personne
possédant les connaissances nécessaires à ce type
d’installation.
Veuillez vous familiariser avant l’installation avec
toutes les instructions et figures contenues dans
cette notice ainsi qu’avec le luminaire même.
Assurez-vous avant l’installation de l’absence
de tension sur la ligne électrique devant être
raccordée au luminaire. À cet effet, retirez le
fusible ou désactivez le disjoncteur automatique
dans le boîtier à fusibles (position 0).
Vérifiez l‘absence de tension au moyen d‘un
détecteur de tension à 2 pôles.
Montage
Détachez l‘abat-jour
9
de la plaque de fond
10
en le tournant dans le sens anti-horaire.
Maintenez la plaque de fond contre la surface
de montage et marquez les trous de perçage
à l‘aide des trous prévus pour les vis 8 sur la
plaque de fond 10 .
Percez les trous (Ø6mm, env. 40mm de pro-
fondeur). Assurez-vous de ne pas endommager
le câble d‘alimentation.
Enfoncez les chevilles 1 dans les trous de per-
çage. Si nécessaire, aidez-vous d‘un marteau.
Ouvrez la membrane en caoutchouc 2 avec
un objet pointu (par ex. un tournevis).
Introduisez le câble d‘alimentation électrique
(externe) 4 dans la membrane en caoutchouc
2
. Assurez-vous que le positionnement est correct.
Strona się ładuje...
Strona się ładuje...
Strona się ładuje...
Strona się ładuje...
Strona się ładuje...
Strona się ładuje...
Strona się ładuje...
Strona się ładuje...
Strona się ładuje...
Strona się ładuje...
Strona się ładuje...
Strona się ładuje...
Strona się ładuje...
Strona się ładuje...
Strona się ładuje...
Strona się ładuje...
Strona się ładuje...
Strona się ładuje...
Strona się ładuje...
Strona się ładuje...
Strona się ładuje...
Strona się ładuje...
Strona się ładuje...
Strona się ładuje...
Strona się ładuje...
Strona się ładuje...
Strona się ładuje...
Strona się ładuje...
Strona się ładuje...
-
 1
1
-
 2
2
-
 3
3
-
 4
4
-
 5
5
-
 6
6
-
 7
7
-
 8
8
-
 9
9
-
 10
10
-
 11
11
-
 12
12
-
 13
13
-
 14
14
-
 15
15
-
 16
16
-
 17
17
-
 18
18
-
 19
19
-
 20
20
-
 21
21
-
 22
22
-
 23
23
-
 24
24
-
 25
25
-
 26
26
-
 27
27
-
 28
28
-
 29
29
-
 30
30
-
 31
31
-
 32
32
-
 33
33
-
 34
34
-
 35
35
-
 36
36
-
 37
37
-
 38
38
-
 39
39
-
 40
40
-
 41
41
-
 42
42
-
 43
43
-
 44
44
-
 45
45
-
 46
46
-
 47
47
-
 48
48
-
 49
49


w innych językach
- Deutsch: LIVARNO 355071 Bedienungsanleitung
- slovenčina: LIVARNO 355071 Návod na obsluhu
- français: LIVARNO 355071 Le manuel du propriétaire
- Nederlands: LIVARNO 355071 de handleiding
Powiązane artykuły
-
LIVARNO 373269 Instrukcja obsługi
-
-
-
-
-
-
-
-
-