Electrolux ESL2400RO Instrukcja obsługi
- Kategoria
- Zmywarki
- Typ
- Instrukcja obsługi


CONTENTS
1. SAFETY INFORMATION....................................................................................3
2. SAFETY INSTRUCTIONS..................................................................................4
3. PRODUCT DESCRIPTION................................................................................ 5
4. CONTROL PANEL............................................................................................. 6
5. PROGRAMMES ................................................................................................ 6
6. DAILY USE.........................................................................................................8
7. HINTS AND TIPS............................................................................................. 11
8. CARE AND CLEANING....................................................................................12
9. TROUBLESHOOTING......................................................................................13
10. INSTALLATION.............................................................................................. 16
11. TECHNICAL INFORMATION......................................................................... 18
WE’RE THINKING OF YOU
Thank you for purchasing an Electrolux appliance. You’ve chosen a product that
brings with it decades of professional experience and innovation. Ingenious and
stylish, it has been designed with you in mind. So whenever you use it, you can
be safe in the knowledge that you’ll get great results every time.
Welcome to Electrolux.
Visit our website for:
Get usage advice, brochures, trouble shooter, service information:
www.electrolux.com/webselfservice
Register your product for better service:
www.registerelectrolux.com
Buy Accessories, Consumables and Original spare parts for your appliance:
www.electrolux.com/shop
CUSTOMER CARE AND SERVICE
Always use original spare parts.
When contacting our Authorised Service Centre, ensure that you have the
following data available: Model, PNC, Serial Number.
The information can be found on the rating plate.
Warning / Caution-Safety information
General information and tips
Environmental information
Subject to change without notice.
www.electrolux.com2

1. SAFETY INFORMATION
Before the installation and use of the appliance, carefully
read the supplied instructions. The manufacturer is not
responsible if an incorrect installation and use causes
injuries and damages. Always keep the instructions with
the appliance for future reference.
1.1 General Safety
• This appliance is intended to be used in household
and similar applications such as:
– farm houses; staff kitchen areas in shops, offices
and other working environments;
– by clients in hotels, motels, bed & breakfast and
other residential type environments.
• Do not change the specification of this appliance.
• The operating water pressure (minimum and
maximum) must be between 0.3 (0.03) / 10 (1) bar
(Mpa)
• Obey the maximum number of 6 place settings.
• If the supply cord is damaged, it must be replaced by
the manufacturer, its Authorised Service Centre or
similarly qualified persons in order to avoid a hazard.
• Put knives and cutlery with sharp points in the cutlery
basket with the points down or in a horizontal position.
• Do not keep the appliance door open without
supervision to prevent to fall on it.
• Before maintenance, deactivate the appliance and
disconnect the mains plug from the mains socket.
• Do not use water spray and steam to clean the
appliance.
• The ventilation openings in the base (if applicable)
must not be obstructed by a carpet.
• The appliance is to be connected to the water mains
using the new supplied hose-sets. Old hose sets must
not be reused.
ENGLISH 3

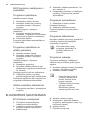
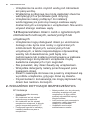
1.2 Children and vulnerable people safety
• This appliance can be used by children aged from 8
years and above and persons with reduced physical,
sensory or mental capabilities or lack of experience
and knowledge if they have been given supervision or
instruction concerning use of the appliance in a safe
way and understand the hazards involved.
• Do not let children play with the appliance.
• Keep all detergents away from children.
• Keep children and pets away from the appliance door
when it is open.
• Cleaning and user maintenance shall not be made by
children without supervision.
2. SAFETY INSTRUCTIONS
2.1 Installation
• Remove all the packaging.
• Do not install or use a damaged
appliance.
• Do not install or use the appliance
where the temperature is less than 0
°C.
• Obey the installation instruction
supplied with the appliance.
• Make sure that the appliance is
installed below and adjacent to safe
structures.
• Do not move the appliance without
disconnecting it from the electrical
supply.
• The appliance must be installed in a
cabinet.
• Do not use the appliance without a
wooden panel, assembled on the
door.
2.2 Electrical connection
WARNING!
Risk of fire and electrical
shock.
• The appliance must be earthed.
• Make sure that the electrical
information on the rating plate agrees
with the power supply. If not, contact
an electrician.
• Always use a correctly installed
shockproof socket.
• Do not use multi-plug adapters and
extension cables.
• Make sure not to cause damage to
the mains plug and to the mains
cable. Should the mains cable need to
be replaced, this must be carried out
by our Authorised Service Centre.
• Connect the mains plug to the mains
socket only at the end of the
installation. Make sure that there is
access to the mains plug after the
installation.
• Do not pull the mains cable to
disconnect the appliance. Always pull
the mains plug.
• This appliance complies with the
E.E.C. Directives.
• Only for UK and Ireland. The
appliance has a 13 amp mains plug. If
it is necessary to change the fuse in
the mains plug, use fuse: 13 amp
ASTA (BS 1362).
2.3 Water connection
• Make sure not to cause damage to
the water hoses.
www.electrolux.com4

• Before you connect the appliance to
new pipes or pipes not used for a long
time, let the water flow until it is clean.
• The first time you use the appliance,
make sure that there is no leakage.
• If the water inlet hose is damaged,
immediately disconnect the mains
plug from the mains socket. Contact
the Authorised Service Centre to
replace the water inlet hose.
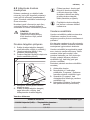
2.4 Use
• Do not sit or stand on the open door.
• Dishwasher detergents are
dangerous. Obey the safety
instructions on the detergent
packaging.
• Do not drink and play with the water in
the appliance.
• Do not remove the dishes from the
appliance until the programme is
completed. There can be detergent on
the dishes.
• The appliance can release hot steam
if you open the door while a
programme operates.
• Do not put flammable products or
items that are wet with flammable
products in, near or on the appliance.
2.5 Disposal
WARNING!
Risk of injury or suffocation.
• Disconnect the appliance from the
mains supply.
• Cut off the mains cable and discard it.
• Remove the door catch to prevent
children and pets to get closed in the
appliance.
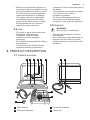
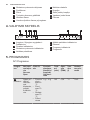
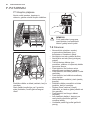
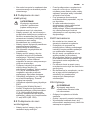
3. PRODUCT DESCRIPTION
3.1 General overview
9
1 2 5 63
7
84
10
11
12
13
1
Salt container
2
Detergent dispenser
3
Rinse aid dispenser
4
Spray arm
ENGLISH 5

5
Filters
6
Rating plate
7
Drain hose
8
Inlet hose connection
9
Mains cable
10
Basket
11
Cutlery basket
12
Inlet hose
13
Funnel
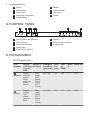
4. CONTROL PANEL
1 2 43 85 6 7
1
On/off button and indicator
2
Salt indicator
3
Rinse aid indicator
4
Delay Start
5
Delay Start indicator
6
Display
7
Programmes indicators
8
Programmes
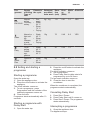
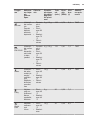
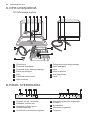
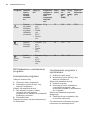
5. PROGRAMMES
5.1 Programmes
Pro‐
gramme
Degree
of soiling
Type of
load
Phases in
the cycle
Detergent
pre-wash /
main wash
Dura‐
tion
(min)
Ener‐
gy
(kWh)
Water
(l)
Rinse aid
Intensive
Heavy ,
dried-on
soiling
Pans,
pots, cas‐
serole
dishes
• Pre-
wash
50°C
• Wash
70 °C
• Rinse
70 °C
• Drying
3g / 15g 145 0.94 11 YES
Normal
Normal
soiling
Pots,
plates,
glasses,
pans
• Pre-
wash
• Wash
60 °C
• Rinse
70 °C
• Drying
3g / 15g 125 0.70 8.4 YES
www.electrolux.com6

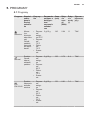
Pro‐
gramme
Degree
of soiling
Type of
load
Phases in
the cycle
Detergent
pre-wash /
main wash
Dura‐
tion
(min)
Ener‐
gy
(kWh)
Water
(l)
Rinse aid
Eco
EN 50242
Normal
soiling
Crockery,
cutlery
• Pre-
wash
• Wash
50 °C
• Rinse
70 °C
• Drying
3g / 15g 170 0.61 7.0 YES
Glass
Normal or
light soil‐
ing
Glasses,
crystal,
fine china
• Wash
45 °C
• Rinse
60 °C
• Drying
15g 75 0.48 6.8 YES
Party
Fresh
soiling
Coffee
cup,
glasses
• Wash
45 °C
• Rinse
40 °C
5g 20 0.30 7.0
Quick
Plus
Light soil‐
ing
All
• Wash
40 °C
• Rinse
15g 30 0.30 6.0
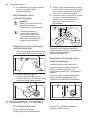
5.2 Setting and starting a
programme
Starting a programme
Open the water tap.
1. Open the appliance door.
2. Press the on/off button to activate the
appliance.
The on/off indicator comes on.
3. To set a programme, press
Programmes until the indicator of the
selected programme comes on.
4. Close the door.
Programme starts automatically after 10
seconds.
Starting a programme with
Delay Start
1. Open the water tap.
2. Press the on/off button to activate the
appliance.
The on/off indicator comes on.
3. Set a programme.
4. Press Delay Start to delay start of a
programme by up to 24 hours.
The pre-wash indicator comes on.
5. Close the door to start the
countdown.
When the countdown is completed, the
programme starts automatically.
Cancelling Delay Start
1. Press Start / Pause.
2. Press Delay Start until 0 comes on.
3. Press Start / Pause. The programme
starts automatically.
Interrupting a programme
1. Open the appliance door.
The appliance stops.
ENGLISH 7

2. Close the appliance door.
The programme continues from the point
of interruption.
Cancelling a programme
Press and hold Programmes for about 3
seconds to cancel the programme.
Make sure that there is
detergent in the detergent
dispenser before you start a
new programme.
End of a programme
When a programme is completed, an
intermittent acoustic signal sounds for
approximately 8 seconds.
1. Press the on/off button to deactivate
the appliance.
2. Close the water tap.
• Let the dishes become
cold before you remove
them from the appliance.
Hot dishes can be easily
damaged.
• There can be water on
the sides and on the door
of the appliance.
Stainless steel becomes
cool more quickly than
the dishes.
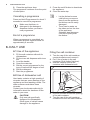
6. DAILY USE
6.1 Use of the appliance
1. Fill the salt container with salt for
dishwashers.
2. Fill the rinse aid dispenser with rinse
aid.
3. Load the basket.
4. Open the water tap.
5. Set the correct programme for the
type of load and the degree of soil.
6. Add the detergent.
7. Start the programme.
6.2 Use of dishwasher salt
Hard water contains a high quantity of
minerals that can cause damage to the
appliance and bad washing results. The
water softener neutralises these
minerals.
Contact your local water authority for
information about the hardness of the
water in your area.
CAUTION!
Only use salt specifically
designed for dishwashers.
Other types of salt will cause
damage to the appliance.
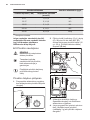
Filling the salt container
1. Turn the cap of the salt container
counterclockwise and remove it.
2. Put 1 litre of water in the salt
container (Only for the first time).
3. Use the funnel to fill the salt
container with dishwasher salt.
4. Remove the salt around the opening
of the salt container.
5. Turn the cap of the salt container
clockwise to close the salt container.
www.electrolux.com8

Water and salt can come out
from the salt container when
you fill it which poses a risk
of corrosion. To prevent it,
start a programme
immediately after filling the
salt container.
Refill the salt container when
salt indicator on the display
comes on.
The water softener
The water softener removes minerals
from the water supply, which would have
a detrimental effect on the washing
results and on the appliance.
The higher the content of these minerals,
the harder your water is. Water hardness
is measured in equivalent scales.
The water softener should be adjusted
according to the hardness of the water in
your area. Your local water authority can
advise you on the hardness of the water
in your area. It is important to set the
right level of the water softener to assure
good washing results.
To change the water softener setting:
1. Open the door
2. Press and hold Programme for 5
seconds . Current water softener
level appears.
3. Press Programme to set the
necessary water softener level
4. Do not change the setting for 5
seconds to confirm the choice.
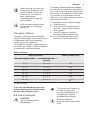
Water hardness
Water hardness Water softener level
German degrees (°dH) International unit
(mmol/l)
0 - 5 0.0 - 0.9 H1
6 - 11 1.0 - 2.0 H2
12 - 17 2.1 - 3.0 H3
18 - 22 3.1 - 4.0 H4
23 - 34 4.1 - 6.1 H5
35 - 45 6.2 - 8.0
H6
1)
1)
Factory setting.
If you use standard detergent, set a
proper water hardness level to keep
the salt refill indicator active.
6.3 Use of detergent
CAUTION!
Use only detergents for
dishwashers.
To help the environment, do
not use more than the
recommended quantity of
detergent given by the
detergent manufacturer.
Refill the detergent
dispenser before each wash
cycle.
ENGLISH 9

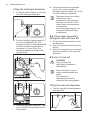
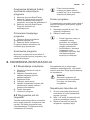
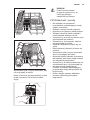
Filling the detergent dispenser
1. Press the release button to open the
lid of the detergent dispenser.
2. Put the detergent (approximately 15
g) in the compartment (C). The
compartment has 2 parts (D) and (E)
that refer to different quantities of
detergent (15 g and 25 g). Put
detergent tablets in part (E) of the
compartment.
C
D E
3. Close the detergent dispenser. Press
the lid until the release button locks
into position.
4. If the programme has a prewash
phase, put a small quantity of
detergent (approximately 3 g) on the
lid of the detergent dispenser.
Detergent tablets do not fully
dissolve with short
programmes and detergent
residues can remain on the
dishes when the programme
is completed.
We recommend that you use
detergent tablets with long
programmes.
6.4 Using again separately
detergent, salt and rinse aid
1. Fill the salt container and the rinse
aid dispenser.
2. Start a programme without loading
dishes.
3. When the programme is completed,
adjust the position of the rinse aid
dispenser.
6.5 Use of rinse aid
CAUTION!
Only use rinse aid
specifically designed for
dishwashers.
Rinse aid helps to dry the
dishes without streaks and
stains.
The rinse aid is
automatically released
during the last rinsing phase.
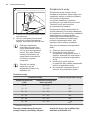
Filling the rinse aid dispenser
1. Turn the cap (A) counterclockwise
and remove it.
A
www.electrolux.com10

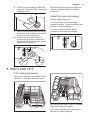
2. Fill the rinse aid dispenser (B) with
rinse aid. The mark ''MAX'' shows the
maximum level.
B
3. Remove the spilled rinse aid with an
absorbent cloth to prevent too much
foam during the programme.
4. Put the cap on again and turn it
clockwise until it locks. Make sure
that the signs on the cap and on the
dispenser are aligned.
C
Refill the rinse aid dispenser when the
rinse aid indicator (C)on the display
comes on.
Adjust the rinse aid dosage
Factory setting: position 3.
You can set the rinse aid dosage
between position 1 (lowest dosage) and
position 4 (highest dosage).
Turn the rinse aid selector (A) to
increase or decrease the dosage.
A
7. HINTS AND TIPS
7.1 Loading the basket
The rows of prongs in the basket can be
lowered to load pots, pans and bowls.
Mix spoons with other cutlery to prevent
them from bonding together.
The cutlery basket has 2 cutlery grids
that can be easily removed.
ENGLISH 11

CAUTION!
Make sure that the spray
arm can turn freely before
you start a programme.
7.2 Hints and tips
• Do not put in the appliance items that
can absorb water (sponges,
household cloths).
• Remove the remaining food from the
items.
• Make soft the remaining burned food
on the items.
• Put hollow items (cups, glasses and
pans) with the opening down.
• Make sure that water does not collect
in containers or in bowls.
• Make sure that cutlery and dishes do
not bond together.
• Make sure that the glasses do not
touch with each other.
• Put small items in the cutlery basket.
• Mix the spoons with other cutlery to
prevent them to bond together.
• When you put items in the basket
make sure that water can reach all
surfaces.
• Make sure that light items cannot
move.
• Water droplets can collect on plastic
items and non-stick pans.
• Long bladed knives are potential
hazard when positioned vertically.
8. CARE AND CLEANING
8.1 Maintenance
WARNING!
Before maintenance,
deactivate the appliance and
disconnect the mains plug
from the mains socket.
CAUTION!
Do not use the appliance
without filters.
Make sure that the filters are
correctly positioned. An
incorrect positioning of the
filters will cause bad
washing results and damage
to the appliance.
Dirty filters and a clogged
spray arm decrease the
washing results. Regularly
check and if necessary,
clean the filters.
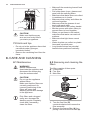
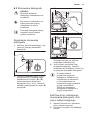
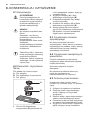
8.2 Removing and cleaning the
filters
The filter consists of three parts.
A. Coarse filter
B. Fine filter
C. Main filter
A
B
C
1. Turn the fine filter (B)
counterclockwise and remove the
filter assembly.
2. Remove the coarse filter (A) by
pulling it out from the fine filter (B).
www.electrolux.com12

3. Fully wash the filters with water and a
brush.
4. Put the coarse filter (A) into the fine
filter (B).
5. Put the filter assembly into the tub
and turn the fine filter (B) clockwise
until it locks.
8.3 To clean the spray arm
Do not remove the spray arm. If the
holes in the spray arm are clogged,
remove remaining parts of soil with a thin
pointed object.
8.4 To clean the external
surfaces
Clean the external surfaces of the
appliance and the control panel with a
moist soft cloth.
Only use neutral detergents.
Do not use abrasive products, abrasive
cleaning pads or solvents (e.g. acetone).
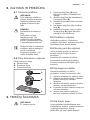
8.5 Protecting against frost
Protect the appliance from frost, for
example in winter. After each cycle:
1. Disconnect the appliance from the
electrical supply.
2. Shut off water supply and disconnect
the water inlet pipe from the water
valve.
3. Drain water from the inlet pipe and
water valve.
4. Connect the water inlet pipe to the
water valve.
5. Remove the filter at the bottom of the
tub and use a sponge to collect water
from the sump.
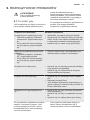
9. TROUBLESHOOTING
WARNING!
Refer to Safety chapters.
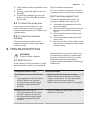
9.1 What to do if...
If the appliance does not start or it stops
during operation, before you contact an
Authorised Service Centre, check if you
can solve the problem by yourself with
the help of the information in the table.
With some problems programme
indicators flash intermittently indicating a
malfunction.
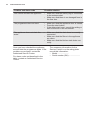
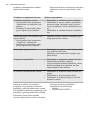
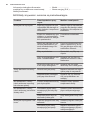
Problem and alarm code Possible solution
The appliance does not fill with wa‐
ter.
• The programme indicator ''Rinse
& Hold'' flashes very quickly.
• An intermittent acoustic signal
sounds for approximately 30
seconds.
• Make sure that the water tap is open.
• Make sure that the pressure of the water
supply is not too low. For this information,
contact your local water authority.
• Make sure that the water tap is not clogged.
The anti-flood device is on.
• The programme indicator ''Deli‐
cate 45°'' flashes very quickly.
• An intermittent acoustic signal
sounds for approximately 30
seconds.
• Close the water tap and contact an Author‐
ised Service Centre.
ENGLISH 13

Problem and alarm code Possible solution
You cannot activate the appliance. • Make sure that the mains plug is connected
to the mains socket.
• Make sure that there is no damaged fuse in
the fuse box.
The programme does not start. • Make sure that the appliance door is closed.
• Press the start button.
• If the delay start is set, cancel the setting or
wait for the end of the countdown.
The appliance does not drain the
water.
• Make sure that the drain hose is correctly
connected.
• Make sure that the filters in the appliance
are clean.
• Make sure that the kitchen sink drains cor‐
rectly.
Once you have checked the appliance,
set and start the programme again. If the
problem occurs again, contact an
Authorised Service Centre.
For alarm codes not described in the
table, contact an Authorised Service
Centre.
The necessary information for the
Service Centre is on the rating plate.
record this information:
• Model ......................
• Serial number (SN.) ......................
www.electrolux.com14

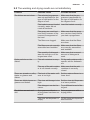
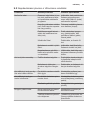
9.2 The washing and drying results are not satisfactory
Problem Possible cause Possible solution
The dishes are not clean. The selected programme
was not applicable for the
type of load and/or for the
degree of soil.
Make sure that the pro‐
gramme is applicable for
the type of load and/or for
the degree of soil.
The basket was not loaded
correctly, water did not
reach all surfaces.
Load the basket correctly.
The spray arm could not
turn freely because of the
incorrect arrangement of
the load.
Make sure that the spray
arm can turn freely before
you start a programme.
The filters are clogged. Make sure that the filters
are clean.
The filters are not correctly
assembled and installed.
Make sure that the filters
are correctly assembled
and installed.
The quantity of detergent
was not enough or no de‐
tergent was used.
Make sure that a correct
amount of detergent is
used.
Scale particles on the
dishes.
The salt container is emp‐
ty.
Fill the salt container with
specific salt for dishwash‐
ers.
The cap of the salt contain‐
er is not closed correctly.
Make sure that the salt
container is correctly
closed.
There are streaks or milky
stains on glasses and
dishes.
The level of the water soft‐
ener is too high.
Set the water softener to a
lower level.
There are bluish layers on
glasses and dishes.
The rinse aid dosage is too
high.
Set the rinse aid dispenser
to a lower position.
The detergent can be the
cause.
Try a different brand of de‐
tergent.
The dishes are wet and
dull.
A programme without a
drying phase has been se‐
lected.
Set a programme with a
drying phase.
The rinse aid dispenser is
empty.
Fill the rinse aid dispenser
with rinse aid.
ENGLISH 15

9.3 Error codes
Code Meaning Possible cause
E1 Longer inlet time Tap is not open or water
intake is restricted or water
pressure is too low
E4 Overfilled Too much inlet water or
some dishwasher element
leaks
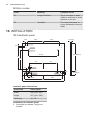
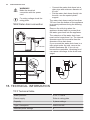
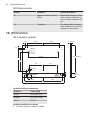
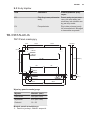
10. INSTALLATION
10.1 Aesthetic panel
64 (45min.)
3,5
407 (388min.)
26,6
21,5
2-Ø15/5
2-Ø2/12
2-Ø5 (A)
4-Ø2/12
4-Ø2/12
6-Ø2/12
4-Ø35/12
327
195
32
47
23 20
18
6
262,5 262,5
45
590 (550min.)
195
285
228,5
415 (B)
228,5 16~22(F)
Aesthetic panel dimensions
Dimension Value (mm)
Width 590 (min. 550)
Height 407 (min. 388)
Thickness 16 - 22
Installation of aesthetic panel
1. Assemble the handle, hinge and
bracket.
www.electrolux.com16

A
B
C
A. Handle
B. Bracket, screws 4*12
C. Hinge, screws 4.2*16
2. Fix the panel onto the door with
screws.
A
B
A. Screw 4*12
B. Screw 4.2*16
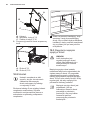
10.2 Assembly
Make sure to position the
appliance with minimum
space of 50mm on both
sides of fully open door.
Keep 5 mm distance between both sides
of the appliance and the cabinet. There
are two possibilities for the cabinet hole
for the appliance.
min.
550 mm
min.
443mm
100
80
min.
555mm
1
Power cord, drain hose and water
supply line hole. To facilitate a proper
installation, position the hole to the
right or the the left of the appliance.
10.3 Tension adjustment of the
door spring
CAUTION!
To adjust the door spring call
an Authorised Service
Centre.
The door springs are set at the factory to
the proper tension for the outer door. If
you install aesthetic panel, adjust the
door spring tension. To strain or relax the
steel cable, rotate the adjusting screws.
Door spring tension is
correct when the door
remains horizontal in the
fully open position, yet, you
can close them with a slight
move of a finger .
10.4 Electrical connection
WARNING!
Do not use an extension
cord or and adapter plug
with this appliance.
WARNING!
Do not cut or remove the
earthing.
ENGLISH 17

WARNING!
Make the electrical
connection with the power
cord.
For rating voltage check the
rating plate.
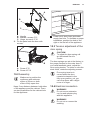
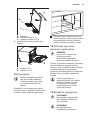
10.5 Water drain connection
max. 750 mm
• Connect the water drain hose into a
drain pipe with minimum diameter of
40 mm.
• Put the water drain hose directly into
the sink. use the special plastic
support.
The water drain hose must be less than
750 mm from the bottom of the appliance
to prevent problems during the draining
phases.
Remove the sink plug when the
appliance drains water to prevent that
the water goes back into the appliance.
The extension of the water drain hose
must not be longer than 2 m. The internal
diameter must not be smaller than the
diameter of the drain hose.
If you connect the water drain hose to a
trap spigot under the sink, remove the
plastic membrane (A). If you do not
remove the membrane, remaining food
can cause a blockage in the drain hose
spigot.
A
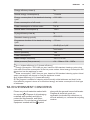
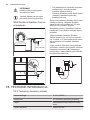
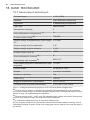
11. TECHNICAL INFORMATION
11.1 Technical table
Water pressure 0.04 - 1.0 MPa
Power supply Refer to rating plate
Capacity 6 place settings
Type / Description WQP6-3305E
Standard place settings 6
www.electrolux.com18

Energy efficiency class
1)
A+
Annual energy consumption
2)
174 kWh
Energy consumption of the standard cleaning
cycle
0.61 kWh
Power consumption of off-mode 0 W
Power consumption of left-on mode 0.4 W
Annual water consumption
3)
1820 l
Drying efficiency class
4)
B
Standard cleaning cycle
5)
ECO 50°C
Programme duration of the standard cleaning
cycle
170 min
Noise level 54 dB (A) re 1 pW
Mounting build under
Build-in possibility Yes
Power consumption 1280 W
Rated voltage / frequency 230 V~/ 50 Hz
Water pressure (flow pressure) 0.4 - 10bar = 0.04 - 1 MPa
1)
A+++ (highest efficiency) to D (lowest efficiency)
2)
Energy consumption "180" kWh per year, based on 280 standard cleaning cycles using
cold water fill and the consumption of the low power modes. Actual energy consumption will
depend on how the appliance is used.
3)
Water consumption "1960" litres per year, based on 280 standard cleaning cycles. Actual
water consumption will depend on how the appliance is used.
4)
A (highest efficiency) to G (lowest efficiency)
5)
This program is suitable for cleaning soiled normally soiled tableware and that it is the
most efficient program in terms of its combined energy and water consumption for that type
of tableware.
12. ENVIRONMENT CONCERNS
Please recycle all materials marked with
the symbol . Dispose of all packaging
materials appropriately and help to
protect the environment, and future
generations. Do not dispose of electrical
equipment marked with the symbol
along with the general house hold waste.
Dispose all electrical goods via
applicable local authority collections, or
at local authority or, commercial recycling
centres.
ENGLISH 19

TURINYS
1. SAUGOS INFORMACIJA................................................................................. 21
2. SAUGOS INSTRUKCIJA..................................................................................22
3. GAMINIO APRAŠYMAS...................................................................................23
4. VALDYMO SKYDELIS......................................................................................24
5. PROGRAMOS .................................................................................................24
6. KASDIENIS NAUDOJIMAS.............................................................................. 26
7. PATARIMAI...................................................................................................... 30
8. VALYMAS IR PRIEŽIŪRA................................................................................ 31
9. TRIKČIŲ ŠALINIMAS....................................................................................... 31
10. ĮRENGIMAS....................................................................................................34
11. TECHNINĖ INFORMACIJA............................................................................ 36
MES GALVOJAME APIE JUS
Dėkojame, kad pirkote šį „Electrolux“ prietaisą. Jūs pasirinkote gaminį, kuris
pasižymi dešimtmečių profesionalia patirtimi ir naujovėmis. Originalus ir stilingas,
jis sukurtas galvojant apie jus. Taigi, kai tik naudojate jį, galite jaustis saugūs,
žinodami, kad kiekvieną kartą pasieksite puikių rezultatų.
Sveiki atvykę į „Electrolux“ pasaulį!
Apsilankykite mūsų interneto svetainėje, kad:
Gautumėte naudojimo patarimų, brošiūrų, trikčių šalinimo, aptarnavimo
informacijos:
www.electrolux.com/webselfservice
Užregistruotumėte savo gaminį geresniam aptarnavimui:
www.registerelectrolux.com
Įsigytumėte priedų, vartojamųjų prekių ir originalių atsarginių dalių savo
prietaisui:
www.electrolux.com/shop
KLIENTŲ PRIEŽIŪRA IR APTARNAVIMAS
Rekomenduojame naudoti tik originalias atsargines dalis.
Kreipdamiesi į įgaliotąjį aptarnavimo centrą, būtinai pateikite šią informaciją:
modelis, PNC, serijos numeris.
Informacija yra nurodyta techninių duomenų plokštelėje.
Įspėjimas / atsargumo ir saugos informacija
Bendroji informacija ir patarimai
Aplinkosaugos informacija
Galimi pakeitimai.
www.electrolux.com20
Strona się ładuje...
Strona się ładuje...
Strona się ładuje...
Strona się ładuje...
Strona się ładuje...
Strona się ładuje...
Strona się ładuje...
Strona się ładuje...
Strona się ładuje...
Strona się ładuje...
Strona się ładuje...
Strona się ładuje...
Strona się ładuje...
Strona się ładuje...
Strona się ładuje...
Strona się ładuje...
Strona się ładuje...
Strona się ładuje...
Strona się ładuje...
Strona się ładuje...
Strona się ładuje...
Strona się ładuje...
Strona się ładuje...
Strona się ładuje...
Strona się ładuje...
Strona się ładuje...
Strona się ładuje...
Strona się ładuje...
Strona się ładuje...
Strona się ładuje...
Strona się ładuje...
Strona się ładuje...
Strona się ładuje...
Strona się ładuje...
Strona się ładuje...
Strona się ładuje...
Strona się ładuje...
Strona się ładuje...
Strona się ładuje...
Strona się ładuje...
-
 1
1
-
 2
2
-
 3
3
-
 4
4
-
 5
5
-
 6
6
-
 7
7
-
 8
8
-
 9
9
-
 10
10
-
 11
11
-
 12
12
-
 13
13
-
 14
14
-
 15
15
-
 16
16
-
 17
17
-
 18
18
-
 19
19
-
 20
20
-
 21
21
-
 22
22
-
 23
23
-
 24
24
-
 25
25
-
 26
26
-
 27
27
-
 28
28
-
 29
29
-
 30
30
-
 31
31
-
 32
32
-
 33
33
-
 34
34
-
 35
35
-
 36
36
-
 37
37
-
 38
38
-
 39
39
-
 40
40
-
 41
41
-
 42
42
-
 43
43
-
 44
44
-
 45
45
-
 46
46
-
 47
47
-
 48
48
-
 49
49
-
 50
50
-
 51
51
-
 52
52
-
 53
53
-
 54
54
-
 55
55
-
 56
56
-
 57
57
-
 58
58
-
 59
59
-
 60
60


Electrolux ESL2400RO Instrukcja obsługi
- Kategoria
- Zmywarki
- Typ
- Instrukcja obsługi
w innych językach
- English: Electrolux ESL2400RO User manual
Powiązane artykuły
-
Electrolux ESF2400OS Instrukcja obsługi
-
-
-
Electrolux ESL63010 Instrukcja obsługi
-
Electrolux ESF5542LOW Instrukcja obsługi
-
Electrolux ESI64010X Instrukcja obsługi
-
-