

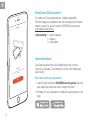
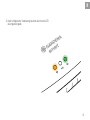
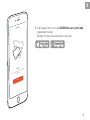
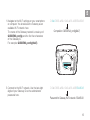
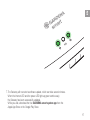
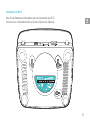
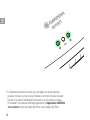
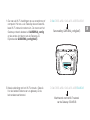
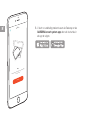
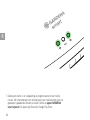
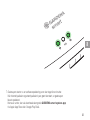
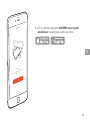
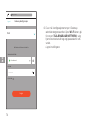
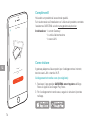
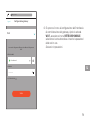
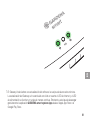
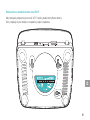
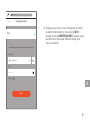
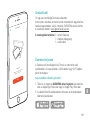
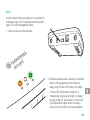
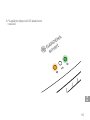
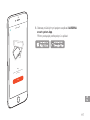
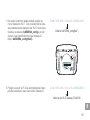
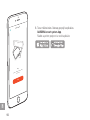
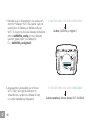
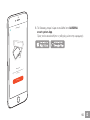
Willkommen
Mein Garten
Wir beginnen mit der Einrichtung Ihres smart Gateway.
Sind Sie bereit?
Starten
2
DE
Herzlichen Glückwunsch!
Sie haben ein Produkt allerhöchster Qualität ausgewählt.
Falls Sie Fragen zur Installation oder Verwendung Ihres Produkts
haben, wenden Sie sich an unseren GARDENA Service unter
www.gardena.de/service
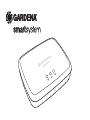
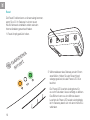
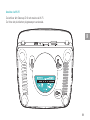
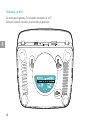
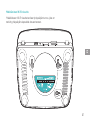
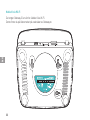
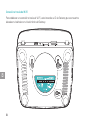
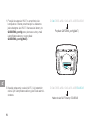
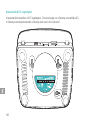
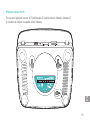
Lieferumfang: 1 x smart Gateway
1 x Netzteil
1 x LAN-Kabel
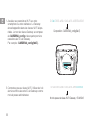
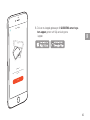
Inbetriebnahme
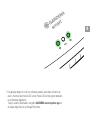
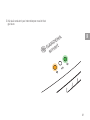
Das Gateway bietet Ihnen zwei Möglichkeiten sich mit dem
Internet zu verbinden. Das Verbinden mit dem LAN-Kabel oder
über WLAN.
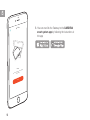
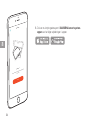
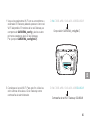
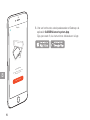
Mit Kabel verbinden (empfohlen):
1. Laden Sie die kostenlose GARDENA smart system-App aus
dem Apple App Store oder dem Google Play Store.
2. Befolgen Sie zum Verbinden mit Kabel die Anweisungen in der
App.

3
DE
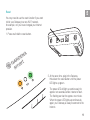
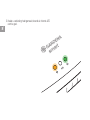
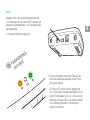
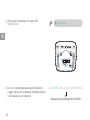
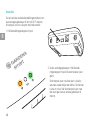
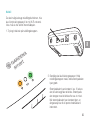
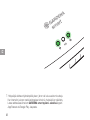
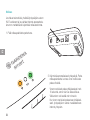
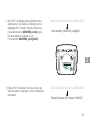
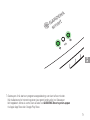
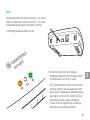
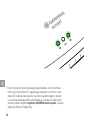
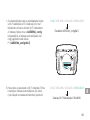
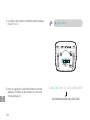
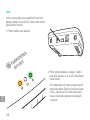
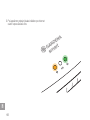
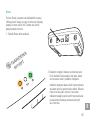
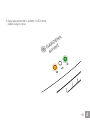
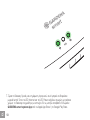
Über WLAN verbinden
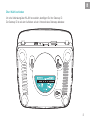
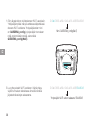
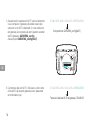
Um eine Verbindung über WLAN herzustellen, benötigen Sie Ihre Gateway ID.
Die Gateway ID ist auf dem Aufkleber auf der Unterseite des Gateways ablesbar.

Zusammensetzung:GARDENA_config(9eb7)
ID:9eb74563-e89b-12d3-a456-426655446548
PasswortGatewayWLAN-Netz:55446548
ID:9eb74563-e89b-12d3-a456-426655446548
4
DE
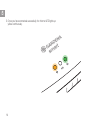
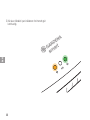
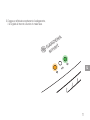
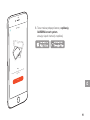
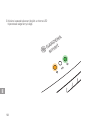
1. Gehen Sie mit Ihrem Smartphone oder Computer
auf die WLAN Einstellungen. Hier sollte jetzt das
Gateway als verfügbares WLAN-Netz angezeigt
werden. Der Name des Gateway Netzes setzt sich
aus GARDENA_config und den ersten vier Stellen
der Gateway ID zusammen.
Bsp.: GARDENA_config(9eb7).
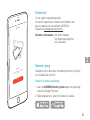
2. Stellen Sie eine Verbindung mit dem WLAN-Netz
her. Verwenden Sie dazu die letzten acht Ziffern
Ihrer Gateway ID als Administrator Passwort.

5
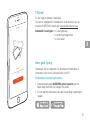
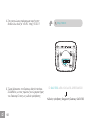
DE
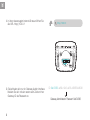
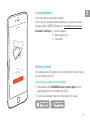
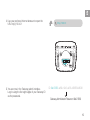
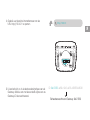
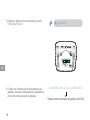
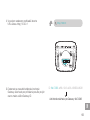
3. Nach erfolgreicher Verbindung leuchtet die Internet-LED
durchgehend gelb.

http://10.0.0.1
GatewayAdministratorPasswort:9eb74563
ID:9eb74563-e89b-12d3-a456-426655446548
6
DE
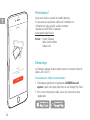
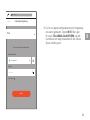
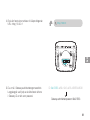
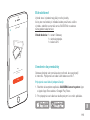
4. In ihrem bevorzugten Internet-Browser öffnen Sie
die URL http://10.0.0.1
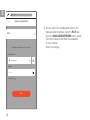
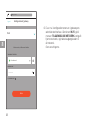
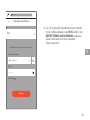
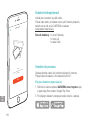
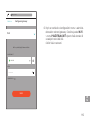
5. Sie befinden sich nun im Gateway Admin Interface.
Melden Sie sich mit den ersten acht Zeichen Ihrer
Gateway ID als Passwort an.

••• • ••• • •
Logout
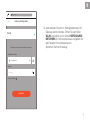
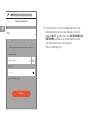
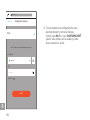
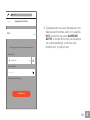
WLAN wird verwendet, wenn das Ethernet getrennt ist.
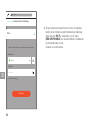
Gateway-Konguration
VERFÜGBARES NETZWERK
PASSWORT
PASSWORT ANZEIGEN
Your Network
WLAN
Speichern
http://10.0.0.1
7
DE
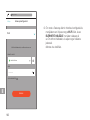
6. Jetzt befinden Sie sich im Konfigurationsmenü im
Gateway Admin Interface. Öffnen Sie den Reiter
WLAN und wählen sie im Menü VERFÜGBARES
NETZWERK Ihr Heimnetzwerk aus und geben Sie
das Passwort Ihres Netzwerkes ein.
Speichern Sie Ihre Einstellung.

8
DE
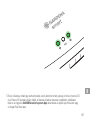
7. Nun startet das Gateway eine Softwareaktualisierung, dies kann einige
Minuten dauern. Sobald die Internet-LED und die Power-LED dauerhaft
grün leuchten, wurde das Gateway erfolgreich aktualisiert.
In der Zwischenzeit laden Sie die kostenlose GARDENA smart system App
aus dem Apple App Store oder dem Google Play Store herunter.

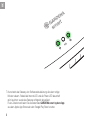
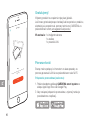
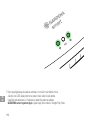
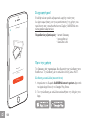
Willkommen
Mein Garten
Wir beginnen mit der Einrichtung Ihres smart Gateway.
Sind Sie bereit?
Starten
9
DE
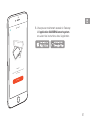
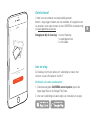
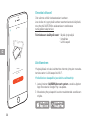
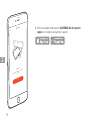
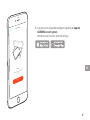
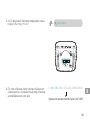
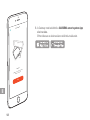
8. Das Gateway kann nun in der GARDENA smart system App
eingebunden werden.
Befolgen Sie dazu die Anweisungen in der App.

10
DE
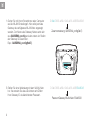
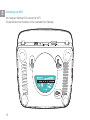
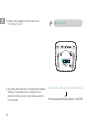
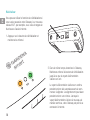
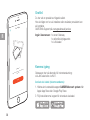
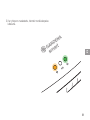
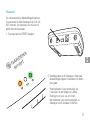
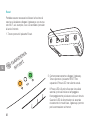
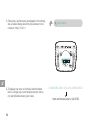
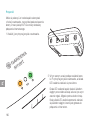
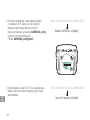
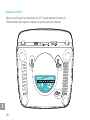
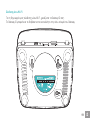
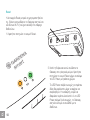
Reset
Die Reset-Funktion kann zur Anwendung kommen,
wenn Sie z. B. Ihr Gateway in einem neuen
WLAN-Netzwerk einbinden wollen oder den
Internet-Anbieter gewechselt haben.
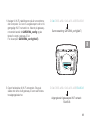
1. Reset-Knopf gedrückt halten.
2. Währenddessen das Gateway an den Strom
anschließen. Halten Sie den Reset-Knopf
solange gedrückt, bis die Power-LED Grün
leuchtet.
Die Power-LED leuchtet durchgehend für
ca. zehn Sekunden, bis sie anfängt zu blinken.
Das Blinken kann ca. eine Minute dauern.
Leuchtet die Power- LED wieder durchgängig,
ist Ihr Gateway bereit sich mit dem Internet zu
verbinden.

Welcome
My Garden
Let's start by setting up your smart Gateway.
Are you ready?
Start
EN
11
Congratulations!
You have chosen a top-quality product.
If you have any questions about installing or using your product,
please contact GARDENA Support on www.gardena.de/service
Included in delivery: 1 x smart Gateway
1 x power supply unit
1 x LAN cable
Getting started
The Gateway has two options for connecting to the Internet; using
the LAN cable or via Wi-Fi.
Connecting via cable (recommended):
1. Download the free GARDENA smart system app from the
Apple App Store or the Google Play Store.
2. To connect via cable, follow the instructions in the app.

EN
12
Connecting via Wi-Fi
You need your Gateway ID to connect via Wi-Fi;
this can be found on the sticker on the underside of the Gateway.

Composition:GARDENA_config(9eb7)
ID:9eb74563-e89b-12d3-a456-426655446548
PasswordforGatewayWi-Finetwork:55446548
ID:9eb74563-e89b-12d3-a456-426655446548
EN
13
1. Navigate to the Wi-Fi settings on your smartphone
or computer. You should see the Gateway as an
available Wi-Fi network here.
The name of the Gateway network is made up of
GARDENA_config and the first four characters
of the Gateway ID.
For example: GARDENA_config(9eb7).
2. Connect to the Wi-Fi network. Use the last eight
digits of your Gateway ID as the administrator
password here.

EN
14
3. Once you have connected successfully, the Internet LED lights up
yellow continuously.

http://10.0.0.1
GatewayAdministratorPassword:9eb74563
ID:9eb74563-e89b-12d3-a456-426655446548
EN
15
4. Use your preferred Internet browser to open the
URL http://10.0.0.1
5. You are now in the Gateway admin interface.
Log in using the first eight digits of your Gateway ID
as the password.

••• • ••• • •
Logout
Wi-Fi will be used when Ethernet is disconnected.
Gateway Conguration
AVAILABLE NETWORK
PASSWORD
SHOW PASSWORD
Your Network
Wi-Fi
Save
http://10.0.0.1
EN
16
6. You are now in the configuration menu in the
Gateway admin interface. Open the Wi-Fi tab,
go to the AVAILABLE NETWORK menu, select
your home network and enter the password
for your network.
Save your settings.

EN
17
7. The Gateway will now start a software update, which can take several minutes.
When the Internet LED and the power LED light up green continuously,
the Gateway has been successfully updated.
While you wait, download the free GARDENA smart system app from the
Apple App Store or the Google Play Store.

Welcome
My Garden
Let's start by setting up your smart Gateway.
Are you ready?
Start
EN
18
8. You can now link the Gateway to the GARDENA
smart system app by following the instructions in
the app.

EN
19
Reset
You may need to use the reset function if you want
to link your Gateway to a new Wi-Fi network,
for example, or if you have changed your Internet
provider.
1. Press and hold the reset button.
2. At the same time, plug in the Gateway.
Hold down the reset button until the power
LED lights up green.
The power LED will light up continuously for
approx. ten seconds, before it starts to flash.
The flashing can last for approx. one minute.
When the power LED lights up continuously
again, your Gateway is ready to connect to the
Internet.

Bienvenue
Mon Jardin
Commençons par congurer votre smart Gateway.
Êtes-vous prêt?
Démarrer
FR
20
Félicitations !
Vous avez choisi un produit de qualité optimale.
Si vous avez des questions relatives à l’installation ou
l’utilisation de votre produit, veuillez contacter
l’assistance GARDENA à l’adresse
www.gardena.de/service
Inclus : 1 smart Gateway
1 bloc d’alimentation
1 câble LAN
Démarrage
Le Gateway dispose de deux options pour la connexion Internet :
câble LAN ou Wi-Fi.
Connexion par câble (recommandé) :
1. Téléchargez gratuitement l’application GARDENA smart
system à partir de l’Apple App Store ou du Google Play Store.
2. Pour une connexion par câble, suivez les instructions dans
l’application.
Strona się ładuje...
Strona się ładuje...
Strona się ładuje...
Strona się ładuje...
Strona się ładuje...
Strona się ładuje...
Strona się ładuje...
Strona się ładuje...
Strona się ładuje...
Strona się ładuje...
Strona się ładuje...
Strona się ładuje...
Strona się ładuje...
Strona się ładuje...
Strona się ładuje...
Strona się ładuje...
Strona się ładuje...
Strona się ładuje...
Strona się ładuje...
Strona się ładuje...
Strona się ładuje...
Strona się ładuje...
Strona się ładuje...
Strona się ładuje...
Strona się ładuje...
Strona się ładuje...
Strona się ładuje...
Strona się ładuje...
Strona się ładuje...
Strona się ładuje...
Strona się ładuje...
Strona się ładuje...
Strona się ładuje...
Strona się ładuje...
Strona się ładuje...
Strona się ładuje...
Strona się ładuje...
Strona się ładuje...
Strona się ładuje...
Strona się ładuje...
Strona się ładuje...
Strona się ładuje...
Strona się ładuje...
Strona się ładuje...
Strona się ładuje...
Strona się ładuje...
Strona się ładuje...
Strona się ładuje...
Strona się ładuje...
Strona się ładuje...
Strona się ładuje...
Strona się ładuje...
Strona się ładuje...
Strona się ładuje...
Strona się ładuje...
Strona się ładuje...
Strona się ładuje...
Strona się ładuje...
Strona się ładuje...
Strona się ładuje...
Strona się ładuje...
Strona się ładuje...
Strona się ładuje...
Strona się ładuje...
Strona się ładuje...
Strona się ładuje...
Strona się ładuje...
Strona się ładuje...
Strona się ładuje...
Strona się ładuje...
Strona się ładuje...
Strona się ładuje...
Strona się ładuje...
Strona się ładuje...
Strona się ładuje...
Strona się ładuje...
Strona się ładuje...
Strona się ładuje...
Strona się ładuje...
Strona się ładuje...
Strona się ładuje...
Strona się ładuje...
Strona się ładuje...
Strona się ładuje...
Strona się ładuje...
Strona się ładuje...
Strona się ładuje...
Strona się ładuje...
Strona się ładuje...
Strona się ładuje...
Strona się ładuje...
Strona się ładuje...
Strona się ładuje...
Strona się ładuje...
Strona się ładuje...
Strona się ładuje...
Strona się ładuje...
Strona się ładuje...
Strona się ładuje...
Strona się ładuje...
Strona się ładuje...
Strona się ładuje...
Strona się ładuje...
Strona się ładuje...
Strona się ładuje...
Strona się ładuje...
Strona się ładuje...
Strona się ładuje...
Strona się ładuje...
Strona się ładuje...
Strona się ładuje...
Strona się ładuje...
Strona się ładuje...
Strona się ładuje...
Strona się ładuje...
Strona się ładuje...
Strona się ładuje...
-
 1
1
-
 2
2
-
 3
3
-
 4
4
-
 5
5
-
 6
6
-
 7
7
-
 8
8
-
 9
9
-
 10
10
-
 11
11
-
 12
12
-
 13
13
-
 14
14
-
 15
15
-
 16
16
-
 17
17
-
 18
18
-
 19
19
-
 20
20
-
 21
21
-
 22
22
-
 23
23
-
 24
24
-
 25
25
-
 26
26
-
 27
27
-
 28
28
-
 29
29
-
 30
30
-
 31
31
-
 32
32
-
 33
33
-
 34
34
-
 35
35
-
 36
36
-
 37
37
-
 38
38
-
 39
39
-
 40
40
-
 41
41
-
 42
42
-
 43
43
-
 44
44
-
 45
45
-
 46
46
-
 47
47
-
 48
48
-
 49
49
-
 50
50
-
 51
51
-
 52
52
-
 53
53
-
 54
54
-
 55
55
-
 56
56
-
 57
57
-
 58
58
-
 59
59
-
 60
60
-
 61
61
-
 62
62
-
 63
63
-
 64
64
-
 65
65
-
 66
66
-
 67
67
-
 68
68
-
 69
69
-
 70
70
-
 71
71
-
 72
72
-
 73
73
-
 74
74
-
 75
75
-
 76
76
-
 77
77
-
 78
78
-
 79
79
-
 80
80
-
 81
81
-
 82
82
-
 83
83
-
 84
84
-
 85
85
-
 86
86
-
 87
87
-
 88
88
-
 89
89
-
 90
90
-
 91
91
-
 92
92
-
 93
93
-
 94
94
-
 95
95
-
 96
96
-
 97
97
-
 98
98
-
 99
99
-
 100
100
-
 101
101
-
 102
102
-
 103
103
-
 104
104
-
 105
105
-
 106
106
-
 107
107
-
 108
108
-
 109
109
-
 110
110
-
 111
111
-
 112
112
-
 113
113
-
 114
114
-
 115
115
-
 116
116
-
 117
117
-
 118
118
-
 119
119
-
 120
120
-
 121
121
-
 122
122
-
 123
123
-
 124
124
-
 125
125
-
 126
126
-
 127
127
-
 128
128
-
 129
129
-
 130
130
-
 131
131
-
 132
132
-
 133
133
-
 134
134
-
 135
135
-
 136
136
-
 137
137


w innych językach
- italiano: Gardena 19060 Manuale utente
- Deutsch: Gardena 19060 Benutzerhandbuch
- slovenčina: Gardena 19060 Používateľská príručka
- svenska: Gardena 19060 Användarmanual
- français: Gardena 19060 Manuel utilisateur
- dansk: Gardena 19060 Brugermanual
- Nederlands: Gardena 19060 Handleiding
Powiązane artykuły
Inne dokumenty
-
Abus TVVR36000 instrukcja
-
Abus TVVR30004 Instrukcja obsługi
-
Siemens KT16RAW30 Instrukcja obsługi
-
IKEA TRADFRI Instrukcja obsługi
-
Johnson Controls MAP 1810 Skrócona instrukcja obsługi
-
Abus TVVR60021 Instrukcja obsługi
-
Abus TVVR41200 Instrukcja obsługi
-
Abus TVVR35011 Instrukcja obsługi
-
D-Link ShareCenter DNS-315 Quick Installation Manual
-
Behringer XR16 Skrócona instrukcja obsługi