
Noble house Home Furnishings LLC Page 1 OF 12
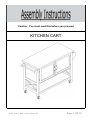
Caution : You must read this before you proceed
KITCHEN CART
Noble house Home Furnishings LLC Page 1 OF 12
Caution : You must read this before you proceed
KITCHEN CART
Noble house Home Furnishings LLC
Caution : You must read this before you proceed
KITCHEN CART

Noble house Home Furnishings LLC Page 2 OF 12
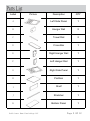
Label Picture Description QTY
ALeft Side Panel 1
BHanger Rail 2
CTowel Rail 2
DCross Bar 1
ERight Hanger Rail 1
FLeft Hanger Rail 1
GRight Side Panel 1
HPartition 1
IShelf 1
JStretcher 1
KBottom Panel 1
Page 1 OF 12
Caution : You must read this before you proceed
KITCHEN CART

Noble house Home Furnishings LLC Page 3 OF 12
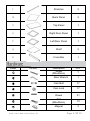
LStretcher 2
MBack Panel 2
NTop Panel 1
ORight Door Panel 1
PLeft Door Panel 1
QShelf 2
RCross Bar 1
Label Picture Description QTY
Screw
(M5x50mm)
7
Allen Wrench 1
Cam Bolt 17
Cam Lock 17
Dowel 31
Bolt
(M6x25mm)
10
Magnet 2

Noble house Home Furnishings LLC Page 4 OF 12
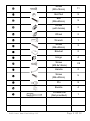
Screw
(M3x14mm) 11
Bolt Nut 9
Bolt
(M6x65mm) 9
Wheel
(with brake) 2
Wheel 2
Wrench 1
Screw
(M4x25mm) 3
Bracket 2
Hinge 4
Handle 2
Screw
(M4x20mm) 5
Pin 9
Buckle 4
Screw
(M3.5x14mm) 25
Screwdriver
(Not provided) 1

Noble house Home Furnishings LLC Page 5 OF 12
Before Beginning Assembly:
Overview
FRONT FACING
Top Panel(N)
Bottom Panel(K)
Left Side
Panel(A)
Left Door
Panel(P)
Right Side
Panel(G)
x11

Noble house Home Furnishings LLC Page 6 OF 12
Step 1
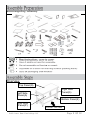
Unpack and place all parts on a clean, non-marring surface.
Step 2
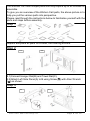
2.1)Connect Hanger Rail(B) and Towel Rail(C).
2.2)Attach Left Side Panel(A) to B using Screw( ) with Allen Wrench
() as shown.
Step 3
This Kitchen Cart has multiple parts and may require up to 60 minutes to
assemble.
To give you an overview of the Kitchen Cart parts, the above picture is to
help you put the various parts into perspective.
Please read through the instructions below to familiarise yourself with the
parts and steps before assembly.
3.1 3.2
2.1
2.2

Noble house Home Furnishings LLC Page 7 OF 12
Step 5
Step 4
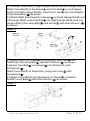
4.1)Attach Shelf(I) to Dowel( ) on Partition(H),insert Nut( ) into
Partition(H),then using Bolt( ) with Allen Wrench ( ) as shown.
4.2)Insert Cam Bolt( ) and Dowel( ) into Stretcher(L) with
Screwdriver( )
Attach Cross Bar(R) to Stretcher(L) using Cam Lock( ) with
Screwdriver( )
4.3)Attach Cross Bar(R) and Stretcher(L) to Dowel( ) on Bottom
Shelf(K) using Bolts( ) with Allen Wrench ( ) as shown.
3.1)Connect Towel Rail(C),Right Hanger Rail(E) and Left Hanger Rail(F).
Attach Cross Bar(D) to the Dowel( ) and Cam Bolt( ) on Left Hanger
Rail(F) and Right Hanger Rail(E), insert Cam Lock( ) into Cross Bar(D)
using Screwdriver( ) as shown.
3.2)Attach Right Side Panel(G) to Dowel( ) on Right Hanger Rail(E) and
Left Hanger Rail(F),insert the Nut( ) into Right Hanger Rail(E) and Left
Hanger Rail(F),then using Blot( ) and Screw( ) with Allen Wrench ( )
as shown.
4.1
4.2
4.3

Noble house Home Furnishings LLC Page 8 OF 12
Step 6
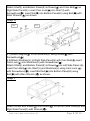
6.1)Attach Magnet( ) to the Stretcher(J) using Screw( ) with
Screwdriver( ).
6.2)Attach Stretcher(J) to Right Side Panel(G) with Cam Bolt( ),insert
Cam Lock( ) into Stretches(J) with Screwdriver( ).
Attach Shelf(I) and Bottom Panel(K) to Dowel( ) on Left Side Panel (A),
insert Cam Bolt( ) into Shelf (I) and Stretches(J) using Cam Lock ( )
with Screwdriver( ), insert Bolt Nut( ) into Bottom Panel(K) using
Bolt( ) with Allen Wrench ( ) as shown.
Step 7
Attach Wheel with brake( ) and Wheel( ) to the Left Side Panel(A) and
Right Side Panel(G) with Wrench( ).
Attach Shelf(I) and Bottom Panel(K) to Dowel( ) and Cam Bolt( ) on
Right Side Panel(G), insert Cam Lock( ) into Shelf (I) with
Screwdriver( ), insert Nut( ) into Bottom Panel(K) using Bolt( ) with
Allen Wrench ( ) as shown.
6.1 6.2

Noble house Home Furnishings LLC Page 9 OF 12
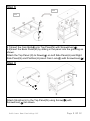
8.1)Insert the Cam Bolt( ) into Top Panel(N) with Screwdriver( ).
8.2)Insert the Back Panel(M) by sliding in the panel into the grooving as
shown.
Attach the Top Panel (N) to Dowel( ) on Left Side Panel(A) and Right
Side Panel(G) and Partition(H),insert Cam Lock() with Screwdriver( ).
Step 8
Step 9
Attach Stretcher(J) to the Top Panel(N) using Screw( ) with
Screwdriver( ) as shown.
8.1
8.2
Step 10
) to Right Door Panel(O) using Screw( ) with
) to Right Door Panel(O) using Screw( ) with
) to Right Door Panel(O) using Screw( ) with
Repeat the steps above to install the Left Door Panel(P).
Step 10
Attach Bracket( ) to Right Door Panel(O) using Screw( ) with
Screwdriver( ).
Attach Handle( ) to Right Door Panel(O) using Screw( ) with
Screwdriver( ).
) to Right Door Panel(O) using Screw( ) with
Repeat the steps above to install the Left Door Panel(P).
Attach Right Door Panel( O ) to Right Side Panel(G) using Screw(
Step 10
Attach Bracket( ) to Right Door Panel(O) using Screw( ) with
) to Right Door Panel(O) using Screw( ) with
) to Right Door Panel(O) using Screw( ) with
Repeat the steps above to install the Left Door Panel(P).
Step 10
Attach Bracket( ) to Right Door Panel(O) using Screw( ) with
).
) to Right Door Panel(O) using Screw( ) with
) to Right Door Panel(O) using Screw( ) with
Repeat the steps above to install the Left Door Panel(P).

Noble house Home Furnishings LLC Page 10 OF 12
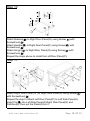
Step 10
Attach Bracket( ) to Right Door Panel(O) using Screw( ) with
Screwdriver( ).
Attach Handle( ) to Right Door Panel(O) using Screw( ) with
Screwdriver( ).
Attach Hinge ( ) to Right Door Panel(O) using Screw( ) with
Screwdriver( ).
Repeat the steps above to install the Left Door Panel(P).
Attach Right Door Panel( O ) to Right Side Panel(G) using Screw( )
with Screwdriver( ).
Repeat the step to Attach Left Door Panel(P) to Left Side Panel(A).
Insert Pin( ) into Left Side Panel(A),Right Side Panel(G) and
Partition(H), then put the Panel(Q) on it.
Step 11
Noble house Home Furnishings LLC Page 10 OF 12
Step 10
Attach Bracket( ) to Right Door Panel(O) using Screw( ) with
Screwdriver( ).
Attach Handle( ) to Right Door Panel(O) using Screw( ) with
Screwdriver( ).
Attach Hinge ( ) to Right Door Panel(O) using Screw( ) with
Screwdriver( ).
Repeat the steps above to install the Left Door Panel(P).
Attach Right Door Panel( O ) to Right Side Panel(G) using Screw( )
with Screwdriver( ).
Repeat the step to Attach Left Door Panel(P) to Left Side Panel(A).
Insert Pin( ) into Left Side Panel(A),Right Side Panel(G) and
Partition(H), then put the Panel(Q) on it.
Step 11
Noble house Home Furnishings LLC
Attach Bracket( ) to Ri
Screwdriver( ).
Attach Handle( ) to Right Doo
Screwdriver( ).
Attach Hinge ( ) to Right Door Pane
Screwdriver( ).
Repeat the steps above to install the Left Doo
Attach Right Door Panel( O ) to Right Side Panel(G) using Screw
with Screwdriver( ).
Repeat the step to Attach Left Door Panel(P) to Left Side Pane
Insert Pin( ) into Left Side Panel(A),Right Side Panel(G)
Partition(H), then put the Panel(Q) on it.
Step 11
Noble house Home Furnishings LLC
Atta
Screw
Attach Hand
Screwdriver(
Attach Hinge (
Screwdriver( ).
Repeat the steps abo
Attach Right Door Panel( O ) to Right Side Panel(G) using Scre
with Screwdriver( ).
Repeat the step to Attach Left Door Panel(P) to Left Side P
Insert Pin( ) into Left Side Panel(A),Right Side Panel(G
Partition(H), then put the Panel(Q) on it.
Step 11
Noble house Home Furnishings LLC
Attach Bracket(
Screwdriver( ).
Attach Handle( ) to R
Screwdriver( ).
Attach Hinge ( ) to Right Doo
Screwdriver( ).
Repeat the steps above to insta
Attach Right Door Panel( O ) to Right Side Panel(G) using Screw( )
with Screwdriver( ).
Repeat the step to Attach Left Door Panel(P) to Left Side Panel(A)
Insert Pin( ) into Left Side Panel(A),Right Side Panel(G) and
Partition(H), then put the Panel(Q) on it.
Step 11
Noble house Home Furnishings LLC
Attach Bracket(
Screwdriver( ).
Attach Handle( ) to R
Screwdriver( ).
Attach Hinge ( ) to Right Doo
Screwdriver( ).
Repeat the steps above to insta
Attach Right Door Panel( O ) to Right Side Panel(G) using
with Screwdriver( ).
Repeat the step to Attach Left Door Panel(P) to Left S
Insert Pin( ) into Left Side Panel(A),Right Side Pane
Partition(H), then put the Panel(Q) on it.
Step 11
Noble house Home Furnishings LLC Page 10 OF 12
Step 10
Attach Bracket( ) to Right Door Panel(O) using Screw( ) with
Screwdriver( ).
Attach Handle( ) to Right Door Panel(O) using Screw( ) with
Screwdriver( ).
Attach Hinge ( ) to Right Door Panel(O) using Screw( ) with
Screwdriver( ).
Repeat the steps above to install the Left Door Panel(P).
Attach Right Door Panel( O ) to Right Side Panel(G) using Screw( )
with Screwdriver( ).
Repeat the step to Attach Left Door Panel(P) to Left Side Panel(A).
Insert Pin( ) into Left Side Panel(A),Right Side Panel(G) and
Partition(H), then put the Panel(Q) on it.
Step 11

Noble house Home Furnishings LLC Page 11 OF 12
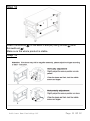
Step 13
Step 12
Attach the Buckle( ) to the Back Panel(M) using Screw( ) with
Screwdriver( ).
Make sure the whole product is stable.

●
Stains may be removed with mild soap solution and
damp cloth.
●
Children should not climb or jump on the furniture.
●
Dust and pick-up spills using a clean, non-colored,
lint-free cloth.
●
Do not place furniture under direct sunlight.
●
Do not place furniture near heating or cooling vents.
●
Do not write on furniture without a padded barrier to
protect the surface.
●
Do not place furniture outside . For indoor use only.
●
Not for commercial use. For residential use only.
Care & Maintenance
●
Do not put hot items directly on furniture surface.
●
Do not clean furniture with harsh cleansers or polish.
●
Furniture may scratch floors. We recommend using
furniture pads to protect your floors.
Page 12 OF 12
Noble house Home Furnishings LLC
-
 1
1
-
 2
2
-
 3
3
-
 4
4
-
 5
5
-
 6
6
-
 7
7
-
 8
8
-
 9
9
-
 10
10
-
 11
11
-
 12
12


