Strona się ładuje...

DVD3200
Installation and Owner’s Manual
Audiovox Corporation
150 Marcus Blvd.
Hauppauge, NY 11788
1-800-225-6074
www.audiovox.com

Contents
Page
Contents...................................................................................................................................................2
Safety......………………………………….................................................................................................. 3
Introduction...............................................................................................................................................4
Installation.............................................................................................................................................5-6
Front Panel Controls.................................................................................................................................7
Rear Panel Connections...........................................................................................................................8
Stand Alone DVD Remote Control Function ............................................................................................9
Standard Connections............................................................................................................................10
Getting Started........................................................................................................................................12
DVD Icon List..........................................................................................................................................13
Audio CD Icon List..................................................................................................................................14
DVD Operation..................................................................................................................................15-16
Playing a Video CD...........................................................................................................................16-18
Favorite Track Selection (FTS)..........................................................................................................19-20
Customizing DVD Play..................................................................................................................... 21-23
Troubleshooting......................................................................................................................................24
Maintenance...........................................................................................................................................25
Specifications..........................................................................................................................................26
WARNING
RISK OF ELECTRICAL
SHOCK, DO NOT OPEN
CAUTION: TO REDUCE THE RISK OF
ELECTRICAL SHOCK, DO NOT REMOVE
COVER (OR BACK). NO USER
SERVICEABLE PARTS INSIDE. REFER
SERVICING TO QUALIFIED SERVICE
PERSONNEL.
The lightning flash with the arrowhead symbol,
within an equilateral triangle, is intended to alert the
user to the presence of uninsulated "dangerous
voltage" within the product's enclosure that may be
of sufficient magnitude to constitute a electric
shock to persons.
The exclamation point within an equilateral triangle
is intended to alert the user to the presence of
important operating and maintenance (servicing)
instructions in the literature accompanying the
appliance.
2

WARNING: TO PREVENT FIRE OR SHOCK HAZARD, DO NOT EXPOSE THIS PRODUCT TO
RAIN OR MOISTURE
.
3

Introduction
Congratulations on your purchase of an Audiovox DVD3200! Your DVD-Video player is a Player for
digital video discs conforming to the universal DVD Video standard. With it, you will be able to
Enjoy full-length movies with true cinema picture quality, and stereo sound. The unique features of
DVD
-Video, such as selection of soundtrack and subtitle languages, and of different camera angles
(depending on the disc), are all included. You will find your player easy to use, by way of the On
Screen Display, in combination with the remote control, as well as the main faceplate controls. It is
important to note that CD-R, and CD-RW discs must be FINALIZED before they can be played on
this player. The disc types which run on the player, feature one or more of these logos on the disc
Unpackin
g
First, check and identify the contents of your DVD3200 player package, as listed below:
- DVD-Video Player
- DIN Plug Power Harness
- Power Harness Extension
- DIN Sleeve
- 6' Stereo Audio/Video RCA Cable
- Mounting Strap
- Accessory Kit
- DIN Sleeve Removal Tools
- Stand-Alone Remote Control with Batteries
If any of these items should be damaged or missing, please inform your supplier without delay.
Please keep all packaging materials, as you might need to transport your player in the future.
DVD- Video
DVD has brought about a true revolution in video quality. The wonders of DVD-Video are possible
due to the use of the latest state-of-the-art MPEG2 data compression that enables an entire movie
to be put on a single 5-inch disc. The complex MPEG2 technology captures even the most
complex pictures in all of their original glory. Technically, DVD-Video provides crystal clear digital
pictures with a high resolution of over 500 lines and 720 pixels (picture elements) to each line!
This is more than double the resolution of VHS, better than Laser Discs, and is the closest match
to the digital masters made in the recording studios! DVD-Video is poised to be the universal
video system of the future, offering optimal viewing quality on any TV screen.
4

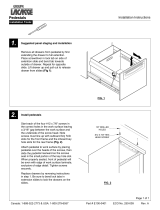
Installation-DVD3200
This unit is designed for installation in vehicle cabs with an existing radio opening. In many
cases, a special installation kit will be required to mount the DVD3200 to the dashboard.
These kits are available at electronics supply stores and car stereo specialist shops. Always
check the kit application before purchasing to make sure the kit works with your vehicle.
:
1)
2)
3)
4)
5)
6)
MUST
Universal Installation Procedure Using DIN Mounting Sleeves
Slide the mounting sleeve off of the chassis. If it is locked into position, remove the end caps and
use the removal tools (supplied) to disengage it.
Check the dashboard opening size by sliding the mounting sleeve into it. If the opening is not large
enough, carefully cut or file as necessary until the sleeve easily slides into the opening. Do not
force the sleeve into the opening or cause it to bend or bow. Check that there is sufficient space
behind the dashboard for the DVD player chassis. Wire prior to actually installing the sleeve. (See
Figure 10 on page 15) Wiring the DIN power harness assembly should take place after hole size is
confirmed. Mount sleeve after wiring.
Locate the series of bend tabs along the top, bottom, and sides of mounting sleeve. With the sleeve
fully inserted into the dash opening, bend as many tabs as necessary so that the sleeve is firmly
secured to the dashboard.
Follow the wiring diagram carefully, (See Figure 10 on page 15) and make certain all connections
of the wiring harness are properly secured and insulated to ensure proper operation of this unit.
After completing the wiring connections, turn the unit on to confirm operation (ignition switch must
be “ON”). If unit does not operate, recheck all wiring until problem is corrected. Once proper
operation is achieved, turn off ignition switch and proceed with final mounting of the chassis.
Carefully slide the DVD player into the mounting sleeve, making sure it is right-side-up until fully
seated, and that the spring clips lock it into place.
Attach one end of the DIN mounting strap (supplied) to the screw stud on the rear chassis using the
flange nut provided (See Figure 2 on page 6). Fasten the other end of the DIN mounting strap to a
secure part of the dashboard, either above or below the DVD player using the screw and flange nut
provided. Bend strap to position as necessary.
The rear of the DVD player be supported with the strap to prevent damage to the
dashboard from the weight of the DVD player or improper operation due to vehicle vibration.
CAUTION:
Figure 1
5

Installation Usin
g
Kits:
1)
2)
3)
4)
5)
If your vehicle requires the use of an installation kit to mount this DVD player, follow the instructions
included with the installation kit to attach the DVD player to the mounting plate supplied with the kit.
Wire and test the DVD player as described in step 4 on page 5.
Install the DVD player / mounting plate assembly to the sub-dash according to the instructions of the
installation kit.
Attach the DVD player support strap to the player and the dashboard as described in step 6 on page
5.
Replace the dashboard trim panel
.
Figure 2

Figure 3

Rear Panel Connections:
Figure 4
9) Select this button to access the DVD menus. Titles and chapters may be included on the
DVD OSD menu along with Camera Angles, Spoken language, and Sub-title options. To remove the
OSD menu press the menu button again.
10) Pressing this button will stop play of the DVD disc.
11) Pressing this button will start play of the DVD disc.
12) Pressing this button will shift the play to the previous chapter.
13) Pressing this button will skip forward to the next chapter.
14) If pressed in the OSD menu mode this button will return you to the previous screen.
This works the same as the RETURN on the remote control.
15) f pressed, this button will temporarily stop play of the DVD on the frame of play you are
watching. Pressing this button again will step frame by frame. Pressing PLAY resumes play.
16) This eye picks up the IR signal from the remote. A blocked
“eye” will not allow the remote to function properly.
MENU:
STOP:
PLAY:
PREVIOUS / FAST REVERSE:
NEXT / FAST FORWARD:
GO BACK:
PAUSE: I
INFRARED SENSOR EYE:
8

9
Loading the Batteries into the Infrared Remote Control
(Figure 5)
Open the battery compartment cover and insert two “AAA” (R03) batteries as indicated inside the
battery compartment. Note polarity. Close the cover.
Unless otherwise mentioned, all operations can be directly carried out with the
remote control. Always point the remote control directly at the DVD player, making sure there are
no obstructions in the path of the infrared beam. When there are corresponding keys on the front
panel, they can be used also.
CAUTION: DO NOT MIX OLD AND NEW BATTERIES. NEVER MIX DIFFERENT TYPES OF
BATTERIES (STANDARD, ALKALINE, AND SO ON).
OPERATION NOTE:
Stand-Alone DVD Remote Control Function
: (Figure 6)
1) (On Screen Display) This button turns the on
screen display on and off.
2) If the DVD disc contains sequences
recorded from different camera angles, pressing this
button causes the angle icon to appear and show
you the number of camera angles available and
allows you to change the angle if you wish.
3) This button controls the language
selector and allows you to choose whether subtitles
are able to be viewed or not.
4) This button allows you to select the language
you prefer from the menu.
5) These numeric keys allow you to directly enter
the highlighted menu chapter, or track selection.
6) This button is the mode selector for the Title /
Chapter.
7) Pressing this button will enable the user to
select the DVD defined menu.
8) Use this button to acknowledge the highlighted
menu selection.
9) : Use this icon to navigate through the menu
selections. In play mode will also pause play.
10) : Use this icon to navigate the menu selections.
In play mode this button will also fast reverse.
11) : Use this icon to navigate the menu selections.
In play mode this button will also fast forward 4X.
12) : Use this button to navigate the menu selections.
In play mode this button will also allow the DVD play
o be viewed in slow motion.
13) :Pressing this button will select the previous
chapter.
14
chapter.
15) : Pressing this button will pause the DVD play.
Pressing pause again will step through the sequence
frame by frame.
OSD:
ANGLE:
SUBTITLE:
AUDIO:
0-9:
T-C:
MENU:
OK:
) : Pressing this button will select the next
Figure 5
Figure 6

13) : Pressing this button will start the DVD play.
Another press will resume play at the point at
which the DVD was stopped.
14) :Pressing this button will stop the DVD play.
15) With a disc inserted in the DVD player,
in stop mode this button will allow you to select
player settings such as aspect ratio, etc.
16) This button will allow you to go back
one menu step.
17) : Pressing this button will turn the DVD player
on or set the player on standby.
SETUP:
RETURN:
Figure 6
10


Gettin
g
Started
Loading a Disc
1) Insert the DVD disc into the front slot on the
DVD3200.
2) Make sure that you insert the disc with the label
side up.
3) The disc should begin playing, if power is available
to the DVD player, even though the player is of
initially off. If the DVD player is off but power is
available, the player will automatically turn on
when the disc is inserted.
You will recognize DVD-Video discs by the logo. Depending on the material on the disc (a movie,
video clips, a drama series, etc.) These discs may have one or more Titles, and each Title may
have one or more Chapters. Play stops at the end of each Title. To make access easy and
convenient, your player lets you move between Titles and also between Chapters.
NOTE: During play, various icons will appear on the TV screen for about 2 seconds to confirm
that a function has been selected. You can get rid of these icons by pressing the OSD
key on the remote. At any time during play, you can press OSD to call up the Play
Banner, which shows you which functions are active, for about 2 seconds. To keep the
Play Banner on the screen, hold OSD for a couple of seconds. To get rid of the Play
Banner, press the OSD again.
Playin
g
a DVD-Video Disc
12

DVD Icon List:
..............................................................................................................................................Play
.......................................................................................................................................... Pause
..............................................................................................................................................Stop
..............................................................................................................Search Forward
............................................................................................................Search Backward
...................................................................................................Slow Forward
..........................................................................................................................A-B Repeat Start
..................................................................................................................................A-B Repeat
.................................................................................................................................Repeat Disc
.................................................................................................................................Repeat Title
...........................................................................................................................Repeat Chapter
...........................................................................................................................Chapter Shuffle
...................................................................................................................................Title Indication
............................................................................................................................Chapter Indication
...............................................................................................................................Disable Function
.................................................................................................................................................Angle
............................................................................................................................No Alternate Angle
.............................................................................................................................Subtitle Language
................................................................................................................................Audio Language
...................................................................................................................................Audio System
....................................................................................................................Remaining Time of Title
....................................................................................................................................Elapsed Time
............................................................................................................................................Resume
.........................................................................................................................................Total Time

Audio CD Icon List:
1
2
3
4
................................................................................................................................................Play
..........................................................................................................................................Pause
.............................................................................................................................................Stop
..............................................................................................................Search Forward
...........................................................................................................Search Backward
...................................................................................................Slow Forward
.........................................................................................................................A-B Repeat Start
........................ .........................................................................................................A-B Repeat
.................................................................................................................................Repeat Disc
...............................................................................................................................Repeat Track
.........................................................................................................................................Shuffle
................................................................................................................................Track Indication
................................................................................................................................Index Indication
...................................................................................................................Remaining Time of Title
..................................................................................................................................Elapsed Time
........................................................................................................................................Total Time
.................................................................................................................................................Ejecting
......................................................................................................................................................Eject
.................................................................................................................................................Inserting
.................................................................................................................................................Reading
14

15
Pla
y
in
g
a Title
Play starts when you insert a disc into the DVD player. If the disc is in a stopped state, press on
the front faceplate or the remote. The disc may invite you to select an item from a menu. If the
selections are numbered, press the appropriate numerical key; if not, use the keys to
highlight your selection, and press OK. Play will stop at the end of the Title, this can result in return
to the menu. To go on to the next Title, press . To stop play at any other time, press Stop. You
can resume play from the point at which you stopped. Press when you see the icon on the
screen.
The feature applies, not only to the disc in the player, but also to the last four discs you
have played.
Simply reload the disc, press if the disc has been stopped, and when you see the icon on
the screen, press again
When a title on a disc has more than one chapter, you can move to another chapter as follows:
Press briefly during play to step forward to the next chapter.
Press briefly during play to return to the beginning of the current chapter. Press briefly
again to step back to the previous chapter.
To go directly to any chapter, enter the chapter number using the numerical keys (0-9).
When a disc has more than one title (which you can see from the OSD), you can move to another
title as follows:
Press T-C, then press briefly during play to step forward to the next Title.
Press T-C, then press briefly during play to return to the beginning of the current title.
Press briefly again to step back to the previous title.
To go directly to any title, press T-C, then enter the title number using the numerical keys.
.
Movin
g
to Another Chapter
Movin
g
to Another Title
NOTE: If the number has more than one digit, press the numbers in rapid succession. For
more information about chapters, see “Checking the contents of DVD-Video discs:
Menus”.
NOTE: If the number has more than one digit, press the numerical (0-9) keys in rapid
succession. For more information about chapters, see “Checking the contents of DVD-
Video discs: Menus”.
DVD Operation

Subtitles
Checkin
g
the Contents of DVD-Video Discs: Menus
Still Picture and Step Frame
Playin
g
a Video CD
When subtitles are available on a disc, you can turn them on by holding down during play
until the subtitles appear.
To step through the languages option, press repeatedly.
To turn the subtitles off, hold down (1 second) agai
For titles and chapters, selection menus may be included on the disc. The DVD’s menu feature
allows you to make selections from the menus. Press the appropriate numerical key; or use the
keys to highlight your selection, and press OK.
Press MENU.
If the present title has a root menu, this now appears on the OSD.
The root menu can list camera angles, spoken language and subtitle options, and chapters for the
title.
To remove the root menu, press MENU again.
Press T-C followed by MENU.
If the disc has a title menu, this now appears on the OSD.
To remove the title menu, press T-C again.
To get a still picture, press during play.
To step forward to the next picture frame, press again.
To return to play, press .
You will recognize Video CD ‘s by the logo. Depending on the material on a disc (a movie, video
clips, a drama series, etc) these discs may have one or more tracks, and tracks may have one or
more indexes, as indicated on the disc case. To make access easy and convenient, your player
lets you move between tracks, and between indexes.
Some Video CD ‘s have Play Back Control (PBC) which is a predefined playback sequence stored
on the disc.
n.
NOTE: During play, various icons will appear on the TV screen for about 2 seconds to confirm
that a function has been selected. You can get rid of the icon by pressing OSD. At any
time during play, you can press OSD to call up the Play Banner, which shows you
which functions are active, for about 2 seconds. To keep the Play Banner on the
screen, hold down OSD for a couple of seconds. To get rid of the Play Banner, press
OSD again.
16

17
Movin
g
to Another Index
Pla
y
back Control
(
PBC
)
Camera An
g
le
12 Minute Power-Off Dela
y
When a track has more than one index (as indicated on the disc case), you can move to another
index as follows:
Press briefly during play to step forward to the next index.
Press briefly during play to return to the beginning of the current index. Press briefly again
to step back to the previous index.
To go directly to any index, enter the index number using the numerical keys (0-9).
Load a Video CD with PBC and press .
The PBC menu appears on the TV screen. (This will be different for different discs).
Go through the menu with the keys indicated on the TV screen until your chosen passage starts to
play. If a PBC menu consists of a list of titles, you can select a title directly.
Enter your choice with the , or numerical keys (0-9).
Press the to start playback of the title.
Press RETURN to go back to the previous menu.
PBC can be turned off in the setup menu
If the disc contains sequences recorded from different camera angles, the angle icon appears
showing the number of available angles, and the angle being shown. You can change the camera
angle if you wish.
To get another angle, press .
The angle icon will show the next angle.
To go to any angle directly, enter the angle number using the numerical keys (0-9).
To turn off the angle feature, press OSD .
The angle icon disappears.
To turn the angle feature on again, press again.
The angle icon appears.
Your DVD player is designed to stay powered up for 12 minutes after the ignition is shut down.
The user can still watch a movie after the vehicle is turned off, but not long enough to drain the
battery.
The current scene will not be lost due to vehicle shut down. After the 12 minute delay, you can
still eject an already inserted disc, or insert a disc. To insert a disc, simply press EJECT to
“wake-up” the DVD unit and then the DVD will accept the disc.
NOTE: If the number has more than one digit, press the numerical (0-9) keys in rapid
succession.
NOTE: The angle icon remains on the screen unless you turn off the angle feature.

Video Search
Playin
g
an Audio CD
Playin
g
a Disc
To search forwards or backwards through the disc at 4X normal speed, hold down or for
about 1 second during play.
Search begins and sound is muted.
To step up to 32X normal speed, press down or again.
To go directly to 32X normal speed, hold down or until the or icon appears.
To return to 4X normal speed, press down or again.
Search speed and direction are indicated on the screen for 2 seconds each time or is
pressed.
To end the search, press or , or stop as desired.
Audio CD ‘s contain music tracks only. You will recognize CD ‘s by their logo. You can play
them in conventional style using a stereo system, or via the TV using the OSD.
You can play audio CD ‘s using the OSD only, or using keys on the remote control.
Play starts as soon as the disc is inserted.
If the disc is in a stopped state, press .
The disc starts to play; if the TV is on, the CD play screen appears on the OSD.
Play will stop at the end of the disc. To stop play at any time press STOP.
You can resume play from the point at which you stopped. Press when you see the icon.
The resume feature applies, not only to the disc in the player, but also to the last four discs
you have played.
Simply reload the disc, press if the disc has stopped, and when you see the icon on
the screen, press again.
18

19
Favorite Track Selection
Compilin
g
an FTS Pro
g
ram
NOTE: Favorite track selection (FTS) is only available for audio discs and can only be
complied with OSD on. To switch FTS on or off, refer to section on SETTINGS.
On this player, FTS programs can be compiled by selecting the tracks you want to play (”Track
Selection”) or by excluding the tracks you do not want to play (”Excluding Tracks”).
To Exclude tracks:
1. Load a disc and go to Stop mode. Press .

2. Use the or key to move to the first track number you want to exclude.
3. Press the key.
4. Exclude further track numbers in the same way. If you change your mind, you can re-include
any track number by moving back to it and pressing the key.
5. To clear your whole selection and start again, press stop on the DVD player or RETURN on the
remote control.
When your FTS program is complete, press to start play, or RETURN to go back to STOP
mode. In either case, the FTS program will be automatically memorized.
To select Tracks:
1. Load a disc and go to the STOP mode.
2. Press .
3. Use the or key to move to the first track you want to select.
4. Press the key.
5. Select further track numbers in the same way. If you change your mind, you can
de-select the track numbers in reverse order by pressing the key as required.
6. To clear your whole selection and start again, press STOP on the DVD player or RETURN on
the remote control.
When your FTS program is complete, press the to start play, or RETURN to go back
to STOP mode. In either case, the FTS program will be automatically memorized.
NOTE: You can have a total of 100 FTS programmed discs. If you exceed that number,
the least frequently played program(s) are automatically deleted.
20
/