
User Guide
PHONO STAGE - NVC TT
POWER SUPPLY - NPX TT


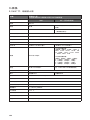
English 2
Français 14
Deutsch 26
Nederlands 38
Español 50
Italiano 62
Polski 74
Русский 86
中文 98
繁體中文 110
한국어 122
134
146

2
1. Read these instructions.
2. Keep these instructions.
3. Heed all warnings.
4. Follow all instructions.
5. Do not use this apparatus near water.
6. Clean only with dry cloth.
7. Do not block any ventilation openings. Install in accordance with the manufacturer’s instructions.
8. Do not install near any heat sources such as radiators, heat registers, stoves, or other apparatus (including
amplifiers) that produce heat.
9. Do not defeat the safety purpose of the polarized plug (common). A polarized plug has two blades with one
wider than the other. The wide bladed is provided for your safety. If the provided plug does not fit into your
outlet, consult an electrician for replacement of the obsolete outlet.
10. Protect the power cord from being walked on or pinched particularly at plugs, convenience receptacles,
and the point where they exit from the apparatus.
11. Only use attachments/accessories specified by the manufacturer.
12. Use only with the cart, stand, tripod, bracket, or table specified
by the manufacturer, or sold with the apparatus. When a cart is used,
use caution when moving the cart/apparatus combination
to avoid injury from tip-over.
13. Unplug this apparatus during lightning storms or when unused for long periods of time.
14. Refer all servicing to qualified service personnel. Servicing is required when the apparatus has been
damaged in any way, such as power-supply cord or plug is damaged, liquid has been spilled or objects have
fallen into the apparatus, the apparatus has been exposed to rain or moisture, does not operate normally, or
has been dropped.
15. Only connect this product to the type of mains electrical supply indicated on the device. If you are unsure
what type of mains electrical supply is required for the product or your electrical installation, ask your installer
or your electricity supplier. For devices intended for use with a battery or another power source, see the user
manual.
16. This product is a Class 1 appliance. Only plug in the device using the mains plug provided, which
incorporates an earth connection. The device must be plugged into an earthed mains socket.
17. Where the mains plug or an appliance coupler is used as the disconnect device, the disconnect device shall
remain readily operable. To disconnect the equipment from the mains remove the mains plug from the mains
outlet.
18. Do not overload wall sockets, extension leads or multiple socket outlets. This could cause fire or electric
shock. Make sure that the maximum permissible power of each component of the installation is not exceeded.
19. In some territories a mains plug may need to be fitted to the supplied mains lead. As the colours of the
wires in the mains lead may not correspond with the coloured markings identifying the terminals in the plug
proceed as follows:
- The wire coloured GREEN-AND-YELLOW must be connected to the terminal in the plug marked by the letter E
or by the safety earth symbol or coloured GREEN or GREEN-AND-YELLOW.
- The wire coloured BLUE must be connected to the terminal in the plug marked with the letter N or coloured
BLACK.
- The wire coloured BROWN must be connected to the terminal in the plug marked with the letter L or
coloured RED.
20. WARNING: To reduce the risk of fire or electric shock, do not expose this device to water, rain or moisture.
In addition, the device must not be exposed to dripping or splashing liquid and no objects filled with liquids,
such as vases, should be placed on the device.
21. When using the device, the ambient temperature should not exceed 95°F (35 degrees Celsius).
22. Do not use this device in tropical climates.
23. Do not use this device at altitudes of more than 2,000m.
24. If the device has been transported from a cold environment to a warm environment, make sure no
condensation has accumulated before connecting the power cable.
25. Always leave a distance of at least 2" (5cm) around the product for proper ventilation.
26. Do not place naked flame sources, such as lit candles, near the device.
27. The appliance should only be mounted on a wall or ceiling if the manufacturer allows for this.
28. This product has sharp corners. Handle it with care.
English IMPORTANT SAFETY INSTRUCTIONS!
The bolt of lightning in an equilateral triangle warns the user that the
device has high voltage that could result in a risk of electric shock.
WARNING: To prevent any risk of electric shock, do not remove the
cover (or the back) from the device. There are no user-serviceable
parts in this device. For maintenance or repairs, contact a qualied
professional.
Warning symbol. This symbol is designed to warn the user of the
presence of important instructions mentioned in the user manual and
relating to the handling, operation and maintenance of the device.

3
29. Do not attempt to repair this device yourself. Opening the device may be dangerous. Contact a qualified
professional for all work on the device.
30. When replacement components are needed, use only the components specified by the manufacturer
or components with identical technical features to those of the original product. Using non-compliant
components could cause fires, electric shocks or other risks.
31. After any maintenance or repair work on the device, test it to check that it is working safely.
32. Turn the source to minimum before connecting the products and turning up the volume. Once the products
are in place, gradually increase the volume to a reasonable and comfortable level.
33. To avoid damaging your hearing, do not listen to loudspeakers at high volumes for long periods
of time. Listening to loudspeakers at an excessive volume can cause damage to the user’s ears and
may lead to hearing problems (temporary or permanent deafness, buzzing in the ears, tinnitus,
hyperacusis). Exposing your ears to a volume higher than 85dB SPL-LAeq for several hours can
irreversibly damage your hearing.
34. After removing the product from its packaging, keep the packaging out of the reach of children. It could
present a suffocation risk.
35. Some users who are not self-sufficient enough to use the product on their own without danger.
In particular, children under 14 or people with some types of disabilities must be supervised and/or
accompanied when using the device.
USA : Federal Communication Commission Interference Statement
This device complies with Part 15 of the FCC Rules. Operation is subject to the following two conditions: (1)
This device may not cause harmful interference, and (2) this device must accept any interference received,
including interference that may cause undesired operation. This equipment has been tested and found to
comply with the limits for a Class B digital device, pursuant to Part 15 of the FCC Rules. These limits are
designed to provide reasonable protection against harmful interference in a residential installation. However,
there is no guarantee that interference will not occur in a particular installation.
Canada : Industry Canada Statement
This device complies with ISED’s licence-exempt RSSs. Operation is subject to the following two conditions:
(1) This device may not cause harmful interference, and (2) this device must accept any interference received,
including interference that may cause undesired operation.

4
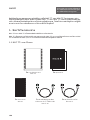
Welcome and congratulations on the purchase of your new NVC TT and NPX
TT. Like all Naim Audio products, NVC TT and NPX TT give priority to musical
performance. To help the products deploy their potential, it is important to
follow the installation and operating instructions provided in the manual.
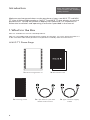
Introduction
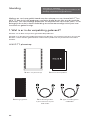
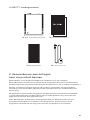
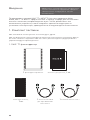
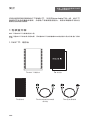
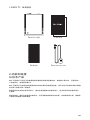
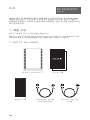
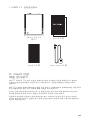
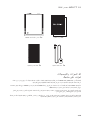
1. What’s in the Box
NVC TT and NPX TT are two related products.
NPX TT is the dedicated upgrade power supply for the NVC TT. It also allows the NVC TT
to be used with older Naim products and products made by other manufacturers.
1.1 NVC TT: Phono Stage
Note: Full safety warnings
can be found in the Statutory
Safety Section.
1x Phono Stage NVC TT 1x Document Pack
1x Type 1 Power Supply
Cable
1x 5 pin DIN to 5 pin DIN
Audio Interconnect
1x Cleaning Cloth

5
1.2 NPX TT: Power Supply
1x Power Supply NPX TT 1x Document Pack
1x Cleaning Cloth
2. Features and Connections
Getting to know your product
Both NVC TT and NPX TT provide the foundations of a complete vinyl replay system. The
simple addition of a turntable is needed for before connection to an amplier. Diagrams
illustrating the connection are shown in Section 3.
The NVC TT has been designed for best performance when connected via DIN to Naim
amplication, but can be used with any amplier with a standard RCA line level input.
Your devices should be installed on a dedicated equipment. Do not stand them directly on
top of another item of equipment. Care should be taken to ensure that all elements are level.
Before switching them on and connecting the cables, the turntable, phono stage and power
supply should be installed in their nal location. Ensure that the volume on the connected
amplier is turned down before switching it on.
1x Power-Line Lite

6
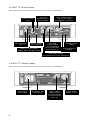
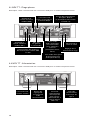
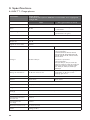
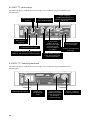
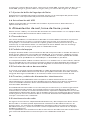
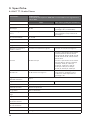
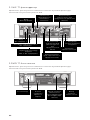
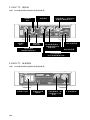
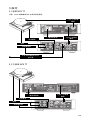
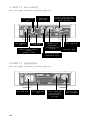
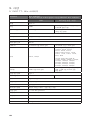
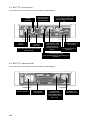
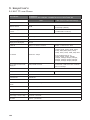
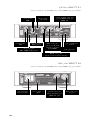
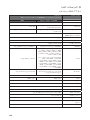
2.1 NVC TT: Phono Stage
Note: Naim recommend DIN connections for the best sound quality.
2.2 NPX TT: Power Supply
Note: Naim recommend DIN connections for the best sound quality.
DIN
25002700
3400
4000
4600
100
1000
400
1600
19003100
3700
4300700
1300
2200
Capacitance (pF)
150140
115
100
85
1k
330
600
215
185125
105
90430
250
165
Resistance (Ohms)
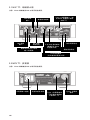
L
R
GND
MMMC
MC Gain
High
Low
L
R
High
Med
Low
Logo
Inputs
Outputs
MC load
Control
PSU In
&
audio
out
S/No.
Auto
standby
Instant
on
Power Supply Input
Type 1
DESIGNED IN THE UK BY NAIM AUDIO, SALISBURY, SP1 2LN
PHONO STAGE
NVC TT
USB
update
Brightness
/ Reset
WARNING: Disconnect
power before opening
FUSE RATING: ANTISURGE
11 20-120 V: T AL
220-240 V: T AL1
AC ONLY
FREQUENCY: 0/60Hz5
I 60NPUT POWER: VA
Power
Power Supply Outputs
DESIGNED IN THE UK
BY NAIM AUDIO,
SALISBURY, SP1 2LN
POWER SUPPLY
NPX TT
S/No.
Type 2
Type 1
Refer to User Manual
MM Cartridge
Input
MC Cartridge
Input
Standby Power
setting
Logo brightness
setting
Switch to select either
MM or MC Cartridge Input
RCA Audio output
(for connection to pre-amplifiers)
5 pin DIN
Audio output
(recommended
for use with Naim
pre-amplifiers)
Ground
connection for
the turntable
Type 1 Power Supply
input (from Naim
preamplifier or NPX TT)
MC Cartridge
gain settings
Mains Input
Connection
Brightness and
reset button Type 1 Power
Supply output
(for connection
to Phono Stage
NVC TT)
Type 2 Power
Supply output

7
DIN
25002700
3400
4000
4600
100
1000
400
1600
19003100
3700
4300700
1300
2200
Capacitance (pF)
150140
115
100
85
1k
330
600
215
185125
105
90430
250
165
Resistance (Ohms)
L
R
GND
MMMC
MC Gain
High
Low
L
R
High
Med
Low
Logo
Inputs
Outputs
MC load
Control
PSU In
&
audio
out
S/No.
Auto
standby
Instant
on
Power Supply Input
Type 1
DESIGNED IN THE UK BY NAIM AUDIO, SALISBURY, SP1 2LN
PHONO STAGE
NVC TT
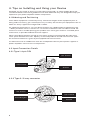
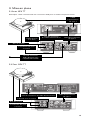
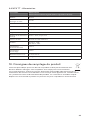
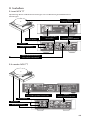
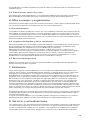
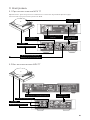
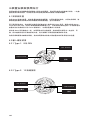
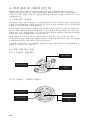
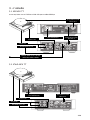
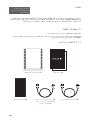
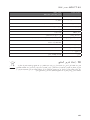
3. Set-up
3.1 With NPX TT
Note: Naim recommend DIN connections for the best sound quality.
DIN
25002700
3400
4000
4600
100
1000
400
1600
19003100
3700
4300700
1300
2200
Capacitance (pF)
150140
115
100
85
1k
330
600
215
185125
105
90430
250
165
Resistance (Ohms)
L
R
GND
MMMC
MC Gain
High
Low
L
R
High
Med
Low
Logo
Inputs
Outputs
MC load
Control
PSU In
&
audio
out
S/No.
Auto
standby
Instant
on
Power Supply Input
Type 1
DESIGNED IN THE UK BY NAIM AUDIO, SALISBURY, SP1 2LN
PHONO STAGE
NVC TT
USB
update
Brightness
/ Reset
WARNING: Disconnect
power before opening
FUSE RATING: ANTISURGE
11 20-120 V: T AL
220-240 V: T AL1
AC ONLY
FREQUENCY: 0/60Hz5
I 60NPUT POWER: VA
Power
Power Supply Outputs
DESIGNED IN THE UK
BY NAIM AUDIO,
SALISBURY, SP1 2LN
POWER SUPPLY
NPX TT
S/No.
Type 2
Type 1
Refer to User Manual
Type 1 Power
Supply Cable
Type 1 Power
Supply Cable
Ground connector
Connect Power Cable
5 pin DIN connection to
Naim amplifier
Ground cable
Ground cable
Tonearm
Tonearm
3.2 Without NPX TT
Type 2 Power
Supply Cable
Connect Power Cable
Ground connector

8
4. Tips on Installing and Using your Device
We know you are eager to enjoy your new Phono Stage and / or Power Supply, but it will
sound even better once these guidelines have been followed. They are designed to help you
experience your power amplier without compromise.
4.1 Unboxing and Positioning
Some Naim equipment is extremely heavy. Check the weight of the equipment prior to
lifting and if necessary, get some help to carry it safely. Ensure that your equipment rack or
table can easily support the weight and is stable.
For optimum performance, use your Naim products on a dedicated hi- equipment rack
– ideally the Naim Fraim or Fraim Lite – to minimise vibrations that can aect sound. No
room for a rack? Consider placing your product on a Fraim glass shelf on a suitable piece
of furniture, to provide solid but discreet support.
Never stack Naim products on top of each other. If they are placed side-by-side, leave
some space between the units. Equally, connected products should not be too far apart:
the maximum distance is given by the supplied interconnect lead.
To reduce the risk of audible hum from the loudspeakers do not place power supplies or
power ampliers close to source components.
4.2 Input Connection Details
4.2.1 Type 1: 8 pin DIN
4.2.2 Type 2: 12 way connector
+18V 300mA
-18V 300mA
Ground
+5V 200mA
Ground
Ground Digital
+22V 300mA

9
4.3 Connectors
For both safe use and performance reasons, do not modify the standard cables supplied.
4.3.1 Interconnect Cables
Naim interconnect cables that share the same connector on each end are marked with a
band to establish correct orientation. The band denotes the end that connects to the signal
source. Naim Super Lumina interconnect cable will provide the best results.
4.3.2 Signal Outputs
The NVC TT Phono Stage features audio outputs on 5 pin DIN and RCA outputs, and an 8
pin DIN power supply input (NSC 222, NAC 332 or NPX TT), making it easy to connect to a
variety of Naim and other manufacturers’ equipment. Always use high quality interconnect
cables to connect the phono stage to the amplier inputs.
4.3.3 Mains Connection
Connect the NPX TT Power Supply to a mains power socket using either the mains lead
supplied or a Naim Power-Line.
4.4 Powering Up/Down
Once all your input and output connections are made, connect the supplied mains lead to
your NPX TT and then to a mains power source.
Ensure your sources - your turntable, for example - and any associated external power
supplies are switched on before you switch on your NPX TT.
Always use the power switch on the product rather than a mains outlet switch for both
powering and on and o.
A “thump” may be heard from the loudspeakers as power ampliers are switched on.
This is normal, will not cause any loudspeaker damage and does not point to any fault or
problem. A mild “pop” may also be heard shortly after equipment is switched o.
4.5 Standby Power Settings
The NVC TT Phono Stage powers down into a sleep mode after 20 minutes as its default.
In this sleep mode (‘Auto Standby’) the system consumes less than 0.5W of power. The
‘Instant On’ feature sets your system to a mode that leaves the sensitive audio circuitry
permanently powered for the best sound quality.
The standby power setting on the NVC TT phono stage is only applicable when it is
powered by the NPX TT power supply. The standby power setting on the NVC TT phono
stage depends on the power supply used. It needs to be powered by a pre-amplier which
can control the standby settings.
4.6 Cartridge Selection
The NVC TT Phono Stage features adjustable settings to enable the best performance of
a connected cartridge. It is possible to adjust both gain, capacitive and resistive load for
Moving Coil (MC) cartridges. The adjustment switches do not apply for Moving Magnet
(MM) cartridges as they typically have a much higher output.
The NVC TT is preset to MC mode with cartridge loading values of 100ohms and 1000pF
and the high gain setting. The gain and loading can be adjusted using the rear panel
switches to match your cartridge choice. Check with the cartridge manufacturer for the
recommended values. They can be adjusted for personal preference.

10
For example:
· Adding more capacitance may reduce any perceived system forwardness.
· Making the resistance lower can help counteract any perceived excessive liveliness
· Switching between high and low gain may help match input levels across a system.
If you use a moving magnet cartridge, set the mode to MM. When using the NVC TT in
MM mode set the MC gain to high and the loading values to 1k and 100pF.
4.7 Naim Logo Brightness Settings
The brightness of the product logos can be set using the rear panel switch on the NVC TT
or the rear panel push button on the NPX TT.
4.8 USB Update
The NPX TT has a micro-USB socket on its rear panel for service use only.
5. Mains Power, Earthing and More
Only use the mains lead and plugs supplied with your Naim products, or the upgrade Naim
Power-Line mains lead.
5.1 Earthing
In order to avoid hum loops, the signal ground of the whole system should be connected to
the mains earth in one place. Typically, this is at the primary source.
For example, if your turntable has a mains earth and you have a Naim streamer in the
system, its ground lift switch should be set to "Floating”. This is the best setting for sound
quality.
5.2 Equipment Fuses
Mains powered Naim Audio equipment is tted with a mains fuse on the rear panel
adjacent to the mains input socket. If necessary; replace it only with the spare fuse
supplied or with an identical fuse. Repeated failure of the fuse indicates a fault that should
be investigated by your retailer or Naim itself.
Where fused plugs are used, 13 amp fuses should be tted. Fuses of a lower rating will fail
after a period of use. Do not wire voltage dependent resistors or noise suppressors into
mains plugs. They degrade the mains supply and the sound.
5.3 Non-Rewirable Mains Plugs
If a non-rewirable plug is cut from a mains lead (for whatever purpose) the plug MUST be
disposed of in a way to render it totally useless. Considerable shock hazard exists if the
cut-o plug is inserted into a mains outlet.
5.4 Mains Circuits and Cables/Interference
A hi- system usually shares a mains power circuit with other household equipment, some
of which can cause distortion that may manifest mechanical hum from mains transformers,
including the transformer in your NPX TT.
Transformer hum is not transmitted through the speakers and has no eect on the
performance of the system; however, a careful positioning of your Naim system may
reduce it, as may a separate, dedicated mains circuit. Such a circuit (ideally with a 30 or
45 Amp rating) generally also improves system performance. Only seek advice on the
installation of a separate mains circuit from a qualied electrician.
5.5 Radio Interference
In some circumstances, depending on where you live and the earthing arrangements of
your home, you may experience radio frequency interference. Controls on broadcasting in
some territories allow very high levels of radio frequency radiation and both the choice and
exact location of the equipment may be critical.

11
Susceptibility to radio frequency interference is related to the wide internal bandwidth
necessary for high sound quality.
Contact your dealer or the factory for advice on dealing with radio frequency interference.
5.6 Lightning Precautions
To protect it from potential damage, your Naim system should be turned o and fully
disconnected from mains power when there is a risk of a lightning strike.
6. Further Tips and Advice
Now you have all the essentials sorted, let us move onto a few more things that you can do
to optimise the performance of your new devices.
6.1 Running In
Naim products are hand-crafted from a carefully selected range of high-quality
components. Your products will sound superb out of the box, but their performance can
improve further still as all these various components power up and interact in their rst
few weeks of use. Keeping your system powered up before using it will assist this process.
6.2 Cleaning your Product and Connections
We recommend using only the supplied cleaning cloth to lightly dust any surfaces of
the product. Cleaning products may contain ingredients that can likely degrade surface
treatments and coatings.
Keep interconnect plugs and sockets clean and free from corrosion. The easiest way to
achieve this is to fully power o your Naim products (and any connected equipment),
unplug all connections from their sockets and rmly push them in again. Do not use
contact cleaners and so-called ‘enhancers’, as they can leave deposits that can degrade the
sound of your system.
6.3 Resetting your Device
The NPX TT can be reset to factory settings by pressing the "Brightness/Reset" button for
more than 3 seconds.
7. Support
The consumers’ legal guarantee of conformity varies depending on the country. In most
countries, the dealer where you purchased your Naim product is your main interlocutor
in the event of a defect. If the equipment is non-compliant, it must be sent to the dealer,
in its original packaging, who will analyse it and determine where the breakdown comes
from. If the equipment is under warranty and conditions are met, the equipment will be
repaired or replaced according to the conditions applicable to the legal warranty on the
date of purchase of the device. Otherwise, a repair estimate will be submitted. The legal
guarantee does not cover damage from a misuse or a wrong connection (burnt mobile
coils for instance). France excluded, Naim equipment is covered by a warranty whose
conditions are locally set or carried out by the ocial Naim dealer of each country, in
compliance with the laws of the concerned territory. In France, every Naim equipment is
covered by a two-year legal guarantee from the date of purchase.
A defect can be caused by a failure of the system or by the installation, contact your
dealer. You can nd a range of support articles for each Naim product online
at www.naimaudio.com
If you are still experiencing an issue with your Naim product, contact us directly for help
and advice, at support@naimaudio.com
8. Service and Updates
Any repairs or hardware updates must be carried out by a professional. We recommend
you to contact an authorised Naim service centre as many components are custom made,
tested or paired. Please contact your local Naim retailer for any service or repair queries.

12
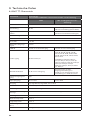
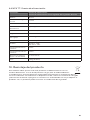
9. Specications
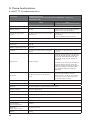
9.1 NVC TT: Phono Stage
Parameter Phono Stage
Switchable MM/MC phono stage with MC load adjustment
MM MC (low & high gain)
Model NVC TT
Gain 42dB 61dB low gain and 67dB high gain
(switchable)
Signal to noise ratio 83dB ref 5mV A-wtd 84dB ref 0.5mV A-wtd
(both gain settings)
RIAA accuracy +/-0.1dB
IEC cut (Partial) – 2dB at 20Hz and -3dB at 14Hz
Cross talk >75dB
Max output signal 8Vrms
THD+N <0.005% ref 50mV input <0.005% ref 1.5mV input
Loading 47k and 100pF
16 selectable capacitive values:
1000, 600, 430, 330, 250,
215, 185,165,150, 140, 125,
115, 105, 100, 90, 85
16 selectable capacitive values:
100pF, 400pF, 700pF, 1000pF,
1300pF, 1600pF, 1900pF, 2200pF,
2500pF, 2700pF, 3100pF, 3400pF,
3700pF, 4000pF, 4300pF, 4600pF
Headroom 22dB ref 5mV input
23dB ref 0.5mV input low gain
setting, 17dB ref 0.5mV high gain
setting
Power Supply input Type 1
Input Stereo RCA Stereo RCA
Output 5 pin DIN, 8 pin DIN, Stereo RCA
Front Panel Clear Acrylic
Naim Logo White illuminated
Logo Brightness setting 3 position switch - High, Medium, Low
Power input +/-18V DC @300mA
Operating Temperature 5-35°C
Storage Temperature 0-50°C
Dimensions (H x W x D) 7 × 21.4 × 31.7cm
Weight 3.4kg (7.5lbs)

13
9.2 NPX TT: Power Supply
Parameter Power Supply
DR regulated linear power supply
Model NPX TT
Standby Power
Consumption <0.5W
Other Connectors Micro USB (update only)
Power Supply Output Type 1, Type 2
Front Panel Clear Acrylic
Naim Logo White illuminated
Logo Brightness setting Button - High, Medium, Low
Mains Supply 110 to 120V and 220 to 240Vac
Fuses 110-120 V:T2AL
220-240 V: T1AL
Operating Temperature 5-35°C
Storage Temperature 0-50°C
Dimensions (H x W x D) 7 × 21.4 × 33cm
Weight 5.6kg (12.35lbs)
10. Product Recycling
This marking indicates that within the EU this product should not be disposed of
with other household wastes. To prevent any risk to the environment or human
health, please recycle them responsibly to encourage the reuse of material resources. To
return your used device, please use the return and collection systems available, or contact
the retailer where you purchased the product. They can recycle this product safely.

14
1. Lire ces instructions.
2. Conserver ces instructions.
3. Tenir compte de tous les avertissements.
4. Suivre toutes les instructions.
5. Ne pas utiliser cet appareil à proximité de l'eau.
6. Nettoyer uniquement avec un chiffon sec.
7. N'obstruer aucun orifice de ventilation. Installer l'appareil en suivant les instructions du fabricant.
8. Ne pas installer l'appareil à proximité d'une source de chaleur telle qu'un radiateur, une cuisinière, une
bouche de chauffage ou tout autre appareil (y compris les amplificateurs) dissipant de la chaleur.
9. Ne pas contourner le dispositif de sécurité de la fiche polarisée. Une fiche polarisée possède deux lames
dont une plus large que l'autre. La grande lame est fournie pour votre sécurité. Si la fiche fournie ne rentre pas
dans votre prise, consulter un électricien pour le remplacement de la prise obsolète.
10. S'assurer que le câble d'alimentation ne puisse pas être piétiné, écrasé ou pincé. Une attention toute
particulière doit être accordée à la fiche d'alimentation et à la liaison du cordon avec l'appareil.
11. Utiliser uniquement les accessoires recommandés par le fabricant.
12. N'utiliser que les chariots, pieds, trépieds, supports ou tables recommandés
par le fabricant ou ceux vendus avec l'appareil. Lorsqu'un chariot est utilisé,
redoubler de prudence pendant le déplacement de l'ensemble chariot/appareil afin d'éviter toute
blessure par basculement.
13. Débrancher l'appareil en cas d'orage ou si l'appareil reste inutilisé pendant de longues périodes.
14. Toute tâche de maintenance doit être réalisée par un personnel qualifié. Une maintenance est nécessaire à
la suite de tout dommage occasionné à l'appareil tel que la déterioration du câble ou de la fiche d'alimentation,
le déversement de liquide ou l'insertion d'objets à l'intérieur de l'appareil, l'exposition à la pluie ou à l'humidité,
le mauvais fonctionnement ou la chute de l'appareil.
15. Raccorder ce produit uniquement au type d'alimentation secteur indiqué sur l'appareil. En cas d'hésitation
sur le type d'alimentation nécessaire au produit ou de votre installation électrique, consulter le vendeur de
votre produit, votre installateur ou votre fournisseur d'électricité. Pour les appareils prévus pour une utilisation
à partir d'une batterie ou d'une autre source d'alimentation, se référer au manuel d'utilisation.
16. Ce produit appartient aux appareils de Classe 1. Connecter l'appareil uniquement à l'aide de la fiche secteur
fournie intégrant une liaison à la terre. L'appareil doit être raccordé à une prise secteur dotée d'une protection
par mise à la terre.
17. Si la fiche secteur ou un connecteur est utilisé comme dispositif de débranchement de l’appareil, celui-ci
doit être facilement accessible. Pour débrancher l’appareil du secteur, retirer la fiche secteur de la prise de
courant.
18. Ne pas surcharger les prises murales, les rallonges électriques ou les prises multiples. Il pourrait en résulter
incendies ou chocs électriques. Veiller à ne pas dépasser la puissance maximale admissible de chaque élément
de l'installation.
19. Dans certains territoires, il peut s’avérer nécessaire d’installer une fiche secteur sur le câble d’alimentation
fourni. Les couleurs des fils du câble d’alimentation pouvant ne pas correspondre aux marquages de couleur
identifiant les bornes de la fiche, procéder comme suit :
• Le fil VERT-ET-JAUNE doit être raccordé à la borne au sein de la prise identifiée par la lettre E ou par le
symbole de terre ou de couleur VERTE ou VERTE-ET-JAUNE.
• Le fil BLEU doit être raccordé à la borne au sein de la prise identifiée par la lettre N ou de couleur NOIRE.
• Le fil MARRON doit être raccordé à la borne au sein de la prise identifiée par la lettre L ou de couleur
ROUGE.
20. ATTENTION : pour réduire le risque d’incendie ou de choc électrique, ne pas exposer cet appareil à
l’eau, la pluie ou à l’humidité. De plus, l’appareil ne doit pas être exposé à des égouttements d’eau ou des
éclaboussures et aucun objet rempli de liquide, tel qu’un vase, ne doit être posé sur l’appareil."
21. La température ambiante lors de l'utilisation de l'appareil ne doit pas dépasser 35 degrés Celsius (95 °F).
22. Ne pas utiliser cet appareil dans des climats tropicaux.
23. Ne pas utiliser cet appareil dans des zones situées au-dessus de 2000 m d’altitude.
24. Si l'appareil a été transporté d’un environnement froid à un environnement chaud, s'assurer qu'aucun
phénomène de condensation ne s'est produit avant de connecter le cordon d'alimentation.
25. Toujours laisser une distance de 5 cm (2") minimum autour du produit pour assurer une bonne ventilation.
26. Ne pas approcher de l'appareil une source de flammes nues, telle que des bougies allumées.
27. L’appareil ne doit être monté sur un mur ou au plafond que si le constructeur le prévoit.
Français INSTRUCTIONS DE SÉCURITÉ IMPORTANTES !
L'éclair représenté par le symbole èche et contenu dans un triangle
équilatéral, a pour but de prévenir l’utilisateur de la présence de tension
élevée au sein de l'appareil pouvant entraîner un choc électrique.
ATTENTION : An de prévenir tout choc électrique, ne pas retirer
le capot (ou l’arrière) de cet appareil. Aucune pièce n’est remplaçable
par l’utilisateur. Si un entretien ou une réparation de l’appareil est
nécessaire, contacter une personne qualiée.
Symbole de mise en garde. Ce symbole est destiné à prévenir
l’utilisateur de la présence d’instructions importantes mentionnées
dans le manuel d’utilisation et relatives à la manipulation, mise en
œuvre et à l’entretien de l’appareil.

15
28. Ce produit présente des angles vifs. Le manipuler avec précaution.
29. Ne pas tenter de réparer cet appareil par vos propres moyens. L'ouverture de cet appareil peut s'avérer
dangereuse. Pour toute intervention sur l'appareil, s'adresser à un personnel qualifié.
30. Lorsque le remplacement de composants est nécessaire, n'utiliser que les composants spécifiés par
le fabricant ou présentant des caractéristiques identiques à l'exemplaire d'origine. Des composants non-
conformes peuvent provoquer incendies, chocs électriques ou autres risques.
31. Après toute intervention ou réparation sur l'appareil, procéder à des tests afin de vérifier que le produit
fonctionne en toute sécurité.
32. Mettre le volume de la source au minimum avant d’y raccorder les produits et d’augmenter le volume. Une
fois les produits en place, augmenter progressivement le volume jusqu’à un niveau raisonnable et agréable.
33 . Afin d’éviter des dommages auditifs éventuels, ne pas écouter les enceintes à un niveau
sonore élevé pendant une longue durée. L’écoute d’enceintes à un niveau sonore excessif peut
endommager l’oreille de l’utilisateur et entraîner des troubles auditifs (surdité temporaire ou
définitive, bourdonnements d’oreille, acouphènes, hyperacousie). L’exposition de l'appareil auditif à
un niveau supérieur à 85 dB SPL LAeq pendant plusieurs heures peut endommager l’ouïe irréversiblement."
34. Après avoir déballé le produit, veiller à ne pas laisser l’emballage à portée des enfants. Il présente un risque
de suffocation.
35. Certains utilisateurs ne disposent pas d’une autonomie suffisante pour utiliser seuls le produit sans danger.
En particulier, les enfants âgés de moins de 14 ans et les personnes présentant certaines déficiences doivent
être impérativement surveillés et accompagnés lors de l’utilisation de l’appareil.
Canada : Industry Canada Statement
Le présent appareil est conforme aux CNR d’ ISED applicables aux appareils radio exempts de licence.
L’exploitation est autorisée aux deux conditions suivantes : (1) le dispositif ne doit pas produire de brouillage
préjudiciable, et (2) ce dispositif doit accepter tout brouillage reçu, y compris un brouillage susceptible de
provoquer un fonctionnement indésirable.

16
Bienvenue et toutes nos félicitations pour l’achat de vos nouveaux NVC TT et
NPX TT. Comme tous les produits Naim Audio, NVC TT et NPX TT donnent la
priorité à la performance musicale. Pour aider les produits à déployer tout leur
potentiel, il est important de suivre les consignes d’installation et d’utilisation
indiquées dans ce manuel.
Introduction
1. Liste des éléments fournis
NVC TT et NPX TT sont deux produits associés.
NPX TT est l’alimentation améliorée dédiée au NVC TT. Elle permet également d’utiliser le
NVC TT avec d’autres produits Naim plus anciens et les produits d’autres fabricants.
1.1 NPX TT: Étage phono
Remarque: Tous les avertissements
de sécurité se trouvent dans
la section de sécurité agréée.
1x Phono stage NVC TT 1x Documentation
1x Câble d’alimentation
de type 1
1x Interconnexion audio
DIN 5broches vers DIN
5broches
1x Chion
de nettoyage

17
1.2 NPX TT: Alimentation
1x Alimentation NPX TT 1x Documentation
1x Chion
de nettoyage
2. Caractéristiques et ports de connexion
Faites connaissance avec votre produit
NVC TT et NPX TT sont les bases d’un système complet de diusion sur vinyle. Le simple
ajout d’un tourne-disque est nécessaire avant d'eectuer la connexion à un amplicateur. Les
schémas illustrant le branchement gurent à la section3.
NVC TT a été conçu pour fournir les meilleures performances lorsqu’il est connecté via un
DIN à un amplicateur Naim, mais il peut être utilisé avec n’importe quel amplicateur doté
d’une entrée ligne RCA standard.
Vos appareils doivent être installés sur un support d’équipement dédié. Ne les posez pas
directement au-dessus d’un autre appareil. Veillez à ce tous les éléments soient bien de
niveau.
Avant leur mise en marche et la connexion des câbles, le tourne-disque, l’étage phono et
l’alimentation doivent être installés à leur emplacement dénitif. Assurez-vous que le volume
de l’amplicateur connecté est baissé avant de l’allumer.
1x Power-Line Lite

18
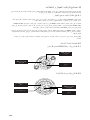
2.1 NPX TT: Étage phono
Remarque: Naim recommande les connexions DIN pour la meilleure qualité sonore.
2.2 NPX TT: Alimentation
Remarque: Naim recommande les connexions DIN pour la meilleure qualité sonore.
DIN
25002700
3400
4000
4600
100
1000
400
1600
19003100
3700
4300700
1300
2200
Capacitance (pF)
150140
115
100
85
1k
330
600
215
185125
105
90430
250
165
Resistance (Ohms)
L
R
GND
MMMC
MC Gain
High
Low
L
R
High
Med
Low
Logo
Inputs
Outputs
MC load
Control
PSU In
&
audio
out
S/No.
Auto
standby
Instant
on
Power Supply Input
Type 1
DESIGNED IN THE UK BY NAIM AUDIO, SALISBURY, SP1 2LN
PHONO STAGE
NVC TT
USB
update
Brightness
/ Reset
WARNING: Disconnect
power before opening
FUSE RATING: ANTISURGE
11 20-120 V: T AL
220-240 V: T AL1
AC ONLY
FREQUENCY: 0/60Hz5
I 60NPUT POWER: VA
Power
Power Supply Outputs
DESIGNED IN THE UK
BY NAIM AUDIO,
SALISBURY, SP1 2LN
POWER SUPPLY
NPX TT
S/No.
Type 2
Type 1
Refer to User Manual
Entrée de la
cellule à aimant
mobile (MM)
Entrée de la
cellule à bobine
mobile (MC)
Réglage de la
mise en veille
Réglage de la
luminosité du logo
Commutateur de sélection
de l’entrée pour cellule MM
ou MC
Sortie audio RCA (pour
branchement aux
préamplificateurs)
Connecteur de
mise à la terre pour
le tourne-dique
Entrée de l’alimentation
de type1 (depuis
le préamplificateur Naim
ou NPX TT)
Réglage
du gain de
la cellule MC
Connecteur de
l’entrée secteur
Bouton de
réglage de
la luminosité
et de
réinitialisation
Sortie de
l’alimentation
électrique de
type1 (pour
branchement à
l'étage phono
NVC TT)
Sortie de
l’alimentation
électrique de
type 2
Sortie audio
DIN à 5broches
(recommandée
pour utilisation
avec les
préamplificateurs
Naim)
Strona się ładuje...
Strona się ładuje...
Strona się ładuje...
Strona się ładuje...
Strona się ładuje...
Strona się ładuje...
Strona się ładuje...
Strona się ładuje...
Strona się ładuje...
Strona się ładuje...
Strona się ładuje...
Strona się ładuje...
Strona się ładuje...
Strona się ładuje...
Strona się ładuje...
Strona się ładuje...
Strona się ładuje...
Strona się ładuje...
Strona się ładuje...
Strona się ładuje...
Strona się ładuje...
Strona się ładuje...
Strona się ładuje...
Strona się ładuje...
Strona się ładuje...
Strona się ładuje...
Strona się ładuje...
Strona się ładuje...
Strona się ładuje...
Strona się ładuje...
Strona się ładuje...
Strona się ładuje...
Strona się ładuje...
Strona się ładuje...
Strona się ładuje...
Strona się ładuje...
Strona się ładuje...
Strona się ładuje...
Strona się ładuje...
Strona się ładuje...
Strona się ładuje...
Strona się ładuje...
Strona się ładuje...
Strona się ładuje...
Strona się ładuje...
Strona się ładuje...
Strona się ładuje...
Strona się ładuje...
Strona się ładuje...
Strona się ładuje...
Strona się ładuje...
Strona się ładuje...
Strona się ładuje...
Strona się ładuje...
Strona się ładuje...
Strona się ładuje...
Strona się ładuje...
Strona się ładuje...
Strona się ładuje...
Strona się ładuje...
Strona się ładuje...
Strona się ładuje...
Strona się ładuje...
Strona się ładuje...
Strona się ładuje...
Strona się ładuje...
Strona się ładuje...
Strona się ładuje...
Strona się ładuje...
Strona się ładuje...
Strona się ładuje...
Strona się ładuje...
Strona się ładuje...
Strona się ładuje...
Strona się ładuje...
Strona się ładuje...
Strona się ładuje...
Strona się ładuje...
Strona się ładuje...
Strona się ładuje...
Strona się ładuje...
Strona się ładuje...
Strona się ładuje...
Strona się ładuje...
Strona się ładuje...
Strona się ładuje...
Strona się ładuje...
Strona się ładuje...
Strona się ładuje...
Strona się ładuje...
Strona się ładuje...
Strona się ładuje...
Strona się ładuje...
Strona się ładuje...
Strona się ładuje...
Strona się ładuje...
Strona się ładuje...
Strona się ładuje...
Strona się ładuje...
Strona się ładuje...
Strona się ładuje...
Strona się ładuje...
Strona się ładuje...
Strona się ładuje...
Strona się ładuje...
Strona się ładuje...
Strona się ładuje...
Strona się ładuje...
Strona się ładuje...
Strona się ładuje...
Strona się ładuje...
Strona się ładuje...
Strona się ładuje...
Strona się ładuje...
Strona się ładuje...
Strona się ładuje...
Strona się ładuje...
Strona się ładuje...
Strona się ładuje...
Strona się ładuje...
Strona się ładuje...
Strona się ładuje...
Strona się ładuje...
Strona się ładuje...
Strona się ładuje...
Strona się ładuje...
Strona się ładuje...
Strona się ładuje...
Strona się ładuje...
Strona się ładuje...
Strona się ładuje...
Strona się ładuje...
Strona się ładuje...
Strona się ładuje...
Strona się ładuje...
Strona się ładuje...
Strona się ładuje...
Strona się ładuje...
Strona się ładuje...
Strona się ładuje...
Strona się ładuje...
Strona się ładuje...
Strona się ładuje...
Strona się ładuje...
-
 1
1
-
 2
2
-
 3
3
-
 4
4
-
 5
5
-
 6
6
-
 7
7
-
 8
8
-
 9
9
-
 10
10
-
 11
11
-
 12
12
-
 13
13
-
 14
14
-
 15
15
-
 16
16
-
 17
17
-
 18
18
-
 19
19
-
 20
20
-
 21
21
-
 22
22
-
 23
23
-
 24
24
-
 25
25
-
 26
26
-
 27
27
-
 28
28
-
 29
29
-
 30
30
-
 31
31
-
 32
32
-
 33
33
-
 34
34
-
 35
35
-
 36
36
-
 37
37
-
 38
38
-
 39
39
-
 40
40
-
 41
41
-
 42
42
-
 43
43
-
 44
44
-
 45
45
-
 46
46
-
 47
47
-
 48
48
-
 49
49
-
 50
50
-
 51
51
-
 52
52
-
 53
53
-
 54
54
-
 55
55
-
 56
56
-
 57
57
-
 58
58
-
 59
59
-
 60
60
-
 61
61
-
 62
62
-
 63
63
-
 64
64
-
 65
65
-
 66
66
-
 67
67
-
 68
68
-
 69
69
-
 70
70
-
 71
71
-
 72
72
-
 73
73
-
 74
74
-
 75
75
-
 76
76
-
 77
77
-
 78
78
-
 79
79
-
 80
80
-
 81
81
-
 82
82
-
 83
83
-
 84
84
-
 85
85
-
 86
86
-
 87
87
-
 88
88
-
 89
89
-
 90
90
-
 91
91
-
 92
92
-
 93
93
-
 94
94
-
 95
95
-
 96
96
-
 97
97
-
 98
98
-
 99
99
-
 100
100
-
 101
101
-
 102
102
-
 103
103
-
 104
104
-
 105
105
-
 106
106
-
 107
107
-
 108
108
-
 109
109
-
 110
110
-
 111
111
-
 112
112
-
 113
113
-
 114
114
-
 115
115
-
 116
116
-
 117
117
-
 118
118
-
 119
119
-
 120
120
-
 121
121
-
 122
122
-
 123
123
-
 124
124
-
 125
125
-
 126
126
-
 127
127
-
 128
128
-
 129
129
-
 130
130
-
 131
131
-
 132
132
-
 133
133
-
 134
134
-
 135
135
-
 136
136
-
 137
137
-
 138
138
-
 139
139
-
 140
140
-
 141
141
-
 142
142
-
 143
143
-
 144
144
-
 145
145
-
 146
146
-
 147
147
-
 148
148
-
 149
149
-
 150
150
-
 151
151
-
 152
152
-
 153
153
-
 154
154
-
 155
155
-
 156
156
-
 157
157
-
 158
158
-
 159
159
-
 160
160
-
 161
161
-
 162
162
-
 163
163
-
 164
164


Naim NPX TT Instrukcja obsługi
- Typ
- Instrukcja obsługi
- Niniejsza instrukcja jest również odpowiednia dla
w innych językach
- italiano: Naim NPX TT Manuale del proprietario
- français: Naim NPX TT Le manuel du propriétaire
Powiązane artykuły
-
Naim NAC 332 Instrukcja obsługi
-
Naim NDX 2 Instrukcja obsługi
-
-
-
-
-
Naim NDX Skrócona instrukcja obsługi
-
-
-