
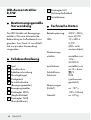
LED SPOTLIGHT 8.5 W
IAN 270250
LED-AUSSENSTRAHLER 8,5 W
Montage-, Bedienungs- und Sicherheitshinweise
LED SPOTLIGHT 8.5 W
Assembly, operating and safety instructions
ZEWNĘTRZNY REFLEKTOR LEDOWY 8,5 W
Wskazówki montażu, obsługi i bezpieczeństwa
LED VENKOVNÍ REFLEKTOR 8,5 W
Pokyny k montáži, obsluze a bezpečnostní pokyny
LED REFLEKTOR 8,5 W
Pokyny pre montáž, obsluhu a bezpečnostné pokyny
ZUNANJI LED REFLEKTOR 8,5 W
Navodila za montažo, uporabo in varnostna navodila
LED KÜLTÉRI REFLEKTOR 8,5 W
Szerelési, használati és biztonsági tudnivalók

GB Assembly, operating and safety instructions Page 5
PL Wskazówki montażu, obsługi i bezpieczeństwa Strona 13
HU Szerelési, használati és biztonsági tudnivalók Oldal 22
SI Navodila za montažo, uporabo in varnostna navodila Stran 30
CZ Pokyny k montáži, obsluze a bezpečnostní pokyny Strana 39
SK Pokyny pre montáž, obsluhu a bezpečnostné pokyny Strana 47
DE / AT / CH Montage-, Bedienungs- und Sicherheitshinweise Seite 55

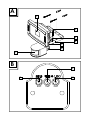
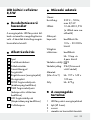
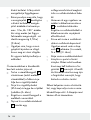
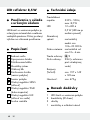
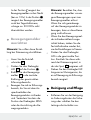
A
B
5
6
7
2
4
10
9
8
3
1

2.5 m
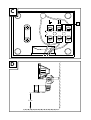
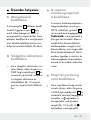
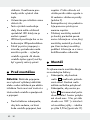
C
D
11

5 GB
Intended use ........................................................................... Page 6
Parts description .................................................................Page 6
Technical Data .......................................................................Page 6
Scope of delivery................................................................Page 6
General safety instructions ........................................Page 7
Before installation .............................................................Page 8
Installation ...............................................................................Page 8
Start-up
Adjusting the motion detector.......................................................Page 9
Setting the lighting duration ..........................................................Page 10
Adjusting the sensitivity of the sensor ........................................... Page 10
Setting the daylight level ..............................................................Page 10
Aligning the motion detector ........................................................Page 10
Cleaning and Care .............................................................Page 11
Disposal ......................................................................................Page 11
Warranty ................................................................................... Page 11

6 GB
LED Spotlight 8.5 W
Intended use
The LED spotlight with motion
detector is intended for automatic
lighting in outdoor areas. This device
is solely intended for private use.
Parts description
1 Spot
2 Connection box
3 Cable gland
4 Mounting stirrup
5 Hinge joint
6 Locking screw (motion detector)
7 Motion detector
8 Rotary control SENS (sensitivity)
9 Rotary control TIME
(switched on duration)
10 Rotary control LUX
(light sensitivity)
11 Terminal block
Technical Data
Operating voltage: 230 V∼ 50 Hz,
max. 8.5 W
LEDs: 12 x LED x
0.5 W (LEDs
non-replace-
able)
Dimming switch: Adjustable
from 10 lx–
20,000 lx
Light on time: adjustable
between
approx.10 s –
4 min
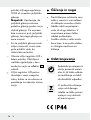
Protection class: / II
Protection class: IP44 (splash
water proof)
Dimensions
(HxWxD): approx. 197 x
149 x 120 mm
Weight: approx. 675 g
Scope of delivery
1 LED spot with motion detector
2 Wall plugs (Ø 6 mm)
2 Screws
1 Set of mounting and operating
instructions

7 GB
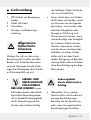
General safety
instructions
Before using the product, please
familiarise yourself with all of the
safety information and instructions
for use! When passing this product
on to others, please also include
all the documents!
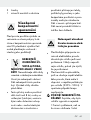
DANGER TO LIFE
AND ACCIDENT
HAZARD FOR
TODDLERS AND SMALL
CHILDREN! Never leave chil-
dren unattended with the pack-
aging material. The packaging
material represents a danger of
suffocation. Children frequently
underestimate the dangers.
Please keep children away
from the device at all times.
This appliance may be used by
children age 8 years and up, as
well as by persons with reduced
physical, sensory or mental
capacities, or lacking experience
and / or knowledge, so long as
they are supervised or instructed
in the safe use of the appliance
and understand the associated
risks. Children should not be
allowed to play with the
appliance. Cleaning and user
maintenance should not be
performed by children without
supervision.
Danger to life by
electric shock
Always check lamp for damage
before connecting it to power.
Never use the light if it shows
any signs of damage.
Prior to installation, verify that
the mains voltage on site corre-
sponds with the operating
voltage required for the light
(230 V∼ 50 Hz). Otherwise do
not install the light.
CAUTION! DANGER OF
BURN INJURIES! To prevent
burns, verify the light is switched
off and has cooled down for
at least 15 min before touching
it. Lamps can become very hot.
Only intended for installations
out of normal reach.
This product does not contain
any parts that can be serviced

8 GB
by the user. The LEDs cannot
be replaced.
The spotlight is only suited for
use with the built-in LED control
gear.
The product continues to draw
a small amount of power even
if the lamp is off as long as
product is connected to supply
mains. To switch the device off
completely, the mains switch
should be switched off.
Before installation
Important: The electrical con-
nection must be established by a
qualified electrician or a person
trained to perform electrical instal-
lations. This person must be familiar
with the properties of the light and
the connection regulations.
Before installation ensure that
the circuit, to which the light will
be connected, is not energised.
To do so, remove the fuse or
switch off the circuit breaker in
the fuse box (0 position).
Use the voltage tester to verify
the de-energised status.
The included mounting material
is suitable for ordinary solid
concrete or masonry construc-
tion. Check which mounting
material is suitable for your
chosen mounting surface. If
necessary, seek expert advice.
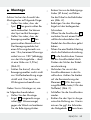
Installation
When selecting the mounting loca-
tion, pay attention to the following:
Make sure that the spot 1
illuminates the desired area. You
can move the spot vertically.
Make sure the motion detector
7 covers the desired area. The
motion detector has a maximum
coverage range of 12 m, with a
coverage angle of about 180°
(depending on the mounting
height – a height of 2.50 m is
ideal) (Fig. D).
Make sure the motion detector
is not illuminated at night by
street lighting. This can influence
its functioning.

9 GB
During mounting, proceed as
described below:
Hold the mounting bracket 4
so that it is horizontal (possibly
with a spirit level) against the
wall and mark the fastening
holes.
Now drill the fastening holes
(Ø 6 mm) and push the wall
plugs into the drill holes (Fig. A).
Secure the mounting bracket
onto the wall using the screws
provided.
Open the connection box 2
after you have released the lid
of the connection box with a
cross head screwdriver.
Run the flexible supply line
through the cable gland 3
and into the connection box.
Fix the connection cable by
turning the nut of the cable
gland.
Connect it with the connection
terminals in the connection box.
Pay attention to the markings
on the terminals 11 (L for live
and N for neutral) (Fig. C).
Close the connection box.
Align the spot into the desired
direction. For this, you may need
to slacken the screw of the hinge
joint 5. After alignment, tighten
the screw of the hinge joint
again, to ensure a secure hold.
Reinsert the fuse or switch the circuit
breaker back on. Your light is now
ready to use.
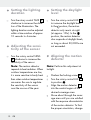
Start-up
Adjusting the
motion detector
Depending on the preadjustments
of the motion detector 7, the spot
1 will switch itself on for a certain
period of time as soon as the motion
detector detects movement. These
preadjustments are made using the
three controllers on the underside
of the motion detector (Fig. B).

10 GB
Setting the lighting
duration
Turn the rotary control TIME 9
clockwise to increase the dura-
tion of the illumination. The
lighting duration can be adjusted
within a time window of approx.
10 seconds to 4 minutes.
Adjusting the sensi-
tivity of the sensor
Turn the rotary control SENS
8 clockwise to increase the
sensitivity of the sensor.
Note: The motion detector
responds to heat radiation. When
outdoor temperatures are low,
it is more sensitive to body heat
than when outdoor temperatures
are warm. Be sure to regulate
the sensitivity of the sensor
over the course of the year.
Setting the daylight
level
Turn the rotary control LUX 10
to increase the daylight level:
In the position, the motion
detector only reacts at night
(at approx. 10 lx). In the
position, the motion detector
also responds at daylight levels,
as long as about 20,000 lx are
not exceeded.
Aligning the motion
detector
Note: Perform this adjustment at
twilight.
Slacken the locking screw 6.
Turn the rotary control LUX 10
to position .
Align the motion detector 7
into the central region of the
desired coverage area.
Move about through the cover-
age area until you are satisfied
with the response characteristics
of the motion detector. To find
the proper orientation, change

11 GB
the position of the rotary control
SENS or the orientation of the
motion detector.
Note: Please note that the
motion detector primarily detects
movements transverse to the
motion detector. If you move
directly towards the motion
detector, it cannot detect this
movement.
When you have aligned the
motion detector satisfactorily,
re-tighten the fastening screws
to fix the adjustment.
Turn the rotary control LUX to
the desired position. These can
be determined during the dawn
or twilight hours during which
the spotlight 1 should respond.
Slowly turn the rotary control
LUX clockwise until it reacts to
movement within the coverage
area.
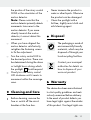
Cleaning and Care
Before cleaning, remove the
fuse or switch off the circuit
breaker at the fuse box.
Never immerse the product in
water or other liquids. Otherwise
the product can be damaged.
Clean the spotlight with a
lint-free, slightly moist cloth and
mild cleaning agent.
Disposal
The packaging is made of
environmentally-friendly
materials, which may be
disposed of through your
local recycling facilities.
Contact your municipal
authorities for details on
how to dispose of your
worn-out product.
Warranty
The device has been manufactured
to strict quality guidelines and meti-
culously examined before delivery.
In the event of product defects you
have legal rights against the retailer
of this product. Your legal rights are

12 GB
not limited in any way by our
warranty detailed below.
The warranty for this device is
3 years from the date of purchase.
Should this device show any fault in
materials or manufacture within
3 years from the date of purchase,
we will repair or replace it – at our
choice – free of charge to you.
The warranty period begins on the
date of purchase. Please keep the
original sales receipt in a safe loca-
tion. This document is required as
your proof of purchase. This
warranty becomes void if the de-
vice has been damaged or impro-
perly used or maintained.
The warranty applies to faults in
material or manufacture. This
warranty does not cover product
parts subject to normal wear, thus
possibly considered consumables
(e.g. batteries) or for damage to fra-
gile parts, e.g. switches, rechargea-
ble batteries or glass parts.

13 PL
Zastosowanie zgodne z
przeznaczeniem ...............................................................Strona 14
Opis części .............................................................................Strona 14
Dane techniczne................................................................Strona 14
Zawartość..............................................................................Strona 15
Ogólne wskazówki bezpieczeństwa ............Strona 15
Przed montażem ..............................................................Strona 16
Montaż .....................................................................................Strona 17
Uruchomienie
Ustawienie czujnika ruchu .........................................................Strona 18
Ustawianie czasu świecenia .....................................................Strona 18
Ustawienie czułości czujnika .....................................................Strona 18
Ustawianie poziomu światła dziennego ..................................Strona 19
Ustawianie czujnika ruchu .........................................................Strona 19
Czyszczenie i pielęgnacja .........................................Strona 20
Utylizacja ...............................................................................Strona 20
Gwarancja ............................................................................Strona 20

14 PL
Zewnętrzny reflektor
ledowy 8,5 W
Zastosowanie zgod-
ne z przeznacze-
niem
Reflektor LED z czujnikiem ruchu jest
przeznaczony do automatycznego
oświetlenia na obszarze zewnętrz-
nym. Urządzenie jest przewidziane
wyłącznie do zastosowania pry-
watnego.
Opis części
1 Spot
2 Skrzynka przyłączeniowa
3 Przepust kablowy
4 Uchwyt montażowy
5 Zawias
6 Śruba ustalająca
(czujnik ruchu)
7 Czujnik ruchu
8 Pokrętło regulacyjne SENS
(czułość)
9 Pokrętło regulacyjne TIME
(czas włączenia)
10 Pokrętło regulacyjne LUX
(światłoczułość)
11 Zacisk
Dane techniczne
Napięcie
robocze: 230 V∼ 50 Hz,
maks. 8,5 W
LED: 12 x LED po
0,5 W (diody
LED nie podle-
gają wymianie)
Przełącznik
zmierzchowy: regulowany ok.
10 lx – 20.000 lx
Czas świecenia: regulowany
ok.10 s–4 min
Klasa ochrony: / II
Rodzaj ochrony: IP44 (ochrona
przed wodą
rozpryskową)
Wymiary
(wys. x szer. x gł.): ok. 197 x 149 x
120 mm
Ciężar: ok. 675 g

15 PL
Zawartość
1 Reflektor LED z czujnikiem
ruchu
2 Kołki (Ø 6 mm)
2 Śruby
1 Instrukcja obsługi i montażu
Ogólne
wskazówki
bezpieczeństwa
Przed pierwszym użyciem produktu
należy zapoznać się ze wszystkimi
wskazówkami dotyczącymi obsługi
i bezpieczeństwa! W przypadku
przekazania produktu innej osobie
należy dołączyć do niego całą
jego dokumentację!
NIEBEZPIECZEŃ-
STWO UTRATY
ŻYCIA LUB
ODNIESIENIA OBRAŻEŃ
PRZEZ DZIECI! Nigdy bez
nadzoru nie należy pozostawiać
dzieci z materiałem opakowa-
niowym. Istnieje niebezpie-
czeństwo uduszenia się
materiałem opakowaniowym.
Dzieci często nie dostrzegają
niebezpieczeństwa. Dzieci nie
powinny mieć dostępu do
produktu.
Niniejsze urządzenie może być
używane przez dzieci od lat
8 oraz przez osoby z obniżo-
nymi zdolnościami fizycznymi,
sensorycznymi lub mentalnymi
lub brakiem doświadczenia i /
lub wiedzy, jeśli pozostają pod
nadzorem lub zostały pouczone
w kwestii bezpiecznego użycia
urządzenia i rozumieją wyni-
kające z niego zagrożenia.
Dzieci nie mogą bawić się
urządzeniem. Czyszczenie i
konserwacja przez użytkownika
nie mogą być bez nadzoru pr-
zeprowadzane przez dzieci.
Zagrożenie życia
przez porażenie prą-
dem elektrycznym
Przed każdym podłączeniem
lampy do sieci upewnić się, że
nie zostało ono w jakikolwiek
sposób uszkodzone. Nie

16 PL
używać lampy w razie stwier-
dzenia jakichkolwiek uszkodzeń.
Przed montażem należy upew-
nić się, że istniejące napięcie
sieci jest zgodne z wymaganym
napięciem roboczym oprawy
oświetleniowej (230 V∼
50 Hz). W przeciwnym razie
nie należy montować lampy.
OSTROŻNIE! NIEBEZPIE-
CZEŃSTWO POPARZE-
NIA! Aby uniknąć oparzenia
należy upewnić się przed do-
tknięciem lampy, że jest ona
wyłączona i ochłodzona przy-
najmniej 15 minut. Źródło
światła wydziela dużo ciepła.
Przeznaczone do instalacji
tylko poza zasięgiem ręki.
Artykuł ten nie zawiera elemen-
tów wymagających konserwacji
przez użytkownika. Diod LED
nie można wymienić.
Reflektora LED należy używać
tylko z wbudowanym statecz-
nikiem LED.
Dopóki produkt podłączony jest
do gniazda wtykowego, po-
biera nieco prądu - nawet jeśli
lampa jest wyłączona. Aby
całkowicie wyłączyć lampę,
przełącznik sieciowy musi być
wyłączony.
Przed montażem
Ważne: Wykonanie podłączenia
elektrycznego należy zlecić wy-
kwalifikowanemu elektrykowi lub
osobie przeszkolonej wzakresie
wykonywania instalacji elektrycznych.
Osoba ta musi posiadać wiedzę
na temat właściwości lampy iprze-
pisów dotyczących podłączania.
Przed instalacją należy upewnić
się, że przewód, do którego
ma być podłączona lampa,
nie znajduje się pod napięciem.
Wtym celu należy wyjąć bez-
piecznik lub wyłączyć wyłącz-
nik nadmiarowoprądowy
wskrzynce bezpiecznikowej
(położenie 0).
Brak napięcia należy stwier-
dzić za pomocą wskaźnika
napięcia.
Dołączony do zestawu mate-
riał montażowy przeznaczony
jest do typowego muru. Należy
się również poinformować, jaki

17 PL
materiał montażowy nadaje
się do wybranego przez Pań-
stwa podłoża do montażu.
Ewentualnie należy zasięgnąć
informacji o tym u profesjonalisty.
Montaż
Podczas wyboru miejsca montażu
należy zwracać uwagę na nastę-
pujące czynniki:
Upewnić się, że spot 1 będzie
oświetlał żądany obszar. Spot
można przesuwać pionowo.
Upewnić się, że czujnik ruchu
7
obejmie zasięgiem żądany
obszar. Obszar wykrywalności
czujnika to maks. 12m przy
kącie wykrywalności ok. 180°
(wzależności od wysokości
zamontowania – idealna
wysokość to 2,50m) (rys. D).
Zwrócić uwagę, aby czujnik
ruchu nie był wnocy oświe-
tlany przez oświetlenie
uliczne. Może to negatywnie
wpływać na jego działanie.
Montaż należy przeprowadzić w
następujący sposób:
Przytrzymać uchwyt monta-
żowy 4 skierowany poziomo
(ew. poziomica) przy ścianie i
zaznaczyć otwory do zamo-
cowania.
Teraz wywiercić otwory do
zamocowania (Ø 6 mm) i
wprowadzić kołki do wywier-
conych otworów (rys. A).
Przymocować uchwyt montażowy
za pomocą dołączonych śrub.
Otworzyć skrzynkę przyłącze-
niową 2 po odkręceniu jej
pokrywy za pomocą wkrętaka
krzyżowego.
Przeprowadzić elastyczny
przewód przez przepust
kablowy 3 w skrzynce przy-
łączeniowej. Unieruchomić
kabel przyłączeniowy poprzez
dokręcenie śruby przepustu
kablowego.
Połączyć go z zaciskami przy-
łączeniowymi w skrzynce przy-
łączeniowej. Uważać przy tym
na oznaczenia na zaciskach 11
(L dla przewodu doprowadza-
jącego napięcie, N dla prze-
wodu neutralnego) (rys. C).
Ponownie zamknąć skrzynkę
przyłączeniową.

18 PL
Wyrównać spot w żądanym
kierunku. Przy tym należy ew.
nieco poluzować śrubę za-
wiasu 5. Po wyrównaniu
ponownie zaciągnąć śrubę
zawiasu, aby zapewnić bez-
pieczną podporę.
Ponownie nałożyć zabezpieczenie
lub ponownie uruchomić włącznik
instalacyjny. Lampa jest gotowa do
zastosowania.
Uruchomienie
Ustawienie
czujnika ruchu
W zależności od wstępnych usta-
wień czujnika ruchu 7 spot 1
włącza się na pewien czas, gdy
tylko czujnik wykryje ruch. Te
ustawienia przeprowadzane są na
trzech regulatorach na dolnej
stronie czujnika ruchu (rys. B).
Ustawianie czasu
świecenia
Obrócić pokrętło regulacyjne
TIME 9 w kierunku ruchu
wskazówek zegara, aby wy-
dłużyć czas świecenia. Czas
świecenia można ustawić w
przedziale od ok. 10 sekund
do 4 minut.
Ustawienie czułości
czujnika
Proszę przekręcić pokrętło
SENS 8 w kierunku ruchu
wskazówek zegara, aby
zwiększyć czułość czujnika.
Wskazówka: Czujnik ruchu
wykrywa promieniowanie
cieplne. Przy niskiej temperatu-
rze otoczenia jego czułość na
ciepło ciała jest większa niż
przy wysokiej temperaturze
otoczenia. Należy pamiętać
oewentualnej regulacji czuło-
ści czujnika w zależności od
pory roku.

19 PL
Ustawianie
poziomu światła
dziennego
Przekręcić pokrętło LUX 10 w
kierunku ruchu wskazówek
zega, aby zwiększyć poziom
światła dziennego: w tej pozy-
cji czujnik ruchu reaguje
tylko w nocy (przy ok. 10 lx).
Wpołożeniu czujnik ruchu
reaguje także przy świetle
dziennym, jeżeli jego natęże-
nie nie przekracza 20 000 lx.
Ustawianie
czujnika ruchu
Wskazówka: Ustawienie to
powinno się przeprowadzać w
czasie zmierzchu.
Odkręcić śrubę ustalającą 6.
Przekręcić pokrętło regula-
cyjne LUX 10 na pozycję .
Skierować czujnik ruchu 7
do środka żądanego obszaru
wykrywalności.
Poruszać się w obszarze wy-
krywalności, aż sposób reakcji
czujnika ruchu będzie zado-
walający. W tym celu zmienić
położenie pokrętła regulacyj-
nego SENS lub kierunek
czujnika ruchu.
Wskazówka: Uważać na
to, aby czujnik ruchu wykrywał
głównie ruch przebiegający w
poprzek do czujnika ruchu.
Jeśli będziesz się pouszało w
kierunku prostym do czujnika
ruchu, może on nie wykryć
tego ruchu.
Po zadowalającym ustawieniu
czujnika ruchu ponownie za-
ciągnąć śrubę ustalającą, aby
zachować ustawienia.
Obrócić pokrętło regulacyjne
LUX w żądane położenie.
Położenie pokrętła ustalić w
czasie zapadania mroku, wy-
bierając moment, w którym
spot 1 ma zostać włączony.
Powoli obracać pokrętło regu-
lacyjne LUX w kierunku ruchu
wskazówek zegara, aż za-
cznie reagować na ruch w
obszarze wykrywalności.

20 PL
Czyszczenie i
pielęgnacja
Przed rozpoczęciem czyszcze-
nia wyjąć bezpiecznik lub wy-
łączyć włącznik instalacyjny.
Produktu nie zanurzać nigdy w
wodzie ani w innej cieczy. W
przeciwnym razie produkt
może zostać uszkodzony.
Lampę czyścić lekko zwilżoną,
niestrzępiącą się ściereczką i
łagodnym środkiem czyszczącym.
Utylizacja
Opakowanie wykonane
jest zmateriałów przy-
jaznych dla środowiska,
które można przekazać
do utylizacji wlokalnym
punkcie przetwarzania
surowców wtórnych.
O możliwościach
usuwania do odpadów
wysłużonych mebli do-
wiesz się wzarządzie
gminy lub miasta.
Gwarancja
Urządzenie wyprodukowano we-
dług wysokich standardów jakości
i poddano skrupulatnej kontroli pr-
zed wysyłką. W przypadku wad
produktu nabywcy przysługują us-
tawowe prawa. Gwarancja nie
ogranicza ustawowych praw nab-
ywcy urządzenia.
Szanowny kliencie, uzyskują
Państwo na niniejsze urządzenie
3 lata gwarancji od daty zakupu.
Gwarancja wygasa w razie zawi-
nionego przez użytkownika uszko-
dzenia produktu, niewłaściwego
użycia lub konserwacji.
W przypadku wystąpienia w ciągu
3 lat od daty zakupu wad mate-
riałowych lub fabrycznych, doko-
nujemy – według własnej oceny
– bezpłatnej naprawy lub wy-
miany urządzenia.
Świadczenie gwarancyjne obej-
muje wady materiałowe i fa-
bryczne. Gwarancja nie obejmuje
części produktu ulegających nor-
malnemu zużyciu, uznawanych za
Strona się ładuje...
Strona się ładuje...
Strona się ładuje...
Strona się ładuje...
Strona się ładuje...
Strona się ładuje...
Strona się ładuje...
Strona się ładuje...
Strona się ładuje...
Strona się ładuje...
Strona się ładuje...
Strona się ładuje...
Strona się ładuje...
Strona się ładuje...
Strona się ładuje...
Strona się ładuje...
Strona się ładuje...
Strona się ładuje...
Strona się ładuje...
Strona się ładuje...
Strona się ładuje...
Strona się ładuje...
Strona się ładuje...
Strona się ładuje...
Strona się ładuje...
Strona się ładuje...
Strona się ładuje...
Strona się ładuje...
Strona się ładuje...
Strona się ładuje...
Strona się ładuje...
Strona się ładuje...
Strona się ładuje...
Strona się ładuje...
Strona się ładuje...
Strona się ładuje...
Strona się ładuje...
Strona się ładuje...
Strona się ładuje...
Strona się ładuje...
Strona się ładuje...
Strona się ładuje...
Strona się ładuje...
Strona się ładuje...
-
 1
1
-
 2
2
-
 3
3
-
 4
4
-
 5
5
-
 6
6
-
 7
7
-
 8
8
-
 9
9
-
 10
10
-
 11
11
-
 12
12
-
 13
13
-
 14
14
-
 15
15
-
 16
16
-
 17
17
-
 18
18
-
 19
19
-
 20
20
-
 21
21
-
 22
22
-
 23
23
-
 24
24
-
 25
25
-
 26
26
-
 27
27
-
 28
28
-
 29
29
-
 30
30
-
 31
31
-
 32
32
-
 33
33
-
 34
34
-
 35
35
-
 36
36
-
 37
37
-
 38
38
-
 39
39
-
 40
40
-
 41
41
-
 42
42
-
 43
43
-
 44
44
-
 45
45
-
 46
46
-
 47
47
-
 48
48
-
 49
49
-
 50
50
-
 51
51
-
 52
52
-
 53
53
-
 54
54
-
 55
55
-
 56
56
-
 57
57
-
 58
58
-
 59
59
-
 60
60
-
 61
61
-
 62
62
-
 63
63
-
 64
64


w innych językach
- Deutsch: LIVARNO 270250 Bedienungsanleitung
- slovenčina: LIVARNO 270250 Návod na obsluhu
Powiązane artykuły
-
LIVARNO 113227 Instrukcja obsługi
-
-
-
-
-
-
-
-
-