Pro Breeze PB-F20W-UK-FBA Instrukcja obsługi
- Typ
- Instrukcja obsługi

Instruction Manual
Bedienungsanleitung
Mode d’emploi
Manuale di istruzioni
Manual de instrucciones
Handleiding
Instrukcja obsługi
Bruksanvisning
Model PB-F20W
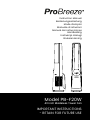
40 Inch Bladeless Tower Fan
IMPORTANT INSTRUCTIONS
- RETAIN FOR FUTURE USE

2 of 92 | English
CONTENTS
Safety Instructions................................................. Page 3
Batteries ....................................................................Page 5
Specication ............................................................Page 6
Symbols Explained ................................................ Page 7
Parts ............................................................................ Page 7
Operating Instructions .........................................Page 8
Additional Safety Features ................................ Page 10
Troubleshooting .....................................................Page 11
Cleaning ....................................................................Page 11
Storage .....................................................................Page 12
Recycling and Disposal ...................................... Page 12
Deutsch ..................................................................... Page 13
Français ...................................................................Page 25
Italiano .....................................................................Page 36
Español ....................................................................Page 48
Nederland ...............................................................Page 59
Svenska ...................................................................Page 70
Polskie .......................................................................Page 81
EN
DE
FR
IT
ES
NL
SV
PL

English | 3 of 92
40 INCH BLADELESS TOWER FAN
MODEL PB-F20W
Thank you for choosing to purchase a product from Pro Breeze. Please read the entire manual carefully
prior to rst use and keep in a safe place for future reference.
SAFETY INSTRUCTIONS
――
PLEASE READ AND SAVE THESE IMPORTANT SAFETY
INSTRUCTIONS.
When using electrical appliances, basic safety precautions
should always be followed to reduce the risk of re, electric
shock, and injury to persons, including the following:
WARNING: TO AVOID THE RISK OF ELECTRICAL SHOCK, FIRE
OR INJURY TO PEOPLE, ALWAYS MAKE SURE THE APPLIANCE
IS UNPLUGGED FROM THE ELECTRICAL OUTLET BEFORE
RELOCATING, SERVICING, OR CLEANING IT.
• Use this appliance only as described in this manual. Any
other use not recommended by the manufacturer may
cause re, electric shock, or injury to person.
• Do not cover the appliance whilst in use.
• Always unplug the appliance when not in use.
• Keep the appliance out of reach of children and pets.
• Do not leave children alone or unattended in the area
where the appliance is in use.
• Children must be supervised not to play with the
appliance.
• Cleaning and user maintenance shall not be made by
children unless continuously supervised.
• The appliance is not to be used by persons (including
children) with reduced physical, sensory, or mental
capabilities, or lack of experience and knowledge unless
they have been given supervision or instruction.
• The appliance must have a minimum 50cm clearance
around all sides of the appliance. Take care that curtains

4 of 92 | English
or other objects are not sucked into the fan during
operation.
• Never leave the appliance unattended while in use.
Always turn the appliance off and disconnected from the
power supply when not in use.
• Avoid placing the power cord in areas where it can
become a tripping hazard. Do not place the power cord
under carpeting or cover it with rugs, runners, or similar.
• Place the appliance on a at, stable and dry surface and
always keep the appliance in an upright position.
• Never place anything on top of the appliance.
• Ensure that the mains supply (including voltage,
frequency and power) complies with the rating label of
the appliance.
• There may be a trace of odour during the rst few
minutes of initial use. This is normal and will quickly
disappear.
• Do not cover the appliance or restrict the airow of the
inlet or exhaust grills whilst in use.
• Do not use this appliance to dry clothes.
• Do not use the appliance in high humidity or steam lled
rooms.
• Do not operate the appliance with wet hands.
• Do not use this appliance near water or in the immediate
surroundings of a bath, shower or a swimming pool.
Never place the appliance where it may fall into a
bathtub or other water container.
• Do not allow water or other liquids to run into the interior
of the appliance, as this could create a re and/or
electrical hazard.
• This appliance is intended for indoor household use and
similar applications. Do not use outdoors.
• Do not use the appliance while sleeping or place it near a
person who is sleeping.
• Do not use the appliance near petrol, paints, ammable
gases, ovens, or other heating sources.

English | 5 of 92
• The mains cable should not hang down from the surface
on which the appliance is placed in order to prevent the
appliance from being pulled down.
• To avoid a circuit overload when using this appliance,
do not operate another high-wattage appliance on the
same electrical circuit.
• Always plug the appliance directly into a wall socket.
Avoid using extension leads where possible as they may
overheat and cause a risk of re.
• Do not use this appliance with an external programmer,
timer switch or any other device which would switch the
appliance on automatically unless this has already been
pre-built into the appliance by the manufacturer.
• Do not pull on the power cord. Never move, carry, or hang
the appliance by the power cord.
• Do not kink or wrap the power cord and plug around the
appliance, as this may cause the insulation to weaken or
split, particularly where it enters the appliance.
• Do not operate the appliance with any safety guards
removed.
• Do not operate the appliance if there are signs of
damage to the appliance, power cord, or any of the
accessories supplied. If the supply cord is damaged, it
must be replaced by the manufacturer, its service agent
or a similarly qualied person in order to avoid a hazard.
• Do not attempt to repair or adjust any electrical or
mechanical elements in the appliance. Doing so may be
unsafe and will void your warranty.
BATTERIES
――
This product is supplied with 2 x AAA disposable batteries.
PLEASE READ AND SAVE THESE IMPORTANT SAFETY
INSTRUCTIONS.

6 of 92 | English
BATTERY WARNING: KEEP OUT OF REACH OF CHILDREN.
Choking hazard. Do not swallow. Harmful if swallowed.
Swallowing can lead to chemical burns, perforation of soft
tissue, and death. Severe burns can occur within 2 hours of
ingestion. If you think batteries might have been swallowed
or placed inside any part of the body, seek immediate
medical attention.
•This product only uses a AAA battery. It is not compatible
with other battery types.
•Do not allow children to handle batteries.
•If the battery compartment does not close securely, stop
using the product and keep it away from children.
•Ensure that the battery is installed with the correct
polarity (+ and –).
•Remove exhausted battery promptly.
•Always inspect new batteries before use. Damaged or
weak batteries may leak acid. Discontinue use if batteries
show signs of leakage, damage, or weakness at any time.
•Ensure the battery compartment is correctly and
securely closed after installing the batteries.
•Wash hands after handling batteries.
•Disposable batteries are not rechargeable and must
be recycled or disposed of separately from household
waste. Always dispose of batteries at an ofcial collection
point and according to your local environmental laws
and guidelines.
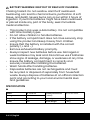
SPECIFICATION
――
Model: PB-F20W-EU Product Dimensions
(LxWxH):
24 x 20.5 x 101cm
Voltage: 220-240V~
Frequency: 50/60Hz Net Weight: 5.54kg
Power: 33W Gross Weight: 9.36kg

English | 7 of 92
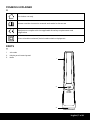
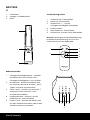
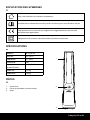
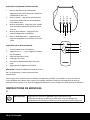
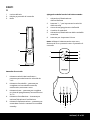
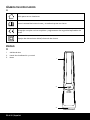
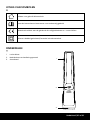
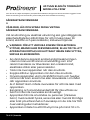
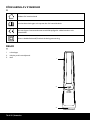
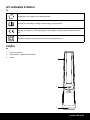
PARTS
――
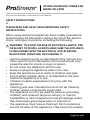
1. Air outlet
2. Display and Control panel
3. Base
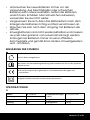
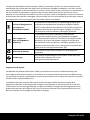
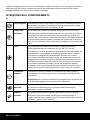
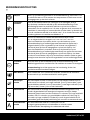
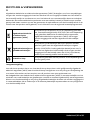
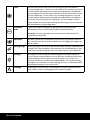
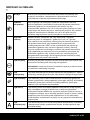
SYMBOLS EXPLAINED
――
For indoor use only
Please read the instruction manual and retain for future use
Equipment complies with the applicable EU safety requirements and
regulations
Class II Double Insulated / Reinforced Insulation Equipment
1
2
3

8 of 92 | English
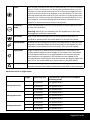
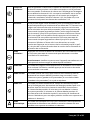
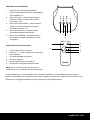
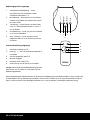
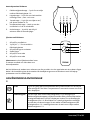
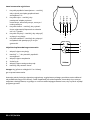
Control Panel Explained
1. Fan Speed Button – Press to choose
between fan speeds 1-6
2. Mode Button - Press to toggle between
natural, auto, night, and max modes
3. Timer Button – Press to choose a turn-
off/on timer between 1h-7h
4. Oscillate Button – Press to turn on / off
the oscillation
5. Power Button – Press to turn the unit on
or into standby mode
Remote Control Explained
1. Turn on/off oscillation
2. Press "+, -" to set the wind speed
3. Turn unit on/off
4. Change mode
5. Turn on/off the max mode
6. Press to set the timer
Note: Use the remote within a 5m distance
and point it at the control panel.
1 3
5
2 4
1 3
4
5
6
2
These images are for reference only, please refer to your product. If you nd you’re missing any
parts from your order, please contact our customer care team by emailing [email protected]
for fast and friendly help.
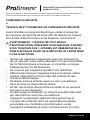
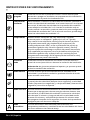
OPERATING INSTRUCTIONS
――
On/Off Press once on your control panel or remote to turn your fan on or
off. The temperature of the room will display in the led display panel.
Fan Speed To turn the fan speed up or down, either press the fan speed button
on the remote or on the control panel. The speed indicator on the
led display will change to reect the speed from 1-6. When the fan
is in natural, or auto mode press this button to set the fan speed
from speeds 1-6. In night mode you will be able to choose from fan
speeds 1-3.

English | 9 of 92
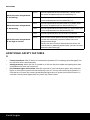
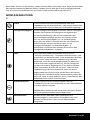
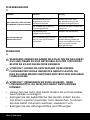
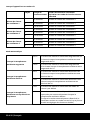
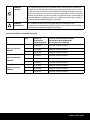
When the unit is on night mode
Stages Operating time Equivalent fan speed level to standard
operating mode
Fan Speed Level 1
1 30 minutes Fan speed level 4
2 30 minutes Fan speed level 3
3 Continuous Fan speed level 1
Fan Speed Level 2
1 30 minutes Fan speed level 5
2 30 minutes Fan speed level 4
3 Continuous Fan speed level 2
Fan Speed Level 3
1 30 minutes Fan speed level 6
2 30 minutes Fan speed level 5
3 Continuous Fan speed level 3
Timer
You can set your fan to turn off/on automatically in 1-hour increments
from 1-7 hours. To set a turn-on timer press the timer button on your
remote or control panel when the unit is off (but still plugged into the
mains) until the correct time displays on the led display. To set a turn-
off timer press the timer button on your remote or control panel when
the unit is on until the correct time displays on the led display. To turn
this mode off, continue pressing the timer button until there are no
lights lit on the timer section of the control panel.
Oscillation
Mode
Press oscillate button once on your remote or control panel to start
or stop fan oscillation.
Warning: Please do not manually turn the appliance as this may
damage the oscillation mechanics.
Max Mode Max mode automatically puts the fan at speed 6 and turns on
oscillation, please press the mode button to access this mode.
Natural Mode Natural mode is designed to mimic the natural ow of wind and will
transition from high speed (for ve seconds) to mid speed (for ve
seconds), to low speed (for ve seconds). This cycle will repeat.
Night Mode Night mode slowly reduces the fan speed until it switches to the
lowest speed setting to save energy as you sleep. Once activated,
the fan speed will function on high speed for 30 minutes and will
then reduce to mid speed for 30 minutes and low speed for 30
minutes before switching off. After 60 seconds, the display lights will
turn off for an undisturbed rest. Please refer to the table below.
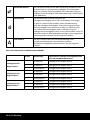
Auto Mode
Auto mode is designed to maintain an ambient temperature and will
transition between fan speeds. Please refer to the table on the next page.

10 of 92 | English
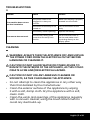
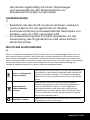
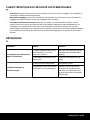
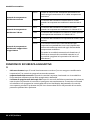
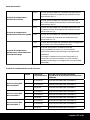
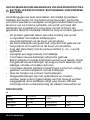
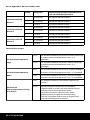
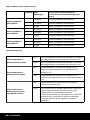
Auto Mode
When the room temperature
is increasing
≥30°C The fan speed level will increase by 2 levels when
the room temperature has increased by 1°C.
<30°C The fan speed level will increase by 1 level when the
room temperature has increased by 1°C.
When the room temperature
is decreasing
≥31°C The fan speed level will decrease by 2 levels when
the room temperature has decreased by 1°C.
<31°C The fan speed level will decrease by 1 level when the
room temperature has decreased by 1°C.
When the room temperature
is too high or too low
<10°C The fan speed level is set at Level 1 by default.
≥40°C Auto mode will be deactivated by default and will
not be automatically resumed when the room
temperature drops.
(When the auto mode is deactivated, the fan will
switch back to natural mode where you can choose
desired speed settings.)
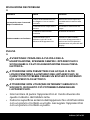
ADDITIONAL SAFETY FEATURES
――
•Forced shutdown: After 15 hours of continuous operation (if no settings are changed), the
fan will shut down automatically.
•Setting memory: When the fan is turned on it will run with the mode and setting that was
used before the unit was turned off.
•LED indicator lights off function: After 60 seconds of your last button press, any indicator
lights on the control panel will automatically turn off. the fan will continue to operate. To
turn the fan off when the control panel display lights are off, press the ON/OFF button. To
turn the control panel lights back on, press any other button.

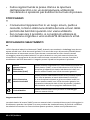
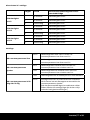
English | 11 of 92
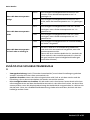
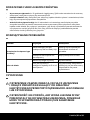
Problem Cause Solution
The machine does not turn
on after installation
The power cable is not
plugged in or has poor
contact.
Make sure the plug is properly
inserted into the socket.
The switch on the body is not
turned on.
Turn on the switch on the
body.
The remote does not work
The battery needs replacing. Replace the battery.
The remote is being used
more than 5m away from
the fan.
Use the remote closer to
the fan and make sure it
is pointing directly at the
display panel.
TROUBLESHOOTING
――
CLEANING
――
WARNING: ALWAYS TURN THE APPLIANCE OFF AND UNPLUG
THE POWER CORD FROM THE ELECTRICAL OUTLET BEFORE
HANDLING OR CLEANING IT.
CAUTION: DO NOT ALLOW WATER OR OTHER LIQUIDS TO
RUN INTO THE INTERIOR OF THE APPLIANCE, AS THIS COULD
CREATE A FIRE AND/OR ELECTRICAL HAZARD.
CAUTION: DO NOT USE ANY ABRASIVE CLEANERS OR
SOLVENTS, AS THIS CAN DAMAGE THE APPLIANCE.
• Do not attempt to clean the appliance in any other way
than that detailed by the manufacturer.
• Clean the exterior surface of the appliance by wiping
it with a soft, damp cloth. Dry the appliance with a soft,
clean cloth.
• Clean the vents and openings of the appliance regularly
with a vacuum cleaner, using the brush attachment to
avoid any dust build-up.

12 of 92 | English
STORAGE
――
• Store the appliance in a safe, clean, and dry place, away
from direct sunlight and out of reach of children when
not in use.
• To store your product, we recommend using the original
or a similar-sized box.
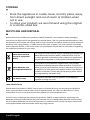
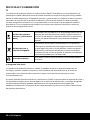
RECYCLING AND DISPOSAL
――
Waste electrical and electronic products (WEEE), batteries, accumulators and packaging
should not be disposed of with general household waste. This is to prevent possible harm to the
environment and human well-being, and to help conserve our natural resources. Most electrical
products with a plug, battery, or cable can be recycled. Contact your local council, household
waste disposal service, or the store where you purchased the product for information regarding
the collection schemes in your area.
Take-Back Scheme
Waste electrical products (WEEE) can be sent to One Retail Group for recycling and disposal
when you purchase a new product from One Retail Group, on a like-for-like basis. For more
information on how to recycle this product please visit www.probreeze.com
The end-user of electrical and electronic products (WEEE) is responsible for separating old
batteries and lamp bulbs before they are handed over to a designated disposal and recycling
service. Waste batteries can also be disposed of in collection bins, which can be found in most
local supermarkets and household waste recycling centres.
Waste Electrical and
Electronic Equipment
(WEEE)
This symbol on the product and/or packaging indicates that
Waste Electrical products (WEEE) under Directive 2012/19/
EU which governs used electrical and electronic appliances,
should not be disposed of with general household waste.
Waste Batteries and
Rechargeable Batteries
This symbol on the batteries supplied with your product
indicates that Waste Batteries under Directive 2006/66/EC
which governs used batteries and accumulators should not
be disposed of with general household waste. If the battery
contains more than 0.004% lead, the battery symbol will be
accompanied by the letters (PB).
The Mobius Loop This symbol indicates that the product or packaging is
capable of being recycled.

Deutsch | 13 of 92
40-ZOLL-BLATTLOSER TURMVENTILATOR
MODELL PB-F20W
Vielen Dank, dass Sie sich für den Kauf eines Produkts von Pro Breeze entschieden haben. Bitte lesen
Sie das gesamte Handbuch vor der ersten Nutzung sorgfältig durch und bewahren Sie es für später an
einem sicheren Ort auf.
SICHERHEITSHINWEISE
――
BITTE LESEN UND BEWAHREN SIE DIESE WICHTIGEN
SICHERHEITSHINWEISE AUF.
Bei der Verwendung von Elektrogeräten sollten stets
grundlegende Sicherheitsvorkehrungen getroffen werden,
um das Risiko von Feuer, Stromschlag und Verletzungen zu
verringern, einschließlich der folgenden:
WARNUNG : UM DIE GEFAHR EINES STROMSCHLAGS,
FEUERS ODER PERSONENSCHADENS ZU VERMEIDEN,
STELLEN SIE IMMER SICHER, DASS DIE DAS GERÄT VOM
STROMNETZ GETRENNT WIRD, BEVOR ES AN EINEN
ANDEREN ORT GEBRACHT, GEWARTET ODER GEREINIGT
WIRD.
• Verwenden Sie dieses Gerät nur wie in dieser Anleitung
beschrieben. Jede andere Verwendung, die nicht vom
Hersteller empfohlen wird, kann Brände, Stromschläge
oder Personenschäden verursachen.
• Decken Sie das Gerät während des Gebrauchs nicht ab.
• Trennen Sie das Gerät immer vom Stromnetz , wenn es
nicht verwendet wird.
• Bewahren Sie das Gerät außerhalb der Reichweite von
Kindern und Haustieren auf.
• Lassen Sie Kinder nicht allein oder unbeaufsichtigt im
Bereich, in dem das Gerät verwendet wird.
• Kinder müssen beaufsichtigt werden, damit sie nicht mit
dem Gerät spielen .
• Reinigung und Benutzerwartung dürfen nicht von Kindern

14 of 92 | Deutsch
durchgeführt werden, es sei denn, sie werden ständig
beaufsichtigt.
• Das Gerät darf nicht von Personen (einschließlich
Kindern) mit eingeschränkten körperlichen, sensorischen
oder geistigen Fähigkeiten oder mangels Erfahrung
und Wissen benutzt werden, es sei denn, sie werden
beaufsichtigt oder unterwiesen.
• Das Gerät muss an allen Seiten des Geräts einen
Mindestabstand von 50 cm aufweisen . Achten Sie
darauf, dass während des Betriebs keine Gardinen oder
andere Gegenstände in den Ventilator gesaugt werden.
• Verlassen Sie niemals das Gerät während des Gebrauchs
unbeaufsichtigt. Drehen Sie immer die Gerät ausschalten
und von der Stromversorgung trennen, wenn es nicht
benutzt wird.
• Verlegen Sie das Netzkabel nicht an Orten, an denen es
zur Stolperfalle werden kann. Legen Sie das Netzkabel
nicht unter einen Teppichboden und bedecken Sie es
nicht mit Teppichen, Läufern oder ähnlichem.
• Stellen Sie das Gerät auf eine ebene, stabile und trockene
Oberäche und halten Sie das Gerät immer aufrecht.
• Stellen Sie niemals etwas auf das Gerät.
• Stellen Sie sicher, dass die Netzversorgung (einschließlich
Spannung, Frequenz und Leistung) mit dem Typenschild
des Geräts übereinstimmt .
• In den ersten Minuten des ersten Gebrauchs kann
es zu Geruchsspuren kommen. Dies ist normal und
verschwindet schnell.
• Decken Sie das Gerät während des Betriebs nicht ab
und schränken Sie den Luftstrom der Einlass- oder
Auslassgitter nicht ein.
• Verwenden Sie dieses Gerät nicht zum Trocknen von
Kleidung.
• Verwenden Sie das Gerät nicht in Räumen mit hoher
Luftfeuchtigkeit oder Dampf.
• Bedienen Sie das Gerät nicht mit nassen Händen.

Deutsch | 15 of 92
• Verwenden Sie dieses Gerät nicht in der Nähe von
Wasser oder in unmittelbarer Nähe einer Badewanne,
Dusche oder eines Schwimmbeckens. Stellen Sie niemals
die Gerät , wo es in eine Badewanne oder einen anderen
Wasserbehälter fallen könnte.
• Lassen Sie kein Wasser oder andere Flüssigkeiten in das
Innere des Geräts laufen , da dies zu einem Brand und/
oder elektrischen Gefahren führen kann.
• Dieses Gerät ist für den Hausgebrauch in Innenräumen
und ähnliche Anwendungen vorgesehen. Nicht im Freien
verwenden.
• Verwenden Sie das Gerät nicht im Schlaf und stellen Sie
es nicht in die Nähe einer schlafenden Person.
• Verwenden Sie das Gerät nicht in der Nähe von
Benzin, Farben, brennbaren Gasen, Öfen oder anderen
Wärmequellen.
• Das Netzkabel darf nicht von der Aufstelläche
herunterhängen, um ein Herunterziehen des Gerätes zu
vermeiden.
• Um eine Überlastung des Stromkreises bei Verwendung
dieses Geräts zu vermeiden, betreiben Sie kein anderes
Gerät mit hoher Wattleistung am selben Stromkreis.
• Schließen Sie das Gerät immer direkt an eine
Wandsteckdose an. Vermeiden Sie nach Möglichkeit
die Verwendung von Verlängerungskabeln, da diese
überhitzen und ein Brandrisiko darstellen können.
• Verwenden Sie dieses Gerät nicht mit einem externen
Programmierer, Zeitschalter oder anderen Geräten,
die das Gerät automatisch einschalten würden, es sei
denn, diese wurden bereits vom Hersteller in das Gerät
eingebaut.
• Ziehen Sie nicht am Netzkabel. Bewegen, tragen oder
hängen Sie das Gerät niemals am Netzkabel.
• Knicken oder wickeln Sie das Netzkabel und den
Stecker nicht um das Gerät, da dies dazu führen kann,
dass die Isolierung geschwächt oder gespalten wird,

16 of 92 | Deutsch
insbesondere dort, wo sie in das Gerät eintritt.
• Betreiben Sie das Gerät nicht mit entfernten
Schutzvorrichtungen.
• Betreiben Sie das Gerät nicht, wenn das Gerät oder das
mitgelieferte Zubehör Anzeichen von Schäden aufweisen.
• Versuchen Sie nicht, elektrische oder mechanische
Elemente im Gerät zu reparieren oder einzustellen .
Dies kann unsicher sein und führt zum Erlöschen Ihrer
Garantie.
BATTERIEN
――
Dieses Produkt wird mit 2 x AAA-Einwegbatterien geliefert.
BITTE LESEN UND BEWAHREN SIE DIESE WICHTIGEN
SICHERHEITSHINWEISE AUF.
BATTERIEWARNUNG: AUSSERHALB DER REICHWEITE VON
KINDERN AUFBEWAHREN.
Erstickungsgefahr. Nicht schlucken. Schädlich bei
Verschlucken. Das Verschlucken kann zu Verätzungen,
Perforation des Weichgewebes und zum Tod führen.
Innerhalb von 2 Stunden nach der Einnahme können
schwere Verbrennungen auftreten. Wenn Sie vermuten,
dass Batterien verschluckt oder in ein Körperteil eingeführt
wurden, suchen Sie unverzüglich einen Arzt auf.
• Dieses Produkt verwendet nur eine AAA-Batterie. Es ist
nicht mit anderen Batterietypen kompatibel.
• Lassen Sie Kinder nicht mit Batterien hantieren.
• Wenn das Batteriefach nicht sicher schließt, verwenden
Sie das Produkt nicht mehr und halten Sie es von Kindern
fern.
• Stellen Sie sicher, dass die Batterie mit der richtigen
Polarität (+ und –) installiert ist.
• Erschöpfte Batterie umgehend entfernen.

Deutsch | 17 of 92
• Untersuchen Sie neue Batterien immer vor der
Verwendung. Aus beschädigten oder schwachen
Batterien kann Säure austreten. Sollten die Batterien
undicht sein, Schäden oder Schwächen aufweisen,
verwenden Sie sie nicht weiter.
• Vergewissern Sie sich, dass das Batteriefach nach dem
Einlegen der Batterien richtig und fest verschlossen ist.
• Waschen Sie sich nach dem Umgang mit Batterien die
Hände.
• Einwegbatterien sind nicht wiederauadbar und müssen
recycelt oder getrennt vom Hausmüll entsorgt werden.
Entsorgen Sie Batterien immer an einer ofziellen
Sammelstelle und gemäß Ihren lokalen Umweltgesetzen
und -richtlinien.
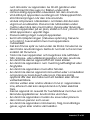
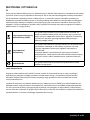
ERKLÄRUNG DER SYMBOLE
――
Nur für den Innengebrauch
Bitte lesen Sie die Bedienungsanleitung und bewahren Sie sie für den späteren
Gebrauch auf
Das Gerät entspricht den geltenden EU-Sicherheitsanforderungen und
-vorschriften
Doppelt isolierte/verstärkt isolierte Geräte der Klasse II
SPEZIFIKATIONEN
――
Modell: PB-F20W-EU Produktabmessungen
(LxBxH):
24 x 20,5 x 101 cm
Spannung: 220-240 V ~
Frequenz: 50/60 Hz Reingewicht: 5,54 kg
Leistung: 33W Bruttogewicht: 9,36 kg

18 of 92 | Deutsch
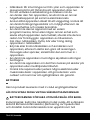
BAUTEILE
――
1. Luftauslass
2. Anzeige- und Bedienfeld
3. Basis
1 3
5
2 4
1 3
4
5
6
2
Bedienfeld erklärt
1. Lüftergeschwindigkeitstaste – Drücken
Sie diese Taste, um zwischen den
Lüftergeschwindigkeiten 1-6 zu wählen
2. Modustaste - Drücken Sie diese Taste,
um zwischen den Modi „Natural“, „Auto“,
„Night“ und „Max“ umzuschalten
3. Timer-Taste – Drücken, um einen Ein-/
Ausschalt-Timer zwischen 1 und 7
Stunden auszuwählen
4. Oszillationstaste – Drücken, um die
Oszillation ein-/auszuschalten
5. Power-Taste – Drücken Sie diese Taste,
um das Gerät einzuschalten oder in den
Standby-Modus zu versetzen
Fernbedienung erklärt
1. Oszillation ein-/ausschalten
2. Gerät ein-/ausschalten
3. Drücken Sie "+,-", um die
Lüftergeschwindigkeit einzustellen
4. Modus ändern
5. Max. Modus ein-/ausschalten
6. Drücken Sie , um den Timer einzustellen
Hinweis: Verwenden Sie die Fernbedienung
innerhalb einer Entfernung von 5 m und
richten Sie sie auf das Bedienfeld.
1
2
3

Deutsch | 19 of 92
Diese Bilder dienen nur als Referenz, sehen Sie bitte direkt am Produkt nach. Wenn Sie feststellen,
dass bei Ihrer Bestellung Bauteile fehlen, wenden Sie sich bitte per E-Mail an help@probreeze.
com an unser Kundendienstteam, wo Ihnen schnell und freundlich geholfen wird.
MONTAGEANLEITUNG
――
An aus Drücken Sie einmal auf Ihrem Bedienfeld oder Ihrer
Fernbedienung, um Ihren Lüfter ein- oder auszuschalten. Die
Raumtemperatur wird auf dem LED-Anzeigefeld angezeigt.
Lüftergeschwindigkeit Um die Lüftergeschwindigkeit zu erhöhen oder zu verringern,
drücken Sie entweder die Lüftergeschwindigkeitstaste
auf der Fernbedienung oder auf dem Bedienfeld. Die
Geschwindigkeitsanzeige auf dem LED-Display ändert
sich, um die Geschwindigkeit von 1-6 wiederzugeben.
Wenn sich der Lüfter im natürlichen oder automatischen
Modus bendet, drücken Sie diese Taste, um die
Lüftergeschwindigkeit von Geschwindigkeit 1-6
einzustellen. Im Nachtmodus können Sie zwischen den
Lüftergeschwindigkeiten 1-3 wählen.
Timer Sie können Ihren Lüfter so einstellen, dass er sich in
1-Stunden-Schritten von 1-7 Stunden automatisch ein- und
ausschaltet. Um einen Einschalt-Timer einzustellen, drücken
Sie die Timer-Taste auf Ihrer Fernbedienung oder dem
Bedienfeld, wenn das Gerät ausgeschaltet ist (aber noch
an das Stromnetz angeschlossen ist), bis die richtige Zeit
auf dem LED-Display angezeigt wird. Um einen Ausschalt-
Timer einzustellen, drücken Sie die Timer-Taste auf Ihrer
Fernbedienung oder dem Bedienfeld, wenn das Gerät
eingeschaltet ist, bis die richtige Zeit auf dem LED-Display
angezeigt wird. Um diesen Modus auszuschalten, halten Sie
die Timer-Taste so lange gedrückt, bis im Timer-Bereich des
Bedienfelds keine Lichter mehr leuchten.
Oszillationsmodus Drücken Sie einmal die Oszillationstaste auf Ihrer
Fernbedienung oder dem Bedienfeld, um die Lüfteroszillation
zu starten oder zu stoppen.
Vorsicht: Bitte drehen Sie das Gerät nicht von Hand, da dies
die Schwingungsmechanik beschädigen kann.
Maximalmodus Der Max-Modus stellt den Lüfter automatisch auf
Geschwindigkeit 6 und schaltet die Oszillation ein, bitte
drücken Sie die Modus-Taste, um auf diesen Modus
zuzugreifen.

20 of 92 | Deutsch
Wenn sich das Gerät im Nachtmodus bendet
Stufen Betriebszeit Äquivalente Lüftergeschwindigkeitsstufe
zum Standardbetriebsmodus
Lüftergeschwin-
digkeit Stufe 1
1 30 Minuten Lüftergeschwindigkeit Stufe 4
2 30 Minuten Lüftergeschwindigkeit Stufe 3
3 Kontinuierlich Lüftergeschwindigkeit Stufe 1
Lüftergeschwin-
digkeit Stufe 2
1 30 Minuten Lüftergeschwindigkeit Stufe 5
2 30 Minuten Lüftergeschwindigkeit Stufe 4
3 Kontinuierlich Lüftergeschwindigkeit Stufe 2
Lüftergeschwin-
digkeit Stufe 3
1 30 Minuten Lüftergeschwindigkeit Stufe 6
2 30 Minuten Lüftergeschwindigkeit Stufe 5
3 Kontinuierlich Lüftergeschwindigkeit Stufe 3
Natürlicher Modus Der natürliche Modus ahmt den natürlichen Winduss nach
und wechselt von hoher Geschwindigkeit (fünf Sekunden
lang) zu mittlerer Geschwindigkeit (fünf Sekunden lang) zu
niedriger Geschwindigkeit (fünf Sekunden lang). Dieser Zyklus
wird wiederholt.
Nachtmodus Der Nachtmodus reduziert langsam die
Lüftergeschwindigkeit, bis er sich ausschaltet, um Energie
zu sparen, während Sie schlafen. Nach der Aktivierung
läuft die Lüftergeschwindigkeit 30 Minuten lang auf hoher
Geschwindigkeit und reduziert sich dann 30 Minuten lang
auf mittlere Geschwindigkeit und 30 Minuten lang auf
niedrige Geschwindigkeit, bevor sie sich ausschaltet. Nach 30
Sekunden erlischt die Displaybeleuchtung für eine ungestörte
Erholung. Bitte beachten Sie die folgende Tabelle –
Auto-Modus Der Auto-Modus dient zur Aufrechterhaltung einer
Umgebungstemperatur und wechselt zwischen
Windgeschwindigkeiten. Bitte beachten Sie die folgende
Tabelle –
Strona się ładuje...
Strona się ładuje...
Strona się ładuje...
Strona się ładuje...
Strona się ładuje...
Strona się ładuje...
Strona się ładuje...
Strona się ładuje...
Strona się ładuje...
Strona się ładuje...
Strona się ładuje...
Strona się ładuje...
Strona się ładuje...
Strona się ładuje...
Strona się ładuje...
Strona się ładuje...
Strona się ładuje...
Strona się ładuje...
Strona się ładuje...
Strona się ładuje...
Strona się ładuje...
Strona się ładuje...
Strona się ładuje...
Strona się ładuje...
Strona się ładuje...
Strona się ładuje...
Strona się ładuje...
Strona się ładuje...
Strona się ładuje...
Strona się ładuje...
Strona się ładuje...
Strona się ładuje...
Strona się ładuje...
Strona się ładuje...
Strona się ładuje...
Strona się ładuje...
Strona się ładuje...
Strona się ładuje...
Strona się ładuje...
Strona się ładuje...
Strona się ładuje...
Strona się ładuje...
Strona się ładuje...
Strona się ładuje...
Strona się ładuje...
Strona się ładuje...
Strona się ładuje...
Strona się ładuje...
Strona się ładuje...
Strona się ładuje...
Strona się ładuje...
Strona się ładuje...
Strona się ładuje...
Strona się ładuje...
Strona się ładuje...
Strona się ładuje...
Strona się ładuje...
Strona się ładuje...
Strona się ładuje...
Strona się ładuje...
Strona się ładuje...
Strona się ładuje...
Strona się ładuje...
Strona się ładuje...
Strona się ładuje...
Strona się ładuje...
Strona się ładuje...
Strona się ładuje...
Strona się ładuje...
Strona się ładuje...
Strona się ładuje...
Strona się ładuje...
-
 1
1
-
 2
2
-
 3
3
-
 4
4
-
 5
5
-
 6
6
-
 7
7
-
 8
8
-
 9
9
-
 10
10
-
 11
11
-
 12
12
-
 13
13
-
 14
14
-
 15
15
-
 16
16
-
 17
17
-
 18
18
-
 19
19
-
 20
20
-
 21
21
-
 22
22
-
 23
23
-
 24
24
-
 25
25
-
 26
26
-
 27
27
-
 28
28
-
 29
29
-
 30
30
-
 31
31
-
 32
32
-
 33
33
-
 34
34
-
 35
35
-
 36
36
-
 37
37
-
 38
38
-
 39
39
-
 40
40
-
 41
41
-
 42
42
-
 43
43
-
 44
44
-
 45
45
-
 46
46
-
 47
47
-
 48
48
-
 49
49
-
 50
50
-
 51
51
-
 52
52
-
 53
53
-
 54
54
-
 55
55
-
 56
56
-
 57
57
-
 58
58
-
 59
59
-
 60
60
-
 61
61
-
 62
62
-
 63
63
-
 64
64
-
 65
65
-
 66
66
-
 67
67
-
 68
68
-
 69
69
-
 70
70
-
 71
71
-
 72
72
-
 73
73
-
 74
74
-
 75
75
-
 76
76
-
 77
77
-
 78
78
-
 79
79
-
 80
80
-
 81
81
-
 82
82
-
 83
83
-
 84
84
-
 85
85
-
 86
86
-
 87
87
-
 88
88
-
 89
89
-
 90
90
-
 91
91
-
 92
92


Pro Breeze PB-F20W-UK-FBA Instrukcja obsługi
- Typ
- Instrukcja obsługi
w innych językach
- español: Pro Breeze PB-F20W-UK-FBA Manual de usuario
- italiano: Pro Breeze PB-F20W-UK-FBA Manuale utente
- Deutsch: Pro Breeze PB-F20W-UK-FBA Benutzerhandbuch
- svenska: Pro Breeze PB-F20W-UK-FBA Användarmanual
- français: Pro Breeze PB-F20W-UK-FBA Manuel utilisateur
- English: Pro Breeze PB-F20W-UK-FBA User manual
- Nederlands: Pro Breeze PB-F20W-UK-FBA Handleiding


