UMAX VisionBook 15Wu-i3 Instrukcja obsługi
- Typ
- Instrukcja obsługi

15Wu-i3
EN
CZ
SK
PL
HU


USER MANUAL ENGLISH
15Wu-i3

| EN | 4 |
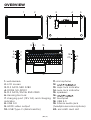
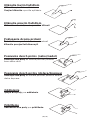
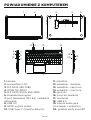
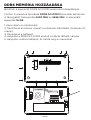
OVERVIEW
1. webcamera
2. LCD screen
3. M.2 SATA SSD 2280
4. DDR4 SO-DIMM
5. M.2 SATA/NVMe SSD 2280
6. Kensington lock
7. charging port (19V 3A) and charging
indicator
8. USB 3.0
9. HDMI video output
10. USB Type-C (data transfer)
134 5
2
11. microphone
12.
13. caps lock indicator
14. num lock indicator
15. speakers
16.
17. touchpad
18. USB 3.0
19. 3.5mm audio jack
(headphones+microphone)
20. microSD card slot
6
8
10
7
9
11
12 14 15 16
13
19
18
20
17
11
| EN | 4 |

| EN | 5 |
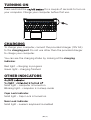
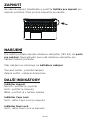
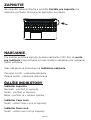
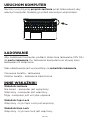
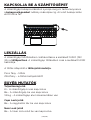
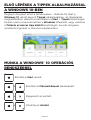
TURNING ON
Press and hold the for a couple of seconds to turn on
your computer. Charge your computer before first use.
CHARGING
To charge your computer, connect the provided charger (19V 3A)
to the charging port. Do not use other than the provided charger
to charge your computer.
You can see the charging status by looking at the charging
indicator.
Red light - charging in progress
Green light - charging finished
OTHER INDICATORS
Solid light - computer is turned on
Blinking light - computer is in sleep mode
Caps Lock indicator
Solid light - Caps Lock is turned on
Num Lock indicator
Solid light - numeric keyboard is enabled

| EN | 6 |
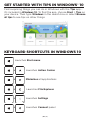
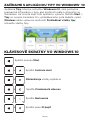
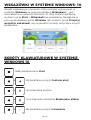
GET STARTED WITH TIPS IN WINDOWS® 10
Find surprising things you can do in Windows with the Tips app –
it’s included in Windows 10. To find the app, choose Start > Tips on
your device. Then type Windows in the search box or select Browse
all tips to see tips on other things.
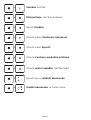
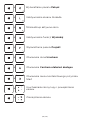
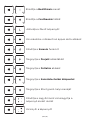
KEYBOARD SHORTCUTS IN WINDOWS 10
Launches Start menu
Launches Action Center
Minimizes all applications
+
+
+
+
+
Launches File Explorer
Launches Settings
Launches Connect panel
| EN | 6 |

| EN | 7 |
+
+
+
+
+
+
+
+
+
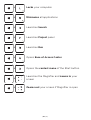
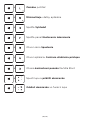
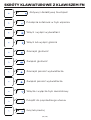
Locks your computer
Minimazes all applications
Launches Search
Launches Project panel
Launches Run
Opens Ease of Access Center
Opens the context menu of the Start button
Launches the Magnifier and zooms in your
screen
Zooms out your screen if Magnifier is open

| EN | 8 |
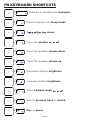
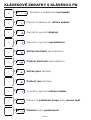
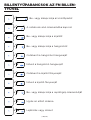
FN KEYBOARD SHORTCUTS
+
+
+
+
+
+
+
+
+
+
+
Enables or disables the touchpad
Puts the laptop into Sleep mode
screen
Turns the speaker
Turns the speaker volume down
Turns the speaker volume up
Decreases display brightness
Increases display brightness
Turns Airplane mode
Skip to previous track or rewind
Play or pause
| EN | 8 |

| EN | 9 |
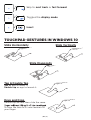
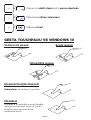
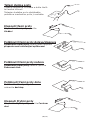
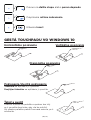
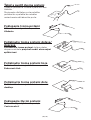
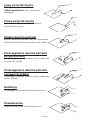
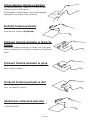
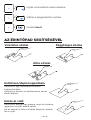
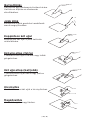
TOUCHPAD GESTURES IN WINDOWS 10
+
+
+
Skip to next track or fast forward
Toggles the display mode
Insert
Slide Horizontally Slide Vertically
Slide Diagonally
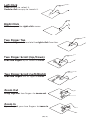
Tap & Double Tap
Tap an app to select it.
Double tap an app to launch it.
Drag and Drop
Double tap an item then slide the same
To drop the item to its new location lift
your finger.

| EN | 10 |
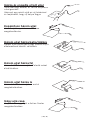
Left Click
Click an app to select it.
Double click an app to launch it.
Right Click
Click to open the right-click menu.
Two Finger Tap
Tap two fingers to simulate the right-click function.
Two Finger Scroll (Up/Down)
Slide two fingers up or down to scroll.
Zoom In
Spread apart your two fingers to zoom in.
Two Finger Scroll (Left/Right)
Slide two fingers left or right to scroll.
Zoom Out
Bring together two fingers to zoom out.
| EN | 10 |

| EN | 11 |
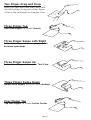
Two Finger Drag and Drop
Select an item and then press and hold
the left button. Using your other finger
slide on the touchpad to drag the item.
Three Finger Tap
Tap three fingers to invoke Search.
Three Finger Swipe Left/Right
Swipe three fingers left or right to switch
between open apps.
Three Finger Swipe Up
Swipe three fingers up to open Task View.
Three Finger Swipe Down
Swipe three fingers down to show desktop.
Four Finger Tap
Tap four fingers to invoke Action Center.

| EN | 12 |
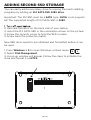
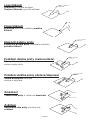
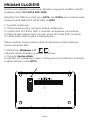
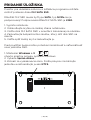
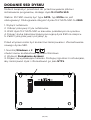
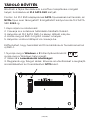
ADDING SECOND SSD STORAGE
You can easily add a secondary drive for saving files and installing
programs by adding an M.2 SATA SSD 2280 drive.
Important: The M.2 SSD must be a SATA type, NVMe is not support-
ed! The supported length of M.2 SATA SSD is 2280.
2. Unscrew the hatch on the back side of your laptop.
3. Insert the M.2 SATA SSD in the orientation shown on the picture.
4. Screw the security screw to hold the SSD in place.
5. Screw back the protection hatch.
New SSD drive needs to be initialized and formatted before it can
be used.
1. Press Windows + X to open Windows context menu.
2. Select Disk Management.
3. A pop up window will appear. Follow the steps to initialize the
drive and format it as NTFS.
+
| EN | 12 |

| EN | 13 |
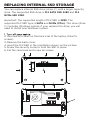
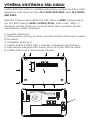
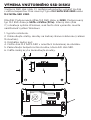
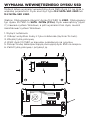
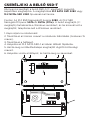
REPLACING INTERNAL SSD STORAGE
You can replace internal SSD drive (drive C:) with a larger capacity
drive. The supported SSD drive is M.2 SATA SSD 2280 and M.2
NVMe SSD 2280
Important: The supported length of M.2 SSD is 2280. The
supported M.2 SSD type is SATA and NVMe (PCIe). This drive (drive
C:) includes Windows system, if your replace this drive, you will
need to install new Windows system.
2. Unscrew all screws on the back side of the laptop (total 15
screws).
3. Remove the back cover.
4. Insert the M.2 SSD in the orientation shown on the picture.
5. Screw the security screw to hold the SSD in place.
6. Put the case back and screw all screws.

| EN | 14 |
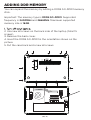
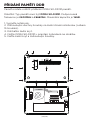
ADDING DDR MEMORY
You can expand the memory by adding a DDR4 SO-DIMM memory
stick.
Important: The memory type is DDR4 SO-DIMM. Supported
frequency is 2400MHz and 2666MHz. Maximum supported
memory size is 16GB.
2. Unscrew all screws on the back side of the laptop (total 15
screws).
3. Remove the back cover.
4. Insert the DDR4 SO-DIMM in the orientation shown on the
picture.
5. Put the case back and screw all screws.
| EN | 14 |

| EN | 15 |
SAFETY INFORMATION
Operating temperature: 10° to 35° C, storage temperature: -25° to 45° C, relative
humidity: 0% to 90% (noncondensing).
Built-in battery. Do not attempt to replace or remove the battery yourself. You may
damage the battery, which could cause overheating and injury. The battery should
be replaced by an authorized service provider, and must be recycled or disposed of
separately from household waste.
Handle with care. It has sensitive electronic components inside. Place it on a stable
work surface that allows for air circulation under and around the computer. Your
computer can be damaged if dropped, burned, punctured, or crushed, or if it comes
in contact with liquids, oils, and lotions. Do not use a damaged computer as it may
cause injury.
Liquid exposure. Keep your computer away from sources of liquid, such as drinks,
oils, lotions, sinks, bathtubs, shower stalls, and so on. Protect your computer from
dampness, humidity, or wet weather, such as rain, snow, and fog.
Charging. Charge only with the included power adapter. Other power adapters might
not meet safety standards, and using such power adapters could pose a risk of death
or injury. Using damaged power adapters or cables, or charging when moisture is
present, can cause fire, electric shock, injury, or damage to your computer or other
property. Do not use a power adapter in wet locations, such as near a sink, bathtub, or
shower stall, or connect or disconnect the power adapter with wet hands.
Medical device interference. It contains components and radios that emit
electromagnetic fields, including magnets, which may interfere with pacemakers,
defibrillators, and other medical devices. Maintain a safe distance between
your medical device and computer. Consult your physician and medical device
manufacturer for information specific to your medical device.
Repetitive motion. When you perform repetitive activities such as typing or playing
games, you may experience discomfort in your hands, arms, wrists, shoulders, neck,
or other parts of your body. If you experience discomfort, stop using computer and
consult a physician.
Choking hazard. Some accessories may present a choking hazard to small children.
Keep these accessories away from small children.
High-consequence activities. Your computer is not intended for use where the
failure of the computer could lead to death, personal injury, or severe environmental
damage.
Explosive and other atmospheric conditions. Using computer in any area with a
potentially explosive atmosphere may be hazardous—particularly in areas where
the air contains high levels of flammable chemicals, vapors, or particles such as
grain, dust, or metal powders. Exposing computer to environments having high
concentrations of industrial chemicals, including evaporating liquified gases such as
helium, may damage or impair its functionality.

| EN | 16 |
© 2021 Umax Czech a.s. All rights reserved. Umax, Umax logo, Visionbook and Visionbook logo are trade-
marks of Umax Czech a.s. Windows is a registered trademark of Microsoft Corporation.
All other trademarks are the property of their respective owners.
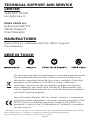
TECHNICAL SUPPORT AND SERVICE
CENTER
+420 800 118 629
Umax Czech a.s.
Kolbenova 962/27e
198 00 Prague 9
Czech Republic
MANUFACTURER
Umax Czech a.s., Kolbenova 962/27e, 198 00 Prague 9,
Czech Republic
KEEP IN TOUCH
Importer hereby declares that this wireless device is in compliance
with the essential requirements and other relevant provisions of the
R&TTE Directive and Radio Equipment Directive 2014/53/EU, as
applicable. A copy of the EU Declaration of Conformity is available
at www.umax.cz.
Do not dispose of electrical appliances as unsorted municipal waste,
use separate collection facilities. Contact your local authority for
information regarding the collection systems available. If electrical
appliances are disposed of in landfills or dumps, hazardous
substances can leak into the groundwater and get into the food
chain, damaging your health and well-being. Please contact your
local or regional waste authority for more information on collection,
reuse and recycling programs.


UŽIVATELSKÝ MANUÁL ČEŠTINA
15Wu-i3

| CZ | 20 |
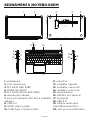
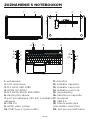
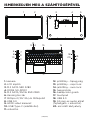
SEZNÁMENÍ S NOTEBOOKEM
1. webkamera
2. LCD obrazovka
3. M.2 SATA SSD 2280
4. DDR4 SO-DIMM
5. M.2 SATA/NVMe SSD 2280
6. Kensington zámek
7. port pro nabíjení (19V 3A) a indikátor
nabíjení
8. USB 3.0
9. HDMI video výstup
10. USB Type-C (přenos dat)
134 5
2
11. mikrofon
12. indikátor zapnutí
13. indikátor caps lock
14. indikátor num lock
15. reproduktory
16. tlačítko pro zapnutí
17. touchpad
18. USB 3.0
19. 3.5mm audio jack
(sluchátka+mikrofon)
20. slot pro microSD kartu
6
8
10
7
9
11
12 14 15 16
13
19
18
20
17
11
| CZ | 20 |
Strona się ładuje...
Strona się ładuje...
Strona się ładuje...
Strona się ładuje...
Strona się ładuje...
Strona się ładuje...
Strona się ładuje...
Strona się ładuje...
Strona się ładuje...
Strona się ładuje...
Strona się ładuje...
Strona się ładuje...
Strona się ładuje...
Strona się ładuje...
Strona się ładuje...
Strona się ładuje...
Strona się ładuje...
Strona się ładuje...
Strona się ładuje...
Strona się ładuje...
Strona się ładuje...
Strona się ładuje...
Strona się ładuje...
Strona się ładuje...
Strona się ładuje...
Strona się ładuje...
Strona się ładuje...
Strona się ładuje...
Strona się ładuje...
Strona się ładuje...
Strona się ładuje...
Strona się ładuje...
Strona się ładuje...
Strona się ładuje...
Strona się ładuje...
Strona się ładuje...
Strona się ładuje...
Strona się ładuje...
Strona się ładuje...
Strona się ładuje...
Strona się ładuje...
Strona się ładuje...
Strona się ładuje...
Strona się ładuje...
Strona się ładuje...
Strona się ładuje...
Strona się ładuje...
Strona się ładuje...
Strona się ładuje...
Strona się ładuje...
Strona się ładuje...
Strona się ładuje...
Strona się ładuje...
Strona się ładuje...
Strona się ładuje...
Strona się ładuje...
Strona się ładuje...
Strona się ładuje...
Strona się ładuje...
Strona się ładuje...
Strona się ładuje...
Strona się ładuje...
-
 1
1
-
 2
2
-
 3
3
-
 4
4
-
 5
5
-
 6
6
-
 7
7
-
 8
8
-
 9
9
-
 10
10
-
 11
11
-
 12
12
-
 13
13
-
 14
14
-
 15
15
-
 16
16
-
 17
17
-
 18
18
-
 19
19
-
 20
20
-
 21
21
-
 22
22
-
 23
23
-
 24
24
-
 25
25
-
 26
26
-
 27
27
-
 28
28
-
 29
29
-
 30
30
-
 31
31
-
 32
32
-
 33
33
-
 34
34
-
 35
35
-
 36
36
-
 37
37
-
 38
38
-
 39
39
-
 40
40
-
 41
41
-
 42
42
-
 43
43
-
 44
44
-
 45
45
-
 46
46
-
 47
47
-
 48
48
-
 49
49
-
 50
50
-
 51
51
-
 52
52
-
 53
53
-
 54
54
-
 55
55
-
 56
56
-
 57
57
-
 58
58
-
 59
59
-
 60
60
-
 61
61
-
 62
62
-
 63
63
-
 64
64
-
 65
65
-
 66
66
-
 67
67
-
 68
68
-
 69
69
-
 70
70
-
 71
71
-
 72
72
-
 73
73
-
 74
74
-
 75
75
-
 76
76
-
 77
77
-
 78
78
-
 79
79
-
 80
80
-
 81
81
-
 82
82


UMAX VisionBook 15Wu-i3 Instrukcja obsługi
- Typ
- Instrukcja obsługi
w innych językach
- slovenčina: UMAX VisionBook 15Wu-i3 Používateľská príručka
Powiązane artykuły

Inne dokumenty
-
Dell Precision 5750 Instrukcja obsługi
-
-
Dell OptiPlex 7080 Instrukcja obsługi
-
ASROCK B450M PRO4 Instrukcja obsługi
-
ASROCK B450 Pro4 Instrukcja instalacji
-
-
Dell Precision 3650 Tower Instrukcja obsługi
-
Gigabyte GB-BNIP-N100 BRIX Ultra Compact PC Kit instrukcja