Parkside PMFS 200 C3 Instrukcja obsługi
- Kategoria
- Elektronarzędzia
- Typ
- Instrukcja obsługi

3-IN-1 MULTI-FUNCTION SANDER / 3-IN-1-MULTI-
FUNKTIONSSCHLEIFER / PONCEUSE MULTIFONCTION
3 EN 1 PMFS 200 C3
PONCEUSE MULTIFONCTION 3 EN 1
Traduction des instructions d’origine
3-IN-1-MULTIFUNKTIONSSCHLEIFER
Originalbetriebsanleitung
3-IN-1 MULTI-FUNCTION SANDER
Translation of the original instructions
MULTIFUNKČNÍ BRUSKA 3 V 1
Překlad originálního provozního návodu
3-IN-1-MULTIFUNCTIONELE
SCHUURMACHINE
Vertaling van de originele gebruiksaanwijzing
MULTIFUNKČNÁ BRÚSKA 3 V 1
Preklad originálneho návodu na obsluhu
SZLIFIERKA WIELOFUNKCYJNA
3 W 1
Tłumaczenie oryginalnej instrukcji obsługi
LIJADORA MULTIFUNCIONAL
3 EN 1
Traducción del manual de instrucciones original
3I1 MULTIFUNKTIONSSLIBER
Oversættelse af den originale driftsvejledning
IAN 367467_2101

GB Translation of the original instructions Page 1
DE Originalbetriebsanleitung Seite 13
FR Traduction des instructions d’origine Page 25
NL Vertaling van de originele gebruiksaanwijzing Pagina 39
CZ Překlad originálního provozního návodu Strana 51
PL Tłumaczenie oryginalnej instrukcji obsługi Strona 63
SK Preklad originálneho návodu na obsluhu Strana 75
ES Traducción del manual de instrucciones original Página 87
DK Oversættelse af den originale driftsvejledning Side 99
Before reading, unfold the page containing the illustrations and familiarise yourself with all functions of
the device.
Klappen Sie vor dem Lesen die Seite mit den Abbildungen aus und machen Sie sich anschließend mit allen
Funktionen des Gerätes vertraut.
Avant de lire le mode d‘emploi, ouvrez la page contenant les illustrations et familiarisez-vous ensuite avec
toutes les fonctions de l‘appareil.
Vouw vóór het lezen de pagina met de afbeeldingen open en maak u vertrouwd met alle functies van het
apparaat.
Před čtením si otevřete stranu s obrázky a potom se seznamte se všemi funkcemi přístroje.
Przed przeczytaniem proszę rozłożyć stronę z ilustracjami, a następnie proszę zapoznać się z wszystkimi
funkcjami urządzenia.
Pred čítaním si odklopte stranu s obrázkami a potom sa oboznámte so všetkými funkciami prístroja.
Antes de empezar a leer abra la página que contiene las imágenes y, en seguida, familiarícese con todas
las funciones del dispositivo.
Før du læser, vend siden med billeder frem og bliv bekendt med alle apparatets funktioner.

AB
C

D

PMFS 200 C3 GB│IE │ 1 ■
Contents
Introduction ............................................................2
Intended use ........................................................................2
Features ...........................................................................2
Package contents ....................................................................2
Technical specifications ...............................................................2
General power tool safety warnings .......................................3
1. Work area safety ..................................................................3
2. Electrical safety ...................................................................4
3. Personal safety ....................................................................4
4. Power tool use and care ............................................................5
5. Service ..........................................................................5
Appliance-specific safety instructions .....................................................5
Before use ............................................................. 6
Fitting/changing the sander plate .......................................................6
Selecting a sanding sheet ..............................................................7
Fitting the sanding sheet ...............................................................7
Dust extraction ......................................................................7
Dust box ...........................................................................8
Reducer ...........................................................................8
Use ................................................................... 8
Switching on and off .................................................................8
Setting the oscillating speed ............................................................8
Working procedures ..................................................................9
Maintenance and cleaning ................................................9
Kompernass Handels GmbH warranty .....................................9
Service ............................................................... 11
Importer .............................................................11
Disposal .............................................................. 11
Translation of the original Conformity Declaration ...........................12

PMFS 200 C3
■ 2 │ GB│IE
3-IN-1 MULTI-FUNCTION
SANDER PMFS 200 C3
Introduction
Congratulations on the purchase of your
new appliance. You have chosen a high-
quality product. The operating instructions
are part of this product. They contain important infor-
mation about safety, usage and disposal. Before
using the product, please familiarise yourself with all
of the operating and safety instructions. Use the
product only as described and for the range of appli-
cations specified. Please also pass these operating
instructions on to any future owner.
Intended use
Depending on the sandpaper being used, this
appliance is suitable for the dry sanding of wood,
plastic, metal, filler and also painted surfaces. The
appliance is particularly suitable for corners, edges
and hard-to-reach areas. Any other usage of or
modification to the appliance is deemed to be
improper and carries a significant risk of accidents.
The manufacturer accepts no responsibility for
damage(s) resulting from improper usage. This
appliance is not intended for commercial use.
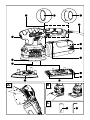
Features
ON/OFF switch
Adapter fitting
Reducer for external extraction appliances
Mains cable
Dust bag
Dust box
Release button for dust box
Clamping levers
Orbital sander plate
Clamping rails
Delta sander plate
Screws (4x)
Random orbital sander plate
Speed selector
Rubber pin (4x)
Hex key
Package contents
1 3-in-1 multi-function sander
1 Random orbital sander plate with Velcro fastener
1 Orbital sander plate with Velcro fastener
1 Delta sander plate with Velcro fastener
2 Random orbital sanding sheets
(grain size 80/240)
2 Orbital sanding sheets (grain size 80/240)
2 Delta sanding sheets (grain size 80/240)
1 Dust box
1 Reducer for external extraction appliances
4 Rubber pins (pre-installed)
4 Screws (pre-installed)
1 Hex key
1 Set of operating instructions
Technical specifications
Rated power consumption 200 W
Nominal voltage 230 V ∼, 50 Hz
Rated idle speed n0 7000–12000 rpm
Rated oscillation speed 14000–24000 rpm
Protection class II / (double
insulation)

PMFS 200 C3 GB│IE │ 3 ■
Noise and vibration data
Noise measurement value determined in accord-
ance with EN 62841. The A-rated noise level of
the power tool is typically as follows:
Sound pressure level LPA = 74.3 dB (A)
Sound power level LWA = 85.3 dB (A)
Uncertainty K = 3 dB
Wear ear muffs!
Rated acceleration, typically
Hand/arm vibration ah = 5.428 m/s2
Uncertainty K = 1.5 m/s2
NOTE
► The vibration emission values and the noise
emission values given in these instructions
have been measured in accordance with a
standardised test procedure and can be used
for comparison of the power tool with
another tool.
► The specified total vibration values and the
noise emission values can also be used to
make a provisional load estimate.
WARNING!
► Depending on the manner in which the
power tool is being used, and in particular
the kind of workpiece being worked, the
vibration and noise emission values can
deviate from the values given in these instruc-
tions during actual use of the power tool.
► Try to keep the vibration loads as low as
possible. Measures to reduce the vibration
load are, e.g. wearing gloves and limiting the
working time. Wherein all states of operation
must be included (e.g. times when the power
tool is switched off and times where the
power tool is switched on but running without
load).
General power tool
safety warnings
WARNING!
►Read all safety warnings, instructions, illus-
trations and specifications provided with
this power tool. Failure to follow all instruc-
tions listed below may result in electric shock,
fire and/or serious injury.
Save all warnings and instructions for future
reference.
The term “power tool” in the warnings refers to
your mains-operated (corded) power tool or
battery-operated (cordless) power tool.
1. Work area safety
a) Keep work area clean and well lit. Cluttered
or dark areas invite accidents.
b) Do not operate power tools in explosive
atmospheres, such as in the presence of flam-
mable liquids, gases or dust. Power tools create
sparks which may ignite the dust or fumes.
c) Keep children and bystanders away while
operating a power tool. Distractions can cause
you to lose control.

PMFS 200 C3
■ 4 │ GB│IE
2. Electrical safety
a) Power tool plugs must match the outlet. Never
modify the plug in any way.
Do not use any adapter plugs with earthed
(grounded) power tools. Unmodified plugs and
matching outlets will reduce risk of electric shock.
b) Avoid body contact with earthed or grounded
surfaces, such as pipes, radiators, ranges and
refrigerators. There is an increased risk of elec-
tric shock if your body is earthed or grounded.
c) Do not expose power tools to rain or wet
conditions. Water entering a power tool will
increase the risk of electric shock.
d) Do not abuse the cord. Never use the cord
for carrying, pulling or unplugging the power
tool. Keep cord away from heat, oil, sharp
edges or moving parts. Damaged or entan-
gled cords increase the risk of electric shock.
e) When working outdoors with an electrical
power tool, always use extension cords that
are also suitable for use outdoors. Use of a
cord suitable for outdoor use reduces the risk of
electric shock.
f) If operating a power tool in a damp location
is unavoidable, use a residual current device
(RCD) protected supply. Use of an RCD
reduces the risk of electric shock.
3. Personal safety
a) Stay alert, watch what you are doing and use
common sense when operating a power tool.
Do not use a power tool while you are tired
or under the influence of drugs, alcohol or
medication. A moment of inattention while
operating a power tool may result in serious
personal injury.
b) Use
personal protective equipment. Always
wear eye protection. Protective equipment such
as a dust mask, non-skid safety shoes, hard hat
or hearing protection used for appropriate condi-
tions will reduce personal injuries.
c) Prevent unintentional starting. Ensure the
switch is in the off-position before connecting
to power source and/or battery pack, picking
up or carrying the tool. Carrying power tools
with your finger on the switch or energising
power tools that have the switch on invites acci-
dents.
d) Remove any adjusting key or wrench before
turning the power tool on. A wrench or a key
left attached to a rotating part of the power tool
may result in personal injury.
e) Do not overreach. Keep proper footing and
balance at all times. This enables better control
of the power tool in unexpected situations.
f) Dress properly. Do not wear loose clothing or
jewellery. Keep your hair and clothing away
from moving parts. Loose clothes, jewellery or
long hair can be caught in moving parts.
g) If devices are provided for the connection of
dust extraction and collection facilities, ensure
these are connected and properly used. Use of
dust collection can reduce dust-related hazards.
h) Do not allow yourself to get lulled into a false
sense of security and do not ignore the safety
rules for power tools, even if you are familiar
with the power tool after repeated use. A
careless action can cause severe injury within a
fraction of a second.

PMFS 200 C3 GB│IE │ 5 ■
4. Power tool use and care
a) Do not force the power tool. Use the correct
power tool for your application. The correct
power tool will do the job better and safer at
the rate for which it was designed.
b) Do not use the power tool if the switch does
not turn it on and off. Any power tool that
cannot be controlled with the switch is
dangerous and must be repaired.
c) Disconnect the plug from the power source
and/or remove the battery pack, if detach-
able, from the power tool before making any
adjustments, changing accessories, or storing
power tools. Such preventive safety measures
reduce the risk of starting the power tool acci-
dentally.
d) Store idle power tools out of the reach of
children, and do not allow persons unfamiliar
with the power tool or these instructions to
operate the power tool. Power tools are
dangerous in the hands of untrained users.
e) Maintain power tools and accessories. Check
for misalignment or binding of moving parts,
breakage of parts and any other condition
that may affect the power tool’s operation. If
damaged, have the power tool repaired
before use. Many accidents are caused by
poorly maintained power tools.
f) Keep cutting tools sharp and clean. Properly
maintained cutting tools with sharp cutting
edges are less likely to bind and are easier to
control.
g) Use the power tool, accessories and tool bits,
etc., in accordance with these instructions,
taking into account the working conditions
and the work to be performed. Use of the
power tool for operations different from those
intended could result in a hazardous situation.
h) Keep handles and grasping surfaces dry,
clean and free from oil and grease. Slippery
handles and grasping surfaces do not allow for
safe handling and control of the tool in unex-
pected situations.
5. Service
a) Have your power tool serviced by a qualified
repair person using only identical replace-
ment parts. This will ensure that the safety of
the power tool is maintained.
b) Always arrange for the replacement of the
plug or the power cord to be carried out by
the manufacturer of the appliance or by his
approved customer services. This will ensure
that the safety of the power tool is maintained.
Appliance-specific safety instructions
■ Secure the workpiece. A workpiece securely
held by a clamping device or vice is much safer
than one held in your hand.
■ Do not rest your hands next to or in front of the
appliance and the area being worked as there
is a risk of injury if you slip.
■ In the event of danger, remove the mains plug
from the socket immediately.
■ Always route the power cable towards the rear,
away from the appliance.
■RISK OF FIRE DUE TO FLYING SPARKS! If
you sand metal, sparks will be produced. There-
fore, make sure that nobody is at risk and that
no combustible materials are located in the
immediate vicinity of where you are working.
■Hold the power tool by the insulated gripping
surfaces, as the grinding surface could hit its
own cable. Damage to a live wire may make
exposed metal parts of the power tool live and
could give the operator an electric shock.
WARNING! TOXIC VAPOURS!
► Working with the tool can produce harmful/
toxic dusts that represent a health hazard for
the person operating the appliance and for
any other people in the area.

PMFS 200 C3
■ 6 │ GB│IE
WARNING! RISKS DUE TO DUST!
► When working for extended periods of time
on wood and, in particular, materials that
produce dust which is hazardous to health,
connect the appliance to an appropriate
external dust extraction appliance. Wear
safety goggles and a protective dust mask!
■ Ensure sufficient ventilation when working on
plastics, paints, lacquers, etc.
■ Do not soak the materials or the area to be
processed with liquids containing solvents.
■ Never work on moistened materials or damp
surfaces.
■ Avoid sanding lead paint or other harmful
materials.
■ Materials containing asbestos must not be
processed. Asbestos is a known carcinogen.
■ Avoid contact with the sanding sheet while the
appliance is running!
■ Do not use the appliance without a sanding
sheet fitted.
■ Never use the appliance for other purposes and
only use original parts/accessories. Using
attachments or accessory tools other than those
recommended in the operating instructions can
lead to a risk of injury.
■ Always allow the appliance to come to a
complete standstill before putting it down.
■ The appliance must always be kept clean, dry
and free from oil or grease.
Before use
Fitting/changing the sander plate
WARNING!
► Always remove the plug from the mains
power socket before carrying out any work
on the appliance.
♦ Use the appropriate sander plate for
the corresponding application.
♦ Remove the four screws using the supplied
hex key .
♦ Remove the pre-fitted sander plate.
NOTE
► The orbital sander plate can only be fitted
to the appliance in one direction. Please pay
attention to the arrow marks on the orbital
sander plate . These must point forwards.
With the delta sander plate the tip points
forwards.
► The rubber pins have a groove on the side.
The groove must be aligned with the tabs in
the mounting holes on the respective sander
plate . This allows you to insert the
rubber pins into the sander plate .
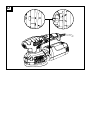
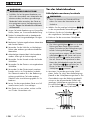
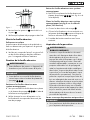
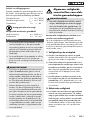
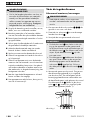
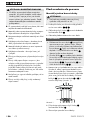
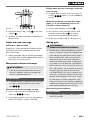
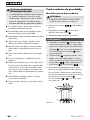
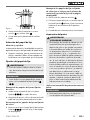
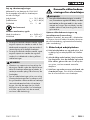
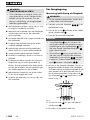
♦ Now fit the required sander plate. Ensure that
the mounting plate B is aligned with the sander
plate. The threaded holes of the mounting plate
B must be aligned with the corresponding holes
on the respective sander plate. Align the rubber
pins A (only on sander plates and )
with the holes in the appliance (see fig. 1).
.
A
B
Figure 1

PMFS 200 C3 GB│IE │ 7 ■
♦ Re-tighten the four screws using the hex key
.
♦ Check that the sander plate is fitted securely.
Selecting a sanding sheet
Removal and surface
The material removal rate and surface quality are
determined by the grain strength of the sanding
sheet.
♦ Please note that you need to use appropriate
sanding sheets with different grains for working
different materials.
Fitting the sanding sheet
WARNING!
► Always remove the plug from the mains
power socket before carrying out any work
on the appliance.
NOTE
► Before fitting a new sanding sheet, remove any
dust and dirt from the sander plate .
Attaching sanding sheets using Velcro
♦ You can attach the sanding sheet to the sander
plate using Velcro.
♦ Ensure that the extraction holes on the sanding
sheet match up with those on the sander plate.
Removing sanding sheets fitted using Velcro
♦ Simply pull the sanding sheet off the sander
plate (see fig. A on the fold-out page).
Attaching sanding sheets without using
Velcro (see fig. B on the fold-out page, not
supplied)
♦ Open the two clamping levers .
♦ Push the sanding sheet under the open
clamping rail at one end and clamp it firmly
in place with the clamping lever.
♦ Follow the same procedure at the other end.
Dust extraction
WARNING! RISK OF FIRE!
► When working with power tools that have a
dust collection box or can be connected to a
vacuum cleaner via the vacuum cleaner
adapter, there is a risk of fire! In unfavourable
conditions, e.g. when sparks are flying while
sanding metal or metal residues in wood,
wood dust in the dust sack (or in the vacuum
cleaner dust bag) can spontaneously ignite.
This is a particular risk if the wood dust is
mixed with paint residues or other chemicals
and the workpiece has become hot after
being worked for a long time. Therefore, do
not allow the workpiece to overheat and
always empty the dust box or the dust bag of
the vacuum cleaner before taking a break
from work.
Wear a dust mask!
NOTE
► Perforated sanding sheets are required for
dust extraction.

PMFS 200 C3
■ 8 │ GB│IE
Dust box
Connecting
♦ Slide the dust box onto the appliance. Make
sure that the symbol on the dust box is
aligned with the ▸ symbol on the appliance.
Turn the dust box to the symbol to lock it
(see detailed illustration fig. D on the fold-out
page).
Removal
♦ Turn the symbol on the dust box to the
▸ symbol on the appliance (see detailed illustra-
tion fig. D on the fold-out page). Pull the dust
box off the appliance.
NOTE
► To achieve optimum dust extraction, the dust
box should be emptied regularly.
♦ To do this, remove the dust box off the
appliance as described above. To do this,
open the dust box by pressing on the release
button and pulling off the rear part. Now
remove the dust bag . Clean the dust bag
thoroughly by tapping it out.
Reducer
Connecting
♦ Push the reducer into the adapter fitting .
♦ Push the hose of a suitable of vacuum cleaning
appliance (e.g. a workshop vacuum cleaner)
onto the reducer .
Removal
♦ Pull the hose of the vacuum cleaner off the
reducer .
♦ Remove the reducer .
Use
CAUTION!
► Ensure that the appliance is switched off
before connecting it to the mains.
NOTE
► Always switch the multi-sander on before
applying it to the material, then move it over
the workpiece.
Switching on and off
Switching the appliance on
♦ Move the ON/OFF switch to the “I” posi-
tion.
Switching the appliance off
♦ Move the ON/OFF switch to the “0” position.
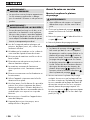
Setting the oscillating speed
You can set the desired oscillating speed using the
speed selector as required. The required speed
depends on the material being processed and can
be determined through practical tests.

PMFS 200 C3 GB│IE │ 9 ■
Working procedures
■ Switch the appliance on before applying it to
the workpiece.
■ Apply minimal pressure when working.
■ Work at a constant speed.
■ Change the sanding sheets regularly.
■ Never use the same sanding sheet for sanding
different materials (e.g. wood followed by
metal). Optimum sanding results can only be
achieved by using clean sanding sheets.
■ Clean the sanding sheet every once in a while
using a vacuum cleaner.
■ Sand hard-to-reach places with the front or side
edge of the sanding sheet on the sander plate.
■ Guide the sander over the workpiece in parallel
and use overlapping sanding motions.
■ After completing the task, lift the appliance from
the workpiece and then switch it off.
Maintenance and cleaning
WARNING!
► Always remove the plug from the mains
power socket before carrying out any work
on the appliance.
The multi-sander is maintenance-free.
■ Always clean the appliance directly after
completion of work.
■ Use a dry cloth to clean the housing.
■ Remove any sanding dust stuck to the appliance
with a brush.
■ Never use sharp objects, petrol, solvents or
cleaning agents which can damage plastic. Do
not allow any liquids to get into the interior of
the appliance.
■ Always keep the ventilation openings free of
obstructions.
Kompernass Handels GmbH
warranty
Dear Customer,
This appliance has a 3-year warranty valid from the
date of purchase. If this product has any faults, you,
the buyer, have certain statutory rights. Your statu-
tory rights are not restricted in any way by the
warranty described below.
Warranty conditions
The warranty period starts on the date of purchase.
Please keep your receipt in a safe place. This will
be required as proof of purchase.
If any material or manufacturing fault occurs within
three years of the date of purchase of the product,
we will either repair or replace the product for you
or refund the purchase price (at our discretion).
This warranty service requires that you present the
defective appliance and the proof of purchase
(receipt) within the three-year warranty period,
along with a brief written description of the fault
and of when it occurred.
If the defect is covered by the warranty, your
product will either be repaired or replaced by us.
The repair or replacement of a product does not
signify the beginning of a new warranty period.

PMFS 200 C3
■ 10 │ GB│IE
Warranty period and statutory claims for
defects
The warranty period is not prolonged by repairs
effected under the warranty. This also applies to
replaced and repaired components. Any damage
and defects present at the time of purchase must be
reported immediately after unpacking. Repairs
carried out after expiry of the warranty period shall
be subject to a fee.
Scope of the warranty
This appliance has been manufactured in accord-
ance with strict quality guidelines and inspected
meticulously prior to delivery.
The warranty covers material faults or production
faults. The warranty does not extend to product
parts subject to normal wear and tear or to fragile
parts which could be considered as consumable
parts such as switches or parts made of glass.
The warranty does not apply if the product has
been damaged, improperly used or improperly
maintained. The directions in the operating instruc-
tions for the product regarding proper use of the
product are to be strictly followed. Uses and
actions that are discouraged in the operating
instructions or which are warned against must be
avoided.
This product is intended solely for private use and
not for commercial purposes. The warranty shall be
deemed void in cases of misuse or improper
handling, use of force and modifications / repairs
which have not been carried out by one of our
authorised Service centres.
The warranty period does not apply to
■ Normal reduction of the battery capacity
overtime
■ Commercial use of the product
■ Damage to or alteration of the product by the
customer
■ Non-compliance with safety and maintenance
instructions, operating errors
■ Damage caused by natural hazards
Warranty claim procedure
To ensure quick processing of your case, please
observe the following instructions:
■ Please have the till receipt and the item number
(e.g.IAN12345) available as proof of purchase.
■ You will find the item number on the type plate
on the product, an engraving on the product,
on the front page of the operating instructions
(below left) or on the sticker on the rear or
bottom of the product.
■ If functional or other defects occur, please
contact the service department listed either by
telephone or by e-mail.
■ You can return a defective product to us free of
charge to the service address that will be
provided to you. Ensure that you enclose the
proof of purchase (till receipt) and information
about what the defect is and when it occurred.
You can download these instructions
along with many other manuals,
product videos and installation
software at www.lidl-service.com.
This QR code will take you directly to the Lidl
service page (www.lidl-service.com) where you
can open your operating instructions by entering
the item number (IAN) 367467_2101.

PMFS 200 C3 GB│IE │ 11 ■
WARNING!
►Have the appliances repaired by the
Service Centre or a qualified electrician
and only using genuine replacement parts.
This will ensure that the safety of the appli-
ance is maintained.
►Always ensure that the power plug or the
mains cable is replaced only by the manu-
facturer of the appliance or by an
approved customer service provider.This
will ensure that the safety of the appliance is
maintained.
Service
Service Great Britain
Tel.: 0800 404 7657
E-Mail: kom[email protected]
Service Malta
Tel.: 80062230
E-Mail: kom[email protected]
IAN 367467_2101
Importer
Please note that the following address is not the
service address. Please use the service address
provided in the operating instructions.
KOMPERNASS HANDELS GMBH
BURGSTRASSE 21
44867 BOCHUM
GERMANY
www.kompernass.com
Disposal
The packaging is made from environ-
mentally friendly material and can be
disposed of at your local recycling
plant.
Do not dispose of power tools
in your normal domestic waste!
In accordance with European Directive
2012/19/EU on Waste Electrical and
Electronic Equipment and its integration into
national law, used power tools must be disposed of
separately and recycled in an environmentally
friendly manner.
Your local community or municipal authorities can
provide information on how to dispose of the appli-
ance.
Dispose of the packaging in an envi-
ronmentally friendly manner. Note
the labelling on the packaging and
separate the packaging material
components for disposal if necessary. The pack-
aging material is labelled with abbreviations (a)
and numbers (b) with the following meanings:
1–7: plastics, 20–22: paper and cardboard,
80–98: composites.
Your local community or municipal
authorities can provide information on
how to dispose of the worn-out product.
The product is recyclable, subject to
extended producer responsibility and
is collected separately.

PMFS 200 C3
■ 12 │ GB│IE
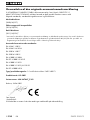
Translation of the original Conformity Declaration
We, KOMPERNASS HANDELS GMBH, document officer: Mr Semi Uguzlu, BURGSTR. 21,
44867 BOCHUM, GERMANY, hereby declare that this product complies with the following standards,
normative documents and EC directives:
Machinery Directive
(2006/42/EC)
EMC (Electromagnetic Compatibility)
(2014/30/EU)
RoHS Directive
(2011/65/EU)*
* The manufacturer bears the full responsibility for compliance with this conformity declaration. The object of the
declaration described above complies with the requirements of the Directive 2011/65/EU of the European Parliament
and Council of 8 June 2011 on the limitations of use of certain dangerous substances in electrical and electronic
appliances.
Applied harmonised standards
EN 62841-1:2015
EN 62841-2-4:2014
EN 55014-1:2017
EN 55014-2:2015
EN 61000-3-2:2004
EN IEC 61000-3-2:2019
EN 61000-3-3:2013
EN 61000-3-3:2013/A1:2019
EN IEC 63000:2018
Type/appliance designation: 3-in-1 multi-function sander PMFS 200 C3
Year of manufacture: 05–2021
Serial number: IAN 367467_2101
Bochum, 26/04/2021
Semi Uguzlu
- Quality Manager -
We reserve the right to make technical changes in the context of further product development.

PMFS 200 C3 DE│AT│CH │ 13 ■
Inhaltsverzeichnis
Einleitung ............................................................. 14
Bestimmungsgemäßer Gebrauch .......................................................14
Ausstattung ........................................................................14
Lieferumfang .......................................................................14
Technische Daten ...................................................................14
Allgemeine Sicherheitshinweise fürElektrowerkzeuge .......................15
1. Arbeitsplatzsicherheit ..............................................................15
2. Elektrische Sicherheit ..............................................................15
3. Sicherheit von Personen ............................................................16
4. Verwendung und Behandlung desElektrowerkzeugs .....................................16
5. Service .........................................................................17
Gerätespezifische Sicherheits hinweise ...................................................17
Vor der Inbetriebnahme ................................................18
Schleifplatte montieren/wechseln ......................................................18
Schleifblatt wählen ..................................................................19
Schleifblatt befestigen ...............................................................19
Staubabsaugung ...................................................................19
Staubbox zur Eigenabsaugung ........................................................20
Reduzierstück ......................................................................20
Inbetriebnahme .......................................................20
Ein- und ausschalten .................................................................20
Schwingzahl einstellen ...............................................................20
Arbeitshinweise. . . . . . . . . . . . . . . . . . . . . . . . . . . . . . . . . . . . . . . . . . . . . . . . . . . . . . . . . . . . . . . . . . . . .21
Wartung und Reinigung .................................................21
Garantie der Kompernaß Handels GmbH ..................................21
Service ............................................................... 23
Importeur ............................................................23
Entsorgung ...........................................................23
Original-Konformitätserklärung ..........................................24

PMFS 200 C3
■ 14 │ DE│AT│CH
3-IN-1-MULTIFUNKTIONS-
SCHLEIFER PMFS 200 C3
Einleitung
Wir beglückwünschen Sie zum Kauf Ihres
neuen Gerätes. Sie haben sich damit für
ein hochwertiges Produkt entschieden. Die
Bedienungsanleitung ist Teil dieses Produkts. Sie
enthält wichtige Hinweise für Sicherheit, Gebrauch
und Entsorgung. Machen Sie sich vor der Benutzung
des Produkts mit allen Bedien- und Sicherheitshin-
weisen vertraut. Benutzen Sie das Produkt nur wie
beschrieben und für die angegebenen Einsatzberei-
che. Händigen Sie alle Unterlagen bei Weitergabe
des Produkts an Dritte mit aus.
Bestimmungsgemäßer Gebrauch
Das Gerät ist – je nach Schleifpapier – zum
trockenen Schleifen von Holz, Kunststoff, Metall,
Spachtelmasse sowie lackierten Oberflächen be-
stimmt. Das Gerät ist besonders geeignet für Ecken,
Profile oder schwer zugängliche Stellen. Jede an-
dere Verwendung oder Veränderung des Gerätes
gilt als nicht bestimmungsgemäß und birgt erhebli-
che Unfallgefahren. Für aus bestimmungswidriger
Verwendung entstandene Schäden übernehmen
wir keine Haftung. Nicht für den gewerblichen
Gebrauch bestimmt.
Ausstattung
EIN-/AUS-Schalter
Adapteranschluss
Reduzierstück zur Fremdabsaugung
Netzleitung
Staubbeutel
Staubbox zur Eigenabsaugung
Entriegelungstaste Staubbox
Spannhebel
Schwingschleifplatte
Klemmleisten
Dreieckschleifplatte
Schraube (4x)
Exzenterschleifplatte
Schwingzahlvorwahl
Kunststoffstift (4x)
Sechskantschlüssel
Lieferumfang
1 3-in-1 Multifunktionsschleifer
1 Exzenterschleifplatte mit Kletthaftung
1 Schwingschleifplatte mit Kletthaftung
1 Dreieckschleifplatte mit Kletthaftung
2 Exzenterschleifblätter (Körnung 80/240)
2 Schwingschleifblätter (Körnung 80/240)
2 Dreieckschleifblätter (Körnung 80/240)
1 Staubbox
1 Reduzierstück zur Fremdabsaugung
4 Kunststoffstifte (vormontiert)
4 Schrauben (vormontiert)
1 Sechskantschlüssel
1 Bedienungsanleitung
Technische Daten
Bemessungsaufnahme 200 W
Nennspannung 230 V ∼, 50 Hz
Bemessungs-
Leerlaufdrehzahl n0 7000–12000 min-1
Nennschwingzahl 14000–24000 min-1
Schutzklasse II / (Doppelisolierung)
Geräusch- und Vibrationsinformationen
Messwert für Geräusch ermittelt entsprechend
EN62841. Der A-bewertete Geräuschpegel des
Elektrowerkzeugs beträgt typischerweise:
Schalldruckpegel LPA = 74,3 dB (A)
Schallleistungspegel LWA = 85,3 dB (A)
Unsicherheit K = 3 dB
Gehörschutz tragen!
Bewertete Beschleunigung, typischerweise
Hand-/Armvibration ah = 5,428 m/s2
Unsicherheit K = 1,5 m/s2

PMFS 200 C3 DE│AT│CH │ 15 ■
HINWEIS
► Die angegebenen Schwingungsgesamtwerte
und die angegebenen Geräuschemissions-
werte sind nach einem genormten Prüfver-
fahren gemessen worden und können zum
Vergleich eines Elektrowerkzeugs mit einem
anderen verwendet werden.
► Die angegebenen Schwingungsgesamtwerte
und die angegebenen Geräuschemissions-
werte können auch zu einer vorläufigen Ein-
schätzung der Belastung verwendet werden.
WARNUNG!
► Die Schwingungs- und Geräuschemissionen
können während der tatsächlichen Benutzung
des Elektrowerkzeugs von den Angabewerten
abweichen, abhängig von der Art und Weise,
in der das Elektrowerkzeug verwendet wird,
insbesondere, welche Art von Werkstück bear-
beitet wird.
► Versuchen Sie, die Belastung so gering wie
möglich zu halten. Beispielhafte Maßnahmen
zur Verringerung der Vibrationsbelastung
sind das Tragen von Handschuhen beim Ge-
brauch des Werkzeugs und die Begrenzung
der Arbeitszeit. Dabei sind alle Anteile des
Betriebszyklus zu berücksichtigen (beispiels-
weise Zeiten, in denen das Elektrowerkzeug
abgeschaltet ist, und solche, in denen es zwar
eingeschaltet ist, aber ohne Belastung läuft).
Allgemeine
Sicherheitshinweise
fürElektrowerkzeuge
WARNUNG!
►Lesen Sie alle Sicherheitshinweise, Anwei-
sungen, Bebilderungen und technischen
Daten, mit denen dieses Elektrowerkzeug
versehen ist. Versäumnisse bei der Einhaltung
der nachfolgenden Anweisungen können
elektrischen Schlag, Brand und/oder schwere
Verletzungen verursachen.
Bewahren Sie alle Sicherheitshinweise und
Anweisungen für die Zukunft auf.
Der in den Sicherheitshinweisen verwendete Begriff
„Elektrowerkzeug“ bezieht sich auf netzbetriebene
Elektrowerkzeuge (mit Netzleitung) und auf akku-
betriebene Elektrowerkzeuge (ohne Netzleitung).
1. Arbeitsplatzsicherheit
a) Halten Sie Ihren Arbeitsbereich sauber und
gut beleuchtet. Unordnung und unbeleuchtete
Arbeitsbereiche können zu Unfällen führen.
b) Arbeiten Sie mit dem Elektrowerkzeug nicht
in explosionsgefährdeter Umgebung, in der
sich brennbare Flüssigkeiten, Gase oder Stäu-
be befinden. Elektrowerkzeuge erzeugen Fun-
ken, die den Staub oder die Dämpfe entzünden
können.
c) Halten Sie Kinder und andere Personen wäh-
rend der Benutzung des Elektrowerkzeugs
fern. Bei Ablenkung können Sie die Kontrolle
über das Elektrowerkzeug verlieren.
2. Elektrische Sicherheit
a) Der Anschlussstecker des Elektrowerkzeugs
muss in die Steckdose passen. Der Stecker
darf in keiner Weise verändert werden.
Verwenden Sie keine Adapterstecker gemein-
sam mit schutzgeerdeten Elektrowerkzeugen.
Unveränderte Stecker und passende Steckdo-
sen verringern das Risiko eines elektrischen
Schlages.

PMFS 200 C3
■ 16 │ DE│AT│CH
b) Vermeiden Sie Körperkontakt mit geerdeten
Oberflächen wie von Rohren, Heizungen,
Herden und Kühlschränken. Es besteht ein
erhöhtes Risiko durch elektrischen Schlag, wenn
Ihr Körper geerdet ist.
c) Halten Sie Elektrowerkzeuge von Regen oder
Nässe fern. Das Eindringen von Wasser in ein
Elektrowerkzeug erhöht das Risiko eines elektri-
schen Schlages.
d) Zweckentfremden Sie die Anschlussleitung
nicht, um das Elektrowerkzeug zu tragen,
aufzuhängen oder um den Stecker aus der
Steckdose zu ziehen. Halten Sie die Anschluss-
leitung fern von Hitze, Öl, scharfen Kanten
oder sich bewegenden Teilen. Beschädigte
oder verwickelte Anschlussleitungen erhöhen das
Risiko eines elektrischen Schlages.
e) Wenn Sie mit einem Elektrowerkzeug im Freien
arbeiten, verwenden Sie nur Verlängerungs-
leitungen, die auch für den Außenbereich
geeignet sind. Die Anwendung einer für den
Außenbereich geeigneten Verlängerungsleitung
verringert das Risiko eines elektrischen Schlages.
f) Wenn der Betrieb des Elektrowerkzeugs in
feuchter Umgebung nicht vermeidbar ist, ver-
wenden Sie einen Fehlerstromschutzschalter.
Der Einsatz eines Fehlerstromschutzschalters ver-
mindert das Risiko eines elektrischen Schlages.
3. Sicherheit von Personen
a) Seien Sie aufmerksam, achten Sie darauf,
was Sie tun, und gehen Sie mit Vernunft an
die Arbeit mit einem Elektrowerkzeug. Be-
nutzen Sie kein Elektrowerkzeug, wenn Sie
müde sind oder unter dem Einfluss von Dro-
gen, Alkohol oder Medikamenten stehen.
Ein Moment der Unachtsamkeit beim Gebrauch
des Elektrowerk zeugs kann zu ernsthaften Ver-
letzungen führen.
b) T
ragen Sie persönliche Schutzausrüstung und
immer eine Schutzbrille. Das Tragen persönlicher
Schutzausrüstung, wie Staubmaske, rutschfeste
Sicherheitsschuhe, Schutzhelm oder Gehörschutz,
je nach Art und Einsatz des Elektrowerkzeugs,
verringert das Risiko von Verletzungen.
c) Vermeiden Sie eine unbeabsichtigte Inbetrieb-
nahme. Vergewissern Sie sich, dass das Elek-
trowerkzeug ausgeschaltet ist, bevor Sie es
an die Stromversorgung und/oder den Akku
anschließen, es aufnehmen oder tragen.
Wenn Sie beim Tragen des Elektrowerkzeugs
den Finger am Schalter haben oder das Elektro-
werkzeug eingeschaltet an die Stromversorgung
anschließen, kann dies zu Unfällen führen.
d) Entfernen Sie Einstellwerkzeuge oder Schrau-
benschlüssel, bevor Sie das Elektrowerkzeug
einschalten. Ein Werkzeug oder Schlüssel, der
sich in einem drehenden Teil des Elektrowerk-
zeugs befindet, kann zu Verletzungen führen.
e) Vermeiden Sie eine abnormale Körperhal-
tung. Sorgen Sie für einen sicheren Stand und
halten Sie jederzeit das Gleichgewicht. Da-
durch können Sie das Elektrowerkzeug in uner-
warteten Situationen besser kontrollieren.
f) Tragen Sie geeignete Kleidung. Tragen Sie
keine weite Kleidung oder Schmuck. Halten
Sie Haare und Kleidung fern von sich bewe-
genden Teilen. Lockere Kleidung, Schmuck
oder lange Haare können von sich bewegen-
den Teilen erfasst werden.
g) Wenn Staubabsaug- und -auffangeinrichtun-
gen montiert werden können, sind diese
anzuschließen und richtig zu verwenden.
Die Verwendung einer Staubabsaugung kann
Gefährdungen durch Staub verringern.
h) Wiegen Sie sich nicht in falscher Sicherheit
und setzen Sie sich nicht über die Sicherheits-
regeln für Elektrowerkzeuge hinweg, auch
wenn Sie nach vielfachem Gebrauch mit dem
Elektrowerkzeug vertraut sind. Achtloses
Handeln kann binnen Sekundenbruchteilen zu
schweren Verletzungen führen.
4. Verwendung und Behandlung
desElektrowerkzeugs
a) Überlasten Sie das Elektrowerkzeug nicht.
Verwenden Sie für Ihre Arbeit das dafür be-
stimmte Elektrowerkzeug. Mit dem passenden
Elektrowerkzeug arbeiten Sie besser und siche-
rer im angegebenen Leistungsbereich.
Strona się ładuje...
Strona się ładuje...
Strona się ładuje...
Strona się ładuje...
Strona się ładuje...
Strona się ładuje...
Strona się ładuje...
Strona się ładuje...
Strona się ładuje...
Strona się ładuje...
Strona się ładuje...
Strona się ładuje...
Strona się ładuje...
Strona się ładuje...
Strona się ładuje...
Strona się ładuje...
Strona się ładuje...
Strona się ładuje...
Strona się ładuje...
Strona się ładuje...
Strona się ładuje...
Strona się ładuje...
Strona się ładuje...
Strona się ładuje...
Strona się ładuje...
Strona się ładuje...
Strona się ładuje...
Strona się ładuje...
Strona się ładuje...
Strona się ładuje...
Strona się ładuje...
Strona się ładuje...
Strona się ładuje...
Strona się ładuje...
Strona się ładuje...
Strona się ładuje...
Strona się ładuje...
Strona się ładuje...
Strona się ładuje...
Strona się ładuje...
Strona się ładuje...
Strona się ładuje...
Strona się ładuje...
Strona się ładuje...
Strona się ładuje...
Strona się ładuje...
Strona się ładuje...
Strona się ładuje...
Strona się ładuje...
Strona się ładuje...
Strona się ładuje...
Strona się ładuje...
Strona się ładuje...
Strona się ładuje...
Strona się ładuje...
Strona się ładuje...
Strona się ładuje...
Strona się ładuje...
Strona się ładuje...
Strona się ładuje...
Strona się ładuje...
Strona się ładuje...
Strona się ładuje...
Strona się ładuje...
Strona się ładuje...
Strona się ładuje...
Strona się ładuje...
Strona się ładuje...
Strona się ładuje...
Strona się ładuje...
Strona się ładuje...
Strona się ładuje...
Strona się ładuje...
Strona się ładuje...
Strona się ładuje...
Strona się ładuje...
Strona się ładuje...
Strona się ładuje...
Strona się ładuje...
Strona się ładuje...
Strona się ładuje...
Strona się ładuje...
Strona się ładuje...
Strona się ładuje...
Strona się ładuje...
Strona się ładuje...
Strona się ładuje...
Strona się ładuje...
Strona się ładuje...
Strona się ładuje...
Strona się ładuje...
Strona się ładuje...
Strona się ładuje...
Strona się ładuje...
Strona się ładuje...
-
 1
1
-
 2
2
-
 3
3
-
 4
4
-
 5
5
-
 6
6
-
 7
7
-
 8
8
-
 9
9
-
 10
10
-
 11
11
-
 12
12
-
 13
13
-
 14
14
-
 15
15
-
 16
16
-
 17
17
-
 18
18
-
 19
19
-
 20
20
-
 21
21
-
 22
22
-
 23
23
-
 24
24
-
 25
25
-
 26
26
-
 27
27
-
 28
28
-
 29
29
-
 30
30
-
 31
31
-
 32
32
-
 33
33
-
 34
34
-
 35
35
-
 36
36
-
 37
37
-
 38
38
-
 39
39
-
 40
40
-
 41
41
-
 42
42
-
 43
43
-
 44
44
-
 45
45
-
 46
46
-
 47
47
-
 48
48
-
 49
49
-
 50
50
-
 51
51
-
 52
52
-
 53
53
-
 54
54
-
 55
55
-
 56
56
-
 57
57
-
 58
58
-
 59
59
-
 60
60
-
 61
61
-
 62
62
-
 63
63
-
 64
64
-
 65
65
-
 66
66
-
 67
67
-
 68
68
-
 69
69
-
 70
70
-
 71
71
-
 72
72
-
 73
73
-
 74
74
-
 75
75
-
 76
76
-
 77
77
-
 78
78
-
 79
79
-
 80
80
-
 81
81
-
 82
82
-
 83
83
-
 84
84
-
 85
85
-
 86
86
-
 87
87
-
 88
88
-
 89
89
-
 90
90
-
 91
91
-
 92
92
-
 93
93
-
 94
94
-
 95
95
-
 96
96
-
 97
97
-
 98
98
-
 99
99
-
 100
100
-
 101
101
-
 102
102
-
 103
103
-
 104
104
-
 105
105
-
 106
106
-
 107
107
-
 108
108
-
 109
109
-
 110
110
-
 111
111
-
 112
112
-
 113
113
-
 114
114
-
 115
115


Parkside PMFS 200 C3 Instrukcja obsługi
- Kategoria
- Elektronarzędzia
- Typ
- Instrukcja obsługi
w innych językach
- español: Parkside PMFS 200 C3 Manual de usuario
- Deutsch: Parkside PMFS 200 C3 Benutzerhandbuch
- slovenčina: Parkside PMFS 200 C3 Používateľská príručka
- français: Parkside PMFS 200 C3 Manuel utilisateur
- dansk: Parkside PMFS 200 C3 Brugermanual
- Nederlands: Parkside PMFS 200 C3 Handleiding
Powiązane artykuły
-
Parkside PSS 250 A1 Operation and Safety Notes
-
Parkside PAEXS 20-Li A1 - IAN 308551-1907 Instrukcja obsługi
-
-
-
Parkside PDS 290 A1 - 3 Operation and Safety Notes
-
Parkside PHS 160 B2 Operation and Safety Notes
-
Parkside PDS 290 B2 Operation and Safety Notes
-
-
Parkside 317724 Translation Of The Original Instructions
-