Hotpoint ITWD 61252 G (PL) instrukcja
- Kategoria
- Pralki
- Typ
- instrukcja


a
1
b
c
d
g
e
f
g
A
A
B
A
B
C
D
2 3 4
5
6
7 8 9
11 12
10
14 15
13
16

EN 1
INTENDED USE
This washing machine is exclusively destined to wash
and spin machine washable laundry in quantities
which are usual for private households.
• Observe the instructions given in these Instructions
for Use and the Programme Chart when using the
washing machine
• Keep these Instructions for Use and the
Programme Chart; if you pass on the washing
machine to another person, also give him/her
Instructions for Use and Programme Chart.
SAFETY AND GENERAL RECOMMENDATIONS
1. Safety instructions
• The washing machine is
appropriate for indoor use only.
• Do not store flammable fluids
near the appliance.
• Do not place electrical
appliances on the lid of your
washing machine.
• Children must be supervised to
ensure that they do not play with
the appliance.
• Children younger than 3 years
should be kept away from the
washing machine, unless they
are continuously supervised.
• The washing machine can
be operated by children from
the age of 8 years up, as well
as by people with reduced
physical, sensory or mental
capabilities or lack of experience
and knowledge, provided they
are supervised or instructed
regarding the safe use of the
washing machine and they
understand the dangers resulting
from the use. Children must not
play with the washing machine.
Care and maintenance works on
the washing machine must not
be carried out by children without
being supervised.
• Do not attempt to force the lid
open.
• If necessary, the power cable
may be replaced with an
identical one obtained from our
After-Sales Service. The power
cable must only be replaced by a
qualified technician.
• Before any cleaning or carrying
out maintenance switch off the
washing machine and disconnect
it from the mains supply.
• The ventilation openings in the
base of the washing machine
must not be obstructed by thick
carpet.
2. Packing
• The packaging materials are 100% recyclable
and bear the recycling symbol . Adhere to local
regulations when disposing of packaging material
3. Disposing of packaging and old
washing machines
• This appliance is marked according to the
European directive 2002/96/EC on Waste Electrical
and Electronic Equipment (WEEE). By ensuring
this product is disposed of correctly, you will help
prevent potential negative consquences for the
environment and human health, which could
otherwise be caused by inappropriate waste
handling of this product.
• The symbol on the product, or on the
documents accompanying the product, indicates
that this appliance may not be treated as
household waste. Instead it shall be handed over
to the applicable collection point for the recycling
of electrical and electronic equipment. Disposal
must be carried out in accordance with local
environmental regulations for waste disposal.
For more detailed information about treatment,
recovery and recycling of this product, please
contact your local city office, your household waste
disposal service or the shop where you purchased
the product.
• The washing machine is built from reusable
materials. It must be disposed of in compliance
with current local waste disposal regulations.
• Before scrapping, remove all detergent residues
and cut off the power cable so that the washing
machine is made unusable.
4. General recommendations
• Do not leave the washing machine connected
when not in use. Turn off the tap.

EN 2
BEFORE USING THE WASHING MACHINE
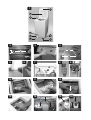
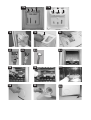
1. Remove the packaging and check
a. Cut and remove the shrink-wrap.
b. Remove the top protection and the protective
corners.
c. Remove the bottom protection by tilting and
turning the washing machine on one rear
bottom corner. Make sure that the plastic part
of the bottom protection (if available on the
model) remains in the packing and not in the
machine bottom.
This is important, as otherwise the plastic part could
damage the washing machine during operation.
d. Open the lid by pressing it slightly down while
raising the handle. Remove the polystyrene
cushion (depending on model).
e. Remove the blue protective film from the panel
(depending on model).
• After unpacking, make sure that the washing
machine is undamaged. If in doubt, do not use the
washing machine. Contact After-Sales Service or
your local retailer.
• Keep the packaging materials (plastic bags,
polystyrene parts, etc.) out of reach of children;
they are potentially dangerous.
• If the appliance was exposed to the cold prior to
delivery, keep it at room temperature for a few
hours before operating.
2. Remove the transport bracket
• The washing machine is fitted with transport
screws and a transport bracket to prevent damage
during transport. Before using the washing
machine you must remove the transport
bracket (see “Installation”/“Removal of transport
bracket”).
3. Install the washing machine
• Place the washing machine on a flat and stable
floor surface.
• Adjust the feet to ensure that the machine is
stable and level (see “Installation”/“Adjust the
feet”).
• In case of wooden or so-called “floating floors” (for
instance certain parquet or laminate floors), place
the appliance on a sheet of plywood with a size of
at least 40 x 60 cm and thickness of at least 3 cm,
which is screwed to the floor.
• Make sure that the ventilation openings in the
base of your washing machine (if available on your
model) are not obstructed by a carpet or other
material.
4. Water supply
• Connect the water supply inlet hose in accordance
with the regulations of your local water company
(see “Installation”/“Connect the water inlet hose”).
• Water supply: Cold water only
• Tap: 3/4” threaded hose connection
• Pressure: 100-1000 kPa (1-10 bar).
• Only use new hoses for connecting the washing
machine to the water supply. Used hoses must not
be used anymore and should be discarded.
5. Drain hose
• Firmly connect the drain hose to the siphon or
another outlet for drain water. (see “Installation”/
Connect the water drain hose”).
• If the washing machine is connected to a built-in
drainage system, ensure the latter is equipped with
a vent to avoid simultaneous loading and draining
of water (siphoning effect).
6. Electrical connection
• Electrical connections must be carried out by a
qualified technician in compliance with the manu-
facturer’s instructions and the current standard
safety regulations.
• The technical data (voltage, power and fuses) are
given on the rating plate on the rear of the washing
machine.
• Do not use extension leads or multi sockets.
• Access to the mains plug or disconnection from
the mains supply via a double-pole switch must be
ensured at all times after the installation.
• Do not operate the washing machine if it has been
damaged during transport. Inform the After-Sales
Service.
• Mains cable replacement is only to be carried out
by After-Sales Service.
• The washing machine must be connected exclu-
sively by means of a socket with an earth connec-
tion, in compliance with the regulations in force. In
particular, washing machines installed in premises
containing a shower or a bath must be protected
by a differential residual current device of at least
30 mA. Earthing the washing machine is obliga-
tory under the law. The manufacturer declines all
liability for injury to persons or animals or damage
to property deriving either directly or indirectly from
failure to observe the directions in these Instruc-
tions for Use.
• When using a residual current circuit breaker
(RCCB), only use a model marked with .
Approximate dimensions:
Width: 400 mm
Height: 900 mm
Depth: 600 mm

EN 3
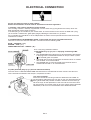
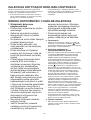
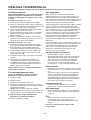
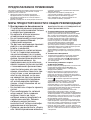
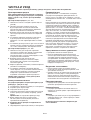
DESCRIPTION OF THE WASHING MACHINE (picture 1)
a. Lid
b. Detergent dispenser
c. Drum
d. Pump access behind filter
e. After-Sales Service sticker (behind the filter cover)
f. Mobility lever (depending on model). To move the
washing machine: pull the handle out a little bit by
hand and pull it out to the stop with the foot.
g. Adjustable feet
INSTALLATION
Removal of transport bracket
The washing machine is fitted with a transport bracket
to avoid any possible damage during transport.
IMPORTANT: Before using the washing machine,
the transport bracket at the back MUST be
removed.
1. Unscrew the two screws “A” and the four screws
“B” with a flat screwdriver or a No. 8 hex nut box
spanner (picture 2).
2. Remove the transport bracket (picture 3).
3. Replace the four outer screws “B” on the machine
and tighten them (picture 2).
4. Clip the two covers “C” supplied into the openings
“D” of the washing machine (picture 4).
Note: do not forget to replace and tighten the four
outer screws.
Adjust the feet (picture 5, 6)
Install the washing machine on a level surface, near
to electrical, water and drain connections.
If the floor is uneven, adjust the feet (do not insert
pieces of wood, cardboard etc. under the feet):
1. Screw out the washing machine´s feet by hand
with 2-3 clockwise turns and then slacken the
locknut by wrench.
2. Adjust the height of the feet by hand.
3. Retighten the locknut by turning it anti-clockwise
towards the washing machine’s bottom.
Make sure that the feet are resting correctly on the
floor and that the washing machine is perfectly
level and stable (use a spirit level).
The washing machine can be installed in an area 40
cm wide and 63 cm deep.
Note: if you install the machine on thick carpet, adjust
the feet to ensure that there is sufficient space under
the machine for the air to circulate.
Connect the water inlet hose (picture 7)
1. Carefully screw the water inlet hose to the valve
on the rear side of the washing machine (A); screw
the other end of the hose to the tap by hand.
2. Make sure there are no kinks in the hose.
3. Check water-tightness of tap and washing machine
connections by turning the tap completely on.
• If the hose is too short, replace it with a suitable
length of pressure resistant hose (1000 kPa min,
EN 61770 approved type).
• If you need a longer waterstop hose, contact our
After Sales Service or your dealer.
• Check the inlet hose regularly for brittleness and
cracks and replace if necessary.
• The washing machine can be connected without a
backflow valve.
Water stop anti-flooding system (picture 8)
(if available)
• Screw the hose to the water supply tap. Turn the
tap fully on and check the water-tightness of the
connection.
• The washing machine must not be connected to
the mixing tap of a non-pressurized water heater!
• Do not immerse the water stop device of the hose
into water; otherwise it will loose its protective
function.
• If the flexible hose is damaged, unplug the washing
machine from the mains immediately, turn off the
tap and replace the hose.
• If the flexible hose is too short, replace it with a 3
m Water Stop hose (available from After-Sales
Service or from your dealer).
Connect the water drain hose (picture 9)
Unhook the drain hose from the left clip, see arrow
“A” on picture.
Important:
Do NOT loosen the drain hose from the right con-
nection, see arrow “B” on picture. Otherwise, there
is the risk of leakage and of scalding with hot water.
Firmly connect the drain hose to the siphon or another
outlet for drain water.
If you need to add an extension, use a flexible hose
of the same size and secure the unions with screw-on
hose clips.
Maximum overall drain hose length: 2.50 m.
Maximum drain height: 100 cm.
Minimum drain height: 55 cm.
Important:
Make sure there are no kinks in the drain hose and
take precautions against it falling while the washing
machine is running.

EN 4
Do not use extension leads or multi sockets.
Electrical connections must be made in accordance with local regulations.
1) Warning - this washing machine must be earthed
This washing machine is normally supplied with a mains lead having a plug fitted in the factory which has
been checked for correct earth continuity.
If the fitted plug is not suitable for your socket outlet, or if the machine’s mains lead is not fitted with a plug,
you should fit a suitable new, good quality plug by following the instructions in (2) below.
Any unsuitable plug should be cut off and disposed of in order to avoid a possible shock hazard should it be
inserted into a socket.
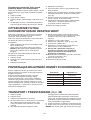
2) CONNECTION TO A REWIRABLE PLUG - to be carried out only by a qualified electrician
The wires in the mains lead are coloured in accordance with the following code:
BLUE - “NEUTRAL” (“N”)
BROWN - “LIVE” (“L”)
GREEN AND YELLOW - “EARTH” (“E”)
To fit a new plug, proceed as follows:
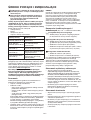
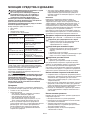
2.1)Polarized Plugs (e.g. 3 pin, 13 amp plug conforming to BS
1363A)
a. The GREEN AND YELLOW wire must be connected to the terminal
in the plug which is marked with the letter “E” or by the Earth symbol
or coloured green and yellow.
b. The BLUE wire must be connected to the terminal which is marked
with the letter “N” or coloured blue.
c. The BROWN wire must be connected to the terminal which is
marked with the letter “L” or coloured brown.
2.2) Non-polarized plugs (e.g. 2 pin with side earth contact)
The wire which is coloured GREEN AND YELLOW must be connected to the earth contact. The other two
wires should be connected to the two pins, irrespective of colour.
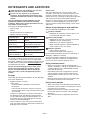
FUSE REPLACEMENT
If the mains lead of this washing machine is fitted with a BS 1363A 13
amp fused plug, replace the fuse only with an A.S.T.A. approved type con-
forming to BS 1362 and proceed as follows: Remove the fuse cover (A)
and the fuse (B). Fit the replacement 13 A fuse into the fuse cover. Refit
both into the plug. For all other types of plug, the supply socket should be
protected by a 16 A fuse or circuit breaker at the distribution board.
ELECTRICAL CONNECTION

EN 5
BEFORE THE FIRST WASH CYCLE
To remove any residual water used in testing by the
manufacturer, we recommend that you carry out a
short wash cycle without laundry.
1. Open the tap.
2. Close the drum flaps.
3. Add a small amount of detergent (maximum
1/3 of the quantity the detergent manufacturer
recommends for lightly soiled laundry) to the main
wash chamber of the detergent dispenser.
4. Close the lid.
5. Select and start programme “Synthetics” at 60°C
(see separate the programme chart).
PREPARATION OF THE LAUNDRY
Sort the laundry
1. Sort the laundry according to…
• Type of fabric / care label symbol
Cottons, mixed fibres, easy care/synthetics, wool,
handwash items.
• Colour
Separate whites and coloureds. Wash new
coloured items separately.
• Size
Wash items of different sizes in the same load to
improve washing efficiency and distribution in the
drum.
• Fabric delicacy
Wash delicate articles separately: use a special
programme for Pure New Wool , curtains and
other delicates. Always remove curtain glides or
wash curtains with the glides inside a cotton bag.
Use the special programme for handwash fabrics.
Wash stockings, belts and other small items or
articles with hooks (e.g. bras) in special cotton
bags for washing machines or in zipped pillow
cases.
2. Empty pockets
Coins, safety pins and similar items can damage
your laundry as well as the washing machine’s
drum and tub.
3. Fasteners
Close zips and fasten buttons or hooks; loose belts
or ribbons should be tied together.
Stain remwoval
• Blood, milk, egg and other organic substances are
generally removed by the enzyme phase of the
programme.
• To remove red wine, coffee, tea, grass and
fruitstains etc. add a stain remover to the main
wash chamber of the detergent dispenser.
• Particularly stubborn stains should be treated
before the wash.
Dyeing and bleaching
• Only use dyes and bleaches that are suitable
forwashing machines.
• Follow the manufacturer’s instructions.
• Plastic and rubber parts of the machine may be
stained by dyes or bleaches.
Loading the laundry
1. Open the machine lid by pulling it upwards.
2. Open the drum
- by pushing the drum flap release (picture 10,11);
models as shown on picture 10 have a fixed drum
flap release which will not compress when pushed.
- by holding the rear drum flap, sliding back the
slider into arrow direction and pushing the front
flap towards the inside of the drum until the closing
mechanism releases (picture 12).
3. Place the items of laundry into the drum one by
one. Do not exceed the maximum load of the
programmes indicated in the separate programme
chart.
- Overloading the machine will result in
unsatisfactory washing results and creased
laundry.
- Take care that the laundry does not overhang the
drum; if this is the case, push the laundry down
into the drum so that there is enough free space
to close the drum flaps properly.
- Do not use the flaps to push the laundry into the
drum.
4. To close the drum, hold both flaps in the middle
again (picture 13), the rear flap over the front flap.
ATTENTION: make sure that the drum flaps are
properly locked - depending on the model:
- all metal hooks must be properly hooked inside
the rear door flap - see picture 14.
- all metal hooks must be properly hooked inside
the rear door flap, and the button must overlap
the edge of the rear door flap see picture 15.
- the slider of the front flap must slightly overlap
the rear flap - see picture 16.
Check that no laundry gets stuck between the flaps,
or between flaps and drum.

EN 6
DETERGENTS AND ADDITIVES
Keep detergents and additives in a safe, dry
place out of the reach of children.
Do not use any solvents (e.g. turpentine,
benzene); do not machine wash fabrics that
have been treated with solvents or flammable
liquids.
Only use detergents and/or additives that are
specifically produced for domestic washing
machines. Observe the recommendations on the
care labels of your laundry.
The choice of detergent depends on:
• Type of fabric
• Colour
• Recommended wash temperature
• Degree and type of soiling
Laundry type Kind of detergent
White robust laundry
(cold-95°C):
heavy duty detergents with
bleach
White delicate laundry
(cold-40°C):
mild detergents with bleach
and/or optical brighteners
Light /pastel- shaded
colours (cold-60°C):
detergents with bleach and/
or optical brighteners
Intensive colours
(cold-60°C):
colour detergents without
bleach/optical brighteners
Black/dark
colours(cold-60°C):
special detergents for black/
dark laundry
For laundry requiring special treatment (e.g. wool
or microfibers), we recommend to use specialized
detergents, additives or pre-treatment available on the
market. Refer to internet link www.cleanright.eu for
more detailed information.
Do not use liquid detergent for the main wash
when having activated the “Prewash” option.
Do not use liquid detergent when selecting a
later cycle start / cycle end (depending on the
model).
Dosage
Follow the dosage recommendations on the detergent
pack. They depend on:
• degree and type of soiling
• size of wash
- full load: follow the detergent manufacturer’s
instructions;
- half load: 3/4 the amount used for a full load;
- minimum load (about 1 kg): half the amount used
for a full load
If there is no reference to a certain wash load on
the detergent pack: the detergent manufacturers
usually refer their dosing recommendations to 4.5
kg laundry for heavy duty detergent and 2.5 kg
laundry for delicate detergent.
• water hardness in your area (ask for information
from your water company). Soft water requires less
detergent than hard water.
Please note:
Too much detergent can result in excess foam
formation, which reduces washing efficiency. If the
washing machine detects too much foam, it may
prevent spinning, or prolong the programme duration
and increase the water consumption (see also
remarks on foam formation in the “Troubleshooting
Guide”). Insufficient detergent may result in grey
laundry and also calcifies the heating system, drum
and hoses.
Where to put detergents and additives
(picture 17a, 17b - depending on the model)
Prewash chamber
• Detergent for the prewash phase (only if you
have activated “prewash” option)
Main wash chamber
• Detergent for the main wash phase (must be
added for all wash programmes)
• Additive for stain removal (optional)
• Water softener (optional; recommendable for
water hardness class 4 or more)
Softener chamber
• Fabric softener (optional)
• Starch dissolved in water (optional)
Do not exceed the “MAX” level mark when filling in
detergent, additives or softener.
For more information regarding the application of
detergent and fabric softener in the programmes,
have a look at the separate program chart.
Using chlorine bleach
• Wash your laundry in the desired programme
(Cotton, Synthetics), adding an appropriate amount
of chlorine bleach to the SOFTENER chamber
(close the lid carefully).
• Immediately after end of programme, start the
“Rinse and Spin” programme to eliminate any
residual bleach smell; if you want, you can add
softener.
• Never put both chlorine bleach and softener into
the softener chamber at the same time.
Using starch powder
• Wash your laundry in the desired wash programme.
• Prepare the starch solution according to the starch
manufacturer’s instructions.
• Fill the prepared starch solution (maximum 100
ml) into the softener chamber of the detergent
dispenser.
• Close the lid and start programme “Rinse and
Spin”.

EN 7
CARE AND MAINTENANCE
Always unplug the washing machine before doing any maintenance.
Detergent dispenser
Clean the detergent dispenser regularly, at least
three or four times a year, to prevent detergent
build-up:
Detergent dispenser - picture 17a
1. Push in the buttons on each side of the dispenser
(picture 18).
2. Pull the dispenser towards you and remove
it. A small quantity of water can remain in the
dispenser. It is advisable to carry the dispenser in
an upright position.
3. Wash the dispenser using running water. You can
also remove the siphon caps in the dispenser for
cleaning.
4. Replace the siphon caps in the dispenser (if
removed). Make sure that they lock in place
5. Replace the dispenser by locating the bottom tabs
in the lid holes and pivot until both of the upper
buttons lock.
Detergent dispenser - picture 17b
1. Press the button to release the detergent dispenser
and remove it (picture 19). A small quantity of
water can remain in the dispenser, thus you should
carry it in an upright position.
2. Wash the dispenser using running water. You can
also remove the siphon cap on the back of the
dispenser for cleaning (picture 20).
3. Replace the siphon cap in the dispenser (if
removed)
4. Reinstall the dispenser by locating the dispenser’s
bottom tabs into the appropriate openings on the
lid, and by pushing the dispenser against the lid
until it locks into place.
Make sure that the detergent dispenser is
correctly reinstalled.
Water inlet hose filter
Check and clean regularly (at least two or three
times a year).
1. Unplug the washing machine.
2. Turn off the tap.
3. Unscrew the hose from the tap.
4. Carefully clean the filter located at the end of hose,
without disassembling it, for example with a tooth-
brush.
Note: Do not submerge the hose in water.
5. Screw the flexible hose back onto the tap by hand.
Do not use pliers (risk of squashing the joint).
6. Turn on the tap and check that the connections
are water-tight.
7. Plug the washing machine back in.
Water inlet hose
(picture 21, 22 or 23, depending on model)
Check the inlet hose regularly for brittleness and
cracks and replace it if necessary using a new hose of
the same type.
The inlet hose as shown on picture 21 has a safety
valve to prevent the appliance against uncontrolled
water inlet; if the safety valve inspection window (A) is
red, the safety valve has been activated and the hose
must be exchanged. Contact out After-Sales Service
or your specialist dealer to obtain a new inlet hose.
For unscrewing the inlet hose as shown on picture 21,
you must push down the release lever (B) (if available)
while unscrewing it.
If your inlet hose has a transparent hose coating
(picture 22), periodically check the colour of the
transparent coating. If the transparent hose shows a
local dark colour change, this is an indication that the
hose may have a leak and should be replaced.
Contact our After-Sales Service team or specialist
dealer to obtain a replacement hose.
Appliance exterior and control panel
• Clean with a soft damp cloth.
• If necessary, use some soapy water or a mild
neutral detergent (do not use detergents containing
solvents, abrasive detergents, window or general-
purpose cleaners - they may harm the surfaces).
Appliance interior
• After each washing, leave the lid open for some-
time to allow the inside of the appliance to dry.
• If you never or seldom wash your laundry at
95°C, we recommend to occasionally run a 95°C
programme without laundry, adding a small amount
of detergent, to keep the interior of the appliance
clean.
Lid seal
• Check the condition of the lid seal periodically and
clean it from time to time with a damp cloth.
Water inlet hose(s)
• Check the hose regularly for brittleness and cracks.
Replace if necessary.
Filter
• Check and clean the filter regularly, at least 3 or
4 times a year (see “Cleaning the Filter/ Draining
Residual Water”).
Do not use flammable fluids for cleaning the ap-
pliance.

EN 8
Recovering an object that falls between
the drumand the tub
If an object accidentally falls between the drum and
the tub, you can recover it thanks to one of the remov-
able drum blades:
1. Unplug the washing machine.
2. Remove the laundry from the drum.
3. Close the drum flaps and turn the drum a
half-turn (picture 24).
4. Using a screw-driver, press on the plastic end
while sliding the blade from left to right (picture
25, 26).
5. It will fall into the drum.
6. Open the drum: you can recover the object
through the hole in the drum.
7. Refit the blade from inside the drum: Position the
plastic tip above the hole on the right side of the
drum (picture 27).
8. Then slide the plastic blade from right to left until
it clips.
9. Close the drum flaps again, turn the drum through
half a turn and check the positioning of the blade
at all its anchorage points.
10. Plug the washing machine in again.
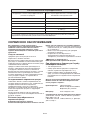
REMAINING MOISTURE CONTENT OF THE LAUNDRY
AFTER SPINNING
The degree of moisture remaining in the laundry
after spinning mainly depends on the fabric type, the
selected programme and spin speed.
The lowest remaining moisture content can be
achieved using the wash programme referred to
by the Energy Label, with maximum spin speed.
This programme is marked in the separate
programme chart as “Reference programme
for the Energy Label”. Below a survey of the
remaining moisture content (in %) related to
the various spin-drying efficiency classes:
Spin-drying
efficiency class
Remaining moisture
content in %
A (= most efficient) less than 45
B 45 or more, but less than 54
C 54 or more, but less than 63
D 63 or more, but less than 72
E 72 or more, but less than 81
TRANSPORT AND HANDLING (picture 30)
1. Unplug the washing machine.
2. Turn off the tap.
3. Remove the water supply and drain hose.
4. Eliminate all water from the hoses and the washing
machine (see “Cleaning the Filter/ Draining
Residual Water”). Wait for the water to cool so as to
avoid any accidents.
5. To facilitate moving the machine, pull the handle
situated at the bottom front (if available on your
model) out a little by hand and pull it out to the stop
with the foot. Afterwards push the handle back into
the original stable position.
6. Fix the transport bracket again for transportation.
7. Transport the washing machine upright.
IMPORTANT: Do not use the washing machine while
the handle is pulled out.
CLEANING THE FILTER/ DRAINING RESIDUAL WATER
The washing machine is provided with a self-cleaning
pump. The filter keeps objects like buttons, coins,
safetypins etc. which have been left in the laundry.
We recommend to check and clean the filter regularly,
at least two or three times a year.
Especially:
• if the appliance is not draining properly or if it fails
to perform spin cycles.
• if the “Pump” indication lights up.
IMPORTANT: make sure the water has cooled
before draining the appliance.
Residual water must be drained also before transport-
ing the machine.
1. Unplug the washing machine.
2. Open the filter cover with a coin (picture 28).
3. Place a bowl beneath it.
4. Turn the filter slowly anti-clockwise until some
water starts to flow out; do not remove it as yet.
5. Wait until all the water has drained.
6. Now unscrew the filter completely and extract it
(picture 29).
7. Clean the filter and the filter chamber.
8. Make sure the pump impeller (in the housing
behind the filter) is not obstructed.
9. Insert the filter again and screw it in
completely in clockwise direction. Make
sure the filter is screwed in properly, as far
as it will go.
10. Pour approximately one litre of water into the
washing machine via the drum and check that
water does not leak from the filter.
11. Close the filter cover.
12. Reconnect the washing machine.

EN 9
AFTER SALES SERVICE
No one is better placed to care for your Hotpoint appliance during the course of its working
life than us - the manufacturer.
Essential Contact Information
Hotpoint Service
We are the largest service team in Europe offering you access to 400 skilled telephone advisors and 1000
fully qualified engineers on call to ensure you receive fast, reliable, local service.
UK: 08448 224 224
Republic of Ireland: 0818 313 413
www.hotpointservice.co.uk
Please note: Our advisors will require the following information:
Model number:
Serial number:
Parts and Accessories
We supply a full range of genuine replacement parts as well as accessory products that protect and
hygienically clean your appliance to keep it looking good and functioning efficiently throughout its life.
UK: 08448 225 225
Republic of Ireland: 0818 313 413
www.hotpointservice.co.uk
Appliance Registration
We want to give you additional benefits of Hotpoint ownership. To activate your free 5 year parts guarantee you
must register your appliance with us.
UK: 08448 24 24 24
Republic of Ireland: 01 230 0800
www.hotpointservice.co.uk
Indesit Company UK Ltd. Morley Way, Peterborough, PE2 9JB
Indesit Company Unit 49 Airways Industrial Estate,Dublin 17
RECYCLING & DISPOSAL INFORMATION
As part of Hotpoint’s continued commitment to helping the environment, Hotpoint reserves the right to use
quality, recycled components to keep down customer costs and minimise material wastage.
Please dispose of packaging and old appliances carefully. To minimise the risk of injury to children, remove the
door, plug and cut the mains cable off flush with the appliance. Dispose of these parts separately to ensure that
the appliance can no longer be plugged into a mains socket, and the door cannot be locked shut.

EN 10
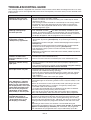
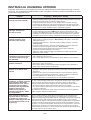
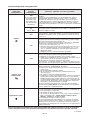
TROUBLESHOOTING GUIDE
Your washing machine is equipped with automatic safety functions which detect and diagnose faults at an early
stage and allow you to react appropriately. These faults are frequently so minor that they can be removed within
a few minutes.
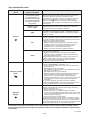
Problem Causes - Solutions - Tips
Appliance does not start,
no indicator lamps are on
• Plug is not properly inserted in socket.
• Socket or fuse does not function correctly (use a table lamp or similar
appliance to test it).
• The washing machine switched off automatically to save energy, before
programme start or after programme end. To switch on the washing
machine, turn the programme selector first to “Off/O” and then to the
desired programme again.
Appliance does not start
although “Start(Pause)”
has been pressed
• Lid is not properly closed.
• The “Child lock” function has been activated (if available on your
model). To unlock the buttons, push temperature and spin speed button
simultaneously and hold them at least for 3 seconds. The key symbol on
the display disappears and the programme can be started.
Appliance stops during the
programme, and the
“Start(Pause)” light blinks
• “Rinse hold” option is activated (if available on your model) - terminate
“Rinse hold” by pressing “Start(Pause)” or by choosing and starting
“Drain”.
• Programme has been changed - reselect desired programme and press
Start(Pause)”.
• Programme has been interrupted and eventually lid has been opened -
close lid and restart programme by pressing “Start(Pause)”.
• The appliance’s safety system has been activated (see “Description of
failure indicators”).
• Water tap is not opened or water inlet hose is kinked (“Water tap closed”
indicator lights up).
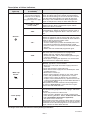
Detergent dispenser
contains residues from
detergent/additives at end
of wash
• Detergent dispenser is not properly installed, or detergent dispenser is
blocked (see “Care and Maintenance”).
• Filter in the water inlet hose is blocked (see “Care and Maintenance”).
Appliance vibrates during
spin cycle
• Washing machine is not level; the feet are not properly adjusted (see
“Installation”).
• The transport bracket has not been removed; before using the washing
machine, the transport bracket must be removed.
Final spin results are poor
• Unbalance during spinning prevented spin phase to protect the washing
machine (see “Unbalance during spinning”).
• Excessive foam formation prevented spinning; select and start “Rinse &
Spin” programme. Avoid excessive detergent dosing (see “Detergents
And Additives”).
• “Spin” button has been set to a low spin speed.
“Unbalance during spinning”
The “Spin/Drain” indicator
in the programme flow bar
blinks, or the spin speed on
the display blinks, or the spin
speed indicator blinks after
the end of the programme
(depending on the model).
The laundry is still very wet.
Unbalance of the laundry load during spinning prevented the spin phase
to avoid damages on the washing machine. This is why the laundry is still
very wet.
Reason for unbalance can be: small laundry loads (consisting of only few
quite big or absorbent items, e.g. towels), or big/heavy laundry items.
• If possible avoid small laundry loads.
• It is highly recommended that you add other laundry items of different
sizes when washing a big or heavy piece of laundry.
If you want to spin the wet laundry, add more laundry items of different
sizes, and subsequently select and start the “Rinse & Spin” programme.
Programme duration is
considerably longer or
shorter as indicated in the
“programme chart” or on
the display (if available)
Normal function of the washing machine to adapt to factors that can have
an effect on the programme duration, like excessive foam formation, load
unbalance due to heavy laundry items, prolonged heating time resulting
from low inlet water temperature etc.. Moreover, the sensing system of the
washing machine adapts the programme duration to the size of the wash
load.
Depending on these factors, the duration is recalculated during the
programme and updated if necessary; during such periods, an animation
appears on the display (if available). For small loads, the programme
time indicated in the “programme chart” may be reduced by up to 50%.

EN 11
If your washing machine has no display, check which of the previously described situations could be
the origin of the fault and follow the corresponding instructions.
F-12/2014
Failure indicator
lights up
Indication on display
(if available)
Description - Causes - Solutions
“Service”
“bdd”
(in case your washing
machine has no display:
all lamps of the
programme flow bar light
up)
Appliance stops during the programme. “Drum flaps
open” (the drum flaps have not been closed properly).
Push the “Reset” button for at least 3 seconds and wait
until the “Door open” lights up. Open lid and close
drum flaps, then select and start desired programme
again. If fault persists, notify our After-Sales Service.
from “F02” to “F35”
(except “F09”)
“Electrical module fault”.
Select and start “Drain” programme or push “Reset”
button for at least 3 seconds.
“F09”
“Water level too high” (after programme cancellation or
false operating). Switch off appliance and then switch it
on again, select programme “Drain” and start within 15
sec.
“FA”
“Waterstop fault”
Switch off appliance, pull out mains plug and turn water
tap off. Tilt appliance forward carefully to allow collected
water to flow out from the bottom. Then:
• Plug in the appliance again.
• Turn the water tap on (if water immediately flows into
the appliance without the appliance being started,
there is a failure; turn off the tap and notify After-Sales
Service).
• Select and start the desired programme again.
“Fod”
“Overfoaming”
Too much foam interrupted the wash programme.
• Select and start “Rinse & Spin” programme.
• Afterwards select and start desired programme again,
using less detergent.
If faults persist, unplug the appliance, turn off the water
tap and contact our After-Sales Service
“Water tap
closed” −
Appliance has no or insufficient water supply. The “Start
(Pause)” light blinks. Check whether:
• Water tap is fully open and water supply pressure is
sufficient.
• Kinks are present in water inlet hose.
• Mesh filter of water supply hose is blocked (see “Care
and Maintenance”).
• Water hose is frozen up.
• Safety valve inspection window of your water supply
hose is red (provided your appliance has a water
supply hose as shown on picture 21 - see previous
chapter “Care and Maintenance”); replace the hose by
a new one available through our After-Sales Service or
your specialist dealer.
After problem has been removed, restart programme
by pressing “Start (Pause)”. If the fault occurs again,
contact our After-Sales Service.
“Clean pump”
−
Waste water is not pumped out. The appliance stops in
the corresponding programme step; unplug it and check
whether:
• Kinks are present in the drain hose.
• Filter or pump is blocked (see chapter “Cleaning the
Filter/ Draining Residual Water”; make sure the water
has cooled before draining the appliance).
• The drain hose is frozen up.
After problem has been removed, select and start “Drain”
programme or push “Reset” button for at least 3 seconds;
afterwards restart desired programme. If the fault occurs
again, contact our After-Sales-Service.
Description of failure indicators

PL 1
ZALECENIA DOTYCZĄCE NINIEJSZEJ INSTRUKCJI
Niniejsza pralka przeznaczona jest wyłącznie do
prania i wirowania bielizny w ilości, które na bieżąco
znajduje się w gospodarstwach domowych.
• W czasie korzystania z pralki należy stosować
się do zaleceń podanych w niniejszej “Instrukcji
obsługi” oraz w “Tabeli programów”.
• “Instrukcję obsługi” i “Tabelę programów” należy
zachować; i przekazać je kolejnemu użytkownikowi
w przypadku sprzedaży lub przekazania
urządzenia.
ŚRODKI OSTROŻNOŚCI I OGÓLNE ZALECENIA
1. Wskazówki dotyczące
bezpieczeństwa
• Pralka służy wyłącznie do użytku
domowego.
• Zabrania się przechovywania
łatwopalnych cieczy w pobliżu
urządzenia.
• Na pralce nie wolno kłaść żadnych
urządzeń elektrycznych.
• Dzieci należy pilnować, aby
mieć pewność, że nie bawią się
urządzeniem.
• Dzieci młodsze niż trzyletnie
powinny być trzymane z dala od
pralki lub pozostawać pod stałą
opieką.
• Pralkę mogą obsługiwać dzieci
powyżej 8 lat oraz osoby o
obniżonej sprawności fizycznej,
zmysłowej czy intelektualnej,
jak też osoby nie posiadające
wystarczającego doświadczenia
lub wiedzy, pod warunkiem iż
będą one pod nadzorem albo
jeśli zostały one pouczone przez
odpowiednią osobę odnośnie
bezpiecznego korzystania z pralki
i którym są zrozumiałe ewentualne
ryzyka płynące z korzystania z
niej. Dzieciom nie wolno bawić się
z pralką. Dzieciom bez nadzoru
nie wolno wykonywać czynności
dotyczących utrzymania lub
konserwacji pralki
• Nie należy próbować otwierać
pokrywy na siłę.
• Jeśli to konieczne, przewód
zasilający może być wymieniony
na identyczny, zakupiony w
serwisie technicznym. Wymiana
przewodu zasilającego może być
wykonywana wyłącznie przez
wykwalifikowanego technika.
• Przed czyszczeniem lub
konserwacją należy wyłą-czyć
pralkę i odłączyć ją od zasilania.
2. Opakowanie
• Materiały opakowaniowe nadają się w 100% do
recyklingu i są oznaczone symbolem . Należy
przestrzegać obowiązujących lokalnych przepisów
dotyczących usuwania opakowań.
3. Utylizacja opakowania i
wyeksploatowanych pralek
• Niniejsze urządzenie zostało oznakowane zgodnie
z Dyrektywą 2002/96/WE w sprawie zużytego
sprzętu elektronicznego i elektrotechnicznego
(WEEE).Zapewniając prawidłową utylizację
niniejszegoproduktu pomogą Państwo zapobiec
ewentualnymnegatywnym skutkom dla środowiska
naturalnego i zdrowia człowieka, wynikającym z
nieprawidłowej utylizacji niniejszego produktu.
• Symbol umieszczony na produkcie lub na
dołączonych do niego dokumentach oznacza, że
niniejsze urządzenie nie może być usuwane razem
z odpadami komunalnymi. Urządzenie należy,
w celu jego złomowania, zdać w odpowiednim
punkcie utylizacji odpadów w celu recyklingu
komponentów elektrycznych i elektronicznych.
Utylizacja powinna być przeprowadzona zgodnie
z lokalnymi przepisami dotyczącymi usuwania
odpadów. Bardziej szczegółowe informacje na
temat odzyskiwania i recyklingu niniejszego
produktu można uzyskać w siedzibie miejscowych
władz, służb zajmujących się usuwaniem odpadów
lub w sklepie, w którym produkt został zakupiony.
• Pralka została wyprodukowana z materiałów
nadających się do przetworzenia. Należy ją
złomować zgodnie z obowiązującymi przepisami
dotyczącymi utylizacji odpadów.
• Przed złomowaniem urządzenia, należy usunąć
resztki proszku oraz odciąć kabel zasilający, aby
pralka nie była już zdolna do pracy.
4. Ogólne zalecenia
• Nie należy pozostawiać pralki podłączonej do
zasilania, kiedy nie jest używana. Zakręcić zawór
dopływowy wody.

PL 2
5. Deklaracja zgodności z normami UE
• Pralka została zaprojektowana, wyprodukowana
i jest sprzedawana zgodnie z wymogami
bezpieczeństwa następujących Dyrektyw
europejskich: Dyrektywą niskonapięciową
2006/95/WE Dyrektywą w sprawie Kompatybilności
Elektromagnetycznej 2004/108/WE
.
Producent nie ponosi odpowiedzialności za jakiekol-
wiek uszkodzenie bielizny spowodowane nieodpow-
iednim i niewłaściwym przestrzeganiem instrukcji
pielęgnacji bielizny, które są zamieszczone na
etykietach odzieży lub bielizny.
PRZED UŻYCIEM PRALKI PO RAZ PIERWSZY
1. Rozpakowanie i sprawdzenie
a. Rozciąć i zdjąć folię termokurczliwą.
b. Zdjąć górną osłonę i zabezpieczenia rogów.
c. Zdjąć dolną osłonę przechylając i obracając
pralkę na jednym z tylnych dolnych rogów.
Upewnić się, że plastikowa część dolnej
osłony (jeśli dotyczy tego modelu) pozostaje w
opakowaniu, a nie na dnie pralki.
Pozostawienie tej części na dnie pralki może
spowodować uszkodzenie pralki.
d. Otworzyć pokrywę lekko naciskając podczas
podnoszenia za uchwyt. Wyjąć poduszkę z
polistyrenu (w zależności od modelu).
e. Zdjąć niebieską folię ochronną z panelu (zależnie
od modelu).
• Po rozpakowaniu należy upewnić się, czy pralka
nie jest uszkodzona. W przypadku wątpliwości nie
używać urządzenia. Należy skontaktować się z
serwisem technicznym lub sprzedawcą.
• Opakowanie (worki plastikowe, kawałki
polistyrenu itd.) należy przechowywać w miejscu
niedostępnym dla dzieci; stanowią one potencjalne
zagrożenie.
• Jeśli pralka przed dostawą była narażona
na działanie niskiej temperatury, przed jej
uruchomieniem należy przez kilka godzin
pozostawić ją w pomieszczeniu o temperaturze
pokojowej.
2. Usuwanie klamry transportowej
• Pralka jest zabezpieczona śrubami transportowymi
i klamrą, aby zapobiec uszkodzeniom podczas
transportu. Przed użyciem pralki należy usunąć
klamrę transportową (patrz “Instalacja”/ “Usuwanie
klamry transportowej”).
3. Instalowanie pralki
• Ustawić pralkę na równej i stabilnej powierzchni.
• Wyregulować wysokość nóżek, aby pralka
stała stabilnie i byłą wypoziomowana (patrz
“Instalacja”/“Regulacja nóżek”).
• W przypadku podłogi drewnianej bądź podłóg
pływających (na przykład niektórych parkietów
albo podłóg laminowanych) należy umieścić
urządzenie na przyśrubowanej do podłogi płycie
sklejkowej o minimalnych wymiarach 40 x 60 cm i
minimalnej grubości 3 cm.
• Należy upewnić się, że otwory wentylacyjne w
podstawie pralki (jeśli dotyczy tego modelu) nie są
zasłonięte dywanem lub innym materiałem.
4. Podłączenie wody
• Podłączyć wąż dopływowy zgodnie z przepisami
lokalnego zakładu wodociągowego (patrz
“Instalacja”/“Podłączanie węża dopływowego
wody”).
• Podłączenie wody: Wyłącznie zimna woda
• Zawór: gwint 3/4” do węża dopływowego
• Ciśnienie: 100-1000 kPa (1-10 barów).
• Do podłączenia pralki należy użyć nowego węża
dopływowego. Nie należy wykorzystywać do tego
celu starych węży.
5. Wąż spustowy wody
• Mocno przymocuj wąż odprowadzający wodę
do syfonu, lub innego odpływu wody (patrz
“Instalacja”/ “Podłączanie węża spustowego
wody”).
• Jeśli pralka jest podłączona do wbudoanego
systemu spustowego, powinien on być
wyposażony w odpowietrzenie zapobiegające
powstaniu efektu syfonowego.
6. Podłączenie do sieci elektrycznej
• Podłączenia elektryczne muszą być wykonane
przez wykwalifikowanego technika zgodnie
z instrukcjami producenta i obowiązującymi
przedpisami bezpieczeństwa.
• Dane techniczne (napięcie, moc i bezpieczniki) są
podane na tabliczce znamionowej, znajdującej się
z tyłu urządzenia.
• Nie stosować przedłużaczy ani rozdzielaczy.
• Podłączenie pralki winno być tak wykonane,
aby po jej zainstalowaniu zapewniało dostęp do
gniazdka zasilającego lub do 2-biegunowego
wyłącznika odłączającego od sieci.
• Nie należy używać pralki, jeśli uległa uszkodzeniu
podczas transportu. O wszelkich uszkodzeniach
należy informować serwis techniczny.
• Wymiany kabla zasilającego może dokonać tylko
serwis techniczny.
• Pralka musi być podłączona do instalacji
uziemiającej zgodnie z obowiązującymi
przepisami. W szczególności pralki zainstalowane
w pobliżu prysznica lub wanny muszą być
chronione wyłącznikiem różnicowo-prądowym
o mocy przynajmniej 30 mA. Uziemienie jest
obowiązkowe i wymagane zgodnie z prawem.
Producent zrzeka się wszelkiej odpowiedzialności
za szkody wyrządzone w mieniu, za zranienia
osób lub zwierząt, będące następstwem
nieprzestrzegania wskazówek zawartych w
niniejszej Instrukcji Obsługi.
• Przy użyciu łącznika różnicowoprądowego
bez wbudowanego zabezpieczenia
nadmiarowoprądowego (RCCB) należy używać
jedynie typu oznaczonego .
Przybliżone wymiary:
Szerokość: 400 mm
Wysokość: 900 mm
Głębokość: 600 mm

PL 3
OPIS PRALKI (Rys.1)
a. Pokrywa
b. Szuflada na detergenty
c. Bęben
d. Dostęp do pompy za filtrem
e. Naklejka serwisowa (za pokrywą filtra)
f. Dźwignia do przemieszczania urządzenia (zależnie
od modelu) Aby przesunąć urządzenie: wyciągnąć
uchwyt ręką na tyle, aby lekko wystawał, a
następnie wysunąć go do oporu nogą.
g. Regulowane nóżki
INSTALACJA
Usuwanie klamry transportowej
Pralka jest zabezpieczona klamrą, aby zapobiec
uszkodzeniom podczas transportu.
WAŻNE: przed przystąpieniem do użytkowania
pralki należy BEZWZGLĘDNIE usunąć klamrę
transportową z tyłu pralki.
1. Odkręcić dwie śruby “A” i cztery śruby “B” za
pomocą płaskiego śrubokręta lub śrubokręta
sześciokątnego nr 8 (Rys. 2).
2. Usunąć klamrę transportową (Rys. 3).
3. Ponownie przykręcić cztery zewnętrzne śruby “B”
do pralki i zacisnąć je (Rys. 2).
4. Nałożyć dwie załączone uszczelki “C” w otworach
“D” pralki (Rys. 4).
Uwagi: nie należy zapomnieć o ponownym
przykręceniu i dociśnięciu czterech zewnętrznych
śrub.
Regulacja nóżek (Rys. 5, 6)
Pralkę należy umieścić na stabilnej i równej podłodze, w
pobliżu podłączeń elektrycznych, wodnych i spustowych.
Jeśli podłoga nie jest równa, należy wyregulować
wysokość nóżek (nie wkładać pod nóżki podkładek z
drewna, tektury itp.):
1. Wykręć ręcznie nóżki pralki, 2 - 3 obroty w
kierunku do ruchu wskazówek zegara, następnie
poluzuj nakrętkę za pomocą klucza.
2. Wyregulować ręcznie wysokość nóżek.
3. Dokręcić mocno przeciw nakrętkę w kierunku
przeciwnym do ruchu wskazówek zegara, w stronę
dolnej części maszyny.
Upewnić się, że nóżki spoczywają poprawnie
na podłodze oraz że pralka jest idealnie
wypoziomowana i stabilna (użyć poziomicy).
Aby zainstalować pralkę, potrzebna jest przestrzeń o
szerokości 40 cm oraz głębokości 63 cm.
Uwagi: jeśli pralka stoi na grubym dywanie, należy
tak wyregulować nóżki, aby zapewnić wystarczającą
ilość miejsca na przepływ powietrza pod pralką.
Podłączanie węża dopływowego wody (Rys. 7)
1. Ostrożnie zaśrubuj wąż zasilania do zaworu
na tylnej ścianie pralki (“A”); drugi koniec węża
zaśrubuj ręką do zaworu dopływu wody.
2. Upewnić się, że wąż nie jest zagięty.
3. Sprawdzić szczelność podłączeń kurka i pralki
poprzez całkowite otwarcie kurka wody.
• Jeśli wąż dopfywowy nie jest dostatecznie dfugi,
należy zastąpić go innym o odpowiedniej dlugości
i odpornym na ciśnienie (min. 1000 kpa, zgodny z
EN 61770).
• Jeżeli potrzebny jest dłuższy wąż proszę się
zwrócić do naszego działu obsługi klientów lub
punkt sprzedaży.
• Sprawdzić, czy wąż dopfywowy nie pęka lub nie
kruszy się. W razie potrzeby, wymienić go.
• Pralka może być zamontowana bez zaworu
zwrotnego.
System zapobiegający zalaniu wodą (Rys. 8 -
zależnie od modelu)
• Przykręcić wąż dopływowy do kurka wody.
Odkręcić zawór całkowicie i sprawdzić czy nie ma
nieszczelności na podłączeniach.
• Nie wolno podłączać pralki do baterii mieszal-
nikowej ani bezciśnieniowego podgrzewacza wody!
• Węża z zabezpieczeniem przed zalaniem nie
należy zanurzać w wodzie, w przeciwnym razie
straci swoją funkcję ochronną.
• Jeżeli elastyczny wąż jest uszkodzony, należy
natychmiast odłączyć pralkę od zasilania, zakręcić
zawór wody i wymienić wąż.
Jeżeli wąż elastyczny jest za krótki, należy go
wymienić na 3 m wąż wyposażony w zabezpieczenie
przed zalaniem (dostępny w serwisie technicznym lub
w punkcie sprzedaży pralki).
Podłączanie węża spustowego wody (Rys. 9)
Zdjąć wąż spustowy z lewego zaczepu, patrz strzałka
“A” na zdjęciu.
Ważne:
NIE luzować połączenia węża od strony prawej,
zobacz strzałka “B” na zdjęciu. W przeciwnym
wypadku istnieje zagrożenie nieszczelnością i
poparzenia gorącą wodą. Mocno przymocuj wąż
odprowadzający wodę do syfonu, lub innego odpływu
wody.
Jeśli zajdzie potrzeba przedłużenia węża, to należy
użyć węża tego samego typu i połączenie zacisnąć
obejmami.
Maksymalna długość węża spustowego: 2,50 m.
Maksymalna wysokość spustu: 100 cm.
Minimalna wysokość spustu: 55 cm.
Ważne:
Dopilnować, aby nie było załamań na wężu i
zabezpieczyć go przed spadnięciem podczas pracy
urządzenia.

PL 4
PRZED PIERWSZYM CYKLEM PRANIA
Aby usunąć resztki wody pozostałe po próbach fabry-
cznych, zaleca się przeprowadzenie krótkiego cyklu
prania bez żadnego wsadu.
1. Odkręcić zawór wody.
2. Zamknąć klapy bębna.
3. Nasyp małą ilość środku piorącego (maksymalnie
1/3 ilości zalecanej przez producenta dla słabo
zabrudzonej bielizny) do przegródki prania
zasadniczego w szufladce na środki piorące.
4. Następnie zamknąć pokrywę.
5. Nastaw i włącz program „Syntetyka 60°C (zajrzyj
do oddzielnie dostarczanej „Tabeli programów”)..
PRZYGOTOWANIE PRANIA
Sort the laundry
1. Posegregować bieliznę według…
• Rodzaj tkaniny / symbol dotyczący prania
Bawełna, tkaniny mieszane, łatwe pranie/
syntetyczne, wełna, pranie ręczne.
• Kolor
Oddzielić tkaniny białe od kolorowych. Nowe
rzeczy kolorowe prać osobno.
• Rozmiar
Rzeczy różnych rozmiarów prać oddzielnie w
takich samych wielkościach wsadów, aby uzyskać
lepszą efektywność prania i rozmieszczenie w
bębnie.
• Delikatność tkaniny
Rzeczy delikatne należy prać oddzielnie:
należy skorzystać ze specjalnego programu
dla “Czystej nowej wełny” , zasłon i innych
tkanin delikatnych. Zdjąć kółka z firanek lub
prać je z kółkami w woreczku z bawełny. Dla
tkanin wymagających prania ręcznego używać
specjalnego programu.Skarpety, paski i inne małe
rzeczy z elementami metalowymi (np. biustonosze)
prać umieszczone w specjalnych bawełnianych
woreczkach lub zapiętych poszewkach.
2. Należy opróżnić kieszenie
Monety, agrafki i tym podobne elementy mogą
uszkodzić pranie oraz bęben i wnętrze pralki.
3. Zatrzaski
Zamknąć zamki i zapiąć guziki oraz haftki; luźne
paski lub wstążki powinno się związać razem.
Wywabianie plam
• Plamy z krwi, mleka, jaj i innych substancji
organicznych na ogół są usuwane w trakcie
enzymatycznej fazy programu prania.
• Aby usunąć plamy z czerwonego wina, kawy,
herbaty, trawy i owoców, należy do komory prania
zasadniczego w szufladzie na detergenty
dodać środek odplamiający.
• Plamy trudno usuwalne należy wywabić
przedpraniem.
Farbowanie i wybielanie
• Należy używać jedynie takich barwników i
wybielaczy, które są przeznaczone do użytku w
pralkach automatycznych.
• Należy przestrzegać instrukcji producenta.
• Po zakończeniu cyklu farbowania może się
okazać, że części plastikowe i gumowe pralki
zostaną zabarwione.
Wkładanie prania
1. Otworzyć pokrywę pralki ruchem do góry.
2. Otwórz bęben :
- Przyciśnięciem na bezpiecznik drzwiczek bębna
(Rys. 10, 11); (modele według rys. Rys. 10 mają
stały bezpiecznik drzwiczek bębna, który się nie
wciśnie jeśli go nie przyciśniesz.
- przytrzymaniem tylnych drzwiczek bębna,
posunięciem bezpiecznika drzwi do tyłu, w
kierunku strzałki, i przyciśnięciem tylnych
drzwiczek w kierunku do wewnątrz bębna, póki nie
zwolni się mechanizm (Rys. 12).
3. Wkładać tkaniny do bębna pojedynczo. Nie należy
przekraczać maksymalnej wagi wsadu podanej dla
danego programu w osobnej tabeli programów.
- Przeciążenie pralki może prowadzić do
niesatysfakcjonujących wyników prania i
zagniecenia tkanin.
- Należy uważać, aby pranie nie wystawało poza
bęben; w takim przypadku należy wcisnąć pranie
do bębna tak, aby dało się prawidłowo zamknąć
klapy bębna.
- Prania nie należy wciskać do bębna za pomocą
klap.
4. Aby zamknąć bęben, ponownie przytrzymaj w
środku obie części drzwiczek bębna (Rys. 13),
tylne drzwiczki nakładając na przednie.
UWAGA: Należy sprawdzić, czy klapy bębna są
prawidłowo zamknięte - w zależności od modelu:
- wszystkie metalowe zaczepy muszą być
całkowicie umieszczone w klapie tylnych drzwi -
patrz rysunek 14.
- wszystkie metalowe zaczepy muszą być
całkowicie umieszczone w klapie tylnych drzwi,
a przycisk musi wystawać poza krawędź klapy
tylnych drzwi - patrz rysunek 15.
- bezpiecznik przednich drzwiczek musi
troszeczkę wystawać przez krawędź tylnych
drzwiczek – patrz rysunek 16.
Sprawdzić, czy prane tkaniny nie dostały się między
klapy lub między klapy a bęben.

PL 5
ŚRODKI PIORĄCE I ZMIĘKCZAJĄCE
Środki piorące i dodatki do prania powinny być
przechowywane w suchym i niedostępnym dla
dzieci miejscu
Nie stosować rozpuszczalników (terpentyna,
benzyna itd.); nie prać w pralce rzeczy, które
były czyszczone rozpuszczalnikami lub
płynami łatwopalnymi.
Należy używać jedynie takich środków piorących
i dodatków do prania, które są przeznaczone do
użytku domowego w pralkach automatycznych.
Należy przestrzegać zaleceń na etykietach odzieży
Wybór rodzaju proszku zależy od:
• rodzaju tkaniny
• koloru;
• temperatury prania;
• stopnia i rodzaju zabrudzenia.
Rodzaj tkaniny Rodzaj proszku
Białe, wytrzymałe
materiały (zimna-95°C):
silne środki piorące z
wybielaczem
Białe, delikatne
materiały (zimna-40°C):
środki piorące z wybielac-
zem i/albo optycznym
rozjaśniaczem
Jasne/pastelowe kolory
(zimna-60°C):
piorące z wybielaczem i/albo
optycznym rozjaśniaczem
Intensywne kolory
(zimna-60°C):
środki piorące do kolorowej
odzieży bez wybielacza/optyc-
znego rozjaśniacza
Czarne/ciemne kolory
(zimna-60°C):
specjalne środki piorące
przeznaczone do czarnej/
ciemnej odzieży
W przypadku tkanin wymagających specjalnej
pielęgnacji (np. wełna lub mikrofibra) zalecamy użycie
specjalnych środków piorących, dodatków do prania
albo środków do prania wstępnego dostępnych na
rynku. Więcej informacji można znaleźć na stronie
internetowej www.cleanright.eu.
Nie należy używać płynnych środków piorących
do prania zasadniczego w przypadku wyboru opcji
“Pranie wstępne” Nie należy używać płynnych
środków piorących przy wyborze funkcji opóźnionego
startu/końca programu (w zależności od modelu)
Dozowanie
Należy postępować zgodnie ze wskazówkami na
opakowaniu detergentu w zależności od:
• stopnia i rodzaju zabrudzenia;
• wielkości wsadu;
- pełny wsad: należy postępować według wskazań
producenta detergentu;
- połowa wsadu: 3/4 ilości stosowanej przy pełnym
wsadzie;
- wsad minimalny (około 1 kg): połowa porcji dla
pełnego wsadu;
W przypadku kiedy na opakowaniu środka piorącego
nie jest podana wielkość wsadu bielizny, producenci
z reguły zalecają: 4,5 kg bielizny w przypadku
koncentrowanego środka piorącego a 2,5 kg bielizny
w przypadku delikatnego środka piorącego
• twardość wody w miejscu zamieszkania (należy się
ewentualnie zwrócić o informacje do odpowiedniej
instytucji): woda miękka wymaga mniej detergentu
niż twarda.
UWAGA:
Użycie zbyt dużej ilości środka piorącego spowoduje
powstanie nadmiaru piany w następstwie czego
pranie jest mniej skuteczne. W przypadku kiedy
pralka stwierdzi nadmiar piany może zatrzymać
wirowanie lub przedłużyć trwanie cyklu prania i
zwiększyć zużycie wody (patrz uwagi o nadmiarze
piany w rozdziale “Instrukcja usuwania problemów”).
Niewystarczająca ilość proszku może z czasem
spowodować szarość prania lub powstawanie osadów
na bębnie, wężu lub grzałce.
Dozowanie środków piorących i
dodatkowych (Rys. 17 - w zależności od modelu)
Przegródka do prania wstępnego
• Środek piorący do prania wstępnego (jedynie
po aktywowaniu funkcji “Pranie wstępne”).
Przegródka do prania zasadniczego
• Środek piorący do prania zasadniczego (należy
go dodawać przy wszystkich programach prania).
• Środki do usuwania plam (do wyboru).
• Środki do zmiękczania wody (do wyboru; zaleca
się stosować począwszy od 4 klasy i wyższej.
Przegródka środka do awiważu
• Środek do awiważu (do wyboru).
• Skrobia rozpuszczona w wodzie (do wyboru).
Przy dozowaniu środków piorących lub dodatkowych
nie należy przekraczać poziomu oznaczonego
“MAX”.W celu uzyskania dodatkowych informacji
dotyczących stosowania środków piorących lub do
awiważu w poszczególnych programach należy
przejrzeć dołączoną tabelę z programami.
Stosowanie wybielaczy chlorowych
• Tkaniny należy prać używając do tego
odpowiedniego programu (Bawełna, Syntetyczne),
dodając odpowiedniej ilości chlorowego wybielacza
do komory PŁYNU ZMIĘKCZAJĄCEGO (należy
pamiętać o dokładnym zamknięciu pokrywy komory).
• Bezpośrednio po zakończeniu programu należy
uruchomić program “Płukanie i Wirowanie” tak, aby
usunąć zapach wybielacza; można też dodać płynu
zmiękczającego.
• Do komory płynu zmiękczającego nie wolno
jednocześnie dodawać wybielacza chlorowego
oraz płynu zmiękczającego.
Stosowanie krochmalu
• Wyprać rzeczy korzystając z wybranego program
prania.
• Roztwór krochmalu należy przygotować zgodnie z
zaleceniami producenta.
• Do komory na płyn zmiękczający w szufladzie na
detergenty wlać przygotowany roztwór krochmalu
(maksymalnie 100 ml).
• Zamknąć pokrywę i rozpocząć program “Płukanie
i wirowanie”.

PL 6
OBSŁUGA I KONSERWACJA
Zawsze należy odłączyć pralkę przed wykonaniem jakichkolwiek czynności konserwacyjnych.
Szuflada na proszek
Aby zapobiec odkładaniu się resztek detergentów
zaleca się regularne sprawdzanie i czyszczenie
szuflady na detergenty (co najmniej 3 lub 4 razy
w roku):
Szuflada na proszek - Rys. 17a
1. Wcisnąć przyciski po każdej stronie szuflady.
2. Wysunąć szufladę do siebie i wyjąć ją. Może się w
niej znajdować niewielka ilość wody. Wskazane jest
trzymanie szuflady w pozycji pionowej.
3. Umyć szufladę pod bieżącą wodą. Można także
wyjąć i wyczyścić zatyczki syfonu.
4. Ponownie umieścić zatyczki syfonu w szufladzie
(jeżeli zostały wyjęte). Upewnić się, że zostały
dobrze włożone.
5. Włożyć z powrotem szufladę tak, aby jej dolne
wypustki weszły do otworów pokrywy i osi, aż do
zamknięcia się górnych przycisków.
Szuflada na proszek - Rys. 17b
1. Przycisnąć przycisk w celu poluzowania lejka i
wyjąć go (Rys. 19). W lejku może się znajdować
mała ilość wody, z tego względu należy nim
manipulować jedynie w płaszczyźnie pionowej.
2. Umyć szufladę pod bieżącą wodą. YMożna też
wyjąć i wyczyścić syfon umieszczony w tylnej
części lejka (Rys. 20).
3. Zamontować syfon lejka z powrotem (o ile został
wyjęty).
4. Lejek należy zainstalować z powrotem tak,
aby jego dolne zapadki zostały umieszczone
w odpowiednich otworach w pokrywie pralki i
następnie wciskać lejek do pokrywy dopóki nie
dojdzie do jego zatrzaśnięcia.
Uwagi: upewnić się, że szuflada na detergenty
została dobrze włożona.
Filtr węża dopływowego wody
Należy go sprawdzać i czyścić regularnie
(przynajmniej dwa lub trzy razy w roku).
1. Odłączyć pralkę.
2. Zakręcić zawór.
3. Odkręcić wąż dopływowy od kurka.
4. Ostrożnie wyczyścić filtr znajdujący się na końcu
węża, bez rozmontowywania, używając do tego np.
szczoteczki do zębów.
Uwagi: węża nie wolno zanurzać w wodzie.
5. Z powrotem ręcznie przykręcić wąż do kranu. Nie
używać kleszczy (ryzyko zgniecenia połączenia).
6. Odkręcić zawór wody i sprawdzić czy
połączenia są całkowicie szczelne.
7. Ponownie podłączyć pralkę.
Wąż dopływowy
(Rys. 21, 22 i 23 - w zależności od modelu)
Regularnie kontroluj, czy wąż nie jest zagięty i czy
jest bez pęknięć. Jeśli na wężu zasilania widoczne
jest uszkodzenie, wymień go za nowy takiego samego
typu, który możesz zakupić w punkcie serwisowym
albo w specjalizowanym punkcie sprzedaży.
Jeśli wąż dopływowy twojej pralki jest zgodny z typem
węża na rysunku 21 a pralka nie pompuje wodę,
skontroluj okienko zaworu bezpieczeństwa (A). Jeśli
jest czerwone, to znaczy, że funkcja bezpieczeństwa
węża - zatrzymanie wody - była inicjowana, i wąż
musi być wymieniony za nowy, który możesz zakupić
w punkcie serwisowym albo w specjalizowanym
punkcie sprzedaży. Aby odkręcić wąż dopływowy
przedstawiony na obrazku 21 trzeba nacisnąć
zwolnienie blokady (B) (jeśli jest dostępna) w czasie
odkręcania.
Jeśli wąż dopływowy jest z przeźroczystą wierzchnią
warstwą (rys. 22), regularnie kontroluj jego kolor. Jeśli
kolor przeźroczystej powierzchni węża ściemniał,
jest to znak, że wąż jest pęknięty i powinien być
wymieniony. Powiadom punkt serwisowy albo
fachowca, aby wąż wymienił.
Obudowa i panel sterowania
• Czyścić miękką, wilgotną szmatką.
• W razie potrzeby należy użyć wody mydlanej lub
delikatnego neutralnego środka czyszczącego
(nie należy stosować środków zawierających
rozpuszczalniki, ostrych ściernych środków
czyszczących lub uniwersalnych środków
czyszczących – mogą uszkodzić powierzchnię).
Wnętrze pralki
• Po każdym praniu należy na pewien czas zostawić
pokrywę otwartą tak, aby wnętrze pralki wysuszyło
się.
• Jeśli pranie nigdy nie jest prane w temperaturze
95°C lub jest rzadko prane w tej temperaturze,
zaleca się okresowe uruchomienie programu w
tej temperaturze bez wkładania prania do bębna i
dodanie niewielkiej ilości proszku. Pozwala to na
utrzymanie wnętrza pralki w czystości.
Uszczelka pokrywy
• Należy okresowo sprawdzać stan uszczelki
pokrywy oraz czyścić ją zwilżoną szmatką.
Wąż dopływowy
• Należy okresowo sprawdzać, czy wąż dopływowy
nie ma wybrzuszeń i pęknięć. W razie potrzeby
wymienić.
Filtr
• Należy regularnie sprawdzać i czyścić filtr,
przynajmniej 3 lub 4 razy w roku (patrz
“Czyszczenie filtra/ Odpompowywanie resztek
wody”).
Pralki nie należy myć przy użyciu cieczy
łatwopalnych.

PL 7
Wyjmowanie przedmiotu, który wpadł
pomiędzy bęben a ściankę komory
Jeżeli jakiś przedmiot wpadnie między bęben a ścianę
komory,można go wyjąć dzięki wyjmowanym płytom
bębna:
1. Odłączyć pralkę.
2. Wyjąć pranie z bębna.
3. Zamknąć klapki i obrócić bęben o pół obrotu (Rys.
24).
4. Śrubokrętem nacisnąć na plastikową końcówkę i
przesuwać płytę od lewej do prawej (Rys. 25, 26).
5. Wpadnie ona do bębna.
6. Otworzyć bęben: można wyjąć przedmiot przez
otwór w bębnie.
7. Założyć płytę od środka bębna: Ustawić plastikową
końcówkę nad otworem po prawej stronie bębna
(Rys. 27).
8. Następnie przesunąć plastikową płytę od lewej
strony w prawo, aż do zatrzaśnięcia.
9. Zamknąć ponownie klapy bębna, obrócić bęben
o pół obrotu i sprawdzić ułożenie płyty we
wszystkich punktach mocowania.
10. Ponownie podłączyć pralkę.
POZOSTAJĄCA WILGOTNOŚĆ ODZIEŻY PO ODWIROWANIU
Stopień wilgotności odzieży po odwirowaniu zależy
głównie od rodzaju materiału, wybranego programu i
prędkości wirowania.
Najniższy stopień wilgotności można uzyskać
przez wybranie programu piorącego według
etykiety energetycznej z maksymalną prędkością
wirowania. Ten program jest oznaczony w osobnej
tabeli programów jako “Program odnoszący się do
etykiety energetycznej“. Poniżej znajduje się przegląd
stopni wilgotności (%) powiązany z różnymi klasami
efektywności odwirowania:
Klasa efektywności
odwirowania
Pozostający stopień
wilgotności w %
A (= najbardziej efektywna) mniej niż 45
B A (= najbardziej efektywna)
C 54 albo więcej, ale mniej niż 63
D 63 albo więcej, ale mniej niż 72
E 72 albo więcej, ale mniej niż 81
TRANSPORT I PRZESTAWIANIE (Rys. 30)
1. Odłączyć pralkę.
2. Zakręcić zawór.
3. Odłączyć wąż dopływowy i spustowy.
4. Spuścić wodę z węży i z pralki (patrz “Czyszczenie
filtra/ Odpompowywanie resztek wody”). Aby
uniknąć wypadku należy odczekać, aż woda
ostygnie.
5. Aby ułatwić przesunięcie urządzenia, należy
wyciągnąć uchwyt umieszczony u dołu od przodu
(jeżeli urządzenie jest wyposażone w taki uchwyt)
ręką na tyle, aby lekko wystawał a następnie wysunąć
go do oporu nogą. Po zakończeniu używania wsunąć
uchwyt z powrotem na jego miejsce.
6. Przed transportem urządzenia zamocować klamrę.
7. Pralkę należy zawsze przenosić w pozycji pionowej.
WAŻNE: Nie używać pralki, gdy uchwyt jest wysunięty.
CZYSZCZENIE FILTRA/
ODPOMPOWYWANIE RESZTEK WODY
Pralka jest wyposażona w samoczyszczącą pompę.
Filtr wyłapuje takie przedmioty jak guziki, monety,
zapinki itp., które pozostały w praniu.
Zaleca się regularne sprawdzanie i czyszczenie filtra,
conajmniej dwa lub trzy razy do roku.
Szczególnie:
• Jeżeli urządzenie nie spuszcza prawidłowo wody
lub nie wiruje prania.
• Jeżeli zapala się kontrolka “Wyczyścić pompę”.
WAŻNE: przed rozpoczęciem odpompowywania
wody, należy upewnić się, że woda zdążyła
ostygnąć.
Resztki wody należy odprowadzić również przed
transportem urządzenia.
1. Odłączyć pralkę.
2. Posługując się monetą otworzyć pokrywkę filtra
(Rys. 28).
3. Podłożyć miskę pod filtr.
4. Powoli obracać filtrem w kierunku przeciwnym
do ruchu wskazówek zegara, dopóki nie zacznie
wyciekać woda; jeszcze go całkowicie nie
wyjmując.
5. Odczekać, aż cała woda spłynie.
6. Wykręcić filtr całkowicie i wyjąć go. (Rys. 29).
7. Oczyścić filtr i komorę filtra.
8. Sprawdzić, czy wirnik pompy (w obudowie za
pokrywą filtra) nie jest zablokowany.
9. Wsunąć filtr z powrotem i wkręcać go
obracając w kierunku ruchu wskazówek
zegara. Sprawdzić, że został poprawnie
przykręcony aż do oporu.
10. Wlać do bębna pralki około 1 litr wody i sprawdzić
czy woda nie wycieka z filtra.
11. Zamknąć pokrywę filtra.
12. Ponownie podłączyć pralkę.
Strona się ładuje...
Strona się ładuje...
Strona się ładuje...
Strona się ładuje...
Strona się ładuje...
Strona się ładuje...
Strona się ładuje...
Strona się ładuje...
Strona się ładuje...
Strona się ładuje...
Strona się ładuje...
Strona się ładuje...
Strona się ładuje...
Strona się ładuje...
Strona się ładuje...
Strona się ładuje...
-
 1
1
-
 2
2
-
 3
3
-
 4
4
-
 5
5
-
 6
6
-
 7
7
-
 8
8
-
 9
9
-
 10
10
-
 11
11
-
 12
12
-
 13
13
-
 14
14
-
 15
15
-
 16
16
-
 17
17
-
 18
18
-
 19
19
-
 20
20
-
 21
21
-
 22
22
-
 23
23
-
 24
24
-
 25
25
-
 26
26
-
 27
27
-
 28
28
-
 29
29
-
 30
30
-
 31
31
-
 32
32
-
 33
33
-
 34
34
-
 35
35
-
 36
36


Hotpoint ITWD 61252 G (PL) instrukcja
- Kategoria
- Pralki
- Typ
- instrukcja
w innych językach
Powiązane artykuły
Inne dokumenty
-
Gorenje AWECO 9560 instrukcja
-
Whirlpool AWE 92360P instrukcja
-
Whirlpool AWE 6730/P instrukcja
-
Polar AWE 8764 instrukcja
-
Whirlpool BTW D612531 (PL) instrukcja
-
Whirlpool TDLR 65330 instrukcja
-
O.E.M TLS 106-1 instrukcja
-
Whirlpool PTL 1061D Instrukcja obsługi
-
Whirlpool ITWA 61052 W (EE) instrukcja
-
Bosch WAQ283S1GB Instruction Manual And Installation Instructions