Hoover HMGV28GDFB Instrukcja obsługi

Typ
Instrukcja obsługi

Ten podręcznik jest również odpowiedni dla

GB
MICROWAVE OVENS
R
INSTALLATION INSTRUCTION
IT
FORNI A MICROONDE
ISTRUZIONI DI INSTALLAZIONE
FR
FOURS A MICRO-ONDES
INSTRUCTIONS D’INSTALLATION
,
PL
INSTRUKCJA INSTALACJI
KUCHENKI MIKROFALOWE
Installation Instruction
Please Read the Manual Carefully Before Installation
Please Note
Electrical connection
The oven is fitted with a plug and must be only connected to a properly installed earthed
socket. In accordance with the appropriate regulations, the socket must only be installed and
the connecting cable must only be replaced by a qualified electrician.
If the plug is no longer accessible following installation and all-pole isolating switch must
be present on the installation side with a contact gap at least 3mm.
A. Built-in furniture
The built-in cabinet shall not have a rear wall behind the appliance.
Minimum installation height is 85cm.
Do not cover ventilation slots and air intake points.
GB
380+2
2
B. Prepare the Cabinet.
1.
the BOTTOM CABINET TEMPLATE
Put
on the bottom plane of cabinet
.
And make the center line of the template coincides with the bottom of cabinet.
GB
2
2.
BRACKET
two
with
Fix
the BOTTOM
And r
emove the BOTTOM CABINET TEMPLATE
SCREW .
.
2*Screw
Bottom Bracket
a
a
CENTER LINE
FRONT EDGE
LEFT EDGE
T EDGE RIGH
1
S
3
GB
3.
z Do not trap or kink the power cord.
. Install the oven.
C.
3
Install the oven into the cabinet.
Bottom Bracket is just installed against the back shell of the oven.
4
4
.
4
INSTALLATION HOLE of TRIM KIT.
5
to the INSTALLATION HOLE.
Then fix the TRIM-KIT PLASTIC COVER
Screw
Installation Hole
5
. Open the door; fix the oven to the cabinet with SCREW at the
GB
5
Istruzioniperl'installazione
Sipregadileggereattentamenteilmanuale
primadell’installazione
Nota
Ilcollegamentoelettrico
Ilfornoèdotatodiunaspinaedeveesseresolocollegatoadunapresaconunacorretta
installazionediterra.Inconformitàconlenormativedelcaso,lapresadeveessereinstallataeilcavo
dicollegamentodeveesseresostituitosolodaunelettri cistaqualificato.
Selaspinanonèpiùaccessibiledopol'installazionetuttiipolisezionatoridevonoesserepresentisul
latodiinstallazioneconunadistanzatraicontattidialmeno3mm.
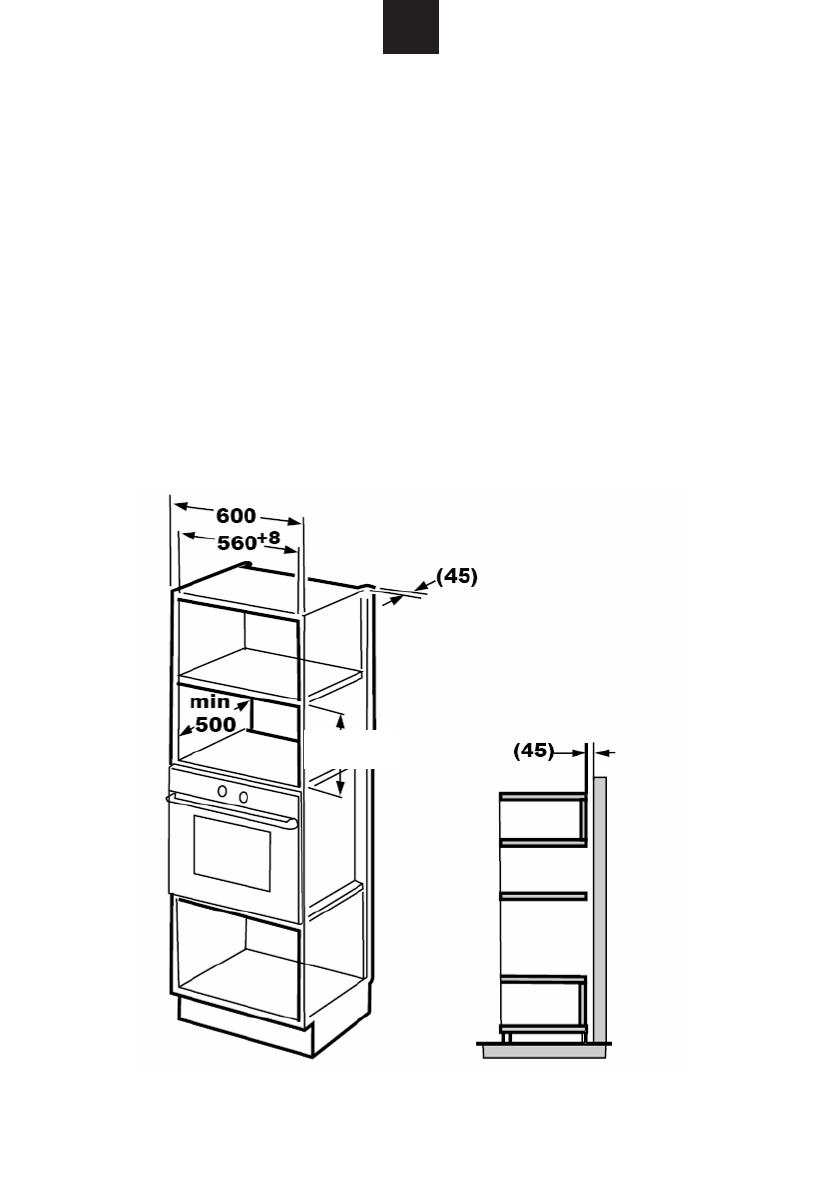
AͲMobiledaincasso
Ilmobiledaincassonondeveavereunapareteposterioredietrol'apparecchio.L’altezzadi
installazioneminimaè85cm.
Non coprire le fessure di ventilazione e i punti di presa d'aria.
IT
380+2
6
BPrepararelanicchiadiincasso
1. Appoggiareilmodelloinferioredellanicchianelpianodellainternodellanicchiastessae
allineare
il
modello

inferiore
della
nicchia
con
il
piano
inferiore
della
nicchia.
IT
a
a
CENTER LINE
FRONT EDGE
LEFT EDGE
T EDGE RIGH
1

2. Fissareilsupporto inferioreconleduevitierimuovere
ilmodelloinferioredellanicchia.
2
2viti
Supporto
inferiore
7
C.Installazionedelforno.
IT
3
3.Installazionedelforno.
Installareilfornodentrolanicchia.Evitarediattorcigliareobloccareilcavodi
alimentazione.
4. Ilsupportoinferioredeveessereins tallatocontrolaparteposterioredellastrutturadel
forno.
4
8
5. Aprire la porta; fissare il forno nella nicchia con la vite e coprire il buco di installazione con la
guarnizione plastica.
IT
5
Vite
Bucodiinstallazionevite
9
Manuel d'installation
Merci de lire attentivement le manuel avant l'installation
Merci de noter
Connection électrique
Le four est équipé d'une prise et doit être connecté à une prise terre adaptée.
Conformément à la réglementation, la prise doit être installée et le cable de connection doit
être remplacé seulement par un électricien qualifié.
Si le prise n'est pas accessible après l'installation le commutateur doit être accessible sur le
côté de l'installation avec un espace de 3mm.
A.Meuble d'encastrement
Il n'est pas recommandé d'avoir une cloison derrière l'appareil.
La hauteur d'installation minimale est 85cm.
Ne couvrez pas les fentes de ventilation et les zones de prise d'air.
FR
380+2
10
B Préparation du meuble
1 .Mettre le gabarit sur le bas de la niche du meuble en faisant en sorte que la
ligne du gabarit soit centrer et coincide avec le centre du bas de la niche.
FR
a
a
CENTER LINE
FRONT EDGE
LEFT EDGE
T EDGE RIGH
1
2
2. Fixer la patte de fixation avec les deux vis et enlever le gabarit
installé précédement.
2 vis
Patte de
fixation
11
3. Installer le four dans la niche.
Ne pas coincer ou plier le câble d'alimentation.
C. Installer le four
3
FR
4. La patte de fixation est installée contre la paroi arrière du four
4
.
12
5
Vis
Trou de fixation
5. Ouvrir la porte, fixer le four au meuble avec la Vis par le trou de fixation.
Puis mettre le cache plastique sur le trou de fixation.
FR
13
1
Jeden. Miejsce w dolnej czĊĞci modelu niszy w zakresie wewnĊtrznego wgáĊbienia i dostosowana do modelu bottom nichhia dolnej
piĊtrze niszowych.
PL
B - Przygotowanie niszowych kolekcji
1.
14
380+2
Uwaga
PoáączeĔ elektrycznych
Kuchenka jest wyposaĪona we wtyczkĊ i musi byü podáączony do prawidáowo zainstalowane ziemi. Zgodnie z obowiązującymi przepisami, muszą
byü zainstalowane gniazdo i kabel musi byü wymieniony przez wykwalifikowanego elektryka.
JeĞli wtyczka nie jest juĪ dostĊpny po zainstalowaniu wszystkich Polaków ciĊcie musi byü obecna w sprawie instalacji z przerwą 3 mm.
A- Kolekcja mebli
Szafka nie musi mieü wpuszczone tylnej Ğcianie za urządzeniem. Minimalna wysokoĞü montaĪu jest 85cm.
Nie naleĪy zakrywaü otwory wentylacyjne i wlot powietrza punktów.
Instrukcja instalacji
ProszĊ uwaĪnie przeczytaü instrukcjĊ przed zainstalowaniem
a
a
CENTER LINE
FRONT EDGE
LEFT EDGE
T EDGE RIGH
3
2

Doáączyü dolną B kulowy z dwie Ğruby i zdjąü dole model niszy.
C.
Instalacja pieca
.
PL
2 Ğruby A
NiĪsze wsparcie
B
3.Instalacja pieca.
Instalacji pieca w niszy. Nie przekrĊcaü lub zablokowaü przewód zasilający.
2.
15
ĝruba
C
Instalacja otwór Ğruby
5. Otworzyü drzwi do ustalenia pieca w niszy z C Ğruby i obejmuje instalacjĊ otworu uszczelnienia z tworzywa sztucznego.
PL
4. Na najniĪszym poziomie B musi byü zainstalowany w plecy konstrukcji pieca.
4
5
16
  • Page 1 1
  • Page 2 2
  • Page 3 3
  • Page 4 4
  • Page 5 5
  • Page 6 6
  • Page 7 7
  • Page 8 8
  • Page 9 9
  • Page 10 10
  • Page 11 11
  • Page 12 12
  • Page 13 13
  • Page 14 14
  • Page 15 15
  • Page 16 16

Hoover HMGV28GDFB Instrukcja obsługi

Typ
Instrukcja obsługi
Ten podręcznik jest również odpowiedni dla