Lauben VS01 Vacuum Sealer Instrukcja obsługi
- Kategoria
- Zgrzewarki próżniowe
- Typ
- Instrukcja obsługi

by TIGMON GmbH
LAUBEN VACUUM SEALER VS01
Tired of reading long manuals? Get started
quickly with ashort video.
www.lauben.com/80036
VIDEO TUTORIAL
Benutzerhandbuch | User manual | Uživatelský manuál | Užívateľský manuál |
Instrukcja użytkowania | Felhasználói kézikönyv | Uporabniški priročnik | Priručnik za upotrebu
DE
EN
CZ
SK
PL
SL
HU
HR

CZ Vakuová balička – Uživatelský manuál 13
SK Vákuová balička – Užívateľský manuál 18
PL Pakowaczka próżniowa – Instrukcja użytkowanial 23
SL Pakowaczka próżniowa – Uporabniški priročnik 33
HR Pakowaczka próżniowa – Priručnik za upotrebu 38
HU Vákuumcsomagoló – Felhasználói kézikönyv 28
EN Vacuum Sealer – User manual 8
DE Vakuumversiegler – Benutzerhandbuch 2
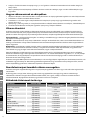
Modell LBNVS01
Leistungsaufnahme 220-240V
Frequenz 50/60Hz
Motorleistung 125W
Vakuum -50 ~ -60Kpa
Breite der Versiegelungsnaht 2.5 mm
Sicherheitssicherung JA
Maximale Folienbreite ≤ 30cm
Maße 370×120×55 mm
Gewicht 1,2 Kg
Vor dem ersten Gebrauch sollte sich der Benutzer mit den
Sicherheitshinweisen des Produkts vertraut machen.
Sicherheitshinweise
1. Bewahren Sie das Gerät außerhalb der Reichweite von Kindern auf. Es ist kein Spielzeug.
2. Die Packung enthält Kleinteile, die für Kinder gefährlich sein können. Bewahren Sie das Gerät immer außerhalb der Reichweite
von Kindern auf. Die Beutel und die zahlreichen Kleinteile in den Beuteln können verschluckt werden. Wenn die Beutel über den
Kopf gezogen werden, kann dies zum Ersticken führen.
3. Personen mit eingeschränkter Mobilität und räumlicher Orientierung dürfen das Gerät nur unter Aufsicht einer geeigneten
erwachsenen Person benutzen und handhaben.
4. Es handelt sich um ein wärmeabstrahlendes Gerät und deshalb besteht in extremen Fällen Brandgefahr. Um dieses Risiko
abzuwenden, sollten Sie sich an folgende Sicherheitshinweise halten:
a. Stellen Sie keine entflammbaren Materialien in unmittelbarer Nähe des Geräts ab!
b. Versiegeln Sie nicht dieselbe Stelle für längere Zeit!
c. Verwenden Sie das Gerät nicht in einer Umgebung mit erhöhtem Explosionsrisiko!
d. Trennen Sie das Gerät nach Gebrauch sofort vom Stromnetz!
e. Lassen Sie das Gerät vor der Lagerung vollständig auskühlen!
f. Lassen Sie das Gerät nicht unbeaufsichtigt, wenn es eingeschaltet ist!
5. Verwenden Sie das Gerät nicht, wenn das Kabel beschädigt ist. Wenden Sie sich an Ihren Händler, der Sie über die nächsten
Schritte informieren wird.
6. Benutzen Sie das Gerät nicht in feuchter Umgebung oder auf einer nassen Oberfläche.
7. Tauchen Sie keine Geräteteile, einschließlich des Kabels in Wasser oder andere Flüssigkeiten ein. Trennen sie das Gerät vor jeder
Reinigung vom Stromnetz.
8. Trennen Sie das Gerät vom Stromnetz, indem Sie das Kabelende am Gerätestecker anfassen und ziehen Sie nicht direkt am Kabel.
Lauben Vakuumversiegler VS01 – Benutzerhandbuch
2 |
DE
EN
CZ
SK
PL
HU
SL
HR

9. Verwenden Sie das Gerät nicht, wenn ein Teil des Vakuumversieglers oder das Zubehör beschädigt ist. Kontaktieren Sie Ihren
Händler und vereinbaren Sie die Reparatur / den Austausch des Geräts.
10. Verwenden Sie das Gerät nur für die vorgesehenen Zwecke.
11. Stellen Sie das Gerät nicht auf Herdplatten, Kochfelder, oder Küchenherde oder in deren Nähe.
12. Wenn Sie das Gerät längere Zeit nicht benutzen, verriegeln Sie die obere Abdeckung nicht mit dem Unterteil, um unnötigen
Druck auf die Dichtungen zu vermeiden.
13. Bei Geräten, die an eine Steckdose angeschlossen werden können: Die Steckdose muss sich in der Nähe des Geräts befinden und
leicht zugänglich sein.
Nützliche Hinweise
1. Ziehen Sie nicht das Schutzband ab, das den Hochtemperaturband bedeckt.
2. Sicherheitssicherung – Wenn die Kontrollanzeige der Taste vac seal („Vakuumversiegelung“) oder seal („Versiegelung“) blinkt,
ist die Sicherung aktiviert und es dauert 2 Minuten, bis das Gerät wieder benutzt werden kann. Die Sicherung wird nach 15
aufeinander folgenden (Vakuum-)versiegelungen automatisch ausgelöst. Jeder einzelne Versiegelungsprozess darf nicht länger
als 1 Minute dauern.
3. Das Vakuumieren von Lebensmitteln ersetzt nicht deren Konservierung. Schnell verderbliche Lebensmittel müssen gekühlt oder
eingefroren werden.
4. Bestmögliche Resultate erzielen Sie nur, wenn Sie ausschließlich das Originalzubehör (Folien, Beutel, Behälter) verwenden.
5. Während des Vakuumiervorgangs kann eine kleinere Menge Flüssigkeit oder Krümel aus den behandelten Lebensmitteln
austreten. Daher sollte die Auffangrinne für Restfeuchtigkeit und Krümel nach jedem Gebrauch gereinigt werden.
6. Lassen Sie am Ende des Beutels etwa 5 bis 7 cm Platz, um genügend Folie zum Versiegeln zu erhalten.
7. Legen Sie die Folie so in das Vakuumiergerät, dass der Rand mindestens 3 cm von den Lebensmitteln in der Folie entfernt ist.
8. Versiegeln Sie die Folie niemals an den Rändern, wo bereits Versiegelungsnähte vorhanden sind.
9. Um unansehnliche Falten zu vermeiden, glätten Sie die Folienoberfläche vorsichtig, bevor Sie die Folie in das Gerät einsetzen.
10. Vakuumieren Sie grundsätzlich keine frischen Pilze, Zwiebeln, Knoblauch und Weichkäse, da das Risiko besteht, dass anaerobe
Bakterien zu stark wachsen.
11. Alle Gemüsesorten setzen auf natürlichem Wege Gase frei und der Vakuumbeutel kann sich nach einigen Tagen aufblähen. Wir
empfehlen daher, das Gemüse immer vorher einzufrieren und im Kühlschrank zu lagern.
12. Wenn Sie scharfe Gegenstände vakuumieren, wickeln Sie sie zuerst in eine weiche Verpackung, damit sie die Vakuumfolie nicht
aufreißen.
Bitte bewahren Sie dieses Handbuch zum späteren Nachschlagen auf.
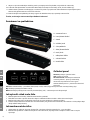
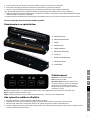
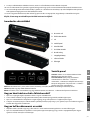
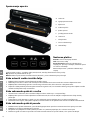
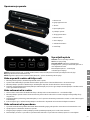
Machen Sie sich mit dem Gerät vertraut
A: Versiegelungsband
B: Obere Schaumstoffdichtung
C: Verriegelung
D: Bedienfeld
E: Obere Abdeckung/Gerätedeckel
F: Untere Schaumstoffdichtung
G: Hochtemperaturband
I: Auffangrinne
J: Vakuumdüse
K: Folienschneider
| 3
DE
EN
CZ
SK
PL
HU
SL
HR

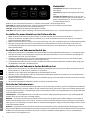
Bedienfeld
Taste Vacuum: Erzeugt nur ein Vakuum, ohne
Versiegelung
Taste Seal: Erzeugt eine Versiegelungsnaht auf der
Folie
Taste Vac Seal/ Cancel: Drücken Sie die Taste zum
Vakuumieren und Versiegeln von Lebensmitteln – der
Prozess läuft automatisch ab, das Gerät schaltet sich
nach Beendigung selbst aus
Drücken Sie diese Taste während des Prozesses – Abbruch des Vakuumier-/ Versiegelungsprozesses
Taste Food: Zwei wählbare Einstellungen– für weiche, feuchte (Moist) und harte, trockene (Dry) Lebensmittel
Die Standardeinstellung des Geräts ist im trockenen Modus Dry
Taste Dry: Geeignet für Lebensmittel ohne Flüssigkeiten oder Öle
Taste Moist: Geeignet für Suppen, fetthaltige oder weiche Lebensmittel (Torten, usw.) – der Vakuumierprozess verlangsamt sich
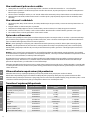
So stellen Sie einen Beutel aus der Folienrolle her
1. Öffnen Sie ein Ende des Folienschneiders und legen Sie die Folie zwischen den Schneider und das Gerät ein.
2. Halten Sie die Folie mit der linken Hand und schneiden Sie sie mit der rechten Hand von links nach rechts ab. So erhalten Sie
einen Ärmel mit zwei offenen Enden.
3. Öffnen Sie den Gerätedeckel und setzen Sie eines der Folienenden so ein, dass sich die Kante genau in der Auffangrinne befindet.
4. Verriegeln Sie den Deckel, indem Sie ihn mit leichtem Druck auf dem Unterteil einrasten lassen. Drücken Sie die Taste seal.
Sobald die Kontrollleuchte erloschen ist, öffnen Sie den Deckel und nehmen Sie den Beutel heraus. Jetzt können Sie ihn mit
Lebensmitteln befüllen.
So stellen Sie ein Vakuum im Beutel her
1. Füllen Sie das Lebensmittel so in den Beutel, dass zwischen Folienrand und dem Beutelinhalt mindestens 5 - 7 cm freie Folie liegen.
2. Entriegeln und öffnen Sie den Gerätedeckel. Legen Sie das offene Ende des Beutels so ein, dass die Kante in der Auffangrinne
endet. Glätten Sie die Folie so gut wie möglich.
3. Schließen Sie den Deckel und lassen Sie ihn auf dem Unterteil einrasten. Drücken Sie die Taste vac seal. Das Vakuumiergerät
saugt automatisch die gesamte Luft heraus und versiegelt die Folie.
4. Sobald die Kontrollleuchte erloschen ist, können Sie den Deckel öffnen und den Vakuumbeutel entnehmen. Wenn nötig, legen
Sie den Beutel in einen Kühl- oder Gefrierschrank.
So stellen Sie ein Vakuum in festen Behältern her
1. Füllen Sie das Lebensmittel, das Sie vakuumieren möchten in den Behälter. Zwischen dem oberen Rand des Behälters und den
Lebensmitteln muss ein Abstand von mindestens 3 cm bestehen.
2. Verbinden Sie den Schlauch für externe Behälter mit der Vakuumdüse am Gerät.
3. Verbinden Sie das andere Ende des Schlauchs mit dem Ventil im Deckel des Gefäßes und vergewissern Sie sich durch Drücken,
dass alle Kanten fest verschlossen sind.
4. Drücken Sie die Taste vacuum und die Luft wird aus dem Behälter gesaugt. Sobald im Gefäß ein Vakuum entstanden ist, schaltet
sich das Gerät alleine aus.
5. Um das Vakuum im Behälter aufzuheben, drücken Sie einfach das Ventil im Deckel.
Vorteile des Vakuumierens
Die Vakuumverpackung macht Lebensmittel länger haltbar. Durch das Absaugen der Luft aus geschlossenen Behältern oder Beuteln
wird der Oxidationsprozess erheblich reduziert, der den natürlichen Geschmack, die Farbe, das Aroma und die Lebensmittelqualität
insgesamt negativ beeinflusst. Sauerstoffmangel nimmt auch wesentlichen Einfluss auf einige Mikroorganismen, die die Haltbarkeit
von Lebensmitteln verändern.
Schimmelpilze – Schimmelpilze brauchen Sauerstoff, um zu wachsen. Vakuumverpackungen können so den Schimmelpilzbefall
erheblich verlangsamen oder sogar vollständig stoppen.
Hefepilze – verursachen eine Gärung, die den Geschmack und das Aroma der Lebensmittel verdirbt. Hefepilze brauchen Wasser,
Zucker und milde Temperaturen, um zu wachsen. Sie können auch ohne Luftzufuhr überleben. Um die Gärung der Lebensmittel zu
verlangsamen, ist es notwendig, sie zu kühlen. Wenn Sie den Fermentierungsprozess völlig zum Stillstand bringen möchten, müssen
Sie die Lebensmittel einfrieren.
Bakterien – verändern das Aroma, die Farbe und die Textur von Lebensmitteln. Unter außergewöhnlichen Bedingungen können
einige anaerobe Bakterien wie zum Beispiel Clostridium botulinum (verursacht Botulismus) ohne Luftzufuhr wachsen. Dabei können
die Bakterien nicht durch einen bestimmten Geschmack oder Geruch identifiziert werden. Obwohl es sich um seltene Bakterien
handelt, können sie sehr gefährlich sein.
4 |
DE
EN
CZ
SK
PL
HU
SL
HR

Für die bedenkenlose Aufbewahrung von Lebensmitteln ist es daher sehr wichtig, sie bei niedrigen Temperaturen zu lagern.
Sie reduzieren das Wachstum von Mikroorganismen bei 4 ° Cund darunter erheblich. Das Einfrieren von Lebensmitteln (bei -17
° C) zerstört die Bakterien nicht, verhindert jedoch deren Vermehrung. Wollen Sie die vakuumierten Lebensmittel langfristig
aufbewahren, frieren Sie sie immer ein und verzehren Sie sie sofort nach dem Auftauen.
Die Vakuumverpackung ist KEIN Ersatz für die Konservierung und verhindert niemals völlig das Verderben von Lebensmitteln. Sie
kann den Zersetzungsprozess nur einschränken oder verlangsamen. Es ist nicht ganz eindeutig zu bestimmen, wie lange welches
Lebensmittel frisch bleibt, weil das von vielen Faktoren abhängt, vor allem vom Zustand des Lebensmittels zum Zeitpunkt des
Vakuumierens.
Vakuumverpackung von Gegenständen, die keine Lebensmittel sind
Die Vakuumverpackung schützt auch unterschiedliche Gegenstände, die sonst dem Einfluss der Zersetzung durch Oxidation oder
Feuchtigkeit ausgesetzt sind.
Wenn Sie scharfe Gegenstände verpacken, wickeln Sie sie zuerst in ein weiches Tuch oder ein Papiertuch, damit sie die Vakuumfolie
nicht aufreißen. Die Vakuumverpackung ist ideal für Ausflüge im Freien, bei denen Sie Streichhölzer, Karten, Kleidung und
Lebensmittel trocken und unbeschädigt aufbewahren können. Wenn Sie Eiswürfel vakuumieren, haben Sie nach einiger Zeit
Trinkwasser im Beutel.
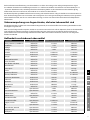
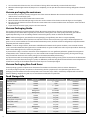
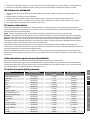
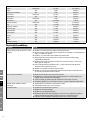
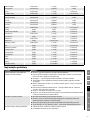
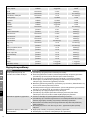
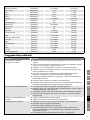
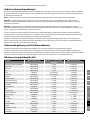
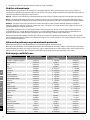
Haltbarkeit verschiedener Lebensmittel
Lebensmittel Art der Lagerung Haltbarkeit in Vakuumverpackung Normale Haltbarkeit
Rind-, Schweine-, Lammfleisch Gefrierfach 2-3 Jahre 6 Monate
Hackfleisch Gefrierfach 1 Jahr 4 Monate
Geflügel Gefrierfach 2-3 Jahre 6 Monate
Geflügel Gefrierfach 2 Jahre 6 Monate
Cheddar Kühlschrank 4-8 Monate 1-2 Wochen
Parmesan Kühlschrank 4-8 Monate 1-2 Wochen
Spargel Gefrierfach 2-3 Jahre 8 Monate
Brokkoli, Blumenkohl Gefrierfach 2-3 Jahre 8 Monate
Kraut, Rosenkohl Gefrierfach 2-3 Jahre 8 Monate
Mais (Kolben oder Korn) Gefrierfach 2-3 Jahre 8 Monate
Grüne Bohnen Gefrierfach 2-3 Jahre 8 Monate
Salat, Spinat Kühlschrank 2 Wochen 3-6 Tage
Erbsen Gefrierfach 2-3 Jahre 8 Monate
Aprikosen, Pflaumen Gefrierfach 1-3 Jahre 6-12 Monate
Pfirsiche, Nektarinen Gefrierfach 1-3 Jahre 6-12 Monate
Himbeeren, Brombeeren Kühlschrank 1 Woche 1-3 Tage
Erdbeeren Kühlschrank 1 Woche 1-3 Tage
Blaubeere Kühlschrank 2 Wochen 1-3 Tage
Preiselbeeren Kühlschrank 2 Wochen 1-3 Tage
Backwaren Gefrierfach 1-3 Jahre 6-12 Monate
Nüsse Speisekammer 2 Jahre 6 Monate
Sonnenblumenkerne Speisekammer 2 Jahre 6 Monate
Kaffeebohnen Gefrierfach 2-3 Jahre 6 Monate
Kaffeebohnen Speisekammer 1 Jahr 3 Monate
Gemahlener Kaffee Gefrierfach 2 Jahre 6 Monate
Gemahlener Kaffee Speisekammer 5-6 Monate 1 Monat
Suppen, Saucen Gefrierfach 1-2 Jahre 3-6 Monate
Öl Speisekammer 1-1.5 Jahre 5-6 Monate
Hülsenfrüchte, Getreide Speisekammer 1-2 Jahre 6 Monate
Teigwaren, Reis Speisekammer 1-2 Jahre 6 Monate
Milchpulver Speisekammer 1-2 Jahre 6 Monate
| 5
DE
EN
CZ
SK
PL
HU
SL
HR

Kokosraspeln Speisekammer 1-2 Jahre 6 Monate
Mehl Speisekammer 1-2 Jahre 6 Monate
Zucker Speisekammer 1-2 Jahre 6 Monate
Chips Speisekammer 3-6 Wochen 1-2 Wochen
Kekse, Zwiebacke Speisekammer 3-6 Wochen 1-2 Wochen
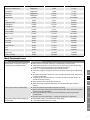
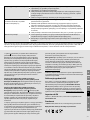
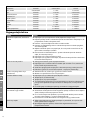
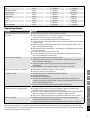
Häugste Probleme
Problem Lösung
Die Vakuumpumpe läuft, aber die
Luft im Beutel wird nicht weniger
■Stellen Sie sicher, dass das versiegelte Ende des Beutels perfekt verschlossen ist.
■Regulieren Sie die Position des Beutels im Vakuumiergerät und beginnen Sie erneut. Stellen
sie sicher, dass das offene Ende des Beutels in der Auffangrinne ist.
■Lassen Sie 5–7 cm freie Folie zwischen dem Beutel und dem Inhalt des Beutels.
■Kontrollieren Sie, dass entlang des Versiegelungsbands im Vakuumiergerät keine Falten
auftreten, glätten Sie gegebenenfalls den Beutel.
■Öffnen Sie das Vakuumiergerät und vergewissern Sie sich, dass die Siebe richtig sitzen und
sich in ihnen weder Schmutz noch Ablagerungen befinden.
■Die Schaumstoffdichtungen können deformiert sein. Lassen Sie den Vakuumierer 10–20
Minuten geöffnet, bis die Dichtungen wieder im Normalzustand sind.
■Stellen Sie sicher, dass der Schlauch für externe Vakuumbehälter nicht an das
Vakuumiergerät angeschlossen ist.
■Vergewissern Sie sich, dass der Gerätedeckel fest mit dem Unterteil verschlossen ist.
Wenn der Deckel auf beiden Seiten nicht richtig eingerastet ist, tritt Luft zwischen den
Dichtungen aus.
Der Beutel wird nicht richtig
versiegelt
■Der Beutel enthält zu viel Flüssigkeit, frieren Sie ihn vor dem Versiegeln ein.
■Stellen Sie sicher, dass sich keine Lebensmittelreste oder Ablagerungen im
Dichtungsstreifen befinden. Wenn ja, entfernen Sie die Dichtung, reinigen Sie sie und
setzen Sie sie erneut ein.
■Der Beutel hat Falten und muss vor dem Einlegen in den Vakuumierer glatt gezogen
werden.
■Drücken Sie die Taste vac seal zweimal hintereinander – der Versiegelungsvorgang wird
länger dauern.
Die Dichtung sitzt nicht gut oder
ist beschädigt
■Entfernen Sie die Dichtung, reinigen Sie sie und setzen Sie die Dichtung wieder an ihren
Platz.
■Kontaktieren Sie einen autorisierten Reparaturservice oder Händler.
Die Kontrolllampe leuchtet nicht ■Stellen Sie sicher, dass sich das Gerätekabel in der Steckdose befindet.
■Vergewissern Sie sich, dass die Steckdose funktioniert.
■Stellen Sie sicher, dass das Gerät angeschaltet ist.
■Wenn Sie das Gerät längere Zeit nicht benutzt und es an einem feuchten Ort aufbewahrt
haben, kann die Feuchtigkeit die elektronischen Schaltungen beschädigen. Lassen Sie es
vollständig trocken werden und versuchen Sie es erneut.
■Wenn keiner der oben genannten Ratschläge hilft, wenden Sie sich an Ihren Händler.
Das Gerät hat die Luft aus dem
Beutel gesaugt, aber das Vakuum
hält nicht an
■Überprüfen Sie die Versiegelungsnaht. Eine Falte in der Naht kann dazu führen, dass erneut
Luft in den Beutel eindringt.
■Manchmal können sich Speisereste oder Fettrückstände negativ auf die
Versiegelungsqualität auswirken. Schneiden Sie den Beutel auf, reinigen Sie ihn von innen
und versiegeln Sie ihn erneut.
■Wenn scharfe Gegenstände im Beutel verschweißt sind, können sie ihn aufreißen. Bevor Sie
ihn erneut verschließen, wickeln Sie die Gegenstände in eine weiche Hülle – zum Beispiel
in ein Papiertuch.
■Wenn die Lebensmittel im Beutel zu gären beginnen oder verderben, müssen sie ihn samt
Inhalt entsorgen.
Der Beutel schmilzt ■Das Hochtemperaturband ist möglicherweise zu heiß. Warten Sie immer mindestens 20
Sekunden, bis sich das Gerät etwas abgekühlt hat, bevor Sie fortfahren.
■Verwenden Sie Originalzubehör, um die Qualität und Sicherheit des Materials zu
gewährleisten.
6 |
DE
EN
CZ
SK
PL
HU
SL
HR

Wenn ein anderes Problem oder ein anderer Fehler auftritt, wenden Sie sich an den Händler. Versuchen Sie auf keinen Fall, das
Gerät zu zerlegen, zu reparieren oder umzubauen. Jeder Versuch, das Gerät zu zerlegen, umzubauen oder zu reparieren, beendet
automatisch die Garantiezeit. Solche Maßnahmen können das Gerät beschädigen, zu Verletzungen oder Sachschäden führen.
| 7
1. Das Symbol auf dem Gerät und in den Produktunterlagen
weist darauf hin, dass gebrauchte Elektronik nicht mit dem
Hausmüll entsorgt werden darf. Bringen Sie Elektrogeräte zu
den dafür vorgesehenen Sammelstellen, wo sie kostenlos zur
Entsorgung angenommen werden. Die fachgerechte Entsorgung
trägt zum Erhalt wertvoller natürlicher Ressourcen und zum Schutz
der Umwelt sowie der öffentlichen Gesundheit bei, die durch
unsachgemäße Entsorgung gefährdet werden können. Für weitere
Informationen wenden Sie sich an die örtlichen Behörden oder die
nächstgelegene Müllsammelstelle. Unsachgemäße Entsorgung von
Elektrogeräten kann gemäß den gesetzlichen Bestimmungen zu
einer Geldstrafe führen. Benutzerinformationen zur Entsorgung
von Elektrogeräten (gewerbliche Nutzung): Informationen zur
Entsorgung von Elektrogeräten sind beim Verkäufer oder Lieferanten
anzufordern, die diese bereitstellen. Benutzerinformationen
zur Entsorgung von Elektrogeräten in Ländern außerhalb
der Europäischen Union: Das oben aufgeführte Symbol ist
nur in den Ländern der Europäischen Union gültig. Fordern Sie
Informationen zur Entsorgung von Elektrogeräten in Ländern
außerhalb der EU bei den örtlichen Behörden oder dem Verkäufer
an, die diese bereitstellen. Die Hinweise zur korrekten Entsorgung
werden durch das Symbol des durchgestrichenen Containers auf
dem Produkt, der Verpackung und den Produktunterlagen gegeben.
2. Gewährleistungsansprüche sind bei Ihrem Händler geltend
zu machen. Bei technischen Problemen und Fragen setzen Sie
sich mit Ihrem Händler in Verbindung, der Sie über die weitere
Vorgehensweise informieren wird. Beachten Sie Regeln für die
Arbeit mit elektrischen Geräten. Der Benutzer ist nicht berechtigt das
Gerät zu zerlegen oder seine Teile auszuwechseln. Beim Öffnen oder
Entfernen der Abdeckungen besteht die Gefahr des Stromschlags. Bei
falschem Zusammenbau des Geräts und seiner Wiedereinschaltung
besteht ebenfalls die Gefahr des Stromschlags.
Die Garantiefrist für Produkte beträgt 24 Monate, soweit nicht etwas
anderes festgelegt ist. Die Garantie bezieht sich nicht auf Schäden
durch nicht bestimmungsgemäße Verwendung, unsachgemäße
Gebrauchsbedingungen, Umgang im Widerspruch zum Handbuch
oder normale Abnutzung. Die Garantiezeit für die Batterie beträgt
24 Monate, für ihre Kapazität 6 Monate. Für weitere Informationen
besuchen Sie die Website www.elem6.com/warranty
Der Hersteller, Importeur oder Vertriebshändler haften für
keine Schäden infolge unsachgemäßer Montage oder nicht
bestimmungsgemäßer Verwendung des Produktes.
EU Konformitätserklärung
Die Firma elem6 s.r.o. erklärt hiermit, dass das Gerät Lauben
Vacuum Sealer VS01 in Übereinstimmung mit den grundlegenden
Anforderungen und anderen einschlägigen Bestimmungen der
Richtlinien 2014/30/EU und 2014/35/EU steht. Alle Produkte
Lauben sind für den uneingeschränkten Vertrieb in Deutschland,
Tschechien, der Slowakei, Polen, Ungarn und anderen EU-
Mitgliedsländern bestimmt. Die vollständige Konformitätserklärung
kann auf der Webseite www.lauben.com/support/doc
heruntergeladen werden.
Import in die EU
elem6 s.r.o., Braškovská 308/15, 16100 Praha 6,
Tschechische Republik
www.lauben.com
Hersteller
TIGMON GmbH, Yorkstraße 22; 93049 Regensburg, Deutschland
Druckfehler und Änderungen im Handbuch sind vorbehalten.
DE
EN
CZ
SK
PL
HU
SL
HR

Lauben Vacuum Sealer VS01 – User Manual
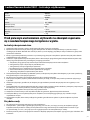
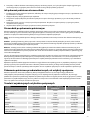
Model LBNVS01
Input 220-240V
Frequency 50/60Hz
Motor 125W
Vacuum -50 ~ -60Kpa
Seam Width 2.5 mm
Safety Fuse YES
Foil Maximum Width ≤ 30cm
Dimensions 370×120×55 mm
Weight 1,2 Kg
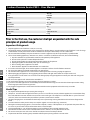
Prior to the first use, the customer shall get acquainted with the safe
principles of product usage.
Important Safeguards
1. Keep the appliance out of children´sreach; it is not atoy.
2. The package contains small parts that can be dangerous for children. Always store the appliance out of children´sreach. The bags
or the number of small parts in them could be swallowed or when put overhead they can cause suffocation.
3. Persons with limited mobility and space orientation can use the appliance only when supervised by aqualified adult.
4. This is aheat-emitting appliance; in extreme cases, there is arisk of fire. To eliminate such risks, observe the following:
a. Pay extra attention to any flammable materials in the proximity of the appliance.
b. Do not seal one place for an extended period of time.
c. Do not use the appliance in the environment with ahigher risk of explosion.
d. Unplug the appliance immediately when you are done using it.
e. Prior to storing, let the appliance cool down.
f. Never leave the appliance unattended when it is switched on.
5. In case the cord is damaged, do not use the appliance. Contact the seller and ask for further instructions.
6. Do not use the appliance in humid environment or on wet surfaces.
7. Do not immerse the appliance or its cord in water or other liquid. Prior to cleaning, unplug the appliance.
8. When unplugging the appliance, do it by gripping the end of the cord right at the outlet. Do not pull on the cord.
9. If any part of the vacuum sealer or its accessories look damaged, stop using the appliance. Contact your seller and arrange the
repair/replacement.
10. Do not use the appliance for other than the intended use.
11. Do not place the appliance at or in the proximity of stoves, hotplates or cookers.
12. If you are to store the appliance for an extended period of time without using it, do not click the lid shut to prevent the sealing
from being exposed to unnecessary pressure.
13. For pluggable equipment, the socket-outlet shall be installed near the equipment and shall be easily accessible.
Useful Tips
1. Do not peel off the protective tape covering the sealing bar.
2. Safety fuse - once the Indicator light for functions „Vac Seal“ or “Seal” flashes, it means that the appliance has activated the safety
fuse and it will take 2 minutes until the vacuum sealer can be used again. The safety fuse is activated after 15 cycles of “Vac Seal”
and “Seal”, at the same time the time period of the operation cannot exceed 1 minute.
3. Vacuum packaging does not substitute for the heat process of preserving/canning. Perishables still need to be refrigerated or
frozen.
4. To achieve the best results possible always use only the original accessories (foil, bags, containers).
5. During the vacuum packaging process, small amounts of liquids, crumbs, or food particles can escape/leak. Every time after use,
it is necessary to clean the vacuum channel that catches such leaks/spills.
6. Leave approximately 5–7 cm of the bag empty to avoid overfilling and have enough material to seal.
7. Place the foil into the vacuum sealer so that the future seam is at least 3 cm away from the food inside.
8. Do not ever create your own side seams. The foil has industrial seams from the production.
9. To prevent unattractive wrinkles, gently smooth the foil flat prior to placing it into the vacuum sealer.
8 |
DE
EN
CZ
SK
PL
HU
SL
HR

10. Due to arisk of anaerobic bacteria growth, do not ever vacuum package fresh mushrooms, onion, garlic, and soft cheese.
11. Vegetables emit gases as anatural process, so the vacuumed bag can blow up again after afew days. We recommend freezing
vegetables prior to vacuum packaging and then keeping them refrigerated.
12. In case you are to vacuum package items with sharp edges, wrap them into soft packaging material to avoid punctures of the foil.
Please, keep the manual for future reference.
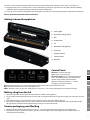
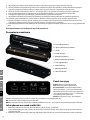
Getting to know the appliance
Control Panel
Vacuum: to create vacuum only
Seal: creates aseam on the foil
Vac Seal/ Cancel: Press for vacuum packaging of
food – an automatic process, once finished, the
vacuum sealer switches off automatically
When pressed during the process – vacuum
packaging/ sealing is interrupted
Food: Two optional modes – for soft and moist goods and for hard and dry food. Default mode is “dry”.
Dry: suitable for food which does not contain liquids or oils
Moist: suitable for soups, oily goods or soft food (such as cakes, etc.) – the vacuum packaging process will take more time
Making abag from the foil
1. Open one end of the cutter and place the foil between the cutter and the appliance
2. Use your left hand to keep the foil in place and cut it with your right hand from left to right. You will get afoil sleeve open on both
ends.
3. Open the lid and place an open end of the sleeve so that the edge is right at the dripping channel.
4. Press down the lid gently until you hear a“click” sound. Press the “Seal” button to start sealing. Once the Indicator light switches
off, open the lid and remove the bag. Now the bag is ready, you can place food inside.
Vacuum packaging your lled bag
1. Put the food items inside the bag so there is at least 5 – 7 cm of the empty foil from the edge. Do not overfill the bag.
2. Open the lid and place the open end of the bag inside so that the edge is right at the dripping channel. Gently stretch and
smooth the foil to make it flat.
A: sealing edge
B: upper foam sealing gasket
C: lock
D: control panel
E: lid
F: lower foam sealing gasket
G: sealing bar
I: dripping channel
J: vacuum nozzle
K: foil cutter
| 9
DE
EN
CZ
SK
PL
HU
SL
HR

3. Close and click the lid shut. Press the “Vac Seal” button. The bag will be automatically vacuumed and then sealed.
4. When the Indicator light switches off, the process is completed; you can open the lid and remove the bag. Refrigerate or freeze if
needed.
Vacuum packaging the containers
1. Place the food you want to vacuum package into one of the containers. Between the container lid and the food content there
shall be at least 3cm of empty space.
2. Attach the tube to the vacuum nozzle at the vacuum sealer.
3. Attach the other end of the tube pressing it to the valve on the container lid and make sure that all edges are closed tightly.
4. Press the “Vacuum” button to evacuate air from the container. Once the vacuum needed has been reached, the sealer will switch
off automatically.
5. To pressurize the container again, just press the valve on the lid.
Vacuum Packaging Guide
The vacuum packaging process extends the life of foods. By removing most of the air from the sealed containers and bags,
the oxidation process, which affects negatively the natural taste, coloring, flavor and overall quality of the food, gets reduced
significantly. Removing air can also inhibit growth of some microorganisms, which can affect the food durability.
Mold – mold needs oxygen to grow, therefore vacuum packaging can significantly slow down or stop it completely.
Yeast – causes fermentation, which spoils the taste and flavor of meals. Yeast needs water, sugar and moderate temperatures to
grow. It can also survive without air. To slow down the fermentation process, the foods need to be refrigerated; to stop fermentation
completely the foods need to be frozen.
Bacteria – results in change of flavor, discoloration and different food texture. Under special conditions, some anaerobic bacteria
such as Clostridium botulinum (the organism that causes Botulism) can grow also without air and it may be impossible to detect it by
smell or taste. Although it is rare, it can be very dangerous.
To preserve foods safely, it is critical to store them at low temperatures. You can significantly reduce the growth of microorganisms
at temperatures of 4°Cor below. Freezing (at -17°C) does not kill bacteria but prevents them from growing. For long-term storage,
always freeze foods that have been vacuum packaged, and eat them immediately after thawing.
It is important to note that vacuum packaging is NOT asubstitute for food preserving/canning and it cannot reverse the deterioration
of foods. It can only slow down the changes in quality. It is difficult to predict how long foods will remain fresh because it depends on
several factors, mainly on the condition of the food on the day it was vacuumed packaged.
Vacuum Packaging Non-Food Items
Vacuum packaging system also protects non-food items from oxidation and moisture, which cause their deterioration.
To vacuum package sharp items, wrap them in soft cushioning cloth or apaper towel, to avoid puncturing the foil. Vacuum
packaging is ideal for outdoor excursions to keep items such as matches, maps, clothes, and food dry and protected. To have fresh
water for drinking, simply fill abag with ice, seal it and when needed, let the ice pack melt.
Food Storage Life
Fods Where to Store Storage Life in Vacuum Package Normal Storage Life
Beef, Pork, Lamb Freezer 2 – 3 years 6 months
Minced Meat Freezer 1 year 4 months
Poultry Freezer 2 – 3 years 6 months
Fish Freezer 2 years 6 months
Cheddar Refrigerator 4-8 months 1-2 weeks
Parmesan Refrigerator 4-8 months 1-2 weeks
Asparagus Freezer 2-3 years 8 months
Broccoli, Cauliflower Freezer 2-3 years 8 months
Cabbage, Brussel Sprouts Freezer 2-3 years 8 months
Maize (cob or corn) Freezer 2-3 years 8 months
Green Beans Freezer 2-3 years 8 months
Lettuce, Spinach Refrigerator 2 weeks 3-6 days
Peas Freezer 2-3 years 8 months
Apricots, Plums Freezer 1-3 years 6-12 months
10 |
DE
EN
CZ
SK
PL
HU
SL
HR

Peaches, Nectarines Freezer 1-3 years 6-12 months
Raspberries, Blackberries Refrigerator 1 week 1-3 days
Strawberries Refrigerator 1 week 1-3 days
Blueberries Refrigerator 2 weeks 1-3 days
Cranberries Refrigerator 2 weeks 1-3 days
Baked Goods Freezer 1-3 years 6-12 months
Nuts Pantry 2 years 6 months
Sunflower Seeds Pantry 2 years 6 months
Coffee Beans Freezer 2-3 years 6 months
Coffee Beans Pantry 1 year 3 months
Ground Coffee Freezer 2 years 6 months
Ground Coffee Pantry 5-6 months 1 month
Soups, Sauces Freezer 1-2 years 3-6 months
Oils Pantry 1-1.5 years 5-6 months
Pulses, Grains Pantry 1-2 years 6 months
Pasta, Rice Pantry 1-2 years 6 months
Dried Milk Pantry 1-2 years 6 months
Dried Coconut Pantry 1-2 years 6 months
Flour Pantry 1-2 years 6 months
Sugar Pantry 1-2 years 6 months
Chips/Crisps Pantry 3-6 weeks 1-2 weeks
Cookies, Crackers Pantry 3-6 weeks 1-2 weeks
Most Common Issues
Issue Troubleshooting
Vacuum pump is running, but the air is
not being evacuated from the bag
■Make sure the sealed end of the bag is sealed properly, check for leaks
■Adjust the bag position in the vacuum sealer and start again. Make sure the open
end of the bag is resting entirely inside the Dripping Channel.
■Leave 5 – 7 cm of foil between the bag end and its content.
■Check that along the sealing bar there are no wrinkles on the bag; smooth the bag
flat.
■Open the lid and make sure that the sieves are properly attached and clean; there is
no dirt or food residues.
■The foam gaskets may be deformed – leave the vacuum sealer open for 10 – 20
minutes to let them recover.
■Make sure the tube is not attached to the inlet.
■Make sure the lid is clicked shut properly, if not on both sides, there will be air
leakage.
The bag has not been sealed properly ■There is too much liquid inside, freeze prior to sealing.
■Make sure that the sealing bar is free from food residues. If not, remove the gaskets,
clean them and re-attach them.
■The bag is wrinkled; it is necessary to smooth it flat prior to placing it into the
vacuum sealer.
■Press the “Vac Seal” button twice – sealing will continue for alonger time.
The gaskets will not adhere properly or
are damaged
■Remove the gaskets, clean them and re-attach them.
■Contact the authorized service or seller.
| 11
DE
EN
CZ
SK
PL
HU
SL
HR

Indicator lights are off ■Make sure, the vacuum sealer is plugged.
■Make sure the outlet is working.
■Make sure the appliance is switched on.
■In case you have not used the vacuum sealer for alonger time and stored it in
ahumid place, the humidity may have damaged the circuitry. Let the appliance dry
out properly and try again.
■If none of the above mentioned helps, contact your seller.
Air was removed from the bag, but now
air has re-entered
■Examine the seam of the bag. Awrinkle along the seal may cause leakage and allow
air to re-enter.
■Sometimes food residues or grease may prevent the bag from sealing properly. Cut
the bag open, wipe it clean from inside and reseal.
■If you are vacuum packaging sharp items, the bag may have been punctured. Cover
them with asoft cushioning material, such as apaper towel, and reseal.
■When the vacuumed food starts fermenting or begins to spoil, it should be
discarded.
The bag has melted ■The sealing bar may be too hot. Always wait at least 20 seconds for appliance to
cool down before you vacuum package another item.
■Use only the original accessories; only then the quality and safety of the materials
used can be guaranteed.
In case there is another problem or defect, contact the seller. Do not ever try to disassemble, repair or modify the appliance in any
way. Any attempts to disassemble, remodel or repair the appliance will automatically terminate the warranty period; such actions
may also damage the appliance or cause injury or property damage.
12 |
1. The symbol on the product and in the documentation indicates
that used electronics shall not be disposed of into communal
waste. When disposing of appliances, take them to the designated
waste collection yard, where they will be accepted for free. Proper
disposal will help to preserve precious natural resources and protect
the environment as well as public health, which both may get
threatened by improper disposal and its consequences. For further
detail contact the local authorities or the nearest waste collection
yard. Improper disposal of electrical appliances may result in fining
in compliance with state regulations.
Disposal information for users of electrical and electronic
appliances (industrial use): Disposal information for users of
electrical and electronic appliances are to be asked for at and
provided by the seller or supplier.
Disposal information for users of electrical and electronic
appliances in countries outside of the European Union: The
disposal symbol stated above is valid only in the European Union.
Disposal information for users of electrical and electronic appliances
are to be asked for at and provided by the seller or supplier. All
information is represented by the crossed container on the product,
package and printed documentation.
2. Please contact your dealer for warranty repairs. In case of
technical problems and questions, please contact your dealer who
will inform you of the next steps to be taken. Observe the rules
for working with electrical equipment. The user is not authorised
to disassemble the equipment or replace any of its components.
There is a risk of electric shock if the covers are opened or removed.
Incorrect assembly and reconnection of the equipment also exposes
you to the risk of electric shock.
The warranty period for the products is 24 months unless
otherwise stated. The warranty does not cover damage caused
by non-standard use, mechanical damage, exposure to harsh
conditions, handling contrary to the manual and normal wear and
tear. The warranty period is 24 months for the battery and 6 months
for its capacity. For more information on the warranty, please visit
www.elem6.com/warranty
Neither the manufacturer, importer nor distributor shall be liable
for any damage caused by the installation or improper use of the
product.
EU Declaration of Conformity
elem6 s.r.o. hereby declares that the Lauben Vacuum Sealer VS01
complies with the essential requirements and other relevant
provisions of Directive 2014/30/EU and 2014/35/EU. All Lauben
products are intended for sale without restriction in Germany, the
Czech Republic, Slovakia, Poland, Hungary and other EU member
states. The full Declaration of Conformity can be downloaded from
www.lauben.com/support/doc
Import to EU
elem6 s.r.o., Braškovská 308/15, 16100 Praha 6, Czech Republic
www.lauben.com
Manufacturer
TIGMON GmbH, Yorkstraße 22; 93049 Regensburg, Deutschland
Printing errors and changes in the manual are reserved.
DE
EN
CZ
SK
PL
HU
SL
HR

Model LBNVS01
Příkon 220-240V
Frekvence 50/60Hz
Motor 125W
Vakuum -50 ~ -60Kpa
Šířka sváru 2.5mm
Bezpečnostní pojistka ANO
Maximální šíře folie ≤ 30cm
Rozměr 370×120×55 mm
Váha 1,2 Kg
Před prvním použitím je spotřebitel povinen se seznámit se zásadami
bezpečného používání výrobku.
Bezpečnostní instrukce
1. Spotřebič uchovávejte mimo dosah dětí, nejedná se ohračku.
2. Balení obsahuje malé dílky, které mohou být nebezpečné pro děti. Produkt vždy ukládejte mimo dosah dětí. Sáčky nebo mnoho
dílků, které obsahují, mohou po spolknutí nebo po nasazení na hlavu způsobit udušení.
3. Osoby se sníženou schopností pohybu aorientace mohou spotřebič používat ajakkoliv sním manipulovat pouze za dozoru
způsobilé dospělé osoby.
4. Jedná se oteplo vyzařující spotřebič, proto vextrémních případech hrozí nebezpečí požáru. Abyste se tomuto nebezpečí vyhnuli,
dodržujte následující:
a. Věnujte zvýšenou pozornost případným hořlavým materiálům vokolí spotřebiče.
b. Nesvářejte stejné místo po delší dobu.
c. Nepoužívejte vprostředí se zvýšeným rizikem výbuchu.
d. Po skončení používání okamžitě vytáhněte ze zásuvky.
e. Před uskladněním spotřebič nechte vychladnout.
f. Nenechávejte spotřebič bez dozoru, pokud je zapnutý.
5. Pokud bude kabel jakkoliv poškozený, spotřebič nepoužívejte. Kontaktujte svého prodejce aten vás bude informovat odalším
postupu.
6. Nepoužívejte spotřebič ve vlhkém prostředí či na mokrém povrchu.
7. Nenamáčejte žádnou část včetně kabelu spotřebiče do vody či jiné tekutiny. Před čištěním vypojte zelektřiny.
8. Vypojte spotřebič ze zásuvky tak, že uchopíte konec kabelu těsně uzásuvky. Za kabel netahejte.
9. Pokud jakákoliv část vakuovačky či jejího příslušenství vykazuje známky poškození, přestaňte spotřebič používat. Kontaktuje
vašeho prodejce adohodněte se na postupu opravy/ výměny.
10. Nepoužívejte spotřebič kjiným účelům, než je určen.
11. Neumisťujte spotřebič na nebo do blízkosti vařičů, ploten či sporáků.
12. Pokud nebudete spotřebič delší dobu používat, nechte víko nezacvaknuté, aby na těsnění nepůsobil zbytečný tlak.
13. Pro zařízení, která lze připojit do zásuvky: zásuvka musí být umístěna v blízkosti zařízení a musí být jednoduše přístupná.
Užitečné tipy
1. Neodlepujte ochranný pásek zakrývající tavné těleso.
2. Bezpečnostní pojistka – pokud kontrolka ufunkce „vac seal“ nebo „seal“ bliká, znamená to, že spotřebič aktivoval bezpečnostní
pojistku abude trvat 2 minuty, než bude možné ho znovu používat. Bezpečnostní pojistka se spustí po 15 cyklech funkcí „vac
seal“ a„seal“, přičemž doba nepřetržitého používání nesmí překročit 1 minutu.
3. Vakuování nenahrazuje konzervování. Rychle se kazící potraviny musí být zchlazeny či zmrazeny.
4. Pro co nejlepší výsledky používejte pouze soriginálním příslušenstvím (folie, sáčky, nádoby).
5. Vprůběhu vakuování může uniknout menší množství tekutin či drobků zvakuovaných pokrmů. Proto je třeba po každém použití
vyčistit drážku na zachycení těchto přebytků.
6. Na konci sáčku nechte asi 5–7 cm volného místa, abyste měli dostatečné množství folie kzatavení.
7. Folii do vakuovačky nasaďte tak, aby okraj byl alespoň 3 cm od surovin uvnitř folie.
8. Folii nikdy nezatavujte po okrajích, kde jsou již ztovárny vytvořené sváry.
Lauben Vacuum Sealer VS01 – Uživatelský manuál
| 13
DE
EN
CZ
SK
PL
HU
SL
HR

9. Abyste se vyhnuli nevzhledným skladům, jemně vyrovnejte povrch folie předtím, než ji vložíte do vakuovačky.
10. Zdůvodu rizika přemnožení anaerobních bakterií nikdy nevakuujte čerstvé houby, cibuli, česnek aměkké sýry.
11. Veškerá zelenina přirozeně uvolňuje plyny azavakuovaný sáček se po pár dnech může nafouknout. Doporučujeme proto
zeleninu vždy předem zmrazit auchovávat vledničce.
12. Pokud vakuujete ostré předměty, zabalte je nejprve do měkkého obalu, aby neprotrhly vakuovací folii.
Prosím, uschovejte tento manuál pro budoucí referenci.
Seznámení se spotřebičem
Ovládací panel
Vacuum: pouze pro vytvoření vakua
Seal: vytvoří svár na folii
Vac Seal/ Cancel: Stiskněte pro zavakuování
azatavení pokrmů – proces je automatický,
vakuovačka se po dokončení sama vypne.
Stisknutí během procesu – pozastavení vakuování/
zatavování
Food: Dva volitelné režimy – pro měkké, vlhké (moist) atvrdé, suché (dry) potraviny. Primárně nastavený režim je „dry“.
Dry: vhodné po pokrmy bez tekutin či oleje
Moist: Vhodné pro polévky, mastné suroviny či měkké (dorty, atd.) – vakuovací proces bude pomalejší
Jak vytvořit sáček zrole folie
1. Otevřete jeden konec řezačky, vložte folii mezi řezačku aspotřebič
2. Držte folii levou rukou apravou rukou zleva doprava odřízněte. Získáte tak rukáv soběma konci otevřenými.
3. Otevřete víko vakuovačky avložte jeden zkonců tak, aby okraj byl přesně vodkapávací drážce.
4. Zavřete alehkým tlakem zacvakněte víko. Stiskněte tlačítko „seal“, jakmile zhasne kontrolka, víko otevřete asáček vyndejte. Nyní
do něj můžete vložit potraviny.
Jak zavakuovat do sáčku
1. Vložte pokrm do sáčku tak, aby mezi okrajem folie aobsahem sáčku bylo minimálně 5 – 7 cm volné folie.
2. Otevřete víko spotřebiče avložte otevřený konec sáčku dovnitř tak, aby okraj končil vodkapávací drážce. Folii co nejvíce
vyrovnejte.
A: zatavovací hrana
B: horní pěnové těsnění
C: zámek
D: ovládací panel
E: víko spotřebiče
F: dolní pěnové těsnění
G: tavící pásek
I: odkapávací drážka
J: vakuová hubice
K: řezačka folie
14 |
DE
EN
CZ
SK
PL
HU
SL
HR

3. Zavřete víko azaklapněte. Stiskněte „vac seal“ tlačítko. Vakuovačka automaticky odsaje všechen vzduch anásledně folii zataví.
4. Jakmile zhasne kontrolka, můžete víko otevřít asáček vyjmout. Vpřípadě potřeby sáček dejte do ledničky či mrazáku.
Jak vakuovat vnádobách
1. Umístěte pokrm, který chcete vakuovat, do nádoby. Mezi horním okrajem nádoby asurovinami musí být minimálně 3 cm
mezera.
2. Připojte hadičku na vakuovou trysku na spotřebiči.
3. Druhý konec hadičky připojte na ventil ve víku nádoby atlakem se ujistěte, že jsou všechny okraje pevně zavřené.
4. Stiskněte tlačítko „vacuum“ aznádoby se začne odsávat vzduch. Jakmile bude vnádobě vakuum, spotřebič se sám vypne.
5. Pro uvolnění vakua vnádobě jednoduše stiskněte ventil ve víku.
Průvodce vakuováním
Vakuové balení prodlouží trvanlivost potravin. Díky odsátí kyslíku zuzavřených nádob či sáčků se významně zredukuje proces
oxidace, který negativně ovlivňuje přirozenou chuť, barvu, aroma acelkově kvalitu potravin. Nedostatek vzduchu má vliv na některé
mikroorganismy měnící trvanlivost pokrmů.
Plíseň – plíseň krůstu potřebuje kyslík, proto vakuové balení může významně zpomalit či zcela zastavit její výskyt
Kvasinky – způsobují fermentaci, která kazí chuť aaroma pokrmů. Kvasinky ke svému růstu potřebují vodu, cukr amírné teploty.
Dokážou přežít ibez přístupu vzduchu. Abyste tedy zpomalili fermentaci pokrmů, je třeba je zchladit, pro úplné zastavení zmrazit.
Bakterie – mění aroma, barvu atexturu pokrmů. Za výjimečných podmínek mohou některé anaerobní bakterie jako například
Clostridium botulinum (způsobuje botulismus) růst ibez přístupu vzduchu azároveň není možné je identifikovat pomocí čichu či
chuti. Ačkoliv se jedná ovzácné bakterie, mohou být velice nebezpečné.
Pro bezpečné uchování pokrmů je tedy zcela zásadní uskladnit je vnízkých teplotách. Výrazně snížíte růst mikroorganismů
vteplotách 4°Caníže. Jejich zamrazení (-17°C) bakterie nezničí, ale zamezí jejich množení. Pro dlouhodobější skladování vakuované
potraviny vždy zamrazte apo rozmrazení ihned zkonzumujte.
Vakuové balení NENÍ náhrada konzervování anikdy zcela nezabrání kažení jídla, pouze je dokáže omezit či zpomalit. Nelze zcela
jednoznačně určit, jak dlouho který pokrm zůstane čerstvý, protože záleží na mnoha faktorech, především na stavu pokrmu vdobě
zavakuování.
Vakuové balení nepotravinových předmětů
Vakuové balení chrání inejrůznější předměty, které jinak podléhají vlivem oxidace či vlhkosti zkáze.
Pokud balíte ostré předměty, nejprve je obalte do měkké látky nebo papírové utěrky tak, aby neprotrhly vakuovací folii. Vakuové
balení je ideální pro outdoor výlety, kdy pomocí něho uchováte například sirky, mapy, oblečení ijídlo vsuchu anezničené. Pokud
zavakuujete kostky ledu, po nějaké době máte vsáčku pitnou vodu.
Trvanlivost nejrůznějších potravin
Surovina Způsob skladování Trvanlivost ve vakuovém
balení
Normální trvanlivost
hovězí, vepřové, jehněčí mrazicí box 2-3 roky 6 měsíců
mleté maso mrazicí box 1 rok 4 měsíce
drůbež mrazicí box 2-3 roky 6 měsíců
ryby mrazicí box 2 roky 6 měsíců
čedar chladicí box 4-8 měsíců 1-2 týdny
parmezán chladicí box 4-8 měsíců 1-2 týdny
chřest mrazicí box 2-3 roky 8 měsíců
brokolice, květák mrazicí box 2-3 roky 8 měsíců
zelí, růžičková kapusta mrazicí box 2-3 roky 8 měsíců
kukuřice (klas nebo zrno) mrazicí box 2-3 roky 8 měsíců
zelené fazole mrazicí box 2-3 roky 8 měsíců
salát, špenát chladicí box 2 týdny 3-6 dní
hrách mrazicí box 2-3 roky 8 měsíců
meruňky, švestky mrazicí box 1-3 roky 6-12 měsíců
broskve, nektarinky mrazicí box 1-3 roky 6-12 měsíců
maliny, ostružiny chladicí box 1 týden 1-3 dny
jahody chladicí box 1 týden 1-3 dny
borůvky chladicí box 2 týdny 1-3 dny
| 15
DE
EN
CZ
SK
PL
HU
SL
HR

brusinky chladicí box 2 týdny 1-3 dny
pečivo mrazicí box 1-3 roky 6-12 měsíců
oříšky spíž 2 roky 6 měsíců
slunečnicová semínka spíž 2 roky 6 měsíců
kávová zrna mrazicí box 2-3 roky 6 měsíců
kávová zrna spíž 1 rok 3 měsíce
mletá káva mrazicí box 2 roky 6 měsíců
mletá káva spíž 5-6 měsíců 1 měsíc
polévky, omáčky mrazicí box 1-2 roky 3-6 měsíců
olej spíž 1-1.5 roky 5-6 měsíců
luštěniny, obilniny spíž 1-2 roky 6 měsíců
těstoviny, rýže spíž 1-2 roky 6 měsíců
sušené mléko spíž 1-2 roky 6 měsíců
sušený kokos spíž 1-2 roky 6 měsíců
mouka spíž 1-2 roky 6 měsíců
cukr spíž 1-2 roky 6 měsíců
chipsy spíž 3-6 týdnů 1-2 týdnů
sušenky, suchary spíž 3-6 týdnů 1-2 týdnů
Nejčastější problémy
Problém Řešení
Vakuová pumpa běží, ale vzduch vsáčku
neubývá
■Ujistěte se, že zatavený konec sáčku je zatavený dokonale
■Upravte polohu sáčku ve vakuovačce azačněte znovu. Ujistěte se, že otevřený konec
sáčku je vodkapávací drážce.
■Nechte 5–7 cm volné folie mezi sáčkem aobsahem sáčku.
■Zkontrolujte, že podél tavicího pásku ve vakuovačce nejsou žádné záhyby,
popřípadě sáček uhlaďte.
■Otevřete vakuovačku aujistěte se, že sítka jsou správně nasazena anení vnich
žádná špína či usazeniny.
■Pěnová těsnění mohou být deformována – nechte vakuovačku 10–20 minut
otevřenou, aby se těsnění narovnala.
■Ujistěte se, že hadička není připevněná na vstup.
■Ujistěte se, že víko je pevně uzavřené, pokud není víko dobře zacvaknuté zobou
stran, bude mezi těsněním unikat vzduch.
Sáček se správně nezataví ■Obsahuje moc tekutin, před zatavením zamrazte.
■Ujistěte se, že vzatavovacím pruhu nejsou zbytky jídla či usazeniny. Pokud ano,
vyjměte těsnění, očistěte anasaďte zpátky.
■Sáček má sklady, je potřeba ho před vložením do vakuovačky narovnat.
■Zmáčkněte tlačítko “vac seal” dvakrát za sebou – tavení bude probíhat delší dobu.
Těsnění dobře nepřiléhá nebo je
poškozené
■Vyjměte těsnění, očistěte ho aopět vraťte na místo.
■Kontaktujte autorizovaný servis či prodejce.
Kontrolky nesvítí ■Ujistěte se, že je vakuovačka vzásuvce.
■Ujistěte se, že zásuvka funguje.
■Ujistěte se, že je spotřebič zapnutý.
■Pokud jste vakuovačku déle nepoužívali auchovávali ji na vlhkém místě, vlhkost
mohla poškodit obvody. Nechte ji řádně vyschnout, apoté zkuste znovu.
■Pokud nic zvýše uvedeného nepomůže, obraťte se na vašeho prodejce.
16 |
DE
EN
CZ
SK
PL
HU
SL
HR

Vakuovačka vzduch ze sáčku odsála, ale
vakuum vněm nevydrželo
■Překontrolujte svár. Záhyb usváru může zapříčinit opětovné vniknutí vzduchu.
■Někdy zbytky jídla či mastnota může negativně ovlivnit kvalitu sváru. Rozstřihněte
sáček, vyčistěte ho zevnitř aopět zatavte.
■Pokud jsou vsáčku zatavené ostré předměty, mohly ho protrhnout. Než je zatavíte
znovu, obalte je do něčeho měkkého – například papírových ubrousků.
■Pokud začne jídlo vsáčku kvasit či jinak se kazit, je třeba ho vyhodit.
Sáček se roztavil ■Tavicí pruh může být moc horký. Vždy počkejte minimálně 20 sekund, než spotřebič
trochu vychladne předtím, než budete pokračovat.
■Používejte originální příslušenství, kde můžeme zaručit kvalitu anezávadnost
materiálu.
Pokud se vyskytne jiná závada čpřekážka, obraťte se na svého prodejce. Zásadně se nepokoušejte přístroj rozebírat, opravovat nebo
jakkoli upravovat. Vpřípadě demontáže, úprav nebo jakéhokoli pokusu oopravu dochází kzániku záruky amůže dojít kpoškození
přístroje či dokonce ke zranění nebo škodám na majetku.
| 17
1. Uvedený symbol na výrobku nebo v průvodní dokumentaci
znamená, že použité elektrické nebo elektronické výrobky nesmí být
likvidovány společně s komunálním odpadem. Za účelem správné
likvidace výrobku jej odevzdejte na určených sběrných místech,
kde budou přijata zdarma. Správnou likvidací tohoto produktu
pomůžete zachovat cenné přírodní zdroje a napomáháte prevenci
potenciálních negativních dopadů na životní prostředí a lidské
zdraví, což by mohly být důsledky nesprávné likvidace odpadů.
Další podrobnosti si vyžádejte od místního úřadu nebo nejbližšího
sběrného místa. Při nesprávné likvidaci tohoto druhu odpadu
mohou být v souladu s národními předpisy uděleny pokuty.
Informace pro uživatele k likvidaci elektrických
a elektronických zařízení (remní a podnikové použití): Pro
správnou likvidaci elektrických a elektronických zařízení si vyžádejte
podrobné informace u Vašeho prodejce nebo dodavatele.
Informace pro uživatele k likvidaci elektrických
a elektronických zařízení v ostatních zemích mimo Evropskou
unii: Výše uvedený symbol je platný pouze v zemích Evropské
unie. Pro správnou likvidaci elektrických a elektronických zařízení
si vyžádejte podrobné informace u Vašich úřadů nebo prodejce
zařízení. Vše vyjadřuje symbol přeškrtnutého kontejneru na výrobku,
obalu nebo tištěných materiálech.
2. Záruční opravy zařízení uplatňujte u svého prodejce. V případě
technických problémů a dotazů kontaktujte svého prodejce, který
Vás bude informovat o dalším postupu. Dodržujte pravidla pro práci
s elektrickými zařízeními. Uživatel není oprávněn rozebírat zařízení
ani vyměňovat žádnou jeho součást. Při otevření nebo odstranění
krytů hrozí riziko úrazu elektrickým proudem. Při nesprávném
sestavení zařízení a jeho opětovném zapojení se rovněž vystavujete
riziku úrazu elektrickým proudem.
Záruční lhůta je na produkty 24 měsíců, pokud není stanoveno
jinak. Záruka se nevztahuje na poškození způsobené nestandardním
používáním, mechanickým poškozením, vystavením agresivním
podmínkám, zacházením v rozporu s manuálem a běžným
opotřebením. Záruční doba na baterii je 24 měsíců, na její kapacitu 6
měsíců. Více informací ohledně záruky naleznete na
www.elem6.com/warranty
Výrobce, dovozce ani distributor nenesou žádnou odpovědnost
za jakékoli škody způsobené montáží nebo nesprávným užíváním
produktu.
EU Prohlášení o shodě
Společnost elem6 s.r.o. tímto prohlašuje, že zařízení Lauben
Vacuum Sealer VS01 je ve shodě se základními požadavky a dalšími
příslušnými ustanoveními směrnice 2014/30/EU a 2014/35/EU.
Všechny produkty Lauben jsou určeny pro prodej bez omezení
v Německu, České republice, Slovensku, Polsku, Maďarsku a v dalších
členských zemích EU. Úplné prohlášení o shodě lze stáhnout z webu
www.lauben.com/support/doc
Dovozce do EU
elem6 s.r.o., Braškovská 308/15, 16100 Praha 6, Česká republika
www.lauben.com
Výrobce
TIGMON GmbH, Yorkstraße 22; 93049 Regensburg, Deutschland
Tiskové chyby azměny vmanuálu jsou vyhrazeny.
DE
EN
CZ
SK
PL
HU
SL
HR

Model LBNVS01
Príkon 220-240V
Frekvencia 50/60Hz
Motor 125W
Vákuum -50 ~ -60Kpa
Šírka zvaru 2.5mm
Bezpečnostná poistka ÁNO
Maximálna šírka fólie ≤ 30cm
Rozmer 370×120×55 mm
Váha 1,2 Kg
Pred prvým použitím je spotrebiteľ povinný oboznámiť sa so zásadami
bezpečného používania výrobku.
Bezpečnostné pokyny
1. Spotrebič uchovávajte mimo dosahu detí, spotrebič nie je hračka.
2. Balenie obsahuje malé dielce ktoré môžu byť nebezpečné pre deti. Produkt vždy ukladajte mimo dosahu detí. Plastový obal po
nasadení na hlavu, či malé dielce pri náhodnom prehltnutí, môžu spôsobiť udusenie.
3. Osoby so zníženou schopnosťou pohybu aorientácie môžu spotrebič používať, či sním manipulovať, iba pod dohľadom dospelej
aspôsobilej osoby.
4. Ide ospotrebič, ktorý vyžaruje teplo, preto vextrémnych prípadoch hrozí nebezpečenstvo požiaru. Aby ste sa tomuto
nebezpečenstvu vyhli, dodržujte nasledujúce pokyny:
a. Venujte zvýšenú pozornosť prípadným horľavým materiálom, vyskytujúcim sa vokolí spotrebiča.
b. Nezvárajte rovnaké miesto dlhšiu dobu.
c. Nepoužívajte vprostredí kde hrozí zvýšené riziko výbuchu.
d. Po ukončení vákuovania okamžite vytiahnite zo zásuvky.
e. Pred uskladnením nechajte spotrebič vychladnúť.
f. Spotrebič vprevádzke nenechávajte nikdy bez dozoru.
5. Pokiaľ je kábel akokoľvek poškodený, spotrebič nepoužívajte. Kontaktujte svojho predajcu aten vás bude informovať oďalšom
postupe.
6. Nepoužívajte spotrebič vo vlhkom prostredí, alebo na mokrom povrchu.
7. Nenamáčajte žiadnu časť, ani kábel od spotrebiča, do vody, či inej tekutiny. Pred čistením odpojte zelektriny.
8. Odpojte spotrebič zo zásuvky tak, že uchopíte koniec káblu tesne pri zástrčke, avytiahnite ho. Nikdy neťahajte len kábel.
9. Pokiaľ akákoľvek časť vákuovačky, či jej príslušenstva, vykazuje známky poškodenia, prestaňte spotrebič používať. Kontaktuje
svojho predajcu adohodnite sa na postupe opravy/ výmeny.
10. Nepoužívajte spotrebič kiným účelom, než na aký je určený.
11. Nedávajte spotrebič na varič, varné platničky či sporák, alebo do ich blízkosti.
12. Pokiaľ nebudete spotrebič dlhšiu dobu používať, nechajte viečko nezacvaknuté, aby na tesnenie nepôsobil zbytočný tlak.
13. Pre zariadenia, ktoré je možné pripojiť do zásuvky: zásuvka musí byť umiestnená v blízkosti zariadenia a musí byť jednoducho
prístupná.
Užitočné tipy
1. Neodlepujte ochranný pásik zakrývajúci taviaci pás.
2. Bezpečnostná poistka – ak kontrolka funkcie „vac seal“ alebo „seal“ bliká, znamená to, že spotrebič aktivoval bezpečnostnú
poistku abude trvať 2 minúty, než bude možné znova ju používať. Bezpečnostná poistka sa spustí po 15 cykloch funkcií „vac seal“
a„seal“, pričom doba nepretržitého používania nesmie prekročiť 1 minútu.
3. Vákuovanie nenahradzuje konzervovanie. Potraviny ktoré podliehajú rýchlemu skazeniu, musia byť schladené alebo zmrazené.
4. Pre dosiahnutie najlepšieho výsledku používajte iba originálne príslušenstvo (fólie, vrecká anádoby).
5. Vpriebehu vákuovania môže uniknúť menšie množstvo tekutín či odrobiniek zvákuovaných pokrmov. Preto je nutné po každom
použití vyčistiť drážku, ktorá slúži na zachytenie týchto zbytkov.
6. Na konci vrecka nechajte asi 5–7 cm voľného miesta, aby ste mali dostatočné množstvo fólie kzataveniu.
Lauben Vacuum Sealer VS01 – užívateľský manuál
18 |
DE
EN
CZ
SK
PL
HU
SL
HR

7. Fóliu do vákuovačky nasaďte tak, aby bol okraj vzdialený aspoň 3 cm od surovín vo vnútri fólie.
8. Fóliu nikdy nezatavujte po okrajoch, na ktorých sú už pôvodné zvary vytvorené výrobcom.
9. Aby ste sa vyhli nevzhľadným záhybom, jemne vyrovnajte povrch fólie skôr, než ju vložíte do vákuovačky.
10. Zdôvodu rizika premnoženia anaeróbnych baktérií, nikdy nevákuujte čerstvé hríby, cibuľu, cesnak amäkké syry.
11. Akákoľvek zelenina prirodzene uvoľňuje plyny azavákuované vrecúško sa môže po pár dňoch nafúknuť. Odporúčame preto
zeleninu schladiť a uchovávať vchladničke.
12. Pokiaľ vákuujete ostré predmety, zabaľte ich najprv do mäkkého obalu, aby sa nenarušila ostrými hranami vákuovacia fólia.
Prosím, uschovajte tento manuál pre budúce použitie.
Zoznámenie sa so spotrebičom
Ovládací panel
Vacuum: Iba na vytvorenie vákua.
Seal: Vytvorí zvar na fólii.
Vac Seal/ Cancel: Stlačte pre zavákuovanie
azatavenie pokrmov - proces je automatický,
vákuovačka sa po dokončení sama vypne.
Ak stlačíte počas procesu, proces vákuovania
azatavenia sa vypne.
Food: Dva voliteľné režimy – pre mäkké, vlhké (moist) atvrdé, suché (dry) potraviny. Primárne je nastavený režim „dry“.
Dry: Vhodné pre pokrmy bez tekutín či oleja.
Moist: Vhodné pre polievky, mastné amäkké suroviny (napr. torty) – vákuovací proces bude pomalší.
Ako vytvoriť vrecúško zrolky fólie
1. Otvorte jeden koniec rezačky, vložte fóliu medzi rezačku aspotrebič.
2. Držte fóliu ľavou rukou apravou rukou zľava doprava odrežte. Získate tak rukáv sotvorenými oboma koncami.
3. Otvorte viečko vákuovačky avložte jeden zkoncov tak, aby bol okraj presne vdrážke na odkvapkávanie.
4. Zatvorte aľahkým tlakom zacvaknite viečko. Stlačte tlačidlo „seal“, akonáhle zhasne kontrolka, viečko otvorte avrecúško vyberte.
Teraz do nej môžete vkladať potraviny.
A: zatavovacia hrana
B: horné penové tesnenie
C: zámok
D: ovládací panel
E: viečko spotrebiča
F: dolné penové tesnenie
G: taviaci pás
I: drážka na odkvapkávanie
J: vákuovacia hubica
K: rezačka fólie
| 19
DE
EN
CZ
SK
PL
HU
SL
HR

Ako zavákuovať pokrm do vrecúška
1. Vložte pokrm do vrecúška tak, aby medzi okrajom fólie aobsahom vrecúška bolo minimálne 5– 7 cm voľnej fólie.
2. Otvorte viečko spotrebiča avložte otvorený koniec vrecúška dovnútra tak, aby okraj končil presne vdrážke na odkvapkávanie.
Fóliu čo najviac vyrovnajte.
3. Zatvorte viečko azaklapnite. Stlačte „vac seal“ tlačidlo. Vákuovačka automaticky odsaje všetok vzduch anásledne fóliu zataví.
4. Akonáhle zhasne kontrolka, môžete viečko otvoriť avrecúško vybrať. Vprípade potreby dajte vrecúško do chladničky alebo
mrazničky.
Ako vákuovať vnádobách
1. Umiestnite pokrm, ktorý chcete vákuovať, do nádoby. Medzi horným okrajom nádoby asurovinami musí byť minimálne 3 cm
medzera.
2. Pripojte hadičku na vákuovaciu trysku na spotrebiči.
3. Druhý koniec hadičky pripojte na ventil vo viečku nádoby auistite sa tlakom, že sú všetky okraje pevne zatvorené.
4. Stlačte tlačidlo „vacuum“ aznádoby sa začne odsávať vzduch. Akonáhle bude vnádobe vákuum, spotrebič sa sám vypne.
5. Pre uvoľnenie vákua vnádobe, jednoducho stačte ventil vo viečku.
Sprievodca vákuovaním
Vákuové balenie predlžuje trvanlivosť potravín. Vďaka odčerpaniu kyslíka zuzavretých nádob, či vrecúšok, sa významne zredukuje
proces oxidácie, ktorý negatívne ovplyvňuje prirodzenú chuť, farbu, arómu avšeobecne kvalitu potravín. Nedostatok vzduchu má
vplyv na niektoré mikroorganizmy meniace trvanlivosť pokrmov.
Pleseň – pleseň potrebuje krastu kyslík, preto vákuové balenie môže významne spomaliť, či dokonca úplne zastaviť jej výskyt.
Kvasinky – spôsobujú fermentáciu, ktorá kazí chuť aarómu pokrmov. Kvasinky krastu potrebujú vodu, cukor amierne teploty.
Dokážu prežiť aj bez prístupu vzduchu. Aby ste teda spomalili fermentáciu pokrmu, je treba ho schladiť, pre úplné zastavenie ho
treba zmraziť.
Baktérie – menia arómu, farbu atextúru pokrmov. Za špecifických podmienok môžu niektoré anaeróbne baktérie, ako napríklad
Clostridium botulinum (spôsobuje botulizmus), rásť bez prístupu vzduchu, azároveň je nemožné identifikovať ich pomocou čuchu či
chuti. Ide síce ovzácne baktérie, no môžu byť veľmi nebezpečné.
Pre bezpečné uchovanie pokrmov je teda zásadné uskladniť ich prinízkych teplotách. Výrazne znížite rast mikroorganizmov pri
teplotách 4°Camenej. Zmrazenie (-17°C) baktérie nezničí, ale zamedzí ich množeniu. Pre dlhodobé skladovanie vákuovaných
potravín ich vždy zamrazte, apo rozmrazení ich ihneď skonzumujte.
Vákuové balenie NIE JE náhrada za konzervovanie anikdy úplne nezabráni kazeniu jedla, iba ho dokáže obmedziť, či spomaliť. Nedá
sa celkom jednoznačne určiť, ako dlho ostane pokrm čerstvý, pretože záleží na mnohých faktoroch, predovšetkým na stave pokrmu
vdobe vákuovania.
Vákuové balenie nepotravinových predmetov
Vákuové balenie chráni aj najrôznejšie predmety, ktoré by inak podľahli skaze pod vplyvom oxidácie či vlhkosti.
Pokiaľ balíte ostré predmety, najprv ich zabaľte do mäkkej látky alebo papierovej utierky tak, aby neprerezali vákuovaciu fóliu.
Vákuové balenie je ideálne pre outdoorové výlety, kedy pomocou neho uchováte napríklad zápalky, mapy, oblečenie ijedlo, vsuchu
anezničené. Pokiaľ zavákuujete kocky ľadu, po určitej dobe budete mať vo vrecúšku pitnú vodu.
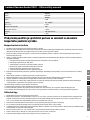
Trvanlivosť najrôznejších potravín
Surovina Spôsob skladovania Trvanlivosť vo vákuovom
balení
Normálna trvanlivosť
hovädzie, bravčové, jahňacie mraziaci box 2-3 roky 6 mesiacov
mleté mäso mraziaci box 1 rok 4 mesiace
hydina mraziaci box 2-3 roky 6 mesiacov
ryby mraziaci box 2 roky 6 mesiacov
čedar chladiaci box 4-8 mesiacov 1-2 týždne
parmezán chladiaci box 4-8 mesiacov 1-2 týždne
špargľa mraziaci box 2-3 roky 8 mesiacov
brokolica, karfiol mraziaci box 2-3 roky 8 mesiacov
kapusta, ružičkový kel mraziaci box 2-3 roky 8 mesiacov
kukurica (klas alebo zrno) mraziaci box 2-3 roky 8 mesiacov
20 |
DE
EN
CZ
SK
PL
HU
SL
HR
Strona się ładuje...
Strona się ładuje...
Strona się ładuje...
Strona się ładuje...
Strona się ładuje...
Strona się ładuje...
Strona się ładuje...
Strona się ładuje...
Strona się ładuje...
Strona się ładuje...
Strona się ładuje...
Strona się ładuje...
Strona się ładuje...
Strona się ładuje...
Strona się ładuje...
Strona się ładuje...
Strona się ładuje...
Strona się ładuje...
Strona się ładuje...
Strona się ładuje...
Strona się ładuje...
Strona się ładuje...
Strona się ładuje...
Strona się ładuje...
-
 1
1
-
 2
2
-
 3
3
-
 4
4
-
 5
5
-
 6
6
-
 7
7
-
 8
8
-
 9
9
-
 10
10
-
 11
11
-
 12
12
-
 13
13
-
 14
14
-
 15
15
-
 16
16
-
 17
17
-
 18
18
-
 19
19
-
 20
20
-
 21
21
-
 22
22
-
 23
23
-
 24
24
-
 25
25
-
 26
26
-
 27
27
-
 28
28
-
 29
29
-
 30
30
-
 31
31
-
 32
32
-
 33
33
-
 34
34
-
 35
35
-
 36
36
-
 37
37
-
 38
38
-
 39
39
-
 40
40
-
 41
41
-
 42
42
-
 43
43
-
 44
44


Lauben VS01 Vacuum Sealer Instrukcja obsługi
- Kategoria
- Zgrzewarki próżniowe
- Typ
- Instrukcja obsługi
w innych językach
- slovenčina: Lauben VS01 Vacuum Sealer Používateľská príručka