Hotpoint HKIA 640 C Instrukcja obsługi
- Kategoria
- Płyty
- Typ
- Instrukcja obsługi

English
GB
Instructions for use
HOB
Contents
Istruzioni importanti per la sicurezza 13
Consigli per la salvaguardia dell'ambiente 14
Dichiarazione di conformità 14
Prima dell’utilizzo 14
Recipienti preesistenti 14
Diametri fondo pentola consigliati 15
Tabella potenze 15
Installazione 16
Collegamento alla rete elettrica 16
Istruzioni per l’uso 17
Operazioni di pulizia 20
Guida ricerca guasti 20
Rumorosità del piano di cottura 20
Servizio assistenza 21
Consignes de securite importantes 22
Conseils pour la protection de
l’environnement 23
Declaration de conformite 23
Avant d’utiliser l’appareil 23
Anciens recipients 23
Diamètre conseille pour le
fond
des casseroles 24
Table des puissances 24
Installation 25
Branchement électrique 25
Mode d’emploi 26
Nettoyage 28
Diagnostic des pannes 29
La table de cuisson est bruyante 29
Service apres-vente 29
Important safety instructions 5
Safeguarding the environment 6
Declaration of conformity 6
Before use 6
Existing pots and pans 6
Recommended pot bottom widths 6
Installation
7
Power level table 7
Electrical
connection 8
Instructions for use 9
Cleaning 11
Troubleshooting guide 11
Noises made by the hob 11
After-sales service 12
IT
FR
Istruzioni per l’uso
PIANO COTTURA
Sommario
Mode d’emploi
TABLE DE CUISSON
Sommaire
Français
Italiano
Instrucciones importantes
para la seguridad 30
Consejos para proteger el medio
ambiente 31
Declaración de conformidad 31
Antes del uso 31
Recipientes preexistentes 31
Diámetros recomendados
para el fondo de la olla 32
Tabla de potencias 32
instalación 33
Conexión eléctrica 33
instrucciones de uso 34
limpieza 37
Guía para la solución de problemas 37
Ruido generado por la placa
de cocción 37
Servicio de
asistencia técnica 38
ES
Manual de instrucciones
ENCIMERA
Sumario
Español
Instruções para a utilização
PLANO
Índice
PT
Português
LIGAÇÃO ELÉTRICA
Instruções de segurança importantes 31
Conselhos para a protecção do ambiente 40
Declaração de conformidade 40
Antes da utilização 40
Recipientes pré-existentes 40
Diâmetros aconselhados do fundo das panelas 41
Tabela de potências 41
Instalação 42
Ligação elétrica 42
Instruções de utilização 43
Guia para resolução de avarias 46
Ruído gerado pela placa 46
Serviço pós-venda 47
L impeza 46
DEKLARACJA ZGODNOŚCI
PRZED ROZPOCZĘCIEM PRACY
INSTALACJA
INSTRUKCJA WYSZUKIWANIA USTEREK
Instrukcja obsługi
PŁYTA GRZEJNA
Spis treści
Ważne instrukcje bezpieczeństwa 48
Porady dotyczące ochrony środowiska 49
Deklaracja zgodności 49
Przed rozpoczęciem pracy 49
I stniejące naczynia 50
Zalecane średnice dna naczyń 50
Tabela mocy 51
Instalacja 51
Podłączenie do zasilania 52
Instrukcja obsługi 53
Instrukcja wyszukiwania usterek 55
Czyszczenie 55
Hałas generowany przez płytę kuchenną 56
Serwis techniczny 56
PL
Polski
Důležité bezpečnostní pokyny 57
Rady k ochraně životního prostředí 58
Prohlášení o souladu s předpisy 58
Před použitím 58
Staré nádoby 58
Doporučené průměry dna nádoby 59
Instalace 60
Připojení k elektrické síti 60
Návod k použití 62 čištění 64
Jak odstranit poruchu 64
Hluk zapnuté varné desky 65
Servis 65
tabulka výkonů 59
Návod k použití
VARNÁ DESKA
Obsah
CZ
Česky
Instrucţiuni importante privind siguranţa 66
Recomandări pentru protecţia
Mediului înconjurător 67
Înainte de utilizare 67
Recipiente deja existente 67
Diametre recomandate pentru baza oalelor 68
Tabel niveluri de putere 68
Instalarea 69
Conectarea la reţeaua de alimentare
cu energie electrică 69
Instrucţiuni de utilizare 70
Curăţenie 73
Ghidul de detectare a defecţiunilor 73
Zgomot generat de plită 73
Serviciul de asistenţă tehnică 74
Românã
Instrucţiuni de folosire
ARAGAZ CUPTOR
RO

mm
mm
21
0
mm
180
mm
14
5
mm
1
80
mm
21
0
mm
180
mm
14
5
mm
1
80
mm
2
10
mm
1
45
mm
2
80/230/1
80
mm
180
mm
1
80
mm 2
80/230/1
80
mm
180
mm
1
80
mm 2
80
mm
180
mm
1
80
mm
2
60
mm
21
0
mm
145
mm
2
80
mm
21
0
mm
145
mm 2
60
mm
21
0
mm
145
mm
2
60
mm
21
0
mm
145
mm
2
80/180
mm
21
0
mm
145
mm
2
80/180
mm
21
0
mm
145
mm
2
80
mm
180
mm
145
mm
2
40
mm
180
mm
145
mm
2
40
mm
21
0
mm 14
5
mm
2
10
mm
14
5
mm
21
0
mm 14
5
mm
2
10
mm
14
5
mm
21
0
mm
180
mm
14
5
mm
1
80
mm
21
0
mm
180
mm
14
5
mm 1
80
mm
21
0
mm
180
mm
180
mm
14
5
mm
21
0
mm
180
mm
14
5
mm
210
mm

3
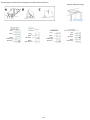
483 mm
553 mm
30 mm
+1
0
510 mm
54 mm
A
R = Min. 6,5 mm
Max. 8 mm
490 mm
560 mm
0
+2
0
+2
513 mm
583 mm
0
+2
0
+2
6 mm
560 mm
490 mm
R = 11,5 mm
R = Min. 6,5 mm
Max. 8 mm
R = 11,5 mm
0
+2
0
+2
B
Min. 50 mm
580mm
650mm
700mm
483 mm
742 mm
30 mm
+1
0
770 mm
510 mm
54 mm
R = Min. 6,5 mm
Max. 8 mm
490 mm
750 mm
0
+2
0
+2
Min. 50 mm
513 mm
Min. 50 mm
773 mm
0
+2
0
+2
750 mm
490 mm
R = 11,5 mm
0
+2
0
+2
6 mm
R = 11,5 mm
R = Min. 6,5 mm
Max. 8 mm
Min. 3 cm
Max. 6 cm
Min. 5 mm

4
Min. 40 cm
Min. 10 cm
Min. 5 cm
X 4
1
2
3
4
5 6

EN5
These instructions shall also be available on website: www.hotpoint.eu
YOUR SAFETY AND THAT OF OTHERS IS VERY IMPORTANT
This manual and the appliance itself provide important safety messages, to be read and always observed.
All messages relevant to safety specify the potential risk to which they refer and indicate how to reduce the risk of injury, damage
and electric shocks due to incorrect use of the appliance. Make sure to comply with the following:
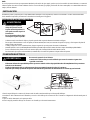
- Use protective gloves to perform all unpacking and installation operations.
- The appliance must be disconnected from the power supply before carrying out any installation operation.
- Installation and maintenance must be carried out by a specialised technician, in compliance with the manufacturer’s instructions
and the local safety regulations in force. Do not repair or replace any part of the appliance unless specifically stated in the user
manual.
- The appliance must be earthed.
- The power cable must be long enough for connecting the appliance, fitted in the cabinet, to the power supply.
- For installation to comply with the current safety regulations, an omnipolar switch with minimum contact gap of 3mm is
required.
- Do not use multi-sockets or extension cords.
- Do not pull the appliance’s power cable.
- The electrical parts must not be accessible to the user after installation.
- The appliance is designed solely for domestic use for cooking food. No other use is permitted (e.g. heating rooms). The
Manufacturer declines any liability for inappropriate use or incorrect setting of the controls.
- The appliance and its accessible parts become hot during use. Care should be taken to avoid touching heating elements. Very
young (0-3 years) and young children (3-8 years) shall be kept away unless continuously supervised.
- Children from 8 years and above and persons with reduced physical, sensory or mental capabilities or lack of experience and
knowledge can use this appliance only if they are supervised or have been given instructions on safe appliance use and if they
understand the hazards involved. Children shall not play with the appliance. Cleaning and user maintenance shall not be
made by children without supervision.
- Do not touch the appliance heating elements during and after use. Do not allow the appliance to come into contact with
cloths or other flammable materials until all the components have cooled down completely.
- Do not place flammable materials on or near the appliance.
- Overheated oils and fats catch fire easily. Pay attention when cooking food products rich in fat and oil.
- A separator panel (not supplied) must be installed in the compartment under the appliance.
- If the surface is cracked, switch off the appliance to avoid the possibility of electric shock (only for appliances with glass
surface).
- The appliance is not intended to be operated by means of an external timer or separate remote control system.
- Unattended cooking on a hob with fat or oil can be dangerous and may result in fire. NEVER try to extinguish a fire with water,
but switch off the appliance and then cover flame e.g. with a lid or a fire blanket.
Danger of fire: do not store items on the cooking surfaces.
- Do not use steam cleaners.
- Metallic objects such as knives, forks, spoons and lids should not be placed on the hob surface since they can get hot.
- After use, switch off the hob element by its control and do not rely on the pan detector (only for induction appliances).
IMPORTANT SAFETY INSTRUCTIONS
This is the danger symbol, regarding safety, warning of potential risks to users and others.
All safety messages will be preceded by the danger symbol and the following words:
DANGER
Indicates a hazardous situation which, if not avoided, will result in serious injury.
WARNING
Indicates a hazardous situation which, if not avoided, could cause serious injury.

EN6
Disposal of packing
The packing material is 100% recyclable and marked with the recycling symbol ( ). The various parts of the packing must not be dispersed in the environment, but
disposed of in compliance with local regulations.
Disposal
This appliance is marked in conformity with European Directive 2012/19/EU on Waste Electrical and Electronic Equipment (WEEE).
By ensuring that this appliance is correctly disposed of, the user can help prevent potentially negative consequences for the environment and the health of people.
The symbol on the appliance or the accompanying documentation indicates that this product should not be treated as domestic waste but must be taken to an
appropriate collection point for recycling WEEE.
Energy saving tips
For optimum results, it is advisable to:
• Use pots and pans with bottom width equal to that of the cooking zone.
• Only use flat-bottomed pots and pans.
• When possible, keep pot lids on during cooking.
• Use a pressure cooker to to save even more energy and time.
• Place the pot in the middle of the cooking zone marked on the hob.
- This appliance has been designed, manufactured and marketed in conformity with the safety requirements of “Low Voltage” Directive 2006/95/EC (replacing 73/
23/EEC as amended) and protection requirements of “EMC” Directive 2004/108/EC.
- This appliance meets the eco design requirements of european regulation N. 66/2014, in conformity to the european standard EN 60350-2.
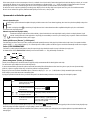
Use a magnet to check if the bottom of the pot is suitable for the induction hob: bottom of the pots and pans are unsuitable if not magnetically detectable.
- Make sure pots have a smooth bottom, otherwise they could scratch the hob. Check dishes.
- Never place hot pots or pans on the surface of the hob’s control panel. This could result in damage.
Place the pot on the required cooking zone before switching the hob on.
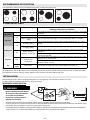
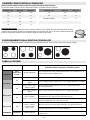
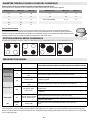
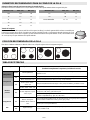
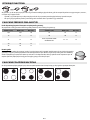
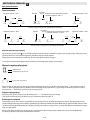
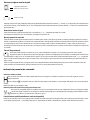
For good cooking results, the diameter of the base of the pot should match the size of the hotplate.
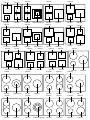
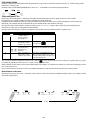
Pan size
To determine the size of the pot please measure the base of the pot (see picture) and refer to recommended pots bottom width table,
reported below, for perfect usage and correct pan detection. Each cooking zone has a minimum limit of detecting pans, which varies
depending on the material of the pan being used. You should therefore use the cooking zone that is most suitable for the diameter of
your pan.
SAFEGUARDING THE ENVIRONMENT
DECLARATION OF CONFORMITY
BEFORE USE
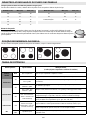
IMPORTANT: The cooking zones will not switch on if pots are not the right size. Only use pots bearing the symbol “INDUCTION SYSTEM” (Figure
opposite). Place the pot on the required cooking zone before switching the hob on.
Using suitable pots, the cooking zones cannot be used at temperatures below 10°C.
EXISTING POTS AND PANS
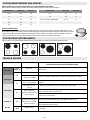
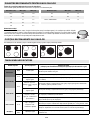
RECOMMENDED POT BOTTOM WIDTHS
Diameter (cm) Max (cm) Min (cm) Diameter (cm) Max (cm) Min (cm)
14.5 14.5 10 28 28 17
18 18 12 30 30 17
21 21 15 FLEXI/CONNEXION 39 - 18 12
24 24 15
26 26 17
NOOK

EN7
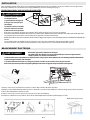
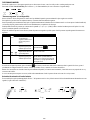
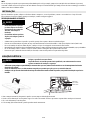
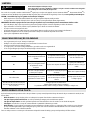
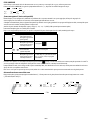
For best performance, when you use two pots simultaneously, put them according to the pictures below:
NOTE:
When making quick-cook foods that require perfect heat distribution (e.g. pancakes) on the 28 cm double cooking zone (where present), use pans no greater than
24 cm in diameter. For delicate cooking (for example, melting chocolate or butter) use the smaller diameter single zones.
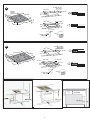
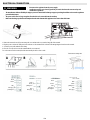
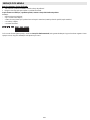
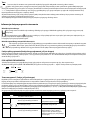
After unpacking the product, check for any damage during transport. In case of problems, contact the dealer or the After-Sales Service.
For built-in dimensions and installation instruction, see the pictures in page 2.
PREPARING THE CABINET FOR FITTING
RECOMMENDED POT POSITION
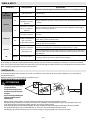
POWER LEVEL TABLE
Power level Type of cooking Level use
(indicating cooking experience and habits)
Max. power
Boost Fast heating
Ideal for rapidly increasing the temperature of food to fast boiling in the case of water or rapidly heating
cooking liquids
9-7
Frying - boiling
Ideal for browning, starting to cook, frying frozen products, fast boiling
High power
Browning - slow frying - boiling
- grilling
Ideal for slow frying, maintaining a high boil, cooking and grilling (short duration, 5-10 minutes)
7-5
Browning - cooking - stewing -
slow frying - grilling
Ideal for slow frying, maintaining a low boil, cooking and grilling (medium duration, 10-20 minutes),
preheating
Medium power
Cooking - stewing -
slow frying - grilling
Ideal for stewing, maintaining a gentle boil, cooking and grilling (long duration).
4-3
Cooking - simmering -
thickening - creaming pasta
Ideal for prolonged cooking (rice, sauces, roasts, fish) with liquids (e.g. water, wine, broth, milk),
creaming pasta.
Ideal for prolonged cooking (volumes of less than a litre: rice, sauces, roasts, fish) with liquids
(e.g. water, wine, broth, milk)
Low power 2-1
Melting - defrosting -
keeping food hot -
creaming risottos
Ideal for softening butter, gently melting chocolate, thawing small products and keeping just-cooked
food hot (e.g. sauces, soups, minestrone)
Ideal for keeping just-cooked food hot, creaming risottos and keeping serving dishes warm
(with induction-suitable accessory),
OFF
Zero
power
Support surface
Hob in standby mode or off (possible end-of-cooking residual heat, indicated by “H”)
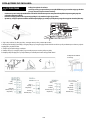
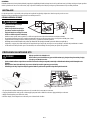
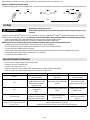
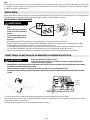
INSTALLATION
WARNING
- Install a separator panel under the hob.
- The lower part of the product must not
be accessible after installation.
- Do not fit the separator panel if an
undertop oven is installed.
• The distance between the underside of the appliance and the separator panel must respect the dimensions given in the figure.
• In order to ensure the correct operation of the product, do not obstruct the minimum required clearance between the hob and the top of the unit (min. 5 mm).
• If an undertop oven is installed, make sure the oven is equipped with a cooling system.
• Do not install the hob above a dishwasher or washing-machine, so that the electronic circuits do not come into contact with steam or moisture which could damage them.
• To remove the hob, use a screwdriver (not provided) to prise off the perimeter clips on the underside of the appliance.
6-7 cm
min. 20 mm
min. 5 mm
57
75
80

EN8
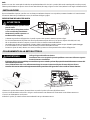
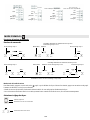
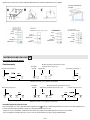
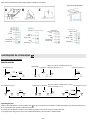
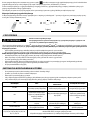
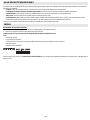
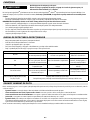
1. Remove the terminal cover (A) by unscrewing the screw and insert the cover into the hinge (B) of the terminal.
2. Plug the power cord into the clamp and connect the wires to the terminal block as shown in the wiring diagram located near the terminal.
3. Secure the power cable with the cable clamp.
4. Close the cover (C) and screw on the terminal with the screw removed.
For each connection to the network, the hob automatically checks for a few seconds.
ELECTRICAL CONNECTION
WARNING
- Disconnect the appliance from the power supply.
- Installation must be carried out by qualified personnel who know the current safety and
installation regulations.
- The manufacturer declines all liability for injury to persons or animals and for damage to property resulting from failure to observe the regulations
provided in this chapter.
- The power cable must be long enough to allow the hob to be removed from the worktop.
- Make sure the voltage specified on the dataplate located on the bottom of the appliance is the same as that of the home.
blue/grey
black/brown
yellow/green
Connection to main power
ONLY FOR BELGIUM
230V 2 phase 2N
}
black
brown
blue
blue (grey)
yellow/green
}
}
black
brown
yellow/green
blue
blue (grey)
}
black
brown
blue
blue (grey)
yellow/green
black
brown
yellow/green
blue
blue (grey)
ONLY FOR NL
AU and UK

EN9
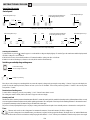
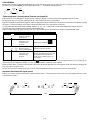
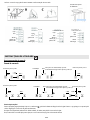
Switching the hob ON/OFF
To switch the hob on, press the button for approx. 2 seconds until the cooking zone displays light up. To switch off, press the same button until the displays switch
off. All the cooking zones are deactivated.
If the hob has been in use, the residual heat indicator “H” remains lit until the cooking zones have cooled down.
If within 10 seconds of switching on, no function is selected, the hob switches off automatically.
Switching on and adjusting cooking zones
Place the pot on the cooking zone, switching the hob on, activate the required cooking zone by pressing the corresponding “+” button “0” appears on the display. It is
possible to select the required power level, from min. 0 to max. 9, or booster “P” if available. To increase the power level, push the “+” button. To decrease the power
level push the “-” button.
Deactivation of cooking zones
To switch off the cooking zone, press the corresponding “+” and “-” button for more than 3 seconds.
The cooking zone switches off and, if still hot, the letter “H” appears on the zone display.
Control panel lock
This function locks the controls to prevent accidental activation of the hob. To activate the control panel lock, switch the hob on and press the Lock function button for three seconds;
an acoustic signal and a luminous indicator near the padlock symbol signal activation. The control panel is locked except for the switching off function. To deactivate the control
lock, repeat the activation procedure. The luminous dot goes off and the hob is active again.
The presence of water, liquid spilled from pots or any objects resting on the button below the symbol can accidentally activate or deactivate the control panel lock.
Timer
The timer can be used to set the cooking time for a maximum of 99 minutes (1 hour and 39 minutes) for all the cooking zones.
Select the cooking zone to be used with the timer, press the timer (see figure) and a beep signals the function. The display shows “00” and the LED indication
comes on. The Timer value can be decreased and increased by keeping the slider function “+” and “-” buttons pressed. When the set time has elapsed, an acoustic signal
INSTRUCTIONS FOR USE
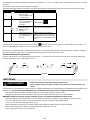
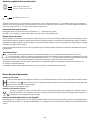
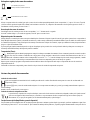
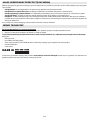
Power indicator display
Selected cooking zone indication
Cooking zone positioning
Control Panel Description
Control panel
Cooking zone controls and corresponding display
Power management step 1 Control panel lock/Special function/
Power management step 2 and 4
TimerOn/Off
Power management step 1
Cooking zone controls and corresponding display
Power management step 1 Control panel lock/Special function/
Power management step 2 and 4
TimerOn/Off
Power management step 1

EN10
sounds and the cooking zone switches off automatically. To deactivate the timer, keep the Timer button pressed for at least 3 seconds.
To set the timer for another zone, repeat the above steps. The timer display always shows the timer for the selected zone or the shortest timer.
To modify or deactivate the timer, press the cooking zone selection button for the timer in question.
Control panel warnings
Residual heat indicator.
The hob is fitted with a residual heat indicator for each cooking zone. These indicators alert the user when cooking zones are still hot.
If the display shows , the cooking zone is still hot. If the residual heat indicator of a given cooking zone is lit, that zone can be used, for example, to keep
a dish warm or to melt butter.
When the cooking zone cools down, the display goes off.
Incorrect or missing pot indicator.
If you are using a pot that is not suitable, not correctly positioned or not of the correct dimensions for your induction hob, the message “no pot” will
appear in the display (see figure at side). In these situations it is recommended to reposition the pot on the hob surface until you find the position of
operation. If no pot is detected within 60 seconds, the hob switches off.
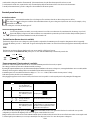
Fast boil function (Booster where it is available)
This function, only present on some cooking zones, makes it possible to exploit the hob’s maximum power (for example to bring water to the boil very quickly).
To activate the function, press the “+” button until “P” appears on the display. After 5 minutes’ use of the booster function, the appliance automatically sets the zone
to level 9.
“Power management” (Function where it is available)
Thanks to the “Power management” function, the user can set the maximum power the hob can reach, as required.
This setting is possible at any time and is maintained until the next change.
By setting the required maximum power, the hob automatically adjusts distribution in the various cooking zones, ensuring that this limit is never exceeded; with the
advantage of also being able to manage all the zones simultaneously, but without overload problems.
4 maximum power levels are available and showed on display: 2.5 – 4.0 – 6.0 – 7.2 kW (7.2 kW is considered as max power of cooktop)
At the time of purchase, the hob is set to maximum power
After plugging the appliance into the electrical socket, in the first 60 seconds it is possible to set the required power level by running the following points:
In case of an error when setting the power, the symbol appears in the middle and an acoustic signal sounds for about 5 seconds. In this case repeat the
configuration procedure from the beginning. If the error occurs again, contact the After-Sales Service.
During normal use, if the user tries to increase the maximum available power level when reached, the level of the zone in use flashes twice and an acoustic signal sounds.
To obtain a higher power in that zone, it is necessary to manually decrease the power level of one or more already active cooking zones.
Step Control panel Display
1 Press for approximately
3 seconds both Power
management button (step
1)
2 Press the Power
Management button (step
2) to confirm the previous
step
The display shows
3 Press to set the chosen level
amongst the different
options available
The light comes on together with the in-use
lights for the individual cooking zones
4 Press the Power
Management button (step
4) to confirm the previous
step
The display shows the set level which flashes
for approximately 2 seconds; after which the
hob emits an acoustic signal and then turns
itself off; it is now ready for use
FLEXI
This function is used in case of big pots that the single zone can not satisfied, ex, fish, big pot for meat.
In order to active the FLEXI/CONNEXTION ZONE, please press on + and - buttons simultaneously as shown in the picture below.

EN11
Activation/deactivation of the acoustic signal
IMPORTANT: Do not use abrasive sponges or scouring pads. Their use could eventually ruin the glass.
• After each use, clean the hob (when it is cool) to remove any deposits and stains due to food residuals.
• Sugar or foods with a high sugar content damage the hob and must be immediately removed.
• Salt, sugar and sand could scratch the glass surface.
• Use a soft cloth, absorbent kitchen paper or a specific hob cleaner (follow the Manufacturer’s instructions).
• Liquid spillages on the cooking zones may make pans vibrate or move.
• Read and follow the instructions given in the section “Instructions for use”.
• Check that the electricity supply has not been shut off.
• Dry the hob thoroughly after cleaning it.
• If, when the hob is switched on, alphanumeric codes appear on the display, consult the following table for instructions.
• If the hob cannot be switched off after using it, disconnect it from the power supply.
The induction cooktops can generate a set of noise and vibration during normal operation, depending on the type of material and the processing of the food, such as
those described below:
• Noise contact: this type of vibration is due to the use of pots made of different materials superimposed.
• Sounds click at mid-lower power: this noise is produced in order to achieve the low-mid power required.
• Sounds like rhythmic click: this noise is produced when operating several areas of cooking and / or high performance.
• Hissing weak: this noise is due to the type of container used and the quantity of food contained.
• Background noise: the induction cooker is equipped with a fan aimed at cooling the electronic components and for this reason during operation and also for a
few minutes after switching off the hob you hear the noise of the fan. Increase / decrease the cooking zones activated, the background noise of the fan may
increase or decrease.
These conditions are normal and essential for the proper functioning of the induction system, they are not indication of failure or damage.
CLEANING
WARNING
- Do not use steam cleaners.
- Before cleaning, make sure the cooking zones are switched off and that the residual heat indicator (“H”)
is not displayed.
TROUBLESHOOTING GUIDE
ERROR CODE DESCRIPTION POSSIBLE CAUSES ERROR ELIMINATION
C81, C82
The control panel switches off
because of excessively high
temperatures
The internal temperature of electronic
parts is too high
Wait for the hob to cool down
before using it again.
C83
The control panel indicates the error
code hob off because of an issue on
electronic circuit
Cooktop has been supplied with over
voltage
Cooktop may be still used but call
the After-Sales Service
C85
Hob is not able to give power to
the pot
Pot is not suitable to the induction hob Use another induction pot
F02 or F04 or C84
The connection voltage is wrong or
issue to the power supply
The sensor detects a discrepancy
between the appliance voltage and
that of the mains supply
Disconnect the hob from the
mains and check the electrical
connection
F01, F05, F06, F07, F10, F12, F25, F33, F34,
F36, F37, F46, F47, F48, F49, F58, F61, F62,
F63, F72, F74, F77
Disconnect the hob from the power supply.
Wait a few seconds and plug it again.
If the problem persists, call the After-Sales Service and specify the error code
NOISES MADE BY THE HOB
After switching the hob on, press and hold the “+” button and the outermost button on the right simultaneously for at least three seconds (“control panel lock”).
5 Sec

EN12
Product Guarantee and Repair Information
Guarantee
12 Months Parts and Labour Guarantee
Your appliance has benefit of our manufacturer’s guarantee, which covers the
cost of breakdown repairs for twelve months from the date of purchase.
This gives you the reassurance that if, with in that time, your appliance is proven to be defective because of either workmanship or materials, we will, a tour discretion,
either repair or replace the appliance at no cost to you:
This guarantee is subject to the following conditions:
-
The appliance has been installed and operated correctly and in accordance with our operating and maintenance instructions.
-
The appliance is used only on the electricity or gas supply printed on the rating plate.
-
The appliance has been used for normal domestic purposes only.
-
The appliance has not been altered, serviced, maintained, dismantled, or
otherwise interfered with by any person not authorised by us.
-
Any repair work must be undertaken by us or our appointed agent.
-
Any parts removed during repair work or any appliance that is replaced become our
property.
-
The appliance is used in the United Kingdom or Republic of Ireland.
The guarantee does not cover:
-
Damage resulting from transportation, improper use, neglect or interference or as a result of improper installation.
-
Replacement of any consumable item or accessory. These include but are not
limited to: plugs, cables, batteries, light bulbs, fluorescent tubes and starters, covers
and filters.
-
Replacement of any removable parts made of glass or plastic.
THIS GUARANTEE WILL NOT APPLY IF THE APPLIANCE HAS BEEN USED IN
COMMERCIAL OR NON
-
DOMESTIC PREMISES.
Recycling and Disposal Information
As part of Hotpoint’s continued commitment to helping the environment,
Hotpoint reserves the right to use quality, recycled components to keep down
customer
costs and minimise material wastage.
Please dispose of packaging and old appliances carefully. To minimise the risk of
injury to children, remove the door, plug, and cut the mains cable off flush with
the
appliance. Dispose of these parts separately to ensure that the appliance can
no longer be plugged into mains socket, and the door cannot be locked shut.
Repairs and After Sales
For product help and advice, repairs, spare parts or accessories, we’re here to help.
For local repair engineers
-
03448111606
ROI
-0818313413
UK standard local rate applies
ROI local Irish rate applies
For Parts and Accessories visit:
parts.hotpoint.co.uk/shop
Please remember to register your appliance at w
ww.hotpoitservice.co.uk
to activate your 10 year parts guarantee.
Please note, our advisors will require the following information:
Model number
Serial number
Before contacting the After-sales Service:
1. See if you can solve the problem yourself with the help of the “Troubleshooting guide”.
2. Switch the appliance off and then on again it to see if the problem has been eliminated.
If the problem persists after the above checks, contact the nearest After-Sales Service.
Always specify:
• a brief description of the fault;
• the product type and exact model;
• the Service number (the number after the word Service on the rating plate), located under the appliance (on the metal plate).
• your full address;
• your telephone number.
If any repairs are required, contact an authorised After-Sales Service Centre (to ensure the use of original spare parts and correct repairs). Spare parts are available
for 10 years.
AFTER-SALES SERVICE

IT 13
Queste istruzioni sono disponibili anche sul sito web:
LA SICUREZZA VOSTRA E DEGLI ALTRI È MOLTO IMPORTANTE
Il presente manuale e l’apparecchio stesso sono corredati da importanti messaggi relativi alla sicurezza, da leggere
ed osservare sempre.
Tutti i messaggi relativi alla sicurezza specificano il potenziale pericolo a cui si riferiscono ed indicano come ridurre
il rischio di lesioni, danni e scosse elettriche conseguenti ad un non corretto uso dell’apparecchio. Attenersi
scrupolosamente alle seguenti istruzioni:
- Utilizzare guanti protettivi durante tutte le operazioni di imballaggio e disimballaggio.
- L’apparecchio deve essere scollegato dalla rete elettrica prima di effettuare qualunque intervento
d’installazione.
- L’installazione o la manutenzione deve essere eseguita da un tecnico specializzato, in conformità alle istruzioni
del fabbricante e nel rispetto delle norme locali vigenti in materia di sicurezza. Non riparare o sostituire
qualsiasi parte dell’apparecchio se non specificamente richiesto nel manuale d’uso.
- La messa a terra dell’apparecchio è obbligatoria.
- Il cavo di alimentazione deve essere sufficientemente lungo da permettere il collegamento dell’apparecchio,
incassato nel mobile, alla rete elettrica.
- Affinché l’installazione sia conforme alle norme di sicurezza vigenti, occorre un interruttore onnipolare avente
una distanza minima di 3
mm tra i contatti.
- Non utilizzare prese multiple o prolunghe.
- Non tirare il cavo di alimentazione dell’apparecchio.
- Una volta terminata l’installazione, i componenti elettrici non dovranno più essere accessibili dall’utilizzatore.
- L’apparecchio è destinato esclusivamente ad uso domestico per la cottura di alimenti. Non sono consentiti altri
usi (es. riscaldare ambienti). Il fabbricante declina ogni responsabilità per usi non appropriati o per errate
impostazioni dei comandi.
- L’apparecchiatura e le parti accessibili diventano roventi durante l’utilizzo. Fare attenzione a non toccare gli
elementi riscaldanti. Tenere lontani i bambini di età inferiore agli 8 anni, a meno che non siano costantemente
sorvegliati.
- Questo apparecchio può essere utilizzato da bambini di età superiore agli 8 anni e da persone con ridotte
capacità fisiche, sensoriali o mentali o con esperienza e conoscenza inadeguate solo se sorvegliati o se hanno
ricevuto istruzioni sull'utilizzo sicuro dell'apparecchio e ne comprendono i rischi.
- Durante e dopo l’uso non toccare gli elementi riscaldanti dell’apparecchio. Evitare il contatto con panni o altro
materiale infiammabile fino a che tutti i componenti dell’apparecchio non si siano sufficientemente raffreddati.
- Non riporre materiale infiammabile sull’apparecchio o nelle sue vicinanze.
- I grassi e gli oli surriscaldati prendono facilmente fuoco. Sorvegliare la cottura di alimenti ricchi di grasso e di olio.
- Non porre sulla zona di cottura oggetti metallici, quali utensili da cucina (coltelli, forchette, cucchiai, coperchi,
etc.) perchè potrebbero scaldarsi.
- È obbligatoria l’installazione di un pannello separatore, non fornito a corredo, nel vano sotto l’apparecchio.
ISTRUZIONI IMPORTANTI PER LA SICUREZZA
Questo è il simbolo di pericolo, relativo alla sicurezza, il quale avverte dei potenziali rischi per l’utilizzatore
e per gli altri.
Tutti i messaggi relativi alla sicurezza saranno preceduti dal simbolo di pericolo e dai seguenti termini:
PERICOLO
Indica una situazione pericolosa che, se non evitata, provoca lesioni
gravi.
AVVERTENZA
Indica una situazione pericolosa che, se non evitata, potrebbe
provocare lesioni gravi.
www.hotpoint.eu

IT 14
- Se la superficie è incrinata, spegnere l’apparecchio per evitare la possibilità di scossa elettrica (solo per
apparecchi con superficie in vetro).
- L’apparecchio non è destinato ad essere messo in funzione per mezzo di un temporizzatore esterno oppure di un
sistema di comando a distanza separato.
- La cottura non sorvegliata su un piano cottura con olio o grasso può essere pericolosa e generare incendi. Non
tentare MAI di spegnere le fiamme con acqua. Al contrario, spegnere l’apparecchio e soffocare le fiamme, ad
esempio con un coperchio o una coperta antincendio.
Pericolo di incendio: non poggiare oggetti sulle superfici di cottura.
- Non usare pulitrici a vapore.
- Non appoggiare oggetti metallici come coltelli, forchette, cucchiai e coperchi sulla superficie del piano di
cottura perché potrebbero surriscaldarsi.
- Dopo l’uso, spegnere l’elemento riscaldante con la manopola e non affidarsi al rilevatore di presenza della
casseruola (solo per apparecchi a induzione).
Smaltimento del materiale di imballaggio
Il materiale da imballo è interamente riciclabile ed è contrassegnato dal simbolo di riciclaggio ( ) Le diverse parti dell’imballaggio non devono quindi essere disperse
nell’ambiente, ma smaltite in conformità alle norme stabilite dalle autorità locali.
Smaltimento
Questo apparecchio è contrassegnato in conformità alla Direttiva Europea 2012/19/EC, Waste Electrical and Electronic Equipment (WEEE).
Assicurandosi che questo prodotto sia smaltito in modo corretto, l’utente contribuisce a prevenire le potenziali conseguenze negative per l’ambiente e la salute.
Il simbolo sull'apparecchio, o sulla documentazione di accompagnamento, indica che questo apparecchio non deve essere trattato come rifiuto domestico ma deve
essere consegnato presso l'idoneo punto di raccolta per il riciclaggio di apparecchiature elettriche ed elettroniche.
Risparmio energetico
Per ottenere risultati ottimali, attenersi ai seguenti suggerimenti:
• Il fondo delle pentole deve avere un diametro uguale a quello della zona di cottura.
• Utilizzare soltanto pentole e tegami con fondi piatti.
• Se possibile, tenere il coperchio sulle pentole durante la cottura.
• Utilizzare la pentola a pressione, riduce ulteriormente il consumo di energia e il tempo di cottura.
• Posizionare la pentola nel centro della zona di cottura indicata sul piano.
- L'apparecchio è stato progettato, fabbricato e commercializzato in conformità ai requisiti di sicurezza della direttiva “Bassa Tensione” 2006/95/CE (che sostituisce
la direttiva 73/23/CEE e successivi emendamenti), nonché ai requisiti di protezione della direttiva “EMC” 2004/108/CE.
- Questo apparecchio soddisfa i requisiti dei regolamenti europei n. 66/2014 in materia di progettazione ecocompatibile, in conformità con la norma europea
EN
60350-2.
Per verificare che il fondo del recipiente sia adatto al piano di cottura ad induzione, servirsi di una calamita: pentole e padelle non sono adatte se non sono rilevabili
magneticamente.
- Assicurarsi che il fondo delle pentole non sia ruvido perché potrebbe graffiare la superficie del piano di cottura. Controllare le stoviglie.
- Non appoggiare mai le pentole e le padelle calde sulla superficie del pannello comandi del piano. Potrebbero derivarne danni.
CONSIGLI PER LA SALVAGUARDIA DELL'AMBIENTE
DICHIARAZIONE DI CONFORMITÀ
PRIMA DELL’UTILIZZO
IMPORTANTE: Le zone di cottura non si accendono se la pentola non è delle dimensioni corrette. Utilizzare solo pentole che riportano il simbolo
“SISTEMA A INDUZIONE” (Figura a lato). Posizionare la pentola sulla zona di cottura prima di accendere il piano.
Utilizzando pentole adatta, non è possibile utilizzare le zone di cottura a temperature inferiori ai 10°C.
RECIPIENTI PREESISTENTI
NOOK

IT 15
Prima di accendere il piano di cottura, posizionare la pentola sulla zona di cottura desiderata.
Per un risultato ottimale, il diametro della base della pentola dovrebbe corrispondere alla misura della piastra.
Dimensione della pentola
Per determinare la dimensione della pentola, misurare il diametro della base (vedere la figura) e fare riferimento alla tabella delle larghezze
consigliate qui sotto. Ogni zona di cottura prevede un limite minimo per il rilevamento delle pentole, che varia a seconda del materiale della
pentola. Si consiglia perciò di utilizzare la zona di cottura più adatta per il diametro della pentola.
Per ottenere le prestazioni migliori quando si utilizzano due pentole contemporaneamente, collocare le pentole nelle posizioni illustrate di seguito:
DIAMETRI FONDO PENTOLA CONSIGLIATI
Diametro (cm) Max (cm) Min (cm) Diametro (cm) Max (cm) Min (cm)
14,5 14,5 10 28 28 17
18 18 12 30 30 17
21 21 15 FLEXI/RACCORDO 39 - 18 12
24 24 15
26 26 17
POSIZIONAMENTO DELLE PENTOLE CONSIGLIATO
TABELLA POTENZE
Livello di potenza Tipologia di cottura Utilizzo livello
(l'indicazione affianca l'esperienza e le abitudini di cottura)
Max potenza
Boost
(temperatura
massima)
Riscaldare rapidamente
Ideale per innalzare in breve tempo la temperatura del cibo fino a veloce ebollizione in caso di
acqua o riscaldare velocemente liquidi di cottura
9–7
Friggere - bollire
Ideale per rosolare, iniziare una cottura, friggere prodotti congelati, bollire rapidamente
Alta potenza
Rosolare - soffriggere - bollire -
grigliare
Ideale per soffriggere, mantenere un bollore alto, cuocere e grigliare (durata breve, 5–10 minuti)
7–5
Rosolare - cuocere - stufare -
soffriggere - grigliare
Ideale per soffriggere, mantenere un bollore basso, cuocere e grigliare (durata media,
10–20 minuti), preriscaldare
Media potenza
Cuocere - stufare - soffriggere -
grigliare
Ideale per stufare, mantenere un bollore delicato, cuocere e grigliare (durata lunga).
4–3
Cuocere - sobbollire -
addensare - mantecare pasta
Ideale per cotture prolungate (riso, sughi, arrosti, pesce) in presenza di liquidi di
accompagnamento (ad es. acqua, vino, brodo, latte), mantecare pasta.
Ideale per cotture prolungate (volumi inferiori a 1 litro: riso, sughi, arrosti, pesce) in presenza di
liquidi di accompagnamento (ad es. acqua, vino, brodo, latte)
Bassa potenza 2–1
Fondere - scongelare -
mantenere in caldo -
mantecare risotti
Ideale per ammorbidire il burro, fondere delicatamente il cioccolato, scongelare prodotti di piccole
dimensioni e mantenere in caldo cibi appena cucinati (ad es. salse, minestre, minestrone)
Ideale per il mantenimento in caldo di cibo appena cucinato, mantecare risotti e tenere in
temperatura piatti di portata (con accessorio adatto all’induzione)
SPEGNIMENTO Potenza zero Superficie di appoggio
Piano di cottura in modalità standby o spento (possibile presenza di calore residuo da fine cottura,
segnalato con H)

IT 16
NOTA:
Quando si cuociono cibi a cottura rapida che richiedono una perfetta distribuzione del calore (ad es. i pancake) sulla zona di cottura doppia di 28 cm (dove presente),
utilizzare pentole di diametro non superiore a 24 cm. Per una cottura delicata (ad esempio, sciogliere cioccolato o burro) utilizzare le zone singole con diametro inferiore.
Dopo avere disimballato il prodotto, controllare se vi sono danni procurati durante il trasporto. In caso di problemi, contattare il rivenditore o il Servizio Assistenza.
Per istruzioni e dimensioni per l'installazione a incasso, fare riferimento alle figure a pagina 2.
PREDISPOSIZIONE DEL MOBILE PER INCASSO
1. Rimuovere il coperchio della morsettiera (A) svitando la vite e inserendo il coperchio nella cerniera (B) della morsettiera.
2. Inserire il cavo di alimentazione nel morsetto e collegare i cavi alla morsettiera come illustrato nello schema situato accanto alla morsettiera stessa.
3. Fissare il cavo di alimentazione con il morsetto.
4. Chiudere il coperchio (C) e avvitarlo sulla morsettiera utilizzando la vite precedentemente rimossa.
INSTALLAZIONE
AVVERTENZA
- Installare un pannello separatore sotto il
piano di cottura.
- La parte inferiore del prodotto non deve
essere accessibile dopo l'installazione.
- Non montare il pannello separatore se è
installato un forno sottopiano.
• La distanza tra parte inferiore dell'apparecchio e il pannello separatore deve rispettare le dimensioni riportate in figura.
• Per un corretto funzionamento del prodotto non ostruire l’apertura minima tra piano di lavoro e il lato superiore del piano del mobile (min. 5 mm).
• Nel caso di installazione di un forno sottopiano, accertarsi che il forno sia dotato di sistema di raffreddamento.
• Non installare il piano di cottura sopra la lavastoviglie o la lavatrice, affinché i circuiti elettronici non vengano a contatto con vapore ed umidità e quindi si danneggino.
• In caso di installazione a incasso, chiamare il Servizio Assistenza per richiedere il kit viti 4801 211 00112.
• Per rimuovere il piano di cottura, utilizzare un cacciavite (non fornito) per rimuovere i fermi perimetrali sul lato inferiore dell'apparecchio.
COLLEGAMENTO ALLA RETE ELETTRICA
AVVERTENZA
- Scollegare l'apparecchio dalla rete elettrica.
- L'installazione deve essere eseguita da personale qualificato a conoscenza delle norme vigenti in
materia di sicurezza e installazione.
- Il fabbricante declina ogni responsabilità per eventuali lesioni a persone o animali e per danni alla proprietà derivanti dalla mancata osservanza delle
norme indicate in questa sezione.
- Il cavo di alimentazione deve essere sufficientemente lungo da consentire la rimozione del piano di cottura dal piano di lavoro.
- Controllare che la tensione indicata sulla targhetta matricola nella parte inferiore dell'apparecchio sia la stessa della rete elettrica domestica.
6-7 cm
min. 20 mm
min. 5 mm
57
75
80
blu/grigio
nero/marrone
giallo/verde

IT 17
Per ogni collegamento alla rete, il piano di cottura esegue un controllo automatico per alcuni secondi.
Descrizione pannello comandi
Pannello comandi
Accensione/Spegnimento piano di cottura
Per accendere il piano premere per circa 2 secondi il tasto finché non si illuminano i display delle zone di cottura. Per spegnere toccare lo stesso tasto fino allo
spegnimento dei display. Tutte le zone di cottura vengono disattivate.
Qualora il piano fosse già stato utilizzato l’indicatore del calore residuo “H” resta attivo fino a raffreddamento delle zone di cottura.
Se entro 10 secondi dopo l’accensione del piano di cottura non si seleziona nessuna funzione, il piano cotture si disattiva automaticamente.
ISTRUZIONI PER L’USO
Collegamento
all'alimentazone di rete
SOLO PER IL BELGIO
230V 2 fase 2N
}
nero
marrone
blu
blu (grigio)
giallo/verde
}
}
nero
marrone
giallo/verde
blu
blu (grigio)
}
nero
marrone
blu
blu (grigio)
giallo/verde
nero
marrone
giallo/verde
blu
blu (grigio)
SOLO PER I PAESI BASSI
Australia e Regno Unito
Gestione potenza fase 1
Gestione potenza fase 1
Accensione/
Spegnimento
Accensione/
Spegnimento
Timer
Timer
Blocco pannello comandi/funzione speciale/
Gestione potenza fase 2 e 4
Blocco pannello comandi/funzione speciale/
Gestione potenza fase 2 e 4
Gestione potenza fase 1
Gestione potenza fase 1
Comandi regolazione zone di cottura e relativo display
Comandi regolazione zone di cottura e relativo display

IT 18
Attivazione e regolazione zone di cottura
Posizionare la pentola sulla zona di cottura accendendo il piano di cottura, quindi attivare la zona di cottura richiesta premendo il tasto “+”; sul display viene
visualizzato “0”. È possibile selezionare il livello di potenza richiesto, da un minimo di 0 a un massimo di 9, oppure continuare a premere fino a visualizzare “P” per
attivare la funzione booster, se disponibile. Per aumentare il livello di potenza, premere il tasto “+”. Per diminuire il livello di potenza, premere il tasto “-”.
Disattivazione delle zone di cottura.
Per spegnere la zona di cottura, premere i corrispondenti tasti “+” e “-” per più di 3 secondi.
La zona di cottura si spegne e, se ancora calda, sul display viene visualizzata la lettera “H”.
Blocco pannello comandi
La funzione blocca i comandi per prevenire l'attivazione accidentale del piano di cottura. Per attivare il blocco del pannello comandi, accendere il piano di cottura e premere il tasto
funzione blocco: un segnale acustico e una spia luminosa accanto al simbolo del lucchetto segnalano l'avvenuta attivazione. Il pannello comandi è bloccato a eccezione della
funzione di spegnimento. Per disattivare il blocco comandi ripetere la procedura di attivazione. Il puntino luminoso si spegne e il piano di cottura è nuovamente attivo.
La presenza di acqua di pulizia, liquido fuoriuscito dalle pentole o oggetti di qualsiasi genere posati sul tasto sotto il simbolo possono provocare l’attivazione o la
disattivazione involontaria della funzione di blocco pannello comandi.
Timer
Il timer è un interruttore orario che offre la possibilità di impostare una durata di cottura per un tempo massimo di 99 minuti (1 ora e 39 minuti) per tutte le
zone di cottura.
Selezionare la zona di cottura a cui si intende associare il timer e premere il timer (vedere figura): il segnale acustico indica la funzione. Il display visualizza “00” la spia
LED si accende. Il valore del timer può essere aumentato e diminuito premendo i tasti “+” e “-” della funzione dispositivo di scorrimento. Allo scadere del tempo si attiva
un segnale acustico e la zona di cottura si spegne automaticamente. Per disattivare il timer, tenere premuto il tasto Timer per almeno 3 secondi.
Per impostare il timer per un'altra zona, ripetere la suddetta procedura. Il display del timer mostra sempre il timer per la zona selezionata o il timer più breve.
Per modificare o disattivare il timer, premere il tasto di selezione della zona di cottura per il timer in questione.
Avvisi del pannello comandi
Spia di calore residuo.
Il piano di cottura è dotato di un indicatore di calore residuo per ogni zona di cottura. Tale indicatore segnala quali sono le zone di cottura ancora a temperatura
elevata.
Se il display visualizza , la zona di cottura è ancora calda. Se la zona presenta questa segnalazione è possibile, per esempio, mantenere calda una pietanza
o fare sciogliere il burro.
Con il raffreddamento della zona di cottura, il display si spegne.
Indicatore di pentola non corretta o assente.
Qualora la pentola non fosse compatibile con il piano di cottura, fosse mal posizionata oppure non fosse delle dimensioni adatte, l'indicazione di “pentola
assente” compare nel display (figura a lato). In queste situazioni, si consiglia di continuare a riposizionare la pentola sulla superficie del piano fino a
quando non si trova la posizione di funzionamento. Se, entro 60 secondi, non viene rilevata nessuna pentola, il piano di cottura si spegne.
Funzione Fast boil (ebollizione rapida) (Booster (temperatura massima) se disponibile)
Funzione presente solo su alcune zone di cottura che permette di sfruttare al massimo la potenza del piano (ad esempio per portare ad ebollizione rapidamente l’acqua).
Per attivare la funzione, premere il tasto “+” fino a quando “P” appare sul display. Dopo 5 minuti di utilizzo della funzione Booster (temperatura massima),
l’apparecchio imposta automaticamente la zona al livello 9.
Display dell'indicatore di potenza
Indicazione della zona di cottura selezionata
Posizionamento della zona di cottura

IT 19
FLEXI /RACCORDO
Questa funzione è utile per le pentole di grandi dimensioni che superano l'area di una singola zona, ad esempio le pesciere o le grandi casseruole per la carne.
Per attivare la zona FLEXI/ RACCORDO, premere simultaneamente i tasti + e - come illustrato nella figura qui sotto.
“Power management” (Gestione potenza) (Funzione dove disponibile)
Grazie alla funzione “Power management” (Gestione potenza), l'utente può impostare a scelta la potenza massima raggiungibile dal piano di cottura.
Tale impostazione può essere eseguita in qualunque momento e viene mantenuta fino alla successiva modifica.
Impostando la potenza massima desiderata, il piano di cottura ne regola automaticamente la distribuzione nelle varie zone di cottura in modo che tale limite non venga
mai superato; con l'ulteriore vantaggio di poter gestire contemporaneamente tutte le zone senza problemi di sovraccarico.
Sono disponibili 4 livelli di potenza massima visualizzati sul display: 2,5 – 4,0 – 6,0 – 7,2 kW (7,2 kW è considerata la potenza massima del piano di cottura)
Al momento dell'acquisto, il piano di cottura è impostato sulla potenza massima.
Dopo aver collegato l'apparecchio alla presa elettrica, entro 60 secondi è possibile impostare il livello di potenza sulla base dei punti indicati di seguito:
In caso di errore durante l'impostazione della potenza, il simbolo appare al centro del display e viene emesso un segnale acustico per circa 5 secondi. In tal caso,
ripetere la procedura di configurazione dall'inizio. Se l'errore si verifica nuovamente, contattare il Servizio Assistenza.
Durante il normale utilizzo, se l'utente prova ad aumentare il livello di potenza massimo disponibile dopo averlo raggiunto, il livello della zona in uso lampeggia due
volte e viene emesso un segnale acustico.
Per ottenere una potenza più elevata in quella zona, è necessario ridurre manualmente il livello di potenza di una o più zone di cottura già attive.
Attivazione/disattivazione del segnale acustico
Dopo aver acceso il piano di cottura, tenere premuti contemporaneamente il tasto “-” della prima zona di cottura e il tasto esterno sulla destra per almeno 5 secondi
(“come illustrato di seguito”).
Fase Pannello comandi Display
1 Premere per circa 3 secondi
entrambi i tasti Gestione
potenza (fase 1)
2 Premere il tasto Gestione
potenza (fase 2) per
confermare la fase
precedente
Sul display viene visualizzato
3 Premere per impostare il
livello prescelto tra le
diverse opzioni disponibili
La spia si accende insieme alle spie di utilizzo
relative alle singole zone di cottura
4 Premere il tasto Gestione
potenza (fase 4) per
confermare la fase
precedente
Sul display viene visualizzato il livello
impostato che lampeggia per circa 2 secondi;
dopodiché il piano di cottura emette un
segnale acustico e quindi si spegne; è ora
pronto per l'uso
5 Sec

IT 20
Se sul vetro è presente il logo iXelium
TM
, il piano di cottura è stato trattato con la tecnologia iXelium
TM
, una finitura esclusiva di Whirlpool che garantisce una perfetta
pulizia e preserva a lungo la brillantezza della superficie. Per la pulizia dei piani di cottura IXELIUM, attenersi alle seguenti raccomandazioni:
• Usare un panno morbido (meglio se in microfibra) inumidito con acqua o con un detergente per vetri di uso quotidiano.
• Per un risultato migliore, lasciare il vetro a contatto con un panno umido per un paio di minuti.
IMPORTANTE: Non utilizzare spugne abrasive o pagliette. in quanto possono rovinare il vetro.
• Dopo ciascun utilizzo, pulire il piano di cottura (una volta raffreddato) per rimuovere eventuali depositi e macchie dovuti a residui di cibo.
• Lo zucchero e gli alimenti ad elevato contenuto di zuccheri danneggiano il piano di cottura e devono essere immediatamente rimossi.
• Sale, zucchero e sabbia possono graffiare la superficie in vetro.
• Utilizzare un panno morbido, carta assorbente da cucina o uno specifico detergente per piani di cottura (seguire le istruzioni del produttore).
• Le fuoriuscite di liquidi sulle zone di cottura possono causare spostamenti o vibrazioni delle pentole.
• Dopo avere pulito il piano di cottura, asciugarlo accuratamente.
• Leggere e seguire le istruzioni della sezione “Istruzioni per l'uso”.
• Controllare che non vi siano interruzioni nell'alimentazione.
• Asciugare bene la superficie del piano dopo averlo pulito.
• Se, accendendo il piano di cottura, il display visualizza codici alfanumerici procedere secondo la seguente tabella.
• Se non si riesce a spegnere il piano di cottura dopo averlo utilizzato, scollegarlo dall'alimentazione.
I piani di cottura a induzione possono generare rumorosità e vibrazioni durante il normale funzionamento, in base al tipo di materiale e alla cottura del cibo, come
descritto di seguito:
• Rumorosità da contatto: questo tipo di vibrazione è dovuto all'utilizzo di pentole realizzate mediante differenti materiali sovrapposti.
• Suono di clic a un livello di potenza medio-basso: questo rumore è prodotto al fine di raggiungere il livello di potenza medio-basso richiesto.
• Suono di clic ritmato: questo rumore è prodotto quando sono in funzione diverse zone di cottura e/o sono attivate prestazioni di cottura elevate.
• Debole sibilo: questo rumore è dovuto al tipo di contenitore utilizzato e alla quantità di cibo contenuta.
• Rumore di fondo: il piano di cottura a induzione è dotato di una ventola per il raffreddamento dei componenti elettronici e per questo motivo durante il
funzionamento e anche per alcuni minuti dopo lo spegnimento si avverte questo rumore di fondo. Aumentando / diminuendo le zone di cottura attivate, il
rumore di fondo della ventola può aumentare o diminuire.
Queste condizioni sono normali ed essenziali per il corretto funzionamento del sistema a induzione e non indicano eventuali guasti o danni.
OPERAZIONI DI PULIZIA
AVVERTENZA
- Non utilizzare pulitrici a vapore.
- Prima di procedere alle operazioni di pulizia, assicurarsi che le zone di cottura siano spente e che
l’indicazione di calore residuo (“H”) sia scomparsa.
GUIDA RICERCA GUASTI
CODICE ERRORE DESCRIZIONE POSSIBILI CAUSE ELIMINAZIONE ERRORE
C81, C82
Il pannello comandi si spegne per la
temperatura troppo elevata.
La temperatura interna delle parti
elettroniche è troppo alta.
Aspettare quindi che il piano si
raffreddi prima di riutilizzarlo.
C83
Il pannello comandi indica il codice
errore di piano spento perché vi è un
problema del circuito elettronico
Il piano di cottura è stato alimentato
con una tensione eccessiva
Il piano di cottura può essere
ancora utilizzato ma è opportuno
chiamare il Servizio Assistenza
C85
Il piano di cottura non trasferisce
alimentazione alla pentola
La pentola non è adatta al piano di
cottura a induzione
Utilizzare una pentola adeguata
F02 oppure F04 oppure C84
La tensione di collegamento è errata
oppure problema
dell'alimentazione
Il sensore rileva una tensione differente
da quella di collegamento.
Scollegare il piano dalla rete e
controllare il collegamento.
F01, F05, F06, F07, F10, F12, F25, F33, F34,
F36, F37, F46, F47, F48, F49, F58, F61, F62,
F63, F72, F74, F77
Scollegare il piano di cottura dalla rete elettrica.
Attendere alcuni secondi e collegarlo nuovamente.
Se il problema persiste, chiamare il Servizio Assistenza e comunicare il codice errore.
RUMOROSITÀ DEL PIANO DI COTTURA
Strona się ładuje...
Strona się ładuje...
Strona się ładuje...
Strona się ładuje...
Strona się ładuje...
Strona się ładuje...
Strona się ładuje...
Strona się ładuje...
Strona się ładuje...
Strona się ładuje...
Strona się ładuje...
Strona się ładuje...
Strona się ładuje...
Strona się ładuje...
Strona się ładuje...
Strona się ładuje...
Strona się ładuje...
Strona się ładuje...
Strona się ładuje...
Strona się ładuje...
Strona się ładuje...
Strona się ładuje...
Strona się ładuje...
Strona się ładuje...
Strona się ładuje...
Strona się ładuje...
Strona się ładuje...
Strona się ładuje...
Strona się ładuje...
Strona się ładuje...
Strona się ładuje...
Strona się ładuje...
Strona się ładuje...
Strona się ładuje...
Strona się ładuje...
Strona się ładuje...
Strona się ładuje...
Strona się ładuje...
Strona się ładuje...
Strona się ładuje...
Strona się ładuje...
Strona się ładuje...
Strona się ładuje...
Strona się ładuje...
Strona się ładuje...
Strona się ładuje...
Strona się ładuje...
Strona się ładuje...
Strona się ładuje...
Strona się ładuje...
Strona się ładuje...
Strona się ładuje...
Strona się ładuje...
Strona się ładuje...
-
 1
1
-
 2
2
-
 3
3
-
 4
4
-
 5
5
-
 6
6
-
 7
7
-
 8
8
-
 9
9
-
 10
10
-
 11
11
-
 12
12
-
 13
13
-
 14
14
-
 15
15
-
 16
16
-
 17
17
-
 18
18
-
 19
19
-
 20
20
-
 21
21
-
 22
22
-
 23
23
-
 24
24
-
 25
25
-
 26
26
-
 27
27
-
 28
28
-
 29
29
-
 30
30
-
 31
31
-
 32
32
-
 33
33
-
 34
34
-
 35
35
-
 36
36
-
 37
37
-
 38
38
-
 39
39
-
 40
40
-
 41
41
-
 42
42
-
 43
43
-
 44
44
-
 45
45
-
 46
46
-
 47
47
-
 48
48
-
 49
49
-
 50
50
-
 51
51
-
 52
52
-
 53
53
-
 54
54
-
 55
55
-
 56
56
-
 57
57
-
 58
58
-
 59
59
-
 60
60
-
 61
61
-
 62
62
-
 63
63
-
 64
64
-
 65
65
-
 66
66
-
 67
67
-
 68
68
-
 69
69
-
 70
70
-
 71
71
-
 72
72
-
 73
73
-
 74
74


Hotpoint HKIA 640 C Instrukcja obsługi
- Kategoria
- Płyty
- Typ
- Instrukcja obsługi
w innych językach
- čeština: Hotpoint HKIA 640 C Návod k obsluze
- español: Hotpoint HKIA 640 C El manual del propietario
- italiano: Hotpoint HKIA 640 C Manuale del proprietario
- português: Hotpoint HKIA 640 C Manual do proprietário
- français: Hotpoint HKIA 640 C Le manuel du propriétaire
- English: Hotpoint HKIA 640 C Owner's manual
- română: Hotpoint HKIA 640 C Manualul proprietarului
Powiązane artykuły
Inne dokumenty
-
Whirlpool KIS 740 B instrukcja
-
Whirlpool VIA 640 0 C Instrukcja obsługi
-
Indesit VIA6400C Instructions For Use Manual
-
Polar AKS 368/NE instrukcja
-
Franke FSM 804 I B BK Instrukcja obsługi
-
Franke FSM 654 I B BK Instrukcja obsługi
-
Franke FSM 654 I BK Instrukcja obsługi
-
Franke FSM302IBK Induction Hob Instrukcja obsługi
-
Franke FSM 653 I D BK Instrukcja obsługi
-
Samsung NZ84J9770EK/EO Instrukcja obsługi