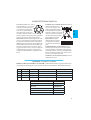
Whirlpool AMW 479 BL instrukcja
- Kategoria
- Mikrofale
- Typ
- instrukcja
Niniejsza instrukcja jest również odpowiednia dla

1
G
B
H
U
P
L
AMW 479
www.whirlpool.com

2
G
B
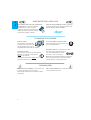
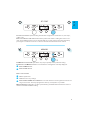
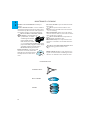
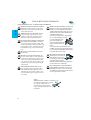
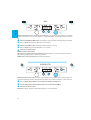
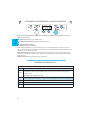
INSTALLATION
PRIOR TO CONNECTING
E
NSURE THAT THE APPLIANCE IS NOT DAMAGED. Check
that the oven door closes fi rmly against the
door support and that the internal door seal is
not damaged. Empty the oven and clean the
interior with a soft, damp cloth.
AFTER CONNECTING
T
HE EARTHING OF THIS APPLIANCE is compulso-
ry. The manufacturer will accept no re-
sponsibility for injury to persons, ani-
mals or damage to objects arising from
the non-observance of this requirement.
The manufacturers are not liable for any
problems caused by the user’s failure to ob-
serve these instructions.
D
O NOT OPERATE THIS APPLIANCE if it has a
damaged mains cord or plug, if it is not
working properly, or if it has been dam-
aged or dropped. Do not immerse the
mains cord or plug in water. Keep the
cord away from hot surfaces. Electrical
shock, fi re or other hazards may result.
E
NSURE the oven cavity is empty before mount-
ing.
C
HECK THAT THE VOLTAGE on the rating
plate corresponds to the voltage in your
home.
T
HE OVEN CAN BE OPERATED ONLY if the oven door is
fi rmly closed.
MOUNTING THE APPLIANCE
FOLLOW THE SUPPLIED separate mounting in-
structions when installing the appliance.

3
G
B
IMPORTANT SAFETY INSTRUCTIONS
DO NOT HEAT, OR USE FLAMMABLE MATERIALS in
or near the oven. Fumes can create a fi re
hazard or explosion.
DO NOT USE YOUR MICROWAVE oven for drying
textiles, paper, spices, herbs, wood, fl ow-
ers, fruit or other combustible materials.
Fire could result.
DO NOT OVER-COOK FOOD. Fire could result.
D
O NOT LEAVE THE OVEN UNATTENDED, espe-
cially when using paper, plastic or oth-
er combustible materials in the cook-
ing process. Paper can char or burn and
some plastics can melt if used when
heating foods.
I
F MATERIAL INSIDE / OUTSIDE THE OVEN SHOULD
IGNITE OR SMOKE IS OBSERVED, keep oven
door closed and turn the oven off . Dis-
connect the power cord or shut off pow-
er at the fuse or circuit breaker panel.
READ CAREFULLY AND KEEP FOR FUTURE REFERENCE
O
NLY ALLOW CHILDREN to use the oven without
adult supervision after adequate instruc-
tions have been given so that the child is
able to use the oven in a safe way and un-
derstands the hazards of improper use.
The appliance is not intended for use by
young children or infi rm persons with-
out supervision. Young children
should be supervised to en-
sure that they do not play
with the appliance.
If your oven has a com-
bination mode, children should
only use the oven under adult supervision
due to the high temperatures generated.
D
O NOT USE YOUR MICROWAVE
oven for heating anything in
airtight sealed contain-
ers. The pressure increas-
es and may cause damage
when opening or may explode.
EGGS
D
O NOT USE YOUR MICROWAVE oven for cook-
ing or reheating whole eggs with or
without shell since they may
explode even after microwave
heating has ended.
T
HE DOOR SEALS AND THE DOOR SEAL AREAS must
be regularly inspected for damage. If these
areas are damaged the appliance should
not be operated until it has been repaired
by a trained service technician.
D
O NOT USE corrosive chemicals or va-
pors in this appliance. This type of oven
is specifi cally designed to heat or cook
food. It is not designed for industrial or
laboratory use.

4
G
B
GENERAL
T
HIS APPLIANCE IS DESIGNED FOR DOMESTIC USE ONLY!
T
HE APPLIANCE SHOULD NOT BE OPERATED without food
in the oven when using microwaves. Operation in
this manner is likely to damage the appliance.
I
F YOU PRACTICE OPERATING the oven, put a glass
of water inside. The water will absorb the mi-
crowave energy and the oven will not be dam-
aged.
REMOVE WIRE TWIST-TIES from paper or
plastic bags before placing bag in
the oven.
DEEPFRYING
D
O NOT USE YOUR MICROWAVE oven for deep-frying,
because the oil temperature cannot be
controlled.
LIQUIDS
E.
G. BEVERAGES OR WATER. Overheating the liquid
beyond boiling point can occur
without evidence of bubbling.
This could result in a sudden
boil over of the hot liquid.
To prevent this possibility the
following steps should be taken:
1. Avoid using straight-sided containers with
narrow necks.
2. Stir the liquid before placing the container
in the oven and let the teaspoon remain
in the container.
3. After heating, allow standing for a short
time, stirring again before carefully re-
moving the container from the oven.
CAREFUL
A
LWAYS REFER to a microwave cookbook for de-
tails. Especially, if cooking or reheating food
that contains alcohol.
A
FTER HEATING BABY FOOD or liquids in a
baby bottle or in a baby food
jar, always stir and check the
temperature before serving.
This will ensure that the heat is evenly distributed
and the risk of scalding or burns can be avoided.
Ensure the Lid and the Teat is removed be-
fore heating!
PRECAUTIONS
USE HOT PADS OR OVEN MITTS to prevent
burns, when touching containers, oven
parts, and pan after cooking.
D
O NOT USE THE CAVITY for any storage purposes.

5
G
B
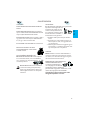
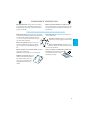
ACCESSORIES
GENERAL
I
F ACCESSORIES CONTAINING METAL comes in contact
with the oven interior, while the oven is in op-
eration, sparking can occur and the oven could
be damaged.
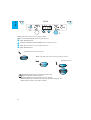
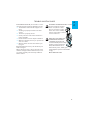
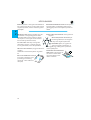
TURNTABLE SUPPORT
USE THE TURNTABLE SUPPORT under the
Glass turntable. Never put any oth-
er utensils on the turntable sup-
port.
Fit the turntable support in the oven.
GLASS TURNTABLE
USE THE GLASS TURNTABLE with all cooking meth-
ods. It collects the dripping juic-
es and food particles that other-
wise would stain and soil the in-
terior of the oven.
Place the Glass turntable on the turntable
support.
ENSURE THAT THE UTENSILS YOU USE are oven proof
and allow microwaves to
pass through them before
cooking.
W
HEN YOU PUT FOOD AND ACCESSORIES in the micro-
wave oven, ensure that they do not come in
contact with the interior of the oven.
This is especially important with accesso-
ries made of metal or metal parts.
A
LWAYS ENSURE that the turntable is able to turn
freely before starting the oven.
T
HERE ARE a number of accessories available on
the market. Before you buy, ensure they are
suitable for microwave use.
STEAMER
USE THE STEAMER WITH THE STRAIN-
ER in place for such foods as fi sh,
vegetables and potatoes.
ALWAYS PLACE the steamer on the
Glass Turntable.

6
G
B
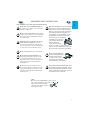
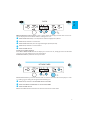
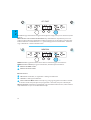
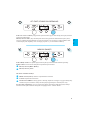
TO PAUSE OR STOP COOKING
TO PAUSE COOKING
The cooking can be paused
to check, turn or stir the food
by opening the door. The set-
ting will be maintained for 10 minutes.
TO CONTINUE COOKING
Close the door and press the Start button
ONCE. The cooking is resumed from
where it was paused.
Pressing the Start button TWICE will in-
crease the time by 30 seconds.
I
F YOU DON’T WANT TO CONTINUE COOKING
Remove the food, close the door and
press the STOP button
A
BEEP WILL SIGNAL once a minute for 10 min-
utes when the cooking is fi nished.
Press the STOP button or open
the door to cancel the signal.
NOTE: The oven will only hold the settings for
60 seconds if the door is opened and then
closed after the cooking is fi nished.
START PROTECTION / CHILD LOCK
THIS AUTOMATIC SAFETY FUNCTION IS ACTIVATED ONE
MINUTE AFTER the oven has returned to
“stand by mode“. (The oven is in
“stand by” when the 24-hour clock is
displayed or if the clock has not been
set, when the display is blank).
THE DOOR MUST BE OPENED AND CLOSED e.g. putting
food into it, before the safety lock is released.
Else the display will show “door“.
COOLING DOWN
WHEN A FUNCTION IS FINISHED, the oven carries out
a cooling procedure. This is normal.
After this procedure the oven switches off au-
tomatically.
THE COOLING PROCEDURE can be interrupted with-
out any harm to the oven.
door

7
G
B
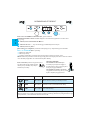
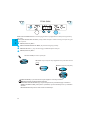
CLOCK
WHEN THE APPLIANCE IS FIRST PLUGGED IN or after a power failure, the display is blank. If the clock is not
set, the display will remain blank until the cooking time is set.
q
PRESS THE CLOCK BUTTON (3 seconds) until the left-hand digit (hour’s) flicker.
w
PRESS THE +/- BUTTONS to set the hours.
e
PRESS THE CLOCK BUTTON. (The two right hand digits (minutes) flicker).
r
PRESS THE +/- BUTTONS to set the minutes.
t
PRESS THE START BUTTON.
T
HE CLOCK IS SET AND IN OPERATION.
IF YOU WISH TO REMOVE THE CLOCK from the display once it has been set, simply press the Clock button
again for 3 seconds and then press the Stop button.
TO REINSTATE THE CLOCK, follow the above procedure.
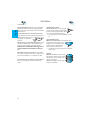
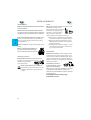
KITCHEN TIMER
USE THIS FUNCTION when you need a kitchen timer to measure exact time for various purposes such
as cooking eggs or letting the dough rise before baking etc.
q
PRESS THE +/- BUTTONS TO SET THE DESIRED LENGTH OF THE TIMER.
w
PRESS THE POWER BUTTON REPEATEDLY TO SET THE POWER TO 0 W.
e
PRESS THE START BUTTON.
A
N ACOUSTIC SIGNAL will be heard when the timer has fi nished to count down.
q
e
t
w
r
w
q
e

8
G
B
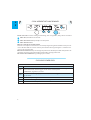
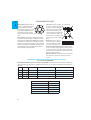
MICROWAVES ONLY
P
OWER SUGGESTED USE:
750 W
R
EHEATING OF BEVERAGES, water, clear soups, coff ee, tea or other food with a high water
content. If the food contains egg or cream choose a lower power.
COOKING OF fi sh, vegetables, meat etc.
500 W
M
ORE CAREFUL COOKING e.g. high protein sauces, cheese and egg dishes and to fi nish cook-
ing casseroles.
350 W S
IMMERING STEWS, melting butter.
160 W D
EFROSTING. Softening butter, cheeses. Softening Ice cream.
0 W W
HEN USING the Timer only.
COOK & REHEAT WITH MICROWAVES
USE THIS FUNCTION for normal cooking and reheating, such as vegetables, fi sh, potatoes and meat.
q
PRESS THE +/- BUTTONS to set the time.
w
PRESS THE POWER BUTTON repeatedly to set the power.
e
PRESS THE START BUTTON.
O
NCE THE COOKING PROCESS HAS BEEN STARTED:
The time can easily be increased in 30-second steps by pressing the Start button. Each press in-
creases the time with 30 seconds. You may also alter the time by pressing the +/- buttons to in-
crease or decrease the time.
P
RESSING THE POWER BUTTON may also change the power level. The fi rst press will show you the cur-
rent power level. Press the power button repeatedly to change power level.
ALL SETTINGS CAN BE CHANGED during cooking if you so desire.
CHOOSING POWER LEVEL
w
q
e

9
G
B
MANUAL DEFROST
FOLLOW THE PROCEDURE for “Cook & Reheat with
microwaves” and choose power level 160 W
when defrosting manually.
CHECK AND INSPECT THE FOOD REGULARLY. Experi-
ence will give you the times needed for vari-
ous amounts.
T
URN LARGE JOINTS halfway through the defrost-
ing process.
FROZEN FOOD IN PLASTIC BAGS, plastic fi lms or card-
board packages can be placed directly in the
oven as long as the package has no met-
al parts (e.g. metal twist ties).
T
HE SHAPE OF THE PACKAGE alters the de-
frosting time. Shallow packets defrost
more quickly than a deep block.
S
EPARATE PIECES as they begin to defrost.
Individual slices defrost more easily.
S
HIELD AREAS OF FOOD with small
pieces of aluminum foil if
they start to become warm
(e.g. chicken legs and wing
tips).
BOILED FOOD, STEWS AND MEAT SAUCES defrost
better if stirred during defrosting time.
W
HEN DEFROSTING it is better to under-
thaw the food slightly and allow the
process to fi nish during standing time.
S
TANDING TIME AFTER DEFROSTING ALWAYS IMPROVES
the result since the temperature
will then be evenly distribut-
ed throughout the food.

10
G
B
FOOD AMOUNT HINTS
MEAT 100
G - 2KG Minced meat, cutlets, steaks or roasts.
POULTRY 100G - 2KG Chicken whole, pieces or fi llets.
FISH 100
G - 1.5KG Whole, steaks or fi llets.
F
OR FOOD NOT LISTED IN THIS TABLE and if the weight is lesser or greater than recommended weight,
you should follow the procedure for “Cook and reheat with microwaves” and choose 160 W when
defrosting.
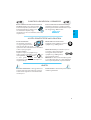
JET DEFROST
USE THIS FUNCTION for defrosting Meat, Fish & Poultry ONLY.
JET DEFROST SHOULD ONLY BE USED if the net weight is between 100 - 2Kg.
q
PRESS THE JET DEFROST BUTTON.
w
PRESS THE + / - BUTTONS to set the weight of the food.
e
PRESS THE START BUTTON.
M
IDWAY THROUGH THE DEFROSTING PROCESS the oven stops and prompts you to TURN FOOD.
Open the door.
Turn the food.
Close the door and restart by pressing the Start button.
NOTE: The oven continues automatically after 2 min. if the food hasn’t been turned. The defrosting
time will be longer in this case.
THIS FUNCTION NEEDS TO KNOW the net weight of
the food. The oven will then auto-
matically calculate the needed time
to fi nish the procedure.
FROZEN FOODS:
I
F THE FOOD IS WARMER than deep-freeze
temperature (-18°C), choose lower
weight of the food.
IF THE FOOD IS COLDER than deep-freeze
temperature (-18°C), choose higher
weight of the food.
w
q
e

11
G
B
JET START
THIS FUNCTION IS USED FOR quick reheating of foods with a high water content such as; clear soups,
coff ee or tea.
PRESS TO AUTOMATICALLY START with full microwave power level and the cooking time set to 30 sec-
onds. Each additional press increases the time with 30 seconds. You may also alter the time by
pressing the +/- buttons to increase or decrease the time after the function has started.
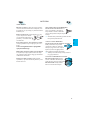
MEMORY
THE MEMORY FUNCTION PROVIDES you with an easy way to quickly recall a preferred setting.
THE PRINCIPLE OF THE MEMORY FUNCTION is to store whatever setting that is currently displayed.
q
PRESS THE MEMO BUTTON.
w
PRESS THE START BUTTON.
H
OW TO STORE A SETTING:
q
SELECT any function.
w
MAKE the nesseccary settings
.
e
PRESS AND KEEP THE MEMO BUTTON PRESSED for 3 seconds until an acoustic signal is heard. The set-
ting is now stored. You may reprogram the memory as many times as you wish.
W
HEN THE APPLIANCE is plugged in or after a power failure, your Memo function will have stored - 1
minutes and 750 W as default setting.
w
q

12
G
B
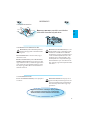
STEAM
USE THIS FUNCTION FOR such food as vegetables & fi sh.
ALWAYS USE THE SUPPLIED STEAMER when using this function.
q
PRESS THE STEAM BUTTON.
w
CONTINUE TO REPEATEDLY PRESS THE STEAM BUTTON to set the food class.
e
PRESS THE +/- BUTTONS to set the weight of the food.
r
PRESS THE START BUTTON.
PLACE the food on the steam grid.
A
DD 100 ml (1dl) water in the bottom part of the steamer.
C
OVER with the lid.
THE STEAMER IS designed to be used with microwaves only!
NEVER USE IT WITH ANY OTHER FUNCTION AT ALL.
USING THE STEAMER in any other function may cause damage.
ALWAYS ENSURE that the turntable is able to turn freely before starting the oven.
ALWAYS PLACE the steamer on the Glass Turntable.
e
q
r
w

13
G
B
POTATOES / ROOT VEGETABLES
(150g - 500g)
U
SE EVEN SIZES.
Cut the vetgetables into even pieces.
Allow to stand for 1 - 2 minutes, after cooking
V
EGETABLES (150g - 500g)
(Caulifl ower and Broccoli)
FROZEN VEGETABLES
(150g - 500g)
ALLOW TO STAND for 1 - 2 minutes.
F
ISH FILETS (150g - 500g)
DISTRIBUTE FILETS EVENLY on the steamgrid. Interlace thin
parts. Allow to stand for 1 - 2 minutes, after cooking.
COOKING VEGETABLES
P
LACE THE VEGETABLES into the strainer.
Pour 100 ml water into the bottom part.
Cover with the lid and set the time.
S
OFT VEGETABLES such as broccoli and leek require 2-3 minutes cooking time.
HARDER VEGETABLES such as carrots and potatoes require 4-5 minutes cooking time.
STEAM
r
w
q
e

14
G
B
MAINTENANCE & CLEANING
CLEANING IS THE ONLY MAINTENANCE normally re-
quired.
FAILURE TO MAINTAIN THE OVEN in a clean condition
could lead to deterioration of the surface that
could adversely aff ect the life of the appliance
and possibly result in a hazardous situation.
D
O NOT USE METAL SCOURING PADS, ABRASIVE
CLEANSERS, steel-wool pads, grit-
ty washcloths, etc. which
can damage the control
panel, and the interior
and exterior oven surfac-
es. Use a sponge with a mild detergent or a
paper towel with spray glass cleaner. Apply
spray glass cleaner to a paper towel.
DO NOT SPRAY directly on the oven.
AT REGULAR INTERVALS, especially if spill
overs have occurred, remove the
turntable, the turntable support
and wipe the base of the oven
clean.
DISHWASHER SAFE:
T
URNTABLE SUPPORT.
G
LASS TURNTABLE.
THIS OVEN IS DESIGNED to operate with the turnta-
ble in place.
DO NOT operate the microwave oven
when the turntable has been removed
for cleaning.
U
SE A MILD DETERGENT, water and a soft cloth to
clean the interior surfaces, front and rear of the
door and the door opening.
DO NOT ALLOW GREASE or food particles to
build up around the door.
FOR STUBBORN STAINS, boil a cup of water in the
oven for 2 or 3 minutes. Steam will soften the
marks.
S
TEAMER
ADDING SOME LEMON JUICE to a cup of water, plac-
ing this on the turntable and boiling for a few
minutes can eliminate odors inside the oven.
D
O NOT USE STEAM CLEANING APPLIANCES when
cleaning your microwave oven.

15
G
B
TROUBLE SHOOTING GUIDE
IF THE OVEN DOES NOT WORK, do not make a service
call until you have made the following checks:
The Turntable and turntable support is in
place.
The Plug is properly inserted in the wall
socket.
The Door is properly closed.
Check your Fuses and ensure that there is
power available.
Check that the oven has ample ventilation.
Wait for 10 minutes, then try to operate the
oven once more.
Open and then close the door before you
try again.
T
HIS IS TO AVOID unnecessary calls for which you
will be charged.
When calling for Service, please give the serial
number and type number of the oven (see Ser-
vice label). Consult your warranty booklet for
further advice.
IF THE MAINS CORD NEEDS REPLACING it should
be replaced by the original
mains cord, which is avail-
able via our service organi-
zation. The mains cord may
only be replaced by a trained
service technician.
S
ERVICE ONLY TO BE CARRIED OUT BY
A TRAINED SERVICE TECHNICIAN. It
is hazardous for anyone oth-
er than a trained person to carry
out any service or repair oper-
ation, which involves the re-
moval of any cover, which gives pro-
tection against exposure to microwave
energy.
DO NOT REMOVE ANY COVER.

16
G
B
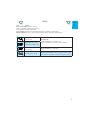
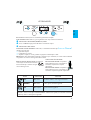
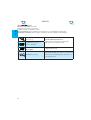
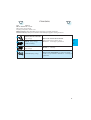
Test Amount Approx. time Power level Container
12.3.1 750 g 10 min 750 W Pyrex 3.227
12.3.2 475 g 5 ½ min 750 W Pyrex 3.827
12.3.3 900 g 14 min 750 W Pyrex 3.838
13.3 500 g 2 min 40 sec Jet Defrost
SUPPLY VOLTAGE 230 V/50 HZ
RATED POWER INPUT 1300 W
F
USE 10 A (UK 13 A)
MW
OUTPUT POWER 750 W
O
UTER DIMENSIONS (HXWXD) 382 X 595 X 320
INNER DIMENSIONS (HXWXD) 187 X 370 X 290
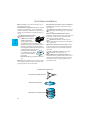
ENVIRONMENTAL HINTS
THE PACKING BOX may be fully re-
cycled as confi rmed by the re-
cycling symbol. Follow lo-
cal disposal regulations. Keep
potentially hazardous pack-
aging (plastic bags, polysty-
rene etc.) out of the reach of chil-
dren.
T
HIS APPLIANCE is marked according to the Euro-
pean directive 2002/96/EC on Waste Electrical
and Electronic Equipment (WEEE). By ensuring
this product is disposed of correctly, you will
help prevent potential negative consequences
for the environment and human health, which
could otherwise be caused by inappropriate
waste handling of this product.
T
HE SYMBOL on the product, or on the docu-
ments accompanying the
product, indicates that this
appliance may not be treat-
ed as household waste. In-
stead it shall be handed over
to the applicable collection
point for the recycling of elec-
trical and electronic equip-
ment.
D
ISPOSAL must be carried
out in accordance with lo-
cal environmental regula-
tions for waste disposal.
FOR MORE DETAILED INFORMATION about treatment,
recovery and recycling of this product, please
contact your local city offi ce, your household
waste disposal service or the shop where you
purchased the product.
BEFORE SCRAPPING, cut off the mains cord so that
the appliance cannot be connected to the
mains.
I
N ACCORDANCE WITH IEC 60705.
T
HE INTERNATIONAL ELECTROTECHNICAL COMMISSION, SC. 59H, has developed a standard for comparative
testing of heating performance of diff erent microwave ovens. We recommend the following for
this oven:

17
H
U
BEÜZEMELÉS
A HÁLÓZATRA CSATLAKOZTATÁS ELŐTT
B
IZONYOSODJUNK MEG ARRÓL, HOGY A KÉSZÜLÉK NINCS
MEGSÉRÜLVE. Győződjünk meg arról, hogy a sütő
ajtaja tökéletesen zár-e, valamint hogy a tömés
nem sérült-e meg. Vegyünk ki mindent a sütő-
ből, majd egy puha nedves ruhadarabbal tisz-
títsuk ki a belteret.
A CSATLAKOZTATÁS UTÁN
A
KÉSZÜLÉK FÖLDELÉSÉT törvény írja elő. A
gyártó semmilyen felelősséget nem vál-
lal az ennek elmaradása miatt bekövet-
kező személyi sérülésekért vagy anya-
gi károkért.
A gyártó nem felelős semmilyen olyan problé-
máért, amelyet az okozott, hogy a felhasználó
elmulasztotta betartani ezeket az utasításokat.
NE HASZNÁLJUK A KÉSZÜLÉKET AKKOR, ha a há-
lózati tápkábel vagy a villásdugó sérült,
továbbá ha a készülék nem működik
megfelelően, vagy ha megsérült vagy le-
esett. A hálózati tápkábelt, illetve a vil-
lásdugót soha ne mártsuk vízbe. A há-
lózati tápkábelt ne helyezzük meleg fe-
lületek közelébe. Ilyen esetekben áram-
ütés, tűz vagy egyéb veszélyek következ-
hetnek be.
G
YŐZŐDJÜNK MEG ARRÓL a szerelés előtt, hogy a
sütő beltere üres.
E
LLENŐRIZZÜK, HOGY A TÖRZSLAPON jelzett fe-
szültség megegyezik-e lakásunk feszült-
ségével.
A
SÜTŐ CSAK AKKOR MŰKÖDTETHETŐ, ha az ajtó jól be
van zárva.
A KÉSZÜLÉK BESZERELÉSE
KÖVESSÜK A MELLÉKELT szerelési utasításokat
a készülék üzembe helyezésekor.

18
H
U
FONTOS BIZTONSÁGI TUDNIVALÓK
NE MELEGÍTSÜNK VAGY HASZNÁLJUNK GYÚLÉKONY
ANYAGOKAT a sütő belsejében vagy köze-
lében. Ezek gőzei tűz- vagy robbanásve-
szélyt idézhetnek elő.
A MIKROHULLÁMÚ SÜTŐT NE HASZNÁLJUK ruha,
papír, fűszer, gyógynövény, fa, virág,
gyümölcs vagy más gyúlékony anyag
szárítására. Ezzel tüzet okozhatunk.
N
E SÜSSÜK TÚL SOKÁIG AZ ÉTELT. Ezzel tüzet
okozhatunk.
N
E HAGYJUK A SÜTŐT FELÜGYELET NÉLKÜL, kü-
lönösen akkor, amikor a sütés folyamata
során papírt, műanyagot vagy más gyú-
lékony anyagokat használunk. Hő hatá-
sára ugyanis a papír elszenesedhet vagy
eléghet, bizonyos műanyagok pedig el-
olvadhatnak.
H
A AZ ANYAG MEGGYULLADNA A SÜTŐBEN/SÜTŐN
KÍVÜL, VAGY FÜSTÖT ÉSZLELNÉNK, tartsuk zár-
va az ajtót, és kapcsoljuk ki a sütőt. Húz-
zuk ki a villásdugót a konnektorból, vagy
kapcsoljuk le a lakás áramellátását a biz-
tosítéktáblán vagy a kapcsolószekrény-
ben.
FIGYELMESEN OLVASSA EL, ÉS ŐRIZZE MEG A KÉSŐBBIEKRE
G
YERMEK CSAK AKKOR HASZNÁLJA a sütőt felnőtt
felügyelete nélkül, ha megfelelő módon ki-
oktattuk, és ennek alapján biztonságos
módon tudja használni a sütőt, illetve tisz-
tában van a helytelen használathoz kap-
csolódó kockázatokkal.
A készüléket kisgyermekek vagy fogyaté-
kos személyek felügyelet nélkül
nem használhatják. A kis-
gyermekek felügyeleté-
vel kell gondoskodni arról,
hogy ne játszanak a készü-
lékkel.
Ha a sütő rendelkezik kombinált üzem-
móddal, a gyermekek csak felnőtt felügye-
lete mellett használhatják a sütőt a létrejö-
vő magas hőmérséklet miatt.
N
E HASZNÁLJUK A MIKROHULLÁMÚ
sütőt légmentesen lezárt tá-
rolóedényben lévő semmi-
lyen anyag melegítéséhez.
A megnövekedett nyomás
károkat okozhat a tárolóedény felnyitása-
kor, ami akár szét is robbanhat.
TOJÁS
A MIKROHULLÁMÚ SÜTŐBEN ne főzzünk vagy
melegítsünk egész tojást (sem héj-
jal, sem héj nélkül), mert az
“felrobbanhat” még azután is,
hogy a mikrohullámú sütés be-
fejeződött.
A
Z AJTÓTÖMÍTÉSEKET ÉS AZ AZOK KÖZELÉBEN TA-
LÁLHATÓ RÉSZEKET időről időre ellenőrizzük.
Károsodások észlelése esetén ne használ-
juk addig a készüléket, amíg szakemberrel
el nem végeztettük a javítást.
A KÉSZÜLÉKBEN NE HASZNÁLJUNK korrozív
vagy elgőzölgő vegyi anyagokat. Ez a
sütő élelmiszerek melegítésére, illetve
elkészítésére van kialakítva. Ezért soha
ne használjuk azt ipari vagy laboratóriu-
mi célokra.

19
H
U
ÁLTALÁNOS
A
KÉSZÜLÉK KIZÁRÓLAGOSAN HÁZTARTÁSI HASZNÁLATRA
KÉSZÜLT!
A
KÉSZÜLÉK NEM MŰKÖDTETHETŐ élelmiszerek behe-
lyezése nélkül, amikor mikrohullámokat használ.
Az ilyen eljárás károsítaná a készüléket.
A
PROGRAMOZÁSI PRÓBÁK idejére tegyünk a sütőbe
egy pohár vizet. A víz elnyeli a mikrohullámo-
kat, és így a sütő nem károsodik.
T
ÁVOLÍTSUK EL A MŰANYAG- VAGY PAPÍR-
ZACSKÓK ZÁRÓZSINÓRJÁT, mielőtt azokat
a sütőbe tennénk.
OLAJFÜRDŐBEN TÖRTÉNŐ SÜTÉS
N
E HASZNÁLJUK A MIKROHULLÁMÚ sütőt olajfürdő-
ben való kisütésekhez, mert a készülékben
nincs lehetőség az olaj hőmérsékleté-
nek szabályozására.
FOLYADÉKOK
P
L. ITALOK VAGY VÍZ. Előfordulhat, hogy buborék-
képződés nélkül lépjük túl a fo-
lyadék forráspontját. Ez a for-
rásban levő folyadék hirtelen
kicsordulását eredményezheti.
Ennek elkerülése érdekében a
következők szerint járjunk el:
1. Kerüljük a szűk nyakú edények alkalma-
zását.
2. Keverjük össze a folyadékot az edény sü-
tőbe helyezése előtt, és hagyjunk benne
egy teáskanalat.
3. A felmelegítést követően hagyjunk egy kis
pihenőidőt, és a sütőből való kivétel előtt
újra keverjük össze a folyadékot.
VIGYÁZAT
M
INDIG VEGYE ELŐ a részletes mikrohullámú re-
cepteket tartalmazó szakácskönyvet. Különö-
sen akkor, ha az elkészítendő vagy melegíten-
dő ételek alkoholt tartalmaznak.
GYEREKÉTELEK VAGY CUMISÜVEGBEN LEVŐ FO-
LYAD ÉKOK FELMELEGÍTÉSÉT követő-
en először mindig rázzuk ös-
sze az anyagot, és ellenőrizzük
annak hőmérsékletét. Ezáltal tud-
juk biztosítani az egyenletes hőeloszlást, és elke-
rülni a száj megégetésének kockázatát.
Ügyeljünk arra, hogy a felmelegítés előtt
levegyük a kupakot és a cumit!
ÓVINTÉZKEDÉSEK
AZ ÉGÉSI SÉRÜLÉSEK elkerülése érdekében
a sütés után mindig viseljünk edény-
fogót vagy sütőkesztyűt az edények, a
sütő megérintéséhez és az edények ki-
vételéhez.
A SÜTŐ BELTERÉT SOHA NE HASZNÁLJUK tárolótérként.

20
H
U
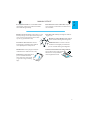
TARTOZÉKOK
ÁLTALÁNOS
H
A A FÉMET TARTALMAZÓ TARTOZÉKOK a sütő műkö-
dése közben hozzáérnek a sütő belsejéhez, ak-
kor szikra keletkezhet, és a sütő károsodhat.
FORGÓTÁNYÉR TARTÓ
A
FORGÓTÁNYÉR TARTÓT az üveg forgó-
tányér alá helyezzük. A forgótányér
tartóra az üveg forgótányéron kívül
soha ne helyezzünk más edényt.
A forgótányér tartót helyezzük be a sütő-
be.
ÜVEG FORGÓTÁNYÉR
MINDEN SÜTÉSI MÓDOZATNÁL használjuk az üveg
forgótányért. Ez felfogja a kicsö-
pögő levet és az olyan ételdara-
bokat, amelyek egyébként be-
szennyeznék a sütő belterét.
Helyezzük az üveg forgótányért a forgótá-
nyér tartóra.
A SÜTÉS MEGKEZDÉSE ELŐTT GYŐZŐDJÜNK MEG ARRÓL,
hogy az alkalmazandó eszközök ellenállnak-e a
sütőben keletkező hőnek, és
átengedik-e a mikrohul-
lámokat.
A
MIKOR AZ ÉTELT ÉS A TARTOZÉKOKAT BETESSZÜK a mik-
rohullámú sütőbe, akkor ellenőrizzük, hogy
azok ne érjenek hozzá a sütő belsejéhez.
Ez különösen a fémből készült vagy fém ré-
szeket tartalmazó tartozékok esetén fon-
tos.
A
SÜTŐ BEINDÍTÁSA ELŐTT MINDIG GYŐZŐDJÜNK MEG AR-
RÓL, hogy a forgótányér szabadon tud-e fo-
rogni.
A
KERESKEDELEMBEN különféle sütési tartozékok
kaphatók. Vásárlás előtt mindig győződjünk
meg arról, hogy ezek alkalmasak-e mikrohullá-
mú sütéshez.
PÁROLÓ
HASZNÁLJUK A PÁROLÓT behelyezett
párolókosár mellett olyan ételek
elkészítésére, mint a halak, zöld-
ségek és burgonya.
A PÁROLÓT mindig az üveg forgó-
tányérra helyezzük.
Strona się ładuje...
Strona się ładuje...
Strona się ładuje...
Strona się ładuje...
Strona się ładuje...
Strona się ładuje...
Strona się ładuje...
Strona się ładuje...
Strona się ładuje...
Strona się ładuje...
Strona się ładuje...
Strona się ładuje...
Strona się ładuje...
Strona się ładuje...
Strona się ładuje...
Strona się ładuje...
Strona się ładuje...
Strona się ładuje...
Strona się ładuje...
Strona się ładuje...
Strona się ładuje...
Strona się ładuje...
Strona się ładuje...
Strona się ładuje...
Strona się ładuje...
Strona się ładuje...
Strona się ładuje...
Strona się ładuje...
-
 1
1
-
 2
2
-
 3
3
-
 4
4
-
 5
5
-
 6
6
-
 7
7
-
 8
8
-
 9
9
-
 10
10
-
 11
11
-
 12
12
-
 13
13
-
 14
14
-
 15
15
-
 16
16
-
 17
17
-
 18
18
-
 19
19
-
 20
20
-
 21
21
-
 22
22
-
 23
23
-
 24
24
-
 25
25
-
 26
26
-
 27
27
-
 28
28
-
 29
29
-
 30
30
-
 31
31
-
 32
32
-
 33
33
-
 34
34
-
 35
35
-
 36
36
-
 37
37
-
 38
38
-
 39
39
-
 40
40
-
 41
41
-
 42
42
-
 43
43
-
 44
44
-
 45
45
-
 46
46
-
 47
47
-
 48
48


Whirlpool AMW 479 BL instrukcja
- Kategoria
- Mikrofale
- Typ
- instrukcja
- Niniejsza instrukcja jest również odpowiednia dla
w innych językach
- English: Whirlpool AMW 479 BL User guide