DELTA DORE TYXAL+ DOS Instrukcja instalacji
- Kategoria
- Wygodne oświetlenie
- Typ
- Instrukcja instalacji
Ten podręcznik jest również odpowiedni dla

LS 14250 - 3,6 V - 1,2 Ah - Lithium
Autonomie 10 ans - Autonomy 10 years
Consumption stand-by :
3,5 μA
Consumption : 14,2 mA max.
868,7 Õ 869,2 MHz - 100 m Ý 300m
Maximum power radio < 10 mW
receiver category: 2
-10°C / +70°C
+5°C / +40°C
IP
IP 30 - IK 02
75 %
33 x 102 x 32 mm
89 x 38 x 38 mm
89 x 38 x 11 mm
Important product information (Ì)
Y
Y
X
X
Z
Z
www.deltadore.com
TYXAL DOS
FR
Notice d’installation
EN
Installation guide
DE
Installationsanleitung
IT
Guida di installazione
ES
Manual de instalación
PL
Instrukcja instalacji
NL
Installatiehandleiding
FR
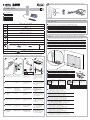
Le détecteur à ouverture contact de sol doit être placé en intérieur et fixé sur une porte de garage.
EN
The floor contact door magnetic contact detector must be installed indoors and mounted on a garage door.
DE
Der Offnungskontakt-Bodensensor muss im Innenraum platziert und an einem Garagentor montiert werden.
IT
Il sensore con apertura a contatto col pavimento deve essere posizionato all’interno e fissato ad una
porta del garage.
ES
El detector de apertura de contacto para suelo se debe colocar en interior y fijarse a una puerta de garaje.
PL
Detektor otwarcia mający kontakt z podłożem musi być umieszczony wewnątrz i zamocowany do
bramy garażowej.
NL
De detector met opening contact moet binnen worden geplaatst en bevestigd aan een garagedeur.
FR
Distances de déclenchement (support ferreux ou support non ferreux).
EN
Triggering distances (ferrous or non ferrous mounts).
DE
Auslöseaabstände (eisenhaltige oder nicht eisenhaltige Träger).
IT
Distanza di azionamento (supporto ferroso o non ferroso).
ES
Distancias de activación (soporte ferroso o no ferroso).
PL
Odległości uruchamiania (nośnik żelazny lub nośnik nieżelazny).
NL
Afstanden activering (ferro of non-ferro drager).
FR
Tolérance sur les distances de fonctionnement : +0% / -50%
X : Déplacement de l’aimant vers la droite ou vers la gauche
Y : Déplacement vers le haut ou vers le bas
Z : Déplacement de l’aimant en avant ou en arrière
EN
Tolerance for operating distances: +0% / -50%
X: Magnet displacement left or right
Y: Magnet displacement upwards or downwards
Z: Magnet displacement forwards or backwards
DE
Toleranzen bei Funktionsabständen: +0% / -50%:
X: Versatz des Gegenstücks nach links oder rechts;
Y: Versatz des Gegenstücks nach oben oder unten;
Z: Versatz des Gegenstücks noch vorn oder hinten
IT
Tolleranza sulle distanze di funzionamento: +0%/-50%
X: spostamento dalla parte magnetica verso destra o sinistra
Y: spostamento verso l’alto o il basso
Z: spostamento della parte magnetica in avanti o indietro
ES
Tolerancja odległości funkcjonalnych: +0% / -50%
X: Przemieszczenie magnesu w prawo lub w lewo
Y: Przemieszczenie do góry lub do dołu
Z: Przemieszczenie magnesu do przodu lub do tyłu
PL
Tolerancja odległości funkcjonalnych: +0% / -50%
X: Przemieszczenie magnesu w prawo lub w lewo
Y: Przemieszczenie do góry lub do dołu
Z: Przemieszczenie magnesu do przodu lub do tyłu
NL
Tolerantie op de werkingsafstanden: +0% / -50%
X : Het verplaatsen van de magneet naar rechts of links
Y: Het verplaatsen van de magneet naar boven of onder
Z : Verplaatsing van de magneet naar voren of naar achteren
266 gr.
Contenu / Contents / Inhalt / Contenuto / Contenido / Spis treści / Inhoud
Instructions
Important
Product
Informations
16£!$'1'2;c3$!ধ32c-2#!<38;c39-A-32!1'2;3c#-$!$-Õ2c30!£-A!$/!c
3$!ধ'
2
-?!ধ32c3<2ধ2+ / 32;!+'c-99!++-3c-/!$-Õ2 / Mocowanie / '='9ধ+-2+
3
1
D1
D2
V1
V2
2 3 4
Ø 4 mm max.
Ø 3,5 mm
Ø 6 mm
À
Á
FR
Ê Séparez les 2
parties du boîtier.
EN
Ê Open the unit.
DE
Ê Trennen Sie die
Gehäusehälften.
IT
Ê Separare le 2
parti della
scatola.
ES
Ê Separe las 2
partes de la caja.
PL
Ê Oddzielić 2
części obudowy.
NL
Ê Scheid de twee
delen van de
behuizing.
Ë Tracez et percez
les trous D1 et D2.
Ë Mark and drill holes
D1 and D2.
Ë Markieren Sie die
Bohrstellen und
bohren Sie die
Löcher D1 und D2.
Ë Segnare e fare i fori
D1 e D2.
Ë Marque y taladre
los agujeros D1 y
D2.
Ë Zaznaczyć i
wywiercić otwory
D1 i D2.
Ë Markeer en boor de
gaten D1 en D2.
Í Fixez le capteur (À) au sol
sur le béton et la partie
aimant (Á) sur la porte de
garage.
Í Mount the sensor À) on
the concrete floor and the
magnetic part (Á) on the
garage door.
Í Befestigen Sie den
Alarmgeber (À) am
Betonfußboden und
das Gegenstück (Á) am
Garagentor.
Í Fissare il sensore (À) al
pavimento sul cemento e la
parte magnetica (Á) sulla
porta del garage.
Í Fije el sensor (À) al suelo
en el hormigón y la parte
de imán (Á) en la puerta
de garaje.
Í Przymocować czujnik (À)
do podłoża na betonie, a
część z magnesem (Á) na
bramie garażowej.
Í Bevestig de sensor (À) op
de grond op het beton en
het deel met de magneet
(Á) aan de garagedeur.
Ì Fixez le socle de
l’émetteur avec les vis
V1 et V2.
Ì Attach the transmitter
base with the V1 and
V2 screws.
Ì Befestigen Sie den
Sockel des Senders
mit den Schrauben V1
und V2.
Ì Fissare il supporto
dell’emettitore con le
viti V1 e V2.
Ì Fije el zócalo del
emisor con los tornillos
V1 y V2.
Ì Przymocować
podstawę nadajnika
śrubami V1 i V2.
Ì Bevestig de basis
van de zender met de
schroeven V1 en V2.
FR
Le détecteur doit être associé à un système d’alarme DELTA DORE radio X3D.
EN
The detector must be associated with a DELTA DORE wireless X3D alarm system.
DE
Der Melder muss mit einer DELTA DORE Funk-Alarmanlage X3D verbunden werden.
IT
Il sensore deve essere associato ad un sistema d’allarme DELTA DORE radio X3D.
ES
El detector debe asociarse a un sistema de alarma DELTA DORE radio X3D.
PL
Detektor musi być skonfigurowany z radiowym systemem alarmowym DELTA DORE X3D.
NL
De detector moet worden gekoppeld aan een alarmsysteem DELTA DORE radio X3D.
8Ì9'2;!ধ32c8'9'2;!ধ32 / '9$,8'-#<2+c8'9'2;!A-32'c8'9'2;!$-Õ2 / 8'A'2-
;!$/! / 3389;'££-2+
1
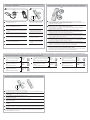
51 mm 46 mm
91 mm 84 mm
94 mm 88 mm
X
Z
Y
50 mm 44 mm
52 mm 42 mm
73 mm 58 mm
X
Z
Y
Ø max = 3 mm
Ouverture /
Opening / Öffnen /
Apertura / Apertura /
Otwieranie /
Opening
Ouverture /
Opening / Öffnen /
Apertura / Apertura /
Otwieranie /
Opening
Fermeture /
Closing / Schließen /
Chiusura / Cierre /
Zamykanie / Sluiting
Fermeture /
Closing / Schließen /
Chiusura / Cierre /
Zamykanie / Sluiting

1 2
1
2
3
AL
Com
AP
-9''29'8=-$'c$ধ=!ধ32c2#';8-'#2!,1'c'99!-2(<2A-32'c<'9;!'29'8=--
$-3c3A8<$,c2+'#8<-02!1'
4
FR
Ê Câblez le fil blanc sur AL, les fils jaune et marron sur
Com et le fil bleu sur AP.
EN
Ê Connect the white wire to AL, the yellow and brown
wires to Com and the blue wire to AP.
DE
Ê Schließen Sie die weiße Leitung an AL, die blauen
und braunen Leitungen an Com und die blaue Leitung
an AP an.
IT
Ê Collegare il filo bianco ad AL, i fili giallo e marrone a
Com e il filo blu ad AP.
ES
Ê Cablee el hilo blanco en el borne AL, los hilos amarillo y
marrón en el borne Com y el hilo azul en el borne AP.
PL
Ê Połączyć biały przewód z AL, przewód żółty i brązowy
z Com, a przewód niebieski z AP.
NL
Ê Sluit de witte kabel aan op AL, de gele en bruine kabel
op Com en de blauwe op AP.
Ë Mettez la pile en place en respectant
son sens puis refermez le boîtier.
Ë Insert the battery and close the unit.
Ë Setzen Sie die Batterie unter
Beachtung der Polarität ein und
schließen Sie dann das Gehäuse.
Ë Posizionare la pila nel corretto senso
e chiudere la scatola.
Ë Coloque la pila respetando la
polaridad y cierre la caja.
Ë Włożyć baterię zgodnie z
polaryzacją, a następnie zamknąć
obudowę.
Ë Plaats de batterij in de correcte
richting en sluit de behuizing.
>-;$,9c>-;$,'9c$,!£;'8c>-;$,c321<;!&38'9c@Ěí$A2-0-c$,!0'£!!89
5
SWB
SWA
SWB
SWA
SWB
SWA
ON
ON
ON
ON
ON
,!2+'1'2;&'£!6-£'c,!2+-2+;,'#!ħ'8-'9c!ħ'8-'>'$,9'£c39ধ;<A-32'
&'££'#!ħ'8-'c!1#-3&'£!6-£!c@1-!2!#!;'8--c!ħ'8-/='8=!2+'2!993$-!ধ329
7
FR
Le produit émet un bip à chaque détection, la pile est usée.
Avant d’ouvrir le boîtier, la centrale doit être en mode Maintenance (voir notice d’installation système).
EN
The product beeps with every detection, the battery is dead.
Before opening the unit, the alarm control unit must be in Maintenance mode (refer to system
installation guide).
DE
Das Gerät piept bei bei jeder Erfassung, die Batterie ist leer.
Die Alarmzentrale muss sich beim Öffnen des Gehäuses im Wartungsmodus befinden (siehe
Installationsanleitung System).
IT
Se il dispositivo emette un bip ad ogni rilevamento, la pila è esaurita.
Prima di aprire la scatola, la centralina deve essere in modalità Manutenzione (vedi istruzioni per
l’istallazione del sistema).
ES
El producto emite un pitido en cada detección, la pila se agota.
Antes de abrir la caja, la central debe estar en modo Mantenimiento (consultar el manual de instalación
del sistema).
PL
Produkt wydaje krótki dźwięk przy każdym wykryciu: bateria jest wyczerpana.
Przed otwarciem obudowy centrala musi być przełączona na tryb konserwacji (zob. instrukcja instalacji
systemu).
NL
Het product geeft een pieptoon wanneer de batterij bijna leeg is.
Voor het openen van de behuizing, moet het apparaat in de onderhoudsmodus worden geplaatst (zie
installatiehandleiding van het systeem).
FR
• Le switch B2 permet le choix du mode de déclenchement (ON : retardé, OFF : immédiat).
• Les autres switchs ne sont pas utilisés (SWA1, SWA2 et SWB1).
• Si votre système d’alarme est équipé d’un clavier tactile CLT 8000, le switch B2 est ignoré car cette
configuration est réalisée sur celui-ci.
EN
Switch B2 is used to select the triggering mode (ON: delayed, OFF: immediate).
• The other switches are not applicable (SWA1, SWA2 and SWB1).
• If your alarm system has a CLT 8000 touch sensitive keypad, switch B2 will be ignored as this
configuration is done on the keypad.
DE
• Mit dem Schalter B2 wird die Auslöseart gewählt: ON = verzögert, OFF = sofortig).
• Die übrigen Schalter (SWA1; SWA2 und SWB1) sind ohne Funktion.
• Wenn Ihre Alarmanlage mit der Touchscreen-Tastatur CLT 8000 ausgerüstet ist, erfolgt die
Konfiguration über diese, der Schalter B2 ist dann außer Funktion.
IT
• Lo switch B2 permette di scegliere la modalità di attivazione (ON: ritardata, OFF: immediata).
• Gli altri switch non vengono utilizzati (SWA1, SWA2 e SWB1).
• Se il vostro sistema d’allarme è dotato di tastiera tattile CLT 8000, lo switch B2 viene ignorato perché
questa configurazione viene eseguita su di esso.
ES
• El conmutador B2 permite seleccionar el modo de activación (ON: retardado, OFF: inmediato).
• Los demás conmutadores no se utilizan (SWA1, SWA2 y SWB1).
• Si su sistema de alarma está equipado con un teclado táctil CLT 8000, el conmutador B2 se ignora
puesto que esta configuración se lleva a cabo sobre el mismo.
PL
•
Wyłącznik B2 umożliwia wybór trybu uruchamiania (ON: opóźniony, OFF: natychmiastowy).
• Inne wyłączniki nie są używane (SWA1, SWA2 i SWB1).
• Jeżeli Twój system alarmowy jest wyposażony w klawiaturę dotykową CLT 8000, wyłącznik B2 należy
zignorować, ponieważ konfigurację przeprowadza się za pomocą klawiatury.
NL
• Met de schakelaar B2 kan de activeringsmodus worden ingesteld (ON: vertraagd OFF: onmiddellijk).
• De andere schakelaars worden niet gebruikt (SWA1, SWA2 en SWB1).
• Als uw alarmsysteem is uitgerust met het touchscreen toetsenbord CLT 8000, dan wordt schakelaar
B2 genegeerd omdat deze configuratie door het toetsenbord wordt uitgevoerd.
32$ধ322'1'2;!='$<29@9;Ë1'&Z!£!81'c6'8!ধ32>-;,!2!£!819@9;'1 / ';8-'#1-;'-2'8£!81!2£!+'c<2A-32!1'2;3$32<29-9;'1!&Z!££!81'cFuncionamiento con el
sistema de alarma֗cA-!Ě!2-'A9@9;'1'1!£!813>@1 / '80-2+1';!£!819@9;''1
6
FR
• Association avec un système d’alarme
• Choix du mode de déclenchement
• Test
• Retour à la configuration usine
IT
• Associazione con un sistema d’allarme
• Scelta della modalità di scatto dell’allarme
• Test
• Ritorno alla configurazione di fabbrica
PL
• Powiązanie z systemem alarmowym
• Wybór sposobu wyzwalania
• Test
• Przywrócenie konfiguracji fabrycznej
EN
• Association with an alarm system
• Selection of triggering mode
• Test
• Restoring factory settings
ES
• Asociación con el sistema de alarma
• Elección del modo de activación
• Prueba
• Volver a la configuración de serie
NL
• Koppeling aan alarmsysteem
• Activeringsmodus selecteren
• Test
• Fabrieksinstellingen herstellen
DE
•
Verbindung mit einer Alarmanlage
• Wahl des Auslösungsmodus
• Test
• Rückkehr zur Werkseinstellung
Voir notice
d’intallation
système
Vedi le
istruzioni
“Sistema”
Patrz
instrukcja
instalacji
systemu
Refer to
system
installation
guide
Ver manual
de instalación
del sistema
Zie
installatiehand-
leiding
systeem
Siehe
Installationsan-
leitung
System
-
 1
1
-
 2
2


DELTA DORE TYXAL+ DOS Instrukcja instalacji
- Kategoria
- Wygodne oświetlenie
- Typ
- Instrukcja instalacji
- Ten podręcznik jest również odpowiedni dla
w innych językach
- español: DELTA DORE TYXAL+ DOS Guía de instalación
- italiano: DELTA DORE TYXAL+ DOS Guida d'installazione
- Deutsch: DELTA DORE TYXAL+ DOS Installationsanleitung
- français: DELTA DORE TYXAL+ DOS Guide d'installation
- English: DELTA DORE TYXAL+ DOS Installation guide
- Nederlands: DELTA DORE TYXAL+ DOS Installatie gids
Powiązane dokumenty
-
DELTA DORE TYXAL+ DOS Instrukcja instalacji
-
-
-
-
-
-
-
-