DNA 61 Keys Roll Up Piano Instrukcja obsługi
- Typ
- Instrukcja obsługi

ROLL 61 KEYBOARD
USER MANUAL
INSTRUKCJA OBSŁUGI

ENGLISH
This Instruction Manual provides a detailed overview of the Electronic Roll-Up Keyboard, its functions,
features, as well as safe operation. Using this product for any purpose outside the scope of this instruc-
tion manual may void the product warranty.
Read all directions carefully and keep this manual as reference.
Safety Precautions
When finished using the keyboard, be sure to disconnect the USB power cable and turn off the power
with the Power button on the front of the unit.
Do not shift the keyboard or place it on an uneven surface during use for optimal experience.
Prevent the keyboard from coming in contact with any sharp objects. Any rips or tears may cause the
product to malfunction or cause permanent damage.
When storing, roll the keyboard up gently. Excessive or forcible bending of the keys may damage the
product and void the warranty.
Do not pull or twist the connection area between the keys and the control box to prevent damage.
Avoid exposing the product to strong electromagnetic waves.
Do not disassemble, attempt to disassemble or modify the product in any way, as this may void the
warranty.
Handle with care and avoid any drops or impacts.
Avoid exposing the product to environments with excessive moisture, humidity, or dust/dirt.
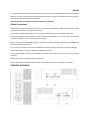
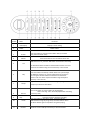
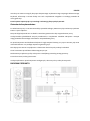
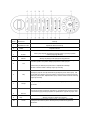
PRODUCT OVERVIEW

Number
Label
Functions
1
LED Display
Displays current setting
2
Power
Power button
3
Sustain
Press this button to turn the Sustain ON or OFF (to simulate
foot pedal sustained notes)
4
Vibrato
Press this button to turn the Vibrato ON or OFF
Press this button and the Up or Down buttons to cycle through the
5
Tim
different tones. Or, press the TIM button and choose a tone using
the Number buttons located around the Power button. Find a list
of the tones available using the Tone Directory in this manual
Press this button and the Up or Down buttons to cycle through
the different rhythms. Or, press the RHY button and choose a
tone using the Number buttons located around the Power
button. Find a list of the rhythms available using the Rhythm
Directory in this manual.
6
Rhy
7
Tempo
Adjusts the tempo of rhythm and demo songs by using the
Tempo up or down arrow buttons.
8
Record
Press this button to record (“REC” will be displayed
when recording. “FUL” will be displayed when recording
memory is full)
9
Play
Press this button to playback recording
Press this button to play demo songs. Cycle through the
10
Demo
different demo songs by using the Up or Down buttons. Press
the Demo button again to stop demo song from playing
11
Press Number buttons to select a specific tone or rhythm.
Number
Check the Tone and Rhythm Directory to find the number

associated with an individual tone or rhythm.
12
Volume
Adjusts the volume up or down.
13
Press the Transpose button and then the Up or Down buttons and
Transpose
play a key. The note you play will either be increased or decreased
by one interval every time an Up or Down button is pressed.
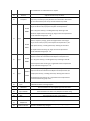
When a rhythm is playing, press the Single button and a single
Model
key, from A0 to F #3, to play chord rhythm accompaniment .
(A0 - F #3) spans 34 keys, including black keys. Starting at the
S3088
left of the keyboard and counting up, Single chord accompaniment
14
Single
can be activated using keys 1 - 34.
When a rhythm is playing, press the Single button and a single
Model
key, from k1 to K19, to play chord rhythm accompaniment . (K1 -
K19) spans 19 keys, including black keys. Starting at the left of
S3061
the keyboard and counting up, Single chord accompaniment
can be activated using keys 1 - 19.
When a Rhythm is playing, press this button; then press three
15
Model
keys from C1 to A2 to activate Chord Rhythm accompaniment.
Finger
(C1 - A2) spans 22 keys, including black keys. Starting at the left
S3088
of the keyboard and counting up, Fingered Chord accompaniment
can be activated using keys 4 - 25.
When a Rhythm is playing, press this button; then press three
15
Model
keys from K1-19 to activate Chord Rhythm accompaniment. (K1
Finger
- K19) spans 19 keys, including black keys. Starting at the left of
S3061
the keyboard and counting up, Fingered Chord accompaniment
can be activated using keys 1-19.
16
Sync
Press this button to activate automatic rhythm accompaniment. Use the Up
and Down buttons to change rhythm.
17
Off Chord
Press this button to stop Single/Finger Chord function.
18
Up and Down
Press this button to select Tone, Rhythm and Demo song.
19
MIC
The connection port for a microphone
20
Headphone
The connection port for external speaker or headphone
21
USB/DC 5V
Power supply connection
22
Power Indicator
LED light on diagram above will turn on (red) during charging
and turn off when fully charged

Using the Roll-Up Piano
To charge, connect the USB power cable to the input on the keyboard and plug the other end directly
into a computer or an outlet using a USB wall adapter (not included).
To record songs played on the keyboard, recording software is needed. To use the keyboard to record
songs on a computer, plug the USB power cable into a USB port on a computer.
Press the Power button until the keyboard turns on. Once it is on, you can connect headphones, ex-
ternal speakers or use the Volume buttons to adjust the built-in speakers.
To play along to a demo song, press the Demo button and cycle through the different options.
Press the Demo button again to stop the song
To play along with a rhythm, press the Rhy button to cycle through the different rhythms listed in the
Piano Rhythm Directory. Press the Rhy button again to stop the rhythm.
To record yourself playing, press the Record button. Press the Play button to playback the recording.
To change the tone of the keyboard, press the Tim button to cycle through the different options listed
in the Keyboard Tone Directory.
Troubleshooting
When the battery level is low, the keyboard may not work properly. To correct this, charge the battery
or connect to a power source.
If the keyboard is not working properly, turn it off by using the Power button, disconnect it from the
power supply (if plugged in), and wait approximately 5-10 seconds before reconnecting it to a power
supply and turn the keyboard back on. This will restore the default settings.
If the keyboard begins emitting a buzzing noise, make sure there are no other electronic devices
nearby that could be causing interference. Check that the keyboard is on a smooth, level surface.
Sound quality issues may occur when used in a room that experiences a dramatic change in temper-
ature or a fluctuation in humidity levels. If this happens, make sure the keyboard is on a level surface
and try the functions again. If the issue still persists, relocate to another room with more stable envi-
ronmental conditions.
Care & Maintenance
Wipe the keyboard down with a soft, dry cloth to clean. Do not submerge in water or use detergents.
After use, store in a cool, dry place.
Avoid exposure to high temperatures, moisture, or high levels of humidity.
Specifications
Power: DC 5V
Speakers: Built-in high quality speaker system
Battery: Built-in Lithium-Ion

Battery capacity: 2000mAh
Tone: 128 options
Demo Songs: 15 options
Rhythm: 128 options
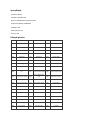
Piano Tone Directory
NO
Tone
NO
Tone
NO
Tone
000
Acoustic Grand piano
001
Bright Acoustic Piano
002
Electric Grand Piano
003
Honky-tonk Piano
004
Rhodes Piano
005
Chorused Piano
006
Harpsichord
007
Clavichord
008
Celesta
009
Glockenspiel
010
Music box
011
Vibraphone
012
Marimba
013
Xylophone
014
Tubular Bells
015
Santur
016
Hammond Organ
017
Percussive Organ
018
Rock Organ
019
Church Organ
020
Reed Organ
021
Accordion
022
Harmonica
023
Tango Accordion
024
Acoustic Guitar (ny-
lon)
025
Acoustic Guitar (steel)
026
Electric Guitar (jazz)
027
Electric Guitar (clean)
028
Electric Guitar
(muted)
029
Overdriven Guitar
030
Distortion Guitar
031
Guitar Harmonics
032
Acoustic Bass
033
Electric Bass (finger)
034
Electric Bass (pick)
035
Fretless Bass
036
Slap Bass 1
037
Slap Bass 2
038
Synth Bass 1
039
Synth Bass 2
040
Violin
041
Viola
042
Cello
043
Contrabass
044
Tremolo Strings
045
Pizzicato Strings
046
Orchestral
047
Timpani
048
String Ensemble 1
049
String Ensemble 2
050
Synth Strings 1
051
Synth Strings 2
052
Choir Aahs
053
Voice Oohs
054
Synth Voice
055
Orchestra Hit
056
Trumpet
NO
Tone
NO
Tone
NO
Tone
057
Trombone
058
Tuba
059
Muted Trumpet
060
French Horn
061
Brass Section
062
Synth Brass 1
063
Synth Brass 2
064
Soprano Sax
065
Alto Sax

066
Tenor Sax
067
Baritone Sax
068
Oboe
069
English Horn
070
Bassoon
071
Clarinet
072
Piccolo
073
Flute
074
Recorder
075
Pan Flute
076
Bottle Blow
077
Shakuhachi
078
Whistle
079
Ocarina
080
Lead 1 (square)
081
Lead 2 (sawtooth)
082
Lead 3 (caliope lead)
083
Lead 4 (chiff lead)
084
Lead 5 (charang)
085
Lead 6 (voice)
086
Lead 7 (fifths)
087
Lead 8 (bass + lead)
088
Pad 1 (new age)
089
Pad 2 (warm)
090
Pad 3 (polysynth)
091
Pad 4 (choir)
092
Pad 5 (bowed)
093
Pad 6 (metallic)
094
Pad 7 (halo)
095
Pad 8 (sweep)
096
FX 1 (rain)
097
FX 2 (soundtrack)
098
FX 3 (crystal)
099
FX 4 (atmosphere)
100
FX 5 (brightness)
101
FX 6 (goblins)
102
FX 7 (echoes)
103
FX 8 (sci-fi)
104
Sitar
105
Banjo
106
Shamisen
107
Koto
108
Kalimba
109
Bagpipe
110
Fiddle
111
Shanai
112
Tinkle Bell
113
Swing Dance Bell
114
Steel Drums
115
Woodblock
116
Taiko Drum
117
Melodic Tom
118
Synth Drum
119
Reverse Cymbal
120
Guitar Fret Noise
121
Breath Noise
122
Seashore
123
Bird Tweet
124
Telephone Ring
125
Helicopter
126
Applause
127
Gunshot
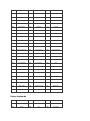
Keyboard Rhythm Directory
NO
Rhythm
NO
Rhythm
NO
Rhythm
000
Beguineswing
001
Beguin1
002
Beguine2
003
Pophit
004
Pop
005
Popmalay
006
Bossanova
007
Disco1
008
Disco2
009
Bluegrassdisco
010
Waltzl1
011
Waltzl2
012
Trueballadwaltz
013
Bossawaltz
014
Easywaltz
015
Shufflewaltz
016
Reggaewaltz
017
Rhumbawaltz

018
March1
019
March2
020
Rhumba1
021
Rhumba2
022
Slow1
023
Slow2
024
Discocha
025
Guaracha
026
Charl
027
Samba1
028
Samba2
029
Ubminimal
030
18Bit
031
28Bit
032
16Bit1
033
16Bit2
034
Ballad16T
035
Country16T
036
Tango1
037
Tango2
038
Polka1
039
Polka2
040
Popswing
041
Easyswing
042
Softswing
043
Rock1
044
Rock2
045
Rock3
046
Airyrock
047
Heartrock
048
Rock&roll
049
Urban
050
Ballad
051
Jazzballad
052
C.ballad
053
J.ballad
054
60Slowballad
055
PianoBallad
056
50Sballad
057
Snakebase
058
Happyblues
059
Oldblues
060
Bluegras
061
Boodie1
062
Boodie2
063
Boodie3
064
Shuffle1
065
Shuffle2
066
Dreamshuffle
067
Countryshuffle
068
Quickshuffle
069
Reggaeshuffle
070
R&B
071
Reggae
072
Reggae
073
Reggae
074
Salsa1
075
Salsa2
076
Salsa3
077
Tecno1
078
Tecno2
079
Funky1
080
Funky2
081
Dixie1
082
Dixie2
083
Foxtrot1
084
Foxtrot2
085
R.roll1
086
R.roll 2
087
Fastbeat
088
Quickbeat
089
Smoothbeat
090
Squarebeat
091
Eurobeat
092
Alphadance
093
Betadance
094
Dreamdance
095
Dance1
096
Dance2
097
Dance3
098
Rap
099
Thevillage
100
Countryshuffle
101
Electrickeys
102
Darkkeys
103
Easywalk
104
Destiny
105
Comedy
106
Drive
107
Liquidnova
108
KIndustrialfolk
109
Slowpure
110
SimpleJam

111
Synthethix
112
Feel
113
Accelerate
114
Beachnight
115
Irish
116
Tarantella
117
Bigband
118
Dandut
119
Fusion
120
Horse
121
Keron
122
Latin
123
Mambo
124
Newage
125
Slowrc
126
Soul
127
Twist
Demo Songs Directory
NO
Name
NO
Name
1
Beer barrel polka
2
Spanish bullfighter
3
Rain in the rhythm
4
Winter Sonata
5
Annie's song
6
Go home
7
Choi Wan chase the moon
8
Rafsky march
9
Haruno
10
Dream wedding
11
A bit of a dream
12
Secret garden
13
Green sleeves
14
Nutcracker dance
15
the blue Danube
WARNING! THE DEVICE MUST NOT BE DISPOSED OF WITH HOUSEHOLD WASTE.
This symbol indicates that this product must not be disposed of with household waste, according to
the EU and your national law. In order to prevent potential damage to the environment or health, the
used product must be recycled. In accordance with current legislation, unusable electrical and elec-
tronic devices must be collected separately at the designated facilities for recycling, acting on the basis
of applicable environmental standards.
Information about used electrical and electronic equipment
The main goal of European and national law regulations is to reduce the amount of waste produced
from used electrical and electronic equipment, to ensure an appropriate level of collection, recovery
and recycling of used equipment, and to increase public awareness of its harmfulness to the environ-
ment, at each stage of use of electrical and electronic equipment. Therefore, it should be pointed out
that households play a key role in contributing to reuse and recovery, including recycling of used equip-
ment. The user of electrical and electronic equipment – intended for households – is obliged to return
it to authorized collector after its use. However, it should be remembered that products classified as
electrical or electronic equipment should be disposed of at authorized collection points.

POLSKI
Instrukcja ta zawiera szczegóły dotyczące bezpiecznego użytkowania tego zwijanego elektronicznego
keyboard, informacje na temat funkcji oraz cech. Użytkowanie niezgodne z instrukcją prowadzi do
utraty gwarancji.
Przed użyciem zapoznaj się z tą instrukcją i zachowaj ją dla przyszłych potrzeb.
Ostrzeżenia bezpieczeństwa
Po zakończeniu pracy z instrumentem odłącz przewód zasilający USB oraz wyłącz zasilanie przyciskiem
Power z tyłu urządzenia..
Nie przechylaj keyboardu ani nie kładź na nierównej powierzchni aby zoptymalizować pracę.
Unikaj kontaktu jakichkolwiek ostrych przedmiotów z urządzeniem. Wszelkie zadrapania i zacięcia
mogą prowadzić do trwałego uszkodzenia i nieprawidłowej pracy.
Do przechowywania zwiń delikatnie keyboard. Ciągłe zwijanie klawiszy przy użyciu znacznej siły może
uszkodzić klawisze i nie podlega naprawom gwarancyjnym.
Nie skręcaj instrumentu na połączeniu z elementem kontrolnym by uniknąć uszkodzeń.
Chroń instrument przed falami elektromagnetycznymi.
Nie demontuj urządzenia, próby rozkręcania i modyfikacji powodują utratę gwarancji.
Przenoś ostrożnie, unikaj upuszczania.
Unikaj użytkowania i przechowywania w wilgotnych, zakurzonych czy mokrych miejscach.
BUDOWA PRODUKTU

Numer
Oznaczenie
Funkcja
1
Wyświetlacz LED
Wyświetla aktualne funkcje
2
Power
Przycisk zasilania
3
Sustain
Wciśnij aby włączyć lub wyłączyć funkcję Sustain (symulacja pedału
Podtrzymującego dźwięki)
4
Vibrato
Wciśnij aby włączyć lub wyłączyć funkcję Vibrato
Wciśnij ten przycisk oraz Up lub Down by przełączać przez różne dźwięki
5
Tim
Lub wciśnij TIM oraz wybierz dźwięk przyciskami numerycznymi
Umieszczonymi dookoła przycisku Power. Odpowiednie dźwięki
Możesz znaleźć w tabeli w dalszej części tej instrukcji
Wciśnij ten przycisk oraz Up lub Down by przełączać przez różne rytmy. Lub
wciśnij RHY oraz wybierz rytm przyciskami numerycznymi umieszczonymi do-
okoła przycisku Power. Odpowiednie rytmy możesz znaleźć w tabeli w dalszej
części tej instrukcji
6
Rhy
7
Tempo
Reguluj tempo rytmów lub utworów demo wciskając przycisk Tempo oraz
Up i Down
8
Record
Wciśnij przycisk by rozpocząć nagrywanie, na wyświetlaczu pojawi się “REC”.
W momencie gdy pamięć jest pełna na wyświetlaczu pojawi się napis “FUL”
9
Play
Wciśnij przycisk by odtworzyć nagranie
Tym przyciskiem uruchamiasz utwory demo. Przyciskami UP i DOWN
10
Demo
przewijasz różne utwory demo. Wciśnij Demo ponownie aby przestać
odtwarzać.
11
Klawiszami tymi wybierasz odpowiedni ton lub rytm.

Klawisze nume-
ryczne
Sprawdź jaki number jest przypisany do pożądanego przez Ciebie
dźwięku lub rytmu.
12
Volume
Reguluje głośność urządzenia
13
Wciśnij ten przycisk oraz Up/Down i wciśnij klawisz. Nuta, którą zagrasz
Transpose
będzie podniesiona/obniżona o jeden interwał za każdym razem przycisk
Up/Down jest wciskany.
Kiedy odtwarzany jest rytm, wciśnij przycisk Single oraz jeden klawisz
Model
od A0 do F #3, aby zagrać akompaniament rytmu akordowego .
(A0 - F #3) to 34 klawisze, włącznie z czarnymi. Zaczynając od lewej
S3088
i licząc w górę, akompaniament rytmu akordowego może być aktywowany
14
Single
za pomocą klawiszy 1 - 34.
Kiedy odtwarzany jest rytm, wciśnij przycisk Single oraz jeden klawisz
Model
od k1 do K19, aby zagrać akompaniament rytmu akordowego
(K1 -K19) to 19 klawiszy, włącznie z czarnymi. Zaczynając od lewej
S3061
i licząc w górę, pojedynczy akompaniament rytmu akordowego może być
aktywowany za pomocą klawiszy 1 - 19.
Podczas odtwarzania rytmu wciśnij ten przycisk i 3 klawisze od C1 do A2
15
Model
aby aktywować akompaniament rytmu akordowego
Finger
(C1 - A2) to 22 klawisze, włącznie z czarnymi. Zaczynając od lewej
S3088
i licząc w górę, palcowy akompaniament rytmu akordowego może być
aktywowany za pomocą klawiszy 4 - 25.
Podczas odtwarzania rytmu wciśnij ten przycisk i 3 klawisze od K1 do 19
15
Model
aby aktywować akompaniament rytmu akordowego
Finger
K1 - K19) to 19 klawiszy, włącznie z czarnymi. Zaczynając od lewej
S3061
i licząc w górę, palcowy akompaniament rytmu akordowego może być
aktywowany za pomocą klawiszy 1 - 19.
16
Sync
Wciśnij ten przycisk by aktywować automatyczny akompaniament rytmu. Użyj
przycisków Up i Down by zmienić rytm.
17
Off Chord
Wciśnij ten przycisk by zatrzymać funkcję Single/Finger Chord.
18
Up i Down
Za ich pomocą wybierz Ton, Rytm i utwór Demo.
19
MIC
Złącze do podłączenia mikrofonu
20
Headphone
Złącze do podłączenia zewnętrznych głośników lub słuchawek
21
USB/DC 5V
Połączenie zasilania
22
Wskaźnik ładowania
Dioda będzie świecić na czerwono podczas ładowania

Użytkowanie
Aby rozpocząć ładowanie podłącz przewód USB do wejścia zasiania do keyboard, a drugi koniec połącz
z komputerem lub adapterem (brak w zestawie).
Aby zapisać utwory grane na keyboardzie potrzebne jest odpowiednie oprogramowanie do nagrywa-
nia. Aby użyć keyboardu do nagrywania utworów na komputerze podłącz przewód USB do keyboardu
i komputera.
Wciśnij przycisk power aż urządzenie się włączy. Po uruchomieniu możesz podłączyć słuchawki, ze-
wnętrzne głośniki lub użyć wbudowanych w instrument głośników. Za pomocą Volume regulujesz gło-
śność.
Aby odtworzyć utwór demo wciśnij przycisk Demo i przewijaj przez wbudowane utwory. Wciśnij po-
nownie Demo, aby zatrzymać odtwarzanie.
Graj razem z rytmem, w tym celu wciśnij przycisk Rhy i wybierz odpowiedni dla siebie rytm (lista w
dalszej części instrukcji). Wciśnij ponownie Rhy aby zatrzymać rytm.
Aby nagrać siebie jak grasz wciśnij przycisk Record. Później wciśnij przycisk Play aby odtworzyć nagra-
nie.
Aby zmienić brzmienie instrumentu wciśnij przycisk Tim i wybierz odpowiedni dla siebie dźwięk (lista
w dalszej części instrukcji).
Rozwiązywanie problemów
Jeśli poziom baterii jest niski, instrument może nie działać prawidłowo. Aby to poprawić należy pod-
łączyć urządzenie do zasilania w celu naładowania baterii.
Jeśli urządzenie nie działa poprawnie należy je odłączyć z zasilania (jeśli podłączone) i wyłączyć przy-
ciskiem. Następnie odczekać około 10 sekund przed ponownym włączeniem. Przywróci to ustawienia
fabryczne.
Jeśli instrument zaczyna wydawać buczące dźwięki, upewnij się, że w pobliżu nie ma innych urządzeń
elektronicznych, które mogłyby spowodować zakłócenia. Sprawdź czy keyboard jest na płaskiej i gład-
kiej powierzchni.
Dźwięk może ulec zniekształceniu jeśli przeniosłeś urządzenie do pomieszczenia o temperaturze znacz-
nie się różniącej, lub w którym następują drastyczne zmiany w poziomie wilgoci. Jeśli tak jest umieść
urządzenie na płaskim podłożu i po pewnym czasie włącz ponownie. Jeśli zmiany nie ustępują przenieś
urządzenie do pomieszczenia o stabilniejszych warunkach.
Czyszczenie i konserwacja
Wycieraj urządzenie suchą miękką ściereczką. Nie używaj detergentów oraz nie namaczaj w wodzie.
Po użyciu przechowuj w suchym chłodnym miejscu.
Unikaj narażania na wysokie temperatury, wilgoć czy kontakt z płynami.

Specyfikacja
Zasilanie: DC 5V
Głośniki: wbudowane
Bateria: wbudowana Litowo-jonowa
Pojemność baterii: 2000mAh
Dźwięki: 128
Utwory demo: 15
Rytmy: 128
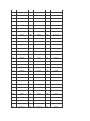
Dźwięki pianina
Nr
Ton
Nr
Ton
Nr
Ton
000
Acoustic Grand piano
001
Bright Acoustic Piano
002
Electric Grand Piano
003
Honky-tonk Piano
004
Rhodes Piano
005
Chorused Piano
006
Harpsichord
007
Clavichord
008
Celesta
009
Glockenspiel
010
Music box
011
Vibraphone
012
Marimba
013
Xylophone
014
Tubular Bells
015
Santur
016
Hammond Organ
017
Percussive Organ
018
Rock Organ
019
Church Organ
020
Reed Organ
021
Accordion
022
Harmonica
023
Tango Accordion
024
Acoustic Guitar (ny-
lon)
025
Acoustic Guitar (steel)
026
Electric Guitar (jazz)
027
Electric Guitar (clean)
028
Electric Guitar (mu-
ted)
029
Overdriven Guitar
030
Distortion Guitar
031
Guitar Harmonics
032
Acoustic Bass
033
Electric Bass (finger)
034
Electric Bass (pick)
035
Fretless Bass
036
Slap Bass 1
037
Slap Bass 2
038
Synth Bass 1
039
Synth Bass 2
040
Violin
041
Viola
042
Cello
043
Contrabass
044
Tremolo Strings
045
Pizzicato Strings
046
Orchestral
047
Timpani
048
String Ensemble 1
049
String Ensemble 2
050
Synth Strings 1
051
Synth Strings 2
052
Choir Aahs
053
Voice Oohs
054
Synth Voice
055
Orchestra Hit
056
Trumpet

NO
Tone
NO
Tone
NO
Tone
057
Trombone
058
Tuba
059
Muted Trumpet
060
French Horn
061
Brass Section
062
Synth Brass 1
063
Synth Brass 2
064
Soprano Sax
065
Alto Sax
066
Tenor Sax
067
Baritone Sax
068
Oboe
069
English Horn
070
Bassoon
071
Clarinet
072
Piccolo
073
Flute
074
Recorder
075
Pan Flute
076
Bottle Blow
077
Shakuhachi
078
Whistle
079
Ocarina
080
Lead 1 (square)
081
Lead 2 (sawtooth)
082
Lead 3 (caliope lead)
083
Lead 4 (chiff lead)
084
Lead 5 (charang)
085
Lead 6 (voice)
086
Lead 7 (fifths)
087
Lead 8 (bass + lead)
088
Pad 1 (new age)
089
Pad 2 (warm)
090
Pad 3 (polysynth)
091
Pad 4 (choir)
092
Pad 5 (bowed)
093
Pad 6 (metallic)
094
Pad 7 (halo)
095
Pad 8 (sweep)
096
FX 1 (rain)
097
FX 2 (soundtrack)
098
FX 3 (crystal)
099
FX 4 (atmosphere)
100
FX 5 (brightness)
101
FX 6 (goblins)
102
FX 7 (echoes)
103
FX 8 (sci-fi)
104
Sitar
105
Banjo
106
Shamisen
107
Koto
108
Kalimba
109
Bagpipe
110
Fiddle
111
Shanai
112
Tinkle Bell
113
Swing Dance Bell
114
Steel Drums
115
Woodblock
116
Taiko Drum
117
Melodic Tom
118
Synth Drum
119
Reverse Cymbal
120
Guitar Fret Noise
121
Breath Noise
122
Seashore
123
Bird Tweet
124
Telephone Ring
125
Helicopter
126
Applause
127
Gunshot
Rytmy keyboardu
Nr
Rytm
Nr
Rytm
Nr
Rytm
000
Beguineswing
001
Beguin1
002
Beguine2
003
Pophit
004
Pop
005
Popmalay

006
Bossanova
007
Disco1
008
Disco2
009
Bluegrassdisco
010
Waltzl1
011
Waltzl2
012
Trueballadwaltz
013
Bossawaltz
014
Easywaltz
015
Shufflewaltz
016
Reggaewaltz
017
Rhumbawaltz
018
March1
019
March2
020
Rhumba1
021
Rhumba2
022
Slow1
023
Slow2
024
Discocha
025
Guaracha
026
Charl
027
Samba1
028
Samba2
029
Ubminimal
030
18Bit
031
28Bit
032
16Bit1
033
16Bit2
034
Ballad16T
035
Country16T
036
Tango1
037
Tango2
038
Polka1
039
Polka2
040
Popswing
041
Easyswing
042
Softswing
043
Rock1
044
Rock2
045
Rock3
046
Airyrock
047
Heartrock
048
Rock&roll
049
Urban
050
Ballad
051
Jazzballad
052
C.ballad
053
J.ballad
054
60Slowballad
055
PianoBallad
056
50Sballad
057
Snakebase
058
Happyblues
059
Oldblues
060
Bluegras
061
Boodie1
062
Boodie2
063
Boodie3
064
Shuffle1
065
Shuffle2
066
Dreamshuffle
067
Countryshuffle
068
Quickshuffle
069
Reggaeshuffle
070
R&B
071
Reggae
072
Reggae
073
Reggae
074
Salsa1
075
Salsa2
076
Salsa3
077
Tecno1
078
Tecno2
079
Funky1
080
Funky2
081
Dixie1
082
Dixie2
083
Foxtrot1
084
Foxtrot2
085
R.roll1
086
R.roll 2
087
Fastbeat
088
Quickbeat
089
Smoothbeat
090
Squarebeat
091
Eurobeat
092
Alphadance
093
Betadance
094
Dreamdance
095
Dance1

096
Dance2
097
Dance3
098
Rap
099
Thevillage
100
Countryshuffle
101
Electrickeys
102
Darkkeys
103
Easywalk
104
Destiny
105
Comedy
106
Drive
107
Liquidnova
108
KIndustrialfolk
109
Slowpure
110
SimpleJam
111
Synthethix
112
Feel
113
Accelerate
114
Beachnight
115
Irish
116
Tarantella
117
Bigband
118
Dandut
119
Fusion
120
Horse
121
Keron
122
Latin
123
Mambo
124
Newage
125
Slowrc
126
Soul
127
Twist
Utwory demo
Nr
Nazwa
Nr
Nazwa
1
Beer barrel polka
2
Spanish bullfighter
3
Rain in the rhythm
4
Winter Sonata
5
Annie's song
6
Go home
7
Choi Wan chase the moon
8
Rafsky march
9
Haruno
10
Dream wedding
11
A bit of a dream
12
Secret garden
13
Green sleeves
14
Nutcracker dance
15
the blue Danube
UWAGA! URZĄDZENIA NIE WOLNO WYRZUCAĆ DO ODPADÓW DOMOWYCH.
To oznaczenie oznacza, że produkt nie może być wyrzucany razem z odpadami domowymi w całej UE.
W celu zapobiegnięcia potencjalnym szkodom dla środowiska lub zdrowia, zużyty produkt należy pod-
dać recyklingowi. Zgodnie z obowiązującym prawem, nie nadający się do użycia sprzęt elektryczny
i elektroniczny należy zbierać osobno, w specjalnie do tego celu wyznaczonych punktach zbierania zu-
żytego sprzętu, celem ich przetworzenia i ponownego wykorzystania na podstawie obowiązujących
norm ochrony środowiska.

Informacja o zużytym sprzęcie elektrycznym i elektronicznym
Głównym celem regulacji europejskich oraz krajowych jest ograniczenie ilości odpadów powstałych
ze zużytego sprzętu elektrycznego i elektronicznego, zapewnienie odpowiedniego poziomu jego zbie-
rania, odzysku i recyklingu oraz zwiększenie świadomości społecznej o jego szkodliwości dla środowiska
naturalnego, na każdym etapie użytkowania sprzętu elektrycznego i elektronicznego. W związku z po-
wyższym należy wskazać, iż gospodarstwa domowe spełniają kluczową rolę w przyczynianiu się do po-
nownego użycia i odzysku, w tym recyklingu zużytego sprzętu. Użytkownik sprzętu przeznaczonego dla
gospodarstw domowych jest zobowiązany po jego zużyciu do oddania zbierającemu zużyty sprzęt elek-
tryczny i elektroniczny. Należy jednak pamiętać, aby produkty należące do grupy sprzętu elektrycznego
lub elektronicznego utylizowane były w uprawnionych do tego punktach zbiórki.
-
 1
1
-
 2
2
-
 3
3
-
 4
4
-
 5
5
-
 6
6
-
 7
7
-
 8
8
-
 9
9
-
 10
10
-
 11
11
-
 12
12
-
 13
13
-
 14
14
-
 15
15
-
 16
16
-
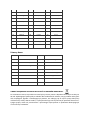 17
17
-
 18
18


