Allview Viper V10 Instrukcja obsługi
- Kategoria
- Telefony komórkowe
- Typ
- Instrukcja obsługi

1
EN Content Page V10 Viper
Product Overview..............................5
Key Operations..................................6
Basic operation..................................6
Touch screen Usage...........................6
Home Screen......................................7
Phone Settings...................................7
Shortcuts............................................8
Shortcut menu...................................8
Move/Uninstall Apps.........................8
Call.....................................................9
Contacts.............................................9
Message.............................................10
Browser..............................................10
Email...................................................11
Google Photos....................................11
Clock...................................................11
Multimedia Function..........................11
Manage File........................................11
Search.................................................11
Voice search........................................11
Google Play.........................................12
Troubleshooting..................................12

2
Notices for the use of phone
CAUTION! Please read carefully these instructions and
follow them, in the case of dangerous situations.
Driving safety: It is recommended not to use the phone
while driving. If you use it however, turn on the
Handsfree mode.
Turn off your phone while in an aircraft.
Interference caused by mobile phones affects aviation
safety, and thus is illegal to use it on the plane. Please
make sure that your mobile phone is turned off when you
are on the plane.
In hospital: When using the phone in a hospital, you must
submit to the relevant rules specified by the hospital. Any
interference caused by wireless devices may affect the
performance of the phone.
Approved service: Only approved repair shops can repair
mobile phones. If you open the phone and try to fix it
yourself, you will void the warranty of the product.
Accessories and batteries: Only accessories and batteries
approved by the producer can be used. It is
recommended that the phone is kept at a minimum of
25mm away from any body part.
Emergency calls: Make sure the phone is turned on and
enabled if you wish to make an emergency call. Press the
call key and confirm the location, explain what happened
and do not close the call.
The battery and charging the battery: It is recommended
to fully charge before the first use of the device.
The battery is not removable. Do not puncture or damage
the battery in any way. Do not expose/keep/store close
to heat sources/in sunlight. Risk of explosion.
Do not expose the battery/product to temperatures
above 40 C. Do not dispose the battery/product in fire
or drop anywhere. Return defective batteries/products in
special centers or to the supplier center.
Warning: We take no responsibility for situations where
the phone is used other than as provided in the manual.
Our company reserves the right to make changes in the
content of the manual without making this public. These
changes will be posted on the company website to the
product it amends. Also, we are not responsible for any
printing errors. The contents of this manual may differ
from that in the product.

3
In this case, the latter will be considered.
To avoid the problems that might occur with the service
shops approved by Visual Fan S.A. (because Visual Fan
reserves the right to stop the collaboration with any
service shop which was previously approved and
mentioned in the warranty card on the date on which the
product batch was sold on the market), before taking a
product to the service shop, please check the updated list
of approved service shops on Allview website at the
section: “Support & Service – Approved service”. For
more product details visit www.allviewmobile.com.
Do not cover the antenna with your hand or other objects.
Failure to comply results in connectivity issues and rapid
discharge of the battery.
All applications provided by third parties and installed in
this device may be modified and/or stopped at any
moment. Visual Fan S.A. will not be responsible in any
way for modifications of the services or content of these
applications. Any request or question regarding third
party applications may be addressed to the owners of
these applications.
Due to the used enclosure material, the product shall
only be connected to a USB interface of version 2.0 or
higher. The connection to the so called power USB is
prohibited.
The adapter shall be installed near the equipment and
shall be easily accessible.
Do not use the mobile phone in an environment with too
high or too low temperature, never expose the mobile
phone under strong sunshine or too a wet environment.
The maximum operating ambient temperature of the
equipment is 40℃.
CAUTION! RISK OF EXPLOSION IF BATTERY IS REPLACED
BY AN INCORRECT TYPE. DISPOSE OF USED BATTERIES
ACCORDING TO THE INSTRUCTIONS.
This device has been tested and meets applicable limits
for Radio Frequency (RF) exposure. Specific Absorption
Rate (SAR) refers to the rate at which the body absorbs
RF energy. SAR limits are 1.6 Watts per kilogram (over a
volume containing a mass of 1 gram of tissue) in
countries that follow the United States FCC limit and 2.0
W/kg (averaged over 10 grams of tissue) in countries that
follow the Council of the European Union limit.

4
Tests for SAR are conducted using standard operating
positions with the device transmitting at its highest
certified power level in all tested frequency bands. To
reduce exposure to RF energy, use a hands-free accessory
or other similar option to keep this device away from
your head and body. Carry this device at least 25 mm
away from your body to ensure exposure levels remain at
or below the tested levels. Choose belt clips, holsters, or
other similar body-worn accessories which do not contain
metallic components, to support operation in this
manner. Cases with metal parts may change the RF
performance of the device, including its compliance with
RF exposure guidelines, in a manner that has not been
tested or certified, and use of such accessories should be
avoided.
For your safety, it is recommended that, during charging,
you don’t keep the device near your body, and that you
place it on an inflammable stand. We recommend that,
during night time, you put the phone away from you at a
minimal distance of 1 meter.

5
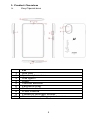
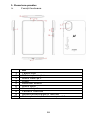
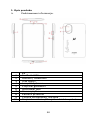
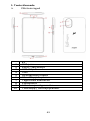
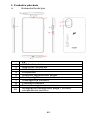
1. Product Overview
➢ Key Operations
EN
1
SIM tray
2
Speaker / receiver
3
USB type C
4
Flash
5
Volume buttons
6
Earphone plug
7
Back camera
8
Front camera
9
Proximity and light sensor
10
Power button / Fingerprint sensor

6
Keys
Functions
Home
Short press this button to return home from
any application or interface.
Long press to open the Assistant feature.
Recent
Short press this button to open recent items.
Back
Press this button to return to the previous
interface, or to close the dialog box, options
menu, notification panel or the keypad.
Power
Short press this button to lock or unlock the
screen. Long press it to open the phone s
menu, then you can choose Power off,
Restart, Screenshot or Emergency.
Up
Press to increase the volume.
Down
Press to decrease the volume.
2. Basic Operations
⚫ Switch on
Touch and hold the Power button until the phone switches
on.
Note: If you have enabled USIM/SIM locking in the
Settings menu, enter the correct PIN number upon
power-on before you use the phone.
Caution: Three consecutive attempts of entering an
incorrect PIN will lock the SIM card. If it is locked, use a
PUK provided by the operator to unlock it.
⚫ Switch off
Touch and hold the "Power button" until the Phone
Options screen displays. Tap "Power off" to switch off the
phone.
⚫ Unlock
Short press the “Power button” light up the screen, according
to the clues of the screen interface can be unlocked.
3. Touch screen Usage
Use your fingers to perform operations directly on icons,
buttons, and the on-screen keypad.
⚫ Tap/Touch/Click
Tap the icon of an App to start it.

7
⚫ Touch & Hold
Touch and hold an item to display a pop-up menu of
options. For example, go to Address Book, touch and hold
a contact on the Address Book page, and a menu of
options pops up.
⚫ Drag
Tap an item on the screen and drag it to another place.
⚫ Slide/Sweep
To sweep vertically or horizontally across the screen, you can
view apps, pictures, and webpages in a convenient manner.
⚫ Scroll
Similar to sweeping, but faster.
⚫ Pinch
Put two fingers on the screen to pinch in or out an item,
such as a webpage or picture.
4. Home Screen
⚫ Status bar: allows you to view status icons and
notices, such as signal, battery, current time and data
service.
⚫ Notification bar: On the Home screen, tap the
status bar and drag it down to display the notification bar.
Tap this bar. Then you can view the notices. Touch the
return button to switch back to the previous page.
⚫ App icon: Tap an app to open it.
⚫ Main menu: Tap the arrow and drag it up to enter
the App main menu.
5. Phone Settings
To display the Settings menu, tap the Settings icon
directly.
⚫ SIM card: In the Settings menu, choose SIM Card. You
can then manage your SIM cards on the pop-up page.
⚫ Network: In the Settings menu, select WLAN to
configure your radio network; or select Traffic usage to
configure your mobile data services; or select Mobile Network
under More to configure data services of your phone.
⚫ Sound: In the Settings menu, choose Sound. The
allows you to set the volume, enable/disable vibration during
ringing, and select ringtones for incoming calls and messages,
as well as enable/disable keypad touch sound effect, touch
alert tone, and screen lock tone.
⚫ Display: allows you to configure the brightness,

8
wallpaper, automatic device rotation, sleep duration, and font
size.
⚫ Security: In the Settings menu, choose Security. The
Security page allows you to set the screen locking mode and
USIM/SIM locking mode. App Permission: allows you to
configure certain permissions for an App and monitor their
usage.
⚫ Anti-theft: allows you to remotely lock the phone or
clear all data of it.
⚫ Manage apps: In the Settings menu, choose Apps.
Then you can view or manage your Apps.
Note: Disable or unload certain apps if available space is
less than 100MB.
⚫ Message: On the Message page, tap the Menu
button and choose Settings. On the Message Settings page,
you can enable/disable report sending, create or select a
message template, and configure a message alert tone for
each short or multimedia message.
⚫ Call: To display the Call Settings page, choose Settings
on the Call page.
6. Shortcuts
On the Home screen, lightly drag down the Status bar. On
the screen top, a group of shortcuts are displayed, such
as Settings, WLAN, Bluetooth, Brightness, Auto-rotate,
flashlight Airplane mode and so on. Tap any of them to
open it quickly.
7. Shortcut menu
Provides several easy-to-use shortcut menus on the home
screen.
On this screen, long press on the screen, the selection
menu of the shortcut function menu will pop up. Click the
menu of the desired settings and complete the function
settings according to the prompts.
8. Move/Uninstall Apps
⚫ Access the App main menu from the Home
screen. On the ALL App page, tap and hold an app to be
put on the Home screen, and drag it left or right to locate
it at a proper place. In this way, a desktop app is created.
⚫ On the All App page, tap and hold an app, and
drag it to Uninstall on the desktop. In this way, the app is

9
removed from the phone.
Note: You are not allowed to uninstall basic apps of
the phone.
⚫ On the All App page, tap and hold an app, and
drag it to APP Info. on the desktop. In this way, details
about the app is displayed.
9. Call
This phone allows you to make or answer a call, initiate
an emergency call, and launch a multi-party call.
On the bottom left of the Home screen, tap the Dial-up
icon. The Dial-up page is displayed. Enter a phone
number and choose between card 1 and card 2 to make
the call. When you enter the number, the phone will
automatically search among all contacts a number that
best matches the entered numerals, to facilitate your
operation.
During a call, tap Add a Call, and this call automatically
switches to Silent mode. Enter the number of another
contact, tap Dial-up, and the previous call automatically
switches to On-hold mode. After the second call is
answered, tap Join. In this way, a teleconference is
established to achieve a multi-party talk.
Note: You need to subscribe to this service from your
carrier before you use it.
You are also allowed to initiate a call by selecting a phone
number from the list of contacts or the Message page.
10. Contacts
Tap Contacts to open it. The Contacts page offers
management functions. It allows you to view the list of
contacts and related details, make a call or send an SMS
to a certain contact, and share the contact.
⚫ Contact import: On the Contacts page, tap the
Menu button, and choose Import/Export to select a
mode for importing or exporting a contact.
⚫ Add a contact: On the lower right of the Contacts
page, tap the Add button to add a contact to your phone
or USIM/SIM. Enter the name and number, and tap Finish.
In this way, a contact is created.
⚫ Contact list: On the Contacts page, tap the image
of a contact. Details about the contact is displayed. This
allows you to quickly make a call or send an SMS to the

10
contact.
⚫ Search contact: On the Contacts page, tab Search,
and enter related information about a certain contact to
search it among the List of contacts.
11. Message
Tab Message on the desktop. Then you can create and
send an SMS or MMS.
⚫ New message: Tap the Add icon on the upper
right of the Message page. The message creating page is
displayed. Enter the name or phone number of the target
contact into the Recipient bar. The phone will
automatically search among the list of contacts for one
that best matches the entered info. (You can also select
the contact from the list of contacts or groups.)
⚫ Input method: Tap the text editing zone to invoke
the keypad. Long press the space bar to switch your input
method.
⚫ Send: After an SMS is complete, tap Send and
choose between card 1 and card 2 for sending the SMS.
12. Browser
Tap Browser to open it. The Browser page allows you to
access and manage WAP and WWW webpages.
During a browse, tap the Menu button, choose Bookmark
to display the Bookmark list. In addition, tapping the
Menu button helps save the webpage that you are
viewing to the Bookmark.
Tap the Menu button during a webpage browse: also
allows you to share the webpage, search on the webpage,
and view history records.
Add a webpage bookmark to desktop: On the Bookmark
page, tap and hold a bookmark, and choose "Add
shortcut to the Home screen". In this way, you can add
frequently used webpages to the desktop for future
access.
Browser settings: Tap the Menu button and choose
Settings. The Browser Settings page allows you to
configure the browser as desired, such as common
content settings and privacy & security settings.
Advanced settings allow resetting to default settings.

11
13. E-mail
Tap E-mail to open it. The E-mail page is display. On this
page, you can send and receive an e-mail via the phone.
For the first time you use this function, enter your e-mail
account and password to set up an account. You can also
set more accounts for ease of uniform management of all
mails.
14. Google Photos
Google Photos is the home for all your photos and videos
that help you find, relive and share your memories.
Automatically organized and searchable by the people,
places, and things in them, your photos and memories
are always easy to find and share.
15. Clock
Tap Clock to open it. The Clock page is displayed.
⚫ Set alarm clock: Tap the alarm clock on the upper
left. The Alarm Clock page is displayed.
⚫ Add alarm: On the Alarm clock page, tap "+" on
the top to add an alarm. Edit the alarm time and tap
Finish. When editing the alarm time, select Hour before
Minute. For example, in the 12-hour format, select 8 as
the hour and 0 as the minute, and select a.m.
16. Multimedia Function
The phone also supports many multimedia functions,
such as camera, music, and recorder. Tap any icon of
theirs to open any one of them.
17. Manage File
This function allows you to copy, paste, share and delete
a file stored on the SD card or other memory cards.
18. Search
On the Home screen, Tap Google , and enter keywords. In
this way, you can search for a webpage, app, contact, and
music. The result will be displayed below the search bar.
19. Voice Search
Control your phone, favorite apps, and your connected
home while on the go using your voice.

12
20. Google Play
Google Play brings together all of the entertainment you
love and helps you explore it in new ways, anytime,
anywhere. We've brought the magic of Google to music,
movies, TV, books, magazines, apps and games, so you
get more from your content every day.
21. Troubleshooting
To save time and avoid unnecessary cost, please conduct
the following checks before contacting our after-sale
personnel:
1. Unable to turn on the phone: Check whether you
have tapped and hold the Power button for over two
seconds. Check whether the battery runs out. If yes,
charge it.
2. Poor signal: It is possibly because of where you
are, for example, on the basement or near a high-rise,
that deteriorates the reachability of radio waves. Please
move to someplace with better signal reachability.
3. Echo or noise: The network trunk line of certain
carriers may be in poor quality. Please tap the hang-up
icon and redial, so that you may switch to another trunk
line with better quality.
4. Unable to charge the battery: Your battery may
fail. Please contact the dealer.
5. SIM card error: The metal surface of the SIM card
is dirty. Rub the metal contact terminals with a clean dry
cloth.
The SIM card is not installed properly. Install it
again as specified in the user manual.
The SIM card breaks down. Contact the network
service provider.
6. Unable to enter anything into Phone Book: This is
possible because that your phone book memory is full.
Please delete needless data from Contacts.

13
RO Conținut V10 Viper
Descriere produs...............................18
Funcții butoane..................................19
Operații de bază.................................19
Utilizare touchscreen.........................19
Ecran principal....................................20
Setări telefon…...................................20
Scurtături............................................21
Meniu scurtături.................................21
Mutare/dezinstalare aplicatii.............21
Apel....................................................22
Contacte.............................................22
Mesaj..................................................23
Browser..............................................23
Email...................................................24
Google Photos.....................................24
Ceas.....................................................24
Funcție multimedia.............................24
Gestiune fișiere...................................24
Căutare................................................24
Căutare vocală.....................................25
Google Play..........................................25
Depanare.............................................25

14
Măsuri de siguranță
IMPORTANT!
Vă rugăm să citiți cu atenție aceste instrucțiuni și
urmați-le implicit, în caz de situații periculoase.
Siguranță în conducere: Este recomandat să nu folosiți
telefonul mobil în timp ce conduceți. Dacă trebuie să-l
folosiți, întotdeauna folosiți sistemul de “Mâini libere”
când conduceți.
Închideți telefonul mobil când sunteți în avion.
Interferențele cauzate de telefoanele mobile afectează
siguranță aviației și, astfel, este ilegal să-l folosiți în avion.
Vă rugăm asigurați-va că telefonul mobil este oprit atunci
când sunteți în avion.
Închideți telefonul mobil în zona de operații de sablare.
În spital: Atunci când folosiți telefonul într-un spital,
trebuie să vă supuneți normelor relevante specificate de
către spital. Orice interferență cauzată de echipamentele
wireless poate afecta performanțele telefonului.
Service-uri aprobate: Numai service-urile aprobate pot
repara telefoanele mobile. Dacă desfaceți telefonul și
încercați să-l reparați singuri veți pierde garanția
produsului.
Accesorii și baterii: Numai accesoriile și bateriile aprobate
de producător pot fi folosite.
Apeluri de urgență: Asigurați-vă că telefonul este pornit și
activat. Dacă doriți să efectuați un Apel de Urgență la 112,
apăsați tasta de apel și confirmați locația, explicați ce s-a
întâmplat și nu închideți convorbirea.
Bateria și încărcarea bateriei: Se recomandă încărcarea
completă a bateriei înainte de prima utilizare a
dispozitivului. Nu expuneți bateria la temperaturi mai
mari de +40ºC. Nu aruncați bateria în foc sau la
întâmplare. Returnați bateriile uzate la furnizor sau la
centrele speciale pentru colectarea bateriilor defecte.
Atenție: Nu ne asumăm responsabilitatea pentru
situațiile în care telefonul este folosit în alt mod decât cel
prevăzut în manual.

15
Compania noastră își rezervă dreptul de a aduce
modificări în conținutul manualului fără a face public
acest lucru. Aceste modificări vor fi afișate pe siteul
companiei la produsul la care se aduc modificări. De
asemenea, nu ne asumăm răspunderea pentru
eventualele erori de tipar. Conținutul acestui manual
poate fi diferit de cel existent în produs. În acest caz,
ultimul va fi luat în considerare. Pentru a evita probleme
care pot să apară cu service-uri care nu mai sunt agreate
de S.C. Visual Fan S.A. (deoarece S.C. Visual Fan S.A. își
rezervă dreptul de a înceta colaborarea cu orice service
colaborator agreat, existent pe certificatul de garanție la
data punerii în vânzare pe piață a lotului de produse),
înainte de a duce un produs în service vă rugăm să
consultați lista actualizată a service-urilor agreate,
existentă pe site-ul Allview la secțiunea “Suport&Service -
Service autorizat”. Pentru mai multe detalii despre
produs accesați www.allviewmobile.com.
Nu acoperiți antena cu mâna sau alte obiecte,
nerespectarea acestei indicații ducând la probleme de
conectivitate și descărcarea rapidă a bateriei.
Aplicațiile care însoțesc produsul și sunt furnizate de terțe
părți pot fi oprite sau întrerupte în orice moment. S.C.
Visual Fan S.A. se dezice în mod explicit de orice
responsabilitate sau răspundere privind modificarea,
oprirea ori suspendarea serviciilor/conținutului puse la
dispoziție de către terțe părți prin intermediul acestui
dispozitiv. Întrebările sau alte solicitări legate de acest
conținut ori servicii se vor adresa direct furnizorilor
proprietari ai acestora.
Din cauza materialului de acoperire utilizat, produsul se
va conecta doar la o interfață USB de versiune 2.0 sau
mai mare. Conexiunea la așa-numitul USB cu sursă
externă de energie este interzisă. Adaptorul va fi instalat
lângă echipament și va fi ușor de accesat.
Nu utilizați telefonul mobil într-un mediu cu temperaturi
prea ridicate sau scăzute, nu-l expuneți la lumina
puternică a soarelui sau unui mediu cu umiditate ridicată.

16
Temperatura ambientală maximă pentru operarea
echipamentului este de 40℃
ATENȚIE: EXISTĂ UN RISC DE EXPLOZIE DACĂ BATERIA
ESTE ÎNLOCUITĂ CU UN MODEL INCORECT. SCOATEȚI
BATERIILE UZATE CONFORM INSTRUCȚIUNILOR.
Acest dispozitiv a fost testat și îndeplinește limitele
aplicabilității pentru expunerea la Frecvențe Radio (FR).
Rata Specifică de Absorbție (SAR) se referă la rata cu care
corpul absoarbe energia FR. Limitele SAR sunt de 1.6
W/kg (la un volum ce conține o masă de 1 gram de țesut)
în țările care aplică limita FCC a Statelor Unite și 2.0 W/kg
(în medie peste 10 grame de țesut) în țările care aplică
limita impusă de Consiliul European. Testele pentru SAR
sunt efectuate utilizând poziții de operare standard, cu
dispozitivul care transmite la cel mai ridicat nivel de
putere, certificat în toate benzile de frecvență. Pentru a
reduce expunerea la energia FR, utilizați un accesoriu
Hands-free, sau alte opțiuni similare, pentru a ține acest
dispozitiv la distanță de capul și corpul dumneavoastră.
Când transportați dispozitivul, este recomandat ca
telefonul/tableta sa fie tinuta la cel putin 25 mm de corp,
pentru a vă asigura că nivelele de expunere rămân la sau
sunt mai joase decât nivelele testate. Alegeți clipsuri de
curea, huse, sau alte accesorii pentru purtat care nu
conțin componente metalice, pentru a susține operarea
în acest mod. Husele cu părți metalice pot schimba
performanța RF a dispozitivului, incluzând concordanța cu
instrucțiunile de expunere RF într-un mod în care nu a
fost testată sau certificată, deci utilizarea acestor
accesorii este de evitat.
Pentru siguranța dumneavostră, este recomandat ca în
timpul încărcării, să nu țineți dispozitivul în apropierea
corpului și să îl plasați pe un suport neinflamabil. Vă
recomandăm ca pe timpul nopții să puneți telefonul la o
distanță de minim 1 metru de dumneavoastră.
Pornire/oprire și standby dispozitiv
După introducerea cartelelor SIM, a cardului de memorie

17
și a bateriei (opțional), porniți telefonul ținând apăsat
butonul Pornire pentru 3 secunde. Pentru oprire, apăsați
lung același buton și confirmați. Dacă apăsați scurt
butonul Pornire veți pune telefonul în modul standby, iar
pentru a reveni apăsați din nou, scurt, același buton.
Deblocare, ecran principal, meniu de aplicații
Pentru a debloca ecranul la revenirea din standby, glisați
cu degetul din partea de jos către partea de sus a
ecranului. Se va afișa ecranul principal.
Paginile ecranului principal pot fi personalizate cu
scurtături și widget-uri. În partea superioară a ecranului
se găsește bara de notificări, care conține informații
despre nivelul semnalului rețelelor mobile, WiFi,
Bluetooth, nivelul bateriei, ceas și evenimente. Pentru
afișarea meniului de aplicații, atingeți simbolul meniu din
ecranul principal. Glisați pentru derularea paginilor
meniului principal. Atingeți pictograma corespunzătoare
pentru accesarea aplicației dorite. Folosiți butonul Înapoi
pentru a reveni în ecranul principal

18
1. Descriere produs
➢ Funcții butoane
RO
1
Tăviță SIM
2
Difuzor / receptor
3
Mufă USB tip C
4
Flash
5
Butoane volum
6
Mufă căști
7
Cameră spate
8
Cameră frontală
9
Senzor proximitate și lumină
10
Buton pornire / Senzor amprentă

19
Taste
Funcții
Home
Apăsați scurt acest buton pentru a reveni in
ecranul principal indiferent de aplicație sau
interfață.
Recent
Apăsați scurt acest buton acest buton pentru
a deschide elemente recente.
Back
Apăsați acest buton pentru a reveni la
interfața anterioară sau pentru a închide o
fereastră de dialog, meniu sau notificare /
tastatură.
Power
Apăsați scurt acest buton pentru a
bloca/debloca ecranul. Apăsarea lungă va
deschide meniul telefonului din care puteți
selecta Power off, Restart, Screenshot sau
Emergency.
Up
Apăsați pentru a crește volumul.
Down
Apăsați pentru a scădea volumul.
2. Operații de bază
⚫ Pornire
Țineți apăsat butonul Power până când pornește dispozitivul.
Notă: Dacă ați activat blocarea USIM/SIM în meniul de
setări, introduceți PIN-ul corect la pornitre pentru a putea
utiliza telefonul.
Atenție: După trei încercări consecutive de introducere
PIN eronat se va bloca SIM-cardul. Dacă este blocat
utilizați codul PUK pus la dispoziție de către operator.
⚫ Oprire
Țineți apăsat butonul Power până la afișarea opțiunilor.
Apăsați "Power off" pentru a opri telefonul.
⚫ Deblocare
Apăsați scurt butonul Power pentru a aprinde ecranul și
apoi îl puteți debloca în funcție de interfață.
3. Utilizare touchscreen
Folosiți degetele pentru a realiza operații direct pe iconuri,
butoane sau pe tastatura virtuală.
⚫ Atinge/Clic
Atingeți iconul aplicației pentru a o porni.
⚫ Atinge & Ține apăsat

20
Atingeși și țineși apăsat elementul pentru a afișa meniul
cu opțiuni. De exemplu, mergeți la Address Book, atingeți
și țineți apăsat un contact și va apărea un meniu cu
opțiuni.
⚫ Trageți
Atingeți un element de pe ecran și trageți-l în alt loc.
⚫ Slide/Sweep
Facând sweep vertical/orizontal pe ecran, puteți vedea
aplicații, poze și pagini web într-o manieră facilă.
⚫ Scroll
Similar cu sweeping, dar mai rapid.
⚫ Pinch
Puneți două degete pe ecran pentru A pinch in or out un
element cum ar fi o pagină web sau o poză.
4. Ecran principal
⚫ Bară de stare: Vă permite să vedeți iconuri și note
de stare cum ar fi semnal, baterie, timp și serviciu de
date.
⚫ Bară de notificare: Pe ecranul principal apăsați
bara de stare și trăgeți-o în jos pentru a afișa bara de
notificări. După ce apăsați această bară puteți vedea note.
Atingeți butonul Return pentru a reveni la pagina anterioară.
⚫ Icon aplicație: Apăsați pentru o deschide.
⚫ Meniu principal: Apăsați săgeata și trageți în sus
pentru a intra în meniul principal al aplicațiilor.
5. Setări telefon
Pentru a afișa meniul de setări apăsași direct iconul
Settings.
⚫ Card SIM: În meniul de setări alegeți card SIM.
Apoi puteți să gestionați cardurile SIM pe pagina afisată.
⚫ Rețea: În meniul de setări selectați WLAN pentru
a configura rețeaua; sau selectați utilizarea traficului
pentru a configura serviciile de date mobile; sau selectați
rețeaua mobile din More pentru a configura serviciile de
date ale telefonului.
⚫ Sunet: În meniul de setări alegeți Sunet. Acesta vă
permite să setați volumul, activare/dezactivare vibrație în
timpul apelului, și selectare tonuri apel pentru apeluri &
mesaje primite, precum și activare/dezactivare efectul de
sunet la atingerea tastaturii, ton alertă atingere, și ton
blocare ecran.
Strona jest ładowana ...
Strona jest ładowana ...
Strona jest ładowana ...
Strona jest ładowana ...
Strona jest ładowana ...
Strona jest ładowana ...
Strona jest ładowana ...
Strona jest ładowana ...
Strona jest ładowana ...
Strona jest ładowana ...
Strona jest ładowana ...
Strona jest ładowana ...
Strona jest ładowana ...
Strona jest ładowana ...
Strona jest ładowana ...
Strona jest ładowana ...
Strona jest ładowana ...
Strona jest ładowana ...
Strona jest ładowana ...
Strona jest ładowana ...
Strona jest ładowana ...
Strona jest ładowana ...
Strona jest ładowana ...
Strona jest ładowana ...
Strona jest ładowana ...
Strona jest ładowana ...
Strona jest ładowana ...
Strona jest ładowana ...
Strona jest ładowana ...
Strona jest ładowana ...
Strona jest ładowana ...
Strona jest ładowana ...
Strona jest ładowana ...
Strona jest ładowana ...
Strona jest ładowana ...
Strona jest ładowana ...
Strona jest ładowana ...
Strona jest ładowana ...
Strona jest ładowana ...
Strona jest ładowana ...
Strona jest ładowana ...
Strona jest ładowana ...
Strona jest ładowana ...
Strona jest ładowana ...
Strona jest ładowana ...
Strona jest ładowana ...
Strona jest ładowana ...
Strona jest ładowana ...
Strona jest ładowana ...
Strona jest ładowana ...
Strona jest ładowana ...
Strona jest ładowana ...
Strona jest ładowana ...
Strona jest ładowana ...
Strona jest ładowana ...
Strona jest ładowana ...
Strona jest ładowana ...
Strona jest ładowana ...
Strona jest ładowana ...
Strona jest ładowana ...
Strona jest ładowana ...
Strona jest ładowana ...
Strona jest ładowana ...
Strona jest ładowana ...
Strona jest ładowana ...
Strona jest ładowana ...
Strona jest ładowana ...
Strona jest ładowana ...
Strona jest ładowana ...
Strona jest ładowana ...
Strona jest ładowana ...
Strona jest ładowana ...
-
 1
1
-
 2
2
-
 3
3
-
 4
4
-
 5
5
-
 6
6
-
 7
7
-
 8
8
-
 9
9
-
 10
10
-
 11
11
-
 12
12
-
 13
13
-
 14
14
-
 15
15
-
 16
16
-
 17
17
-
 18
18
-
 19
19
-
 20
20
-
 21
21
-
 22
22
-
 23
23
-
 24
24
-
 25
25
-
 26
26
-
 27
27
-
 28
28
-
 29
29
-
 30
30
-
 31
31
-
 32
32
-
 33
33
-
 34
34
-
 35
35
-
 36
36
-
 37
37
-
 38
38
-
 39
39
-
 40
40
-
 41
41
-
 42
42
-
 43
43
-
 44
44
-
 45
45
-
 46
46
-
 47
47
-
 48
48
-
 49
49
-
 50
50
-
 51
51
-
 52
52
-
 53
53
-
 54
54
-
 55
55
-
 56
56
-
 57
57
-
 58
58
-
 59
59
-
 60
60
-
 61
61
-
 62
62
-
 63
63
-
 64
64
-
 65
65
-
 66
66
-
 67
67
-
 68
68
-
 69
69
-
 70
70
-
 71
71
-
 72
72
-
 73
73
-
 74
74
-
 75
75
-
 76
76
-
 77
77
-
 78
78
-
 79
79
-
 80
80
-
 81
81
-
 82
82
-
 83
83
-
 84
84
-
 85
85
-
 86
86
-
 87
87
-
 88
88
-
 89
89
-
 90
90
-
 91
91
-
 92
92


Allview Viper V10 Instrukcja obsługi
- Kategoria
- Telefony komórkowe
- Typ
- Instrukcja obsługi
w innych językach
Inne dokumenty
-
LG LGH736.AHUNWH Instrukcja obsługi
-
Overmax Vertis Famy Instrukcja obsługi
-
LG H410 Instrukcja obsługi
-
LG LGH818P.ABRALB Instrukcja obsługi
-
LG LGH815.AVDPLR Instrukcja obsługi
-
LG LGH440N.ASWSKG Instrukcja obsługi
-
LG LG SPIRIT - LG H420 Instrukcja obsługi
-
LG LG Joy - LG H220 Instrukcja obsługi
-
LG Leon-4G-LTE-H340n Instrukcja obsługi
-
LG LGH955.APCLTS Instrukcja obsługi