
1
LevelOne
WAP-6201 / WAP-6202
Managed Wall Mount Wireless Access Point, 802.11b/g/n,
802.3af PoE, In-Wall Mounted
Quick Installation Guide
English
Deutsch
Français
Español
Português
Русский
Italiano
Polski
Ελληνικά
简体中文
V1.0_20150922

2
English
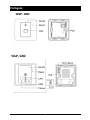
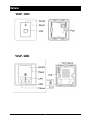
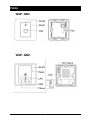
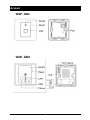
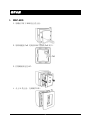
WAP - 6201
WAP - 6202

3
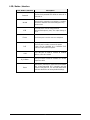
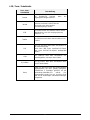
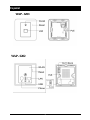
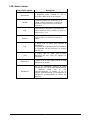
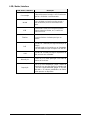
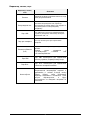
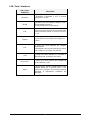
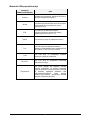
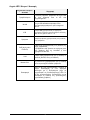
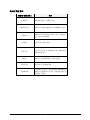
LED / Button / Interface
LED / Button / Interface
Description
Powered
The Device is powered LED will be on when AP is
powered on.
WLAN
After the AP is powered on and wireless is enabled,
WLAN LED will blink when transmitting/receiving
wireless Data.
USB
The USB port is used to charge external
devices(mobile phone, pads). The output Voltage is
5V 1A.
Phone
The Phone port is used to connect a telephone.
PoE
The PoE port is used to connect the power.
Power can be provided by a LevelOne PoE
Switch or a 802.3af Poe injector.
LAN
The LAN port is used to connect to network
devices, such as a switch.
RJ11 Block
The RJ11 block is used to connect to a 4-core
telephone cable.
Reset
With the AP powered on, press the Reset button
with a bent paperclip for 5 seconds until the
Link/Act LED goes off. The AP Will restart itself
and reset the device to factory default settings.

4
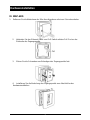
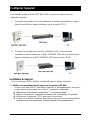
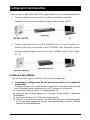
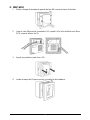
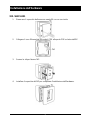
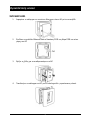
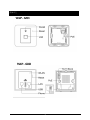
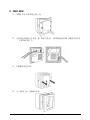
Hardware Installation
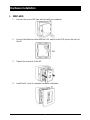
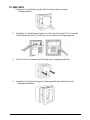
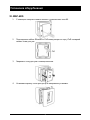
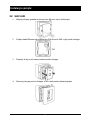
I. WAP-6201
1. Uncover the cover of 86-type wall jack with a screwdriver.
2. Connect the Ethernet cable from the POE switch to the POE port on the back of
the AP.
3. Tighten the screws to fix the AP.
4. Install the AP cover to complete hardware installation.

5
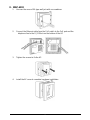
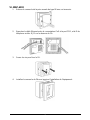
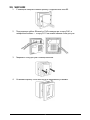
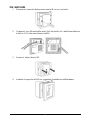
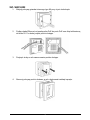
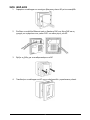
II. WAP-6202
1. Uncover the cover of 86-type wall jack with a screwdriver.
2. Connect the Ethernet cable from the PoE switch to the PoE port and the
telephone line to the RJ11 Block on the bottom of the AP.
3. Tighten the screws to fix the AP.
4. Install the AP cover to complete hardware installation.

6
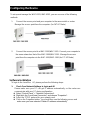
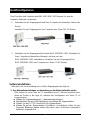
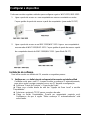
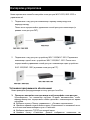
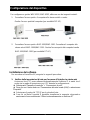
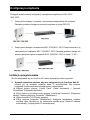
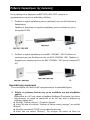
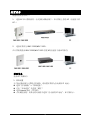
Configuring the Device
To set up and manage the WAP-6201/ WAP-6202, you can use one of the following
methods:
1. Connect the access point and your computer to the same switch or router.
Manage the access point from the computer. (for FAT AP Mode)
2. Connect the access point to a WAC-1000/WAC-1001. Connect your computer to
the same network as that of the WAC-1000/WAC-1001. Manage the access
point from the computer via the WAC-1000/WAC-1001.(for FIT AP Mode)
Software Installation
To login to the LevelOne AP, please perform the following steps:
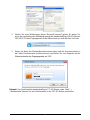
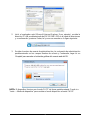
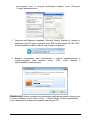
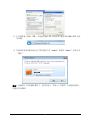
1. Check Your Network Settings to login web UI
Please make sure your PC can get IP address automatically, so the router can
communicate with your PC during configuration.
Select “Control Panel” > “Network Connections”.
Right click the “Local Area Connection” and choose “Properties”.
Select the TCP/IP protocol for your network card.
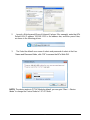
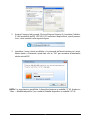
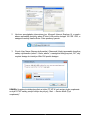
Click on the Properties button. You should then see the following screen and
make sure you have selected “Obtain IP address automatically”

7
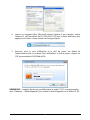
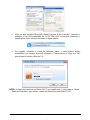
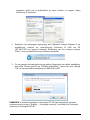
2. Launch a Web browser(Microsoft Internet Explorer 8 for example), enter the AP’s
Default LAN IP address 192.168.1.253 in the address bar, and then press Enter,
as shown in the following picture.
3. The Enter the default user name of admin and password of admin in theUser
Name and Password fields, click “OK” to access the AP’s Web GUI.
NOTE: The device works in FIT AP Mode by default, you can goto “Start → Device
Mode” to change the Device Mode to FAT AP Mode.

8
Deutsch
WAP - 6201
WAP - 6202

9
LED / Taste / Schnittstelle
LED / Taste /
Schnittstelle
Beschreibung
Betrieb
Die Betrieb-LED leuchtet, wenn der
Zugangspunkt eingeschaltet ist.
WLAN
Nach Einschalten des Zugangspunkts und
Aktivieren der WLAN-Funktion blinkt die
WLAN-LED, wenn Daten drahtlos
gesendet/empfangen werden.
USB
Der USB-Port dient dem Aufladen externer Geräte
(Mobiltelefone, Pads). Die Ausgangsspannung
beträgt 5 V, 1 A.
Telefon
Der Telefonanschluss dient dem Anschließen eines
Telefons.
PoE
Der PoE-Anschluss dient dem Anschließen an
die Stromversorgung.
Strom kann über einen LevelOne-PoE-Switch
oder einen 802.3af-PoE-Injektor bereitgestellt
werden.
LAN
Der LAN-Port dient dem Anschließen von
Netzwerkgeräten, wie bspw. eines Switch.
RJ11-Block
Der RJ11-Block dient dem Anschließen eines
4-Kern-Telefonkabels.
Reset
Halten Sie die Reset-Taste bei eingeschaltetem
Zugangspunkts mit einer gerade gebogenen
Büroklammer 5 Sekunden gedrückt, bis die
Verbindungs-/Aktivitäts-LED erlischt. Der
Zugangspunkt startet sich neu und das Gerät
wird auf die werkseitigen Standardeinstellungen
rückgesetzt.

10
Hardwareinstallation
III. WAP-6201
1. Entfernen Sie die Abdeckung der 86er-Anschlussdose mit einem Schraubendreher.
2. Verbinden Sie das Ethernet-Kabel vom PoE-Switch mit dem PoE-Port an der
Rückseite des Zugangspunkts.
3. Ziehen Sie die Schrauben zum Befestigen des Zugangspunkts fest.
4. Installieren Sie die Abdeckung des Zugangspunkts zum Abschließen der
Hardwareinstallation.

11
IV. WAP-6202
1. Entfernen Sie die Abdeckung der 86er-Anschlussdose mit einem
Schraubendreher.
2. Verbinden Sie das Ethernet-Kabel vom PoE-Switch mit dem PoE-Port und die
Telefonleitung mit dem RJ11-Block an der Unterseite des Zugangspunkts.
3. Ziehen Sie die Schrauben zum Befestigen des Zugangspunkts fest.
4. Installieren Sie die Abdeckung des Zugangspunkts zum Abschließen der
Hardwareinstallation.

12
Gerät konfigurieren
Zum Einrichten und Verwalten des WAP-6201/ WAP-6202 können Sie eine der
folgenden Methoden verwenden:
1. Verbinden Sie den Zugangspunkt und Ihren Computer mit demselben Switch oder
Router.
Verwalten Sie den Zugangspunkt vom Computer aus. (Beim FAT-AP-Modus)
2. Verbinden Sie den Zugangspunkt mit einem WAC-1000/WAC-1001. Verbinden Sie
Ihren Computer mit demselben Netzwerk, mit dem auch der
WAC-1000/WAC-1001 verbunden ist. Verwalten Sie den Zugangspunkt via
WAC-1000/WAC-1001 vom Computer aus. (Beim FIT-AP-Modus)
Softwareinstallation
Bitte gehen Sie zur Anmeldung am LevelOne-Zugangspunkt wie folgt vor:
1. Ihre Netzwerkeinstellungen zur Anmeldung an der Webschnittstelle prüfen
Bitte stellen Sie sicher, dass Ihr PC automatisch eine IP-Adresse beziehen kann,
damit der Router in der Lage ist, während der Konfiguration mit Ihrem PC zu
kommunizieren.
Wählen Sie „Systemsteuerung“ > „Netzwerkverbindungen“.
Rechtsklicken Sie auf „LAN-Verbindung“ und wählen Sie „Eigenschaften“.
Wählen Sie das TCP/IP-Protokoll für Ihre Netzwerkkarte.
Klicken Sie auf die „Eigenschaften“-Schaltfläche. Anschließend sollten Sie den
folgenden Bildschirm sehen; stellen Sie sicher, dass „IP-Adresse automatisch
beziehen“ ausgewählt ist.

13
2. Starten Sie einen Webbrowser (bspw. Microsoft Internet Explorer 8), geben Sie
wie in der nachstehenden Abbildung gezeigt die standardmäßige LAN-IP-Adresse
192.168.1.253 des Zugangspunkts in die Adressleiste ein und drücken Sie Enter.
3. Geben Sie dann den Standardbenutzernamen admin und das Kennwort admin in
die Felder Benutzername und Kennwort ein und klicken Sie zum Zugreifen auf die
Webschnittstelle des Zugangspunkts auf „OK“.
Hinweis: Das Gerät arbeitet standardmäßig im FIT-AP-Modus; unter „Start“ →
„Gerätemodus“ können Sie den Gerätemodus in den FAT-AP-Modus umschalten.

14
Français
WAP - 6201
WAP - 6202

15
DEL / Bouton / Interface
DEL / Bouton /
Interface
Description
Alimenté
L'appareil est alimenté La DEL est allumée
lorsque le PA est sous tension.
WLAN
Une fois le PA alimenté et la fonction sans fil
activée, la DEL WLAN clignotera lors de la
transmission/réception de données sans fil.
USB
Le port USB est utilisé pour recharger des appareils
externes (téléphone mobile, assistant numérique
personnel). La tension de sortie est 5V 1A.
Téléphone
Le port Téléphone est utilisé pour brancher un
téléphone.
PoE
Le port PoE est utilisé pour connecter
l'alimentation.
L'alimentation peut être fournie par un
commutateur PoE LevelOne ou un injecteur Poe
802.3af.
LAN
Le port LAN est utilisé pour connecter à des
appareils réseau, comme par exemple un
commutateur.
Bloc RJ11
Le bloc RJ11 est utilisé pour brancher un câble
de téléphone à 4 fils.
Réinitialiser
Lorsque le PA est sous tension, appuyez sur le
bouton Réinitialiser avec un trombone déplié
pendant 5 secondes jusqu'à ce que la DEL
Link/Act s'éteigne. Le PA redémarrera et sera
réinitialisé aux réglages d'usine par défaut.

16
Installation de l'équipement
V. WAP-6201
1. Enlevez le couvercle de la prise murale de type 86 avec un tournevis.
2. Branchez le câble Ethernet entre le commutateur POE et le port POE situé au
dos du PA.
3. Serrez les vis pour fixer le PA.
4. Installez le couvercle du PA pour terminer l'installation de l'équipement.

17
VI. WAP-6202
1. Enlevez le couvercle de la prise murale de type 86 avec un tournevis.
2. Branchez le câble Ethernet entre le commutateur PoE et le port POE, et le fil de
téléphone au bloc RJ11 sur le dessous du PA.
3. Serrez les vis pour fixer le PA.
4. Installez le couvercle du PA pour terminer l'installation de l'équipement.

18
Configurer l'appareil
Pour installer et gérer le WAP-6201/ WAP-6202, vous pouvez utiliser l'une des
méthodes suivantes :
1. Connecter le point d'accès et votre ordinateur au même commutateur ou routeur.
Gérer le point d'accès depuis l'ordinateur. (pour le mode FAT AP)
2. Connecter le point d'accès à un WAC-1000/WAC-1001. Connecter votre
ordinateur au même réseau que le WAC-1000/WAC-1001. Gérer le point d'accès
depuis l'ordinateur via le WAC-1000/WAC-1001 (pour le mode FIT AP).
Installation du logiciel
Pour se connecter au PA LevelOne, veuillez effectuer les étapes suivantes :
1. Vérifiez vos paramètres réseau pour vous connecter à l'IU Web
Assurez-vous que votre PC peut obtenir l'adresse IP automatiquement, afin que le
routeur puisse communiquer avec votre PC pendant la configuration.
Sélectionnez “Panneau de configuration” > “Connexions réseau”.
Faites un clic droit sur “Connexion au réseau local” et choisissez “Propriétés”.
Sélectionnez le protocole TCP/IP pour votre carte réseau.
Cliquez sur le bouton Propriétés. Vous devriez alors voir l'écran suivant et devez
vous assurer d'avoir sélectionné “Obtenir l'adresse IP automatiquement”

19
2. Lancez un navigateur Web (Microsoft Internet Explorer 8 par exemple), entrez
l'adresse IP LAN par défaut du PA (192.168.1.253) dans la barre d'adresse, puis
appuyez sur Entrée, comme montré sur l'image suivante.
3. Saisissez alors le nom d'utilisateur et le mot de passe par défaut de
l'administrateur dans les champs Nom d'utilisateur et Mot de passe, cliquez sur
“OK” pour accéder à l'IUG Web du PA.
REMARQUE : L'appareil fonctionne par défaut dans le mode FIT AP, vous pouvez aller
dans “Démarrer → Mode d'appareil” pour mettre le Mode d'appareil sur le Mode FAT AP.

20
Español
WAP - 6201
WAP - 6202
Strona jest ładowana ...
Strona jest ładowana ...
Strona jest ładowana ...
Strona jest ładowana ...
Strona jest ładowana ...
Strona jest ładowana ...
Strona jest ładowana ...
Strona jest ładowana ...
Strona jest ładowana ...
Strona jest ładowana ...
Strona jest ładowana ...
Strona jest ładowana ...
Strona jest ładowana ...
Strona jest ładowana ...
Strona jest ładowana ...
Strona jest ładowana ...
Strona jest ładowana ...
Strona jest ładowana ...
Strona jest ładowana ...
Strona jest ładowana ...
Strona jest ładowana ...
Strona jest ładowana ...
Strona jest ładowana ...
Strona jest ładowana ...
Strona jest ładowana ...
Strona jest ładowana ...
Strona jest ładowana ...
Strona jest ładowana ...
Strona jest ładowana ...
Strona jest ładowana ...
Strona jest ładowana ...
Strona jest ładowana ...
Strona jest ładowana ...
Strona jest ładowana ...
Strona jest ładowana ...
Strona jest ładowana ...
Strona jest ładowana ...
Strona jest ładowana ...
Strona jest ładowana ...
Strona jest ładowana ...
Strona jest ładowana ...
-
 1
1
-
 2
2
-
 3
3
-
 4
4
-
 5
5
-
 6
6
-
 7
7
-
 8
8
-
 9
9
-
 10
10
-
 11
11
-
 12
12
-
 13
13
-
 14
14
-
 15
15
-
 16
16
-
 17
17
-
 18
18
-
 19
19
-
 20
20
-
 21
21
-
 22
22
-
 23
23
-
 24
24
-
 25
25
-
 26
26
-
 27
27
-
 28
28
-
 29
29
-
 30
30
-
 31
31
-
 32
32
-
 33
33
-
 34
34
-
 35
35
-
 36
36
-
 37
37
-
 38
38
-
 39
39
-
 40
40
-
 41
41
-
 42
42
-
 43
43
-
 44
44
-
 45
45
-
 46
46
-
 47
47
-
 48
48
-
 49
49
-
 50
50
-
 51
51
-
 52
52
-
 53
53
-
 54
54
-
 55
55
-
 56
56
-
 57
57
-
 58
58
-
 59
59
-
 60
60
-
 61
61


LevelOne WAP-6201 Quick Installation Manual
- Typ
- Quick Installation Manual
- Ten podręcznik jest również odpowiedni dla
w innych językach
- español: LevelOne WAP-6201
- italiano: LevelOne WAP-6201
- Deutsch: LevelOne WAP-6201
- português: LevelOne WAP-6201
- français: LevelOne WAP-6201
- English: LevelOne WAP-6201
- русский: LevelOne WAP-6201