Philips AC1214/10 Instrukcja obsługi
- Kategoria
- Oczyszczacze powietrza
- Typ
- Instrukcja obsługi
Niniejsza instrukcja jest również odpowiednia dla

EN User manual 1
CS Příručka pro uživatele 18
HU Felhasználói kézikönyv 36
PL Instrukcja obsługi 55
RO Manual de utilizare 74
SK Príručka užívateľa 94
UK Посібник користувача 113
© 2019 Koninklijke Philips N.V.
All rights reserved.
4241 210 98194
AC1214
1 2
J K L N OM
E
F
G
H
I
A
B
D
C

3s
3s
3s
3s

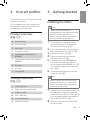
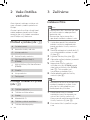
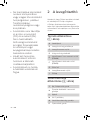
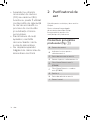
Contents
1 Important 2
Safety 2
2 Your air purier 5
Product overview (Fig. a) 5
Controls overview (Fig. b) 5
3 Getting started 5
Installing the lters 5
Wi-Fi connection 6
4 Using the air purier 7
Understanding the air quality light 7
Turning on and o 7
Changing the fan speed 7
Light sensor 8
Night sensing mode 8
Setting the child lock 9
5 Cleaning 9
Cleaning the body of the air
purier 9
Cleaning the air quality sensor 9
Cleaning the pre-lter 10
6 Replacing the lters 11
Filter replacement indicator 11
Replacing the lters 11
Filter reset 12
1EN
English
7 Storage 12
8 Troubleshooting 13
9 Guarantee and service 16
Order parts or accessories 16
10 Notices 16
Electromagnetic elds (EMF) 16
Recycling 17
Notice 17
Simplied EU declaration of
conformity 17

2 EN
• If the power cord is
damaged, you must have
it replaced by Philips, a
service center authorized
by Philips, or similarly
qualied persons in order
to avoid a hazard.
• Do not use the appliance
if the plug, the power cord,
or the appliance itself is
damaged.
• This appliance can be
used by children aged
from 8 years and above
and persons with reduced
physical, sensory or
mental capabilities or
lack of experience and
knowledge if they have
been given supervision or
instruction concerning use
of the appliance in a safe
way and understand the
hazards involved. Child
shall not play with the
appliance. Cleaning and
maintenance shall not be
made by children without
supervision.
• Do not block the air inlet
and outlet, e.g. by placing
items on the air outlet or
in front of the air inlet.
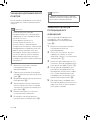
1 Important
Safety
Read this user manual carefully before
you use the appliance, and save it for
future reference.
Danger
• Do not let water or any
other liquid or ammable
detergent enter the
appliance to avoid electric
shock and/or a re hazard.
• Do not clean the
appliance with water,
any other liquid, or a
(ammable) detergent to
avoid electric shock and/
or a re hazard.
• Do not spray any
ammable materials
such as insecticides or
fragrance around the
appliance.
Warning
• Check if the voltage
indicated on the
appliance corresponds to
the local power voltage
before you connect the
appliance.

• Do not place anything on
top of the appliance.
• Do not sit or stand on
the appliance. Sitting or
standing on the appliance
may lead to potential
injury.
• Do not place the
appliance directly below
an air conditioner to
prevent condensation
from dripping onto the
appliance.
• Make sure all lters
are properly installed
before you switch on the
appliance.
• Only use the original
Philips lters specially
intended for this
appliance. Do not use any
other lters.
• Combustion of the lter
may cause inreversible
human hazard and/or
jeopardize other lives. Do
not use the lter as fuel or
for similar purpose.
• Avoid knocking against
the appliance (the air inlet
and outlet in particular)
with hard objects.
• Make sure that foreign
objects do not fall into
the appliance through the
air outlet.
• Standard WiFi interface
based on 802.11b/g/n at
2.4 GHz with a maximum
output power of 31.62 mW
EIRP.
Caution
• This appliance is not
a substitute for proper
ventilation, regular
vacuum cleaning, or use
of an extractor hood or
fan while cooking.
• If the power socket used
to power the appliance
has poor connections,
the plug of the appliance
becomes hot. Make
sure that you plug the
appliance into a properly
connected power socket.
• Always place and use the
appliance on a dry, stable,
level, and horizontal
surface.
• Leave at least 20cm
free space behind and
on both sides of the
appliance and leave at
least 30cm free space
above the appliance.
3EN
English

• To prevent interference,
place the appliance at
least 2 meters away from
electrical appliances that
use airborne radio waves
such as TVs, radios, and
radio-controlled clocks.
• The appliance is only
intended for household
use under normal
operating conditions.
• Do not use the appliance
in wet surroundings or in
surroundings with high
ambient temperatures,
such as the bathroom,
toilet, or kitchen.
• The appliance does
not remove carbon
monoxide (CO) or radon
(Rn). It cannot be used
as a safety device in
case of accidents with
combustion processes
and hazardous chemicals.
• If you need to move the
appliance, disconnect the
appliance from the power
supply rst.
• Do not move the
appliance by pulling its
power cord.
• Always lift or move the
appliance by the handle
on top of the appliance.
• Do not insert your ngers
or objects into the air
outlet or the air inlet to
prevent physical injury
or malfunctioning of the
appliance.
• Do not use this appliance
when you have used
indoor smoke-type insect
repellents or in places
with oily residues, burning
incense, or chemical
fumes.
• Do not use the appliance
near gas appliances,
heating devices or
replaces.
• Always unplug the
appliance after use and
before cleaning or carrying
out other maintenance.
• Do not use the appliance
in a room with major
temperature changes,
as this may cause
condensation inside the
appliance.
4 EN

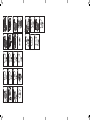
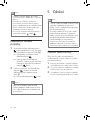
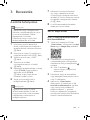
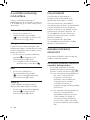
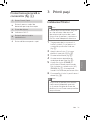
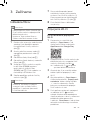
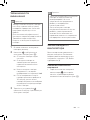
3 Getting started
Installing the lters
Note
• Make sure the air purier is
unplugged from the electrical outlet
before installing the lters.
• Make sure the side of the lter with
the tag is pointing towards you.
1 Pull the bottom part of the front
panel and gently lift to remove it
from the air purier (Fig. c).
2 Press the clip down (1) and pull the
pre-lter towards you (2) (Fig. d).
3 Remove all lters (Fig. e).
4 Remove all packaging materials
from the lters (Fig. f).
5 Place the thick lter (FY1410) into
the air purier and then the thin
active carbon lter (FY1413) (Fig. g).
The model numbers are shown on
each lter.
6 Attach the pre-lter back into the
air purier (Fig. h).
Note
• Make sure the side with the clip is
pointing towards you, and that all
hooks of the pre-lter are properly
attached to the purier.
7 Reattach the front panel by pressing
the top part of the panel onto the
top of the air purier (1). Then, gently
push the panel against the body of
the air purier (2) (Fig. i).
8 Wash your hands thoroughly after
installing lters.
2 Your air purifier
Congratulations on your purchase, and
welcome to Philips!
To fully benet from the support that
Philips oers, register your product at
www.philips.com/welcome.
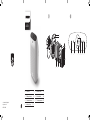
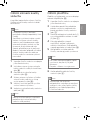
Product overview
(Fig. a)
A Control panel
B Air quality light
C Air outlet
D Air quality sensor
E
NanoProtect lter Series 3
(FY1410)
F
NanoProtect lter Active Carbon
(FY1413)
G Pre-lter
H Air inlet
I Front panel
Controls overview
(Fig. b)
J On/O button
K Night sensing mode button
L Display screen
M Wi-Fi indicator
N Fan speed button
O Child lock button
5EN
English

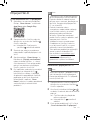
Note
• This instruction is only valid when
the air purier is being set up for the
rst time. If the network has changed
or the setup needs to be performed
again, consult section "Reset the Wi-
Fi connection" on page 6.
• If you want to connect more than
one air purier to your smartphone
or tablet, you have to do this one by
one. Complete the set up of one air
purier before you turn on the other
air purier.
• Make sure that the distance
between your smartphone or tablet
and the air purier is less than 10 m
without any obstructions.
• This app supports the latest
versions of Android and iOS. Please
check www.philips.com/cleanhome
for the latest update of supported
operating systems and devices.
Reset the Wi-Fi connection
Note
• This applies when the default
network to which your purier is
connected has changed.
• Reset the Wi-Fi connection when
your default network has changed.
1 Put the plug of the air purier in the
power socket and touch
to turn
on the air purier.
2 Touch and simultaneously for
3 seconds until you hear a beep.
» The air purier goes to pairing
mode.
» The Wi-Fi indicator
blinks
orange.
3 Follow the steps 4-5 in "Setting up
the Wi-Fi connection for the rst
time" section.
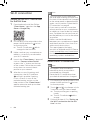
Wi-Fi connection
Setting up the Wi-Fi connection
for the rst time
1 Download and install the Philips
"Clean Home+" app from the App
Store or Google Play.
2 Put the plug of the air purier in the
power socket and touch
to turn
on the air purier.
» The Wi-Fi indicator
blinks
orange for the rst time.
3 Make sure that your smartphone or
tablet is successfully connected to
your Wi-Fi network.
4 Launch the "Clean Home+" app and
click on "Connect a New Device"
or press the "+" button on the top
of the screen. Follow the onscreen
instructions to connect the air
purier to your network.
5 After the successful pairing and
connection, the Wi-Fi indicator
will light up white. If pairing
is not successful, consult the
troubleshooting section, or the
help section in the "Clean Home+"
app for extensive and up-to-date
troubleshooting tips.
6 EN

» The air purier operates under
the auto-purication mode by
default.
» When the air purier is warming
up, "
" displays on the screen.
» After measuring the air
quality for approximately
30 seconds, the air quality
sensor automatically selects
the appropriate air quality light
color.
3 Touch and hold for 3 seconds to
switch o the air purier.
Note
• If the air purier stays connected
to the electrical outlet after turning
OFF, the air purier will operate
under the previous settings when
turned ON again.
• If the air purier accidentally
shuts o during running, it restarts
automatically and operates under
previous settings when the power
supply is resumed.
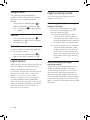
Changing the fan speed
There are several fan speeds available.
You can choose the auto-purication
mode, speed 1, 2, 3 or turbo mode (t).
Auto-purication mode
• Touch the fan speed button
repeatedly to select the auto-
purication mode (Fig. k).
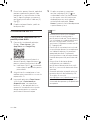
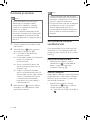
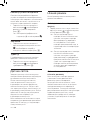
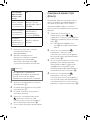
4 Using the air
purifier
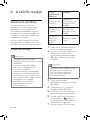
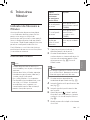
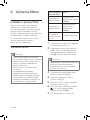
Understanding the air
quality light
Air quality light color Air quality level
Blue Good
Blue-Purple Fair
Purple-Red Poor
Red Very poor
The air quality light automatically goes
on when the air purier is switched on,
and lights up all colors in sequence.
After approximately 30 seconds, the
air quality sensors select the color that
corresponds to the surrounding air
quality of airborne particles.
Turning on and o
Note
• Always place the air purier on a
stable, horizontal, and level surface
with the front of the unit facing
away from walls or furniture.
• For optimum purication
performance, close doors and
windows.
• Keep curtains away from the air inlet
or air outlet.
1 Put the plug of the air purier in the
power socket.
2 Touch to switch on the air purier
(Fig. j).
» The air purier beeps.
7EN
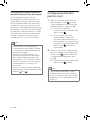
English

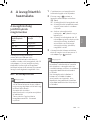
Night sensing mode
You can activate the night sensing
mode in two ways.
Activating the night sensing
mode manually
• Before you go to sleep, touch
manually to activate the night
sensing mode (Fig. o).
» If the air quality light is blue,
the air purier directly goes to
the night sensing mode. The air
purier operates quietly and the
air quality light will be dimmed.
» If the air quality light is not blue,
the air purier operates under
turbo mode for a maximum of
10 minutes, the air quality light
blinks slow during this time, and
then goes to the night sensing
mode.
Auto activating the night
sensing mode
When the air purier operates in auto
mode or allergen mode, if the light
sensor detects the lights in your room
are turned o, the air purier goes to
the night sensing mode automatically.
The air purier will adjust the fan speed
in real-time to make sure the air in your
room is good. The air quality light will be
dimmed.
Allergen mode
The specially designed allergen
mode can eectively reduce common
allergens such as pollen and pet
dander.
• Touch the fan speed button
to
select the Allergen mode (Fig. l).
» Auto (A) and
display on the
screen.
Manual
• Touch the fan speed button
repeatedly to select the fan speed
you need (Fig. m).
Turbo (t)
In turbo mode, the air purier operates
on the highest speed.
• Touch the fan speed button
to
select the turbo mode (t) (Fig. n).
Light sensor
With the light sensor, the air purier can
work according to the ambient light.
When the ambient light dims for
10 seconds, all the lights on the control
panel will turn o slowly. During this
period, you can touch any of the
buttons, all lights will turn on again. If
you don't perform other operations
within 10 seconds, all lights will turn o.
After the ambient light becomes bright
and lasts at least for 10 seconds, all
lights will turn on again.
8 EN

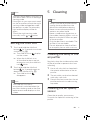
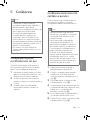
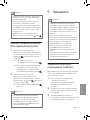
5 Cleaning
Note
• Always turn the air purier o and
unplug the air purier from the
electrical outlet before cleaning.
• Never immerse the air purier in
water or any other liquid.
• Never use abrasive, aggressive, or
ammable cleaning agents such as
bleach or alcohol to clean any part
of the air purier.
• Only the pre-lter is washable. The
air lter is not washable.
• Do not attempt to clean the lters
or air quality sensor with a vacuum.
Cleaning the body of the
air purier
Regularly clean the inside and outside
of the air purier to prevent dust from
collecting.
1 Use a soft, dry cloth to clean both
the interior and exterior of the air
purier.
2 The air outlet can also be cleaned
with a dry, soft cloth.
3 Detach the front cover from the air
purier and wash it under running
tap water.
Cleaning the air quality
sensor
Clean the air quality sensor every
2 months for optimal functioning of the
purier.
Note
• The light sensor detects the lights in
your room after 11 hours in the night
sensing mode.
• If the lights in your room are turned
on, the air purier will quit the night
sensing mode and operate under
the previous mode. The air quality
light and the display will be on
again.
• To exit the night sensing mode
manually, touch or button.
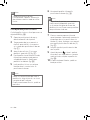
Setting the child lock
1
Touch and hold the child lock
button
for 3 seconds to activate
child lock (Fig. p).
» The child lock icon
displays
on the screen.
» When the child lock is on,
all the other buttons are not
responsive, only the child lock
icon
blinks.
2 Touch and hold the child lock
button
for 3 seconds again to
deactivate child lock (Fig. q).
» The child lock icon
disappears.
Note
• The child lock function is
automatically unlocked when the
pre-lter cleaning code or the lter
replacement code displays on the
screen.
9EN
English

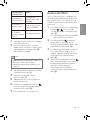
3 Press the clip down (1) and pull the
pre-lter towards you (2) (Fig. d).
4 If the pre-lter is very dirty, use a soft
brush to brush away the dust. Then
wash the pre-lter under running
tap water (Fig. w).
5 Allow the pre-lter to air dry
thoroughly before placing back in
the air purier.
Note
• To optimize the lifetime of the pre-
lter, make sure it dries completely
after cleaning.
• Wash your hands after handling the
lter.
6 Put the pre-lter back into the air
purier (Fig. h).
Note
• Make sure the side with the clip is
pointing towards you, and that all
hooks of the pre-lter are properly
attached to the air purier.
7 To reattach the front panel, press
the top part of the panel onto the
top of the air purier (1). Then, gently
push the panel against the body of
the air purier (2) (Fig. i).
8 Put the plug of the air purier in the
power socket.
9 Touch and hold the for
3 seconds to reset the pre-lter
cleaning time (Fig. x).
10 Wash your hands thoroughly after
installing lters.
Note
• If the air purier is used in a dusty
environment, it may need to be
cleaned more often.
• If the humidity level in the room
is very high, condensation may
develop on the air quality sensor
and the air quality light may indicate
a more poor air quality even though
the air quality is actually good. If this
occurs, clean the air quality sensor
or use the air purier on a manual
speed setting.
1 Switch o the air purier and
unplug from the power socket.
2 Clean the air quality sensor inlet
and outlet with a soft brush
(Fig. r).
3 Open the air quality sensor cover
(Fig. s).
4 Clean the air quality sensor, the
dust inlet and the dust outlet with a
damp cotton swab (Fig. t).
5 Dry all parts thoroughly with a dry
cotton swab.
6 Reattach the air quality sensor
cover (Fig. u).
Note
• Always keep air quality cover closed
while the air purier is working.
Cleaning the pre-lter
Clean the pre-lter when F0 is displayed
on the screen (Fig. v).
1 Switch o the air purier and
unplug from the power socket.
2 Pull the bottom part of the front
panel and then gently lift to remove
it from the air purier (Fig. c).
10 EN

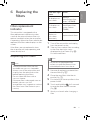
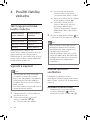
Filter alert light
status
Action
A3 displays on
the screen
Replace
NanoProtect lter
Series 3 (FY1410)
C7 displays on
the screen
Replace
NanoProtect lter
Active Carbon
(FY1413)
A3 and C7
display on
the screen
alternately
Replace both lters
1 Turn o the air purier and unplug
from the power socket.
2 Take out the used air lter according
to the lter alert light status
displayed on the screen (Fig. y).
Discard used lters.
Note
• Do not touch the pleated lter
surface, or smell the lter as it has
collected pollutants from the air.
3 Remove all packaging material from
the new lter (Fig. f).
4 Place the new lters into the air
purier (Fig. g).
5 Put the plug of the air purier in the
power socket.
6 Touch and hold the for 3 seconds
to reset the lter lifetime counter
(Fig. z).
7 Wash your hands after changing a
lter.
6 Replacing the
filters
Filter replacement
indicator
This air purier is equipped with a
lter replacement indicator to make
sure that the air purication lter is in
optimal condition when the air purier
is operating. When the lters need to be
replaced, the lter code displays on the
screen.
If the lters are not replaced in time,
the air purier will stop operating and
automatically lock.
Replacing the lters
Note
• The air purication lters are not
washable nor vacuum cleanable.
• Always turn o the air purier and
unplug from the electrical outlet
before replacing the lters.
• Do not clean the lters with a
vacuum cleaner.
• If the pre-lter is damaged, worn or
broken, do not use. Visit
www.philips.com/support or contact
the Consumer Care Center in your
country.
11EN
English

7 Storage
1 Turn o the air purier and unplug
from the power socket.
2 Clean the air purier, air quality
sensor and pre-lter (see chapter
‘Cleaning’).
3 Let all parts dry thoroughly before
storing.
4 Wrap the lter and pre-lter
separately in air tight plastic bags.
5 Store the air purier, the lter and
pre-lter in a cool, dry location.
6 Always thoroughly wash hands after
handling lters.
Filter reset
You can replace lters even if there is
no lter replacement code displayed on
the screen. After replacing a lter, you
need to reset the lter lifetime counter
manually.
1 Touch and simultaneously for
3 seconds to enter the lter reset
mode (Fig. {).
» Code (A3) of the NanoProtect
lter Series 3 displays on the
screen.
2 Touch and hold for 3 seconds to
force reset the lter lifetime counter
of the NanoProtect lter Series 3
(Fig. z).
3 Code (C7) of the Nanoprotect lter
Active Carbon displays on the
screen after the lifetime counter of
the NanoProtect lter Series 3 has
been reset (Fig. |).
4 Touch and hold for 3 seconds to
force reset the lter lifetime counter
of the NanoProtect lter Active
Carbon and exit the lter reset
mode (Fig. }).
12 EN

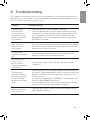
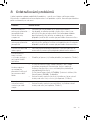
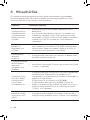
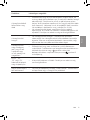
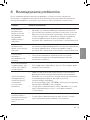
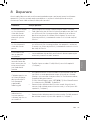
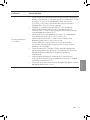
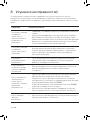
8 Troubleshooting
This chapter summarizes the most common problems you could encounter with the
appliance. If you are unable to solve the problem with the information below, contact
the Consumer Care Center in your country.
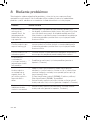
Problem Possible solution
The air purier
does not work
even though it is
plugged in to the
power socket and
switched on.
• Check if the front cover is properly installed.
• The lter replacement code has been displaying on the
screen but you have not replaced the corresponding lter
yet. The appliance will be locked if you keep using the
expired lter. In this case, replace the lter and reset the
lter lifetime counter.
The air purier
does not work
even though it is
switched on.
• The lter replacement indicator has been on continuously
but you have not replaced the corresponding lter, and the
air purier is now locked. In this case, replace the lter and
reset the lter lifetime counter.
The air purier
accidentally powers
o.
• The air purier restarts automatically and goes to the
previous mode when the power resumes.
The airow that
comes out of
the air outlet is
signicantly weaker
than before.
• The pre-lter is dirty. Clean the pre-lter (see chapter
"Cleaning").
The air quality
does not improve,
even though the air
purier has been
operating for a long
time.
• One of the lters has not been placed in the air purier or
the lter is not placed properly. Make sure that all lters are
properly installed in the following order, starting with the
innermost lter:
1) NanoProtect lter Series 3 (FY1410); 2) NanoProtect lter
Active Carbon (FY1413) 3) pre-lter.
• The air quality sensor is wet. Make sure that the air quality
sensor is clean and dry (see chapter "Cleaning").
The color of the air
quality light always
stays the same.
• The air quality sensor is dirty. Clean the air quality sensor
(see chapter "Cleaning").
13EN
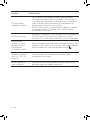
English

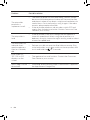
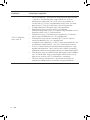
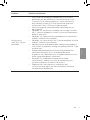
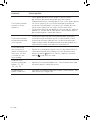
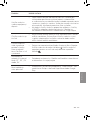
Problem Possible solution
The air purier
produces a
unpleasant smell.
• The lter may produce smell after being used for a while
because of the absorption of indoor air. Remove the lter
and place it where it has direct sunlight and ventilation for
several hours. Re-install and try using it again. If the odor
remains, please replace the lter.
• If the air purier produces a burnt odor, switch OFF and
unplug from the electrical outlet. Contact Consumer Care
Center in your country.
The air purier is
loud.
• If the air purier is too loud, change the fan speed to a
lower fan speed level. When using the air purier in a
bedroom at night, choose the night sensing mode or select
a lower fan speed level.
The air purier still
indicates that I
need to replace a
lter, but I already
did.
• Perhaps you did not reset the lter lifetime counter. Plug
in the air purier, touch
to switch on the air purier, and
touch and hold the
for 3 seconds.
Error codes "E1",
"E2", "E3" or "E4"
displays on the
screen.
• The appliance has malfunctions. Contact the Consumer
Care Center in your country.
Which app I should
download?
• Download and install the Philips "Clean Home+" app from
the App Store or Google Play.
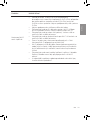
14 EN

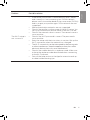
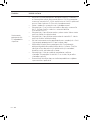
Problem Possible solution
The Wi-Fi setup is
not successful.
• If the router your purier is connected to is dual – band
and currently it is not connecting to a 2.4GHz network,
please switch to another band of the same router (2.4GHz)
and try to pair your purier again. 5GHz networks are not
supported.
• Web authentication networks are not supported.
• Check if the purier is within range of the Wi-Fi router. You
can try to locate the air purier closer to the Wi-Fi router.
• Check if the network name is correct. The network name is
case-sensitive.
• Check if the Wi-Fi password is correct. The password is
case-sensitive.
• Retry the setup with the instructions in section ‘Set up the
Wi-Fi connection when the network has changed’.
• The Wi-Fi connectivity can be interrupted by electromagnetic
or other interferences. Keep the appliance away from other
electronic devices that may cause interferences.
• Check if the mobile device is in airplane mode. Make sure
to have the airplane mode deactivated when connecting
to the Wi-Fi network.
• Consult the help section in the App for extensive and up-
to-date troubleshooting tips.
15EN
English

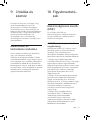
9 Guarantee and
service
If you need information or if you have a
problem, please visit the Philips website
at www.philips.com or contact the
Philips Consumer Care Center in your
country (you nd its phone number
in the worldwide guarantee leaet). If
there is no Consumer Care Centre in
your country, go to your local Philips
dealer.
Order parts or
accessories
If you have to replace a part or want to
purchase an additional part, go to your
Philips dealer or visit
www.philips.com/support.
If you have problems obtaining the
parts, please contact the Philips
Consumer Care Center in your country
(you can nd its phone number in the
worldwide guarantee leaet).
10 Notices
Electromagnetic elds
(EMF)
This Philips appliance complies with all
applicable standards and regulations
regarding exposure to electromagnetic
elds.
Compliance with EMF
Koninklijke Philips N.V. manufactures
and sells many products targeted at
consumers, which, like any electronic
apparatus, in general have the ability
to emit and receive electromagnetic
signals.
One of Philips' leading Business
Principles is to take all necessary health
and safety measures for our products,
to comply with all applicable legal
requirements and to stay well within the
EMF standards applicable at the time of
producing the products.
Philips is committed to develop,
produce and market products that
cause no adverse health eects. Philips
conrms that if its products are handled
properly for their intended use, they
are safe to use according to scientic
evidence available today.
Philips plays an active role in the
development of international EMF
and safety standards, enabling Philips
to anticipate further developments in
standardization for early integration in
its products.
16 EN

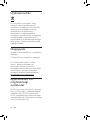
Recycling
This symbol means that this product
shall not be disposed of with normal
household waste (2012/19/EU).
Follow your country’s rules for the
separate collection of electrical and
electronic products. Correct disposal
helps prevent negative consequences
for the environment and human health.
Notice
App Store is a service mark of Apple Inc.
Google Play is a trademark of Google
Inc.
This Philips appliance and Clean
Home+ app applied multiple open
source softwares, Copies of open
source software license text used in this
product can be derived from website-
www.philips.com/cleanhome.
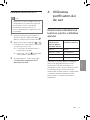
Simplied EU declaration
of conformity
Hereby, Philips Consumer Lifestyle B.V.
declares that the radio equipment type
AC1214 is in compliance with Directive
2014/53/EU. The full text of the EU
declaration of conformity is available at
the following internet address:
www.philips.com.
17EN
English

Obsah
1 Důležité 19
Bezpečnost 19
2 Vaše čistička vzduchu 22
Přehled výrobku (obr. a) 22
Přehled ovládacích prvků
(obr. b) 22
3 Začínáme 22
Instalace ltrů 22
Připojení Wi-Fi 23
4 Použití čističky vzduchu 24
Jak funguje kontrolka kvality
vzduchu 24
Vypnutí a zapnutí 24
Změna rychlosti ventilátoru 24
Světelný senzor 25
Noční režim 25
Nastavení dětské pojistky 26
5 Čištění 26
Čištění těla čističky 26
Čištění snímače kvality vzduchu 27
Čištění předltru 27
6 Výměna ltrů 28
Indikátor výměny ltru 28
Výměna ltrů 28
Resetování ltru 29
18 CS
7 Uskladnění 30
8 Odstraňování problémů 31
9 Záruka a servis 34
Objednání dílů nebo doplňků 34
10 Upozornění 34
Elektromagnetická pole (EMP) 34
Recyklace 35
Oznámení 35
Zjednodušené EU prohlášení
o shodě 35
Strona się ładuje...
Strona się ładuje...
Strona się ładuje...
Strona się ładuje...
Strona się ładuje...
Strona się ładuje...
Strona się ładuje...
Strona się ładuje...
Strona się ładuje...
Strona się ładuje...
Strona się ładuje...
Strona się ładuje...
Strona się ładuje...
Strona się ładuje...
Strona się ładuje...
Strona się ładuje...
Strona się ładuje...
Strona się ładuje...
Strona się ładuje...
Strona się ładuje...
Strona się ładuje...
Strona się ładuje...
Strona się ładuje...
Strona się ładuje...
Strona się ładuje...
Strona się ładuje...
Strona się ładuje...
Strona się ładuje...
Strona się ładuje...
Strona się ładuje...
Strona się ładuje...
Strona się ładuje...
Strona się ładuje...
Strona się ładuje...
Strona się ładuje...
Strona się ładuje...
Strona się ładuje...
Strona się ładuje...
Strona się ładuje...
Strona się ładuje...
Strona się ładuje...
Strona się ładuje...
Strona się ładuje...
Strona się ładuje...
Strona się ładuje...
Strona się ładuje...
Strona się ładuje...
Strona się ładuje...
Strona się ładuje...
Strona się ładuje...
Strona się ładuje...
Strona się ładuje...
Strona się ładuje...
Strona się ładuje...
Strona się ładuje...
Strona się ładuje...
Strona się ładuje...
Strona się ładuje...
Strona się ładuje...
Strona się ładuje...
Strona się ładuje...
Strona się ładuje...
Strona się ładuje...
Strona się ładuje...
Strona się ładuje...
Strona się ładuje...
Strona się ładuje...
Strona się ładuje...
Strona się ładuje...
Strona się ładuje...
Strona się ładuje...
Strona się ładuje...
Strona się ładuje...
Strona się ładuje...
Strona się ładuje...
Strona się ładuje...
Strona się ładuje...
Strona się ładuje...
Strona się ładuje...
Strona się ładuje...
Strona się ładuje...
Strona się ładuje...
Strona się ładuje...
Strona się ładuje...
Strona się ładuje...
Strona się ładuje...
Strona się ładuje...
Strona się ładuje...
Strona się ładuje...
Strona się ładuje...
Strona się ładuje...
Strona się ładuje...
Strona się ładuje...
Strona się ładuje...
Strona się ładuje...
Strona się ładuje...
Strona się ładuje...
Strona się ładuje...
Strona się ładuje...
Strona się ładuje...
Strona się ładuje...
Strona się ładuje...
Strona się ładuje...
Strona się ładuje...
Strona się ładuje...
Strona się ładuje...
Strona się ładuje...
Strona się ładuje...
Strona się ładuje...
Strona się ładuje...
Strona się ładuje...
Strona się ładuje...
Strona się ładuje...
Strona się ładuje...
-
 1
1
-
 2
2
-
 3
3
-
 4
4
-
 5
5
-
 6
6
-
 7
7
-
 8
8
-
 9
9
-
 10
10
-
 11
11
-
 12
12
-
 13
13
-
 14
14
-
 15
15
-
 16
16
-
 17
17
-
 18
18
-
 19
19
-
 20
20
-
 21
21
-
 22
22
-
 23
23
-
 24
24
-
 25
25
-
 26
26
-
 27
27
-
 28
28
-
 29
29
-
 30
30
-
 31
31
-
 32
32
-
 33
33
-
 34
34
-
 35
35
-
 36
36
-
 37
37
-
 38
38
-
 39
39
-
 40
40
-
 41
41
-
 42
42
-
 43
43
-
 44
44
-
 45
45
-
 46
46
-
 47
47
-
 48
48
-
 49
49
-
 50
50
-
 51
51
-
 52
52
-
 53
53
-
 54
54
-
 55
55
-
 56
56
-
 57
57
-
 58
58
-
 59
59
-
 60
60
-
 61
61
-
 62
62
-
 63
63
-
 64
64
-
 65
65
-
 66
66
-
 67
67
-
 68
68
-
 69
69
-
 70
70
-
 71
71
-
 72
72
-
 73
73
-
 74
74
-
 75
75
-
 76
76
-
 77
77
-
 78
78
-
 79
79
-
 80
80
-
 81
81
-
 82
82
-
 83
83
-
 84
84
-
 85
85
-
 86
86
-
 87
87
-
 88
88
-
 89
89
-
 90
90
-
 91
91
-
 92
92
-
 93
93
-
 94
94
-
 95
95
-
 96
96
-
 97
97
-
 98
98
-
 99
99
-
 100
100
-
 101
101
-
 102
102
-
 103
103
-
 104
104
-
 105
105
-
 106
106
-
 107
107
-
 108
108
-
 109
109
-
 110
110
-
 111
111
-
 112
112
-
 113
113
-
 114
114
-
 115
115
-
 116
116
-
 117
117
-
 118
118
-
 119
119
-
 120
120
-
 121
121
-
 122
122
-
 123
123
-
 124
124
-
 125
125
-
 126
126
-
 127
127
-
 128
128
-
 129
129
-
 130
130
-
 131
131
-
 132
132
-
 133
133
-
 134
134


Philips AC1214/10 Instrukcja obsługi
- Kategoria
- Oczyszczacze powietrza
- Typ
- Instrukcja obsługi
- Niniejsza instrukcja jest również odpowiednia dla
w innych językach
- slovenčina: Philips AC1214/10 Používateľská príručka
- română: Philips AC1214/10 Manual de utilizare
Powiązane artykuły
-
Philips AC1214/10 Instrukcja obsługi
-
-
Philips AC1215/50 Instrukcja obsługi
-
-
-
-
-
-
-
Inne dokumenty
-
 NEO TOOLS 90-121 Instrukcja obsługi
-
Truelife AIR Purifier P5 WiFi Instrukcja obsługi
-
Truelife 132546 Instrukcja obsługi
-
-
Hoover HHP30C011 Instrukcja obsługi
-
Electrolux WA71-305DG Instrukcja obsługi
-
Hoover HHP55CA011 Instrukcja obsługi
-
Hyundai HYUAP235 Instrukcja obsługi
-
 Bluewater Pro 600C-HF Instrukcja obsługi

