
OWNER’S MANUAL
BASS COMBO AMPLIFIERS
BC10 BC20 BC40
BC80 BC150
Family Owned ◊ Solar Powered ◊ Sustainably Manufactured in a Green Environment


INDEX
Introduction 5
Safety Instructions 6
Product Information
BC10 8
BC20 10
BC40 12
BC80 14
BC150 16
Troubleshooting 18


INTRODUCTION
A series of compact amplifiers for Bass instruments like nothing you have seen or heard before. These full frequency,
extended headroom, integrated combo amps could be used for virtually any amplified instrument but are specifically tuned
to the unique needs of Electric and Upright Bassists.
Our considerations in these amp designs were multifold and our objectives are to provide:
• An affordable amplier for the discerning musician.
• A gigging amplier for the seasoned professional.
• A teacher’s amp where both the student and the teacher can plug in simultaneously while playing musical examples
with a music player through the auxiliary input.
• An amp for rehearsals, where space and sound levels are limited.
Here is a short explanation of the underlying design concepts.
CLASS A OPERATION
Class A amplifiers are typically more linear and as such are less complex than other amplifier classes. In Class A amplifiers, the
amplification circuitry is designed so that it is always conducting electrical current. This means that the active elements are always on,
thus avoiding the problem of crossover distortion.
LOW-Z CIRCUITRY
Thermal noise is a critical design issue when it comes to audio electronics. By lowering the impedance of components inside an
electronic circuit, the overall thermal noise is substantially reduced. The Low-Z circuitry inside all of our amplifiers makes it possible to
achieve consistently noise-free operation.
DYNAMIC DISTORTION LIMITER
TM
Distortion occurs when an amplifier works beyond its range, when the power supply cannot supply the power any more to
take the amp higher. A common method to control distortion in amps is to use a limiter, a device that stops the signal going
beyond a specific level. Audio limiters work by setting a threshold signal level where the circuit kicks in and keeps signal
levels within the capabilities of the power supply. This method is not very precise and often causes audible effects such as
pumping and thumps.
We designed a circuit that instead reads the distortion level in the power amp and starts limiting as soon as the amp shows
even miniscule amounts of distortion. This means our amps always stay within 0.3% distortion (THD) when most amps are
rated at between 5-10% distortion (that means that to get your 20 Watt out of a 20 Watt amp you will get it audibly distorted
and if you want a clean signal the power will be a lot less). There are desirable types of distortion, but these are not usually
associated with transistor ampliers, but more commonly associated with tube amps and effect pedals. Warwick’s goal is to
give the user a great, clean sound allowing the user to decide how much, and what kind of distortion to employ.
INTEGRATED SPEAKER DESIGN
All the speaker drivers and cabinets have been designed in tandem with the electronics to create units that work together
efficiently. Careful consideration has been taken to modify all parameters, thereby achieving the best results in sound and
performance. All components reflect a custom designed solution to give the end user optimum control over his/her tone,
volume and configuration.
5

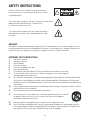
SAFETY INSTRUCTIONS
Caution: To reduce the risk of electrical shock, do not remove the
cover as there are no user serviceable parts inside. Refer servicing
to qualified personnel.
This symbol, wherever it appears, alerts you to the presence of noninsulated
dangerous voltage inside the enclosure - voltage that may
be sufficient to constitute risk of shock.
This symbol, wherever it appears, alerts you to important operating
and maintenance instructions in the accompanying literature. Read
the manual.
WARNING!
This amplifier is capable of producing high sound pressure levels. Continued exposure to these high sound pressure levels
can cause permanent and irreversible hearing damage. Ear protection is recommended if unit is operated at high volume for
long period of time. If you experience any hearing loss or ringing in the ears you should consult a doctor.
IMPORTANT SAFETY INSTRUCTIONS
1. Read these instructions
2. Keep these instructions
3. Heed all warnings
4. Follow all instructions
5. Do not use this apparatus near water
6. Clean only with dry cloth.
7. Do not block any ventilation openings. Install in accordance with the manufacture’s instructions.
8. Do not install near any heat sources such as radiators, heat registers, stoves, or other apparatus
(including amplifiers) that produce heat.
9. Do not defeat the safety purpose of the polarized or grounding plug. A polarized plug has two blades with one wider
than the other. A grounding plug has two blades and a third grounding prong. The wide blade or the third prong is
provided for your safety. If the provided plug does not fit into your outlet, consult an electrician for replacement of the
obsolete outlet.
10. Protect the power cord from being walked on or pinched particularly at the plugs, convenience receptacles, and at the
point where they exit from the apparatus.
11. Only use attachments/accessories specified by the manufacturer.
12. Use only with the cart, stand, tripod, bracket, or table specified by the manufacturer, or sold with
the apparatus. When a cart or rack is used, use caution when moving the cart/apparatus
combination to avoid injury from tip-over.
13. Unplug the apparatus during lightning storms or when unused for long periods of time.
14. Refer all servicing to qualified personnel. Servicing is required when the apparatus has been damaged in any way,
such as power supply cord or plug is damaged, liquid has been spilled or objects have fallen into the apparatus has
been exposed to rain or moisture, does not operate normally, or has been dropped.
6

IMPORTANT SAFETY INSTRUCTIONS
1. Read these instructions
2. Keep these instructions
3. Heed all warnings
4. Follow all instructions
5. Do not use this apparatus near water
6. Clean only with dry cloth.
7. Do not block any ventilation openings. Install in accordance with the manufacture’s instructions.
8. Do not install near any heat sources such as radiators, heat registers, stoves, or other apparatus
(including amplifiers) that produce heat.
9. Do not defeat the safety purpose of the polarized or grounding plug. A polarized plug has two blades with one wider
than the other. A grounding plug has two blades and a third grounding prong. The wide blade or the third prong is
provided for your safety. If the provided plug does not fit into your outlet, consult an electrician for replacement of the
obsolete outlet.
10. Protect the power cord from being walked on or pinched particularly at the plugs, convenience receptacles, and at the
point where they exit from the apparatus.
11. Only use attachments/accessories specified by the manufacturer.
12. Use only with the cart, stand, tripod, bracket, or table specified by the manufacturer, or sold with
the apparatus. When a cart or rack is used, use caution when moving the cart/apparatus
combination to avoid injury from tip-over.
13. Unplug the apparatus during lightning storms or when unused for long periods of time.
14. Refer all servicing to qualified personnel. Servicing is required when the apparatus has been damaged in any way,
such as power supply cord or plug is damaged, liquid has been spilled or objects have fallen into the apparatus has
been exposed to rain or moisture, does not operate normally, or has been dropped.
15. WARNING: To reduce the risk of fire or electric shock, do not expose this apparatus to rain or moisture.
The apparatus shall not be exposed to dripping or splashing and that objects filled with liquids, such as vases,
shall not be placed on apparatus.
16. Never set the amplifier on a support that might give out under its weight.
17. WARNING: The mains plug used as disconnect device, the disconnect device shall remain readily operable.
18. Replace fuse with rated value, never bridge defective fuses. Before changing fuse disconnect power cable from unit!
19. Correct Disposal of this product. This marking indicates that this product should not be disposed
with other household wastes throughout the EU. To prevent possible harm to the environment or human
health from uncontrolled waste disposal, recycle it responsibly to promote the sustainable reuse of material
resources. To return your used device, please use the return and collection systems or contact the retailer where the
product was purchased. They can take this product for environmental safe recycling.
FOR BC10, BC20, BC40, and BC80:
These amplifiers are double insulated electrical appliances whereas BC150 has a protective earthing/grounding
connection and will be discussed in the next chapter.
This equipment is a Class II or double insulated electrical appliance. It has been designed in such a way that it does not
require a safety connection to electrical earth (grounding).
FOR BC150:
1. The apparatus should be connected to a mains socket outlet with a protective earthing/grounding connection.
2. Replace fuse with identically rated fuse and never bridge defective fuses. Before changing fuse, disconnect
power cable from unit!
7

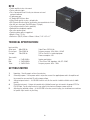
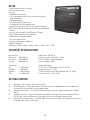
BC10
• Combo amplier for bass instruments
• Passive and active inputs
• Class-A preamp with Low-Z circuitry for minimum noise and
maximum headroom
• 10 watt power amp
• 8” Warwick WXC 8/8 bass driver
• 3-Way EQ with controls for bass, mid and treble
• DDL (Dynamic Distortion Limiter) for distortion-free reproduction at all levels
• Aux mini jack stereo input (iPod, MP3 player, CD player)
• Self-cooling construction (fanless operation)
• Dedicated stereo headphone amplier
• Bass reex speaker cabinet
• Protective speaker grille of rugged steel
• Weight: 6,5 kgs / 13.2 lbs.
• Dimensions: (W/H/D) 320mm x 250mm x 220mm / 12.6” x 9.8” x 8.7”
TECHNICAL SPECIFICATIONS:
Input sensitivity:
Active input: 360mV/50K Ω Output Power: 10W @ 8 Ω
Passive input: 110mV/500K Ω Frequency response: 20Hz-20kHz +/-0.5 dB
Aux input: 750mV/50K Ω THD less than 0.3% at rated output power
Power consumption: 22W
Tone controls:
Bass: +/- 12dB @ 60Hz Speaker specifications:
Mid: +/- 12dB @ 800Hz 8” Bass Driver: 10W, Impedance: 8 Ω, SPL: 90 dB,
Treble: +/- 12dB @ 10kHz Frequency response: 80Hz - 10kHz
GETTING STARTED
1. Unpacking – Carefully unpack unit from the carton box.
2. Connecting to power – Set the power switch in off position, connect the supplied power cord to the amplifier and
then connect the same cord into AC outlet of proper voltage.
3. Setting front panel controls – Set VOLUME control to zero, all other controls should be settled to neutral, middle
position.
4. Connecting instrument – Using an instrumental cable (shielded) connect your instrument to the proper ACTIVE or
PASSIVE input. Turn all volume controls of your guitar to their maximum. Now press power switch on.
5. Adjusting your individual settings – Set the VOLUME to the value you wish to play, you should now hear sound from
the speaker. Adjust controls to your liking.
8

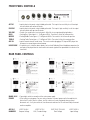
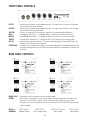
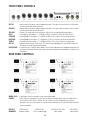
FRONT PANEL CONTROLS
ACTIVE – Input to plug in instrument using shielded guitar cable. This input is low sensitivity to suit the output
from instruments with active electronics.
PASSIVE – Input to plug in instrument using shielded guitar cable. This input is high sensitivity to suit the output
from instruments with passive electronics.
VOLUME – Controls the sound level of your instrument. Adjust this for your preferred playing loudness.
BASS – Shelving Bass Control gives +/- 12 dB gain at 60 Hz. The control is flat at the center position.
MIDDLE – Peaking Middle Control gives +/- 12 dB gain at 800 Hz. The control is at at the center position.
TREBLE – Shelving Treble Control gives +/- 12 dB gain at 10 kHz. The control is flat at the center position.
AUX IN – Input to connect external sound source. This can be used for plugging a CD, tape or MP3 player into
the amp or for connecting an external preamp.
HEADPHONE – For practice use in situations when speakers are too loud. Dedicated Stereo Headphone amp where the
aux input will be played back in stereo and the instrument signal will be reproduced in the center of the
stereo field.
REAR PANEL CONTROLS
MAINS IN AC – Figure-eight socket for connection to the mains power supply.
POWER – On/off switch for main power. For your safety, remember to connect power cord to the amplifier first,
then to the AC outlet. After this is done, turn this switch on. It works backwards when you want
disconnect unit – firstly turn switch off, then disconnect cord from the AC outlet and finally disconnect
cord from amplifier.
9
W BC 10 230 V
European Voltage
W BC 10 115 V
USA / Canada Voltage
W BC 10 DV 115/230 V
Brazil Voltage
W BC 10 100 V
Japan Voltage
ARTICLE
NUMBERS

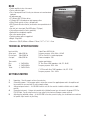
BC20
• Combo amplier for bass instruments
• Passive and active inputs
• Class-A preamp with Low-Z circuitry for minimum noise and maximum
headroom
• 20 watt power amp
• 8” Warwick WXC 8/8 bass driver
• 2” Warwick WTR 2/8 neodymium high-frequency driver
• 3-Way EQ with controls for bass, mid and treble
• DDL (Dynamic Distortion Limiter) for distortion-free reproduction at
all levels
• Aux mini jack stereo input (iPod, MP3 player, CD player)
• Self-cooling construction (fanless operation)
• Dedicated stereo headphone amplier
• Bass reex speaker cabinet
• Protective speaker grille of rugged steel
• Weight: 9kgs/19.8lbs.
• Dimensions: (W/H/D) 310mm x 390mm x 370mm / 12.20” x 15.35” x 14.56”
TECHNICAL SPECIFICATIONS:
Input sensitivity: Output Power: 20W @ 8 Ω
Active input: 360mV/50K Ω Frequency response: 20Hz-20kHz +/-0.5 dB
Passive input: 110mV/500K Ω THD less than 0.3% at rated output power
Aux input: 750mV/50K Ω Power consumption: 43W
Tone controls: Speaker specifications:
Bass: +/- 12dB @ 60Hz 8” Bass Driver: 20W, Impedance: 8 Ω, SPL: 90 dB,
Mid: +/- 12dB @ 800Hz Frequency response: 80Hz - 10kHz
Treble: +/- 12dB @ 10kHz 2” HF Driver with Horn: 10W, Impedance: 8 Ω, SPL: 97 dB,
Frequency response: 1kHz - 20kHz
GETTING STARTED
1. Unpacking – Carefully unpack unit from the carton box.
2. Connecting to power – Set the power switch in off position, connect the supplied power cord to the amplifier and
then connect the same cord into AC outlet of proper voltage.
3. Setting front panel controls – Set VOLUME control to zero, all other controls should be settled to neutral, middle
position.
4. Connecting instrument – Using an instrumental cable (shielded) connect your instrument to the proper ACTIVE or
PASSIVE input. Turn all volume controls of your guitar to their maximum. Now press power switch on.
5. Adjusting your individual settings – Set the VOLUME to the value you wish to play, you should now hear sound from
the speaker. Adjust controls to your liking.
10

FRONT PANEL CONTROLS
ACTIVE – Input to plug in instrument using shielded guitar cable. This input is low sensitivity to suit the output
from instruments with active electronics.
PASSIVE – Input to plug in instrument using shielded guitar cable. This input is high sensitivity to suit the output
from instruments with passive electronics.
VOLUME – Controls the sound level of your instrument. Adjust this for your preferred playing loudness.
BASS – Shelving Bass Control gives +/- 12 dB gain at 60 Hz. The control is flat at the center position.
MIDDLE – Peaking Middle Control gives +/- 12 dB gain at 800 Hz. The control is at at the center position.
TREBLE – Shelving Treble Control gives +/- 12 dB gain at 10 kHz. The control is flat at the center position.
AUX IN – Input to connect external sound source. This can be used for plugging a CD, tape or MP3 player into
the amp or for connecting an external preamp.
HEADPHONE – For practice use in situations when speakers are too loud. Dedicated Stereo Headphone amp where the
aux input will be played back in stereo and the instrument signal will be reproduced in the center of the
stereo field.
REAR PANEL CONTROLS
MAINS IN AC – Figure-eight socket for connection to the mains power supply.
POWER – On/off switch for main power. For your safety, remember to connect power cord to the amplifier first,
then to the AC outlet. After this is done, turn this switch on. It works backwards when you want
disconnect unit – firstly turn switch off, then disconnect cord from the AC outlet and finally disconnect
cord from amplifier.
11
W BC 20 230 V
European Voltage
W BC 20 115 V
USA / Canada Voltage
W BC 20 DV 115/230 V
Brazil Voltage
W BC 20 100 V
Japan Voltage
ARTICLE
NUMBERS

BC40
• Combo amplier for bass Instruments
• Passive and active inputs
• Class-A preamp with Low-Z circuitry for minimum noise and maximum
headroom
• 40 watt power amp
• 10” Warwick WXC 10/8 bass driver
• 2
”
Warwick WTR 2/8 neodymium high-frequency driver
• 3-Way EQ with controls for bass, mid and treble
• DDL (Dynamic Distortion Limiter) for distortion-free reproduction at all
levels
• Aux mini jack stereo input (iPod, MP3 player, CD player)
• Self-cooling construction (fanless operation)
• Dedicated stereo headphone amplier
• Bass reex speaker cabinet
• Protective speaker grille of rugged steel
• Weight: 15kgs/33lbs.
• Dimensions: (W/H/D) 360mm x 440mm x 370mm / 14.17” x 17.32” x 14.56”
TECHNICAL SPECIFICATIONS:
Input sensitivity: Output Power: 40W @ 8 Ω
Active input: 380mV/50K Ω Frequency response: 20Hz-20kHz +/-0.5 dB
Passive input: 130mV/500K Ω THD less than 0.3% at rated output power
Aux input: 630mV/50K Ω Power consumption: 78W
Tone controls: Speaker specifications:
Bass: +/- 12dB @ 60Hz 10” Bass Driver: 40W, Impedance: 8 Ω, SPL: 89 dB,
Mid: +/- 12dB @ 800Hz Frequency response: 50Hz - 8kHz
Treble: +/- 12dB @ 10kHz
2” HF Driver with Horn: 10W, Impedance: 8 Ω, SPL: 97 dB,
Frequency response: 1kHz - 20kHz
GETTING STARTED
1. Unpacking – Carefully unpack unit from the carton box.
2. Connecting to power – Set the power switch in off position, connect the supplied power cord to the amplifier and
then connect the same cord into AC outlet of proper voltage.
3. Setting front panel controls – Set VOLUME control to zero, all other controls should be settled to neutral, middle
position.
4. Connecting instrument – Using an instrumental cable (shielded) connect your instrument to the proper ACTIVE or
PASSIVE input. Turn all volume controls of your guitar to their maximum. Now press power switch on.
5. Adjusting your individual settings – Set the VOLUME to the value you wish to play, you should now hear sound from
the speaker. Adjust controls to your liking.
12

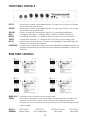
FRONT PANEL CONTROLS
ACTIVE – Input to plug in instrument using shielded guitar cable. This input is low sensitivity to suit the output
from instruments with active electronics.
PASSIVE – Input to plug in instrument using shielded guitar cable. This input is high sensitivity to suit the output
from instruments with passive electronics.
VOLUME – Controls the sound level of your instrument. Adjust this for your preferred playing loudness.
BASS – Shelving Bass Control gives +/- 12 dB gain at 60 Hz. The control is flat at the center position.
MIDDLE – Peaking Middle Control gives +/- 12 dB gain at 800 Hz. The control is at at the center position.
TREBLE – Shelving Treble Control gives +/- 12 dB gain at 10 kHz. The control is flat at the center position.
AUX IN – Input to connect external sound source. This can be used for plugging a CD, tape or MP3 player into
the amp or for connecting an external preamp.
HEADPHONE – For practice use in situations when speakers are too loud. Dedicated Stereo Headphone amp where the
aux input will be played back in stereo and the instrument signal will be reproduced in the center of the
stereo field.
REAR PANEL CONTROLS
MAINS IN AC – Figure-eight socket for connection to the mains power supply.
POWER – On/off switch for main power. For your safety, remember to connect power cord to the amplifier first,
then to the AC outlet. After this is done, turn this switch on. It works backwards when you want
disconnect unit – firstly turn switch off, then disconnect cord from the AC outlet and finally disconnect
cord from amplifier.
13
W BC 40 230 V
European Voltage
W BC 40 115 V
USA / Canada Voltage
W BC 40 DV 115/230 V
Brazil Voltage
W BC 40 100 V
Japan Voltage
ARTICLE
NUMBERS

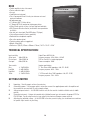
BC80
• Combo amplier for bass Instruments
• Passive and active inputs
• Line out
• Send/Return on front panel
• Class-A preamp with Low-Z circuitry for minimum noise and
maximum headroom
• 80 watt power amp
• 12” Warwick WXC 12/8 bass driver
• 2” Warwick WTR 2/8 neodymium highfrequency driver
• 4-Way EQ with controls for bass, low-mid, high-mid and treble
• DDL (Dynamic Distortion Limiter) for distortion-free reproduction
at all levels
• Aux mini jack stereo input (iPod, MP3 player, CD player)
• Self-cooling construction (fanless operation)
• Dedicated stereo headphone amplier
• Bass reex speaker cabinet
• Protective speaker grille of rugged steel
• Weight: 20kgs/44lbs.
• Dimensions: (W/H/D) 410mm x 490mm x 370mm / 16.14” x 19.29” x 14.56”
TECHNICAL SPECIFICATIONS:
Input sensitivity: Output Power: 80W @ 8 Ω
Active input: 380mV/50K Ω Frequency response: 20Hz-20kHz +/-0.5 dB
Passive input: 130mV/500K Ω THD less than 0.3% at rated output power
Aux input: 630mV/50K Ω Power consumption: 160W
Tone controls: Speaker specifications:
Bass: +/- 12dB @ 60Hz 12” Bass Driver: 80W, Impedance: 8 Ω, SPL: 94 dB,
Low Mid: +/- 8dB @ 800Hz Frequency response: 80Hz - 10kHz
High Mid: +/- 8dB @ 2500Hz
Treble: +/- 12dB @ 10kHz 2” HF Driver with Horn: 10W, Impedance: 8 Ω, SPL: 97 dB,
Frequency response: 1kHz - 20kHz
GETTING STARTED
1. Unpacking – Carefully unpack unit from the carton box.
2. Connecting to power – Set the power switch in off position, connect the supplied power cord to the amplifier and
then connect the same cord into AC outlet of proper voltage.
3. Setting front panel controls – Set VOLUME control to zero, all other controls should be settled to neutral, middle
position.
4. Connecting instrument – Using an instrumental cable (shielded) connect your instrument to the proper ACTIVE or
PASSIVE input. Turn all volume controls of your guitar to their maximum. Now press power switch on.
5. Adjusting your individual settings – Set the VOLUME to the value you wish to play, you should now hear sound from
the speaker. Adjust controls to your liking.
14

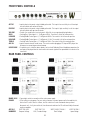
FRONT PANEL CONTROLS
ACTIVE – Input to plug in instrument using shielded guitar cable. This input is low sensitivity to suit the output
from instruments with active electronics.
PASSIVE – Input to plug in instrument using shielded guitar cable. This input is high sensitivity to suit the output
from instruments with passive electronics.
VOLUME – Controls the sound level of your instrument. Adjust this for your preferred playing loudness.
BASS – Shelving Bass Control gives +/- 12 dB gain at 60 Hz. The control is flat at the center position.
LOW MID – Peaking Middle Control gives +/- 12 dB gain at 800 Hz. The control is at at the center position.
HIGH MID – Peaking Middle Control gives +/- 12 dB gain at 2.5 kHz. The control is at at the center position.
TREBLE – Shelving Treble Control gives +/- 12 dB gain at 10 kHz. The control is flat at the center position.
AUX IN – Input to connect external sound source. This can be used for plugging a CD, tape or MP3 player into
the amp or for connecting an external preamp.
HEADPHONE – For practice use in situations when speakers are too loud. Dedicated Stereo Headphone amp where the
aux input will be played back in stereo and the instrument signal will be reproduced in the center of the
stereo field.
REAR PANEL CONTROLS
MAINS IN AC – Figure-eight socket for connection to the mains power supply.
POWER – On/off switch for main power. For your safety, remember to connect power cord to the amplifier first,
then to the AC outlet. After this is done, turn this switch on. It works backwards when you want
disconnect unit – firstly turn switch off, then disconnect cord from the AC outlet and finally disconnect
cord from amplifier.
15
W BC 80 230 V
European Voltage
W BC 80 115 V
USA / Canada Voltage
W BC 80 DV 115/230 V
Brazil Voltage
W BC 80 100 V
Japan Voltage
ARTICLE
NUMBERS

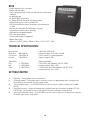
BC150
• Combo amplier for bass Instruments
• Passive and active inputs
• Line out
• Send/Return on front panel
• Class-A preamp with Low-Z circuitry for minimum noise and
maximum headroom
• 150 watt power amp
• 15” Warwick WXC 15/8 bass driver
• 4” Warwick WTR 4/8 high-frequency driver
• 4-Way EQ with controls for bass, low-mid, high-mid and treble
• DDL (Dynamic Distortion Limiter) for distortion-free reproduction at
all levels
• Aux mini jack stereo input (iPod, MP3 player, CD player)
• Self-cooling construction (fanless operation)
• Dedicated stereo headphone amplier
• Bass reex speaker cabinet
• Protective speaker grille of rugged steel
• Weight: 24kgs/53lbs.
• Dimensions: (W/H/D) 530mm x 545mm x 380mm / 20.86” x 21.45” x 14.96”
TECHNICAL SPECIFICATIONS:
Input sensitivity: Output Power: 150W @ 8 Ω
Active input: 440mV/50K Ω Frequency response: 20Hz-20kHz +/-0.5 dB
Passive input: 120mV/500K Ω THD less than 0.3% at rated output power
Aux input: 660mV/50K Ω Power consumption: 300W
Tone controls: Speaker specifications:
Bass: +/- 12dB @ 60Hz 15” Bass Driver: 150W, Impedance: 8 Ω, SPL: 95 dB,
Low Mid: +/- 8dB @ 80Hz Frequency response: 70 - 3kHz
High Mid: +/- 8dB @ 2500Hz 4” HF Bass Driver with Horn: 30W, Impedance: 8 Ω, SPL: 98 dB,
Treble: +/- 12dB @ 10kHz Frequency response: 1.8kHz - 16kHz
GETTING STARTED
1. Unpacking – Carefully unpack unit from the carton box.
2. Connecting to power – Set the power switch in off position, connect the supplied power cord to the amplifier and
then connect the same cord into AC outlet of proper voltage.
3. Setting front panel controls – Set VOLUME control to zero, all other controls should be settled to neutral, middle
position.
4. Connecting instrument – Using an instrumental cable (shielded) connect your instrument to the proper ACTIVE or
PASSIVE input. Turn all volume controls of your guitar to their maximum. Now press power switch on.
5. Adjusting your individual settings – Set the VOLUME to the value you wish to play, you should now hear sound from
the speaker. Adjust controls to your liking.
16

FRONT PANEL CONTROLS
ACTIVE – Input to plug in instrument using shielded guitar cable. This input is low sensitivity to suit the output
from instruments with active electronics.
PASSIVE – Input to plug in instrument using shielded guitar cable. This input is high sensitivity to suit the output
from instruments with passive electronics.
VOLUME – Controls the sound level of your instrument. Adjust this for your preferred playing loudness.
BASS – Shelving Bass Control gives +/- 12 dB gain at 60 Hz. The control is flat at the center position.
LOW MID – Peaking Middle Control gives +/- 12 dB gain at 800 Hz. The control is at at the center position.
HIGH MID – Peaking Middle Control gives +/- 12 dB gain at 2.5 kHz. The control is at at the center position.
TREBLE – Shelving Treble Control gives +/- 12 dB gain at 10 kHz. The control is flat at the center position.
AUX IN – Input to connect external sound source. This can be used for plugging a CD, tape or MP3 player into
the amp or for connecting an external preamp.
HEADPHONE – For practice use in situations when speakers are too loud. Dedicated Stereo Headphone amp where the
aux input will be played back in stereo and the instrument signal will be reproduced in the center of the
stereo field.
REAR PANEL CONTROLS
MAINS IN AC – Figure-eight socket for connection to the mains power supply.
POWER – On/off switch for main power. For your safety, remember to connect power cord to the amplifier first,
then to the AC outlet. After this is done, turn this switch on. It works backwards when you want
disconnect unit – firstly turn switch off, then disconnect cord from the AC outlet and finally disconnect
cord from amplifier.
17
W BC 150 230 V
European Voltage
W BC 150 115 V
USA / Canada Voltage
W BC 150 DV 115/230 V
Brazil Voltage
W BC 150 100 V
Japan Voltage
ARTICLE
NUMBERS

TROUBLESHOOTING
When your unit seems to not work properly, take a few minutes to troubleshoot before calling service. You can save yourself
time and money by doing it yourself, because the source of problem is often something quite simple.
What is the problem?
• There is no sound from the amp and LEDs don’t light up.
- Check your AC outlet
- Outlet is ok. -> Check power cord, unit fuses (BC150 only, BC,10, BC20, BC40 and BC80 has no user
serviceable fuses) and power switch.
- No power in outlet. -> Check house fuse box.
• There is no sound from the amp with LEDs Lit.
- Check amp gain and/or volume controls, check guitar controls. If controls are ok and all set above zero then listen
for hum in the speaker.
- There is no hum in the speaker. -> Internal speaker or power amp may need serviced.
- There is small hum in the speaker. -> Unplug guitar, touch tip of cable and listen.
- Hum is now very loud. -> Check your guitar electronics or try different guitar.
- Hum does not change. -> Replace your guitar cable.
• Sound quality is poor.
- Replace your guitar cable. If this does not help then check your speaker and speaker cable.
If the problem is not covered by the above or if our solutions does not help then please contact Warwick service information.
18


Headquarters: Warwick GmbH & Co. Music Equipment KG • Gewerbepark 46 • 08258 Markneukirchen / Germany • E-Mail: [email protected]
Branch China: Warwick Music Equipment (Shanghai) Ltd., Co.• Zhao Jia Bang Road No 108, 3rd Floor • 200020 Lu Wan District/Shanghai/P.R.China • E-Mail: [email protected]
Branch Switzerland: Warwick Music Equipment Trading (Zurich) GmbH • Kriesbachstrasse 30 • 8600 Dübendorf / Switzerland • E-Mail: [email protected]
Branch CZ/SK: Warwick Music Equipment Trading (Praha CZ) s.r.o. • Spálená 23/93 • 11000 Praha 1 / Czech Republic • E-Mail: [email protected]
Branch Poland: Warwick Music Equipment Trading (Warsaw) Sp. z o.o. • Flory 7/18a • 00-586 Warsaw / Poland • E-Mail: [email protected]
Branch UK/ Ireland: Warwick Music Equipment Trading (Hailsham UK) Ltd. • “Cortlandt” George Street • East Sussex BN27 1AE / Great Britain • E-Mail: [email protected]
Branch USA: Warwick Music Equipment Trading (New York USA) Inc. • 76-80 East 7th Street • New York, NY 10003 USA • E-Mail: [email protected]
www.warwick.de • www.warwickbass.com • www.framus.de • www.framus.com • www.framus-vintage.de • www.warwick-distribution.de • www.warwick.de/forum
Das neue Warwick Bass Forum nden Sie auf: www.warwick.de
Bei technischen Fragen wenden Sie sich bitte an [email protected]
Please see the new Warwick Bass Forum on: www.warwick.de
For support information please refer to [email protected]
Visite por favor el nuevo forum Warwcik de bajo en: www.warwick.de
Para soporte técnico e información, dirigirse por favor a [email protected]
Por favor veja o novo Fórum de Baixos da Warwick em: www.warwick.de
Para mais informações escreva para [email protected]
Visitare il nuovo Forum Warwick Bass: www.warwick.de
Per supporto tecnico: [email protected]
Veuillez consulter le nouveau forum sur les basses Warwick à l‘adresse: www.warwick.de
Si vous avez besoin de plus d‘informations contactez [email protected]
Nové Warwick Bass Forum najdete na webových stránkách: www.warwick.de
Máte-li nejaké technické dotazy, piste na: [email protected]
Zapraszamy, do odwiedzenia naszego nowego forum na stronie: www.warwick.de
Aby otrzymać wsparcie techniczne, skontaktuj się z nami pod adresem: [email protected]
Our Heads and Combos have all the following approvals:
Global
China
Europe
USA/Canada
Japan Australia
-
 1
1
-
 2
2
-
 3
3
-
 4
4
-
 5
5
-
 6
6
-
 7
7
-
 8
8
-
 9
9
-
 10
10
-
 11
11
-
 12
12
-
 13
13
-
 14
14
-
 15
15
-
 16
16
-
 17
17
-
 18
18
-
 19
19
-
 20
20


Warwick BC150 Instrukcja obsługi
- Kategoria
- Akcesoria gitarowe
- Typ
- Instrukcja obsługi
w innych językach
- English: Warwick BC150 Owner's manual
Powiązane dokumenty
Inne dokumenty
-
Yamaha P2050 Instrukcja obsługi
-
-
-
-
-
-
-
-
Fender Rumble 800 HD Instrukcja obsługi
-
Yamaha MGP16X/MGP12X Instrukcja obsługi