
S90 XS/S70 XS Remote Editor Owner’s Manual 1
S90 XS/S70 XS Remote Editor
Owner’s Manual
SOFTWARE LICENSE AGREEMENT
PLEASE READ THIS SOFTWARE LICENSE AGREEMENT ("AGREEMENT") CAREFULLY BEFORE USING THIS SOFTWARE. YOU ARE ONLY
PERMITTED TO USE THIS SOFTWARE PURSUANT TO THE TERMS AND CONDITIONS OF THIS AGREEMENT. THIS AGREEMENT IS BETWEEN
YOU (AS AN INDIVIDUAL OR LEGAL ENTITY) AND YAMAHA CORPORATION ("YAMAHA").
BY DOWNLOADING, INSTALLING, COPYING, OR OTHERWISE USING THIS SOFTWARE YOU ARE AGREEING TO BE BOUND BY THE TERMS
OF THIS LICENSE. IF YOU DO NOT AGREE WITH THE TERMS, DO NOT DOWNLOAD, INSTALL, COPY, OR OTHERWISE USE THIS SOFTWARE.
IF YOU HAVE DOWNLOADED OR INSTALLED THE SOFTWARE AND DO NOT AGREE TO THE TERMS, PROMPTLY DELETE THE SOFTWARE.
1. GRANT OF LICENSE AND COPYRIGHT
Yamaha hereby grants you the right to use one copy of the software program(s) and data ("SOFTWARE") accompanying this Agreement. The
term SOFTWARE shall encompass any updates to the accompanying software and data. The SOFTWARE is owned by Yamaha and/or Yamaha’s
licensor(s), and is protected by relevant copyright laws and all applicable treaty provisions. While you are entitled to claim ownership of the data
created with the use of SOFTWARE, the SOFTWARE will continue to be protected under relevant copyrights.
• You may use the SOFTWARE on a single computer .
• You may make one copy of the SOFTWARE in machine-readable form for backup purposes only, if the SOFTWARE is on media where such
backup copy is permitted. On the backup copy, you must reproduce Yamaha's copyright notice and any other proprietary legends that were
on the original copy of the SOFTWARE.
• You may permanently transfer to a third party all your rights in the SOFTWARE, provided that you do not retain any copies and the recipient
reads and agrees to the terms of this Agreement.
2. RESTRICTIONS
• You may not engage in reverse engineering, disassembly, decompilation or otherwise deriving a source code form of the SOFTWARE by any
method whatsoever.
• You may not reproduce, modify, change, rent, lease, or distribute the SOFTWARE in whole or in part, or create derivative works of the
SOFTWARE.
• You may not electronically transmit the SOFTWARE from one computer to another or share the SOFTWARE in a network with other computers.
• You may not use the SOFTWARE to distribute illegal data or data that violates public policy.
• You may not initiate services based on the use of the SOFTWARE without permission by Yamaha Corporation.
Copyrighted data, including but not limited to MIDI data for songs, obtained by means of the SOFTWARE, are subject to the following
restrictions which you must observe.
• Data received by means of the SOFTWARE may not be used for any commercial purposes without permission of the copyright owner.
• Data received by means of the SOFTWARE may not be duplicated, transferred, or distributed, or played back or performed for listeners in
public without permission of the copyright owner.
• The encryption of data received by means of the SOFTWARE may not be removed nor may the electronic watermark be modified without
permission of the copyright owner.
3. TERMINATION
This Agreement becomes effective on the day that you receive the SOFTWARE and remains effective until terminated. If any copyright law or
provisions of this Agreement is violated, the Agreement shall terminate automatically and immediately without notice from Yamaha. Upon such
termination, you must immediately destroy the licensed SOFTWARE, any accompanying written documents and all copies thereof.
4. DISCLAIMER OF WARRANTY ON SOFTWARE
You expressly acknowledge and agree that use of the SOFTWARE is at your sole risk. The SOFTWARE and related documentation are provided
"AS IS" and without warranty of any kind. NOTWITHSTANDING ANY OTHER PROVISION OF THIS AGREEMENT, YAMAHA EXPRESSLY
DISCLAIMS ALL WARRANTIES AS TO THE SOFTWARE, EXPRESS, AND IMPLIED, INCLUDING BUT NOT LIMITED TO THE IMPLIED
WARRANTIES OF MERCHANTABILITY, FITNESS FOR A PARTICULAR PURPOSE AND NON-INFRINGEMENT OF THIRD PARTY RIGHTS.
SPECIFICALLY, BUT WITHOUT LIMITING THE FOREGOING, YAMAHA DOES NOT WARRANT THAT THE SOFTWARE WILL MEET YOUR
REQUIREMENTS, THAT THE OPERATION OF THE SOFTWARE WILL BE UNINTERRUPTED OR ERROR-FREE, OR THAT DEFECTS IN THE
SOFTWARE WILL BE CORRECTED.
5. LIMITATION OF LIABILITY
YAMAHA’S ENTIRE OBLIGATION HEREUNDER SHALL BE TO PERMIT USE OF THE SOFTWARE UNDER THE TERMS HEREOF. IN NO EVENT
SHALL YAMAHA BE LIABLE TO YOU OR ANY OTHER PERSON FOR ANY DAMAGES, INCLUDING, WITHOUT LIMITATION, ANY DIRECT,
INDIRECT, INCIDENTAL OR CONSEQUENTIAL DAMAGES, EXPENSES, LOST PROFITS, LOST DATA OR OTHER DAMAGES ARISING OUT OF
THE USE, MISUSE OR INABILITY TO USE THE SOFTWARE, EVEN IF YAMAHA OR AN AUTHORIZED DEALER HAS BEEN ADVISED OF THE
POSSIBILITY OF SUCH DAMAGES. In no event shall Yamaha's total liability to you for all damages, losses and causes of action (whether in
contract, tort or otherwise) exceed the amount paid for the SOFTWARE.
S90 XS/S70 XS Remote Editor
Owner’s Manual

Special Notices
S90 XS/S70 XS Remote Editor Owner’s Manual
2
6. THIRD PARTY SOFTWARE
Third party software and data ("THIRD PARTY SOFTWARE") may be attached to the SOFTWARE. If, in the written materials or the electronic data
accompanying the Software, Yamaha identifies any software and data as THIRD PARTY SOFTWARE, you acknowledge and agree that you must
abide by the provisions of any Agreement provided with the THIRD PARTY SOFTWARE and that the party providing the THIRD PARTY
SOFTWARE is responsible for any warranty or liability related to or arising from the THIRD PARTY SOFTWARE. Yamaha is not responsible in any
way for the THIRD PARTY SOFTWARE or your use thereof.
•Yamaha provides no express warranties as to the THIRD PARTY SOFTWARE. IN ADDITION, YAMAHA EXPRESSLY DISCLAIMS ALL IMPLIED
WARRANTIES, INCLUDING BUT NOT LIMITED TO THE IMPLIED WARRANTIES OF MERCHANTABILITY AND FITNESS FOR A PARTICULAR
PURPOSE, as to the THIRD PARTY SOFTWARE.
•Yamaha shall not provide you with any service or maintenance as to the THIRD PARTY SOFTWARE.
•Yamaha is not liable to you or any other person for any damages, including, without limitation, any direct, indirect, incidental or consequential
damages, expenses, lost profits, lost data or other damages arising out of the use, misuse or inability to use the THIRD PARTY SOFTWARE.
7. GENERAL
This Agreement shall be interpreted according to and governed by Japanese law without reference to principles of conflict of laws. Any dispute
or procedure shall be heard before the Tokyo District Court in Japan. If for any reason a court of competent jurisdiction finds any portion of this
Agreement to be unenforceable, the remainder of this Agreement shall continue in full force and effect.
8. COMPLETE AGREEMENT
This Agreement constitutes the entire agreement between the parties with respect to use of the SOFTWARE and any accompanying written
materials and supersedes all prior or contemporaneous understandings or agreements, written or oral, regarding the subject matter of this
Agreement. No amendment or revision of this Agreement will be binding unless in writing and signed by a fully authorized representative of
Yamaha.
Special Notices
• Copying of the commercially available music sequence data and/or digital audio files is strictly prohibited except for
your personal use.
• The software and this owner’s manual are exclusive copyrights of Yamaha Corporation.
• Copying of the software or reproduction of this manual in whole or in part by any means is expressly forbidden without
the written consent of the manufacturer.
•Yamaha makes no representations or warranties with regard to the use of the software and documentation and cannot
be held responsible for the results of the use of this manual and the software.
• The screen displays as illustrated in this Owner’s Manual are for instructional purposes, and may appear somewhat
different from the screens which appear on your computer.
• Steinberg and Cubase are the registered trademarks of Steinberg Media Technologies GmbH.
• The company names and product names in this Owner’s Manual are the trademarks or registered trademarks of their
respective companies.
Contents
SOFTWARE LICENSE AGREEMENT.................................................1
Special Notices ...................................................................................2
What is the S90 XS/S70 XS Remote Editor? ....................................3
Data structure of the S90 XS/S70 XS Remote Editor ......................3
Operation flow from starting the application to closing it..............4
S90 XS/S70 XS Remote Editor Windows ..........................................7
Troubleshooting................................................................................14
This owner’s manual assumes that you are already familiar with basic Windows/Macintosh operations. If you are not,
please refer to the owner’s manual which came with your Windows/Macintosh software before using the S90 XS/S70
XS Remote Editor.
For information about hardware requirements, the interconnection of devices and the installation of the S90 XS/S70
XS Remote Editor software, refer to the separate Installation Manual as well as the Owner’s Manual for the
respective MIDI device.

What is the S90 XS/S70 XS Remote Editor?
S90 XS/S70 XS Remote Editor Owner’s Manual
3
What is the S90 XS/S70 XS Remote Editor?
S90 XS/S70 XS Remote Editor is a convenient tool which lets you edit/create Control Templates for the S90
XS/S70 XS Music Synthesizer. These Control Templates let you assign the appropriate functions for your
favorite VSTi to the Knobs and Sliders on the S90 XS/S70 XS. While the S90 XS/S70 XS handles up to 50
Control Templates (in a single Bank), the S90 XS/S70 XS Remote Editor can be used to create and organize
multiple Bank files, each of which contain 50 Control Templates. Data of a single Bank containing 50 Control
Templates created on the S90 XS/S70 XS Remote Editor can be transferred from the computer to the S90 XS/
S70 XS and saved to the computer as a single Bank file (.rse).
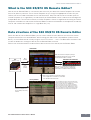
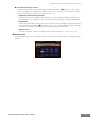
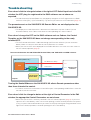
Data structure of the S90 XS/S70 XS Remote Editor
Within the S90 XS/S70 XS Remote Editor, you can select a Bank file then edit each one of the 50 Control
Template contained in the selected Bank. After finishing your edits of the selected Bank (called "Current
Bank"), save the Bank data to a file by using the "Save" or "Save As…" menu. The Bank data saved to the file
can be recalled when starting the S90 XS/S70 XS Remote Editor next time.
Refer to the illustration below to understand the data structure of the S90 XS/S70 XS Remote Editor.
File
(extension: .sre)
50 Control Templates
Open
(1 Bank)
50 Control Templates in a
file are called up the Library
window.
Edit window
Library window
S90 XS/S70 XS Instrument
Data of the 50 Control Templates (1 Bank) is
automatically transferred as soon as the S90
XS/S70 XS Remote Editor is started.*
When a File is opened, data of the 50 Control
Templates (1 Bank) in the file is automatically
transferred to the S90 XS/S70 XS Instrument.*
After a Control Template is imported from the file,
click the [OK] button to transfer the current Bank
to the S90 XS/S70 XS Instrument.*
*This is available only when the S90 XS/S70 XS and the
S90 XS/S70 XS Remote Editor (computer) are connected
properly via USB, and are in the ONLINE status.
When you properly connect the computer and S90 XS/
S70 XS by USB while using the S90 XS/S70 XS Remote
Editor, the status will change to ONLINE and the settings
of the current Bank on the S90 XS/S70 XS Remote Editor
will be transferred to the S90 XS/S70 XS automatically.
Save
Save As
(1 Bank)

Operation flow from starting the application to closing it
S90 XS/S70 XS Remote Editor Owner’s Manual
4
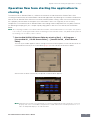
Operation flow from starting the application to
closing it
The S90 XS/S70 XS Remote Editor is a software contained in the S90 XS/S70 XS Remote Tools. After
installing the S90 XS/S70 XS Remote Editor and related applications by following the Installation Guide of the
S90 XS/S70 XS Remote Tools, follow the instructions below. Before starting, make sure that the S90 XS/S70
XS is properly connected to the computer via a USB cable. There is no single way to use the many
components in the S90 XS/S70 XS Remote Editor. Your editing needs and preferences may differ; however,
the following example gives you a simple step-by-step guide in how to use the S90 XS/S70 XS Remote
Editor.
n After completing installation of the S90 XS/S70 XS Remote Editor, start the DAW software once then quit it. This operation
is necessary to scan through the DAW software for obtaining the VSTi-related information. Only DAW software produced
by Steinberg (such as Cubase) can be scanned.
1. Start the S90 XS/S70 XS Remote Editor by selecting [Start] → All Programs →
[Yamaha S90 XS _ S70 XS Remote Editor] → [Yamaha S90 XS _ S70 XS Remote
Editor].
The Auto Sync window appears and the settings of the 50 Control Templates on the S90 XS/S70 XS are
transferred automatically to the Current Bank (page 10) of the S90 XS/S70 XS Remote Editor.
After transfer has been successfully completed, the Edit window appears.
n If data transfer in the Auto Sync window fails even when the S90 XS/S70 XS and computer are connected
properly, make sure to set the MIDI In/Out parameter to "USB" and the Device Number parameter to "1" or
"All" in the Utility MIDI display on the S90 XS/S70 XS.

Operation flow from starting the application to closing it
S90 XS/S70 XS Remote Editor Owner’s Manual
5
2. Select "Setup" from the [File] menu to call up the Setup window.
3. Confirm that the MIDI Port is set to "Yamaha S90 XS (Yamaha S70 XS)," then select the
desired DAW software from the DAW Select column.
If the S90 XS/S70 XS and the S90 XS/S70 XS Remote Editor are connected properly via USB, you can
confirm that the MIDI Port is set to "Yamaha S90 XS (Yamaha S70 XS)" when the above window appears.
The DAW selection is necessary for performing the Scan operation ("VSTi Database" menu in the [File]
menu) and obtaining the VSTi-related information.
4. Click [OK] to start the Scan operation.
The VSTi plug-ins registered to the specified DAW software will be scanned and the information
necessary for editing will be obtained.
After the scanning is completed, the previous display will appear. The setup of the S90 XS/S70 XS
Remote Editor is finished.
n If the VSTi scanning is not performed when you click [OK] in step 4, select [File] → [VSTi Database] → [Full
Scan] to execute scanning.
5. Start the DAW software (for example, Cubase).
6. Press the [DAW REMOTE] button on the S90 XS/S70 XS instrument to enter the Remote
mode.
7. Select the Control Template, then edit the selected Control Template on the Edit window.
Perform the editing referring to the "S90 XS/S70 XS Remote Editor Window (page 7)" and "Menu
(page 11)." When the ONLINE status is turned on (when the S90 XS/S70 XS and the S90 XS/S70 XS
Remote Editor are connected properly via USB), setting the parameters on the S90 XS/S70 XS Remote
Editor affects the settings of the same parameters on the S90 XS/S70 XS in real time. This gives you a
convenient and useful way to edit while actually controlling the VSTi.

Operation flow from starting the application to closing it
S90 XS/S70 XS Remote Editor Owner’s Manual
6
8. After your editing session is finished, select [File] → [Save] (or [Save As...]) to save the
bank to a file.
9. Click "X" at the top left corner to quit the S90 XS/S70 XS Remote Editor.
If the edited Bank data has not been saved yet, messages appear prompting you to save it. Save a Bank
file to quit the S90 XS/S70 XS Remote Editor.

S90 XS/S70 XS Remote Editor Windows: Edit window
S90 XS/S70 XS Remote Editor Owner’s Manual
7
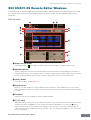
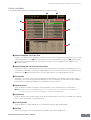
S90 XS/S70 XS Remote Editor Windows
The S90 XS/S70 XS Remote Editor consists of two windows: Edit and Library. The Edit window lets you edit
the settings of the selected Control Template while the Library window lets you import or copy Control
Templates.
Edit window
1 Always on Top button
Turning this button ( ) on keeps the S90 XS/S70 XS Remote Editor's window always on top.
2 ONLINE indicator
Shows whether the S90 XS/S70 XS Remote Editor and the S90 XS/S70 XS are properly connected via
USB (ONLINE status). In the ONLINE status, this indicator lights in green and any operations on the S90
XS/S70 XS Remote Editor automatically change the parameter value on the S90 XS/S70 XS.
3 Library button
Calls up the Library window (page 10).
4 [Store] button
Displays the Store window to save the edited Control Template to a desired destination in the current
Bank. Edited data will be transmitted to the S90 XS/S70 XS instrument when the edited Control Template
is saved.
5 File Name
Displays the file name including the current edited Template.
6 [T] / [F] mark
Shows the Editing status of the Control Template or Bank. The [T] mark indicates that the current Control
Template has been modified but not yet stored. This indicator disappears if you click the 4 [Store]
button and then execute the Template Save operation. The [F] mark is also used to indicate that the
current Bank has been modified but not yet saved to a File. This indicator disappears if you execute the
File Save operation.
461
2
5
3
8
9
)
!
7
9
-2
9-1
9-3
)-1
)-2

S90 XS/S70 XS Remote Editor Windows: Edit window
S90 XS/S70 XS Remote Editor Owner’s Manual
8
7 Control Template Selection box
Shows the currently selected Control Template. You can select the previous/next template by clicking the
scroll button at the right of this box, or select any template in the current bank by clicking the triangular
button.
8 Instrument Select box
Shows the VSTi name which is controlled by the Knobs and Sliders. You can change the VSTi by clicking
the triangular button then selecting the desired one. You can also input the VSTi name directly in this box
manually. Make sure to input the VSTi name correctly.
n If the desired VSTi is not shown even when you click the triangular button, refer to the Troubleshooting
section on page 14.
9 Edit section
The Knobs and Sliders illustrated here correspond to the Knobs and Sliders on the top panel of the S90
XS/S70 XS. Here, you can assign the desired function to each of the Knobs and Sliders.
9-1 Remote/CC buttons
When Remote is selected, using the Knobs and Sliders generates the Remote Control messages
exclusive for Cubase. When CC is selected, using the Knobs and Sliders generates MIDI Control
Change messages.
9-2 Function Assignment boxes
The Knobs and Sliders illustrated here are equivalent to the Knobs and Sliders on the S90 XS/S70
XS. Each of the boxes at the right side of the Knob and Slider shows the function assigned to the
corresponding Knob and Slider. (The function shown here differs depending on the Remote/CC
button status.) You can change the function assigned to each of the Knobs and Sliders by clicking
a desired box, then selecting the desired function in the ) Controller Setting section. In the
ONLINE status, setting this parameter changes the settings of the S90 XS/S70 XS in real time.
9-3 [Reverse] button
Reverses the direction of the Slider operation, determining whether moving the Slider up or down
increases or decreases the value. For example, when a parameter which is increased by moving
the Slider up is assigned to a Slider and this button is turned on, moving the Slider up decreases
the parameter value. Clicking the button once again restores the original state.
) Controller Setting section
Determines the function of the Knobs and Sliders corresponding to the column selected in the 9 Edit
section. There are two sections here: Remote section and CC (Control Change) section.
)-1 Remote section
Assigns the function to the Function Assignment box selected in the 9 Edit section. The setting
here is available when the Remote/CC button is set to "Remote." Clicking "Remote" at the left of this
section also sets the Remote/CC button of the Edit section to "Remote.
• Control Parameter
Click the triangular button to call up the menu, then select the desired function.
n The "QuickCtrl1" – "QuickCtrl8" parameters only apply to Cubase 4.1 or later.

S90 XS/S70 XS Remote Editor Windows: Edit window
S90 XS/S70 XS Remote Editor Owner’s Manual
9
)-2 CC (Control Change) section
Assigns the function to the Function Assignment box selected in the 9 Edit section. The setting
here is available when the Remote/CC button is set to "CC." Clicking "CC" at the left of this section
also sets the Remote/CC button of the Edit section to "CC."
• CC Number (Control Change Number)
Determines the Control Change number. Selects the Control Change number by clicking one of
the scroll buttons at the right of this box. You can also input the Control Change number directly.
• Display Name
Selects the Knob/Slider’s function name which is to be shown on the display of the S90 XS/S70 XS
when the Remote/CC button of 9 Edit section is set to "CC." Click the triangular button at the right
of this box, then select the desired one. You can also input the name directly.
• Display Format
Sets the value format shown on the display of the S90 XS/S70 XS to "0 – 127" or "-64 – +63."
! Detail button
Clicking this button closes the Controller Settings section. Click this again to open the Controller Settings
section.
When closing the Controller Settings section

S90 XS/S70 XS Remote Editor Windows: Library window
S90 XS/S70 XS Remote Editor Owner’s Manual
10
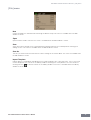
Library window
Clicking the Library button on the Edit window opens the Library window.
1 Control Template List in the File
Displays a list of the Control Templates saved in the File. Select a target Control Template in this list and
a destination location in the 2 Control Template List of the Current Bank, then click the 4 [Import] button
to execute the Import operation. You can view the contents of the selected Control Template in the
7 Preview section.
2 Control Template List of the Current Bank
Displays a list of the Control Templates on the Current Bank. Select a desired Control Template in this list,
then click the [OK] button to return to the Edit window. You can view the contents of the selected Control
Template in the 7 Preview section. You can also copy or paste a Control Template in this list.
3 File section
Clicking the icon in this section will call up the File Select dialog. In this dialog, select the file (saved
previously), then execute the File Select operation so that the Templates in the file are listed. In addition,
the name of the selected file appears in the window at the left of the icon.
4 [Import] button
Click this button to import the specific Control Template in the selected file to the Current Bank.
n The Import operation can be applied to just one Template at a time. You can import all Templates in the
selected file at the same time by operating [File] → [Open] in the Edit window.
5 [OK] button
Click this button to fix the Current Bank and call up the Edit window. If the status is ONLINE, the selected
bank is also transferred to the S90 XS/S70 XS.
6 [Cancel] button
Click this button to cancel editing for the Current Bank and call up the Edit window.
7 Preview
Shows the settings of the Control Template selected in the Control Template List.
54
6
2
7
3
1

S90 XS/S70 XS Remote Editor Windows: [File] menu
S90 XS/S70 XS Remote Editor Owner’s Manual
11
[File] menu
New
Creates and opens a new Bank file containing the default setup. This menu is available when the Edit
window is shown.
Open
Opens a Bank saved in the File. This menu is available when the Edit window is shown.
Save
Saves the current settings of the Current Bank by overwriting the File you called up when starting your
editing session. This menu is available when the Edit window is shown.
Save As
This lets you rename the File and save the current settings of the current Bank. This menu is available when
the Edit window is shown.
Import Template
Imports data of a single Bank including the 50 Control Templates from a file (extension: .sre or .xml) to the
Control Template List in the File in the Library window. Selecting this menu performs the same action as
clicking the icon (
) in the File section in the Library window. This menu is available when the Library
window is shown.

S90 XS/S70 XS Remote Editor Windows: [File] menu
S90 XS/S70 XS Remote Editor Owner’s Manual
12
Setup
Selects the MIDI port of the S90 XS/S70 XS and the DAW software. Selecting this menu calls up the
following window. Set the parameters as necessary, then click [OK].
• MIDI Port
"Yamaha S90 XS (Yamaha S70 XS)" is automatically selected when the S90 XS/S70 XS and the
computer are connected properly via USB.
•DAW Select
Specify the DAW software you are currently using here.
VSTi Database
Scans through the DAW software you are using and obtains the VSTi-related information necessary for
editing. This menu consists of the following two menus.
Selecting "Full Scan" scans the entire DAW software. When you scan the DAW for the first time, select
"Full Scan."
Selecting "Update" scans only the sections that have been updated since previous scanning. When
you've installed a new VSTi, select "Update."
The "Full Scan" is automatically executed when you start the S90 XS/S70 XS Remote Editor the first
time or you change the DAW Select settings in the Setup window.

S90 XS/S70 XS Remote Editor Windows: [Edit] menu
S90 XS/S70 XS Remote Editor Owner’s Manual
13
[Edit] menu
Copy
Copies the selected data to the clipboard.
Paste
Pastes the data on the clipboard to the specified location.
Initialize Template
Resets all settings of the selected Template in the Current Bank to the initial default values.
Restore Hardware Backup Data
Restores all settings of all the Control Templates in the Current Bank and the S90 XS/S70 XS instrument to
the previous settings, before the S90 XS/S70 XS Remote Editor was opened. This menu is available when
the Library window is shown.
Reset to Factory Settings
Restores all settings of all the Control Templates in the Current Bank and the S90 XS/S70 XS instrument to
the Factory default settings. This menu is available when the Library window is shown.
[Help] menu
Manual
Selecting this menu calls up this manual in PDF format.
About
Selecting this menu calls up information on the S90 XS/S70 XS Remote Editor, including the version number.

Troubleshooting
S90 XS/S70 XS Remote Editor Owner’s Manual
14
Troubleshooting
Even when I click the triangular button at the right of VSTi Select/Input box in the Edit
window, the VSTi plug-ins registered to the DAW software are not shown as
expected.
• The S90 XS/S70 XS Remote Editor may not properly recognize the VSTi registered in the DAW
software. Select [File] → [VSTi Database] → [Full Scan] to search the VSTi information (page 12).
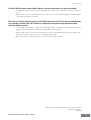
The parameters set on the S90 XS/S70 XS Remote Editor are not displayed on the
S90 XS/S70 XS.
• The display on the S90 XS/S70 XS is based on the information sent from Cubase (see the
illustration above). Start Cubase and select the corresponding VSTi within Cubase.
Even when I change the VSTi on the DAW software such as Cubase, the Control
Template on the S90 XS/S70 XS does not change corresponding to the newly
selected VSTi.
• The VSTi-related information is obtained through the Extension software (see the illustration
below). Make sure that the latest S90 XS/S70 XS Extension is installed.
• Make sure that the VSTi name displayed on the DAW software is the same as the one shown in
the VSTi Select/Input box (page 8).
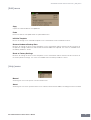
Data transfer between the S90 XS/S70 XS Remote Editor, S90 XS/S70 XS and DAW software:
Turning the Knobs/Sliders on the S90 XS/S70 XS affects Remote parameters other
than those intended for control.
• In Cubase, remove the checkmarks of "ALL MIDI Inputs" corresponding to MIDI Ports 2 and 5 for
the S90 XS/S70 XS instrument.
Even when I click the triangular button at the right of Control Parameter in the Edit
window, the appropriate Control Parameters are not shown.
• Make sure that the VSTi is correctly selected in the VSTi Select/Input box (page 8). If you have
input the VSTi name directly, make sure that the spelling is correct and the placement of spaces
(if any) is correct. We recommend that you select the VSTi by clicking the triangular button at the
right of VSTi Select/Input box, instead of inputting the VSTi name directly.
DAW software (Cubase, etc.)
Note On/Off, Control Change
VSTi
S90 XS/S70 XS
Extension
Computer
S90 XS/S70 XS
Remote Editor
Remote Control
VSTi parameters (name, value)
S90 XS/S70 XS parameters
S90 XS/S70 XS
instrument
Port 1
Port 2
Port 5

Troubleshooting
S90 XS/S70 XS Remote Editor Owner’s Manual
15
On the DAW software other than Cubase, the set parameters are not controlled.
• The Remote control functions are available only for Cubase. Set the Remote/CC buttons (page 8)
to "CC."
• Make sure to select a parameter except to "Cubase" on the Daw Select display of the Utility mode
in the S90 XS/S70 XS instrument.
Even when I select another track on the DAW software, the VSTi to be controlled does
not change; instead, the VSTi which is assigned to the previously selected track
remains under control.
• On the DAW's Preferences dialog, select [Editing]-[Project & Mixer], then checkmark both "Sync
Project and Mixer Selection" and "Enable Record on Selected Track."
• When using Cubase, select "Yamaha S90 XS/S70 XS" in the Remote Device Setup window, then
select Port 2 for the S90 XS/S70 XS as the MIDI Input/Output.
• Make sure to set the S90 XS/S70 XS instrument to the Remote mode.
U.R.G., Pro Audio & Digital Musical Instrument Division, Yamaha Corporation
© 2009 Yamaha Corporation
906MW-A0
-
 1
1
-
 2
2
-
 3
3
-
 4
4
-
 5
5
-
 6
6
-
 7
7
-
 8
8
-
 9
9
-
 10
10
-
 11
11
-
 12
12
-
 13
13
-
 14
14
-
 15
15


Yamaha S90 Instrukcja obsługi
- Typ
- Instrukcja obsługi
- Niniejsza instrukcja jest również odpowiednia dla
w innych językach
- čeština: Yamaha S90 Návod k obsluze
- español: Yamaha S90 El manual del propietario
- italiano: Yamaha S90 Manuale del proprietario
- Deutsch: Yamaha S90 Bedienungsanleitung
- svenska: Yamaha S90 Bruksanvisning
- português: Yamaha S90 Manual do proprietário
- français: Yamaha S90 Le manuel du propriétaire
- Türkçe: Yamaha S90 El kitabı
- English: Yamaha S90 Owner's manual
- dansk: Yamaha S90 Brugervejledning
- русский: Yamaha S90 Инструкция по применению
- suomi: Yamaha S90 Omistajan opas
- Nederlands: Yamaha S90 de handleiding
- română: Yamaha S90 Manualul proprietarului
Powiązane artykuły
-
Yamaha KX25 Instrukcja obsługi
-
-
Yamaha S70XS Instrukcja obsługi
-
-
-
-
-
-
-