CyberResearch CyRAQ E Series Skrócona instrukcja obsługi
- Typ
- Skrócona instrukcja obsługi

CyberResearch, Inc.
25 Business Park Drive
Branford, CT USA
Phone: (203) 643-5000
Fax: (203) 643-5001
www.cyberresearch.com
Page 1
Rev 1.1
12 / 31/ 2007
CyberResearch
®
Industrial Panel PCs
CYRAQ
®
PPC Series
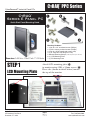
STEP 1
LCD Mounting Plate
Attach LCD mounting plate ()
to monitor using 4 M4 x 10mm screws ().
Place tabs (shown in detail below) toward
the top of the monitor.
CyRAQ
®
Series E Panel
PC
Quick Start Panel-Mounting Guide
Shown above:
C
YRAQ Series E Panel PC with 17" LCD Monitor
Tab
Tab
Mounting Hardware
1. (4) 6-32 x 1/4" trusshead screws (Phillips)
2. (4) M4 x 10 mm panhead screws (Phillips)
3. (4) 6-32 x 5/16" buttonhead screws (hex)
4. (1) 6" long 5/64" hex long-arm L-key
5. Monitor Mounting Clamps
(number depends upon LCD size)
6. (1) LCD Mounting Plate
7. (1) PC Mounting Plate

CyberResearch, Inc.
25 Business Park Drive
Branford, CT USA
Phone: (203) 643-5000
Fax: (203) 643-5001
www.cyberresearch.com
Page 2
Rev 1.1
12 / 31/ 2007
CyberResearch
®
Industrial Panel PCs
CYRAQ
®
PPC Series
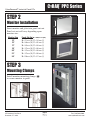
STEP 2
Monitor Installation
Insert monitor and plate into panel cut-out.
Panel cut-out will vary depending upon
monitor size:
Monitor Size Panel Cut-Out
(W = width; H = height)
12" X = 312 mm (W); Y = 244 mm (H)
15" X = 386 mm (W); Y = 302 mm (H)
17" X = 384 mm (W); Y = 346 mm (H)
19" X = 441 mm (W); Y = 356 mm (H)
20" X = 441 mm (W); Y = 356 mm (H)
21" X = 441 mm (W); Y = 356 mm (H)
24" X = 596 mm (W); Y = 421 mm (H)
STEP 3
Mounting Clamps
Install monitor mounting clamps ()
to secure monitor to panel.
X mm*
Y mm*
*dependent on monitor size;
see chart at left

CyberResearch, Inc.
25 Business Park Drive
Branford, CT USA
Phone: (203) 643-5000
Fax: (203) 643-5001
www.cyberresearch.com
CyberResearch
®
Industrial Panel PCs
CYRAQ
®
PPC Series
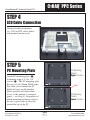
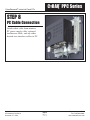
STEP 4
LCD Cable Connection
Attach all cables to monitor
(i.e. VGA or DVI video, power,
and optional touchscreen).
STEP 5
PC Mounting Plate
Attach PC mounting plate ()
to monitor using 4 6-32 x 1/4"
screws (). The PC mounting plate
has two sets of 100mm VESA holes
that allow you to mount the PC
higher or lower on the monitor
(lower position will allow more
access to the monitor’s connector
panel — see Step 8). Regardless of
which mounting position is chosen,
be sure to place tabs on the plate
toward the top of the PC.
PC Mounting
Plate in
Upper Position
PC Mounting
Plate in
Lower Position
Page 3
Rev 1.1
12 / 31/ 2007
Tab

CyberResearch, Inc.
25 Business Park Drive
Branford, CT USA
Phone: (203) 643-5000
Fax: (203) 643-5001
www.cyberresearch.com
CyberResearch
®
Industrial Panel PCs
CYRAQ
®
PPC Series
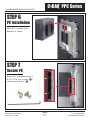
STEP 6
PC Installation
Mate PC assembly with
monitor as shown.
STEP 7
Secure PC
Secure PC to monitor using 4
6-32 x 5/16" hex screws ()
and long-arm L-key ().
Page 4
Rev 1.1
12 / 31/ 2007

CyberResearch, Inc.
25 Business Park Drive
Branford, CT USA
Phone: (203) 643-5000
Fax: (203) 643-5001
www.cyberresearch.com
CyberResearch
®
Industrial Panel PCs
CYRAQ
®
PPC Series
STEP 8
PC Cable Connection
Attach video cable from monitor,
PC power supply cable, optional
touchscreen cable, and any other
desired user interface cables to PC.
Page 5
Rev 1.1
12 / 31/ 2007
-
 1
1
-
 2
2
-
 3
3
-
 4
4
-
 5
5


CyberResearch CyRAQ E Series Skrócona instrukcja obsługi
- Typ
- Skrócona instrukcja obsługi
w innych językach
Inne dokumenty
-
Yamaha CS-R5 Instrukcja obsługi
-
-
-
Midmark 253 LED Exam Light Instrukcja instalacji
-
-
Yamaha EMX5 Instrukcja obsługi
-
Yamaha EMX7 Instrukcja obsługi
-
-
Midmark 225 Barrier-Free® Exam Chair (-002 thru -003) instrukcja
-