Whirlpool LFTA+ 3204 HX.R instrukcja
- Kategoria
- Zmywarki
- Typ
- instrukcja

Operating instructions
Contents
Installation, 2-3
Positioning and levelling
Connecting the water and electricity supplies
Advice regarding the first wash cycle
Technical data
Description of the appliance, 4
Overall view
Control panel
Loading the racks, 5
Lower rack
Cutlery basket
Upper rack
Start-up and use, 6-7
Starting the dishwasher
Measuring out the detergent
Wash options
Wash cycles, 8
Table of wash cycles
Rinse aid and refined salt, 9
Measuring out the rinse aid
Measuring out the refined salt
Care and maintenance, 10
Shutting off the water and electricity supplies
Cleaning the dishwasher
Preventing unpleasant odours
Cleaning the sprayer arms
Cleaning the water inlet filter
Cleaning the filters
Leaving the machine unused for extended periods
Precautions, advice and Assistance,11
General safety
Disposal
Saving energy and respecting the environment
Assistance
Troubleshooting, 12
English, 1
EN
LFTA+ 3204
DISHWASHER
Polski, 13
HU
Magyar, 37
PL
CS
SK
Èesky, 25
Slovenèina, 49

EN
2
Installation
Keep this instruction manual in a safe place for
future reference. If the appliance is sold, given away or
moved, please ensure the manual is kept with the
machine, so that the new owner may benefit from the
advice contained within it.
Please read this instruction manual carefully: it
contains important information regarding the safe
installation, use and maintenance of the appliance.
If the appliance must be moved at any time, keep it in
an upright position; if absolutely necessary, it may be
tilted onto its back.
This appliance is intended to be used in household
and similar applications such as:
- staff kitchen areas in shops, offices and other working
environments;
- farm houses;
- by clients in hotels, motels and other residential type
environments;
- bed and breakfast type environments.
Positioning and levelling
1. Remove the appliance from all packaging and check
that it has not been damaged during transportation.
If it has been damaged, contact the retailer and do not
proceed any further with the installation process.
2. Check the dishwasher by placing it so that its sides or
back panel are in contact with the adjacent cabinets or
even with the wall. This appliance can also be recessed
under a single worktop
* (see the Assembly instruction
sheet).
3. Position the dishwasher on a level and sturdy floor. If
the floor is uneven, the front feet of the appliance may be
adjusted until it reaches a horizontal position. If the
appliance is levelled correctly, it will be more stable and
much less likely to move or cause vibrations and noise
while it is operating.
4. Adjust the height of the rear foot from the front of the
appliance
* on the central lower part of the dishwasher, turning
a hexagonal spanner (red color) with an opening of 8 mm in a
clockwise direction to increase the height or in an
anticlockwise direction to decrease the height.
Connecting the water and electricity
supplies
Connection to the water and electricity supplies
should only be performed by a qualified technician.
The dishwasher should not stand on top of the water
hoses or the electricity supply cable.
The appliance must be connected to the water
supply network using new hoses.
Do not use old hoses.
The water inlet and outlet hoses and the electricity
supply cable may be positioned towards the right or the
left in order to achieve the best possible installation.
Connecting the water inlet hose
To a suitable cold water connection point: before
attaching the hose, run the water until it is perfectly
clear so that any impurities that may be present in the
water do not clog the appliance; after performing this
operation, screw the inlet hose tightly onto a tap with
a ¾ gas threaded connection.
To a suitable hot water connection point: your
dishwasher may be supplied with hot water from the
mains supply (if you have a central heating system
with radiators) provided that it does not exceed a
temperature of 60°C.
Screw the hose to the tap as described for connection
to a cold water supply.
If the inlet hose is not long enough, contact a
specialist store or an authorised technician (see
Assistance).
The water pressure must be within the values
indicated in the Technical data table (see adjacent
information).
The hose should not be bent or compressed.
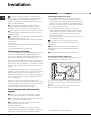
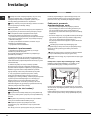
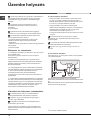
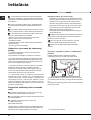
Connecting the water outlet hose
Connect the outlet hose (without bending it) to a drain
duct with a minimum diameter of 4 cm.
The outlet hose must be at a height ranging from 40 to
80 cm from the floor / surface where the dishwasher
rests (A).
Before connecting the water outlet hose to the sink
drain, remove the plastic plug (B).
* Only available in selected models.

EN
3
Anti-flooding protection
To ensure floods do not occur, the dishwasher:
- is provided with a special system which blocks the
water supply in the event of anomalies or leaks from
inside the appliance.
Some models are also equipped with the supplementary
safety device New Acqua Stop
*, which guarantees anti-
flooding protection even in the event of a supply hose
rupture.
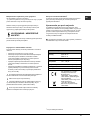
WARNING: HAZARDOUS VOLTAGE!
Under no circumstance should the water inlet hose be
cut as it contains live electrical parts.
Electrical connection
Before inserting the plug into the electrical socket, make
sure that:
The socket is earthed and complies with current
regulations.
The socket can withstand the maximum load of the
appliance, which is indicated on the data plate
located on the inside of the door (see chapter entitled
Description of the appliance).
The power supply voltage falls within the values
indicated on the data plate on the inside of the door.
The socket is compatible with the plug of the
appliance. If this is not the case, ask an authorised
technician to replace the plug (see Assistance); do
not use extension cables or multiple sockets.
Once the appliance has been installed, the power
supply cable and the electrical socket should be easily
accessible.
The cable should not be bent or compressed.
If the power supply cable is damaged, it must be re-
placed by the manufacturer or its Technical Assistance
Service in order to prevent all potential hazards. (See As-
sistance)
The Company shall not be held responsible for any
incidents that occur if these regulations are not
observed.
Anti-condensation strip*
After installing the dishwasher, open the door and stick
the adhesive transparent strip under the wooden shelf in
order to protect it from any condensation which may
form.
Advice regarding the first wash cycle
After the appliance has been installed, immediately
before running the first wash cycle, completely fill the
salt dispenser with water and add only then
approximately 1 kg of salt (see chapter entitled Rinse aid
and refined salt). The water may overflow: this is normal
and is not a cause for concern. Select the water
hardness value (see chapter entitled Rinse aid and
refined salt). - After the salt has been poured into the
machine, the LOW SALT indicator light
* switches off.
If the salt container is not filled, the water softener
and the heating element may be damaged as a result.
* Only available in selected models.
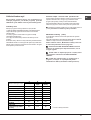
Technical data
Dimensions
width 59.5 cm
height 82 cm
depth 57 cm
Capacity 14 standard place-settings
Water supply
pressure
0,05 ÷ 1MPa (0.5 ÷ 10 bar)
7,25 – 145 psi
Power supply
voltage
See appliance data plate
Total absorbed
power
See appliance data plate
Fuse See appliance data plate
This dishwasher conforms to
the following European
Community Directives:
-2006/95/EC (Low Voltage)
-2004/108/EC (Electromagnetic
Compatibility)
-2005/32/EC (Comm. Reg.
1275/2008) (Ecodesign)
-97/17/EC (Labelling)
-2002/96/EC (WEEE)

EN
4
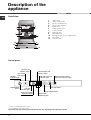
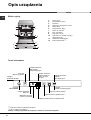
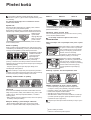
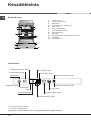
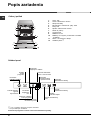
Overall view
Description of the
appliance
1. Upper rack
2. Upper sprayer arm
3. Tip-up compartments
4. Rack height adjuster
5. Lower rack
6. Lower sprayer arm
7. Cutlery basket
8. Washing filter
9. Salt dispenser
10. Detergent and rinse aid dispensers
11. Data plate
12. Control Panel
***
***Only in completely built-in models.
* Only available in selected models.
The number and type of wash cycles and options may vary depending on the dishwasher model.
Control panel
Half load button*
Delayed start button*
ON/OFF/Reset
button
ON/OFF
indicator light
Low salt
indicator light*
Select wash
cycle button
Low rinse aid
indicator light*
Multi-functional tablets
button and indicator light*
Half load upper rack
indicator light*
Half load lower rack
indicator light*
Delayed start
indicator lights*
Wash cycle number
light-up indicator

EN
5
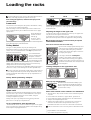
Loading the racks
Before loading the racks, remove all food residues from the
crockery and empty liquids from glasses and cups.
After loading the appliance, check that the sprayer arms
can rotate freely.
Lower rack
The lower rack can hold pans, lids, plates, salad bowls, cutlery,
etc. as seen in the Loading examples.
Plates and large covers should be placed at the sides of the
rack, ensuring that they do not block the rotation of the upper
sprayer arm.
Some dishwasher
models are fitted
with tip-up
sections
*, which
can be used in a
vertical position when arranging plates or in a horizontal position
when arranging pans and salad bowls.
Cutlery basket
The type of cutlery basket may vary according to the
dishwasher model: it may be modular, non-modular or a sliding
version. The non-modular basket must only be positioned at
the front of the lower rack.
The modular basket
may be separated into
two parts, a solution
which is recommended
when performing a half
load wash (only in models offering this option), is available in a
sliding version (positioned at any point on the lower rack by
sliding it between the fixed or tip-up inserts.
- Both versions are fitted with a collapsible sliding system which
means the cutlery can be arranged in the best possible way.
Knives and other utensils with sharp edges must be placed
in the cutlery basket with the points facing downwards, or they
must be positioned horizontally in the tip-up compartments on
the upper rack.
Cutlery basket positioning examples
Upper rack
Load this rack with delicate and lightweight crockery: glasses,
tea and coffee cups, saucers, small salad bowls, saucepans
and small saucepans which are not too soiled, using the
Loading examples as a guide.
Mugs and cups, long sharp knives and serving utensils:
place these on the tip-up compartments
**.
Tip-up compartments with adjustable tilt
- The tilt feature can be used to increase the space in the upper
rack, to position wine glasses with different stem lengths safely
and to improve drying performance.
- Lift the tip-up compartment, slide it gently and position it in the
desired tilt angle.
Adjusting the height of the upper rack
In order to make it easier to arrange the crockery, the upper rack
may be moved to a higher or lower level.
(in models which offer the Baby cycle, the upper rack must be
placed in its lower position when the appliance is being loaded).
The height of the upper rack should ideally be adjusted
WHEN THE RACK IS EMPTY.
Never lift or lower the rack on one side only.
Open the left and right guide rail stops and
pull out the rack; position it higher or lower
as required, slide it along the guide rails
until the front wheels are in place and close
the stops (see figure).
If the rack is fitted with Dual Space
handles
* (see figure), pull out the upper
rack until it reaches its stop point, grip the
handles at the sides of the rack and move it
upwards or downwards, then slowly let it fall
back into place.
Loading examples for the upper/lower rack
Baby Tip-up compartments
*
For dishwasher models with a Baby Cycle,
tip-up compartments suitable for washing
bottles, rings and teats are provided. (see
the instruction sheet)
Items which should not be washed in the dishwasher
Wooden items, objects with wooden or horn handles or glued-
on parts.
Items made from aluminium, copper, brass, pewter or tin.
Items made from plastic material which is not heat-resistant.
Antique or hand-painted porcelain.
Antique silver. Silver which is not antique may, however, be
washed in the dishwasher using a delicate wash cycle,
provided that it does not come into contact with other metals.
We recommend the use of crockery which is dishwasher safe.
* Only available in selected models.
** The number and position may vary.
Tilt A Tilt B Tilt C

EN
6
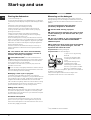
Start-up and use
Starting the dishwasher
1. Turn the water tap on.
2. Open the door and press the ON/OFF button: you will hear
a short beep and the display and option indicator lights switch
on.
3. Measure out the detergent (see below).
4. Load the racks (see Loading the racks).
5. Select the wash cycle in accordance with the type of
crockery and its soil level (see Table of wash cycles),
by
pressing the P button.
6. Select the wash options (see adjacent information).
7. Start the wash cycle by shutting the door: a long beep
signals the start of the wash cycle.
8. Two short beeps and one long one indicate the end of the
wash cycle and the wash cycle number flashes on the display.
Open the door, switch off the appliance by pressing the ON/
OFF button, shut off the water tap and unplug the appliance
from the electricity socket.
9. Wait for a few minutes before removing the crockery, in
order to avoid burns. Unload the racks, beginning with the
lower level.
- The machine will switch off automatically
during certain periods of inactivity, in order to
minimise electricity consumption.
AUTO WASH CYCLES*: this model of dishwasher is
equipped with a special sensor which can be used to assess
the level of soiling and automatically select the most efficient
and economic wash cycle accordingly.
The duration of the auto wash cycles may vary due to the
operation of the sensor.
If the crockery is only lightly soiled or if it has been rinsed
with water before being placed in the dishwasher, reduce the
amount of detergent used accordingly.
Modifying a wash cycle in progress
If a mistake was made during the wash cycle selection
process it is possible to change the cycle, provided that it has
only just begun: open the door, avoiding the escaping steam,
and press and hold the ON/OFF button; the machine will
switch off with a long beep. Switch the machine back on using
the ON/OFF button and select the new wash cycle and any
options desired; start the cycle by closing the door.
Adding extra crockery
Without switching off the machine, open the door, taking care
to avoid the escaping steam, and place the crockery inside
the dishwasher. Close the door: the cycle starts from the point
at which it was interrupted.
Accidental interruptions
If the door is opened during the wash cycle, or if there is a
power cut, the cycle stops. It starts again from the point at
which it was interrupted once the door has been shut or once
the electricity supply is restored.
Measuring out the detergent
A good wash result also depends on the correct amount of
detergent being used; exceeding the stated amount does not
result in a more effective wash and increases environmental
pollution.
Only use detergent which has been
specifically designed for dishwashers.
DO NOT USE washing up liquid.
Using excessive detergent may result in foam
residue remaining in the machine after the cycle
has ended.
The use of tablets is only recommended for
models which offer the MULTI-FUNCTIONAL
TABLETS option.
To achieve the best results from each washing
and drying cycle, powder detergent, rinse aid
liquid and salt should be used.
Compartment A: Washing detergent
Compartment B: Pre-wash detergent
1. Open cover C by pressing
button D.
2. Pour in the detergent after
consulting the Table of wash
cycles:
For powder detergent use
compartments A and B.
For detergent in tablet form:
when the cycle requires 1 tablet,
place it in compartment A and
close the cover; when it requires 2, place the second tablet at
the bottom of the appliance.
3. Remove detergent residues from the edges of the
compartment and close the cover until it clicks.
* Only available in selected models.

EN
7
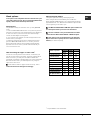
Multi-functional tablets*
This option optimises washing and drying results.
When using multi-functional tablets, press the MULTI-
FUNCTIONAL TABLETS button. The corresponding indicator
light will illuminate. The Multi-functional tablets option results
in the lengthening of the wash cycle.
The MULTI-FUNCTIONAL TABLETS option remains set
for subsequent wash cycles if it is not deselected.
The use of tablets is only recommended for models
which offer the MULTI-FUNCTIONAL TABLETS option.
This option is not recommended for use with wash
cycles which do not specify the use of multi-functional
tablets (see Table of options).
* Only available in selected models.
A B C
Table of options
Delayed
Start
Half
Load
Tabs
1. Auto Intensive
Yes
Yes
Yes
2. Auto Normal
Yes
Yes
Yes
3. Daily wash
Yes
Yes
Yes
4. Soak
Yes
Yes
No
5. Eco
Yes
Yes
Yes
6. Rapid
Yes
No
Yes
7. Crystal
Yes
Yes
Yes
8. Auto Duo Wash
Yes
No
Yes
9. Ultra Intensive
Yes
Yes
Yes
10. Special Guest
Yes
Yes
No
Wash options
If an option is not compatible with the selected was cycle
(see Table of wash cycles), the corresponding LED flashes
rapidly 3 times and 2 short beeps will sound.
Delayed start
It is possible to delay the start time of the cycle by 3, 6 or 9
hours.
1. Press the DELAYED START button: every time it is pressed
a buzzer sounds and the selected period of time is displayed.
2. Select the wash cycle and shut the door: after the beep
sounds, the timer begins counting down.
3. Once this time has elapsed, the indicator light switches off
and the wash cycle begins.
To adjust the delay time and select a smaller period of time,
press the DELAYED START button. To cancel it, press the
button repeatedly until the selected delayed start indicator
light switches off. The wash cycle will start automatically as
soon as the door is shut.
Half load using the upper or lower rack*
If there are not many dishes to be washed, a half load cycle
may be used in order to save water, electricity and detergent.
Select the wash cycle and press the HALF LOAD button
repeatedly: the triangle corresponding to the selected load will
illuminate and the wash cycle will take place only using the
upper or the lower rack.
Remember to load the upper or lower rack only, and to
reduce the amount of detergent accordingly.

EN
8
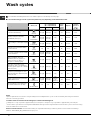
Wash cycles
For available OPTIONS please refer to the Table of options on the Start-up and use page.
The number and type of wash cycles and options may vary depending on the dishwasher model.
Detergent
(A) = compartment A
(B) = compartment B
Wash cycle selection instructions Wash cycle
Powder Liquid Tablets
Wash
cycles
which
include
drying
Options
Wash cycle
duration
(tolerance
±10%)
Hrs. Min.
Heavily soiled dishes and pans (not to
be used for delicate items). 1. Auto
Intensive
35 g (A)
35 ml (A)
1 (A)
Yes
A–B–C
2:25’
Normally soiled pans and dishes.
Standard daily wash cycle.
2. Auto
Normal Wash
29 g (A)
6 g (B)
29 ml (A)
6 ml (B)
1 (A)
Yes
A–B–C
1:50’
Limited quantity of daily soiling.
(4 place settings + 1 saucepan +1 frying
pan).
3. Daily A 60’
25 g (A)
25 ml (A)
1 (A)
No
A–B–C
1:00’
Pre-wash for dishes while awaiting
completion of the load with the dishes
from the next meal.
4. Soak
No
No
No
No
A – B
0:08’
Environmentally-friendly wash cycle with
low energy consumption levels, suitable
for pans and dishes.
5. Eco
*
29 g (A)
6 g (B)
29 ml (A)
6 ml (B)
1 (A)
Yes
A–B-C
2:55’
Economic and fast wash to be used for
lightly soiled dishes. (Run cycle
immediately after use) (2 plates + 2
glasses + 4 pieces of cutlery + 1
saucepan + 1 small frying pan).
6. Rapid
25 g (A)
25 ml (A)
1 (A)
No
A - C
0:25’
Economic and fast wash for delicate
items which are sensitive to high
temperatures. (Run cycle immediately
after use) (glasses upper rack + delicate
plates lower rack).
7. Crystal
35 g (A)
35 ml (A)
1 (A)
Yes
A– B–C
1:30’
Wash spread over the two racks:
delicate for crystal and glasses on the
upper rack and heavy duty for the pans
on the lower rack.
8. Auto
Duo Wash
35 g (A)
35 ml (A)
1 (A)
Yes
A–C
1:45’
Heavily soiled saucepans or pans with
residual dried-on food.
9. Ultra Intensive
35 g (A)
5 g (B)
35 ml (A)
5 ml (B)
1 (A)
1 (bottom
of the
appliance)
Yes
A–B–C
2:35'
Rinse and drying cycle for dishes that
are seldom used and are only dusty.
10. Guest Wash
No
No
No
Yes
A–B
0:32’
Notes:
Optimum performance levels when using the "Daily wash" and "Rapid wash" cycles can be achieved by observing the maximum
amounts of crockery specified.
To make it easier to measure out the detergent, it is worth remembering that:
1 tablespoon = 15 gr. of powder = approximately 15 ml of liquid - 1 teaspoon = 5 gr. of powder = approximately 5 ml of liquid
*The Eco wash cycle adheres to the regulation EN-50242. Although it has a longer duration than other wash cycles it uses less energy
and is les harmful to the environment.
Note for Test Laboratories: for information relating to comparative EN testing conditions, please send an email to the following
address: [email protected]

EN
9
Rinse aid and refined salt
Only use products which have been
specifically designed for dishwashers.
Do not use table salt or industrial salt, or
washing up liquid.
Follow the instructions given on the packaging.
If using a multi-functional product it is not necessary to add
rinse aid; however, we recommend that you add salt,
especially if you live in an area where the water is hard or
very hard. Follow the instructions given on the packaging.
If you do not add salt or rinse aid, the LOW
SALT
* and LOW RINSE AID* indicator lights
remain lit.
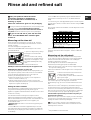
Measuring out the rinse aid
Rinse aid makes it easier for the crockery to dry, as water
runs off surfaces more readily and therefore does not leave
streaks or marks.
The rinse aid dispenser should be filled:
When the LOW RINSE AID
* indicator light on the control
panel is illuminated;
1. Open the dispenser by turning
the lid (G) in an anticlockwise
direction.
2. Pour in the rinse aid, making
sure it does not overflow from the
dispenser. If this happens, clean
the spill immediately with a dry
cloth.
3. Screw the lid back on.
NEVER pour the rinse aid directly into the appliance tub.
Adjusting the amount of rinse aid
If you are not completely satisfied with the drying results, you
may adjust the quantity of rinse aid used. Use a screwdriver
to turn the dosage adjuster (F) to one of the 6 pre-set
positions (the default position is set to 4):
If there are streaks on the crockery, set the adjustment
device to a lower number (1-3).
If drops of water remain on the crockery or if there are
limescale marks present after the cycle has finished, set the
adjuster to a higher number (4-6).
Setting the water hardness
Every dishwasher is equipped with a water softener which, by
using refined salt designed especially for this type of
appliance, supplies water without limescale which is then used
to wash the crockery.
This dishwasher offers a setting which helps to reduce
pollution and optimises washing performance in accordance
with the water hardness level in your area. This information can
be obtained from the organisation which supplies your
household with water.
- Open the door and switch on the machine by pressing the
ON/OFF button.
- Press the P button and hold for approximately 5 seconds;
two short beeps will sound and the set hardness number will
flash slowly on the display (the water softening system is set
to number 3).
- Press the P button repeatedly until the desired hardness
level has been reached (1-2-3-4-5
* see Water hardness
table).
- To exit the function, wait approximately few seconds or press
another option
* button, or switch off the machine using the ON/
OFF button.
Even if using multi-functional tablets, the salt dispenser should
still be filled.
(°dH = hardness measured in German degrees - °f =
hardness measured in French degrees - mmol/l = millimoles
per litre)
Measuring out the refined salt
In order to achieve the best possible results using a wash
cycle, make sure that the dispenser is never empty. Refined
salt removes limescale from the water, thus avoiding the
formation of deposits on crockery.
The salt dispenser is located in the lower part of the
dishwasher (see Description) and should be filled:
When the green float
* cannot be seen by simply looking at
the cap of the salt dispenser.
When the LOW SALT
* indicator light on the control panel is
illuminated;
1. Remove the lower rack and unscrew the
container cap (anticlockwise).
2. The first time you do this: fill the water tank
right up to its edge.
3. Position the funnel
* (see figure) and fill the
salt container right up to its edge (this should hold
approximately 1 kg); it is not unusual for a little water to leak
out.
4. Remove the funnel
* and wipe any salt residue away from
the opening; rinse the cap under running water and then
screw it on, the head facing downwards so as to let the water
flow out of the four cracks which are arranged in a star shape
on the lower part of the cap. (Salt cap with green float
*)
It is advisable to perform this procedure every time you
add salt to the container.
Make sure the cap is screwed on tightly, so that no detergent
can get into the container during the wash cycle (this could
damage the water softener beyond repair).
When necessary, measure out the salt before a wash
cycle so that any saline solution which has leaked out of the
salt dispenser is removed.
* Only available in selected models.
G
F
Water Hardness Table
°dH °fH mmol/l level
0 6 0 10 0 1 1
6 11 11 20 1.1 2 2
12 17 21 30 2.1 3 3
17 34 31 60 3.1 6 4
34 50 61 90 6.1 9
5
*
For values between 0°f and 10°f, we do not
recommend the use of salt.
* this setting may cause a slight increase in the
duration of the cycle.

EN
10
Care and maintenance
Shutting off the water and electricity
supplies
Turn off the water tap after every wash cycle to avoid
leaks.
Always unplug the appliance when cleaning it and
when performing maintenance work.
Cleaning the dishwasher
The external surfaces of the machine and the control
panel may be cleaned using a non-abrasive cloth
which has been dampened with water. Do not use
solvents or abrasive products.
Any marks on the inside of the appliance may be
removed using a cloth dampened with water and a
little vinegar.
Preventing unpleasant odours
Always keep the door of the appliance ajar in order to
avoid moisture from forming and being trapped inside
the machine.
Clean the seals around the door and detergent
dispensers regularly using a damp sponge. This will
avoid food becoming trapped in the seals, which is
the main cause behind the formation of unpleasant
odours.
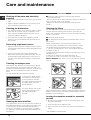
Cleaning the sprayer arms
Food residue may become encrusted onto the sprayer
arms and block the holes used to spray the water. It is
therefore recommended that the arms are checked from
time to time and cleaned with a small non-metallic
brush.
The two sprayer arms may both be removed.
To remove the upper sprayer
arm, rotate the locking ring in
an anti-clockwise direction.
The upper sprayer arm should
be replaced with the holes
facing upwards.
The lower sprayer arm can be
removed by pressing on the
side tabs and pulling it
upwards.
Cleaning the water inlet filter*
If the water hoses are new or have not been used for an
extended period of time, let the water run to make sure it
is clear and free of impurities before performing the
necessary connections. If this precaution is not taken,
the water inlet could become blocked and damage the
dishwasher.
Clean the water inlet filter at the tap outlet regularly.
- Turn off the water tap.
- Unscrew the end of the water inlet hose, remove the filter and
clean it carefully under running water.
- Replace the filter and screw the water hose back into
position.
Cleaning the filters
The filter assembly consists of three filters which remove food
residues from the washing water and then recirculate the
water. They should be cleaned if you wish to achieve the best
results in every wash.
Clean the filters regularly.
The dishwasher should not be used without filters, or if the
filter is loose.
After several washes, check the filter assembly and if
necessary clean it thoroughly under running water, using a
non-metallic brush and following the instructions below:
1. Turn the cylindrical filter C in an anti-clockwise direction
and pull it out (fig. 1).
2. Remove the cup filter B by exerting a slight pressure on the
side flaps (fig. 2).
3. Slide out the stainless steel plate filter A (fig. 3).
4. Inspect the trap and remove any food residue.
NEVER REMOVE the wash cycle pump (black detail)
(fig. 4).
After cleaning the filters, replace the filter assembly and fix it in
position correctly; this is essential for maintaining the efficient
operation of the dishwasher.
Leaving the machine unused for extended
periods
Disconnect the appliance from the electricity supply and
shut off the water tap.
Leave the door of the appliance ajar.
When you return, run a wash cycle when the dishwasher is
empty.
* Only available in selected models.
2
C
B
1
3
4

EN
11
Precautions, advice
and Assistance
This appliance was designed and manufactured in
compliance with current international safety standards. The
following information has been provided for safety reasons
and should therefore be read carefully.
General safety
This appliance is not intended for use by persons
(including children) with reduced physical, sensory or
mental capabilities, or lack of experience and knowledge,
unless they have been given supervision or instruction
concerning use of the appliance by a person responsible
for their safety.
Children should be supervised to ensure that they do not
play with the appliance.
The appliance was designed for domestic use inside the
home and is not intended for commercial or industrial use.
The appliance must be used by adults only, to wash
domestic crockery in accordance with the instructions in
this manual.
The appliance must not be installed outdoors, even in
covered areas. It is extremely dangerous to leave the
machine exposed to rain and storms.
Do not touch the appliance when barefoot.
When unplugging the appliance always pull the plug from
the mains socket, do not pull on the cable.
The water supply tap must be shut off and the plug should
be removed from the electrical socket before cleaning the
appliance or carrying out any maintenance work.
If the appliance breaks down, do not under any
circumstances touch the internal parts in an attempt to
perform the repair work yourself.
Never touch the heating element.
Do not lean or sit on the open door of the appliance: this
may cause the appliance to overturn.
The door should not be left open as it may create a
dangerous obstacle.
Keep detergent and rinse aid out of reach of children.
The packaging material should not be used as a toy.
Disposal
Disposal of packaging materials: observe local legislation
so that the packaging may be reused.
The European Directive 2002/96/EC relating to Waste
Electrical and Electronic Equipment (WEEE) states that
household appliances should not be disposed of using the
normal solid urban waste cycle. Exhausted appliances
should be collected separately in order to optimise the cost
of re-using and recycling the materials inside the machine,
while preventing potential damage to the atmosphere and
to public health. The crossed-out dustbin is marked on all
products to remind the owner of their obligations regarding
separated waste collection.
For further information relating to the correct disposal of
household appliances, owners may contact the relevant
public authority or the local appliance dealer.
Saving energy and respecting the
environment
Saving water and energy
Only begin a wash cycle when the dishwasher is full. While
waiting for the dishwasher to be filled, prevent unpleasant
odours using the Soak cycle (see Wash cycles).
Select a wash cycle which is suited to the type of crockery
and to the soil level of the crockery using the Table of wash
cycles:
- For dishes with a normal soil level, use the Eco wash
cycle, which guarantees low energy and water
consumption levels.
- If the load is smaller than usual activate the Half load
option
* (see Start-up and use).
If your electricity supply contract gives details of electricity
saving time bands, run wash cycles during the periods
when a lower tariff is applied. The Delayed start
* button
(see Start-up and use) helps you organise the wash cycles
accordingly.
Phosphate-free and chlorine-free detergents
containing enzymes
We strongly recommend that you use detergents that do
not contain phosphates or chlorine, as these products are
harmful to the environment.
Enzymes provide a particularly effective action at
temperatures around 50°C, and as a result detergents
containing enzymes can be used in conjunction with low-
temperature wash cycles in order to achieve the same
results as a normal 65°C wash cycle.
To avoid wasting detergent, use the product in appropriate
quantities based on the manufacturers recommendations,
the hardness of the water and the soil level and quantity of
crockery to be washed. Even if they are biodegradable,
detergents contain substances which may alter the balance
of nature.
Assistance
Before contacting Assistance:
Check whether the problem can be resolved using the
Troubleshooting guide (see Troubleshooting).
Restart the programme to check whether the problem has
ceased to exist.
If the problem persists, contact the Authorised Technical
Assistance Service.
Never use the services of unauthorised technicians.
Please have the following information to hand:
The type of malfunction.
The appliance model (Mod.).
The serial number (S/N).
This information can be found on the appliance data plate (see
Description of the appliance).
* Only available in selected models.

EN
12
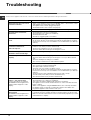
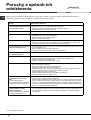
Troubleshooting
Whenever the appliance fails to work, check for a solution from the following list before calling for Assistance.
Problem: Possible causes / Solutions:
The dishwasher does not start or
cannot be controlled
• Switch off the appliance by pressing the ON/OFF button, switch it back on after
approximately one minute and reset the program.
• The appliance has not been plugged in properly.
• The dishwasher door has not been shut properly.
The door won’t close • The lock was released. Strongly push the door until a “clacking” noise is heard.
No water drains out from the
dishwasher.
• The dishwasher cycle has not yet finished.
• The water inlet hose is bent (see Installation).
• The drain duct is blocked.
• The filter is clogged up with food residues.
The dishwasher makes excessive
noise.
• The dishes are rattling against each other or against the sprayer arms.
• An excessive amount of foam has been produced: the detergent has not been
measured out correctly or it is not suitable for use in dishwashers (see Start-up
and use).
The dishes and glasses are
covered in a white film or
limescale deposits.
• The level of the refined salt is low or the dosage setting is not suited to the
hardness of the water (see Rinse aid and salt).
• The lid on the salt dispenser is not closed properly.
• The rinse aid has been used up or the dosage is too low.
The dishes and glasses are
streaked or have a bluish tinge.
• The rinse aid dosage is too high.
The crockery has not been dried
properly.
• A wash cycle without a drying program has been selected.
• The rinse aid has been used up or the dosage is too low (see Rinse aid and
salt).
• The rinse aid dispenser setting is not suitable.
• The crockery is made from non-stick material or plastic.
The dishes are not clean. • The racks are overloaded (see Loading the racks).
• The crockery has not been arranged well.
• The sprayer arms cannot move freely.
• The wash cycle is too gentle (see Wash cycles).
• An excessive amount of foam has been produced: the detergent has not been
measured out correctly or it is not suitable for use in dishwashers (see Start-up
and use).
• The lid on the rinse aid compartment has not been shut correctly.
• The filter is dirty or blocked (see Care and maintenance).
• The refined salt level is low (see Rinse aid and salt).
The dishwasher does not take any
water in - Tap shut-off alarm
(several short beeps are emitted)
(the ON/OFF indicator light flashes
and the number 6 appears on the
display).
• There is no water in the mains supply.
• The water inlet hose is bent (see Installation).
• Turn on the tap and the appliance will start after a few minutes.
• The appliance lock has been activated because no action was taken when the
beeps sounded.
Switch off the appliance using the ON/OFF button, turn on the tap and switch
the appliance back on after 20 seconds by pressing the same button. Re-
program the appliance and restart the wash cycle.
Water inlet hose alarm / Water inlet
filter blocked
(the ON/OFF indicator light flashes
and the number 7 appears on the
display).
• Switch off the appliance by pressing the ON/OFF button. Shut off the water tap
to eliminate the risk of flooding and remove the plug from the electrical socket.
Make sure the water inlet filter has not become blocked by impurities (see “Care
and maintenance” chapter).

PL
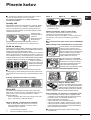
!
Instrukcja obs³ugi
Spis treci
Instalacja, 14-15
Ustawianie i poziomowanie
Pod³¹czenie do sieci wodnej i elektrycznej
Ostrze¿enia dotycz¹ce pierwszego mycia
Dane techniczne
Opis urz¹dzenia, 16
Widok ogólny
Panel sterowania
Nape³nianie koszy, 17
Kosz dolny
Kosz na sztuæce
Kosz górny
Uruchomienie i u¿ytkowanie, 18-19
Uruchomienie zmywarki
Dozowanie rodka myj¹cego
Opcje mycia
Programy, 20
Tabela programów
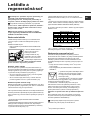
Nab³yszczacz i sól regeneracyjna, 21
Dozowanie rodka nab³yszczaj¹cego
Dozowanie soli regeneracyjnej
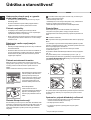
Konserwacja i utrzymanie, 22
Wy³¹czanie wody i pr¹du elektrycznego
Czyszczenie zmywarki
Unikanie powstawania brzydkich zapachów
Czyszczenie spryskiwaczy
Czyszczenie filtra dop³ywu wody
Czyszczenie filtrów
W przypadku d³u¿szej nieobecnoci
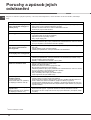
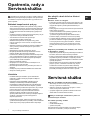
rodki ostro¿noci zalecenia i Serwis
Techniczny, 23
Ogólne zasady bezpieczeñstwa
Usuwanie odpadów
Oszczêdnoæ i ochrona rodowiska
Przed zwróceniem siê do Serwisu Technicznego
Anomalie i rodki zaradcze, 24
Polski, 13
PL
LFTA+ 3204
ZMYWARKA

PL
"
Instalacja
Nale¿y zachowaæ niniejsz¹ ksi¹¿eczkê, aby móc z niej
korzystaæ w ka¿dej chwili. W przypadku sprzeda¿y,
odst¹pienia lub przeniesienia zmywarki, upewniæ siê, ¿e
instrukcja obs³ugi pozosta³a razem z urz¹dzeniem.
Nale¿y uwa¿nie przeczytaæ instrukcjê: zawiera ona wa¿ne
informacje dotycz¹ce instalacji, obs³ugi
i bezpieczeñstwa.
W przypadku przenoszenia nale¿y trzymaæ urz¹dzenie w
pozycji pionowej; w razie koniecznoci przechyliæ je do ty³u.
To urz¹dzenie zosta³o zaprojektowane do u¿ytku
domowego lub podobnych zastosowañ, na przyk³ad:
- w pomieszczeniach przystosowanych do u¿ytku kuchennego
przez personel w sklepach, biurach i innych miejscach pracy;
- w domach kolonijnych;
- do u¿ytku przez klientów w hotelach, motelach i innych
obiektach typu mieszkaniowego;
- w pensjonatach bed and breakfast.
Ustawianie i poziomowanie
1. Rozpakowaæ urz¹dzenie i sprawdziæ czy nie uleg³o
uszkodzeniu podczas transportu.
W przypadku stwierdzenia uszkodzeñ nie pod³¹czaæ go i
powiadomiæ sprzedawcê.
2. Ustawiæ zmywarkê tak, aby jej boki lub ty³ przylega³y do
s¹siaduj¹cych z ni¹ mebli lub do ciany. Urz¹dzenie mo¿e te¿
zostaæ zabudowane pod jednolitym blatem kuchennym
* (patrz
karta monta¿owa).
3. Ustawiæ zmywarkê na równym i twardym pod³o¿u.
Skompensowaæ nierównoci odkrêcaj¹c lub dokrêcaj¹c
przednie nó¿ki a¿ urz¹dzenie znajdzie siê w pozycji poziomej.
Dok³adne wypoziomowanie nadaje stabilnoæ i pozwala
unikn¹æ wibracji, ha³asu oraz przesuwania siê zmywarki.
4
*. Aby wyregulowaæ wysokoæ tylnej nó¿ki, nale¿y
przekrêciæ szeciok¹tn¹ tulejê w kolorze czerwonym,
znajduj¹c¹ siê w dolnej, przedniej, rodkowej czêci zmywarki
za pomoc¹ klucza szeciok¹tnego 8 mm, obracaj¹c j¹ w
kierunku zgodnym z ruchem wskazówek zegara, aby
zwiêkszyæ wysokoæ i w kierunku przeciwnym do ruchu
wskazówek zegara, aby j¹ zmniejszyæ (patrz karta instrukcji
zabudowy za³¹czona do dokumentacji).
Pod³¹czenie do sieci wodnej i
elektrycznej
Przystosowanie instalacji elektrycznej oraz hydraulicznej
powinno byæ dokonywane wy³¹cznie przez wykwalifikowany
personel.
Zmywarka nie powinna byæ ustawiona na przewodach
rurowych ani na kablu zasilania elektrycznego.
Urz¹dzenie powinno byæ pod³¹czone do sieci
wodoci¹gowej przy zastosowaniu nowych przewodów
rurowych.
Nie nale¿y ponownie wykorzystywaæ starych przewodów.
Przewody doprowadzaj¹ce i odprowadzaj¹ce wodê oraz
przewód zasilania elektrycznego mog¹ byæ skierowane w
prawo lub w lewo, aby umo¿liwiæ jak najlepsz¹ instalacjê.
Pod³¹czenie przewodu
doprowadzaj¹cego wodê
Do króæca zimnej wody: dobrze przykrêciæ przewód
doprowadzaj¹cy do kurka z koñcówk¹ gwintowan¹ 3/4
gaz; przed dokrêceniem spuciæ wodê a¿ stanie siê
przejrzysta, aby ewentualne zanieczyszczenia nie zatka³y
urz¹dzenia.
Do króæca ciep³ej wody: w przypadku instalacji centralnego
ogrzewania zmywarka mo¿e byæ zasilana ciep³¹ wod¹ z
sieci, o ile jej temperatura nie przekracza 60°C.
Przykrêciæ przewód do kurka zgodnie z opisem dla króæca
zimnej wody.
Jeli d³ugoæ przewodu doprowadzaj¹cego jest
niewystarczaj¹ca, nale¿y zwróciæ siê do specjalistycznego
sklepu lub do autoryzowanego technika (patrz Serwis
Techniczny).
Cinienie wody powinno mieciæ siê w zakresie wartoci
podanych w tabeli danych technicznych (patrz obok).
Nale¿y zwróciæ uwagê, aby na przewodzie nie by³o zgiêæ
ani zwê¿eñ.
Pod³¹czenie wê¿a odprowadzaj¹cego wodê
Pod³¹czyæ przewód odprowadzaj¹cy, nie zginaj¹c go, do
przewodu kanalizacyjnego o rednicy minimum 4 cm.
Przewód odprowadzaj¹cy musi znajdowaæ siê na wysokoci
od 40 do 80 cm od pod³ogi lub pod³o¿a, na którym umieszczono
zmywarkê (A).
Przed pod³¹czeniem przewodu odprowadzaj¹cego wodê do
syfonu zlewozmywaka, nale¿y usun¹æ plastikow¹ zatyczkê
(B).
* Tylko w niektórych modelach.

PL
#
Zabezpieczenie przed zalaniem
Aby zagwarantowaæ, ¿e nie dojdzie do zalania, zmywarka:
- wyposa¿ona jest w system przerywaj¹cy dop³yw wody w
przypadku pojawienia siê nieprawid³owoci w dzia³aniu lub
wewnêtrznych wycieków.
Niektóre modele wyposa¿one s¹ w dodatkowe urz¹dzenie
zabezpieczaj¹ce New Acqua Stop
*, które gwarantuje ochronê
przed zalaniem równie¿ w przypadku pêkniêcia przewodu
doprowadzaj¹cego wodê.
UWAGA: NIEBEZPIECZNE NAPIÊCIE!
Przewód doprowadzaj¹cy wodê nie mo¿e byæ w ¿adnym
wypadku ciêty, gdy¿ zawiera on elementy znajduj¹ce siê pod
napiêciem.
Pod³¹czenie do sieci elektrycznej
Przed w³o¿eniem wtyczki do gniazdka nale¿y siê upewniæ, czy:
gniazdko ma odpowiednie uziemienie i odpowiada
obowi¹zuj¹cym przepisom;
gniazdko jest w stanie wytrzymaæ maksymalne obci¹¿enie
mocy urz¹dzenia, wskazane na tabliczce znamionowej
umieszczonej na wewnêtrznej obudowie drzwi (patrz
rozdzia³ Opis zmywarki);
napiêcie zasilania odpowiada wartociom podanym na
tabliczce znamionowej umieszczonej na wewnêtrznej
obudowie drzwi;
gniazdko jest kompatybilne z wtyczk¹ urz¹dzenia. W
przeciwnym wypadku nale¿y zleciæ wymianê wtyczki
autoryzowanemu technikowi (patrz Serwis Techniczny); nie
stosowaæ przed³u¿aczy ani rozga³êników.
Po zainstalowaniu urz¹dzenia przewód zasilana
elektrycznego oraz gniazdko elektryczne powinny byæ ³atwo
dostêpne.
Przewód nie powinien byæ powyginany ani zgnieciony.
Przewód powinien byæ okresowo sprawdzany i
wymieniany wy³¹cznie przez autoryzowanych techników (patrz
Serwis Techniczny).
Producent nie ponosi ¿adnej odpowiedzialnoci w
przypadku nieprzestrzegania tych zasad.
Pasek antykondensacyjny*
Po zabudowaniu zmywarki otworzyæ drzwi i przykleiæ
przezroczysty pasek samoprzylepny pod drewnianym blatem,
aby zabezpieczyæ go przed ewentualnymi skroplinami.
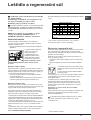
Ostrze¿enia dotycz¹ce pierwszego mycia
Po zainstalowaniu, tu¿ przed pierwszym zmywaniem, nape³niæ
do koñca wod¹ pojemnik na sól, a nastêpnie dodaæ oko³o 1 kg
soli (patrz rozdzia³ rodek nab³yszczaj¹cy i sól
regeneracyjna): to normalne, ¿e woda przelewa siê. Wybraæ
stopieñ twardoci wody (patrz rozdzia³ rodek
nab³yszczaj¹cy i sól regeneracyjna). - Po wsypaniu lampka
kontr. BRAK SOLI
* zganie.
Nie nape³nienie pojemnika na sól mo¿e spowodowaæ
uszkodzenie zmiêkczacza wody i elementu grzewczego.
* Tylko w niektórych modelach.
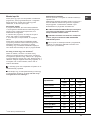
Dane techniczne
Wymiary
szerokość cm 59,5
wysokość cm 82
głębokość cm 57
Pojemność 14 nakryć standardowych
Ciśnienie wody
zasilania
0,05 ÷ 1 MPa (0,5 ÷ bar)
7,25 – 145 psi
Napięcie zasilaniael
ektrycznego
Patrz tabliczka danych
technicznych
Całkowita moc
pochłaniana
Patrz tabliczka danych
technicznych
Bezpiecznik
topikowy
Patrz tabliczka danych
technicznych
Niniejsze urządzenie zostało
wyprodukowane zgodnie z
następującymi
dyrektywami unijnymi:
-2006/95/EC (o Niskim Napięciu)
- 2004/108/EC (o Zgodności
Elektromagnetycznej)
- 2005/32/EC (Comm. Reg. 1275/
2008) (Ecodesign)
- 97/17/CE (Nakładanie
etykietek)
- 2002/96/ EC

PL
$
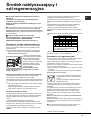
Widok ogólny
Opis urz¹dzenia
1. Kosz górny
2. Spryskiwacz górny
3. Pó³eczki
4. Regulacja wysokoci kosza
5. Kosz dolny
6. Spryskiwacz dolny
7. Kosz na sztuæce
8. Filtr zmywania
9. Pojemnik na sól
10. Pojemniki na rodek myj¹cy i
nab³yszczaj¹cy
11. Tabliczka znamionowa
12. Panel sterowania
***
***Tylko dla modeli do ca³kowitej zabudowy.
* Tylko w niektórych modelach.
Numery i rodzaje programów zmieniaj¹ siê w zale¿noci od modelu zmywarki.
Panel sterowania
Lampka
kontrolna ON-OFF
Przycisk
Wybór programu
Przycisk
ON-OFF/RESET
Lampka kontrolna
Brak soli*
Lampka kontrolna
Brak rodka
nab³yszczaj¹cego*
Przycisk Start z opónieniem*
Lampki kontrolne Start z opónieniem*
Lampka kontrolna
Po³owa wsadu w
koszu górnym/
dolnym*
Przycisk Po³owa wsadu*
Przycisk
Tabletki wielofunkcyjne*
Lampka kontrolna
Tabletki
wielofunkcyjne*
Wskanik wietlny
numeru programu

PL
%
Nape³nianie koszy
Przed nape³nieniem koszy usun¹æ z naczyñ resztki
¿ywnoci i opró¿niæ szklanki oraz kieliszki z pozosta³ych w
nich p³ynów.
Po nape³nieniu koszy sprawdziæ czy spryskiwacze
obracaj¹ siê swobodnie.
Kosz dolny
W dolnym koszu mo¿na umieszczaæ garnki, pokrywki, talerze,
salaterki, sztuæce itp.wed³ug Przyk³adów nape³niania.
Du¿e garnki oraz pokrywki najlepiej ustawiaæ po bokach kosza,
uwa¿aj¹c, aby nie zablokowaæ obrotów górnego spryskiwacza.
Niektóre modele
zmywarek wyposa¿one
s¹ w pochylne pó³ki
*,
mo¿na je ustawiaæ w
pozycji pionowej do
wk³adania talerzy lub w pozycji poziomej do wk³adania garnków
i salaterek.
Kosz na sztuæce
Kosz na sztuæce mo¿e byæ ró¿nego rodzaju w zale¿noci od
modelu zmywarki. Nie rozk³adany, sk³adany, przesuwny. Kosz
nie rozk³adany mo¿e byæ ustawiony tylko w górnej czêci
dolnego kosza.
Mo¿na go podzieliæ na
dwie czêci,
rozwi¹zanie takie jest
wskazane w przypadku
mycia z po³ow¹ wsadu
(w mod. posiadaj¹cych tak¹ opcjê), mo¿e te¿ on byæ
przesuwny, to znaczy umieszczany w dowolnym miejscu
dolnego kosza poprzez przesuwanie go w sta³ych lub
pochylnych prowadnicach.
- Wyposa¿ony jest w przesuwne pó³eczki, które umo¿liwiaj¹
optymalne u³o¿enie sztuæców.
No¿e i ostro zakoñczone narzêdzia nale¿y uk³adaæ w koszu
na sztuæce tak, aby ich ostre koñce by³y skierowane w dó³, lub
te¿ umieszczaæ je na wysuwanych pó³eczkach górnego kosza
w pozycji poziomej.
Przyk³ady rozmieszczenia kosza na sztuæce
Kosz górny
Umieszczaæ w nim naczynia delikatne i lekkie: szklanki, fili¿anki
do herbaty i kawy, talerzyki, p³askie salaterki, patelnie, niskie
lekko zabrudzone garnki, wed³ug Przyk³adów nape³niania.
Fili¿anki i kubeczki, D³ugie i ostre no¿e, sztuæce codzienne:
uk³adaæ je na pó³eczkach
**.
Pó³eczki o ró¿nym nachyleniu
- Nachylenie pozwala na uzyskanie jak najwiêkszej przestrzenia
w koszu górnym, aby ustawiæ lamki o rónej d³ugoci nó¿ek i aby
polepszyæ wyniki suszenia.
- Podnieæ pó³eczkê, przesun¹æ lekko i ustawiæ w dowolnym
nachyleniu.
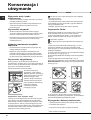
Regulowanie wysokoci górnego kosza
Aby u³atwiæ uk³adanie naczyñ, górny kosz mo¿na ustawiæ na górze
albo na dole. (w przypadku wsadów Baby w modelach
wyposa¿onych w cykl Baby górny kosz musi byæ ustawiony na
dole).
Lepiej wyregulowaæ wysokoæ górnego kosza gdy
KOSZ JEST PUSTY.
Nigdy nie podnosiæ ani nie opuszczaæ kosza tylko z jednej
strony.
otworzyæ blokady prowadnic kosza po
prawej i lewej stornie i wyj¹æ kosz; umieciæ
go wy¿ej lub ni¿ej, przesun¹æ go po
prowadnicach a¿ do zaskoczenia przednich
kó³eczek i zamkn¹æ blokady (patrz rysunek).
Jeli kosz wyposa¿ony jest w uchwyty
Dual Space
* (patrz rysunek), wysun¹æ
górny kosz a¿ do ogranicznika, po czym
przesun¹æ w górê lub w dó³ uchwyty
znajduj¹ce siê po bokach kosza; podczas
opuszczania kosza nale¿y go przytrzymaæ.
Przyklady napelniania górnego/dolnego kosza
Pó³eczki Baby*
W modelach zmywarek, w których jest
dostêpny Cykl Baby, jako wyposa¿enie
dostarczane s¹ odpowiednie pó³eczki do
mycia butelek dla niemowl¹t, nasadek na
butelki i smoczków. (patrz ulotka z instrukcjami
za³¹czona do dokumentacji).
Sztuce nieodpowiednie do mycia w zmywarce
Przedmioty drewniane, z uchwytami drewnianymi lub rogowymi
albo z czêciami klejonymi.
Przedmioty z aluminium, miedzi, mosi¹dzu, cyny lub stopów
cyny.
Naczynia z tworzyw sztucznych nieodporne na dzia³anie
temperatury.
Porcelana antyczna lub rêcznie malowana.
Srebra antyczne. Natomiast srebra nieantyczne mo¿na myæ
przy pomocy programu delikatnego, upewniwszy siê wczeniej,
¿e nie stykaj¹ siê one z innymi metalami.
Zaleca siê u¿ywanie naczyñ nadaj¹cych siê do mycia w
zmywarce.
* Tylko w niektórych modelach.
** Zmienne co do iloci i po³o¿enia.
Nachylenie A Nachylenie B Nachylenie C

PL
&
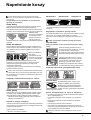
Uruchomienie i u¿ytkowanie
* Tylko w niektórych modelach.
Uruchomienie zmywarki
1. Otworzyæ zawór wody.
2. Otworzyæ drzwi i nacisn¹æ przycisk ON-OFF: s³ychaæ krótki
sygna³ dwiêkowy, lampka kontrolna ON/OFF, wywietlacz
oraz lampki kontrolne opcjizapalaj¹siê.
3. Dodaæ odpowiedni¹ iloæ rodka myj¹cego (patrz poni¿ej).
4. W³o¿yæ naczynia do koszy (patrz Nape³nianie koszy).
5. Wybraæ program w zale¿noci od rodzaju naczyñ i od
stopnia ich zabrudzenia (patrz tabela programów) naciskaj¹c
przycisk P.
6. Wybraæ opcje mycia (patrz obok).
7. Uruchomiæ cykl zamykaj¹c drzwi: d³ugi sygna³ dwiêkowy
poinformuje o rozpoczêciu programu.
8. Zakoñczenie programu sygnalizowane jest przez trzy
sygna³y dwiêkowe, dwa krótkie i jeden d³ugi, oraz pulsowanie
numeru programu na wywietlaczu. Otworzyæ drzwi,
wy³¹czyæ urz¹dzenie naciskaj¹c przycisk ON-OFF, zamkn¹æ
zawór wody i wyj¹æ wtyczkê z gniazdka.
9. Przed wyjêciem naczyñ odczekaæ kilka minut, aby unikn¹æ
oparzenia siê. Roz³adowaæ kosze, zaczynaj¹c od dolnego.
- Aby obni¿yæ zu¿ycie energii elektrycznej, w
niektórych warunkach NIE u¿ytkowania,
maszyna automatycznie wy³¹czy siê.
PROGRAMY AUTOMATYCZNE*: ten model zmywarki
wyposa¿ony jest w specjalny czujnik, który ocenia stopieñ
zabrudzenia naczyñ i ustawia najbardziej wydajny i
oszczêdny tryb zmywania.
Wskutek jego dzia³ania czas zmywania w programach
automatycznych mo¿e ulec zmianie.
Jeli naczynia s¹ ma³o zabrudzone lub zosta³y uprzednio
sp³ukane wod¹, nale¿y znacznie zmniejszyæ iloæ rodka
myj¹cego.
Zmiana programu w trakcie jego trwania
Jeli wybrano niew³aciwy program, mo¿liwe jest dokonanie
jego zmiany, pod warunkiem, ¿e zosta³ on uruchomiony przed
chwil¹: otworzyæ drzwi, uwa¿aj¹c na parê wydobywaj¹c¹ siê
ze zmywarki, i d³u¿ej nacisn¹æ przycisk ON/OFF, urz¹dzenie
wy³¹cza siê, s³ychaæ przy tym d³ugi sygna³ dwiêkowy.
Ponownie w³¹czyæ urz¹dzenie za pomoc¹ przycisku ON/OFF i
wybraæ nowy program oraz ewentualne opcje; uruchomiæ go
zamykaj¹c drzwi.
Dodawanie naczyñ
Nie wy³¹czaj¹c urz¹dzenia otworzyæ drzwi, uwa¿aj¹c na parê
wydobywaj¹c¹ siê ze zmywarki, i w³o¿yæ naczynia. Zamkn¹æ
drzwi: cykl zostanie wznowiony.
Przypadkowe zatrzymanie
Jeli podczas zmywania drzwi zostan¹ otwarte lub wyst¹pi
przerwa w dop³ywie pr¹du, program zostanie przerwany. Z
chwil¹ zamkniêcia drzwi lub przywrócenia dop³ywu pr¹du
program jest kontynuowany od momentu, w którym zosta³
przerwany.
Dozowanie rodka myj¹cego
Dobry rezultat mycia zale¿y równie¿ od w³aciwego
dozowania rodka myj¹cego, jego nadmierna iloæ nie
zwiêksza skutecznoci mycia, powoduje natomiast
zanieczyszczenie rodowiska.
Nale¿y u¿ywaæ wy³¹cznie rodka myj¹cego do
zmywarek.
NIE U¯YWAÆ rodków do mycia rêcznego.
Nadmiar rodka myj¹cego mo¿e byæ powodem
pozostania piany po zakoñczeniu cyklu.
U¿ywanie tabletek dozwolone jest tylko w tych
maszynach gdzie jest opcja TABLETKI
WIELOFUNKCYJNE.
Najlepsze efekty mycia i suszenia mo¿na osi¹gn¹æ
u¿ywaj¹c rodków myj¹cych w proszku, rodków
nab³yszczaj¹cych w p³ynie oraz soli.
pojemnik A: rodek do mycia
pojemnik B: rodek do mycia wstêpnego
1. Otworzyæ pokrywê C, naciskaj¹c
przycisk D.
2. Dodaæ odpowiedni¹ iloæ rodka
myj¹cego podan¹ w Tabeli
programów:
w proszku: pojemniki A i B.
tabletki: kiedy program wymaga 1
tabletki, umieciæ j¹ w pojemniku A i
zamkn¹æ pokrywê; kiedy wymaga 2,
umieciæ drug¹ na dnie komory.
3. Usun¹æ pozosta³oci rodka myj¹cego z krawêdzi pojemnika
i zamkn¹æ pokrywê tak, aby siê zatrzasnê³a.

PL
'
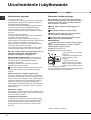
Opcje mycia
Jeli dana opcja nie jest mo¿liwa dla wybranego programu,
(patrz tabela programów) jej lampka kontrolna szybko pulsuje
3 razy i s³ychaæ 2 krótkie sygna³y dwiêkowe.
Start z opónieniem
Mo¿liwe jest opónienie uruchomienia programu o 3, 6, 9
godzin:
1. Nacisn¹æ przycisk START Z OPÓNIENIEM: po ka¿dym
naciniêciu s³ychaæ sygna³ dwiêkowy i zostaje wywietlony
wybrany czas;
2. Wybraæ program i zamkn¹æ drzwi: po sygnale dwiêkowym
rozpoczyna siê odliczanie wstecz;
3. Po up³ywie ustawionego czasu lampka kontrolna ganie i
program jest uruchamiany.
W celu zmodyfikowania opónienia i wyboru krótszego czasu
nale¿y nacisn¹æ przycisk START Z OPÓNIENIEM. Aby
anulowaæ opónienie, nale¿y naciskaæ przycisk a¿ do
momentu wy³¹czenia siê lampki kontrolnej wybranego
opónienia. Program uruchamia siê po zamkniêciu drzwi.
Po³owa wsadu w koszu górnym lub dolnym*
Jeli naczyñ jest niewiele, mo¿na wykonaæ mycie z po³ow¹
wsadu, oszczêdzaj¹c wodê, energiê i rodek myj¹cy. Wybraæ
program, nacisn¹æ przycisk PO£OWA WSADU, wtedy: zapala
siê trójk¹t odpowiadaj¹cy wybranemu wsadowi i w³¹czone
zostaje mycie tylko w górnym lub tylko w dolnym koszu.
Nale¿y pamiêtaæ o uk³adaniu naczyñ tylko w górnym
lub tylko w dolnym koszu i o zmniejszeniu o po³owê
iloci rodka myj¹cego.
Tabletki Wielofunkcyjne*
Dziêki tej opcji optymalizowany jest efekt mycia i suszenia.
W przypadku stosowania tabletek wielofunkcyjnych nacisn¹æ
przycisk TABLETKI WIELOFUNKCYJNE, kontrolka zawieci siê;
kolejne naciniêcie przycisku wy³¹cza opcjê.
Opcja Tabletki Wielofunkcyjne powoduje wyd³u¿enie
programu.
Opcja TABLETKI WIELOFUNKCYJNE pozostaje
nastawiona przy nastêpnych w³¹czeniach maszyny, jeli
nie dokona siê jej dezaktywacji.
Stosowanie tabletek jest zalecane tylko w
urz¹dzeniach z opcj¹ TABLETKI WIELOFUNKCYJNE.
Opcja ta nie jest zalecana w przypadku programów,
które nie przewiduj¹ stosowania tabletek
wielofunkcyjnych (patrz tabela opcji ).
* Tylko w niektórych modelach.
A
B
C
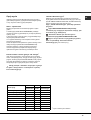
Tabela opcji
Start
zopóźnieniem
Połowa
wsadu
Tabletki
wielofunkcyjne
1. Automatyczny Intensywny
Tak
Tak
Tak
2. Automatyczny Zwykły
Tak
Tak
Tak
3. Cykl codzienny
Tak
Tak
Tak
4. Moczenie
Tak
Tak
Nie
5. Eko
Tak
Tak
Tak
6. Szybki
Tak
Nie
Tak
7. Kryształy
Tak
Tak
Tak
8. Autom. Duo Wash
Tak
Nie
Tak
9. Ultra Intensive
Tak
Tak
Tak
10. Specjalny Goście
Tak
Tak
Nie

PL
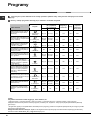
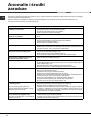
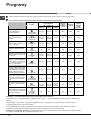
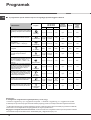
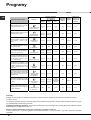
Programy
Numery i rodzaje programów zmieniaj¹ siê w zale¿noci od modelu zmywarki.
Jeli naczynia s¹ ma³o zabrudzone lub zosta³y uprzednio sp³ukane wod¹, nale¿y znacznie zmniejszyæ iloæ rodka
myj¹cego.
* Program Eko, zgodny z norm¹ EN-50242, trwa d³u¿ej ni¿ inne programy, jednak to on zapewnia najmniejsze zu¿ycie energii, a ponadto
jest przyjazny dla rodowiska.
Uwaga dla Laboratoriów Testowych: ¯¹dania o szczegó³owe informacje dotycz¹c warunków testów komparacyjnych EN nale¿y
kierowaæ na adres: [email protected]
Uwaga:
Aby u³atwiæ dozowanie rodka myj¹cego, warto wiedzieæ, ¿e:
1 ³y¿ka kuchenna = 15 gramów proszku = oko³o 15 ml p³ynu - 1 ³y¿eczka kuchenna = 5 gramów proszku = oko³o 5 ml p³ynu
Najlepsza skutecznoæ zmywania i suszenia programu Codzienny 60 - Szybki 25 otrzymuje siê zwykle jeli wk³ada siê w³aciw¹
iloæ naczyñ.
Środek myjący
(A) = pojemnik A
(B) = pojemnik B
Wskazówki ułatwiające
wybór programu
Program
Proszek Płyn Tabletki
Programy z
suszeniem
Opcje
Czas trwania
programu
(tolerancja
±10% )Godz.
Bardzo brudne naczynia i garnki
(nie stosować do mycia naczyń
delikatnych).
1. Automatyczny
Intensywny
35 g (A)
35 ml (A)
1 (A)
Tak
A–B–C
2:25'
Naczynia i garnki zabrudzone w s
topniu normalnym. Program stand
ardowy codzienny.
2. Automatyczny
Zwykły
29 g (A)
6 g (B)
29 ml (A)
6 ml (B)
1 (A)
Tak
A–B–C
1:50'
Zwykłe codzienne zabrudzenia w
niewielkiej ilości. (4 nakrycia +
1 garnek + 1 patelnia)
3. Codzienny
25 g (A)
25 ml (A)
1 (A)
Nie
A–B–C
1:00'
Mycie wstępne w oczekiwaniu na
uzupełnienie wsadu zmywarki po
następnym posiłku. 4. Moczenie
Nie
Nie
Nie
Nie
A–B
0:08'
Mycie ekologiczne przy niskim zu
życiu energii, odpowiednie dla na
czyń i garnków.
5. Eko
*
29 g (A)
6 g (B)
29 ml (A)
6 ml (B)
1 (A)
Tak
A –B-C
2:55'
Szybki i ekonomiczny cykl do myc
ia naczyń mało zabrudzonych,
zaraz po ich użyciu. (2 talerze + 2
szklanki + 4 sztućce + 1garnek +
1 mała patelnia)
6. Szybki
25 g (A)
25 ml (A)
1 (A)
Nie
A - C
0:25'
Szybki i ekonomiczny cykl do myc
ia naczyń delikatnych, bardziej wr
ażliwych na wysokie temperatury,
zaraz po ich użyciu. (kieliszków
Kosz górny + delikatne talerze
Kosz dolny). 7. Kryształy
35 g (A)
35 ml (A)
1 (A)
Tak
A– B–C
1:30'
Różne mycie w dwóch koszach:
delikatne w koszu górnym dla szk
ła i kieliszków, energiczne dla gar
nków w koszu dolnym.
8. Automatyczny
Duo Wash
35 g (A)
35 ml (A)
1 (A)
Tak
A–C
1:45'
Garnki bardzo silnie zabrudzone.
(Ultra Intensive)
9. Ultra Mycie
35 g (A)
5 g (B)
35 ml (A)
5 ml (B)
1 (A)
1 (dno
komory)
Tak
A–B–C
2:35'
Cykl płukania i suszenia rzadko
używanych, jedynie zakurzonych
naczyń.
10. Specjalny
Goście
Nie
Nie
Nie
Tak
A–B
0:32'
Strona się ładuje...
Strona się ładuje...
Strona się ładuje...
Strona się ładuje...
Strona się ładuje...
Strona się ładuje...
Strona się ładuje...
Strona się ładuje...
Strona się ładuje...
Strona się ładuje...
Strona się ładuje...
Strona się ładuje...
Strona się ładuje...
Strona się ładuje...
Strona się ładuje...
Strona się ładuje...
Strona się ładuje...
Strona się ładuje...
Strona się ładuje...
Strona się ładuje...
Strona się ładuje...
Strona się ładuje...
Strona się ładuje...
Strona się ładuje...
Strona się ładuje...
Strona się ładuje...
Strona się ładuje...
Strona się ładuje...
Strona się ładuje...
Strona się ładuje...
Strona się ładuje...
Strona się ładuje...
Strona się ładuje...
Strona się ładuje...
Strona się ładuje...
Strona się ładuje...
Strona się ładuje...
Strona się ładuje...
Strona się ładuje...
Strona się ładuje...
-
 1
1
-
 2
2
-
 3
3
-
 4
4
-
 5
5
-
 6
6
-
 7
7
-
 8
8
-
 9
9
-
 10
10
-
 11
11
-
 12
12
-
 13
13
-
 14
14
-
 15
15
-
 16
16
-
 17
17
-
 18
18
-
 19
19
-
 20
20
-
 21
21
-
 22
22
-
 23
23
-
 24
24
-
 25
25
-
 26
26
-
 27
27
-
 28
28
-
 29
29
-
 30
30
-
 31
31
-
 32
32
-
 33
33
-
 34
34
-
 35
35
-
 36
36
-
 37
37
-
 38
38
-
 39
39
-
 40
40
-
 41
41
-
 42
42
-
 43
43
-
 44
44
-
 45
45
-
 46
46
-
 47
47
-
 48
48
-
 49
49
-
 50
50
-
 51
51
-
 52
52
-
 53
53
-
 54
54
-
 55
55
-
 56
56
-
 57
57
-
 58
58
-
 59
59
-
 60
60


Whirlpool LFTA+ 3204 HX.R instrukcja
- Kategoria
- Zmywarki
- Typ
- instrukcja
w innych językach
- italiano: Whirlpool LFTA+ 3204 HX.R Guida utente
- slovenčina: Whirlpool LFTA+ 3204 HX.R Užívateľská príručka
- English: Whirlpool LFTA+ 3204 HX.R User guide