
October-2023

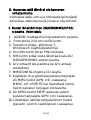
Safety information
Please read the safety instructions carefully
before using the product for the first time and
keep the instructions for future reference.
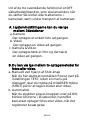
1. This product is not a toy. Keep it out of
reach of children.
2. Keep product out of the reach of children
and pets to avoid chewing and swallowing.
3. Never use old and new batteries or different
types of batteries together in main unit.
Remove the batteries when you are not
using the system for a longer period of time.
Check the polarity (+/-) of the batteries when
inserting them in the product. Wrong
positioning can cause an explosion.
Batteries are not included.
4. Product operating and storage temperature
is from -20 degree Celsius to 40 degree
Celsius. Under and over this temperature
might affect the function.
5. Never open the product. Repairs or service
should only be performed by qualified
personnel.
6. Do not expose to heat or direct sunlight!
7. Do not use non original accessories together
with the product as this can make the
product functionality abnormal.
ENG 01

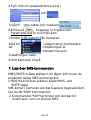
1. Instructions
1.1 General Description
This digital trail camera with MMS function
(built-in antenna) can work automatically
day and night. It can be triggered by any
movement of human (or animals) in a certain
region monitored by motion sensor, and then
automatically captures pictures (up to 12M
pixels) or records 1080p or HD video clips.
During daytime it begins to take color photos
and video till light is not enough, then it begins
to take monochrome photos and video.
It supports 2G/GSM/MMS/SMTP/SMS. And it is
waterproof IP65.
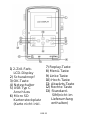
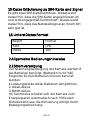
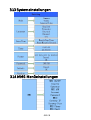
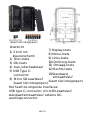
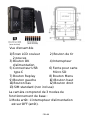
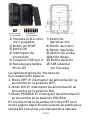
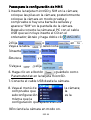
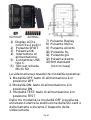
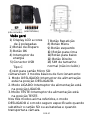
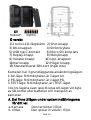
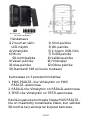
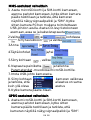
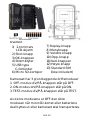
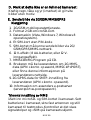
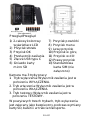
1.2 Camera Body Interface
It has the following interfaces: USB Type C
connector, MICRO SD-Card Slot, Standard SIM
card slot, external DC power connector.
1.3 Camera components and features
ENG 02

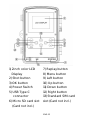
1) 2inch color LCD
Display
2) Shot button
3) OK button
4) Power Switch
5) USB Type C
connector
6) Micro SD card slot
(Card not incl.)
7) Replay button
8) Menu button
9) Left button
10) Up button
11) Down button
12) Right button
13) Standard SIM card
slot (Card not incl.)
ENG 03

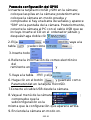
LED
Lens
Front
motion
sensor
Side
motion
sensor
Side
motion
sensor
Belt
Mounting
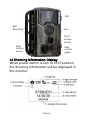
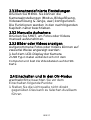
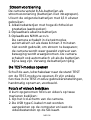
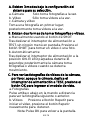
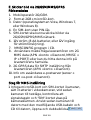
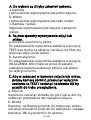
1.4 Shooting Information Display
When power switch is turn to TEST position,
the shooting information will be displayed in
the monitor.
ENG 04

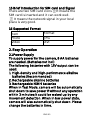
1.5 Brief Introduction for SIM card and Signal
There are two SIM card icons. It means the
SIM card is inserted and it can work well.
It means the network signal in your local
place is very good.
1.6 Supported Format
Item
Photo
Video
Format
JPG
AVI
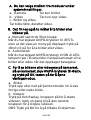
2. Easy Operation
2.1 Power Supply
To supply power for the camera, 8 AA batteries
are needed. (Batteries not incl)
The following batteries with 1.5V output can be
used:
1.High-density and high-performance alkaline
batteries (Recommended)
2.Rechargeable alkaline batteries
3.Rechargeable NiMH batteries
When in Test Mode, camera will be automatically
shut down to save power if without any operation
within 3 minutes; it could be waked up by any
movement detection. When in low power state,
camera will also automatically shut down. Please
change the batteries in time.
ENG 05

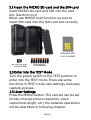
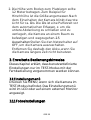
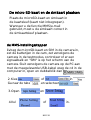
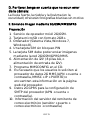
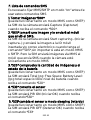
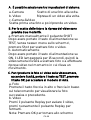
2.2 Insert the MICRO SD-card and the SIM-card
Insert MICRO SD-card and SIM into the card
slot. (Card not incl)
When use MMS/E-mail function, be sure to
insert SIM-card into the SIM-card slot correctly.
2.3 Enter into the TEST Mode
Turn the power switch to the TEST position to
enter into the TEST mode. There are some
functions in TEST mode: user settings, manually
capture, preview.
2.3.1 User Settings
Press the MENU button. The camera can be set
(mode, interval, picture resolution, video
resolution& length, etc.) the detailed operations
will be described in following chapter.
Press Shot to manually capture photos or
record video.
ENG 06
Standard SIM
(not included)
(not included) (not included)

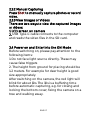
2.3.2 Manual Capturing
Press Shot to manually capture photos or record
video.
2.3.3 View Images or Videos
There are two ways to view the captured images
or videos:
1. LCD screen on camera
2. USB Type-C cable connects to the computer
and reads the video files in the SD card.
2.4 Power on and Enter into the ON Mode
Before switching on, please pay attention to the
following items:
1. Do not face light source directly. These may
cause false triggers
2. The height from ground for placing should be
1-2 meters. For example for deer height is good
size appropriately.
After switching on the camera, the red light will
blink for about 10s. The 10s is a buffering time
before automatic capturing, e.g. for closing and
locking the bottom cover, fixing the camera on a
tree and walking away.
ENG 07

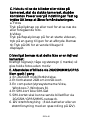
2.5 Power Off
Slide the power switch to OFF position to turn
off the camera.
Therefore, please remove the battery if the
camera will not be used for a long time.
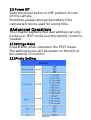
3.Advanced Operations
This chapter explains that user settings can only
be done in TEST mode and the remote control is
needed.
3.1 Settings Menu
Press MENU when camera in the TEST mode.
The settings menu will be shown on the LCD or
the external TV monitor.
3.1.1 Photo Setting
ENG 08

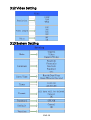
3.1.2 Video Setting
3.1.3 System Setting
ENG 09

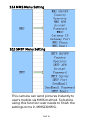
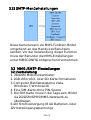
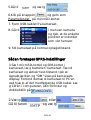
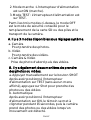
3.1.4 MMS Menu Setting
3.1.5 SMTP Menu Setting
This camera can send pictures instantly to
user’s mobile via MMS method. So before
using this function user needs to finish the
settings mms in MMSCONFIG.
ENG 10

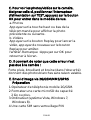
3.2 MMS/SMTP Settings
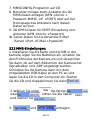
3.2.1 Preparation
1. 2G/GSM Mobile Operator Service
2. format 2GB+ MICROSD or SD card
3. computer (Vista, Windows 7, windows 8 system)
4. One SIM card without PIN lock
5. The SIM card should be able to send images via
2G/GSM/ GPRS/MMS network
6. 9V power (8 AA Batteries, or 12V input power
supply)
7. MMSCONFIG Program in CD
8. Users need to ask the provider 2G MMS data
(APN+Account+Password, MMSC+IP+PORT), or
find this info on providers homepage.
9. 2G GPRS data for SMTP setting from provider
(APN+Account+Password)
10. Sender Email server info(
server+port+email+password)
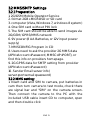
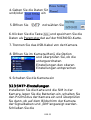
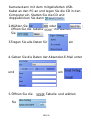
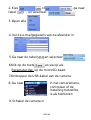
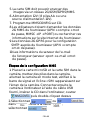
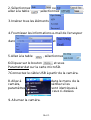
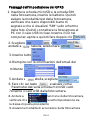
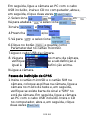
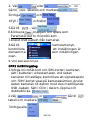
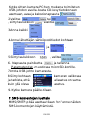
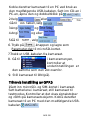
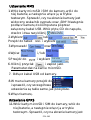
3.2.2 MMS setting:
1. Insert card and SIM to camera, put batteries in
cam then turn camera to test mode, check there
are signal bar and ''SIM'' on the camera screen.
Then connect the camera to the PC with the
included USB cable insert CD to computer, open
and then double click
ENG 11

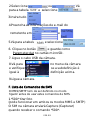
2. Choose or
in , Go to table, select
3. Insert and
4. Fill in and or
5. Go to , choose
6. Click button and save as
Parameter.dat to MICROSD card
7. Plug USB cable from camera
8. Go to in camera menu, check the
subsetting is thesame with
above setting
9. Turn camera to on mode
ENG 12

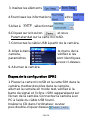
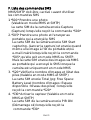
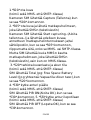
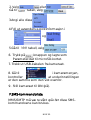
3.2.3 SMTP setting
1. Insert card and SIM to camera, put batteries in
cam then turn camera to test mode, check there
are signal bar and ''SIM'' on the camera screen.
Then connect the camera to the PC with the
included USB cable insert CD to computer, open
and then double click
2. Choose or , Go to
table, select
3. Insert all
4. Fill in sender email info in
and
5. Go to table, choose
6. Click button and save as
Parameter.dat to MICROSD card
7. Plug USB cable from camera
ENG 13

8. Go to in cam menu, check the
subsetting is the same
with above setting
9. Turn camera to on mode
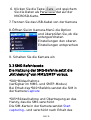
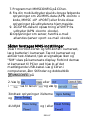
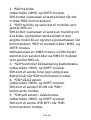
3.3 SMS Command Code
mms/smtp need to be set ‘on' mode well
before using thes sms command
*500* take picture
(Can work in both mms and smtp mode)
*505* take picture and send to the mobile who
sends sms sim in camera will send picture to
mms Mobile or smtp email when got* 505*
Command, no matter MMS or smtp mode.
But sim will send mms to the mobile who sends
sms when camera only in mms mode
*520* check the picture quantity and
battery status
(Can work in both mms and smtp mode)
sim will send Total Jpg: Free Space: Battery
Level: when receive *520* command
ENG 14

*530* turn on camera
(Can work in both mms and smtp mode) sim will
send PIR ON when receive *530* command
*531* turn camera to sleeping mode
(Can work in both mms and smtp mode)
Sim will send PIR OFF when receive *531*
command
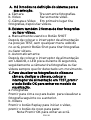
4. Cautions
The working voltage of the camera is 12.0 V.
Please unlock and format the Micro SD card.
Please insert the Micro SD-card when the
power switch is at OFF position.
Please do not insert or take out the Micro SD-card
when the power switch is at ON position.
Please ensure full power when having firmware
upgrade, otherwise the upgrade process could be
stopped.
As communications networks may vary we can’t
guarantee 100% MMS and GPRS can work fine
ENG 15

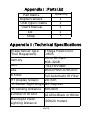
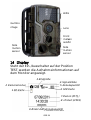
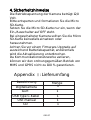
AppendixⅠ: Parts List
Part Name Quantity
Digital Camera
User's Manual
CD
1
1
1
1
1
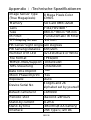
AppendixⅡ: Technical Specifications
Image Sensor Type
(True Megapixels) 8 Mega Pixels Color
CMOS
Micro SD Card
8GB~32GB
Memory
Lens F=3.1; FOV=108°
Size 135mm*95mm*85 mm
Full Automatic IR Filter
IR Filter:
TFT Display Screen: 2.0 inch
PIR Sensor Sight Angle 120 Degrees
PIR Sensing Distance 65ft/20m
42 LEDs Black or White
Number of IR LED
Max Night Vision
Lighting Distance 65ft/20 meters
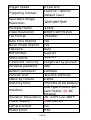
ENG 16
Strap
USB Type C Cable

Trigger Speed 0.3 second
1 second ~ 30mins
Triggering Interval : (default 1 sec)
Selectable Image
Resolution: 12MP/8MP/5MP
Multiple Frame 1/3/6/9
Video Resolution 1080P/720P/WVGA
File Format JPEG/AVI
Date Time Imprint Yes
Moon Phase Imprint Yes
Exposure: Auto
MMS/EMAIL Support
SMS Control Support
PasswordSecurity 4 Digits set by yourself
Universal password 1314
Default camera ID CAM000
Periodic shot 1Second~24Hours
Stand-by current 0.2mA
Stand-by time 3 Months (8 AA Battery)
USB Type C; Micro SD
Card Holder; 12V DC
External
Interface
Operation Temperature -30 ~+70°C/-22~+158°F
Power Supply 8×AA battery
Camera Socket Yes
Water proof IP65
ENG 17

Menu Langugae English, French,
Germany, Spanish ,
Danish, Dutch, Poland,
Portuguese, Swedish,
Italian, Finnish, CR
Please notice - All products are
subject to change without any
notice. We take reservations for
errors and omissions in the manual.
ALL RIGHTS RESERVED,
COPYRIGHT DENVER A/S
ENG 18

Electric and electronic equipment and
included batteries contains materials,
components and substances that can be
hazardous to your health and the
environment, if the waste material (discarded
electric and electronic equipment and
batteries) is not handled correctly.
Electric and electronic equipment and
batteries is marked with the crossed
out trash can symbol, seen below. This
symbol signifies that electric and
electronic equipment and batteries
should not be disposed of with other
household waste, but should be
disposed of separately.
As the end user it is important that
you submit your used batteries to the
appropriate and designated facility. In
this manner you make sure that the
batteries are recycled in accordance
with legislature and will not harm the
environment.
ENG 19
Strona jest ładowana ...
Strona jest ładowana ...
Strona jest ładowana ...
Strona jest ładowana ...
Strona jest ładowana ...
Strona jest ładowana ...
Strona jest ładowana ...
Strona jest ładowana ...
Strona jest ładowana ...
Strona jest ładowana ...
Strona jest ładowana ...
Strona jest ładowana ...
Strona jest ładowana ...
Strona jest ładowana ...
Strona jest ładowana ...
Strona jest ładowana ...
Strona jest ładowana ...
Strona jest ładowana ...
Strona jest ładowana ...
Strona jest ładowana ...
Strona jest ładowana ...
Strona jest ładowana ...
Strona jest ładowana ...
Strona jest ładowana ...
Strona jest ładowana ...
Strona jest ładowana ...
Strona jest ładowana ...
Strona jest ładowana ...
Strona jest ładowana ...
Strona jest ładowana ...
Strona jest ładowana ...
Strona jest ładowana ...
Strona jest ładowana ...
Strona jest ładowana ...
Strona jest ładowana ...
Strona jest ładowana ...
Strona jest ładowana ...
Strona jest ładowana ...
Strona jest ładowana ...
Strona jest ładowana ...
Strona jest ładowana ...
Strona jest ładowana ...
Strona jest ładowana ...
Strona jest ładowana ...
Strona jest ładowana ...
Strona jest ładowana ...
Strona jest ładowana ...
Strona jest ładowana ...
Strona jest ładowana ...
Strona jest ładowana ...
Strona jest ładowana ...
Strona jest ładowana ...
Strona jest ładowana ...
Strona jest ładowana ...
Strona jest ładowana ...
Strona jest ładowana ...
Strona jest ładowana ...
Strona jest ładowana ...
Strona jest ładowana ...
Strona jest ładowana ...
Strona jest ładowana ...
Strona jest ładowana ...
Strona jest ładowana ...
Strona jest ładowana ...
Strona jest ładowana ...
Strona jest ładowana ...
Strona jest ładowana ...
Strona jest ładowana ...
Strona jest ładowana ...
Strona jest ładowana ...
Strona jest ładowana ...
Strona jest ładowana ...
Strona jest ładowana ...
Strona jest ładowana ...
Strona jest ładowana ...
Strona jest ładowana ...
Strona jest ładowana ...
Strona jest ładowana ...
Strona jest ładowana ...
Strona jest ładowana ...
Strona jest ładowana ...
Strona jest ładowana ...
Strona jest ładowana ...
Strona jest ładowana ...
Strona jest ładowana ...
Strona jest ładowana ...
Strona jest ładowana ...
Strona jest ładowana ...
Strona jest ładowana ...
Strona jest ładowana ...
Strona jest ładowana ...
Strona jest ładowana ...
Strona jest ładowana ...
Strona jest ładowana ...
Strona jest ładowana ...
Strona jest ładowana ...
Strona jest ładowana ...
Strona jest ładowana ...
Strona jest ładowana ...
Strona jest ładowana ...
Strona jest ładowana ...
Strona jest ładowana ...
Strona jest ładowana ...
Strona jest ładowana ...
Strona jest ładowana ...
Strona jest ładowana ...
Strona jest ładowana ...
Strona jest ładowana ...
Strona jest ładowana ...
Strona jest ładowana ...
Strona jest ładowana ...
Strona jest ładowana ...
Strona jest ładowana ...
Strona jest ładowana ...
Strona jest ładowana ...
Strona jest ładowana ...
Strona jest ładowana ...
Strona jest ładowana ...
Strona jest ładowana ...
Strona jest ładowana ...
Strona jest ładowana ...
Strona jest ładowana ...
Strona jest ładowana ...
Strona jest ładowana ...
Strona jest ładowana ...
Strona jest ładowana ...
Strona jest ładowana ...
Strona jest ładowana ...
-
 1
1
-
 2
2
-
 3
3
-
 4
4
-
 5
5
-
 6
6
-
 7
7
-
 8
8
-
 9
9
-
 10
10
-
 11
11
-
 12
12
-
 13
13
-
 14
14
-
 15
15
-
 16
16
-
 17
17
-
 18
18
-
 19
19
-
 20
20
-
 21
21
-
 22
22
-
 23
23
-
 24
24
-
 25
25
-
 26
26
-
 27
27
-
 28
28
-
 29
29
-
 30
30
-
 31
31
-
 32
32
-
 33
33
-
 34
34
-
 35
35
-
 36
36
-
 37
37
-
 38
38
-
 39
39
-
 40
40
-
 41
41
-
 42
42
-
 43
43
-
 44
44
-
 45
45
-
 46
46
-
 47
47
-
 48
48
-
 49
49
-
 50
50
-
 51
51
-
 52
52
-
 53
53
-
 54
54
-
 55
55
-
 56
56
-
 57
57
-
 58
58
-
 59
59
-
 60
60
-
 61
61
-
 62
62
-
 63
63
-
 64
64
-
 65
65
-
 66
66
-
 67
67
-
 68
68
-
 69
69
-
 70
70
-
 71
71
-
 72
72
-
 73
73
-
 74
74
-
 75
75
-
 76
76
-
 77
77
-
 78
78
-
 79
79
-
 80
80
-
 81
81
-
 82
82
-
 83
83
-
 84
84
-
 85
85
-
 86
86
-
 87
87
-
 88
88
-
 89
89
-
 90
90
-
 91
91
-
 92
92
-
 93
93
-
 94
94
-
 95
95
-
 96
96
-
 97
97
-
 98
98
-
 99
99
-
 100
100
-
 101
101
-
 102
102
-
 103
103
-
 104
104
-
 105
105
-
 106
106
-
 107
107
-
 108
108
-
 109
109
-
 110
110
-
 111
111
-
 112
112
-
 113
113
-
 114
114
-
 115
115
-
 116
116
-
 117
117
-
 118
118
-
 119
119
-
 120
120
-
 121
121
-
 122
122
-
 123
123
-
 124
124
-
 125
125
-
 126
126
-
 127
127
-
 128
128
-
 129
129
-
 130
130
-
 131
131
-
 132
132
-
 133
133
-
 134
134
-
 135
135
-
 136
136
-
 137
137
-
 138
138
-
 139
139
-
 140
140
-
 141
141
-
 142
142
-
 143
143
-
 144
144
-
 145
145
-
 146
146
-
 147
147
-
 148
148


w innych językach
- español: Denver WCM-8010MK3 Manual de usuario
- italiano: Denver WCM-8010MK3 Manuale utente
- Deutsch: Denver WCM-8010MK3 Benutzerhandbuch
- svenska: Denver WCM-8010MK3 Användarmanual
- português: Denver WCM-8010MK3 Manual do usuário
- français: Denver WCM-8010MK3 Manuel utilisateur
- dansk: Denver WCM-8010MK3 Brugermanual
Inne dokumenty
-
Allview W1i Instrukcja obsługi
-
Allview Impera i Instrukcja obsługi
-
Evolveo strongvision s2 Instrukcja obsługi
-
Allview P5 Quad Instrukcja obsługi
-
Allview E2 Living Instrukcja obsługi
-
Allview V1 Viper Instrukcja obsługi
-
-
-
Allview A5 Smiley Instrukcja obsługi