
GB|NL|D|F|PL|SK|DK
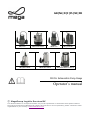
MQ 250
MR 2500 PLUS
MW 750
MQ 550 INT
MQ 400 INOX
MW 850 INOX
MQ1000 MULTI INOX
MEGA Submersible Pump Range
Operator’s manual
© MegaGroup Logistic Services BV
This documentation or excerpts therefrom may not be reproduced or disclosed to third parties without
the express permission of MegaGroup Logistic Services BV. In case of questions, please contact the sales
organization in your country: www.bosta-bevo.com

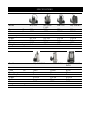
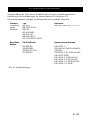
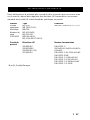
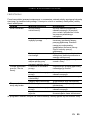
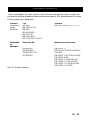
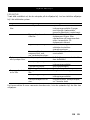
Model
MQ 250
MR 2500
PLUS
MW 750
MQ 550 INT
Power
W
250
250
750
550
Flow
l/h
6500
4000
12000
11000
Head
m
6
6
9.5
8.5
Max. Depth
m
7
7
7
7
Outlet
G1-1/4
G1-1/4
G1-1/4
G1-1/4
Solid
mm
2-3
2-3
2-3
2-3
IP
IPX8
IPX8
IPX8
IPX8
Weight
kg
4.4
4.6
6.5
7
Model
MQ 400 INOX
MW 850 INOX
MQ 1000 MULTI
INOX
Power
W
400
850
1000
Flow
l/h
7500
10000
6700
Head
m
8
10
36
Max. Depth
m
7
7
7
Outlet
G1-1/4
G1-1/4
G1-1/4
Solid
mm
5
35
0.5
IP
IPX8
IPX8
IPX8
Weight
kg
6.2
6.4
9.1
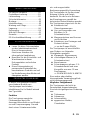
SPECIFICATIONS

About this handbook ………………01
Product description………………...01
Scope of delivery …………………..02
Safety instructions………………….02
Assembly……………………………02
Startup……………………………….03
Maintenance and care……………..04
Storage………………………………04
Disposal……………………………..04
Help in case of malfunctions………05
Warranty………………………….….06
EU declaration of conformity….…...07
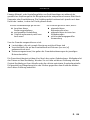
Read this documentation before
starting up the machine. This is a
precondition for safe working and
flawless operation.
Observe the safety warnings in
this documentation and on the
product.
This documentation is a
permanent integral part of the
product described and must be
passed on to the new owner if the
product is sold.
This documentation describes various
different models of immersion pumps.
Identify your model using the
identification plate.
Function
The immersion pump draws the
conveying medium through the suction
slots directly and feeds it to the pump
outlet. It is switched on and off using a
float switch.
Designated use
The immersion pump is designed for
private use in the house and garden. It
must only be operated within the
framework of the deployment
limitations in accordance with the
technical data.
The immersion pump is suitable for:
Water removal in the event of a
flood
Re-pumping and pumping out
from vessels (e.g. swimming
pools)
Water removal from streams and
shafts
Water removal from drains and
trickle shafts.
➯ Only on DRAIN pump
The immersion pump is only suitable
for conveying the following fluids:
Clear water, rainwater
Chlorine-containing water (e.g.
swimming pools)
Waste water
Dirty water having a suspended
matter proportion of max. 5 % and
a grain size of max. 30 mm
diameter.
➯ ON MW 850 INOX & MW750
Any use not in accordance with this
designated use shall be regarded as
misuse.
Possible misuse
The immersion pump must not be
used continuously.
They are not suitable for conveying:
Drinking water
Salt water
CONTENT
ABOUT THIS HANDBOOK
PRODUCT DESCRIPTION
GB 01

Foodstuffs
Aggressive media, chemicals
Corrosive, flammable, explosive
or fuming fluids
Fluids that are hotter than 35 °C
Water containing sand and
abrasive fluids
➯ Only on SUB pump
Thermal protection
The unit is fitted with a thermal
protection switch which switches the
motor off in the event of overheating.
The pump switches on again
automatically after a cooling down
period of approx. 15 - 20 minutes.
Operate the unit only if the immersion
pump is fully immersed.
CAUTION!
Risk of injury!
Use the machine and the extension
cable only in perfect working order.
Damaged equipment may not be
operated. Do not disable safety and
protective devices!
Children, or people who are not
familiar with the operating
instructions, are not allowed to
use the machine.
Never lift, transport or suspend
the unit using the connection
cable.
Unilateral modifications or
conversions of the unit are
prohibited.
Electrical safety
CAUTION!
Danger when touching voltage
conducting parts!
Disconnect the plug from the mains if
the extension cable is damaged or
severed! We recommend connecting a
RCD (residual current operated
device) having a nominal residual
current of < 30 mA.
The house mains voltage must
agree with the details quoted in
the technical data, do not use any
other supply voltage.
The unit must only be operated
with an electrical installation in
accordance with DIN/VDE 0100,
Part 737, 738 and 702 (swimming
pools). Protection must be
provided by a 10 A line protection
switch and a RCCD (residual
current operated device) having a
nominal residual current of 10/30
mA.
Use only extension cables that
are suitable for use outdoors -
minimum cross-section 1.5 mm2.
Cable drums should always be
unrolled completely.
Damaged or brittle extension
cables must not be used.
➯ Check the condition of your
extension cable each time you start
to use the equipment.
Mounting the pressure line
1. Screw the connection elbow into
the pump outlet.
SCOPE OF DELIVERY
SAFETY INSTRUCTIONS
ASSEMBLY
GB 02

2. Screw the combination nipple into
the connection elbow.
3. Fix a hose to the combination
nipple.
The combination nipple can be
trimmed to suit the selected hose
connection. Use the largest possible
hose diameter.
Safety
CAUTION!
Exclude, by suitable means that in
the event of a fault in the immersion
pump, consequential damage is
caused by flooding.
Make sure that the immersion
pump is standing securely or
operate the immersion pump
suspended from a rope.
Make sure there is adequate
clearance under the pump.
Never allow the immersion
pump to run against a closed off
pressure line.
When using in shafts, make
sure the size is adequate.
Always cover the shaft with a
secure footplate.
Switching the pump on
CAUTION!
The immersion pump must not draw
in any solid bodies. Sand and other
abrasive materials in the conveying
medium will destroy the immersion
pump.
1. Unwind the connection cable (2)
completely.
2. Make sure that the electrical plug
connection is mounted in the area
safe from flooding.
3. Change the terminal position and
adjust the switching points of the
float switch (3) individually.
4. Attach the cable on the float
switch to the pump housing
securely.
➯ Recommended cable length on
the float switch approx. 120 mm
Use a suitable plate to ensure secure
mounting of the immersion pump on
muddy, sandy or stony ground.
5. Immerse the immersion pump in
the conveying medium slowly. Hold
the immersion pump at a slight angle
to allow any air to escape.
6. Insert the mains plug into the plug
socket.
➯ the immersion pump switches on
automatically using the float switch
when a specific water level has been
reached, and switches off again if the
water drops below the switch-off
height.
Switching the pump off
1 Remove the mains plug from the
plug socket.
Pumping out to residual water level
CAUTION!
Monitor the pump continuously when
pumping out to the residual water
level and avoid the pump running dry.
STARTUP
GB 03

Take the pump out of service when
the residual water level is reached by
pulling out the mains plug.
The float switch must be operated
manually to pump to the residual
water level:
1. Remove the mains plug from the
plug socket.
2. Lay the float switch up and fix it in
position.
3. Insert the mains plug into the plug
socket. The pump switches on and
starts to feed.
If the water drops below the residual
water level, (under 10/40 mm), the
pump will draw air in. In this case, the
pump must be vented when the water
level rises and before using it again.
Cleaning the pump
After conveying chlorine-containing
swimming pool water or fluids that
leave a residue, the pump must be
flushed out with clear water.
1. Clean the suction slots on the
suction foot if necessary with clear
water.
In the event of a risk of frost, the
system must be drained completely.
Do not dispose of worn-out machines
or spent batteries (including
rechargeable batteries) in domestic
waste!
The packaging, machine and
accessories are made from
recyclable materials and must be
disposed of accordingly.
XMAINTENANCE AND CARE
STORAGE
DISPOSAL
GB 04

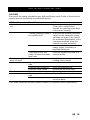
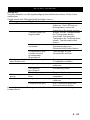
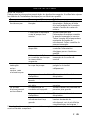
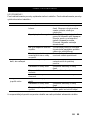
CAUTION!
Disconnect the mains plug before any fault rectification work! Faults in the electrical
system must be rectified by a qualified electrician.
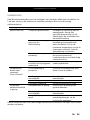
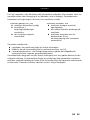
Malfunction
Possible cause
Solution
Motor does not
run.
Impeller blocked.
Remove dirt in the suction area.
Clean with a suitable tool
through the opening at the back
of the motor housing.
Thermal protection switch
has switched off.
Wait until the thermal protection
switch on the immersion pump
switches on again. Take note of
the maximum temperature of the
conveying medium. Have the
immersion pump inspected.
No mains power.
Check the fuses, have the
power supply checked by a
qualified electrician.
Float switch does not
switch off when the water
level rises.
Send the immersion pump to a
service facility.
Pump running but
does not feed.
Air in pump housing.
Vent the immersion pump by
holding it at an angle.
Blockage on the suction
side.
Remove dirt in the suction area.
Pressure line closed off.
Open the pressure line.
Pressure hose kinked.
Extend the pressure hose.
Feed rate too low
Hose diameter too small.
Use a bigger pressure hose.
Blockage on the suction
side.
Remove dirt in the suction area.
Feed head to high.
Observe max. Feed head, see
technical data!
If the faults cannot be rectified, please contact our customer service department.
HELP IN CASE OF MALFUNCTIONS
GB 05

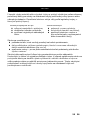
We will address claims for any defects in materials and workmanship during the
statutory period of limitation by means of repairs or replacements of our choice. The
period of limitation is governed by the laws of the country in which the machine was
purchased.
Our warranty applies only if:
The machine has been properly
handled
The operating instructions have
been adhered to
Original replacement parts have
been used
The warranty is no longer in effect if:
Efforts have been made to repair
the machine
Technical modifications have been
made to the machine
The machine has not been used
for its intended purpose
The warranty does not cover:
Damage to paint work through normal use
Parts subject to wear as indicated in the replacement parts list with a box [xxx xxx
(x)]
Internal combustion engines – separate warranty conditions of the respective
engine manufacturer apply
The warranty period begins with the purchase by the first buyer. The warranty period
begins on the date that appears on the original purchase receipt. In the event of a
warranty claim, please your contact supplier or the nearest authorized customer
service center with this warranty declaration and the purchase receipt in hand. This
warranty does not affect the legal warranty claims by the purchaser against the seller.
WARRANTY
GB 06

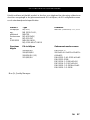
We hereby declare that this product, in the version brought into circulation by us,
complies with the requirements of the harmonized EU guidelines, EU safety
standards and the product-specific standards.
Product
Type
Manufacturer
Immersion
pump,
electrical
MQ 250,
MR 2500 PLUS,
MW750,
MQ 400 INOX,
MQ 550 INT
MW 850 INOX,
MQ 1000 MULTI INOX
MEDAS (SUZHOU) CO., LTD
Duly
authorized
person
EU guidelines
Harmonized standards
2006/95/EU
2004/108/EU
2000/14/EU (13)
2011/65/EU
EN 60335 -1:
2002+A1+A11+A12+A2+A13+
A14+A15
EN 60335 -2-41: 2003+A1+A2
EN 62233: 2008
EN 55014 -1: 2006+A1+A2
EN 55014 -2: 1997+A1+A2
EN 61000 -3-2: 2006+A1+A2
EN 61000 -3-3: 2008
Max Qi; Quality Manager.
EU DECLARATION OF CONFORMITY
GB 07

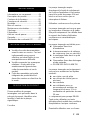
Over dit handboek............................01
Productbeschrijving......................... 01
Inhoud van de levering.................... 02
Veiligheidsvoorschriften...................02
Montage...........................................02
Inbedrijfstelling.................................03
Onderhoud.......................................04
Opslag............................................. 04
Afvoeren.......................................... 04
Storingen oplossen.......................... 05
GARANTIE...................................... 06
EG-conformiteitsverklaring.............. 07
Lees deze documentatie vóór
ingebruikname door. Dit is een
voorwaarde voor veilig werken en
storingsvrij gebruik.
Neem de veiligheidsvoorschriften
en waarschuwingen in deze
documentatie en op het product
in acht.
Deze documentatie is permanent
onderdeel van het beschreven
product en dient bij verkoop aan
de koper te worden
overgedragen.
In deze documentatie worden diverse
modellen dompelpompen
beschreven. U kunt uw model
identificeren aan de hand van het
typeplaatje.
Functie
De dompelpomp zuigt de te
verpompen vloeistof rechtstreeks aan
via de aanzuigsleuf en verpompt
deze naar de pompuitgang. Het
apparaat wordt via een
vlotterschakelaar in- en
uitgeschakeld.
Reglementair gebruik
De dompelpomp is bestemd voor
particulier gebruik in huis en tuin. Hij
mag alleen worden gebruikt
binnen de grenswaarden en
overeenkomstig de technische
gegevens.
De dompelpomp is geschikt voor:
afvoeren van water na een
overstroming
het rond- en leegpompen van
reservoirs (bijv. zwembassins)
uitpompen van water uit
bronnen en schachten
ontwateren van draineringen en
zinkputten.
➯ uitsluitend bij DRAIN-pomp
De dompelpomp is uitsluitend geschikt
voor het verpompen van de volgende
vloeistoffen:
schoon water, regenwater
chloorhoudend water (zoals in
zwembassins)
gebruikswater
vuilwater met max. 5 % aan
zwevende deeltjes en een max.
korrelgrootte van 30 mm
doorsnede.
➯ ON MW 850 INOX & MW750
Elke andere of verder strekkende
toepassing wordt beschouwd als niet
overeenkomstig het gebruiksdoel.
Mogelijk foutief gebruik
De dompelpomp mag niet worden
ingezet voor continubedrijf. De pomp is
niet geschikt voor het verpompen van:
drinkwater
zout water
vloeibare levensmiddelen
bijtende vloeistoffen, chemicaliën
NHOUDSOPGAVE
OVER DIT HANDBOEK
PRODUCTBESCHRIJVING
NL 01

agressieve, brandbare,
explosieve of gas
producerende chemicaliën of
vloeistoffen
vloeistoffen die warmer zijn dan
35 °C
Zandhoudend water of schurende
vloeistoffen.
➯ Uitsluitend bij SUB-pomp
Thermische beveiliging
Het apparaat is uitgerust met een
thermische beveiliging die de motor
uitschakelt bij oververhitting. Na een
afkoelfase van circa 15 - 20 minuten
schakelt de pomp weer automatisch in.
Gebruik de dompelpomp uitsluitend
wanneer deze volkomen is
ondergedompeld.
LET OP!
Risico op letsel!
Gebruik het apparaat en de
verlengkabel uitsluitend in
onbeschadigde toestand! Beschadigde
apparaten mogen niet worden
gebruikt.
Veiligheidsfuncties en beveiligingen
mogen niet buiten werking worden
gesteld!
Kinderen of personen die de
gebruikshandleiding niet hebben
gelezen, mogen het apparat niet
gebruiken.
Het apparaat mag nooit aan de
aansluitkabel worden opgetild,
vervoerd of bevestigd.
Het eigenhandig aanbrengen van
veranderingen of ombouwen van
het apparaat is verboden.
Elektrische veiligheid
VOORZICHTIG!
Risico bij het aanraken van
stroomvoerende onderdelen!
Haal de stekker meteen uit het
stopcontact wanneer de verlengkabel
werd beschadigd of is doorgesneden!
Wij raden aan het apparaat aan te
sluiten via een FI-aardlekschakelaar
met een nominale lekstroom van < 30
mA.
De spanning van het lichtnet in
huis moet overeenstemmen met
de vermeldingen voor
netspanning in de Technische
Gegevens; gebruik geen andere
voedingsspanning.
Het apparaat mag uitsluitend
worden gebruikt met een
elektrische inrichting die voldoet
aan de vereisten vermeld in
DIN/VDE 0100, Paragraaf 737,
738 en 702 (zwembaden). Ter
beveiliging moet een
hoofdschakelaar van 10 A en een
aardlekschakelaar met een
nominale lekstroom van 10/30
mA worden geïnstalleerd.
Gebruik alleen een
verlengingskabel die geschikt is
voor gebruik buitenshuis en met
een minimale doorsnede van 1,5
mm2. Wikkel een kabeltrommel
altijd helemaal af.
Beschadigde of sterk
verslechterde verlengingskabels
mogen niet gebruikt worden.
➯ Controleer vooraf aan de
ingebruikname de conditie van uw
verlengingskabels.
Monteren van drukleiding
INHOUD VAN DE LEVERING
VEILIGHEIDSVOORSCHRIFTEN
MONTAGE
NL 02

1. Schroef het elleboogstuk in de
pompuitgang.
2. Schroef de combinippel in het
elleboogstuk.
3. Bevestig een slang aan de
combinippel.
De combinippel kan worden
afgesneden naargelang de gekozen
slangaansluiting. Gebruik een zo groot
mogelijke slangdiameter.
Veiligheid
LET OP!
Voorkom door passende maatregelen
dat bij een storing aan de dompelpomp
gevolgschade door overstroming zou
kunnen optreden.
Zorg dat de dompelpomp stevig
wordt geplaatst of gebruik de
pomp hangend aan een touw.
Houd voldoende afstand aan ten
opzichte van de ondergrond.
Laat de dompelpomp nooit
draaien tegen een gesloten
drukleiding in.
Let bij gebruik in zinkputten
steeds op de afdoende
dimensionering.
Zorg dat de put voor lopende
mensen en dieren steeds veilig is
afgedekt.
Aanzetten van de pomp
LET OP!
De dompelpomp mag geen vaste
substanties aanzuigen. Door zand en
andere schurende stoffen in de
verpompte vloeistof raakt de
dompelpomp defect.
1. Rol de aansluitkabel helemaal af.
2. Controleer of elektrische
aansluitpunten veilig zijn aangebracht
en niet nat kunnen worden.
3. Wijzig de vastklempositie en stel het
schakelpunt van de vlotterschakelaar
afzonderlijk in.
4. Klem de kabel van de
vlotterschakelaar aan het pomphuis
vast.
➯ Aanbevolen kabellengte van
vlotterschakelaar ca. 120 mm.
Gebruik bij een modderige, zandige of
steenachtige ondergrond een
geschikte plaat om de dompelpomp
veilig op te plaatsen.
5. Laat de dompelpomp langzaam
zakken in de te verpompen vloeistof.
Houd de dompelpomp daarbij iets
schuin, zodat eventueel ingesloten
lucht kan ontwijken.
6. Steek de stekker aan de
aansluitkabel in het stopcontact.
➯ De dompelpomp schakelt via de
vlotterschakelaar bij het bereiken van
een bepaalde waterstand automatisch
in en bij het dalen van de waterstand
tot uitschakelhoogte automatisch uit.
Uitschakelen van de pomp
1 Trek de lichtnetstekker uit het
stopcontact.
Afpompen tot op restwaterhoogte
LET OP!
Bij het afpompen tot restwaterhoogte
moet de pomp voortdurend worden
gecontroleerd om te voorkomen dat de
pomp droog loopt. Zet de pomp bij het
bereiken van de restwaterhoogte door
loshalen van de lichtnetstekker buiten
bedrijf.
Voor afpompen tot op restwaterhoogte
moet de vlotterschakelaar handmatig
worden bediend:
INBEDRIJFSTELLING
NL 03

1. Trek de lichtnetstekker uit het
stopcontact.
2. Schuif de vlotterschakelaar naar
boven en bevestig deze.
3. Steek de stekker aan de
aansluitkabel in het stopcontact. De
pomp schakelt in en begint te pompen.
Zodra het waterniveau onder de
restwaterhoogte komt (beneden 10/40
mm), zal de pomp lucht gaan
aanzuigen. In dat geval moet de pomp
bij stijgende waterstand en alvorens in
te schakelen eerst worden ontlucht.
Reinigen van de pomp
Na het verpompen van chloorhoudend
zwembadwater of vloeistoffen die
resten achterlaten, moet de pomp met
schoon water worden doorgespoeld.
1. Reinig de aanzuigsleuf van de
zuigvoet zo nodig met schoon water.
Als er kans is op bevriezing moet het
system helemaal geleegd worden.
Gebruikte apparaten, batterijen of
accu´s niet afvoeren via de
vuilnisophaaldienst!
Verpakking, apparaat en accessoires
zijn gemaakt van recyclebare
materialen en moeten ook als zodanig
worden afgevoerd.
ONDERHOUD
OPSLAG
AFVOEREN
NL 04

VOORZICHTIG!
Haal bij werkzaamheden voor het verhelpen van storingen altijd eerst de stekker los.
Laat een storing in de elektrische installatie verhelpen door een deskundig
elektrotechnicus.
Storing
Possible cause
Solution
Motor loopt niet.
Pomprotor geblokkeerd.
Verwijder de vervuiling aan de
aanzuigzijde. Reinig met
geschikt gereedschap via de
opening aan de achterkant van
de motorbehuizing.
Thermische beveiliging
ging over tot
uitschakeling.
Wacht tot de thermische
beveiliging de dompelpomp
weer inschakelt. Let op de
maximale temperatuur van de te
verpompen vloeistof. Laat de
dompelpomp controleren.
Geen netspanning
aanwezig.
Controleer de zekeringen; laat
de stroomvoorziening
controleren door een deskundig
elektrotechnicus.
Vlotterschakelaar
schakelt niet bij stijgende
waterstand.
Lever de dompelpomp af bij een
onderhoudsdealer.
Dompelpomp
draait maar
verpompt
Geen vloeistof.
Lucht aanwezig in
pomphuis.
Ontlucht de dompelpomp door
deze schuin te houden.
Verstopping in de
aanzuigzijde.
Verwijder de vervuiling aan de
aanzuigzijde.
Drukleiding gesloten.
Open de drukleiding.
Drukslang afgekneld.
Breng de drukslang in orde.
Verpompte
waterhoeveelheid
is gering.
Slangdiameter te gering.
Gebruik een drukslang met
grotere diameter.
Verstopping in de
aanzuigzijde.
Verwijder de vervuiling aan de
aanzuigzijde.
Hoogte pomptraject te
groot.
Let op de max.
pomptrajecthoogte, zie de
technische gegevens!
Neem contact op met onze deskundige klantenservice wanneer storingen niet kunnen
worden verholpen.
STORINGEN OPLOSSEN
NL 05

Eventuele materiaal- of fabricagefouten aan het apparaat verhelpen we gedurende de
wettelijke termijn voor garantieaanspraken naar onze keuze door reparatie of een
vervangende levering. Deze garantietermijn wordt bepaald door de wetgeving in het
land, waar het apparaat is gekocht.
Onze garantietoezegging geldt enkel
bij:
correcte behandeling van het
apparat
inachtneming van de
bedieningshandleiding
gebruik van originele
reserveonderdelen
De garantie is niet langer van kracht
als:
pogingen tot reparatie van het
apparat
technische wijzigingen aan het
apparat
gebruik dat niet in
overeenstemming is met de
bestemming
Uitgesloten van de garantie zijn:
lakschade die is veroorzaakt door normale slijtage
slijtageonderdelen, die op de kaart met reserveonderdelen zijn gekenmerkt met
de omkadering [xxxxxx (x)]
verbrandingsmotoren (hiervoor gelden de aparte garantiebepalingen van de
betreffende motorfabrikant)
De garantieperiode begint op de aankoop door de eerste eindgebruiker. Bepalend is
de datum van het ontvangstbewijs. Bij garantieaanspraken kunt u zich met deze
garantieverklaring en het aankoopbewijs wenden tot de distributeur of de bevoegde
klantenservice bij u in de buurt. Met deze garantietoezegging blijven de wettelijke
aanspraken bij gebreken van de koper tegenover de verkoper onverkort van kracht.
GARANTIE
NL 06

Hierbij verklaren wij dat dit product in de door ons uitgebrachte uitvoering voldoet aan
de eisen neergelegd in de geharmoniseerde EU-richtlijnen, de EU-veiligheidsnormen
en de standaardproductspecificaties.
Product
Type
Fabrikant
Dompelpo
mp,
elektrisch
Serienumm
er
G3023025
MQ 250,
MR 2500 PLUS,
MW750,
MQ 400 INOX,
MQ 550 INT
MW 850 INOX,
MQ 1000 MULTI INOX
MEDAS (SUZHOU) CO., LTD
Gevolmac
htigde
EU-richtlijnen
Geharmoniseerde normen
2006/95/EU
2004/108/EU
2000/14/EU (13)
2011/65/EU
EN 60335 -1:
2002+A1+A11+A12+A2+A13+
A14+A15
EN 60335 -2-41: 2003+A1+A2
EN 62233: 2008
EN 55014 -1: 2006+A1+A2
EN 55014 -2: 1997+A1+A2
EN 61000 -3-2: 2006+A1+A2
EN 61000 -3-3: 2008
Max Qi; Quality Manager.
EG-CONFORMITEITSVERKLARING
NL 07

Zu diesem Handbuch.....................01
Produktbeschreibung.....................01
Lieferumfang..................................02
Sicherheitshinweise........................02
Montage..........................................02
Inbetriebnahme...............................03
Wartung und Pflege........................04
Lagerung........................................04
Entsorgung.....................................04
Hilfe bei Störungen.........................05
Garantie..........................................06
EG-Konformitätserklärung…….......07
Lesen Sie diese Dokumentation
vor der Inbetriebnahme durch.
Dies ist Voraussetzung
fürsicheres Arbeiten und
störungsfreie Handhabung.
Beachten Sie die Sicherheits- und
Warnhinweise in dieser
Dokumentation und auf dem
Produkt.
Diese Dokumentation ist
permanenter Bestandteil des
beschriebenen Produkts und soll
bei Veräußerung dem Käufer mit
übergeben werden.
In dieser Dokumentation warden
verschiedene Modelle von
Tauchpumpen beschrieben.
Identifizieren Sie Ihr Modell anhand
des Typschilds.
Funktion
Die Tauchpumpe saugt das
Fördermedium durch die
Ansaugschlitze direkt an und fördert
es zum Pumpenausgang. Sie wird
durch einen Schwimmerschalter
ein- und ausgeschaltet.
Bestimmungsgemäße Verwendung
Die Tauchpumpe ist für die private
Nutzung in Haus und Garten
bestimmt. Sie darf nur im Rahmen
der Einsatzgrenzen gemäß der
technischen Daten betrieben werden.
Die Tauchpumpe eignet sich für die:
Entwässern bei
Überschwemmungen
Um- und Auspumpen von
Behältern (z. B.
Schwimmbecken)
Wasserentnahme aus Brunnen
und Schächten
Entwässern von Drainagen und
Sickerschächten.
➯ nur bei Pumpe DRAIN
Die Tauchpumpe ist ausschließlich
zum Fördern von folgenden
Flüssigkeiten geeignet:
Klarwasser, Regenwasser
chlorhaltigem Wasser (z. B.
Schwimmbecken)
Brauchwasser
Schmutzwasser mit max. 5 %
Schwebstoffanteil und einer
Korngröße von max. 30 mm
Durchmesser.
➯ ON MW 850 INOX & MW750
Eine andere oder darüber
hinausgehende Verwendung gilt als
nicht bestimmungsgemäß.
Möglicher Fehlgebrauch
Die Tauchpumpe darf nicht im
Dauerbetrieb eingesetztwerden.
Sie sind nicht geeignet zur Förderung
von:
Trinkwasser
Salzwasser
Lebensmitteln
aggressiven Medien,
Chemikalien
INHALTSVERZEICHNIS
PRODUKTBESCHREIBUNG
D 01
ZU DIESEM HANDBUCH

ätzenden, brennbaren,
explosiven oder gasenden
Flüssigkeiten
Flüssigkeiten, die wärmer als
35 °C sind
sandhaltigem Wasser und
schmirgelnden Flüssigkeiten.
➯ Nur bei Pumpe SUB
Thermoschutz
Das Gerät ist mit einem
Thermoschutzschalter ausgestattet,
der den Motor bei Überhitzung
abschaltet. Nach einer Abkühlphase
von ca. 15 - 20 Minuten schaltet die
Pumpe selbsttätig wieder ein.
Betreiben Sie das Gerät nur, wenn die
Tauchpumpe vollkommen eingetaucht
ist.
Kinder oder Personen, die die
Betriebsanleitung nicht kennen,
dürfen das Gerät nicht benutzen.
Das Gerät nie am Anschlusskabel
hochheben, transportieren oder
befestigen.
Eigenmächtige Veränderungen
oder Umbauten am Gerät sind
verboten.
Elektrische Sicherheit
VORSICHT!
Gefahr beim Berühren
spannungsführender
Teile!
Stecker sofort vom Netz trennen, wenn
das Verlängerungskabel beschädigt
oder durchtrennt wurde! Wir
empfehlen den Anschluss über einen
FISchutzschalter mit einem
Nennfehlerstrom < 30 mA.
Die Haus-Netzspannung muss
mit den Angaben zur
Netzspannung in den
Technischen Daten
übereinstimmen, keine andere
Versorgungsspannung
verwenden.
Das Gerät darf nur an einer
elektrischen Einrichtung gemäß
DIN/VDE 0100, Teil 737, 738 und
702 (Schwimmbäder) betrieben
werden. Zur Absicherung muss
ein Leitungs-Schutzschalter 10 A
sowie ein Fehlerstrom-
Schutzschalter mit einem
Nennfehlerstrom von 10/30 mA
installiert werden.
Nur Verlängerungskabel
verwenden, die für den Gebrauch
im Freien vorgesehen sind -
Mindestquerschnitt 1,5 mm2.
Kabeltrommeln immer vollständig
abrollen.
Beschädigte oder brüchige
Verlängerungskabel dürfen nicht
verwendet werden.
➯ Kontrollieren Sie vor jeder
Inbetriebnahme den Zustand ihres
Verlängerungskabels.
Druckleitung montieren
1. Schrauben Sie den Anschlusswinkel
in den Pumpenausgang ein.
2. Schrauben Sie den Kombi-Nippel in
den Anschlusswinkel ein.
3. Befestigen Sie einen Schlauch am
Kombi-Nippel.
Der Kombi-Nippel kann entsprechend
dem gewählten Schlauchanschluss
D 02
LIEFERUMFANG
SICHERHEITSHINWEISE
MONTAGE

abgeschnitten werden. Nutzen Sie den
größtmöglichen
Schlauchdurchmesser.
Sicherheit
ACHTUNG!
Schließen Sie durch geeignete
Maßnahmen aus, dass bei Störungen
an der Tauchpumpe Folgeschäden
durch Überflutungen entstehen.
Achten Sie auf sicheren Stand
der Tauchpumpe oder betreiben
Sie die Tauchpumpe an einem
Seil hängend.
Achten Sie auf ausreichenden
Abstand zum Untergrund.
Lassen Sie die Tauchpumpe
niemals gegen eine geschlossene
Druckleitung laufen.
Achten Sie bei Schächten immer
auf ausreichende
Dimensionierung.
Decken Sie Schächte immer
trittsicher ab.
Pumpe einschalten
ACHTUNG!
Die Tauchpumpe darf keine
Festkörper ansaugen. Sand und
andere schmirgelnde Stoffe im
Fördermedium zerstören die
Tauchpumpe.
1. Wickeln Sie das Anschlusskabel
vollständig ab.
2. Stellen Sie sicher, dass elektrische
Steckverbindungen im
überflutungssicheren Bereich
angebracht sind.
3. Verändern Sie die Klemmposition
und stellen Sie die Schaltpunkte des
Schwimmerschalters individuell ein.
4. Klemmen Sie das Kabel des
Schwimmerschalters am
Pumpengehäuse fest.
➯ Empfohlene Kabellänge des
Schwimmerschalters ca. 120 mm.
Benutzen sie bei schlammigem,
sandigem oder steinigem Untergrund
eine geeignete Platte für den
sicheren Stand der Tauchpumpe.
5. Tauchen Sie die Tauchpumpe
langsam in
das Fördermedium ein. Halten Sie die
Tauchpumpe
dabei leicht schräg, damit eventuell
eingeschlossene Luft entweichen
kann.
6. Stecken Sie den Netzstecker in die
Steckdose.
➯ Die Tauchpumpe schaltet über den
Schwimmerschalter bei Erreichen
eines bestimmten Wasserstands
automatisch ein und bei Abfallen des
Wasserstands auf die Abschalthöhe
wieder ab.
Pumpe ausschalten
1 Ziehen Sie den Netzstecker aus der
Steckdose.
Abpumpen auf Restwasserhöhe
ACHTUNG!
Beaufsichtigen Sie die Pumpe beim
Abpumpen auf Restwasserhöhe
ständig und vermeiden Sie, dass die
Pumpe trocken läuft. Setzen Sie die
Pumpe bei Erreichen der
Restwasserhöhe durch Ziehen des
Netzsteckers außer Betrieb.
Zum Abpumpen auf Restwasserhöhe
muss der Schwimmerschalter manuell
bedient werden:
1. Ziehen Sie den Netzstecker aus der
Steckdose.
D 03
INBETRIEBNAHME

2. Legen Sie den Schwimmerschalter
nach oben und befestigen Sie ihn.
3. Stecken Sie den Netzstecker in die
Steckdose. Die Pumpe schaltet ein
und beginnt zu fördern.
Wird die Restwasserhöhe
unterschritten (unter 10/40 mm), saugt
die Pumpe Luft an. In diesem Fall
muss die Pumpe bei ansteigendem
Wasserstand und vor erneutem
Betrieb entlüftet werden.
WARTUNG UND PFLEGE
Pumpe reinigen
Nach Förderung von chlorhaltigem
Schwimmbadwasser oder
Flüssigkeiten, die Rückstände
hinterlassen, muss die Pumpe mit
klarem Wasser gespült werden.
1. Reinigen Sie die Ansaugschlitze des
Saugfußes bei Bedarf mit klarem
Wasser.
LAGERUNG
Bei Frostgefahr muss das System
vollständig entleert werden.
ENTSORGUNG
Ausgediente Geräte, Batterien oder
Akkus nicht über den Hausmüll
entsorgen!
Verpackung, Gerät und Zubehör sind
aus recyclingfähigen Materialien
hergestellt und entsprechend zu
entsorgen.
INBETRIEBNAHME
D 04
Strona się ładuje...
Strona się ładuje...
Strona się ładuje...
Strona się ładuje...
Strona się ładuje...
Strona się ładuje...
Strona się ładuje...
Strona się ładuje...
Strona się ładuje...
Strona się ładuje...
Strona się ładuje...
Strona się ładuje...
Strona się ładuje...
Strona się ładuje...
Strona się ładuje...
Strona się ładuje...
Strona się ładuje...
Strona się ładuje...
Strona się ładuje...
Strona się ładuje...
Strona się ładuje...
Strona się ładuje...
Strona się ładuje...
Strona się ładuje...
Strona się ładuje...
Strona się ładuje...
Strona się ładuje...
Strona się ładuje...
Strona się ładuje...
Strona się ładuje...
Strona się ładuje...
-
 1
1
-
 2
2
-
 3
3
-
 4
4
-
 5
5
-
 6
6
-
 7
7
-
 8
8
-
 9
9
-
 10
10
-
 11
11
-
 12
12
-
 13
13
-
 14
14
-
 15
15
-
 16
16
-
 17
17
-
 18
18
-
 19
19
-
 20
20
-
 21
21
-
 22
22
-
 23
23
-
 24
24
-
 25
25
-
 26
26
-
 27
27
-
 28
28
-
 29
29
-
 30
30
-
 31
31
-
 32
32
-
 33
33
-
 34
34
-
 35
35
-
 36
36
-
 37
37
-
 38
38
-
 39
39
-
 40
40
-
 41
41
-
 42
42
-
 43
43
-
 44
44
-
 45
45
-
 46
46
-
 47
47
-
 48
48
-
 49
49
-
 50
50
-
 51
51


Mega MW 850 INOX Instrukcja obsługi
- Typ
- Instrukcja obsługi
- Niniejsza instrukcja jest również odpowiednia dla
w innych językach
- Deutsch: Mega MW 850 INOX Benutzerhandbuch
- slovenčina: Mega MW 850 INOX Používateľská príručka
- français: Mega MW 850 INOX Manuel utilisateur
- English: Mega MW 850 INOX User manual
- dansk: Mega MW 850 INOX Brugermanual
- Nederlands: Mega MW 850 INOX Handleiding
Inne dokumenty
-
AL-KO Clear Water Pump SUB 6000 , 6.500 L/h Instrukcja obsługi
-
-
-
-
AL-KO 7500 Instrukcja obsługi
-
-
-
Renkforce 1210395 Instrukcja obsługi
-
-
Pontec 2482384 PondoSwitch Water Pressure Switch Instrukcja obsługi