
IO-HOO-0062/8
(04.2021)
Kitchen extractor hood / okap nadkuchenny /
kuchyňského odsavače / kuchynského odsávača
/ Hotă de bucătărie / tűzhely feletti páraelszívó /
кухненски аспиратор / Campana extractora de
cocina / Exaustor de cozinha / Kuhinjska napa /
Kuhinjska napa / Korpus nape
OSC...
OPERATING INSTRUCTIONS EN
INSTRUKCJA OBSŁUGI PL
NÁVOD K OBSLUZE CS
NÁVOD NA OBSLUHU SK
INSTRUCŢIUNE DE DESERVIRE RO
HASZNÁLATI UTASÍTÁS HU
ИНСТРУКЦИЯ ЗА ОБСЛУЖВАНЕ BG
MANUAL DE INSTRUCCIONES ES
MANUALDE INSTRUÇÕES PT
UPUTE ZA UPORABU HR
NAVODILA ZA UPORABO SL
UPUTSTVO ZA UPOTREBU SR


- 3 -
NOTES ON SAFETY 8
UNPACKING 11
DISPOSAL OF OLD APPLIANCE 11
OPERATION 12
OTHER IMPORTANT INFORMATION CONCERNING THE OPERATION OF THE HOOD 14
CLEANING AND MAINTENANCE 15
MAINTENANCE 15
GREASE FILTER 15
ACTIVATED CHARCOAL FILTER 15
LIGHT 15
WARRANTY AND AFTER SALES SERVICE 16
WARRANTY 16
EN- Table of contents
CS- Obsah
PL- Spis treści
WSKAZÓWKI DOTYCZĄCE BEZPIECZEŃSTWA 18
ROZPAKOWANIE 22
USUWANIE ZUŻYTYCH URZĄ DZEŃ 22
OBSŁUGA 23
INNE WAŻNE INFORMACJE DOTYCZĄCE OBSŁUGI OKAPU 25
CZYSZCZENIE I KONSERWACJA 26
KONSERWACJA 26
FILTR PRZECIWTŁUSZCZOWY 26
FILTR WĘGLOWY 26
OŚWIETLENIE 26
GWARANCJA, OBSŁUGA POSPRZEDAŻOWA 27
GWARANCJA 27
BEZPEČNOSTNÍ POKYNY 29
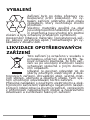
VYBALENÍ 32
LIKVIDACE OPOTŘEBOVANÝCH ZAŘÍZENÍ 32
OBSLUHA 33
JINÉ DŮLEŽITÉ INFORMACE O OBSLUZE ODSAVAČE 35
ČIŠTĚNÍ A ÚDRŽBA 36
ÚDRŽBA 36
PROTITUKOVÝ FILTR 36
UHLÍKOVÝ FILTR 36
OSVĚTLENÍ 36
ZÁRUKA, POPRODEJNÍ SERVIS 37
ZÁRUKA 37

- 4 -
SK- Obsah
HU - Tartalomjegyzék
RO - Cuprins
BEZPEČNOSTNÉ POKYNY POUŽÍVANIA 39
ROZBALENIE 43
LIKVIDÁCIA ZARIADENÍ 43
OBSLUHA 44
INÉ DÔLEŽITÉ INFORMÁCIE TÝKAJÚCE SA POUŽÍVANIA ODSÁVAČA 46
ČISTENIE A ÚDRŽBA 47
KONZERVÁCIA 47
PROTITUKOVÝ FILTER 47
UHLÍKOVÝ FILTER 47
OSVETLENIE 47
ZÁRUKA, POPREDAJNÝ SERVIS 48
ZÁRUKA 48
INDICAȚII PRIVIND SIGURANȚA 50
DESPACHETARE 54
ÎNDEPĂRTAREA DISPOZITIVELOR UZATE 54
OPERARE 55
ALTE INFORMATII IMPORTANTE PENTRU OPERAREA HOTEI 57
CURĂŢAREA ŞI ÎNTREŢINEREA 58
ÎNTREŢINERE 58
FILTRUL ÎMPOTRIVA GRĂSIMILOR 58
FILTRUL DE CARBON 58
SISTEM DE ILUMINARE 58
GARANŢIE, SERVICII POSTVÂNZARE 59
GARANŢIA 59
BIZTONSÁGI UTASÍTÁSOK 61
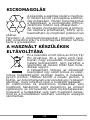
KICSOMAGOLÁS 65
A HASZNÁLT KÉSZÜLÉKEK ELTÁVOLÍTÁSA 65
HASZNÁLAT 66
A PÁRAELSZÍVÓ MŰKÖDÉSÉVEL KAPCSOLATOS EGYÉB FONTOS INFORMÁCIÓK 68
TISZTÍTÁS ÉS KARBANTARTÁS 69
KARBANTARTÁS 69
ZSÍRSZŰRŐ 69
SZÉNSZŰRŐ 69
VILÁGÍTÁS 69
GARANCIA ÉS VÁSÁRLÁS UTÁNI SZERVIZ 70
GARANCIA 70

- 5 -
BG - Съдържание
PT - Índice
ES - Tabla de contenidos
ПРЕПОРЪКИ ОТНОСНО БЕЗОПАСНОСТТА 72
РАЗОПАКОВАНЕ 76
ОБЕЗВРЕЖДАНЕ НА ИЗНОСЕНИ УРЕДИ 76
ОБСЛУЖВАНЕ 77
ДРУГИ ВАЖНИ ИНФОРМАЦИИ ЗА ОБСЛУЖВАНЕТО НА АБСОРБАТОРА 79
ПОЧИСТВАНЕ И ПОДДРЪЖКА 80
ПОДДРЪЖКА 80
ФИЛТЪР ЗА МАЗНИНИ 80
ВЪГЛЕН ФИЛТЪР 80
ОСВЕТЛЕНИЕ 80
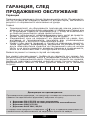
ГАРАНЦИЯ, СЛЕД ПРОДАЖБЕНО ОБСЛУЖВАНЕ 81
ГАРАНЦИЯ 81
INDICACIONES RELACIONADAS CON SEGURIDAD 83
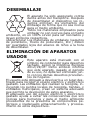
DESEMBALAJE 87
ELIMINACIÓN DE APARATOS USADOS 87
USO 88
OTRA INFORMACIÓN IMPORTANTE RELATIVA AL USO DE LA CAMPANA 90
LIMPIEZA Y CONSERVACIÓN 91
MANTENIMIENTO 91
FILTRO DE GRASA 91
FILTRO DE CARBÓN 91
ILUMINACIÓN 91
GARANTÍA, ATENCIÓN DE POST VENTA 92
GARANTÍA 92
CONSELHOS DE SEGURANÇA 94
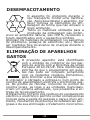
DESEMPACOTAMENTO 98
ELIMINAÇÃO DE APARELHOS GASTOS 98
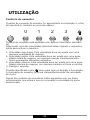
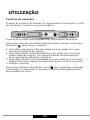
UTILIZAÇÃO 99
OUTRAS INFORMAÇÕES IMPORTANTES SOBRE A UTILIZAÇÃO DO EXAUSTOR 101
LIMPEZA E MANUTENÇÃO 102
MANUTENÇÃO 102
FILTRO DE GORDURA 102
FILTRO DE CARVÃO 102
ILUMINAÇÃO 102
GARANTIA, SERVIÇO PÓS-VENDA 103
GARANTIA 103

- 6 -
HR - Kazalo
SR- Sadržaj
SL - Sadržaj
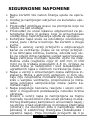
SIGURNOSNE NAPOMENE 105
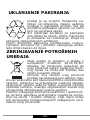
UKLANJANJE PAKIRANJA 108
ZBRINJAVANJE POTROŠENIH UREĐAJA 108
UPORABA 109
OSTALE VAŽNE INFORMACIJE O UPORABI NAPE 111
ČIŠĆENJE I ODRŽAVANJE 112
ODRŽAVANJE 112
FILTER PROTIV MASNOĆE 112
UGLJENI FILTER 112
RASVJETA 112
JAMSTVO, POSLIJEPRODAJNE AKTIVNOSTI 113
JAMSTVO 113
NAVODILA ZA ZAGOTAVLJANJE VARNOSTI UPORABE 115
RAZPAKIRANJE 118
ODSTRANJEVANJE IZRABLJENIH NAPRAV 118
UPORABA 119
DRUGE POMEMBNE INFORMACIJE GLEDE NAVODIL ZA UPORABO NAPE 121
ČIŠČENJE IN VZDRŽEVANJE 122
VZDRŽEVANJE 122
MAŠČOBNI FILTER 122
OGLENI FILTER 122
OSVETLITEV 122
GARANCIJA, POPRODAJNE STORITVE 123
GARANCIJA 123
BEZBEDNOSNE NAPOMENE 125
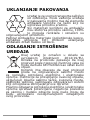
UKLANJANJE PAKOVANJA 128
ODLAGANJE ISTROŠENIH UREĐAJA 128
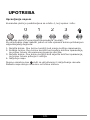
UPOTREBA 129
OSTALE VAŽNE INFORMACIJE O UPOTREBI NAPE 131
ČIŠĆENJE I ODRŽAVANJE 132
ODRŽAVANJE 132
FILTER ZA MASNOĆU 132
UGLJENI FILTER 132
OSVETLJENJE 132
GARANCIJA, USLUGE POSLE PRODAJE 133
GARANCIJA 133

- 7 -
Dear customer,
From now on, your daily housework will be easier
than ever before. Your appliance is excepon-
ally easy to use and extremely ecient. Aer reading
these Operang Instrucons, operang the appliance
will be easy.
Before being packaged and leaving the manufacturer,
the appliance was thoroughly checked with regard to
safety and funconality.
Before using the appliance, please carefully read
these Operang Instrucons. By following these
instrucons carefully you will be able to avoid any
problems in using the appliance. It is important to
keep these Operang Instrucons and store them in a
safe place so that they can be consulted at any me.
Follow these instrucons carefully in order to avoid
possible accidents.
Sincerely,

- 8 -
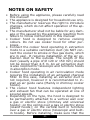
NOTES ON SAFETY
• Before using the appliance, please carefully read
this manual!
• The appliance is designed for household use only.
• The manufacturer reserves the right to introduce
changes, which do not aect operation of the ap-
pliance.
• The manufacturer shall not be liable for any dam-
age or re caused by the appliance resulting from
failure to follow instructions in this manual.
• Cooker hood is designed to remove cooking
odours. Do not use cooker hood for other pur-
poses.
• Connect the cooker hood operating in extraction
mode to a suitable ventilation duct (do NOT con-
nect the cooker to smoke or ue gas ducts, which
are in use). It requires installation of the air ex-
traction duct to the outside. The length of the
duct (usually a pipe of Ø 120 or 150 mm) should
not be longer than 4-5 m. An air extraction duct
is also required for telescopic and furniture hoods
in absorption mode.
• Cooker hood operating in air recirculation mode
requires the installation of an activated charcoal
lter. In this case, installing an extractor duct is
not required, however it is recommended to in-
stall an air guide vane (Mainly in chimney cooker
hoods).
• The cooker hood features independent lighting
and exhaust fan that can be operated at one of
several speeds.
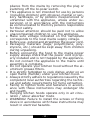
• Depending on the type, the hood is designed to
be permanently attached to a vertical wall over
a gas or electric stove (chimney and universal
hoods); on the ceiling over a gas or electric stove
(island hoods); on the vertical built in furniture
over a gas or electric stove (telescopic and built-
in hoods). Before installing, make sure that the

- 9 -
wall/ceiling structure is strong enough to suspend
the hood. Some hoods are very heavy.
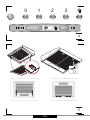
• For details of the installation distance above an
electric hob please refer to product technical
sheet If the installation instructions of the gas
cooker specify a greater distance, this must be
taken into account (Fig. 1).
• Do not leave an open ame under the hood.
When the pots are removed from the burner, set
the minimum ame. Always make sure that the
ame does not extend outside the pot, because it
causes unwanted loss of energy and a dangerous
concentration of heat.
• When cooking on fat, supervise the pans con-
stantly, because overheated fat can ignite.
• Unplug the appliance before any cleaning, replac-
ing the lter or repair work.
• Cooker hood grease lter should be cleaned at
least once a month, because the lter saturated
with fat is ammable.
• Ensure adequate ventilation (air ow) if other
equipment such as liquid fuel stoves or heaters
are operated in the room in addition the cooker
hood. When the cooker hood is simultaneously
operated with burning appliances requiring ade-
quate fresh air from the room to work properly,
their safe operation is possible if under pressure
around these appliances is a maximum of 0.004
mbar (this does not apply when the cooker hood
is used as an odour lter)
• Do not lean on the hood.
• The hood should be cleaned regularly both inside
and out (AT LEAST ONCE A MONTH, following the
indications concerning maintenance provided in
this manual)..Failure to adhere to the rules con-
cerning cleaning the hood and replacing lters
results in a re risk.
• If the power cord is damaged it should be re-
placed by a specialised service centre.
• Ensure that it is possible to disconnect the ap-

- 10 -
pliance from the mains by removing the plug or
switching o the bi-polar switch.
• This appliance is not intended for use by persons
(including children) with physical, mental or sen-
sory handicaps, or by persons inexperienced or
unfamiliar with the appliance, unless under su-
pervision or in accordance with the instructions
as communicated to them by persons responsible
for their safety.
• Particular attention should be paid not to allow
unaccompanied children to use the appliance.
• Make sure voltage indicated on the nameplate
corresponds to the local mains supply voltage.
• Before use, extend and straighten the power cord.
• Packaging materials (bags, polyethylene, poly-
styrene, etc.) should be kept away from children
during unpacking.
• Before connecting the hood to the mains power
supply always check that the power cord is prop-
erly installed and is not trapped by the appliance.
Do not connect the appliance to the mains until
assembly is complete.
• Do not operate your kitchen hood without the al-
uminium grease lters.
• It is strictly forbidden to cook dishes under on an
open ame (ambé) under your kitchen hood.
• Always strictly adhere to regulations issued by the
competent local authorities regarding the techni-
cal and safety requirements for fume extraction.
• Failing to tighten bolts and fasteners in accord-
ance with these instructions may endanger life
and health.
• Hanging kitchen hoods operate only in air circu-
lation / odour absorber mode
• WARNING! Failure to install the screws or xing
device in accordance with these instructions may
result in electrical hazards.

- 11 -
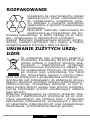
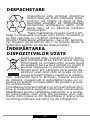
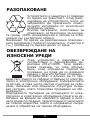
UNPACKING
During transportation, protective
packaging was used to protect the
appliance against any damage. Af-
ter unpacking, please dispose of all
elements of packaging in a way that
will not cause damage to the environ-
ment.
All materials used for packaging the
appliance are environmentally friendly; they are
100% recyclable and are marked with the appropri-
ate symbol.
Important! Packaging materials (bags, polyethyl-
ene, polystyrene, etc.) should be kept away from
children during unpacking.
DISPOSAL OF OLD APPLIANCE
In accordance with European Directive
2012/19/EU and local legislation re-
garding used electrical and electronic
goods, this appliance is marked with
the symbol of the crossed-out waste
container. This marking indicates that
the appliance must not be disposed of
together with other household waste
after it has been used.
The user is obliged to hand it over to waste collec-
tion centre collecting used electrical and electron-
ic goods. The collectors, including local collection
points, shops and local authority departments pro-
vide recycling schemes.
Proper handling of used electrical and electronic
goods helps avoid environmental and health haz-
ards resulting from the presence of dangerous com-
ponents and the inappropriate storage and process-
ing of such goods.

- 12 -
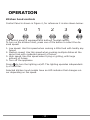
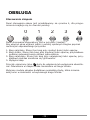
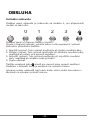
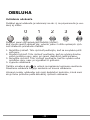
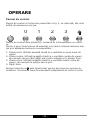
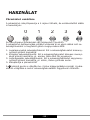
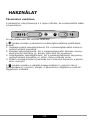
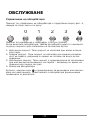
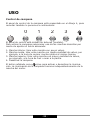
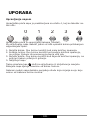
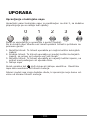
OPERATION
Kitchen hood controls
Control Panel is shown in Figure 4, for reference it is also shown below:
0123
The control panel is equipped with buttons (isostat switch).
To turn on the kitchen hood, press one of the button to select the de-
sired speed:
1- Low speed. Use this speed when cooking a little food with hardly any
fumes.
2- Medium speed. Use this speed when cooking multiple dishes at the
same time with moderate amount of fumes.
3- High speed. Use this speed when frying or grilling, with large
amount of fumes.
0- Turn o the appliance
Press to turn the lighting on/o. The lighting operates independent-
ly of hood fan.
Selected kitchen hood models have an LED indicator that changes col-
our depending on fan speed.

- 13 -
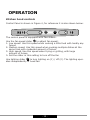
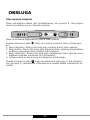
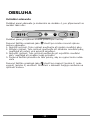
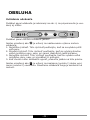
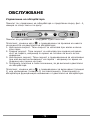
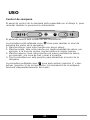
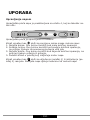
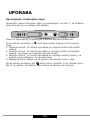
OPERATION
Kitchen hood controls
Control Panel is shown in Figure 4, for reference it is also shown below:
The control panel is equipped with two sliders:
Use the fan speed slider to adjust fan speed:
1- Low speed. Use this speed when cooking a little food with hardly any
fumes.
2- Medium speed. Use this speed when cooking multiple dishes at the
same time with moderate amount of fumes.
3- High speed. Use this speed when frying or grilling, with large
amount of fumes.
0- Set the slider in this setting to turn o the fan
Use lighting slider to turn lighting on (1) / o (0). The lighting oper-
ates independently of hood fan.

- 14 -
Other important information concerning the operation of
the hood
Operation in air circulation / odour lter mode. In this mode, the ltered
air returns to the room through the outlets. Install activated charcoal
lter in this setting. It is recommended to install the air guide (available
depending on the model, mainly in chimney cooker hoods).
Air extraction operation: When cooker hood operates in extraction mode,
air is discharged outside through an extraction duct. Remove activated
charcoal lter in this setting. The cooker hood is connected to the air
outlet opening using a rigid or exible extraction duct with a diameter of
150 or 120 mm, and the appropriate clamps, which must be purchased
at a hardware store. The appliance should be installed by a qualied
installer.
Fan speed: Lowest and medium fan speed is used in normal conditions
and less intense odours, while the highest speed is used only when cook-
ing odours are very intense, such as during frying or grilling.
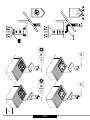
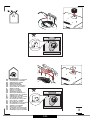
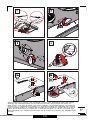
Note (applies to universal hoods only): Due to the design of universal
hoods you need to manually change the mode of operation. See Figure
8 for instructions on how to change the mode.
Note (only applies to telescopic and in-built kitchen hoods): Furniture
and telescopic cooker hoods operating in air recirculation mode require
installation of the exhaust duct. The other end of the duct should be di-
rected to the room as it will discharge ltered air.
Note: Hanging kitchen hoods operate only in air circulation / odour ab-
sorber mode

- 15 -
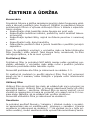
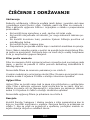
CLEANING AND
MAINTENANCE
Maintenance
Regular maintenance and cleaning of the appliance will ensure trou-
ble-free operation of the cooker hood and extend its life. Especially make
sure that the grease lter and activated charcoal lter are replaced ac-
cording to manufacturer's recommendations.
• Do not use a soaked cloth, sponge, or water jet.
• Do not use solvents or alcohol, as they may tarnish lacquered sur-
faces.
• Do not use caustic substances, especially for cleaning stainless steel.
• Do not use a rough or abrasive cloth.
• It is recommend to use a damp cloth and a neutral detergent.
Note: After several washes in the dishwasher, the colour of the alumini-
um lter may change. The change of colour does not indicate improprie-
ties or the necessity to change it.
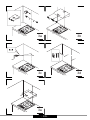
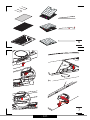
Grease lter
For normal hood operation, grease lter should be cleaned every month
in the dishwasher or by hand using a mild detergent or liquid soap.
Dismantling of grease lter is shown on Figure 5.
Acrylic lter is used in some models. This lter should be replaced at
least once every 2 months or more frequently if the appliance is used
intensively.
Activated charcoal lter
Charcoal lter is used only when the cooker hood is not connected to
the ventilation duct. Activated charcoal lter can absorb odours until
saturated. Charcoal lter is not suitable for washing or regeneration and
should be replaced at least once every 3-4 months or more frequently if
the appliance is used intensively.
Dismantling of charcoal lter is shown on Figure 6.
Light
Use incandescent / halogen / LED modules of the same specication as
those factory-installed in the appliance. See Figure 7 for details how to
replace lights. If there is no such gure in this manual, please contact
authorised service to replace the lighting module.

- 16 -
WARRANTY AND AFTER
SALES SERVICE
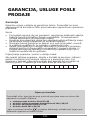
Warranty
Warranty service as stated on the warranty card. The manufacturer shall
not be held liable for any damage caused by improper use of the product.
Service
• The manufacturer recommends that all repairs and adjustments be
carried out by the Factory Service Technician or the Manufacturer’s
Authorized Service Point. For safety reasons, repairs should be re-
ferred to professionals.
• Repairs carried out by unqualied persons may seriously endanger
the appliance user.
• The minimum warranty period for the appliance oered by the man-
ufacturer, importer or authorized representative is given in the war-
ranty card.
• The warranty shall be void if you make any independent adaptations
or alterations, tamper with seals or other appliance safety devices
or its parts or interfere with the appliance contrary to operating in-
structions.
In the event of appliance malfunction, request assistance or repair.
If your appliance needs repair, please contact the service centre. Please
see warranty card for address and contact details of our service centre.
Before contacting us, please have ready the appliance serial number,
which can be found on the identication sticker: For your convenience,
please write it down below:
Manufacturer’s Declaration
The manufacturer hereby declares that this product meets the re-
quirements of the following European directives:
• Low Voltage Directive 2014/35/EC
• Electromagnetic Compatibility (EMC) Directive 2014/30/EC
• ErP Directive 2009/125/EC
• Directive RoHS 2011/65/EC
and has thus been marked with the symbol and been issued with
a declaration of compliance made available to market regulators.

- 17 -
Szanowny
Kliencie
Od dziś codzienne obowiązki staną się prostsze niż
kiedykolwiek. Urządzenie to połączenie wy-
jątkowej łatwości obsługi i doskonałej efektywności.
Po przeczytaniu instrukcji, obsługa nie będzie proble-
mem.
Sprzęt, który opuścił fabrykę był dokładnie sprawdzo-
ny przed zapakowaniem pod względem bezpieczeń-
stwa i funkcjonalności na stanowiskach kontrolnych.
Prosimy Państwa o uważną lekturę instrukcji obsłu-
gi przed uruchomieniem urządzenia. Przestrzeganie
zawartych w niej wskazówek uchroni Państwa przed
niewłaściwym użytkowaniem. Instrukcję należy zacho-
wać i przechowywać tak, aby mieć ją zawsze pod ręką.
Należy dokładnie przestrzegać instrukcji obsługi
w celu uniknięcia nieszczęśliwych wypadków.
Z poważaniem

- 18 -
WSKAZÓWKI DOTYCZĄCE
BEZPIECZEŃSTWA
• Okap należy używać dopiero po przeczytaniu tej
instrukcji
• Urządzenie przeznaczone jest wyłącznie do użyt-
ku domowego.
• Producent zastrzega sobie możliwość dokonywa-
nia zmian niewpływających na działanie urządze-
nia.
• Producent nie ponosi żadnej odpowiedzialności
za ewentualne szkody lub pożary spowodowane
przez urządzenie wynikające z nieprzestrzegania
zaleceń podanych w niniejszej instrukcji.
• Okap nadkuchenny służy do usuwania oparów
kuchennych. Nie należy go używać do innych ce-
lów.
• Okap pracujący w trybie wyciągu należy podłą-
czyć do odpowiedniego kanału wentylacyjnego
(nie podłączać do kanałów kominowych, dymo-
wych lub spalinowych, będących w eksploatacji).
Okap wymaga zainstalowania przewodu odpro-
wadzającego powietrze na zewnątrz. Długość
przewodu (najczęściej rura Ø 120 mm lub 150
mm) nie powinna być dłuższa niż 4-5 m. Przewód
odprowadzający powietrze jest również wymaga-
ny przy okapach teleskopowych i meblowych w
trybie pochłaniacza.
• Okap pracujący w trybie pochłaniacza wymaga
zainstalowania ltra z węglem aktywnym. W tym
przypadku nie wymaga się instalowania przewo-
du odprowadzającego powietrze na zewnątrz, za-
leca się natomiast montaż kierownicy wydmuchu
powietrza (występuje głównie w okapach komi-
nowych).
• Okap posiada niezależne oświetlenie oraz wenty-

- 19 -
lator wyciągowy z możliwością ustawienia jednej
z kilku prędkości obrotowych.
• W zależności od wersji urządzenia, okap jest prze-
znaczony do trwałego zamocowania na pionowej
ścianie ponad kuchenką gazową lub elektryczną
(okapy kominowe i uniwersalne); na sucie ponad
kuchenką gazową lub elektryczną (okapy wyspo-
we); na pionowej ścianie w zabudowie meblowej
ponad kuchenką gazową lub elektryczną (okapy
teleskopowe i do zabudowy). Przed montażem
należy się upewnić czy konstrukcja ściany / sutu
jest odpowiednia do utrzymania okapu. Niektóre
modele okapów są bardzo ciężkie.
• Wysokość montażu urządzenia nad płytą elek-
tryczną podana jest w karcie produktu (specy-
kacji technicznej urządzenia). Jeżeli w instruk-
cjach instalowania urządzeń gazowych podano
większą odległość, należy to uwzględnić (Rys. 1).
• Pod okapem kuchennym nie wolno pozostawiać
odkrytego płomienia, podczas zdejmowania na-
czyń znad palnika, należy ustawić minimalny pło-
mień. Zawsze należy sprawdzać czy płomień nie
wykracza poza naczynie, gdyż powoduje to nie-
pożądane straty energii i niebezpieczną koncen-
trację ciepła.
• Potrawy przygotowywane na tłuszczach powinny
być stale nadzorowane, gdyż przegrzany tłuszcz
może się łatwo zapalić.
• Przed każdą operacją czyszczenia, wymianą ltra
lub przed podjęciem prac naprawczych, należy
wyjąć wtyczkę urządzenia z gniazdka.
• Filtr przeciw tłuszczowy do okapu kuchennego
należy czyścić, co najmniej, raz na 1 miesiąc,
gdyż nasycony tłuszczem jest łatwopalny.
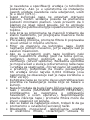
• Jeżeli w pomieszczeniu, oprócz okapu, eksploa-
tuje się inne urządzenia o zasilaniu nieelektrycz-
nym (np. piece na paliwa ciekłe, grzejniki prze-
pływowe, termy), należy zadbać o wystarczającą

- 20 -
wentylację (dopływ powietrza). Bezpieczna eks-
ploatacja jest możliwa, gdy przy jednoczesnej
pracy okapu i urządzeń spalających, zależnych od
powietrza w pomieszczeniu, w miejscu ustawie-
nia tych urządzeń panuje podciśnienie najwyżej
0,004 milibara (ten punkt nie obowiązuje, gdy
okap nadkuchenny jest użytkowany jako pochła-
niacz zapachów).
• Okap nie powinien służyć jako płaszczyzna pod-
parcia dla osób znajdujących się w kuchni.
• Okap powinien być często czyszczony zarówno
na zewnątrz jak i od wewnątrz (PRZYNAJMNIEJ
RAZ W MIESIĄCU, z zachowaniem wskazówek
dotyczących konserwacji podanych w niniejszej
instrukcji).Nieprzestrzeganie zasad dotyczących
czyszczenia okapu oraz wymiany ltrów powodu-
je powstanie zagrożenia pożarem.
• Jeżeli przewód zasilający ulegnie uszkodzeniu, to
powinien być wymieniony w specjalistycznym za-
kładzie naprawczym.
• Należy zapewnić możliwość odłączenia urządze-
nia od sieci elektrycznej, poprzez wyjęcie wtyczki
lub wyłączenie wyłącznika dwubiegunowego.
• Niniejszy sprzęt nie jest przeznaczony do użytko-
wania przez osoby (w tym dzieci) o ograniczonej
zdolności zycznej, czuciowej lub psychicznej,
lub osoby o braku doświadczenia lub znajomo-
ści sprzętu, chyba że odbywa się to pod nadzo-
rem lub zgodnie z instrukcją użytkowania sprzę-
tu, przekazaną przez osoby odpowiadające za ich
bezpieczeństwo.
• Należy zwrócić szczególną uwagę, aby z urządze-
nia nie korzystały po zo sta wio ne bez opieki dzieci.
• Sprawdzić, czy napięcie podane na tabliczce zna-
mionowej odpowiada miejscowym parametrom
zasilania.
• Przed montażem rozwinąć i wyprostować prze-
wód sieciowy.
Strona się ładuje...
Strona się ładuje...
Strona się ładuje...
Strona się ładuje...
Strona się ładuje...
Strona się ładuje...
Strona się ładuje...
Strona się ładuje...
Strona się ładuje...
Strona się ładuje...
Strona się ładuje...
Strona się ładuje...
Strona się ładuje...
Strona się ładuje...
Strona się ładuje...
Strona się ładuje...
Strona się ładuje...
Strona się ładuje...
Strona się ładuje...
Strona się ładuje...
Strona się ładuje...
Strona się ładuje...
Strona się ładuje...
Strona się ładuje...
Strona się ładuje...
Strona się ładuje...
Strona się ładuje...
Strona się ładuje...
Strona się ładuje...
Strona się ładuje...
Strona się ładuje...
Strona się ładuje...
Strona się ładuje...
Strona się ładuje...
Strona się ładuje...
Strona się ładuje...
Strona się ładuje...
Strona się ładuje...
Strona się ładuje...
Strona się ładuje...
Strona się ładuje...
Strona się ładuje...
Strona się ładuje...
Strona się ładuje...
Strona się ładuje...
Strona się ładuje...
Strona się ładuje...
Strona się ładuje...
Strona się ładuje...
Strona się ładuje...
Strona się ładuje...
Strona się ładuje...
Strona się ładuje...
Strona się ładuje...
Strona się ładuje...
Strona się ładuje...
Strona się ładuje...
Strona się ładuje...
Strona się ładuje...
Strona się ładuje...
Strona się ładuje...
Strona się ładuje...
Strona się ładuje...
Strona się ładuje...
Strona się ładuje...
Strona się ładuje...
Strona się ładuje...
Strona się ładuje...
Strona się ładuje...
Strona się ładuje...
Strona się ładuje...
Strona się ładuje...
Strona się ładuje...
Strona się ładuje...
Strona się ładuje...
Strona się ładuje...
Strona się ładuje...
Strona się ładuje...
Strona się ładuje...
Strona się ładuje...
Strona się ładuje...
Strona się ładuje...
Strona się ładuje...
Strona się ładuje...
Strona się ładuje...
Strona się ładuje...
Strona się ładuje...
Strona się ładuje...
Strona się ładuje...
Strona się ładuje...
Strona się ładuje...
Strona się ładuje...
Strona się ładuje...
Strona się ładuje...
Strona się ładuje...
Strona się ładuje...
Strona się ładuje...
Strona się ładuje...
Strona się ładuje...
Strona się ładuje...
Strona się ładuje...
Strona się ładuje...
Strona się ładuje...
Strona się ładuje...
Strona się ładuje...
Strona się ładuje...
Strona się ładuje...
Strona się ładuje...
Strona się ładuje...
Strona się ładuje...
Strona się ładuje...
Strona się ładuje...
Strona się ładuje...
Strona się ładuje...
Strona się ładuje...
Strona się ładuje...
Strona się ładuje...
Strona się ładuje...
Strona się ładuje...
Strona się ładuje...
-
 1
1
-
 2
2
-
 3
3
-
 4
4
-
 5
5
-
 6
6
-
 7
7
-
 8
8
-
 9
9
-
 10
10
-
 11
11
-
 12
12
-
 13
13
-
 14
14
-
 15
15
-
 16
16
-
 17
17
-
 18
18
-
 19
19
-
 20
20
-
 21
21
-
 22
22
-
 23
23
-
 24
24
-
 25
25
-
 26
26
-
 27
27
-
 28
28
-
 29
29
-
 30
30
-
 31
31
-
 32
32
-
 33
33
-
 34
34
-
 35
35
-
 36
36
-
 37
37
-
 38
38
-
 39
39
-
 40
40
-
 41
41
-
 42
42
-
 43
43
-
 44
44
-
 45
45
-
 46
46
-
 47
47
-
 48
48
-
 49
49
-
 50
50
-
 51
51
-
 52
52
-
 53
53
-
 54
54
-
 55
55
-
 56
56
-
 57
57
-
 58
58
-
 59
59
-
 60
60
-
 61
61
-
 62
62
-
 63
63
-
 64
64
-
 65
65
-
 66
66
-
 67
67
-
 68
68
-
 69
69
-
 70
70
-
 71
71
-
 72
72
-
 73
73
-
 74
74
-
 75
75
-
 76
76
-
 77
77
-
 78
78
-
 79
79
-
 80
80
-
 81
81
-
 82
82
-
 83
83
-
 84
84
-
 85
85
-
 86
86
-
 87
87
-
 88
88
-
 89
89
-
 90
90
-
 91
91
-
 92
92
-
 93
93
-
 94
94
-
 95
95
-
 96
96
-
 97
97
-
 98
98
-
 99
99
-
 100
100
-
 101
101
-
 102
102
-
 103
103
-
 104
104
-
 105
105
-
 106
106
-
 107
107
-
 108
108
-
 109
109
-
 110
110
-
 111
111
-
 112
112
-
 113
113
-
 114
114
-
 115
115
-
 116
116
-
 117
117
-
 118
118
-
 119
119
-
 120
120
-
 121
121
-
 122
122
-
 123
123
-
 124
124
-
 125
125
-
 126
126
-
 127
127
-
 128
128
-
 129
129
-
 130
130
-
 131
131
-
 132
132
-
 133
133
-
 134
134
-
 135
135
-
 136
136
-
 137
137
-
 138
138
-
 139
139
-
 140
140


Amica OSC5111W Instrukcja obsługi
- Kategoria
- Okapy kuchenne
- Typ
- Instrukcja obsługi
w innych językach
- español: Amica OSC5111W Manual de usuario
- slovenčina: Amica OSC5111W Používateľská príručka
- português: Amica OSC5111W Manual do usuário
- română: Amica OSC5111W Manual de utilizare