
GRILL GAZOWY
GAS BBQ GRILL
99641
PL
GB
INSTRUKCJA OBSŁUGI
1

INSTRUKCJA OBSŁUGI
2
I III
II
IV VIV
VII IX
VIII
X XII
XI
XIII XVXIV
XVI XVIII
XVII
1
2
3
5
6
7
8
9
10
11
12
13
14
15
16
17
15
18
19
20
21
22
23
24
25
26

INSTRUKCJA OBSŁUGI
3
XIX XX
XXI
XXII XXIII XXIV
XXV XXVI XXVII
XXXXXIXXXVIII
XXXI
23
24

INSTRUKCJA OBSŁUGI
4
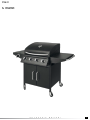
WYKAZ CZĘŚCI
1. misa grilla – 1 szt.
2. pokrywa grilla – 1 szt.
3. nogi krótsze – 2 szt.
4. nogi dłuższe – 2 szt.
5. łącznik górny – 2 szt.
6. łącznik dolny – 2 szt.
7. półka dolna – 1 szt.
8. ścianka tylna – 1 szt.
9. koło – 2 szt.
10. łącznik górny – 1 szt.
11. magnes – 1 szt.
12. drzwiczki – 2 szt.
13. uchwyt drzwiczek – 2 szt.
14. oś drzwiczek – 2 szt.
15. półka boczna – 2 szt.
16. regulator gazowy palnika bocznego – 1 szt.
17. pokrętło palnika bocznego – 1 szt.
18. nakładka dekoracyjna palnika bocznego – 1 szt.
19. ruszt palnika bocznego – 1 szt.
20. iskrownik – 1 szt.
21. ruszt pomocniczy – 1 szt.
22. ruszt – 2 szt.
23. wąż gazowy – 1 szt.
24. reduktor gazowy – 1 szt.
25. pokrętło palnika – 3 szt.
26. zestaw śrub i nakrętek do montażu grilla
INSTRUKCJE BEZPIECZEŃSTWA
Stosować tylko na wolnej przestrzeni. Ze względu na możliwość gromadzenia się gazu, co może
doprowadzić do pożaru lub wybuchu, dozwolone jest użytkowanie grilla tylko na wolnej przestrzeni.
Zabronione jest użytkowanie grilla w garażach, halach i innych pomieszczeniach. Grilla nie należy
wystawiać na działanie opadów atmosferycznych.
Przeczytaj instrukcję przed użyciem urządzenia. Zastosowanie się do poleceń zawartych może
uchronić użytkownika przed odniesieniem obrażeń, spowodowaniem pożaru lub wybuchu. Instruk
-
cję należy zachować na cały czas użytkowania grilla. W przypadku przekazywania produktu innym
osobom należy przekazać go wraz z instrukcją.
OSTRZEŻENIE: dostępne części urządzenia mogą być bardzo gorące. Trzymaj dzieci z dala
od urządzenia. Posługując się urządzeniem należy mieć na uwadze, że pod wpływem płomieni
części narzędzia nagrzewają się do wysokich temperatur. Należy stosować rękawice chroniące
przed gorącem i chwytać tylko za uchwyty przeznaczone do tego.
Nie przesuwać urządzenia w trakcie jego działania. Przemieszczanie urządzenia podczas jego
działania może doprowadzić do jego przewrócenia, co grozi poważnymi poparzeniami i pożarem.
Podczas przemieszczania może dojść do przerwania elastycznego przewodu łączącego butlę ga
-
zową z grillem, co może doprowadzić do niekontrolowanego wypływu gazu i spowodować pożar
lub eksplozję.
Po użyciu należy zakręcić zawór na butli z gazem. Zamknięcie zaworów umieszczonych na
grillu nie spowoduje odcięcia dopływu gazu do grilla. Pozostawienie instalacji pod ciśnieniem może
spowodować niekontrolowany wypływ gazu, co grozi pożarem i eksplozją.
Nie wolno zmieniać konstrukcji urządzenia. Producent jest w stanie zagwarantować bezpie
-
czeństwo tylko w przypadku montażu grilla zgodnie z jego zaleceniami. Niewłaściwe przeróbki
mogą spowodować niekontrolowany wypływ gazu, co grozi pożarem i eksplozją.
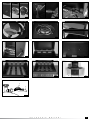
MONTAŻ GRILLA
Ze względu na ryzyko skaleczenia należy zachować ostrożność podczas montażu grilla. Stosować
rękawice ochronne.
Montaż grilla opisany poniżej należy przeprowadzić w jasno oświetlonym pomieszczeniu.
Za pomocą śrub złączyć nogi przednie i tylne górnym łącznikiem (II).
Uwaga! W przypadku nóg dłuższych należy zwrócić uwagę aby otwory do mocowania kół znajdo
-
wały się w jednej linii. Wsporniki znajdujące się u góry nóg, są zamocowane do nóg tylnych i po
montażu były skierowane do wewnątrz.
Pomiędzy nogami przednimi i tylnymi zamocować za pomocą śrub łączniki dolne (III). Uwaga!
Łączniki górne i dolne należy zamontować odwrotnie względem siebie (IV).
Nogi połączyć za pomocą śrub (V) z półką dolną (VI). Następnie zamocować za pomocą śrub
ściankę tylną (VII).
Do każdej z nóg przykręcić koło, koła wyposażone w blokadę powinny zostać zamontowane wzdłuż
jednego z krótszych boków grilla (VIII).
Za pomocą śrub i nakrętek zamocować przy przedniej krawędzi półki dolnej magnes (X).
Do nóg przednich zamocować za pomocą śrub łącznik górny, należy zwrócić uwagę aby magnes
przymocowany do łącznika był skierowany do przodu i do dołu grilla (XI).
Przygotować drzwiczki, za pomocą śrub przymocować do nich uchwyty (XII). Następnie zamoco
-
wać je do konstrukcji grilla. W tym celu należy oś obrotu przełożyć przez otwór w górnym łączniku
grilla, otwory w drzwiczkach oraz otwór w półce dolnej (XIII). Sprawdzić czy drzwiczki zamykają się i
otwierają swobodnie, a magnesy utrzymują je w pozycji zamkniętej. W razie potrzeby wyregulować
położenie magnesów.
Do górnej części nóg za pomocą śrub (XV) zamocować półki boczne (XVI). Uwaga, półka lewa
posiada otwór na palnik dodatkowy oraz otwór na regulator palnika, należy się upewnić, że otwór
do zamocowania regulatora będzie się znajdował z przodu grilla.
Na nogi nałożyć misę grilla i przymocować ją za pomocą śrub do otworów w górnych łącznikach
nóg (XVII).
Od spodu półki lewej wsunąć w otwór regulator palnika bocznego, a od przodu zamontować na
-
kładkę dekoracyjną. Całość zamocować za pomocą śrub, następnie na trzpień regulatora nasunąć
pokrętło (XIX). Trzpień regulatora jest spłaszczony z jednej strony, a otwór w pokrętle ma kształt
dostosowany do kształtu trzpienia. Tylko właściwy montaż spowoduje, że skala palnika będzie
właściwie odczytywana.
Od góry półki bocznej przełożyć palnik boczny, tak aby jego wlot nasunął się na dyszę regulatora.
Palnik przymocować do półki za pomocą śrub wkręcanych od spodu półki (XX).
Do styku regulatora podłączyć przewód iskrownika (XXI), a sam iskrownik przykręcić do półki
PL
(XXII). Palnik zabezpieczyć rusztem bocznym (XXIII).
W szczelinę tylnej ściany wsunąć tacę grilla (XXIV).
Otworzyć pokrywę grilla i w pokrywie oraz misie zamocować ruszt pomocniczy, przekładając za
-
kończenia prętów rusztu przez otwory w pokrywie oraz misie Zakończenia prętów umieszczonych
w pokrywie zabezpieczyć zawleczkami (XXV). Zapobiegnie to przypadkowemu wypadnięciu rusztu
pomocniczego podczas otwierania lub zamykania pokrywy. Poprawnie zamocowany ruszt pomoc
-
niczy pozostaje zawsze w pozycji poziomej, niezależnie od pozycji pokrywy grilla.
Na trzpieniach (XXVII) zamocowanych na wewnętrznej powierzchni przedniej i tylnej ściany misy
położyć osłony palników (XXVIII). Każda osłona jest podpierana przez cztery trzpienie, dwa w
przedniej i dwa w tylnej ścianie misy. Upewnić się, że osłona nie zsunie się samoistnie z trzpieni
podczas użytkowania grilla. Zabronione jest użytkowanie grilla bez poprawnie założonych osłon
palników.
Do misy włożyć ruszt grilla tak, aby oparł się na krawędzi wewnątrz misy (XXIX).
UŻYTKOWANIE GRILLA
OSTRZEŻENIE! Urządzenie podczas używania należy trzymać z dala od materiałów łatwo
-
palnych.
OSTRZEŻENIE! Podczas używania grilla należy zakładać rękawice chroniące przed popa
-
rzeniem.
OSTRZEŻENIE! Podczas podłączania butli z gazem oraz użytkowania grilla zabronione jest
palenie oraz zbliżanie się z ogniem.
Przeznaczenie grilla
Grill jest przeznaczony do przygotowywania potraw na wolnym powietrzu. Produkt jest przeznaczo
-
ny tylko do użytku przez osoby prywatne i nie może być stosowany w handlu lub w zastosowaniach
komercyjnych.
Zabronione jest stosowanie innego paliwa niż wymienionego w instrukcji. Nie należy stosować
do ogrzewania pomieszczeń oraz do nagrzewania innych produktów niż potrawy. Główny ruszt
służy do przygotowywania potraw przez ich bezpośrednie umieszczenie na nim. Zabronione jest
stawianie na nim naczyń takich jak np. garnki czy patelnie. Do podgrzewania potraw w naczyniach
służy palnik boczny, na ruszcie palnika bocznego zabronione jest bezpośrednie przygotowywanie
potraw.
Dane techniczne
Nazwa produktu: Grill gazowy
Numer katalogowy produktu: 99641
Moc cieplna wejściowa: 16,0 kW (1142 g/h) (4 x 3,2 kW + 3,2 kW)
Rodzaj i ciśnienie gazu zasilającego: butan G30 oraz propan G31 przy ciśnieniu 37 mbar
Kategoria urządzenia gazowego wg EN 498: I
3B/P(37)
Sposób zasilania gazem: butle gazowe o wadze 11 kg; maksymalne rozmiary butli to 310 mm
średnicy i 600 mm wysokości, mierzonej z zainstalowanym zaworem.
Ilość palników: 3 palniki główne oraz 1 palnik boczny
Średnica dyszy: 0,85 mm
Wymiary rusztu głównego dł. x szer.: 660 x 400 mm
Wymiary zewnętrzne grilla z zamkniętą pokrywą dł. x szer. x wys.: 1480 x 520 x 1060 mm
Masa całkowita grilla bez butli gazowej: ok. 32 kg
Producent oraz autoryzowany serwis: TOYA S.A. ul. Sołtysowicka 13-15, 51-168 Wrocław, Polska
Reduktor gazowy:
Nazwa handlowa produktu wraz z oznakowaniem: Reduktor gazowy A310i
Typ gazu: Propan
Minimalna i maksymalne ciśnienie zasilające: 1 – 16 bar
Ciśnienie nominalne wyjściowe: 37 mbar
Przepływ gwarantowany: 1,5 kg/h
Strzałka na obudowie oznacza kierunek przepływu gazu.
Typ przyłączy gazowych: G12 / H50
Reduktor jest zgodny z normą EN 16129
Producent oraz autoryzowany serwis: TOYA S.A. ul. Sołtysowicka 13-15, 51-168 Wrocław, Polska
Uwagi do montażu grilla
Zabronione jest samodzielne zmienianie konstrukcji grilla. Nie demontować elementów zmontowa
-
nych fabrycznie oraz elementów zaplombowanych fabrycznie, zwłaszcza instalacji gazowej.
W przypadku palnika bocznego może zajść potrzeba regulacji iskrownika przed pierwszym uży
-
ciem grilla. Iskra musi przeskakiwać z iskrownika w miejsce otworów palnika. W innym przypadku
iskrownik może niepoprawnie zapalać gaz lub nie zapalać go w ogóle. W razie potrzeby należy przy
użyciu niewielkiej siły zgiąć trzpień iskrownika. Wszelkiej regulacji iskrownika należy dokonywać
przy odłączonej butli gazowej.
Przygotowanie grilla do użytkowania
Upewnić się że grill został zmontowany zgodnie z instrukcją. Grill oraz butle należy umieścić na pła
-
skim, równym i niepalnym podłożu. Jeżeli koła grilla zostały wyposażone w blokadę, należy jej użyć
w celu unieruchomienia grilla. Upewnić się, że w pobliżu w tym również nad grillem nie znajdują się
żadne łatwopalne przedmioty, a także inne źródła ognia lub ciepła. Wokół grilla należy zachować
przynajmniej 1 metr wolnej przestrzeni, a nad grillem nie mogą się znajdować żadne przeszkody.
Uwaga! Sprawdzić czy wszystkie pokrętła palników grilla znajdują się w pozycji zamknięty.
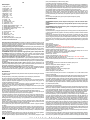
Grill został wyposażony w gazowy wąż elastyczny z zamocowanym do niego reduktorem gazo
-
wym, który ogranicza ciśnienie gazu w butli do ciśnienia bezpiecznego dla grilla. Reduktor nie
umożliwia regulacji ciśnienia gazu. Reduktor musi spełniać wymogi normy europejskiej EN 16129.
Reduktor jest podłączony fabrycznie do węża i nie należy tego połączenia modykować. Reduktor
gazowy został wyposażony w przyłącze gwintowe które należy przykręcić do zaworu butli gazo
-
wej za pomocą klucza. Po przyłączeniu regulator powinien znajdować się równolegle do podłoża
(XXXI). Butlę ustawić w takim miejscu aby elastyczny wąż nie był zagięty, skręcony ani nadmiernie
naprężony. Przed podłączeniem należy sprawdzić stan węża pod kątem uszkodzeń lub zużycia.
W przypadku wyrycia uszkodzeń lub zużycia węża należy go wymienić na nowy w tym celu należy
przekazać grill do autoryzowanego punktu naprawczego. Zabroniona jest samodzielna wymiana
węża lub zastępowanie go wężem nie przeznaczonym do przesyłania gazu. Wąż powinien mieć 80
cm długości, jego długość nie może przekraczać 150 cm. Należy stosować tylko węże elastyczne
przeznaczone do przesyłania gazu płynnego propanu lub butanu.
Jeżeli lokalne przepisy wymagają użycia innego węża i / lub reduktora należy zwrócić się do auto
-
ryzowanego serwisu celem wymiany.
W normalnych warunkach użytkowania, zaleca się wymianę poprawnie zainstalowanego reduktora
co 10 lat od roku produkcji widocznym na reduktorze. Przepisy lokalne mogą wymagać innych
okresów wymiany reduktora. W przypadku stosowania reduktora na zewnątrz pomieszczeń, należy

go umieścić lub zabezpieczyć przed dostaniem się jakiejkolwiek wody. Podczas używania reduk-
torowi należy zapewnić dobra wentylację, która zapobiegnie kondensacji pary wodnej wewnątrz
urządzenia. Reduktor jest przystosowany do pracy w temperaturze otoczenia od -20 do +50 st. C.
Jeżeli reduktor został zainstalowany za innym reduktorem wtedy należy ciśnienie w instalacji tak
wyregulować aby znajdowało się w zakresie ciśnienia wejściowego obsługiwanego przez reduktor
dołączony do grilla, uwzględniając przy tym spadki ciśnienia na złączach w instalacji. Reduktor nie
powinien być umieszczany niżej niż butla gazowa, pozwoli to uniknąć skraplania się gazu podczas
opróżniania butli gazowej. Rury i węże użyte do podłączenia wlotu reduktora powinny obniżać się
w kierunku butli gazowej.
Ze względu na bliskość palników zabronione jest ustawianie butli na dolnej półce grilla. Butla musi
być ustawiona w pionie. Przed przykręceniem należy z zaworu butli zdjąć folię (plombę) zabezpie
-
czającą sprawdzić stan uszczelki i w przypadku stwierdzenia braku uszkodzeń i zużycia należy
przykręcić nakrętkę reduktora do zaworu butli. Połączenie należy skręcić siłą wymaganą do uzy
-
skania szczelności. Nadmierne skręcenie połączenia może uszkodzić uszczelkę i połączenie nie
uzyska wymaganej szczelności. Zabronione jest przykręcanie reduktora do zaworu z uszkodzoną
uszczelką. W takim przypadku należy uzyskać od producenta butli informacje potrzebne do prze
-
prowadzenia wymiany uszczelki.
Odkręcać powoli zawór butli, aż do uzyskania pełnego otwarcia i sprawdzić szczelność połączeń.
OSTRZEŻENIE! Jeżeli już w trakcie otwierania zaworu butli będzie słychać dźwięk ulatniającego
się gazu oraz zapach gazu będzie wyraźnie wyczuwalny, należy natychmiast zamknąć zawór butli.
Sprawdzić czy zawory palników są zamknięte, a następnie sprawdzić szczelność połączeń.
OSTRZEŻENIE! Zabronione jest sprawdzanie szczelności połączenia za pomocą ognia. Grozi to
poparzeniami, pożarem oraz eksplozją. Należy użyć dostępnych w handlu testerów elektronicznych
lub chemicznych. Przed ich użyciem należy się zapoznać z instrukcjami do nich dołączonymi.
Można też przygotować mieszankę wody i mydła w proporcjach ok ¼ mydła na ¾ wody i pokryć nią
instalację gazową. Jeżeli zostaną zauważone pęcherzyki gazu oznacza to miejsce nieszczelności
instalacji. W przypadku zaobserwowania nieszczelności, należy zakręcić zawór butli i usunąć nie
-
szczelności, np. przez dokręcenie połączeń. Powtórzyć sprawdzenie szczelności instalacji. Jeżeli
nie da się usunąć nieszczelności należy zamknąć zawór butli, odłączyć butlę od grilla, a następnie
przekazać grill do autoryzowanego punktu naprawczego.
Jeżeli sprawdzanie szczelności instalacji gazowej nie wykryło żadnych nieszczelności można przy
-
stąpić do użytkowania grilla.
Jeżeli grill jest uruchamiany po okresie przechowywania należy sprawdzić stan palników. Zdemon-
tować ruszt i osłony palników, sprawdzić stan wszystkich palników w tym także bocznego, pod
kątem zabrudzeń i rdzy. Sprawdzić czy palniki, dysze nie są zatkane przez brud, resztki żywności
lub przez owady. Przed przystąpieniem do użytkowania grilla należy oczyścić palniki za pomocą
środków do czyszczenia grilli lub piekarników. W przypadku stwierdzenia zatkania dyszy gazowej
zabroniona jest samodzielna naprawa. W takim przypadku grill należy przekazać do autoryzowa
-
nego punktu serwisowego. Zabronione jest użytkowanie grilla z niesprawnym jednym bądź kilkoma
palnikami.
W przypadku stwierdzenia obecności wilgoci na przykład na skutek kondensacji pary wodnej na
-
leży osuszyć dostępne powierzchnie za pomocą tkaniny lub ręczników papierowych, a następnie
pozostawić grill w suchym miejscu w celu osuszenia wilgoci zgromadzonej w miejscach niedostęp
-
nych. Dla przyspieszenia osuszania należy otworzyć pokrywę grilla i palnika bocznego, zdemonto-
wać osłony palników oraz ruszt. Zabronione jest osuszanie za pomocą przepuszczenia gazu przez
instalację. Zabronione jest uruchamianie grilla z zawilgoconymi palnikami, może doprowadzić do
niekontrolowanego zapalenia się gazu, co grozi poparzeniami, pożarem lub eksplozją.
Obsługa palników głównych
Uwaga! Otworzyć w pełni pokrywę grilla. Zabronione jest zapalanie palników przy opuszczonej
pokrywie.
Drugi palnik od lewej posiada wbudowany iskrownik, który pozwala na zapalenie mieszanki po
-
wietrza i gazu.
Otworzyć zawór butli gazowej. Wcisnąć i przytrzymać pokrętło palnika drugiego z lewej, a następ
-
nie obrócić je w prawo o 90 stopni. Jeżeli będzie słyszany dźwięk wyładowania elektrycznego
oznacza to zadziałanie iskrownika. Mieszanka powietrza i gazu powinna się zapalić. Jeżeli to nie
nastąpi należy zamknąć zawór palnika i powtórzyć procedurę.
Jeżeli nawet po kilkukrotnej próbie nie uda się zapalić palnika, może to oznaczać, że dysza palnika
została zablokowana. W takim wypadku należy zamknąć zawór palnika, zamknąć zawór butli, odłą
-
czyć butlę od grilla i przekazać go do autoryzowanego punktu naprawczego.
Po udanej próbie zapalenia palnika należy zwolnić nacisk na pokrętło i obracając je wyregulować
wielkość płomienia. Pozostawienie pokrętła obróconego o 90 stopni względem pozycji początkowej
(zawór zamknięty) spowoduje ustawienie maksymalnej wielkości płomienia. Obrót do oporu w pra
-
wo spowoduje ustawienie niewielkiego płomienia, a obrót do oporu w prawo spowoduje zamknięcie
zaworu oraz wygaszenie płomienia. Pozostawienie pokrętła w pozycji pośredni względem opisa
-
nych powyżej pozwala dobrać pożądaną wysokość płomienia.
W przypadku potrzeby zapalenia pozostałych palników głównych należy najpierw zapalić palnik
drugi od lewej strony, a następnie należy wcisnąć i przytrzymać pokrętło jednego z pozostałych
palników i obrócić je w lewo o 90 stopni. Palnik powinien zapalić się samoczynnie od płomienia
zapalanego już palnika. Jeżeli nie następuje zapłon palnika może to oznaczać zablokowanie jego
dyszy. W takim wypadku należy zamknąć zawór palnika, zamknąć zawór butli, odłączyć butlę od
grilla i przekazać go do autoryzowanego punktu naprawczego.
Palniki należy zapalać pojedynczo, kolejne zapalać dopiero o zapaleniu poprzedniego. Zabronione
jest zapalanie kilku palników jednocześnie.
Regulację wysokości płomienia pozostałych palników należy przeprowadzić wg procedury opisanej
powyżej.
Obsługa palnika bocznego
Uwaga! Otworzyć w pełni pokrywę palnika. Zabronione jest zapalanie palnika oraz podgrzewanie
potraw przy opuszczonej pokrywie palnika.
Palnik posiada wbudowany iskrownik, który pozwala na zapalenie mieszanki powietrza i gazu.
Zapalenie palnika bocznego odbywa się tak samo jak zapalanie głównego palnika drugiego z le
-
wej strony. Regulacja wielkości płomienia palnika bocznego odbywa się tak samo jak pozostałych
palników opisanych powyżej.
Palnik boczny służy tylko do podgrzewania potrwa w naczyniach z płaskim dnem o średnicy od 16
– 22 cm. Zabronione jest stawianie na nim naczyń z innym dnem niż płaskie, np. woków.
Postępowanie w przypadku wycieku gazu
W przypadku wycieku gazu lub nawet podejrzenia wycieku gazu, na przykład czuć wyraźny zapach
gazu należy natychmiast zamknąć zawór butli gazowej oraz zawory wszystkich palników. Następ
-
nie odłączyć butlę gazową od grilla. Jeżeli grill jest gorący poczekać do jego ostygnięcia. Poczekać
do wywietrzenia gazu, sprawdzić instalację gazową na obecność uszkodzeń. Jeżeli takowe nie
zostaną zaobserwowane należy przygotować detektor gazu, podłączyć butlę gazową do grilla
i otwierając zawór butli rozpocząć detekcję miejsca wycieku gazu. Jeżeli nie zostanie znalezione
miejsce wycieku, a nadal dają się zaobserwować efekty wycieku gazu. Należy grill przekazać do
autoryzowanego punktu serwisowego.
Ochrona przed poparzeniem
Grill podczas używania nagrzewa się do wysokich temperatur. Najbardziej nagrzewa się pokrywa
grilla, ruszt oraz osłony palników. Jednak nawet pozostałe części grilla mogą się nagrzać do tempe
-
ratur powodujących poważne poparzenia w przypadku dotknięcia ich nieosłoniętą dłonią. Podczas
użytkowania grilla należy nosić rękawice ochronne chroniące przed poparzeniem. Podczas pracy,
nigdy nie chwytać żadnej części grilla nieosłoniętą dłonią.
KONSERWACJA, PRZECHOWYWANIE I TRANSPORT
Po skończeniu używania grilla należy zamknąć zawory wszystkich palników, a następnie zamknąć
zawór butli i odłączyć ją od grilla. Odczekać do całkowitego ostygnięcia wszystkich elementów
grilla. Ruszt, tacę oraz osłony palników należy czyścić po każdym użyciu za pomocą środków
przeznaczonych do czyszczenia grilli lub piekarników. Nie zaleca się używać ostrych metalowych
przedmiotów do oczyszczania zaschniętych resztek żywności.
Pozostałe elementy grilla czyścić za pomocą tkaniny lub gąbki oraz detergentów dostępnych w
handlu i przeznaczonych do czyszczenia metalowych powierzchni.
Przed każdym użyciem należy sprawdzić stan instalacji gazowej w szczególności palników, jeżeli
zostanie zaobserwowana rdza lub uszkodzenia należy wymienić wadliwe elementy na nowe. W
tym celu należy się skontaktować z autoryzowanym serwisem producenta.
Przed każdym użyciem należy sprawdzić stan węża elastycznego. W przypadku zauważenia ja
-
kichkolwiek uszkodzeń lub zużycia węża należy go wymienić na nowy. Zaleca się okresową wymia-
nę węża nie rzadziej niż co 10 lat, nawet jak nie wykazuje oznak zużycia.
Przed rozpoczęciem przechowywania grilla należy upewnić się, że wszystkie regulatory gazowe
zostały ustawione w pozycji: „zamknięty”. Należy zamknąć zawór umieszczony na butli z gazem, a
następnie ją odłączyć od grilla. Zabronione jest przechowywanie grilla z podłączoną butlą gazową.
Grill oraz butlę należy przechowywać w suchych i ciemnych pomieszczeniach, zabezpieczonych
przed dostępem osób niepowołanych. Grill przechowywać w miejscach wolnych od kurzu. Podczas
przechowywania należy zamknąć wszystkie pokrywy palników. Podczas dłuższego przechowy
-
wania na przykład w czasie zimy, zaleca się nakryć grill, aby ochronić go przed wpływem pyłu i
kurzu. W miejscu przechowywania należy zapewnić dobrą wentylację, zapobiegnie to gromadzeniu
się wilgoci na elementach urządzenia co może prowadzić do korozji. Korozja może spowodować
zmianę parametrów elementów instalacji gazowej, co może doprowadzić do niekontrolowanego
wypływu gazu i skutkować pożarem lub eksplozją.
Nie zakrywać otworów wentylacyjnych pomieszczenia do przechowywania butli. Nagromadzenie
gazu może doprowadzić, do pożaru lub eksplozji.
Grill transportować na niewielkie odległości (kilkanaście metrów) korzystając z kół do niego do
-
łączonych. W przypadku potrzeby transportu grilla na znaczne odległości za pomocą osobnych
środków transportu należy grill rozmontować, przetransportować w opakowaniu fabrycznym, a
następnie zmontować ponownie. Zabronione jest transportowanie grilla na dowolną odległość z
podłączoną do niego butlą gazową. Przed rozpoczęciem transportu należy zamknąć zawór butli, a
następnie odłączyć ją od grilla.
INSTRUKCJA OBSŁUGI
5
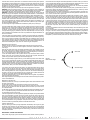
Zawór zamknięty
Niewielka wysokość płomienia
Iskrownik
Maksymalna wysokość płomienia

INSTRUKCJA OBSŁUGI
6
PARTS LIST
1. grill bowl - 1 pc.
2. grill cover - 1 pc.
3. short legs - 2 pc.
4. long legs - 2 pcs.
5. upper connector - 2 pcs.
6. lower connector - 2 pcs.
7. bottom shelf - 1 pc.
8. rear wall - 1 pc.
9. wheel - 2 pcs.
10. upper connector - 1 pc.
11. magnet - 1 pc.
12. door - 2 pcs.
13. door handle - 2 pc.
14. door axle - 2 pc.
15. side shelf - 2 pcs.
16. gas control of the side burner - 1 pc.
17. handweel of the side burner - 1 pc.
18. decorative cover plate of the side burner - 1 pc.
19. grate of the side burner - 1 pc.
20. magneto - 1 pc.
21. auxiliary grate - 1 pc.
22. grate - 2 pcs.
23. gas hose - 1 pc.
24. gas regulator - 1 pc.
25. handweel of the burner - 3 pcs
26. set of nuts and bolts for mounting the grill
SAFETY INSTRUCTIONS
Use only outdoors. Due to the potential for a build-up of gas, which could lead to a re or explo
-
sion, it is permitted to use the grill only outdoors. It is forbidden to use the grill in garages, factories,
and other rooms. The grill must not be exposed to the inuence of precipitation.
Read the manual before using the device. The compliance with the included recommendations
can protect the user against injury, re or explosion. The manual must be kept for the whole time of
grill usage. In the case of product transfer to others, you must pass it along with the manual.
WARNING: Accessible parts of the device may be very hot. Keep children away from the
device. Using the device, it should be noted that under inuence of ames the tools heat up to
high temperatures. Use protective gloves against heat and catch only by the handles designed for
this purpose.
Do not move the device during its operation. The transport of the device during its operation
can cause its overturning, which can cause serious burns and re. During transportation the exi
-
ble cord connecting the gas cylinder with a grill can be damaged, which can lead to uncontrolled
discharge of gas and cause a re or an explosion.
After usage you should turn off the valve on the gas bottle. Closing the valves, which are pla
-
ced on the grill, will not cut off the supply of gas to the grill. Leaving the installation under pressure
can cause an uncontrolled ow of gas, which may cause re and explosion.
You may not alter the structure of the device. The manufacturer is able to guarantee security
only in the case when the grill assembly is in accordance with the manufacturer’s recommendations.
Unproper alterations can cause uncontrolled ow of gas, which may cause re and explosion.
GRILL ASSEMBLY
Because of the injury risk you should be careful when installing the grill. Wear protective gloves.
Grill assembly, as it is described below, must be carried out in brightly lit room.
Using screws join the front and rear legs by the upper link (II).
Attention! In the case of longer legs, ore attention should be paid to that the holes for the attachment
of the wheels be in one line. The brackets located on the top of legs are mounted to the rear legs
and after mounting they should be facing inwards.
Between the front and rear legs lower connectors (III) should be xied with screws. Attention! Upper
and lower connectors should be installed opposite to each other (IV).
The feet should be connected with screws (V) to the lower shelf (VI). Then x the rear wall (VII)
using screws.
Screw to each of legs the wheel, wheels, that are equipped with a lock, should be tted along one
of the shorter sides of the grill (VIII).
Using bolts and nuts attach the magnet (X) to the front edge of the bottom shelf.
To the front legs attach with screws the upper connector, it should be noted that the magnet atta
-
ched to the connector was directed to the front and bottom of the grill (XI).
Prepare door, by using the screws attach handles to them (XII). Then attach them to the grill struc
-
ture. To do this, move the rotation axis through the hole in the upper connector, through the holes in
door and through the hole in bottom shelf (XIII). Check whether the door close and open freely, and
whether the magnets keep it in the closed position. Adjust the magnets location if required.
To the upper part of the legs attach side shelf (XVI) using screws (XV). Attention: the left shelf has
the hole for burner and the hole for burner regulator, make sure that the hole for the attachment of
the regulator will be in front of grill.
Put the grill bowl on the legs, x it using the screws to holes in upper leg connectors (XVII).
From the left shelf bottom insert the side burner control in the hole, and from the front mount a
decorative cover plate. The x the whole part using screws, then slide on the regulator mandrel the
handweel (XIX). The regulator mandrel is attened on one side, and the hole in the handweel has
the shape adapted to the shape of the mandrel. Only proper installation will ensure that the scale
of the burner will be correctly red.
Put the side burner from the top shelf, so that its intake was located at on the control nozzle. Attach
the burner to the shelf using screws screwn from the underside of the shelf (XX).
To the controler contact connect magneto cable (the 21ST), and magneto itself screw to the shelf
(XXII). Secure the burner by side grate (XXIII).
Insert the grill tray into the gap in back wall (XXIV).
Open the grill cover and x in the cover and in the bowl the auxiliary grate, putting the rod ending
of grate through the holes in cover and in bowl. Rods endings, which are placed in the cover, you
should secure by cotter pins (XXV). This will prevent from accidentally falling off by the auxiliary
grate during opening or closing of the cover. Properly tted auxiliary grate always remains in a
GB
horizontal position, regardless of the position of grill cover.
On the mandrels(XXVII), which are mounted on the inner surface of the front and back walls of the
bowl, put the burners covers (XXVIII). Each cover is supported by four mandrels, two in the front
and two in back wall of the bowl. Make sure that the cover cannot itself slide off from the madrels
during usage.. It is forbidden to use the grill without having properly mounted cover burners.
Grill grate put to the bowl to so that it is resting on the edge of inside bowl (XXIX).
GRILL OPERATION
WARNING! This appliance shall be kept away from inammable materials.
WARNING! When using the grill, you should wear protective protecting you against being
burned.
WARNING! During connecting the gas cylinder and during the use of grill, it is forbiddent to
smoke and the approach the re.
Grill designation
Grill is designed for preparing food in the open air. The product is intended for use only by individu
-
als and may not be used in a trade or commercial applications.
It is forbidden to use any other fuel than listed in the manual. It should not be used for room heating and
for heating of other products than food. The main grate is used for preparing food by its direct placement
on the grate. It is prohibited to putting the vessels on it such ask, for example pots or pans. To reheat the
food in vessels the side burner is used, it is prohibited to directly prepare the dishes on side burner grate
Technical data
Product name: Gas grill
Catalog number of the product: 99641
Heat input power: 16,0 kW (1142 g/h) (4 x 3,2 kW + 3,2 kW)
Type and pressure of the supply gas: butane G30 and propane G31 at the pressure of 37 mbar
Category of the gas device according to EN 498:
The method of gas supply: gas cylinders weighing 11 kg; the maximum size of the cylinder is 310
mm in diameter and 600 mm in height, measured with the installed valve.
Number of burners: 3 main burners and 1 side burner
Diameter of the nozzle: 0.85 mm
The dimensions of the main grill length x width: 660 x 400 mm
External grill dimensions with the cover closed length x width: 1480 x 520 x 1060 mm
The total weight of grill without gas cylinder: approximately 32 kg
Manufacturer and authorized service: TOYA S.A. ul. Sołtysowicka 13-15, 51-168 Wrocław, Poland
Gas reducer:
Trade name of the product with its marking: Gas reducer A310i
Type of gas: Propane
The minimum and maximum supply pressure: 1 – 16 bar
Nominal outlet pressure: 37 mbar
Guaranteed ow: 1.5 kg/h
The arrow on the housing indicates the direction of the gas ow.
The type of gas connectors: G12 / H50
The grducer is compatible with standard EN 16129
Manufacturer and authorized service: TOYA S.A. Sołtysowicka 13-15, 51-168 Wrocław, Poland
Comments to grill assembly
It is prohibited to change the grill structure independently. Do not disassemble the components, that
are assembled and sealed at the factory, especially the gas installation.
In the case of side burner, you may need to adjust magneto before grill rst use. The spark must
jump from the magneto in place of the burner holes. In another case, magneto may incorrectly
ignite gas or not ignite it at all. If necessary, bend the magneto mandrel by using a small force. Any
magneto adjustments must be made when the gas cylinder is disconnected.
Preparation of the grill for use
Make sure that the grill has been assembled in accordance with the manual. Grill and the cylinders
must be placed on a at, level and inammable surface. If the grill wheels are equipped with a lock,
you must use it in order to immobilize the grill. Make sure that in the neibourhood, including also
the space above the grill, there are not any ammable items, including other sources of re or heat.
You should keep at least 1 meter of free space around the grill, and above the grill there must not
be located any obstacles.
Attention! Check that all grill burners handweels are in their closed position.
The grill was equipped with gas hose with attached to it the gas reducer, which reduces the pressu
-
re of the gas from the inside cylinder pressure to the pressure which is safe for grill. Reducer does
not allow to control the gas pressure. Reducer must comply with the requirements of the European
standard EN 16129. Reducer is factory connected to the hose and you should not modify this
connection. The gas reducer has been tted with a threaded gas connection that must be screwed
to the valve of gas bottle with the key. After connecting the controlshould be parallel to the ground
(XXXI). Set the cylinder in such a place that the exible hose be not bent, twisted, or excessively
stressed. Before connecting please check the condition of the hose for damages or wear. In the
case of discovery of damage or wear of the hose it must be replaced with a new one, to do this, you
must submit the grill to an authorized repair service. It is prohibited independent hose replacement
or replacement it by the hose, that is not intended for the transmission of gas. The hose should be
80 cm in length, its length must not exceed 150 cm. Use only exible hoses, wich are designed for
transfer of liquid propane or butane gas.
If local laws require the use of another hose and/or reducer you consult the authorized service for
its replacement.
Under normal conditions of use, it is recommended to replace the correctly installed reducer every
10 years from the year of production, which is visible on the reducer. Local regulations may require
other periods of reducer replacement. In the case of reducer use outdoors, you shoul place it or
protect it against getting any water. During operation you, you should ensure good ventilation for
the reducer, that will prevent water condensation inside the device. Reducer is designed to operate
in ambient temperatures from -20 to + 50 degrees C. If the reducer has been installed behind
another reducer, then you should adjust the pressure in installation to t it within the range of the
input pressure supported by the reducer attached to grill, taking into account the pressure declines
on the connectors in installation. Reducer should not be placed lower than the gas cylinder, this will
allow to prevent the liquefaction of gas during the emptying of gas cylinders. Pipes and hoses used
to connect the reducer inlet should lower in the direction of gas cylinder.
Due to the proximity of burners it is forbidden to set the bottle on bottom grill shelf. The cylinder
must be positioned vertically. Before you screw on it is necessary to remove the protective foil (seal)
from cylinder, check the condition of seal, and, in case of absence of damage and wear, you should

INSTRUKCJA OBSŁUGI
7
screw the reducer nut to the cylinder valve. The connection should be screwed by force required to
obtain tightness. Excessive twisting of the connection may damage the gasket and the connection
will not achieve the required tightness. It is prohibited to screw down the reducer to valve with a
damaged seal. In this case, you must obtain from the manufacturer of the cylinder the information
needed to carry out the exchange of seal.
Slowly unscrew the cylinder valve until it fully opens and check tightness of connections.
WARNING! If during the opening process of cylinder valve you will hear the sound of leaking gas
and the smell of gas will be clearly perceptible, you should immediately close the cylinder valve.
Check whether the burner valves are closed, and then check the tightness of connections.
WARNING! It is forbidden to check the tightness of the connection by using re. This may cause the
danger of burning, re and explosion. Use commercially available electronic or chemical testers.
Before their application you should be familiar with the instructions, which are attached to them.
You can also prepare a mixture of soap and water in the proportions about ¼ of soap to ¾ of water
and to cover with it the gas installation. If you notice the bubbles of gas, it means that this place of
installation leaks. When leaks are discovered, screw on the cylinder valve and remove the leaks
by,for example, tightening the connections. Repeat checking the tightness of installation. If you
cannot remove the leak, close the cylinder valve, disconnect the cylinder from grill, and then pass
the grill to the authorized repair point.
The check of tightness of gas installation has not detected any leaks you may use the grill.
If the grill is started after a period of storage, check the condition of the burners. Remove the grate
and burners covers, check the status of all burners including the side burner for dirt and rust. Check
whether the burners, nozzles are not clogged by dirt, food remains or by insects. Before starting to
use the grill, you should clean burners with the media for cleaning the grills or ovens. In the case
of the gas nozzle clogging it is prohibited to perform an independent repair. In this case, the grill
must be submitted to an authorized service center. It is prohibited to use the grill with defective one
burner or more burners.
In the case of discovery of moisture presence, for example, as a result of water vapor condensation,
you should drain the available surfaces using a cloth or paper towels and then leave the grill in a dry
place to dry the moisture accumulated in inaccessible places. To accelerate the drying, open the
cover of grill and side burner, remove the burner covers and grate. It is prohibited to dry by means
of passing gas through the installation. It is forbidden to start the grill with moistured burners, it can
lead to the uncontrolled ignition of gas, which can cause burning, re and explosion.
Maintenance for the main burners
Attention! Open the cover fully. It is prohibited to ignite the burners when the cover is lowered.
The second burner from the left has a built-in magneto, which allows for inammation of mixture
of air and gas.
Open the gas cylinder valve. Press and hold the handwheel of burner, that is located as second
from the left, and then turn it clockwise by 90 degrees. If you heard the sound of electrical dischar
-
ge, this means activation of the magneto. Mixture of air and gas should ignite up. If this does not
occur, you must close the burner valve and repeat the procedure.
If, even after multiple attempt, it fails to ignite the burner, it may mean that the burner nozzle is
blocked. In this case, you must close the burner valve, close the valve of cylinder, disconnect the
cylinder from grill, and then pass the grill to the authorized repair point.
After a successful attempt to ignite the burner, you must release the pressure on the hand wheel
and, by turning it, adjust the size of the ame. If you leave knob rotated 90 degrees, relative to its
starting position (closed valve), it will set the maximum size of the ame. Turning it to the maximum
clockwise will set a small ame, turning it to the maximum counterclockwise will close the valve and
suppress the ame. Leaving the handwheel in the intermediate position in relation to the positions
described above, allows you to choose the desired height of the ame.
In the case of need to ignite the other main burners, you should rst ignite the burner, which is
second from the left, and then press and hold down the handwheel of one of the other burners
and turn it counterclockwisze by 90 degrees. The burner should be ignited automatically from the
ame of already ignited burner. If there is no ignition of the burner, this could mean the blocking of
its nozzle. In this case, you must close the burner valve, close the valve of cylinder, disconnect the
cylinder from grill, and then pass the grill to the authorized repair point.
The burners should ignite one by one, just after the previous burner is ignited. It is prohibited to
ignite several burners at the same time.
Flame height adjustment for the remaining burners should be carried out according to the procedu
-
re which is described above.
Maintenance of the side burner
Attention! Open the burner cover fully. It is prohibited to ignite the burner and heat the dishes when
the burner cover is lowered.
The burner has a built-in magneto, which allows for ignition of mixture of air and gas.
Ignition of the side burner is done the same way as igniting the main burner, which is located
second from the left. Side burner ame size adjustment is done the same way as other burners,
as it is described above.
The side burner is used only for heating the food in at-bottomed vessels with a diameter from 16 to
22 cm. It is prohibited to putting on the vessels with another bottom than at, for example woks.
The proceedings in the case of a gas leak
In the case of a gas leak or even when a gas leak is suspected, for example, when you feel the distinct
smell of gas immediately you should close the gas cylinder valve and all valves of the burners.
Then disconnect the gas cylinder from grill. If the grill is hot, wait for its cooling down. Wait for the
gas venting, check the gas installation for the presence of damages. If they are not noticed, the gas
detector must be prepared, connect the gas cylinder to the grill and by opening the cylinder valve
you should start detection of the gas leak place. If this place is not found, and the gas leak effects
still can be noticed, the grill should be passed to an authorized service center.
Protection against burning
When you use the grill, it heats up to high temperatures. Most heated up are the grill cover, grate
and burners covers. However, even the remaining parts of the grill can heat up to temperatures
causing serious burns if you touch them by your bare hand. When using the grill, you should wear
safety gloves protecting you against being burned. While working, you should never catch any part
of the grill by a bare hand.
MAINTENANCE, STORAGE AND TRANSPORT
After you nish using the grill, wyou should close all burners valves, and then close the cylinder va
-
lve and disconnect it from the grill. Wait till all the grill elements cool down. Grate, tray, and burners
covers should be cleaned after each use using medial designed for cleaning grills or ovens. It is not
recommended to use sharp metal objects to scrub off the dried food residues.
Other elements of the grill should be cleaned with a sponge or cloth, and commercially available
detergents and intended for cleaning the metal surfaces.
Before each use, you should check the condition of the gas system, in particular burners, if it is no
-
ticed the rust or damage, the defective parts should replaced with new ones. To do this you should
contact the manufacturer’s authorized service center.
Before each use, check the condition of a exible hose. In case of any damage or wear of the hose,
it must be replaced for a new one. It is recommended to periodically replace the hose at least once
every 10 years, even as shows no signs of wear.
Before storing the grill, make sure that all the gas regulators are set to position: “closed”. You sho
-
uld close the valve placed on the gas cylinder, and then disconnect it from the grill. It is forbidden
to store the grill with the connected gas cylinder. Grill and cylinder should be stored in a dry and
dark rooms, protected from access by unauthorized persons. Grill should be stored in places free
of dust. During its storage you should close all the covers burners. During long-term storage, for
example during the winter, it is advisable to cover the grill, to protect it from the effects of dust and
dirt. Provide good ventilation in the storage area, this will prevent the accumulation of moisture on
the elements of the device, which can lead to corrosion. Corrosion may change the parameters of
the gas system components, which can lead to the uncontrolled outow of gas, and result in re
or explosion.
Do not cover the ventilation holes of the room for bottles storage. The accumulation of gas can lead
to re or explosion.
Grill can be transported for short distancea (several meters) by using wheels, which are attached
to the grill. In the case of necessity to transport the grill for a signicant distance by using different
means of transport, it should be dismantled, transported in a factory packaging, and then reassem
-
bled. It is forbidden to transport the grill at any distance with the gas cylinder connected to it. Before
transportation, you should close the cylinder valve, then disconnect it from the grill.
Valve closed
Small ame height
Magneto
Maximum ame height

INSTRUKCJA OBSŁUGI
8
-
 1
1
-
 2
2
-
 3
3
-
 4
4
-
 5
5
-
 6
6
-
 7
7
-
 8
8


w innych językach
- English: Toya 99641 Owner's manual
Inne dokumenty
-
Mr. Heater MH-F273072 Instrukcja obsługi
-
 Blooma Ossa 100 instrukcja
-
G21 California Instrukcja obsługi
-
Gorenje K62CLI Instrukcja obsługi
-
Gorenje K634XH Instrukcja obsługi
-
Amica 618GGD4.33HZpFQ(W) Instrukcja obsługi
-
-
-
Amica 58GGD4.33HZpTabNQ(Xx) Instrukcja obsługi
-
